Instruction Manual
ETX-60AT Astro Telescope with Autostar Hand Controller
ETX-70AT Astro Telescope with Autostar Hand Controller
Quick-Start Guide ... 3
Telescope Features ... 4
Autostar Features ... 7
Getting Started ...10
Parts Listing ...10
How to Assemble Your Telescope ...10
Choosing an Eyepiece ...10
Manual Operation Without Using Autostar...11
Manual Operation Using Autostar's Arrow Keys ...11
Moving Through Autostar’s Menus ...12
Initializing Autostar ...12
Autostar Operation ...13
Autostar Navigation Exercise ...13
Easy Two-Star Alignment ...14
Observing Exercises ...15
Go To Saturn ...15
Using the Guided Tour ...15
Autostar Menus ...16
Complete Autostar Menu Structure ...16
Objects Menu ...16 Event Menu ...17 Glossary Menu ...18 Utilities Menu ...18 Setup Menu ...19 Advanced Features ...21
Terrestrial and Astronomical Observing ...21
Sidereal Rate ...21
Alignment (Mount) ...21
Alt/Az Alignment ...21
Alt/Az Home Position ...21
Two-Star Alt/Az Alignment...21
One-Star Alt/Az Alignment ...21
Slew Speeds...22
Observing a Satellite ...23
Photography with the ETX ...23
Optional Accessories ...25
Maintenance and Servicing ...27
Storage and Transport ...27
Inspecting the Optics ...27
Troubleshooting ...28
Meade Customer Service ...29
Specifications ...29
Appendix A: Equatorial (Polar) Alignment ...31
Appendix B: Using Autostar to Enter Coordinates ...33
Appendix C: Helpful Charts ...34
Appendix D: Training the Drive ...35
Appendix E: Initialization Example ...36
Basic Astronomy ...37
Roadmap to the Stars ...39
CONTENTS
WARNING!
Never use a Meade
®ETX
®Astro
Telescope to look at the Sun! Looking at or
near the Sun will cause instant and
irre-versible damage to your eye. Eye damage is
often painless, so there is no warning to the
observer that damage has occurred until it is
too late. Do not point the telescope or its
viewfinder at or near the Sun. Do not look
through the telescope or its viewfinder as it is
moving. Children should always have adult
supervision while observing.
® The name “Meade,” the Meade logo, and “ETX” are trade-marks registered with the U.S. Patent Office and in principal countries throughout the world. All rights reserved.
Design: Automated Telescope - Patent No. D417881
© 2000 Meade Instruments Corporation.
CAUTION: Use care to install batteries in
the orientation indicated by illustration in the
battery slots of the battery holder. Follow
battery manufacturer's precautions. Do not
install batteries backwards or mix new and
used batteries. Do not mix battery types. If
these precautions are not followed, batteries
may explode, catch fire, or leak. Improperly
installed batteries void your Meade warranty.
If you are anxious to use your telescope
for the first time, read the QUICK-START
QUICK-START GUIDE
Quick Start Guide 3
B
A
A
A
5
6
A
B
C
1
2
3
3. Flip the Power Switch (A) on the computer control panel to the ON position. The copyright message lights on Autostar’s LCD display.
1. Take the ETX from its packaging and place it on a sturdy surface. Remove the cover from the bat-tery compartment (20, Fig. 1, page 4) located on
top of the drive base and carefully lift the 9v con-nector and the battery holder from the compart-ment. Insert six AA-size batteries into the battery holder, oriented as shown on the battery holder. Connect the 9v connector plug (A) to the connec-tor (B) on the battery holder. Return the battery holder to the battery compartment. Replace the cover. See page 10 for more information.
2. Make sure that the computer control panel power switch is in the OFF position. Remove Autostar (18, Fig. 1) from the packing materials and plug it
into the HBX port (A).
4. Press the Speed/? key (C) to accept the Sun warning. Keep pressing the ENTER key (A) until "Country/State" appears on the display. (Ignore the prompts requesting "Date" and "Time" for now – these functions will be explained later). Use the Scroll keys (D) to cycle through the lists of Country/States, Cities, and Telescope Models. Press ENTER (A) when the correct information for each prompt displays. The display then reads "Setup: Align." See page 11 for more information. You can now use the Arrow keys (B) to slew (move) the telescope up, down, right, or left. To change the telescope’s slew speed, briefly press the Speed/? key (C). Each press decreases the slew speed down one level, and then will cycle back to the fastest speed.
5. Tighten (to a "firm feel" only, do not overtighten) the vertical and horizontal locks (6, 9, Fig. 1). See page
5 for more information. Remove the dust cover from the end of the telescope tube. Place the MA 25mm eyepiece (A) into the eyepiece holder on the telescope and tighten the attachment thumb-screw (B) to a "firm feel" only. Make sure that the flip-mirror control (C) is in the “up” position. See page 6, for more information.
6. Sight along the side of the telescope’s main tube to locate an object. Practice using the Autostar’s Arrow keys to center an object in the telescope’s field of view. Use the telescope’s focus knob (8, Fig. 1) to bring the object into focus.
Slew Speed: Slow . . . Medium . . . Fast
4
A
C
D
B
If you wish to observe using Autostar’s databases, go to:
Page 14 to learn how to perform an Easy Two-Star Alignment; Page 15 for some practice observing exercises;
(opposite side)
Fig. 1: The ETX-60AT and ETX-70AT Telescope.
TELESCOPE FEATURES
4 Telescope Features (not shown)1
2
17
7
4
5
19
6
7
3
15
14
16
13
11
12
8
18
9
10
20
(on top of base, not shown)
ETX: Your Personal Window to the Universe
The Meade ETX-60AT and the ETX-70AT are extremely versatile, high-resolution telescopes with features similar to those once available only with larger and more specialized imaging sys-tems. With pushbutton controls, automatic tracking of celestial objects, and software down-loading capability, an ETX telescope may be all the telescope ever required by many terrestri-al and astronomicterrestri-al observers.
Your ETX telescope reveals nature in an ever-expanding level of detail. Observe the feather structure of an eagle from 50 yards or study the rings of the planet Saturn from a distance of 800 million miles. Focus beyond the Solar System and observe majestic nebulae, ancient star clusters, remote galaxies, and even stars recently discovered to have planets orbiting about them. Meade ETX telescopes are instruments fully capable of growing with your interest and are ideal for both the casual observer and serious astronomer alike.
Eyepiece - Place the MA 25mm eyepiece into the 90° Eyepiece Holder (3, Fig. 1) and tighten
in place with thumbscrew (2, Fig.1).
Eyepiece Holder Thumbscrew - Tightens the eyepiece in place. Tighten to a "firm feel"
only.
90° Eyepiece Holder - Holds the eyepiece upright for easy viewing.
Optical Tube - The main optical component that gathers the light from distant objects and
brings this light to a focus for examination with the eyepiece.
Movable Objective Lens Cell - This component contains the telescope’s lenses. The
focus knob (8, Fig. 1) moves the cell for precise image focus.
Vertical Lock - Controls the manual vertical movement of the telescope. Turning the
ver-tical lock counterclockwise unlocks the telescope enabling it to be freely rotated by hand about the vertical axis. Turning the vertical lock clockwise (to a "firm feel" only) prevents the telescope from being moved manually, but engages the vertical motor drive for Autostar operation.
NOTE: The vertical lock knob (6, Fig. 1) is a knurled knob located on the fork arm
to the right of the focus knob (8, Fig. 1). Mounted beneath the knob is a circular
scale with no numbers. Do not confuse this scale with the Dec setting circle (17, Fig. 1) on the opposite fork arm which has a numbered scale used to locate
astronomical objects.
CAUTION: When loosening the vertical lock, be sure to support the objective lens
cell (5, Fig. 1). The weight of the objective lens could cause the tube to swing
down-ward suddenly and damage the telescope. Fork Arms - Hold the optical tube in place.
Focus Knob - Moves the telescope’s objective lens (5, Fig. 1) in a finely-controlled motion
to achieve precise image focus. The ETX-60AT and ETX-70AT telescopes can be focused on objects from a distance of about 17 ft. to infinity. Rotate the focus knob clockwise to focus on distant objects, and counterclockwise to focus on nearby objects.
Horizontal Lock - Controls the manual horizontal rotation of the telescope. Turning the
horizontal lock counterclockwise unlocks the telescope, enabling it to be freely rotated by hand about the horizontal axis. Turning the horizontal lock clockwise prevents the tele-scope from being rotated manually, but engages the horizontal motor drive for Autostar operation.
Except for the lens diameter, the Meade ETX-60AT and the ETX-70AT are identical; all procedures and descriptions in this manual apply to both telescopes.
CAUTION:
Using products other than standard Meade accessories may cause damage to the telescope’s internal electronics and may void the Meade warranty. Telescope Features 5 1 2 3 4 5 6 7 8 9
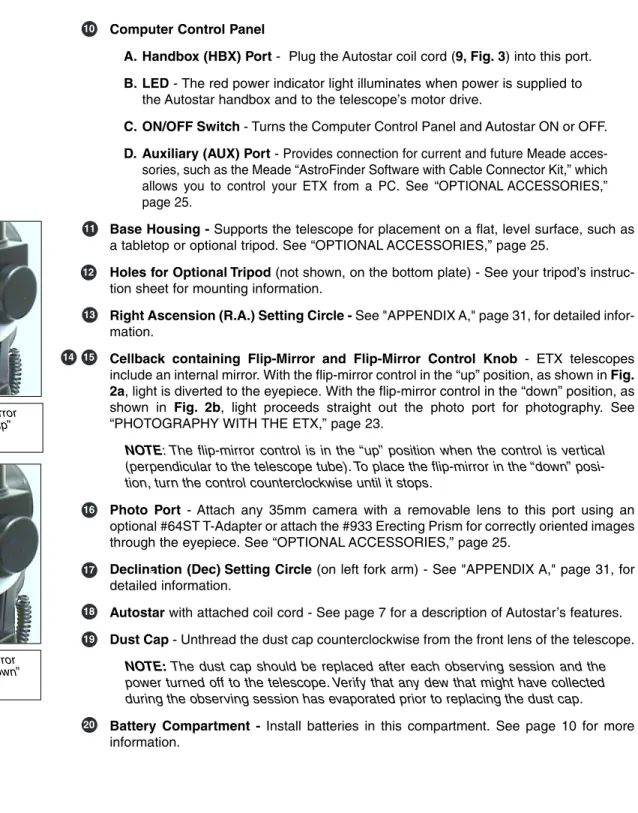
Computer Control Panel
A. Handbox (HBX) Port - Plug the Autostar coil cord (9, Fig. 3) into this port. B. LED - The red power indicator light illuminates when power is supplied to
the Autostar handbox and to the telescope’s motor drive.
C. ON/OFF Switch - Turns the Computer Control Panel and Autostar ON or OFF. D. Auxiliary (AUX) Port - Provides connection for current and future Meade
acces-sories, such as the Meade “AstroFinder Software with Cable Connector Kit,” which allows you to control your ETX from a PC. See “OPTIONAL ACCESSORIES,” page 25.
Base Housing - Supports the telescope for placement on a flat, level surface, such as
a tabletop or optional tripod. See “OPTIONAL ACCESSORIES,” page 25.
Holes for Optional Tripod (not shown, on the bottom plate) - See your tripod’s
instruc-tion sheet for mounting informainstruc-tion.
Right Ascension (R.A.) Setting Circle - See "APPENDIX A," page 31, for detailed
infor-mation.
Cellback containing Flip-Mirror and Flip-Mirror Control Knob - ETX telescopes
include an internal mirror. With the flip-mirror control in the “up” position, as shown in Fig. 2a, light is diverted to the eyepiece. With the flip-mirror control in the “down” position, as
shown in Fig. 2b, light proceeds straight out the photo port for photography. See
“PHOTOGRAPHY WITH THE ETX,” page 23.
NOTE: The flip-mirror control is in the “up” position when the control is vertical
(perpendicular to the telescope tube). To place the flip-mirror in the “down” posi-tion, turn the control counterclockwise until it stops.
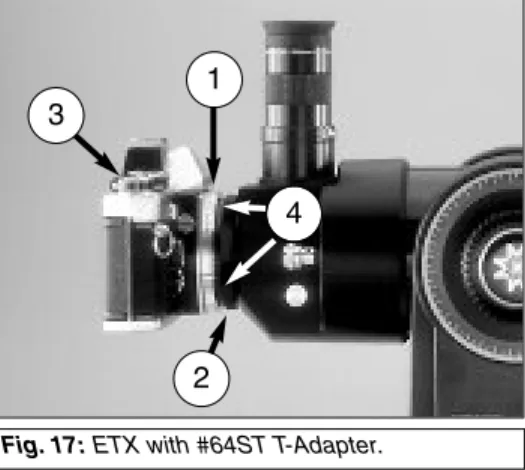
Photo Port - Attach any 35mm camera with a removable lens to this port using an
optional #64ST T-Adapter or attach the #933 Erecting Prism for correctly oriented images through the eyepiece. See “OPTIONAL ACCESSORIES,” page 25.
Declination (Dec) Setting Circle (on left fork arm) - See "APPENDIX A," page 31, for
detailed information.
Autostar with attached coil cord - See page 7 for a description of Autostar’s features. Dust Cap - Unthread the dust cap counterclockwise from the front lens of the telescope.
NOTE: The dust cap should be replaced after each observing session and the
power turned off to the telescope. Verify that any dew that might have collected during the observing session has evaporated prior to replacing the dust cap.
Battery Compartment - Install batteries in this compartment. See page 10 for more
information. 16 17 18 19 20 14 15 11 12 13 6 Telescope Features
Fig. 2a: Flip mirror
control in the “up” position.
Fig. 2b: Flip mirror
control in the “down” position.
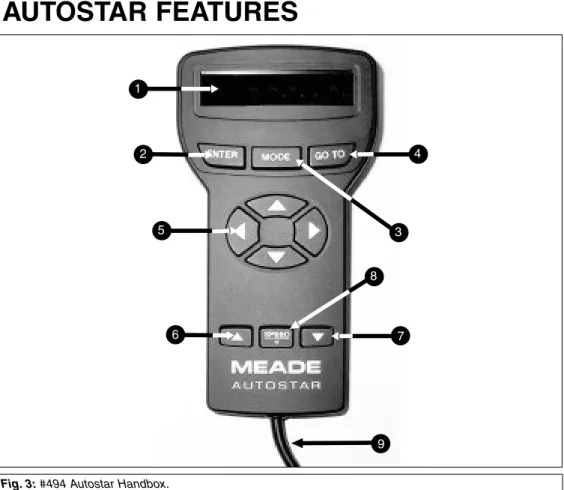
Fig. 3: #494 Autostar Handbox. 1 2 5 4 3 6 8 7 9
Tour the Cosmos with Just the Push of a Button
Control of the ETX-60AT and the ETX-70AT is through the operation of the standard-equipment #494 Autostar. Nearly all functions of the telescope are accomplished with just a few pushes of Autostar’s buttons. Some of the major features of Autostar are:
• Automatically move the telescope to any of the 1400 objects stored in the database or manually enter the astronomical coordinates of any celestial object.
• Take a guided tour of the best celestial objects to view on any given night of the year. • Download the latest satellite data and software revisions directly from the Meade website
(www.meade.com) and share software with other Autostar enthusiasts. (Requires
option-al #506 AstroFinder™ Software and Cable Connector Kit. See “OPTIONAL ACCES-SORIES,” page 25.)
• Access a glossary of astronomical terms.
• Calculate which eyepiece to use for optimum viewing of a celestial object.
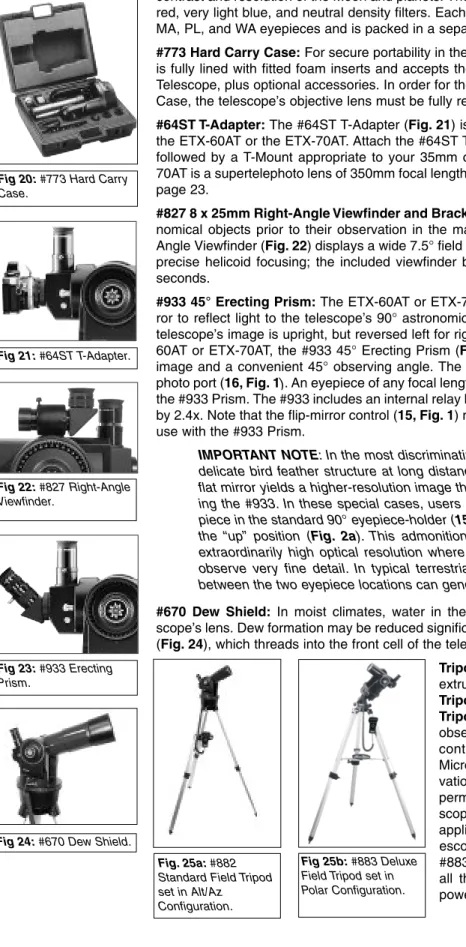
• Mount the telescope in the “Alt/Az” mode (Altitude - Azimuth, or vertical - horizontal) for fully automatic tracking of celestial objects using a flat, level surface, such as a tabletop, or the optional #882 Standard Field Tripod. (See “OPTIONAL ACCESSORIES,” page 25.)
Autostar Features 7
The Autostar Computer Controller provides control of virtually every telescope function within a compact handbox. Autostar has soft-touch keys designed to have a positive feel. The LCD (Liquid Crystal Display) is backlit with a red LED (Light Emitting Diode) for easy viewing in the dark. The backlit display, key arrangement, and sequential database make Autostar extremely user friendly.
NOTE: Autostar does not require batteries; the telescope’s batteries supply power
to Autostar.
2-Line LCD Display - Provides an interface between Autostar and the telescope.
• Top line: Lists the primary category or menu item.
• Bottom line: Contains a menu option or information about an object or subject,
depending on which function is being performed.
ENTER Key - Accesses, in a sequential manner, the next menu or data level in the
Autostar database. See “MOVING THROUGH AUTOSTAR'S MENUS,” page 12 and “AUTOSTAR’S MENUS,” page 16.
NOTE: If ENTER is pressed for two seconds or more and then released, Autostar
emits a beep and “ENTER to Sync” is displayed. "ENTER to Sync" is relevant only after the telescope has been aligned and is pointing at an object. If the "ENTER to Sync" feature is accessed by mistake, press MODE to return to the previous screen. See “HIGH PRECISION,” page 20, for more details about this feature.
MODE Key - Returns to the previous menu or data level in the Autostar database until the
top level, “Select Item," is reached. The MODE key is similar to the ESCAPE key on a com-puter.
NOTE: Pressing MODE while in the “Select Item” level moves Autostar to the
top-most screen: “Select Item: Object.”
NOTE: If MODE is pressed and held for two seconds or more, the following
infor-mation is then available using the Scroll keys (6 and 7, Fig. 3):
• Right Ascension and Declination (astronomical) coordinates (see "APPENDIX A") • Altitude (vertical) and Azimuth (horizontal) coordinates
• Local Time and Local Sidereal Time (LST) • Timer and Alarm Status
Press MODE again to return to the previous menu.
GO TO Key - Slews (moves) the telescope to the coordinates of the currently selected
object. While the telescope is slewing, the operation may be aborted at any time by press-ing any key except GO TO. Presspress-ing GO TO again resumes the slew to the object.
Arrow Keys - Slew the telescope in a specific direction (up, down, left, and right), at any
one of nine different speeds. Speed selection is explained in “SLEW SPEEDS,” page 22. The following functions are also available with the Arrow keys:
• Data Entry - Use the Up and Down Arrow keys to scroll through the letters of
the alphabet and numerical digits. The Down Arrow key starts with the letter "A" and the Up Arrow key starts with the digit "9." The Left and Right Arrow keys are used to move the blinking cursor left and right across the LCD display. • Alt/Az Alignment - Use the Up and Down Arrow keys to move the telescope
vertically up and down. The Left Arrow key rotates the telescope horizontally counterclockwise, while the Right Arrow key rotates it clockwise.
8 Autostar Features 1 2 3 4 5 NOTE:
Throughout this man-ual, you will notice the term "Alt/Az." Alt/Az is frequently used to refer to alti-tude or horizontal and azimuth or verti-cal. Alt/Az is just one of many methods used by amateur astronomers to help locate stars in the night sky.
Scroll Keys - Accesses database options within a selected menu. The menu is displayed
on the first line of the screen. Options within the menu are displayed, one at a time, on the second line. Press the Scroll keys to move through the options. Press and hold a Scroll key to move quickly through the options.
The Scroll keys also scroll through the letters of the alphabet and numerical digits.
NOTE: The Scroll Down key and the Down Arrow key move forward through the
alphabet & digits (A to Z, 0 to 9). The Scroll Up key and the Up Arrow key move backward (Z to A, 9 to 0). Common symbols are also available in the list.
Speed/? Key - Pressing the Speed/? key cycles through the nine slew speeds that move
the telescope. Each time the Speed/? key is pressed briefly, the current slew speed is shown for about two seconds on the display. See “SLEW SPEEDS,” page 22.
The Speed/? key also accesses the "Help" file. "Help" provides on-screen information on how to accomplish whatever task is currently active.
NOTE: Pressing the Speed/? key very briefly changes the slew speed. Holding
down the Speed/? key longer (one to two seconds) accesses the Help function.
Hold down the Speed/? key and then follow the prompts on the display to access details of Autostar functions in the Help feature. The Help system is essentially an on-screen instruction manual.
If you have a question about an Autostar operation, e.g., INITIALIZATION, ALIGNMENT,
etc., hold down the Speed/? key and follow the directions that scroll on the second line of
the LCD screen. When a word appears in [brackets], press ENTER to access the Autostar Glossary. A definition or more detailed information is displayed. Press MODE to return to the scrolling Autostar Help display.
When satisfied with the Help provided, press MODE to return to the original screen and continue with the chosen procedure.
Coil Cord - Plug the Autostar coil
cord into the HBX port (10A, Fig. 1)
of the computer control panel of the telescope.
6 7
8
9
Autostar Features 9
TIPS
FOR BEGINNERS
Join an Astronomy Club
Attend a Star Party
One of the fun ways to learn about astronomy is to join an astronomy club. Check your local newspa-per, school, library, or telescope dealer/store to find out if there’s a club in your area.
At club meetings, you will meet other astronomy enthusiasts with whom you will be able to share your discoveries. Clubs are an excellent way to learn more about observing the sky, to find out where the best observing sites are, and to compare notes about telescopes, eyepieces, filters, tripods, and so forth.
Often, club members are excellent astrophotogra-phers. Not only will you be able to see examples of their art, but you may even be able to pick up some “tricks of the trade” to try out on your ETX tele-scope. See page 23 for more information about photography with the ETX.
Many groups also hold regularly scheduled Star Parties at which you can check out and observe with many different telescopes and other pieces of astronomical equipment. Magazines such as Sky & Telescope and Astronomy print schedules for many popular Star Parties around the United States and Canada.
Parts Listing
Getting the telescope ready for first observations requires only a few minutes. When first open-ing the packopen-ing box, note carefully the followopen-ing parts:
• The ETX Astro Telescope with fork mount system. • #494 Autostar handbox with attached coil cord.
• MA 25mm and MA 9mm eyepieces, each packed in a plastic storage container. • Hex-wrench, packed with the instruction manual. See “GENERAL MAINTENANCE,”
page 27.
How to Assemble Your Telescope
Assembly of the ETX telescope requires only six AA-size (user-supplied) batteries and a few, simple steps: 1. The telescope’s battery compartment (1, Fig. 4) is located on top of the drive base. Open
the battery compartment by lifting the release latch and pulling it away from the drive base. 2. Remove the battery holder from the compartment and carefully lift the 9v connector out
from the compartment. Take care not to accidentally detach the wires of the battery con-nector from the base. Whenever you replace the batteries, to safeguard the wires, dis-connect the 9v dis-connector from the battery holder before removing the batteries.
3. Insert six AA-size batteries into the battery holder, oriented as shown on the diagram on the battery slots of the battery holder. Insert the center battery on each side last for easi-er installation. Connect the 9v connector plug to the batteasi-ery holdeasi-er. Carefully replace the battery holder back into the battery compartment. Replace the cover.
CAUTION: Use care to install batteries as indicated by the battery compartment.
Follow battery manufacturer's precautions. Do not install batteries backwards or mix new and used batteries. Do not mix battery types. If these precautions are not followed, batteries may explode, catch fire, or leak. Improperly installed batteries void your Meade warranty. Always remove the batteries if they are not to be used for a long period of time.
4. Be certain that the power switch on the computer control panel (10C, Fig. 1) is in the OFF
position. Plug the coil cord of the Autostar Controller into the HBX port (10A, Fig. 1).
NOTE: Autostar does not require batteries; the telescope’s batteries supply power
to Autostar.
5. Remove the MA 25mm eyepiece (1, Fig. 1) from its container and place it in the eyepiece
holder (3, Fig. 1). Tighten the thumbscrew (2, Fig. 1) to a "firm feel" only. Unscrew the dust
cover counterclockwise to remove it from the telescope. Basic assembly of the telescope is now complete.
Choosing an Eyepiece
A telescope’s eyepiece magnifies the image formed by the telescope’s main optics. Each eye-piece has a focal length, expressed in millimeters, or “mm.” The smaller the focal length, the higher the magnification. For example, an eyepiece with a focal length of 9mm has a higher magnification than an eyepiece with a focal length of 25mm.
Your telescope comes supplied with two standard eyepieces. The MA 25mm eyepiece gives a wide, comfortable field of view with high image resolution, while the MA 9mm eyepiece pro-vides a smaller field of view but higher magnification when seeing conditions permit.
Low power eyepieces offer a wide field of view, bright, high-contrast images, and eye relief dur-ing long observdur-ing sessions. To find an object with a telescope, always start with a low power eyepiece such as the MA 25mm. When the object is located and centered in the eyepiece, you may wish to switch to a higher power eyepiece to enlarge the image as much as practical for prevailing seeing conditions.
NOTE:Seeing conditions vary widely from night-to-night and site-to-site. Turbulence in the air, even on an apparently clear night, can distort images. If an image appears fuzzy and ill-defined, back off to a lower power eyepiece for a more well-resolved image (Fig. 7a and 7b).
Fig. 4: View of the ETX
tele-scope showing six AA-size batteries mounted inside the battery compartment: (1) Battery Compartment (2) Battery Holder (3) 9v Connector
(4) Battery Holder Connector
GETTING STARTED
Fig.5: MA 25mm and MA 9mm eyepieces. 2 1 3 4 10 Getting StartedThe power, or magnification of a telescope is determined by the focal length of the telescope and the focal length of the eyepiece being used. To calculate eyepiece power, divide the tele-scope's focal length by the eyepiece's focal length. E.g., a 25mm eyepiece is used with the ETX-60AT. The focal length of the ETX-60AT is 350mm (see "SPECIFICATIONS," page 29).
Telescope Focal Length 350mm Eyepiece Focal Length 25mm The eyepiece power, or magnification is therefore 14x.
Manual Operation of the Telescope without Autostar
If you wish to observe a distant land object, such as a mountain top or a bird, you can observe by merely pointing the telescope and looking through the eyepiece. Set the telescope on a table top or tripod, loosen the horizontal and vertical locks (6 and 9, Fig. 1), and turn the telescope
towards the object you wish to observe. Sight along the top of the tube until you find the object. When the object appears in the eyepiece, focus the image using the by turning the focus knob (8, Fig. 1). Rotate the knob clockwise to focus on distant objects and counterclockwise to focus
on nearby objects.
You can also observe stars and objects in the night sky using this method, but note that objects begin to slowly drift across the eyepiece field. This motion is caused by the rotation of the Earth. As you become familiar with Autostar operation, you can counteract the drift using the auto-matic tracking feature in the Setup menu (see "TO TRACK AN OBJECT AUTOMATICALLY," page 20), or by using Autostar's GO TO capabilities (see "GO TO SATURN," page 15).
Manual Operation of the Telescope Using Autostar's Arrow Keys
You may also observe land and astronomical objects using Autostar's Arrow keys.If you have not already done so, prepare your telescope following the steps described in "HOW TO ASSEMBLE YOUR TELESCOPE," page 10. Next, flip the On/Off Switch (10, Fig. 1) on the
computer control panel to the ON position. The copyright message lights on Autostar’s display. Press the Speed/? key (8, Fig. 3) to accept the Sun warning. The "Getting Started" message
displays. Keep pressing the ENTER key (A) until "Country/State" appears on the display. (Ignore the prompts requesting "Date" and "Time" for now – these functions will be explained later in the manual).
Use the Scroll keys (D) to cycle through the database of countries/states. Press ENTER (A) when your location displays. Next, use the Scroll keys (D) to scroll to the nearest city to your observing site and press ENTER. Next, use the Scroll keys (D) to scroll to your telescope model and press ENTER. The display then reads "Setup: Align."
You can now use the Arrow keys (5, Fig. 3) to slew (move) the telescope up, down, right, or left. To change the tele-scope’s slew speed, briefly press the Speed/? key (8, Fig. 3). Each press decreases the slew speed down one level, and then cycles back to the fastest speed. See page 22 for more informa-tion.
Tighten (to a "firm feel" only, do not over-tighten) the vertical and horizontal locks (6 and 9, Fig. 1). Sight along the side of
the telescope’s main tube to locate an object and practice using the Autostar’s Arrow keys to center the object in the telescope’s field of view. Use the tele-scope’s focus knob (8, Fig. 1) to bring
the object into focus.
This procedure demonstrates just a very small part of Autostar's capabilities. In the next section of this manual, you will begin to learn how to make use of Autostar's extensive and powerful features.
Getting Started 11
TIPS
FOR BEGINNERS
Too Much Power?
Can you ever have too much power? If the type of power you’re referring to is eyepiece magnification, yes, you can! The most common mistake of the beginning observer is to “overpower” his or her tel-escope by using high magnifications which the tele-scope’s aperture and atmospheric conditions can not reasonably support. Keep in mind that a small-er, but bright and well-resolved image is far superi-or to one that is larger, but dim and posuperi-orly resolved (see below). Powers above 110X should be employed only under the steadiest atmospheric conditions.
Autostar can calculate the best eyepiece for you to use. Try out the “Eyepiece Calc” feature in the Utilities menu.
Most observers should have three or four addition-al eyepieces to achieve the full range of reasonable magnifications possible with the ETX telescopes. See “OPTIONAL ACCESSORIES,” page 25.
Fig. 7a & b: Jupiter; example of too much magnification.
NOTE:
For a list of magnifica-tion ratings of the eye-pieces available for the ETX-60AT and ETX-70AT telescopes, see "OPTIONAL ACCESSORIES," page 25.
Fig. 6: Autostar's Arrow
keys.
Eyepiece Power = = = 14X
NOTE:
Autostar requests the Country/State, City, and Telescope Model information only the first time Autostar is activated. If you wish to change this informa-tion, use the "Site" and "Telescope Model" options in the Setup menu.
Moving Through Autostar’s Menus
The Autostar database is organized in levels for quick and easy navigation. • Press ENTER to go deeper into Autostar's menu levels.
• Press MODE to move back toward the top menu level.
• Press the Scroll keys to move up and down through the options available for each level.
• Press the Arrow keys to enter characters and digits. The Arrow keys are also used to move the telescope.
Initializing Autostar
This section describes how to initialize Autostar. Perform this procedure the first time you use Autostar or after performing a RESET. An example of this procedure is presented in "APPENDIX E," page 36.
1. Make sure that the vertical and horizontal locks (6 and 9, Fig. 1) are secured as described
on page 5.
2. Verify that Autostar is properly connected to your telescope. See “HOW TO ASSEMBLE YOUR TELESCOPE,” page 10.
3. Flip the telescope power switch to the ON position.
The Autostar screen is activated and a copyright message displays briefly, followed by a short beep. Then Autostar takes a few moments to start up the system.
4. A message displays that warns not to look at the Sun. At the end of this message, press the Speed/? key to signify that the message has been read and understood.
5. The Getting Started menu displays a scrolling message with two choices:
a. Hold down the Speed/? key (8, Fig. 3) for information on Autostar functions and controls.
When finished, press MODE (3, Fig. 3) to exit Help and to return to the Getting Started
pro-cedure, or,
b. Press ENTER (2, Fig. 3) to bypass the Help tutorial and continue with initialization.
6. Autostar then requests the current date. Use the Up and Down Arrow keys (5, Fig. 3) to
enter the digits for the date. Use the Right Arrow key (5, Fig. 3) to move from one number
to the next in the day display, and also to move to the month. Then, use the Scroll keys (6 and 7, Fig. 3) to cycle through the list of months.
When the current month is displayed, use the Right Arrow (5, Fig. 3) to move to the year.
Use the Up and Down Arrow keys to enter all four digits of the current year. Press ENTER when the date has been entered.
7. Autostar then requests the current time. Use the Up and Down Arrow keys to enter the time. (Use a "0" for the first digit if less than 10.) Use the Right (or Left) Arrow key to move from one number to the next. Press one of the Arrow keys (5, Fig. 3) to scroll to "AM" or
"PM." If you select the "blank" choice that follows "AM" and "PM," the clock displays time in a 24-hour (military time) format. Then, press ENTER to start the clock.
NOTE:When multiple choices are available within a menu option, the current option is usually displayed first and highlighted by a right pointing Arrow (>).
8. The next screen requests the status of Daylight Savings Time. Pressing a Scroll key tog-gles between the YES/NO settings. Select the desired setting by pressing ENTER.
NOTE: Daylight Savings Time may be referred to by a different name in various areas of the world.
9. The next screen asks for the Country or State (listed alphabetically) of the observing site. Use the Scroll keys to cycle through the database of countries, states, and provinces. Press ENTER when the correct location displays.
10. The next screen asks for the city (listed alphabetically) closest to the observing site. Use the Scroll keys to cycle through the database of cities. Press ENTER when the correct city appears on screen.
11. The next screen asks for the telescope model. Use the Scroll keys to locate ETX-60 or ETX-70. Press ENTER to select the appropriate model.
12. System initialization is complete and the screen reads "Setup: Align".
Initialization is a
pro-cedure that ensures that Autostar oper-ates correctly. When you first use Autostar, it doesn't yet know where the observa-tion locaobserva-tion site is or the time or date of the observation ses-sion.
During the procedure, you will enter infor-mation, such as the current time and date, observation location, and telescope model. Autostar uses this information to pre-cisely calculate the location of celestial objects (such as stars and planets) and how to move your tele-scope correctly for various operations.
It is important to understand that menu selections are set in a loop (Fig. 9). This means that
pressing the Scroll Down key (7, Fig. 3) cycles down through all the available options within a
given category, then returns to the first option. The Scroll Up key (6, Fig. 3) cycles up through the
options in the opposite order. Note that this capability is a quick way to get to an option that is near the bottom of the list. The following example demonstrates this capability.
Example:
To navigate to the “Select Item: Setup” menu option when the “Select Item: Object” menu is displayed: 1. Press the Scroll Down key four times or the Scroll Up key once.
The screen in Figure 10 displays two lines of information. The top line shows the current menu
level. The second line displays an option which may be selected within that menu level. Some options are choices that select the next menu level down. The Scroll keys move up and down within the list of available options, showing one option at a time.
When the desired option is displayed on the second line, press the ENTER key to choose that option and move down one menu level.
Press the MODE key to leave a level; e.g., the wrong menu option is chosen.
IMPORTANT NOTE: No matter how many levels into Autostar are traveled, each
press of the MODE key moves up a level, until the top level, "Select Item," is reached. Once in the Select Item level, press MODE to return to the topmost level, "Select Item: Object."
Autostar Navigation Exercise
To demonstrate how the Autostar menu structure works, the following exercise calculates Sunset time so an evening observing session can be planned.
NOTE: To perform an accurate calculation, Autostar must be properly initialized
with the current date, time, and location of the observing site. To enter the current date, time, and location information of your observing site, see “INITIALIZING AUTOSTAR,” page 12, before proceeding with this exercise.
AUTOSTAR OPERATION
The Universe ofAutostar
Select Item: Setup Select Item: Utilities Select Item: Glossary Select Item: Guided Tour Select Item: Event Select Item: Object SETUPQuick, easy alignment permits all telescope operations with only a 2-minute setup.
UTILITIES Calculate eyepiece magnifications; set the timer for an observing session; or survey user landmarks in 30-second intervals.
GLOSSARY
Discover the world of astronomy by alphabetically accessing astronomical terms.
OBJECT
Select from over 1400 database objects and
press GO TO to move the telescope automatically to the object and place it in the telescopic field of view.
EVENT Access the time of an astronomical event, such as the rising or setting times of the Moon.
GUIDED TOUR Journey through the universe as Autostar escorts you to the best celestial objects at your location.
Fig. 8: The Autostar Universe: The six primary categories listed in the Select Item menu of Autostar.
Object Event Guided Tours Glossary Utilities Setup
Fig. 9: Menus set in a
loop. Select Item Solar System Select Item Object ENTER
Fig. 10: Autostar levels.
To Calculate Sunset time:
1. Press the MODE key several times, until “Select Item: Object” is displayed.
2. Press the Scroll Down key once to display the “Event” option in the “Select Item” menu. 3. Press the ENTER key to choose the "Event" option and move down a level. "Event:
Sunrise" is displayed.
4. Press the Scroll Down key once to display the "Sunset" option in the Event menu. 5. Press the ENTER key to choose the "Sunset" option and move down another level. 6. Autostar calculates the Sunset time based on the current date, time, and location. Autostar
then displays the results of the calculation.
7. Press MODE once to start moving back up through the Autostar levels. The first level up is the Event menu.
8. Press MODE again to move up another level. This is the top level, "Select Item." 9. Press MODE again to return to the starting point of "Select Item: Object."
Easy Two-Star Alignment
The fastest and easiest way to start observing with Autostar is to use Easy Two-Star Alignment. Autostar automatically picks two stars from its database for the Easy Two-Star Alignment pro-cedure. During the Easy Alignment procedure, Autostar slews the telescope to a first alignment star. The user is asked to verify that the telescope is pointed at the chosen star and then to cen-ter the star in the eyepiece. The process is repeated with a second star to complete the align-ment.
NOTE: Before aligning the telescope, first verify that “INITIALIZING AUTOSTAR,”
page 12, has been performed. See “MOVING THROUGH AUTOSTAR’S MENUS,” page 12, for a description of how Autostar’s keys operate.
Easy Two-Star Alignment Procedure:
1. Sun Warning - Press the Speed/? key to accept.
2. Getting Started - Press ENTER to continue, or the Speed/? key to access the Autostar
Help tutorial. Press MODE to leave the tutorial at any time. 3. Enter Date - Enter the current date, then press ENTER.
4. Enter Time - Enter the current time. Select "AM," "PM," or 24-hour clock (blank). Then
press ENTER.
5. Daylight Savings - Select “Yes” or “No,” then press ENTER.
6. Alignment Option Screen - “Setup: Align” displays. Press ENTER.
7. Select Alignment - “Align Easy” displays. Press ENTER.
8. Set Home Position - Autostar then prompts you to set the telescope in the Alt/Az
Alignment home position. To set your telescope in the "Alt/Az" home position: • Loosen the telescope’s vertical lock (6, Fig. 1).
• Level the optical tube by lining up 0° on the Dec setting circle (17, Fig. 1) with the
pointer (Fig. 13).
• Tighten the vertical lock (6, Fig. 1) to a "firm feel" only.
• Unlock the horizontal lock (9, Fig. 1) and turn the telescope horizontally until it points
North. Re-lock the horizontal lock (9, Fig. 1).
• Press ENTER. See “ALT/AZ HOME POSITION,” page 21, for more information.
9 . Star Alignment - The Autostar then chooses two stars to align upon. When the telescope
slews to the first star for alignment, it may not appear in the field of view in the eyepiece. The alignment star should be easily recognized and be the brightest star in the area of the sky where the telescope is pointing. Use the Arrow keys to move the telescope until the star is visible and centered in the eyepiece. Press ENTER. Repeat procedure for the sec-ond alignment star.
NOTE: Autostar locates alignment stars based on the date, time, and location
entered. The alignment stars may change from night to night. All that is required is for the observer to center the selected stars in the eyepiece when prompted.
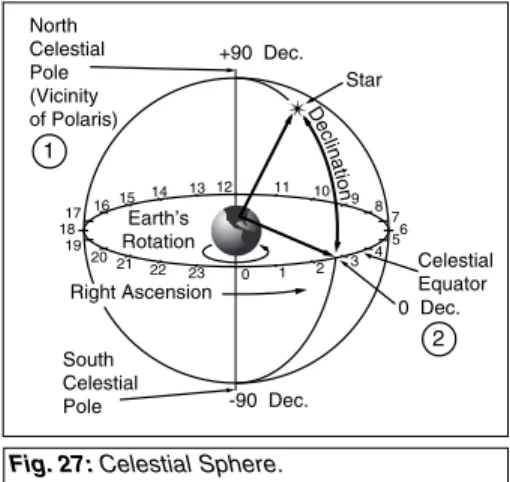
North
Declination
at 0˚ Pointer
Fig. 11: Alt/Az Alignment
Home Position.
14 Autostar Operation
IMPORTANT NOTE:
The "Telescope: Mount" option of the Setup menu is set to "Alt/Az" as the default alignment by the factory.The example presented in this section assumes that you are performing an alignment procedure for the first time with your telescope and therefore, the "Telescope: Mount" option does not need to be selected. For infor-mation on equatorial (Polar) alignment, see “APPENDIX A,” page
NOTE:
The GO TO key also allows you to perform a
"spiral search." A spiral
search is useful when the telescope slews to an object, but that object is not visible in the eye-piece after the telescope finishes it search. (This sometimes occurs dur-ing an alignment proce-dure.) Press GO TO when the slew is finished and the telescope starts slewing in a spiral pattern at a very slow speed around the search area. Look through the eye-piece and when the object does become vis-ible, press MODE to stop the spiral search. Then use the Arrow keys to center the object.
Go To Saturn
After performing the Easy Two-Star Alignment procedure, the motor drive begins operating and the telescope is aligned for a night of viewing. Objects in the eyepiece should maintain their position even though the Earth is rotating beneath the stars.
IMPORTANT NOTE:Once aligned, only use the GO TO or Arrow keys to move the telescope. Do not loosen the telescope locks (6 and 9, Fig. 1), or move the base
manually, or alignment will be lost.
This exercise demonstrates how to select an object for viewing from Autostar’s database. This example demonstrates how to select Saturn.
NOTE: Saturn is not visible the entire year and you may need to choose another
object from Autostar's database; however, the procedure, as described below, remains the same.
1 After the telescope is aligned, “Select Item: Object” displays. Press ENTER. 2. “Object: Solar System” displays. Press ENTER.
3. “Solar System: Mercury” displays. Keep pressing the Scroll Down key until “Solar System: Saturn” displays.
4. Press ENTER. “Calculating” displays. Then “Saturn” and a set of coordinates displays. Saturn’s (and other planets’) coordinates change throughout the year.
5. Press GO TO. “Saturn: Slewing...” displays and the telescope slews until it finds Saturn. You may need to use the Arrow keys to center Saturn precisely in the eyepiece. Autostar then automatically slews (moves) the telescope so that it "tracks" Saturn (or whatever other object you may have chosen); i.e., Saturn remains centered in the eyepiece. If an object is observed in the telescope without using Autostar's GO TO or automatic tracking capabilities (see "TO TRACK AN OBJECT AUTOMATICALLY," page 20), objects in the
eyepiece gradually drift out of the field of view due to the Earth's rotation.
Using the Guided Tour
This example demonstrates using “Tonight’s Best” Guided Tour.
1. After observing Saturn, press MODE twice so that “Select Item: Object” displays again. 2. Press the Scroll Down key twice. “Select Item: Guided Tour” displays.
3. Press ENTER. “Guided Tour: Tonight’s Best” displays. Press ENTER.
NOTE: If you wish to try out other Guided Tours, press the Scroll Down key to scroll
through other tour choices. When the tour you wish to select dis-plays, press ENTER.
4. “Tonight’s Best: Searching...” dis-plays. After calculating, “Tonight’s Best: Jupiter” displays.
NOTE: Different objects may be
displayed on a tour list on any given night.
Press ENTER or Speed/? to display information about the object. Press GO TO to move the telescope to the object.
5. Press MODE to return to the Tour list. Press the Scroll keys to scroll through the list. Press ENTER when you find the next object you wish to observe.
6. Press MODE repeatedly to leave the Guided Tour menu.
OBSERVING EXERCISES
TIPS
FOR BEGINNERS
Which One’s the Alignment
Star?
If Autostar has chosen an alignment star with which you are unfamiliar, how can you be sure if the star in your eyepiece is really the alignment star? The rule of thumb is that an alignment star is usual-ly the brightest star in that area of the sky. When you view an alignment star in an eyepiece, it stands out dramatically from the rest of the stars in that portion of the sky.
If you have an obstruction, such as a tree or a build-ing blockbuild-ing your view of the alignment star, or if you have any doubts at all about the star that has been chosen, no problem. Just press the Scroll Down key and Autostar will find another star to align upon.
NOTE:
Keep in mind that when viewing through the eye-piece, images of terrestrial objects are right-side-up, but reversed left-for-right. Normally, such an image orienta-tion is not bother-some, unless trying to read a distant sign, for example. If the telescope is to be used for exten-sive terrestrial observations, a cor-rectly oriented image is provided with the #933 45° Erecting Prism. See “OPTIONAL ACCESSORIES,” page 25.
Object Menu
Almost all observing with Autostar is performed using the Object menu category. (NOTE:
Exceptions include Guided Tour and Landmark Survey.) See “GO TO SATURN,” page 15, for an
example of observing using the Object menu. Also see “USING THE GUIDED TOUR,” page 15. Many Autostar menu categories contain databases. An Autostar database is a list of viewable
objects, such as stars, planets, comets, nebulae and so forth. When one of these objects is selected, Autostar moves your telescope (if properly aligned) and points it at the selected object.
The Object Menu functions include:
Solar System is a database of the eight planets (Earth is not included) in order out from the
Sun, followed by the Moon, asteroids, and comets.
Constellation is a database of all 88 Northern and Southern Hemisphere constellations. When
this menu option is chosen and a constellation name appears on the first line of the screen, press GO TO once to change the second line to the name of the brightest star in the constel-lation. Press GO TO a second time to slew the telescope to that star. Use the Scroll keys to cycle through the list of stars in the constellation, from brightest to dimmest.
Deep Sky is a database of objects outside our Solar System such as nebulae, star clusters,
galaxies, and quasars.
Star is a database of stars listed in different categories such as named, double, variable, or
nearby.
Satellite is a database of Earth-orbiting objects such as the International Space Station, the
Hubble Space Telescope, Iridium, Global Positioning System satellites, and geosynchronous orbit satellites. See“OBSERVING SATELLITES,” page 23.
User Objects allows the user to define deep-sky objects of specific interest that are not
cur-rently in the Autostar database. See "APPENDIX B," page 33, for more information.
Use the Landmark Survey option in the Utilities menu to sequentially view all Landmarks
entered into Autostar.
Landmarks stores the location of terrestrial points of interest in the permanent Autostar database.
IMPORTANT NOTE:To use the Landmark function, the telescope must be located and aligned exactly as when the landmark was added to the database. Additionally, the telescope needs to be mounted in the same configuration, i.e., Alt/Az or Polar.
AUTOSTAR MENUS
Solar System Mercury Etc. Moon Asteroids Comets Constellations Andromeda Etc. Deep Sky Named Object Galaxies Nebulae Planetary Neb. Etc. Star Named SAO Catalog Double Etc. Satellite Select Add Delete Edit User Objects Select Add Delete Edit Landmarks Select Add Delete Identify Sunrise Sunset Moonrise Moonset Moon PhasesNext Full Moon Next New Moon Next 1st Qtr Next 3rd Qtr Meteor Showers Quadrantids Lyrids Eta Aquarids Delta Aquarids Perseids Orionids Taurids Leonids Geminids Ursids Solar Eclipses Lunar Eclipses Min. of Algol Autumn Equinox Vernal Equinox Winter Solstice Summer Solstice
Tour Objects A... Accretion Disk Etc. B... C... D... E... F... G... H... I... J... K... L... M... N... O... P... Q... R... S... T... U... V... W... X... Y... Z... Timer Set Start & Stop Alarm Set On & Off Eyepiece Calc. Field of View Magnification Suggest Display Options Sun Warning Getting Started Brightness Adj. Contrast Adj. Battery Alarm Landmark Survey Sleep Scope Park Scope Align Easy One Star Two Star Date Time Daylight Saving Telescope Tele. Model Focal Length Az/Alt Ratio Mount Train Drive Tracking Rate Reverse L/R Reverse Up/Dn Calibrate Motor High Precision Targets Astronomical Terrestrial Site Select Add Delete Edit Owner Info Download Statistics Reset Select Item: Object Select Item: Event Select Item: Guided Tour Select Item: Glossary Select Item: Utilities Select Item: Setup Tonight's Best How Far is Far A Star's Life
16 Autostar Menus
• Select - To select a Landmark already in the database, choose the "Select" option and
scroll through the list. Press ENTER to select a Landmark, then press GO TO and the tel-escope slews to the object.
• Add - To add a Landmark, choose the "Add" option. Enter a name for the Landmark.
Locate and center the Landmark, then press ENTER.
Identify is an exciting feature for an observer who wants to scan the night sky and start
explor-ing. After the telescope has been properly aligned, use the Autostar Arrow keys to move about in the sky. Then follow this procedure:
IMPORTANT NOTE: Only use the Arrow keys to move the telescope during the
Identify procedure. Do not loosen the telescope locks or move the base. Alignment is lost.
1. When a desired object is visible in the eyepiece, keep pressing MODE until the “Select Item: Object” menu is displayed.
2. Scroll through the Object menu options until the “Object: Identify” screen appears. 3. Press ENTER. Autostar searches the database for the identity of the object being
observed.
4. If the telescope is not directly on an Autostar database object, the nearest database object is located and displayed on the screen. Press GO TO and the telescope slews to that object.
Event Menu
The Event menu provides access to dates and times of astronomical events. The Event data-base includes:
Sunrise and Sunset calculates the time
that the Sun rises or sets on the current date. Find rise and set times for other dates by entering a new date into the “Setup: Date” menu.
Moonrise and Moonset calculates the
time that the Moon rises or sets on the current date. Find rise and set times for other dates by entering a new date into the “Setup: Date” menu.
Moon Phases displays the date and
time of the next Full, New, 1st Quarter, and 3rd Quarter Moon.
Meteor Showers provides information
on upcoming meteor showers, such as the Perseids, the Leonids, etc. Also lists the dates of the showers and when they reach maximum.
NOTE: Meteors are fast moving
objects that cover large areas of the sky and are usually best observed with the naked eye. Solar Eclipse lists upcoming Solar Eclipses, including the date and type (total, annular, or partial) of eclipse, and the location and time of the first and last contacts of the Moon's shadow. Use the Scroll Up and Down keys to display the available data. Remember, never use a telescope to look at the sun! See “WARNING!” page 2.
Autostar Menus 17
TIPS
FOR BEGINNERS
• Try to pick an observing site away from street and house lights and car headlights. While this is not always possible, the darker the site, the better.
• Give your eyes about ten minutes to adjust to the darkness before observing. Give your eyes a rest from observing every ten or fifteen min-utes to relieve eyestrain.
• Try not to use a standard flashlight. A lot of observers use red LED flashlights or tape red cellophane over their flashlights to use for setup and map reading so they don’t have to continually readjust their eyes to the darkness. Be careful not to shine bright lights if there are other observers in the area. Do not shine a flashlight into the telescope while someone is observing!
• Dress warmly. It gets chilly when you’re sitting for prolonged periods.
• Practice setting up your equipment during the day or in a lighted area to become familiar with it before going to a dark site.
• Use your 25mm eyepiece to view terrestrial objects and wider areas of space, such as open star clusters. Use your 9mm eyepiece when you wish to view something up close, such as craters on the Moon or the rings of Saturn.
• Know your observing site. If you’re going to try out an unfamiliar site, check it out in the daylight for possible obstructions and pitfalls.
Lunar Eclipse lists upcoming Lunar Eclipses, including the date and type (total, partial,
penum-bral) of eclipse. Use the Scroll Up and Down keys to display the available data.
Min. (Minimum) of Algol is the minimum brightness of the dramatic eclipsing binary star
sys-tem, Algol. It is relatively close at a distance of 100 light years. Every 2.8 days during a 10-hour period, Algol undergoes a major change in apparent magnitude as one of the two stars passes behind the other. The combined magnitude of the two stars thus dips from +2.1 to a minimum of +3.4 halfway through the eclipse as the second star is hidden. Autostar calculates minimum magnitude time at mid-eclipse.
Autumn and Vernal Equinox calculates the time and date of the fall or spring equinox of the
current year.
Winter and Summer Solstice calculates the time and date of the winter or summer solstice of
the current year.
Glossary Menu
The Glossary menu provides an alphabetical listing of definitions and descriptions for common astronomical terms and Autostar functions. Access directly through the Glossary menu or through hypertext words embedded in Autostar. Ahypertext word is any word in [brackets],
usually found when using the Autostar Help function or when reading a scrolling message such as a description of a planet or star. Press ENTER whenever a hypertext word is on screen and Autostar links directly to the glossary entry for that word.
To access directly from the Glossary menu, use the Scroll keys to scroll through the alphabet. Press ENTER on the desired letter. Scroll to the desired entry, then press ENTER to read the description.
Utilities Menu
The Utilities menu provides access to several extra features within Autostar, including a count-down timer and an alarm. The Utilities functions include:
Timer selects a countdown timer. This feature is useful for functions such as astrophotography
and tracking satellites. See“OBSERVING SATELLITES,” page 23. To use the Timer, press
ENTER, then choose “Set” or “Start/Stop”.
• Set: Enter the time to be counted down, in hours, minutes, and seconds, then press ENTER.
• Start/Stop: Activates the timer set previously. Use the Scroll keys to toggle between ON
and OFF. When ON is displayed, press ENTER to activate the timer. When the timer runs out, four beeps sound and the timer is deactivated.
Alarm selects a time for an alarm signal as a reminder. To use the Alarm, press ENTER, then
choose "Set" or "Start/Stop."
• Set: Enter the time of day for the alarm to sound, in hours, minutes, and seconds, then press
ENTER.
• Start/Stop: Activates the alarm set previously. Use the Scroll keys to toggle between ON
and OFF. When ON is displayed, press ENTER to activate the alarm. When the alarm time arrives, Autostar beeps. Press ENTER to deactivate the alarm.
Eyepiece Calc calculates information about an eyepiece for the specific telescope to which
Autostar is connected.
• Field of View: Scroll through a list of available eyepieces. When an eyepiece is selected,
the field of view is calculated.
• Magnification: Scroll through a list of available eyepieces. When an eyepiece is selected,
the magnification is calculated.
• Suggest: Autostar calculates and suggests the best eyepiece for viewing, based on the
telescope and the object being viewed.
Display Options enables or disables Autostar’s two initial displays. If both displays are
dis-abled, Autostar begins with the Date display.
• Sun Warning: Turns the “Sun Warning” message on or off. • Getting Started: Turns the “Getting Started” message on or off.
Brightness Adj: Adjusts the brightness of the display using the Scroll keys. When complete, press
ENTER.
Contrast Adj: Adjusts the contrast of the display using the Scroll keys. When complete, press
ENTER.
NOTE: This feature is usually only required in very cold weather.
Landmark Survey automatically slews the telescope to all user-defined landmarks with a short
pause at each location. Press ENTER to start the survey. While a slew is in progress, press any key to skip that object and go to the next landmark on the list. To observe a landmark for a longer period, press MODE when paused on the object to stop the survey. Press ENTER to restart the survey at the first object on the list. See "Landmark," page 16.
Sleep Scope is a power saving option that shuts down Autostar and the telescope without
for-getting its alignment. With "Sleep Scope" selected, press ENTER to activate the Sleep func-tion. Autostar goes dark, but the internal clock keeps running. Press any key, except ENTER, to re-activate Autostar and the telescope.
Park Scope is designed for a telescope that is not moved between observing sessions. Align
the telescope one time, then use this function to park the telescope. Next time it is powered up, enter the correct date and time - no alignment is required. Pressing ENTER causes the tele-scope to move to its pre-determined Park position. Once parked, the screen prompts to turn off power.
IMPORTANT NOTE: When the "Park Scope" option is chosen and the display
prompts you to turn off the telescope's power, Autostar is unable to be returned to operation without turning the power off and then back on.
Setup Menu
The Setup menu’s primary function is to align the telescope (see pages 14 and 21). However, there are numerous other features available within the Setup menu, including:
Date changes the date used by Autostar. This function is useful to check events in the past or
future. For example, set the Date menu for a day three months in the future. Then check the "Select Item: Event" menu for the Sunset
time on that date. See “EVENT MENU,” page 17.
Time changes the time entered into
Autostar. Setting the correct time is criti-cal for Autostar to properly criti-calculate locations and events. Time may be set to 24-hour mode (military time) by selecting the "blank" option which follows the "AM" and "PM" options.
Daylight Saving is used to enable or
disable Daylight Savings time.
NOTE: Daylight Savings Time may
be referred to by different names in various areas of the world. Check local time to verify.
Telescope accesses the several
options, including:
• Telescope Model: Selects the
model of telescope connected to Autostar.
• Focal Length: Displays the focal
length of the selected telescope. • Az Ratio and Alt Ratio: The Az
(Azimuth) ratio and Alt (Altitude) ratio refers to the gears of the tele-scope's motors. Do not alter these numbers.
• Mount: Choose between Alt/Az
mount or Polar Mount. Mount requires that the telescope be physically aligned to the mount selected in this menu. The default setting is "Alt/Az."
TIPS
FOR BEGINNERS
Surf the Web
One of the most exciting resources for astronomy is the internet. The internet is full of websites with new images, discoveries, and the latest astronomical information. For example, when comet Hale-Bopp made its approach to our Sun in 1998, astronomers around the world posted new photos daily. You can find websites for almost any topic relating to astronomy on the internet. Try the following key word searches: NASA, Hubble, HST, astronomy, Messier, satellite, nebula, black hole, variable stars, etc.
Check out Meade’s website for the latest product and technical information. You can download the latest software revisions, links to other astronomi-cal sites, coordinates of celestial objects and the latest satellite tracking information for your #494 Autostar handset. See page 20 for more informa-tion. You’ll find our website at:
http://www.meade.com/
Here are some other sites you might find interesting: • Sky & Telescope:
http://www.skypub.com/ • Astronomy:
http://www2.astronomy.com/astro/ • The Starfield:
http://users.nac.net/gburke/ • Astronomy Picture of the Day:
http://antwrp.gsfc.nasa.goc/apod/ • Heaven’s Above (satellite observing information):
http://www.heavens-above.com/
• Train Drive: Trains the altitude and azimuth motors to locate objects with more precision.
If you are experiencing any problems with pointing accuracy, follow the procedure described in “APPENDIX D: TRAINING THE DRIVE,” page 35, to insure accurate point-ing and trackpoint-ing.
• Tracking Rate: Changes the speed at which the telescope tracks targets in the sky.
a. Sidereal: The default setting for Autostar; sidereal rate is the standard rate at which
stars move from East to West across the sky due to the rotation of the Earth. b. Lunar: Choose this option to properly track the Moon over long observing sessions.
c. Custom: Allows entry of user-defined tracking rates.
• Reverse L/R: Reverses the functions of the Left and Right Arrow keys (i.e., the Right key
moves the telescope to the left).
• Reverse UP/DOWN: Reverses the functions of the Up and Down Arrow keys (i.e., the Up
key moves the telescope down).
• Calibrate Motor: If the telescope motors appear to have a problem, use this option to
retest the motors before doing a Reset. This option is also used if an Autostar unit is moved between telescopes to match Autostar to the telescope.
• High Precision: If High Precision is turned on, when looking for a faint celestial object (i.e.,
a nebula or galaxy), Autostar first slews to a nearby bright star and displays "ENTER to Sync." Center the star in the eyepiece, then press ENTER. At that point the telescope has a high precision alignment to that part of the sky and it then slews to the object that was originally requested.
Targets switches between Astronomical targets and Terrestrial targets. If Astronomical targets
are selected, the telescope tracking motor is activated and objects you're observing will remain centered in the eyepiece. If Terrestrial targets are selected, the tracking motor is turned off.
To track an object automatically, set the telescope in the Alt/Az home position (see "EASY
TWO-STAR ALIGNMENT PROCEDURE, step #8", page 14), locate an object you wish to observe using Autostar's Arrow keys (see page 11), and center the object in the eyepiece. Then scroll to the "Targets: Astronomical" menu display and press ENTER. Autostar then automati-cally slews (moves) the telescope to keep the object centered in the eyepiece.
Site provides access to several options including:
• Select: Displays the currently selected observing site and
and also allows you to select
other sites you have entered into a user-defined database (see "Add" below)
. Usethe Scroll keys to cycle through all available sites in this database. Press ENTER when the site you wish to select displays. Use this option when you move to a different geographic location.
NOTE: Only the site that is entered during Initialization (see page 16) will be
dis-played until other sites are entered with the "Add" option.
• Add: Allows you to add a new observing site to the database (up to six sites may be
stored). Scroll through the list of Countries/States. Press ENTER when the site you wish to add displays. Then choose the desired city in the same manner.
• Delete: Deletes a stored site from the database.
• Edit: Edits a selected site, including: the name, latitude, longitude, and time zone. Time
Zone refers to the Greenwich Mean Time (GMT) time zone shift. Users West of Greenwich, England use “-” hours, East of Greenwich use “+” hours. For the United States, look up the time zone shift in Table 1.
NOTE: Autostar compensates for daylight savings time, if selected. See “Setup
Menu: Daylight Saving,” page 19.
Owner Info accesses the owner information menu, including:
• Name: Users may enter both their first and last names using the Up and Down Arrow keys
to cycle through the alphabet. Use the Right and Left Arrow keys to move through the text. Press ENTER when the entry is complete.
• Address: Use the Up and Down Arrow keys to enter your street address, city, state, and
zip code. Press ENTER when the entry is complete.
Download transfers information from a personal computer or another Autostar. During the
operation, the warning “Downloading Do Not Turn Off” appears.
Statistics provides basic statistical data about Autostar, including:
• Characters Free: Shows how much room is available in user-defined object memory.
• Version: Shows the current version of the Autostar software.
Reset completely resets Autostar. Autostar requires initialization again after a Reset before
pro-ceeding with observations. See “INITIALIZING AUTOSTAR,” page 12. You also need to per-form “TRAINING THE DRIVE,” page 35.
Time Zone Shift
Atlantic -4 Hours Eastern -5 Hours Central -6 Hours Mountain -7 Hours Pacific -8 Hours Hawaii -10 Hours
Table 1: Time Zone Shift.
20 Autostar Menus
NOTE:
The Download function requires the optional #506 Astrofinder Software and Cable Connector Kit. See the instruction sheet included with the kit for more information on how to download. Also see “OPTIONAL ACCESSORIES,” page 25.
IMPORTANT NOTE:
While performing the automatic tracking pro-cedure, only use the Arrow keys to move the telescope. Once the telescope has been set in the Alt/Az home position, do not loosen the telescope locks (6 and 9, Fig. 1), or move the base manually, or alignment will be lost.