VMware Smart Assurance Network
Configuration Manager Installation
Guide
You can find the most up-to-date technical documentation on the VMware website at: https://docs.vmware.com/ VMware, Inc. 3401 Hillview Ave. Palo Alto, CA 94304 www.vmware.com
Contents
1
Introduction to Network Configuration Manager 11What is Network Configuration Manager? 11 Where to get help 11
About this manual 12
Product installation directory 12 Deployment architecture 12
Running a software prerequisites check 14 Product and version compatibility 15 Installation tasks 15
Product installation directory 16
2
Installation procedures (Linux platform) 17Prerequisites and installation order 17 Prerequisites 17
Order of installation 18
Install Network Configuration Manager using graphical installer mode 18 Install a Database server by using graphical installer 19
Install Combination or Application server using graphical installer 20 Lockbox utility 24
Add distributed system hosts for remote servers (standard or advanced security) 24 Export and import certificates for EDAA and Smarts Adapter 25
Import Network Configuration Manager Certificates for remote servers 25 Install a Device server using graphical installer 26
Install Network Configuration Manager using console installer 28
Install Combination, Application, and Database server using console installer 29 Lockbox utility 33
Add distributed system hosts for remote servers (standard or advanced security) 33 Import Network Configuration Manager Certificates for remote servers 34
Export and import certificates for EDAA and Smarts Adapter 34 Install a Device server using console installer 35
Install Network Configuration Manager using silent installer 37 Creating the configuration file for a silent installation 37
Configuration parameters 38 Installing in silent mode 41
3
Uninstallation procedures (Linux platform) 43Summary of uninstall tasks 43
Uninstalling the Network Configuration Manager Device Drivers 44
4
Post-Installation procedures 45Configuring Watch4net server 45 For Linux 46
Launching Watch4net user interface from Network Configuration Manager 46 For Linux 46
Enabling CAS configuration for EDAA URI 46 In Linux 47
Healthcheck updates 47
Database password change information 47 Error handling 48
Installer log files 48
Multi-Level cut-through mode configuration 49
Configuring Windows to accept cut-thru with default Telnet Client 49 Enable/disable auto-login features 49
Enable data on User Activity screen (Linux) 50
Client-side required configuration to disable SSLv3 50 Client-side installation 52
NCM UI Installation (Windows) 52 NCM UI Installation (Linux) 52 NCM UI Uninstallation Procedure 53 Client-side startup 53
Configuring the sysadmin user’s email address 54 Setting up the profile 54
Enabling SAML authentication 55
Installing the sysadmin console (Linux) 56 Enabling Syslog messages in RHEL 8 57
5
Cluster installation 58Overview 58
Software Requirements 58 Configuration Requirements 58
Installing the Fibre Channel Cards 59
Installing Network Configuration Manager with the Cluster installation 59 Validating the UNIX User ID and Group ID numbers 60
Operating the Network Configuration Manager Cluster 60 Restoring from a Backup 61
Uninstalling Network Configuration Manager 61
Summary of Installation Tasks 63
Prerequisites for the RSA Token Service 64 Software Requirements 64
Installing the RSA Token Service using the graphical installer mode 65 Post-Installation Procedures 66
Importing RSA Tokens into the Network Configuration Manager RSA Token Server 67 Deleting RSA Tokens from the Network Configuration Manager RSA Token Server 68 Configuring the RSA Token ServiceNetwork Configuration Manager 68
Verifying RSA Tokens in Network Configuration Manager 69 Uninstalling the RSA Token Service 70
Network Configuration Manager RSA Token Service Instrumentation Web Page 70 Resetting the RSA Token Server Username and Password 71
7
Installation on Geo Diverse 72Network Configuration Manager Geo Diverse 72 Features 72
Replication Requirements 73
Components 73
Installing Network Configuration Manager in a Geo Diverse Environment 74 Validating the UNIX User ID and Group ID Numbers 75
Using the vcgeoadmin.pl script 76 Logging the vcgeoadmin.pl script 77
Testing the Geo Diverse failover script without replication software 77 If you need to rollback to first Application server: 79
8
Integration Adapter for Smarts Manager 80Introduction 80 Terminology 81 Prerequisites 81 Deployment 81
How the Integration adapter for Smarts Manager operates 82 Batch device synchronization 82
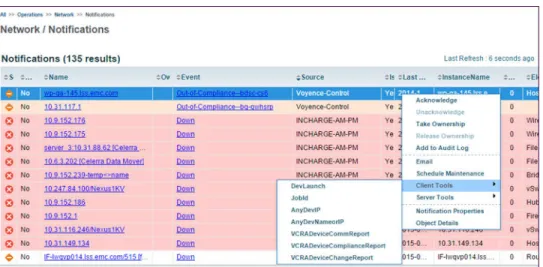
Active (device) synchronization 83 SNMP credential synchronization 83 Event notification 84
Important information about synchronization 84
Mapping between networks and IP Availability Managers 84 Installation programs 85
Installing the Integration adapters 85 For Linux 85
Installed services 86
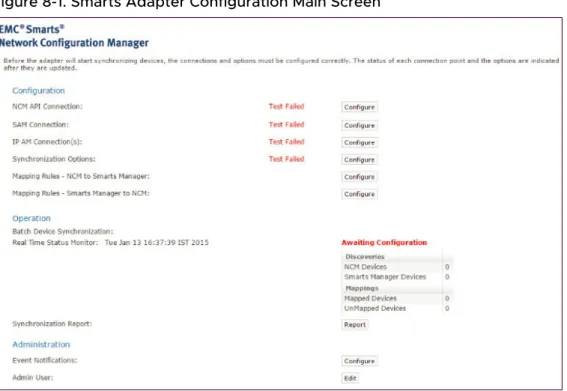
Establish a secure connection with the server 86 Configuring the Adapter 87
Discovering Network Configuration Manager with Smarts Manager 87 Accessing the configuration GUI 87
Step 1: Network Configuration Managerpublic API connection configurations 88 Step 2: SAM connection configuration 89
Step 3: Smarts IP Availability Manager connections configuration 90 Step 4: Synchronization options 92
Mapping Configuration 94
Device Configuration Change Event 94 Credential Synchronization Configuration 94 Step 5: Mapping rules 94
Rule structure 95
Extended rule for Network Configuration Manager Device servers 96 Exclusions 98
Tips and tricks 99
Mapping NCM to Smarts 100
Mapping with topology split manager (TSM) 100
Configuring Service Assurance Manager (SAM) for contextual launch 101 Additional Required Configurations 102
Installing the contextual launch scripts for Smarts Manager 102 Setup for SAM GUI contextual launch 102
Setup for M&R GUI contextual launch 103 Client tools 104
NCM device Info client tool 104 NCM job info client tool 105 NCM Query Client Tool 105
Device communication report client tool 105 Device change report client tool 106
Device compliance report client tool 106 NCM Device query client tool 107
Configuring the Service Assurance Manager (SAM) dashboard (web client) 107 Advanced configuration 108
Customizing notifications 108 User-defined fields 108 Uninstall instructions 109
Linux 109
Uninstall instructions for client tools for Service Assurance Manager (SAM) 110
9
Integration modules configuration 111Integration adapters installation 112
Integration adapters configuration and management 112 JMiniX Console 112
Accessing the JMiniX Console 112
Updating configuration using the JMiniX Console 113 Starting or restarting integration modules 114 Integration adapters management operations 114 Managing events 115
Supported Events 116
The types of actions that can cause events to be fired 116 Transform Definition File 120
XPATH 121
CONSTANT 122
VARSTRING 122
VELOCITY 122
Flat File Integration adapters 123
Flat file Integration adapters assembly 123 Flat file integration adapters configuration 123 Tailoring the flat file integration adapters 124
Modifying the transform definition 124 Flat file integration adapters administration 125
Default file format 125
File locking considerations 126 File rolling considerations 127 Email Integration adapters 127
Email integration adapters assembly 128 Email Integration adapters configuration 128 Tailoring the email integration adapters 129 Generic SNMP Integration adapters 129
Generic SNMP integration adapters assembly 129 Generic SNMP integration adapters configuration 130 Tailoring the generic SNMP integration adapters 130 Launching the application through a URL 131
List of allowed query strings 131
10
Upgrade procedures (Linux platform) 133Overview 133
Upgrading using the graphical installer mode 133
Upgrading an existing version using the graphical installer mode 134 Upgrading using the console installer mode 135
Upgrading an existing version using the console based installer mode 136
Updating the privLevels.xml 137 Post upgrade procedures 137
Add distributed system hosts for remote servers (standard or advanced security) 138 Reset the JMX password 138
Reapply customizations to the system-config.xml file 138 Retain RSA users after the NCM upgrade 139
11
Retaining Report Advisor 14012
Backup and recovery 142Overview 142
Network Configuration Manager distributed architecture 143 Data locations 143
Backup utilities 144
Steps to backup and restore database in NCM 145
Steps to backup and restore database in NCM Combination setup 145 Steps to backup and restore database in NCM distributed setup 148 Customer responsibilities 151
Hot spare scenario 151
Backing up clustered and distributed database environments 152
13
Getting Started with Network Configuration Manager 153Accessing additional Network Configuration Manager publications 153 After installation—getting started using Network Configuration Manager 153
Tips: 154
Lightweight Directory Access Protocol (LDAP) 154
14
Maintaining the server 157Licensing 157
Obtaining a new license key 157 Installing a license key 158 Upgrading a license key 158
Using the runLicenseCmd script 158 The product serial number 158
Handling an expired license key 158 Command-line utilities 159
Extract config 159 Security 159
Backup and restore 159 Creating a data image 159 Restoring a data image 160
Purging device revisions and audit history 160 System services 161
Log files 161
Application server logs 161 Debug logging 162 Certificates 162
Installing Root CA certificate on the client 162 SSL Configuration—CA-signed certificates 162 Installing the private key and certificate 163 Changing the default from address 164
Changing the department and company name in the client Dashboard 164 Changing the default pull operation 165
Database vacuum 166
Searching for database tables to cleanup 166 Running a full database vacuum 167
Running a partial database vacuum 167 Disabling TCP Fusion 168
Password management 168
Changing passwords in Network Configuration Manager 168 Archiving data 169
Performance tweaks 169 Disclaimer 169
Switch between advanced and standard security modes 170 Switch from Standard Security to Advanced Security 170 Switch from Advanced Security to Standard Security 171 Location of IP addresses in Servers 172
Application server 172 Device server 172 Database server 172
15
Utilities 173Database Archive Utility 173
Usage 174
Arguments 174 Examples 175 Lockbox utility 175
Lockbox utility features 175 Encrypting functionality 176
Decrypting functionality (for system administrators only) 176 Unlocking functionality 176
Unlocking the lockbox using the passphrase 176
Introduction to Network
Configuration Manager
1
This chapter includes the following topics:
n What is Network Configuration Manager? n Where to get help
n About this manual
n Product installation directory n Deployment architecture
n Running a software prerequisites check n Product and version compatibility n Installation tasks
What is Network Configuration Manager?
n Network Configuration Manager is a network configuration management tool that gives you
the power to quickly, easily, and accurately design, modify, and maintain networks, using an intuitive graphical network view.
n Network Configuration Manager automates complex and routine engineering tasks, such as adding devices and connections, with drag-and-drop simplicity.
n Using real-time auto discovery of network devices and logical and physical topology
information, Network Configuration Manager provides a proactive configuration management approach.
Where to get help
Contact your VMware technical support professional if a product does not function properly or does not function as described in this document.
Note This document was accurate at publication time. Go to VMware Online Support docs.vmware.com to ensure that you are using the latest version of this document.
VMware support and product information can be obtained as follows: Product information
For documentation, release notes, software updates, or information about VMware products, go to VMware Online Support at:
support.vmware.com docs.vmware.com Technical support
Go to VMware Online Support and click Service Center. You will see several options for contacting VMware Technical Support. Note that to open a service request, you must have a valid support agreement. Contact your VMware sales representative for details about obtaining a valid support agreement or with questions about your account.
About this manual
This manual provides the following information and procedures necessary to install to Network Configuration Manager including:
n Deployment Architecture
n Installing Network Configuration Manager
n Post Installation Procedures n Maintaining the Server
n Uninstalling Network Configuration Manager Procedures
Product installation directory
In the install and uninstall instructions, the term [Product Directory] represents your actual installation directory. You must substitute [Product Directory] with your actual installation directory path. Ensure that the name of the [Product Directory] do not have spaces.
For Linux, you can determine your product installation directory by examining /etc/voyence.conf, and looking for the text VOYENCE_HOME.
Deployment architecture
The Network Configuration Manager can be deployed in a single-server model or a distributed model. The distributed model is often used by multi-national corporations or managed service providers with thousands of devices to manage.
n Single server deployment
n Combination server – One physical box serves as both the Application and Device server.
n Distributed deployment
n Application server—The server that handles the Graphical User Interface (GUI), and coordinates with the Device server to communicate with discovered devices. This server also serves as the repository for device configuration files.
n Device server—The communication portal between the Application server and the
network devices under management.
n Remote Database—A client computer monitored and professionally managed from a
remote location, usually by a third-party. (For Linux only). VMware Smart Assurance Network Configuration Manager Installation Guide
n Local Database—A database that is located on the Application server. Note
The installation must be repeated for each server. If you are installing a distributed server configuration, with separate Application server and Device servers, you must first install Network Configuration Manager on the Application server, and then install it on the Device servers.
You must use the same operating system for all Network Configuration Manager servers in order for NCM features to work properly. For example, if the Application Server (AS) is on Linux and the Device Server (DS) is on other platform, the Event Manager will not show the Key Strokes for Run Cut-thru.
Running a software prerequisites check
Note These steps are optional. The software prerequisites will be verified during a normal Network Configuration Manager installation.
A software prerequisite check verifies that the Network Configuration Manager software prerequisites are installed prior to installing Network Configuration Manager. These steps are strongly recommended.
Step Action
1 On the server where you want to install Network Configuration Manager software, log in with administrator privileges.
2 In the downloaded binary for the Network Configuration Manager product obtained from
support.vmware.com, navigate to the utils folder.
3 Type unzip prereq-check.zip to unzip the software prerequisite script, and press Enter.
3 Type perl prereq-check.pl <Server Type> to run the software prerequisite script, where <Server Type> is one of the values below.
n CS for Combination server
n AS for Application server
n DS for Device server
n DB for Database server
n RSA for RSA Token server
If successful, the script exits displaying the results of prerequisites check. If one or more software
prerequisites are missing or are the incorrect version, a message appears with instructions to fix the problems.
Product and version compatibility
Review the minimum system requirements mentioned in VMware Smart Assurance Network Configuration Manager Support Matrix document. The document provides information that helps you:
n Determine if the product is supported on your platform.
n Review the patch requirements for your operating system. n Determine if your system meets the hardware requirements.
Installation tasks
The recommended order of installation tasks for new installations is as follows: Step Task
1 Review the minimum system requirements mentioned in VMware Smart Assurance Network Configuration Manager Support Matrix document.
2 Install the operating system including any prerequisites.
Note Install the appropriate package groups for use with Network Configuration Manager.
3 Ensure all firewalls adhere to the Communication security settings mentioned in VMware Smart Assurance Network Configuration Manager Security Configuration Guide.
5 Install Network Configuration Manager.
Note If errors occur during installation, refer to the VMware Smart Assurance Network Configuration Manager Troubleshooting Guide for a list of solutions.
Step Task
6 Configure Network Configuration Manager using Chapter 4 Post-Installation procedures
7 Begin using Network Configuration Manager using the steps in Chapter 13 Getting Started with Network Configuration Manager .
Product installation directory
Note In the install and uninstall instructions, the term [Product Directory] represents your actual installation directory. You must substitute [Product Directory] with your actual installation
directory path. Ensure that the name of the [Product Directory] do not have spaces.
For Linux, you can determine your product installation directory by examining /etc/voyence.conf, and looking for the text VOYENCE_HOME.
Installation procedures (Linux
platform)
2
This chapter includes the following topics:
n Prerequisites and installation order
n Install Network Configuration Manager using graphical installer mode n Install Network Configuration Manager using console installer
n Install Network Configuration Manager using silent installer
Prerequisites and installation order
Prerequisites
The following conditions are required.
1 Install the Network Configuration Manager on a dedicated server and do not run other applications on that server.
2 Before you start the installation, ensure that you have proper FQDN set on the server where you are performing the installation.
To verify, run the hostname command and check if it is returning the server name with DNS. 3 Before you start the installation, ensure that no instance of Tomcat exists on the target
machine.
Note If an instance of Tomcat exists on the machine, you must remove it before proceeding with installation.
4 Before you start the installation, run the prereq-check.pl script to verify that all of the Network Configuration Manager software prerequisites are met.
Note It is strongly recommended to run the prereq-check.pl script on a server before installing any Network Configuration Manager software on that server.
For information about obtaining and running prereq-check.pl, see Running a software prerequisites check.
Order of installation
Follow these sections in the order mentioned to install Network Configuration Manager: 1 Install Combination or Application server using graphical installer
or
Install Combination, Application, and Database server using console installer 2 Add distributed system hosts for remote servers (standard or advanced security) 3 Export and import certificates for EDAA and Smarts Adapter
4 Import Network Configuration Manager Certificates for remote servers 5 Install a Device server using graphical installer
Install Network Configuration Manager using graphical
installer mode
This section describes how to use the graphical installer mode to install Network Configuration Manager. When installing Network Configuration Manager, the servers must be installed in the following order:
n Stand-alone Database server (if applicable)
n Combination server or Application server n Device server (if applicable)
The installation must be repeated for each server. If you are installing a distributed server configuration with separate Database server, Application server and Device servers, then:
n You must first install Network Configuration Manager on the Database server, followed by
installation on the Application server, and then install on the Device server.
Note At setup, the Device server registers itself with the Application server. Before installing the Device servers, ensure its corresponding Application server has the same date and time as the candidate Device server. If not, the Device server cannot communicate with the Application server resulting in the installation failure.
To start the installation, you have to run the script install.sh. When you run the script, the command prompt screen appears with four options:
n Type 1, and press Enter to install NCM Core product, and Device Drivers. n Type 2, and press Enter to install NCM Smarts Adapters.
n Type 3, and press Enter to install NCM Core product and NCM Smarts Adapters. n Type 4, and press Enter to exit the installation.
Install a Database server by using graphical installer
Note The graphical user interface (GUI mode) installer requires a connection to a running X server.
This section only applies to remote, stand-alone Database servers for use with Network Configuration Manager.
To install a stand-alone Database server using the graphical installer mode, follow these steps: Step Action
1 Log into the server as a user with administrator privileges.
2 Type bash install.sh –i gui to run the installer in the graphical installer mode, and press Enter. The command prompt screen appears:
n Type 1, and press Enter to install NCM Core product, and Device Drivers.
The installer begins to load. The install.sh script checks to ensure that all the prerequisites for the Network Configuration Manager are installed. The script automatically installs any missing prerequisites if the prerequisites are located in the Utils directory.
The Core Setup Installer begins to load. Core Setup Installer Procedures
3 The Introduction window opens.
Click Next at the Introduction window. Notice that as you go through the various steps needed to install, the navigation pane on the left keeps a running list of the completed steps. For example, you can see at the License Agreement window that the Introduction has been completed. A check (√) appears by each completed phase of the installation. The right arrow (►) indicates the current window and installation status. 4 The License Agreement window opens.
Read the license agreement, select I accept the terms of the License Agreement, and click Next. 5 The Server Configuration window opens.
Select Database server as your configuration type, and click Next.
6 The Choose Install Folder window opens. You are prompted to choose the Install Folder. Accept the default location, or click Choose and select another location.
Once the install folder is selected, click Next.
This is the location where Network Configuration Manager will be installed. 7 The Database Access List window opens.
Type the IP Address that needs access to the Database server, and click Next.
Step Action
9 The Database password window appears. Type a password for Database. The password must contain at least: n One letter in upper case
n One letter in lower case n One special character n One numerical
n Minimum fifteen characters
The special characters that can be used for the database password are: n Tilde (~)
n Exclamation (!) n At (@) n Number (#) n Percent (%)
Note It is recommended that the password must not start or end with a special character. 10 The Summary window displays the product information, as well as the required disk space.
Click Install to start the installation. This portion of the installation may take several minutes. When complete, the Install Complete window opens.
11 Install Combination or Application server as described in “Install Combination or Application server using
graphical installer” on page75.
Install Combination or Application server using graphical installer
Note The graphical user interface (GUI mode) installer requires a connection to a running X server.
To install a Combination or Application server using the graphical installer mode, follow these steps:
Step Action
1 Log into the server as a user with administrator privileges.
2 Type bash install.sh –i gui to run the installer in the graphical installer mode,and press Enter. The command prompt screen appears:
n Type 1, and press Enter to install NCM Core product, and Device Drivers.
The installer begins to load. The install.sh script checks to ensure that all the prerequisites for the Network Configuration Manager are installed. The script automatically installs any missing prerequisites if the prerequisites are located in the Utils directory.
The Core Setup Installer begins to load. Core Setup Installer Procedures
3 The Introduction window opens. Click Next at the Introduction window.
Notice that as you go through the various steps needed to install, the navigation pane on the left keeps a running list of the completed steps. For example, you can see at the License Agreement window that the Introduction has been completed. A check (√) appears by each completed phase of the installation. The right arrow (►) indicates the current window and installation status.
Step Action
4 The License Agreement window opens.
Read the license agreement, select I accept the terms of the License Agreement, and click Next. 5 The Server Configuration window opens.
Select the server you want to install, and click Next.
6 The Choose Install Folder window opens. You are prompted to choose the Install Folder. n Accept the default location, or click Choose and select another location.
n Once the install folder is selected, click Next.
This is the location where Network Configuration Manager will be installed. n If you are installing Application server, proceed to step “11”.
7 Note This step only appears if the httpd.conf directory is not in the default location.
The httpd.conf Location window opens. You are now prompted to choose the httpd.conffile location. n Accept the default location, or click Choose and select another location.
n Once the httpd.conf file location is selected, click Next. This is where the Apache configuration file httpd.conf is located.
8 Note This step only appears if the Java directory is not in the default location. The Java Location window opens. You are now prompted to choose the Java directory. n Accept the default location, or click Choose and select another location.
n Once the Java directory is selected, click Next. This is the location where the Java application is installed.
9 Note This step only appears if the Tomcat directory is not in the default location.
The Tomcat Location window opens. You are now prompted to choose the Tomcat directory. n Accept the default location, or click Choose and select another location.
n Once the Tomcat directory is selected, click Next. This is the location where the Tomcat application is installed. Note If you are installing Application server, proceed to step “11”. 10 The Combo Server Alias window opens.
Enter an Alias for the Combination server and click Next.
This alias displays in the System Administration portion of Network Configuration Manager. This alias must not contain spaces or special characters.
11 The Database Configuration window opens.
n The Database Configuration window lets you specify whether the database is running locally to the Application or Combination server or remotely. Select one of the following options:
n Select local to run the database on the same server as the application.
n Select remote to run the database on a separate server. If you select remote, the separate Database server must already be installed and available over the network, and you must type the IP address of the Database server.
n Click Next.
Step Action
12 The Watch4net configuration requirement check window appears.
n Select Yes to configure the Network Configuration Manager Reporting SolutionPack and click Next. n Select No to continue without configuring Network Configuration Manager Reporting SolutionPack.
“Configuring EMC M&R server” on page120 provides instructions on configuring Watch4net server post
Network Configuration Manager installation.
13 The Watch4net Server IP address window appears. Type the Watch4net Server IP address and click Next. Note Do not enter the server name or FQDN.
14 The License Key window opens. You are now prompted to Choose the License Key File.
n Click Choose, and select another location. Make the needed selection, then click Select when you have completed selecting another file.
n Type the Company Name you want displayed on the main screen of the application.
n Type the Department/Division name you want displayed on the main screen of the application. This field is optional.
n Click Next.
Note If you are installing Application server, proceed to step “17”. 15 The Root CA Certificates window opens.
n To import a 3rd party root CA certificate, select Yes, or to accept the default certificate, select No.
Note Root CA certificates should only need to be imported if a 3rd party SSL certificate is used in the Network Configuration Manager configuration.
16 The Certificate password window appears. Type a password for Certificate. The password must contain at least:
n One letter in upper case n One letter in lower case n One special character n One numerical
n Minimum fifteen characters
Note The password must not start or end with a special character. Special characters that can be used for the certificate password are: n Tilde (~)
n Exclamation (!) n At (@) n Number (#) n Percent (%)
17 If you selected Yes in the previous step, you are prompted to select the file containing the Root CA certificate. Click Next to continue. At the end of this step, you are able to import additional certificates, if needed. 18 The Email Configuration window opens.
n Enter a From Address for the email notifications that come from the server. This is the email address where the job notifications are sent from.
n Enter a FQDN or IP Address for the outbound SMTP mail server. n Click Next.
Step Action
19 The Lockbox passphrase window appears. Type a passphrase for Lockbox. The passphrase must contain at least:
n One letter in upper case n One letter in lower case n One special character n One numerical
n Minimum fifteen characters
The special characters that can be used for the lockbox passphrase are: n Tilde (~)
n At (@) n Number (#) n Percent (%) n Exclamation (!)
Note It is recommended that the passphrase must not start or end with a special character. 20 The Security Questions window appears. Type the answers for the security questions and click Next.
21 The Encryption Key store option window appears. Choose a location where NCM should store the encryption key that is used to encrypt and decrypt data. The options are:
n 1 for Standard Security – Key stored encrypted in a flat file n 2 for Advanced Security – Key stored in RSA Lockbox
Note If you return to this window later during the installation process, the option you selected will be displayed in encrypted format (not in clear text).
22 The Database password window appears. Type a password for Database. The password must contain at least: n One letter in upper case
n One letter in lower case n One special character n One numerical
n Minimum fifteen characters
The special characters that can be used for the database password are: n Tilde (~)
n Exclamation (!) n At (@) n Number (#) n Percent (%)
Note It is recommended that the password must not start or end with a special character. 23 The Summary window displays the product information, as well as the required disk space.
Click Install to start the installation. This portion of the installation may take several minutes. When complete, the Device Driver Installer begins to load.
Note If there is not enough available disk space, the installer displays an error message until sufficient disk space is free. You can continue once enough disk space is available.
Device Driver Installer Procedures
Step Action
24 While the Device Driver installer is running, a progress bar displays the install status. This portion of the installation may take several minutes.
Note During installation of the device drivers, the files in the custompackage directory that matches the files in the device drivers directory are listed. These files will override similar files in the device drivers directories. For example, if you have modified the file stdfuncs.inc for CiscoIOSRouter, it would be placed in the custom package directory and will override the same file in the /opt/voyence/package/cisco/ios directory. After installing Combination server or Application server
26 Add distributed system hosts to the lockbox for remote servers.
Lockbox utility
Lockbox utility provides increased security for data. The lockbox is a file that serves as a local repository for storing the passphrase which is used for encryption of sensitive data such as user credentials. The encryption algorithm is upgraded from Blowfish to AES. The lockbox file can be opened only on the machine on which it is created.
Lockbox utility provides more information for Lockbox utility functionalities.
Add distributed system hosts for remote servers (standard or
advanced security)
Use the following steps to add distributed system hosts:
1 If you choose Standard Security mode during AS installation, copy lockb.ekey from [product directory]/data in the AS to [product directory]/data on the remote server (DS, RA, or Database).
2 If you chose Advanced Security mode during AS installation: 3 On the Application server, go to [Product directory]/bin directory. 4 Source the voyence.conf file
source /etc/voyence.conf
5 Add distributed system hosts to the lockbox using the cstdriver utility:
./cstdriver -lockbox [Product directory]/data/lockb.clb -passphrase <passphrase> -addHost <FQDN of Database server> ./cstdriver -lockbox [Product directory]/data/lockb.clb -passphrase <passphrase> -addHost <FQDN>
./cstdriver -lockbox [Product directory]/data/lockb.clb -passphrase <passphrase> -addHost <FQDN of Device server>
6 Go to [Product directory]/data directory.
8 For example:
scp lockb.clb Host2_DB_Server:/root/ scp lockb.clb Host3_Device_Server:/root/
Next step, go to Export and import certificates for EDAA and Smarts Adapter.
Export and import certificates for EDAA and Smarts Adapter
For establishing a secure connection to the Network Configuration Manager server:1 From the Network Configuration Manager Application or Combination server, export the self signed certificate from [Product Directory]/conf/voyence-ssl.keystore to a file using the steps:
a source /etc/voyence.conf
b $JAVA_HOME/bin/keytool -export -keystore [Product directory]/conf/voyence-ssl.keystore -alias selfsigned -file <CERTIFICATE>
To find the location of JAVA_HOME, type the command echo $JAVA_HOME. Ensure that
JAVA_HOME is pointing to the right version of Java. For example, <<VOYENCE_HOME>>/java.
Note <CERTIFICATE> can be any name and it is the file that is created from the export. c Press Enter without entering a password.
2 Import the self signed certificate from the file <CERTIFICATE>.
$JAVA_HOME/bin/keytool keystore $JAVA_HOME/jre/lib/security/cacerts import file <CERTIFICATE> -alias selfsigned
3 Type the password changeit during the prompt.
4 This is the default password, unless otherwise modified.
5 Type Yes and click Enter when the Trust the certificate prompt appears. To view the imported certificate, type:
$JAVA_HOME/bin/keytool -keystore $JAVA_HOME/jre/lib/security/cacerts -list -alias selfsigned
Import Network Configuration Manager Certificates for remote
servers
For establishing a secure connection from Application server to remote Device server, you have to get the certificates from the Application server.
Follow these steps to get the certificates from Application server: 1 On a Linux server, run the command
# source /etc/voyence.conf
2 Go to [Product directory]/conf directory.
Install a Device server using graphical installer
Note The graphical user interface (GUI mode) installer requires a connection to a running X server.
If you are installing a distributed server configuration, with separate Application server and Device servers, you must first install Network Configuration Manager on the Application server, and then install it on the Device servers.
Note Before installing Device servers, ensure the Application or Combination servers have the same date and time as the candidate Device server. If not, the Device server will not be able to register with the Application or Combination servers, and the installation will fail.
If the Device server cannot communicate with the Application server, this step fails, and you must reinstall the Device server.
To install a Device server using the graphical installer mode, follow these steps: Step Action
1 Log into the server as a user with administrator privileges.
2 Type bash install.sh –i gui to run the installer in the graphical installer mode, and press Enter. The command prompt screen appears:
n Type 1, and press Enter to install NCM Core product, and Device Drivers.
The installer begins to load. The install.sh script checks to ensure that all the prerequisites for the Network Configuration Manager are installed. The script automatically installs any missing prerequisites if the prerequisites are located in the Utils directory.
The Core Setup Installer begins to load. Core Setup Installer Procedures
3 The Introduction window opens.
Click Next at the Introduction window. Notice that as you go through the various steps needed to install, the navigation pane on the left keeps a running list of the completed steps. For example, you can see at the License Agreement window that the Introduction has been completed. A check (√) appears by each completed phase of the installation. The right arrow (►) indicates the current window and installation status. 4 The License Agreement window appears.
Read the license agreement, select I accept the terms of the License Agreement, and click Next. 5 The Server Configuration window opens.
Select Device server as your configuration type, and click Next.
Note When installing a Device server, you must install the Application server first, and have it running and available to the Device server over the network.
Step Action
6 The Choose Install Folder window opens. You are prompted to choose the Install Folder. n Accept the default location, or click Choose and select another location.
n Once the install folder is selected, click Next.
This is the location where Network Configuration Manager will be installed.
7 Note This step only appears if the httpd.conf directory is not in the default location.
The httpd.conf Location window opens. You are now prompted to choose the directory where httpd.conf is located.
n Accept the default location, or click Choose and select another location. n Once the httpd.conf file location is selected, click Next.
This is where the Apache configuration file httpd.conf is located.
8 Note This step only appears if the Java directory is not in the default location.
The Java Location window opens. You are now prompted to choose the Java directory. n Accept the default location, or click Choose and select another location.
n Once the Java directory is selected, click Next. This is the location where the Java application is installed.
9 Note This step only appears if the Tomcat directory is not in the default location.
The Tomcat Location window opens. You are now prompted to choose the Tomcat directory. n Accept the default location, or click Choose and select another location.
n Once the Tomcat directory is selected, click Next. This is the location where the Tomcat application is installed. 10 The Application server IP window opens.
n Enter an IP Address for the Application server, and click Next.
11 The Device server Alias window opens.
n Enter an Alias for the Device server and click Next.
This alias appears in the System Administration portion of Network Configuration Manager. This alias must not contain spaces or special characters.
12 The Root CA Certificates window opens. To import a 3rd party root CA certificate, select Yes, or to accept the default certificate, select No.
Note Root CA certificates should only need to be imported if a 3rd party SSL certificate is used in the Network Configuration Manager configuration.
13 If you selected Yes in the previous step, you are prompted to select the file containing the Root CA certificate. Click Next to continue. At the end of this step, you are able to import additional certificates, if needed.
Note If there is not enough available disk space, the installer displays an error message until sufficient disk space is free. You can continue once enough disk space is available.
14 The Certificate file location window appears. Provide the path for the certificate file bundle.p12 that was copied earlier and click Next.
15 The Password for certificate window appears. Type the same password that you entered while installing Application server and click Next.
Step Action
16 Note You must perform this step irrespective of the mode of security you selected during the installation. The lockbox file location window appears. Provide the path to the lockbox file lockb.clb that was copied earlier and click Next.
17 The database password window appears. Type the same password that you entered while installing Application or Database server and click Next.
18 The Summary window displays the product information, as well as the required disk space. Click Install to start the installation. This portion of the installation may take several minutes.
When complete, the Device Driver Installer begins to load. Device Driver Installer Procedures
19 While the Device Driver installer is running, a progress bar displays the install status. This portion of the installation may take several minutes.
The installer displays the installation complete message.
Note During installation of the device drivers, the files in the custompackage directory that matches the files in the device drivers directory are listed. These files will override similar files in the device drivers directories. For example, if you have modified the file stdfuncs.inc for CiscoIOSRouter, it would be placed in the custom package directory and will override the same file in the /opt/smarts-ncm/package/cisco/ios directory.
Next step, go to Chapter 4 Post-Installation procedures.
Install Network Configuration Manager using console
installer
This section describes how to use the console-based installer to install Network Configuration Manager. When installing Network Configuration Manager, the servers must be installed in the following order.
n Stand-alone Database server (if applicable)
n Combination server or Application server n Device server (if applicable)
The installation must berepeated for each server. If you are installing a distributed server configuration, with separate Application server and Device servers, you must first install Network Configuration Manager on the Application server, and then install Network Configuration Manager on the Device servers.
Note At setup, the Device server registers itself with the Application server. Before installing the Device servers, ensure the Application or Combination servers have the same date and time as the candidate Device server. If not, the Device server cannot communicate with the Application server, this step fails, and you must reinstall the Device server.
To start the installation, you have to run the script install.sh. When you run the script, the command prompt screen appears with four options:
n Type 1, and press Enter to install NCM Core product, and Device Drivers. n Type 2, and press Enter to install NCM Smarts Adapters.
n Type 3, and press Enter to install NCM Core product and NCM Smarts Adapters. n Type 4, and press Enter to exit the installation.
Install Combination, Application, and Database server using console
installer
To install a Combination, Application, and Database server using the console installer mode, follow these steps:
Step Action
1 Log into the server as the root user.
2 Type bash install.sh –i console to run the installer in the console-based installer mode, and press Enter. The command prompt screen appears:
n Type 1, and press Enter to install NCM Core product, and Device Drivers.
The installer begins to load. The install.sh script checks to ensure that all the prerequisites for the Network Configuration Manager are installed. The script automatically installs any missing prerequisites if the prerequisites are located in the Utils directory.
The Core Setup Installer begins to load. Core Setup Installer Procedures
3 The introduction to the installer appears. Press Enter to continue.
4 The License Agreement appears.
Read the license agreement. Press Enter, and continue to press Enter to move through each page of the license agreement until you reach the final page.
5 On the final page of the license agreement, type Y, and press Enter to accept the terms of the license agreement.
6 The installer prompts you to select a server configuration. Type 1, and press Enter to select Combination server. Type 2, and press Enter to select Application server. Type 4, and press Enter to select Database server. 7 The installer prompts you to choose an install folder.
Press Enter to accept the default, or enter a location for the install folder. This is the location where Network Configuration Manager will be installed. If you are installing Combination server, proceed to step “9”
If you are installing Application server, proceed to step “13”.
8 For Database server installation only:
The installer prompts you for the Database Access List IP Address.
Type the IP Address that needs access to the Database server and Press Enter. Proceed to step “14”.
Step Action
9 Note This step only appears if the httpd.conf directory is not in the default location. The installer prompts you for the directory where httpd.conf is located.
Press Enter to accept the default, or type the location of the httpd.conf file. This is where the Apache configuration file httpd.conf is located.
10 Note This step only appears if the Java directory is not in the default location. The installer prompts you for the directory where Java is located.
Press Enter to accept the default, or type the location of the Java directory. This is the location where the Java application is installed.
11 Note This step only appears if the Tomcat directory is not in the default location. The installer prompts you for the directory where Tomcat is located.
Press Enter to accept the default, or type the location of the Tomcat directory. This is the location where the Tomcat application is installed.
Note If you are installing Application server, proceed to step “13”.
12 For Combination server installation only:
The installer prompts you for the combination server alias.
Press Enter to accept the default, or enter an Alias for the Combination server.
This alias displays in the System Administration portion of Network Configuration Manager. This alias must not contain spaces or special characters.
13 The installer prompts you for the database configuration type.
n The Database Configuration screen lets you specify whether the database is running locally to the Application or Combination server or remotely. Select one of the following options:
n Press Enter to select local (the default) to run the database on the same server as the application. n Type 2 to select remote to run the database on a separate server. If you select remote, the separate
Database server must already be installed and available over the network. The default option is local. If you select remote, you will be prompted for the IP address of the Database server.
n Press Enter.
14 The installer prompts you for the Reports server configuration type. Select one of the following options:
n Press Enter to select local to run the reporting server on the same server as the application. n Type 2 to select remote to run the reporting server on a separate server and press Enter. For Database server installation, proceed to step “27”.
15 The installer prompts you for Watch4net configuration requirement check.
n Select Yes to configure the Network Configuration Manager Reporting SolutionPack and press Enter. n Select No to continue without configuring Network Configuration Manager Reporting SolutionPack.
“Configuring EMC M&R server” on page120 provides instructions on configuring Watch4net server post
Network Configuration Manager installation.
16 The installer prompts you for the Watch4net server IP address. Type the Watch4net server IP address and press Enter.
17 The installer prompts you for the License Key.
Step Action
18 The installer prompts you to enter a company name.
Press Enter to accept the default, or type the company name you want displayed on the main screen of the application.
19 The installer prompts you to enter a department or division name.
Type the department or division name you want displayed on the main screen of the application, and press Enter. This field is optional.
Note If you are installing Application server, proceed to step “21”.
20 For Combination server installation only:
The installer prompts you to import root CA certificates.
If you have any root CA certificates to import, type the appropriate number, and then press Enter. 21 The installer prompts for a password for Certificate. Type a password for Certificate.
The password must contain atleast: n One letter in upper case n One letter in lower case n One special character n One numerical
n Minimum fifteen characters
Note The password must not start or end with a special character. Special characters that can be used for the certificate password are: n Tilde (~)
n Exclamation (!) n At (@) n Number (#) n Percent (%)
22 The installer prompts you to enter an Email From address.
Press Enter to accept the default, or enter a From Address for the email notifications that come from the server.
This is the email address where the job notifications are sent from.
23 Enter a FQDN or IP Address for the outbound SMTP mail server, and press Enter.
Step Action
24 The installer prompts for a lockbox passphrase. Type a passphrase for Lockbox. The passphrase must contain at least:
n One letter in upper case n One letter in lower case n One special character n One numerical
n Minimum fifteen characters
Note It is recommended that the passphrase must not start or end with a special character. The special characters that can be used for the lockbox passphrase are:
n Tilde (~) n At (@) n Number (#) n Percent (%) n Exclamation (!)
If you use an Exclamation (!) in the lockbox passphrase, enclose the passphrase within single quotes, for example, 'Test!1234567890'. This is applicable only if the passphrase needs to be typed in the command line. Example:
./cstdriver -lockbox /opt/smarts-ncm/data/lockb.clb -passphrase 'Test!1234567890' -addHost linbgh130.lss.vmware.com
If you have not used an Exclamation (!) in the lockbox passphrase, then the lockbox passphrase need not be enclosed within single quotes, for example, Test@1234567890 does not need to be enclosed within single quotes.
Note Use single quotes to unlock the lockbox from the command line. Do not use single quotes during installation.
25 The installer prompts for answers to the security questions. Type the answers for the security questions and press Enter.
26 The installer prompts you to select an Encryption Key store option. Type a location where NCM should store the encryption key that is used to encrypt and decrypt data. The options are:
n 1 for Standard Security – Key stored encrypted in a flat file n 2 for Advanced Security – Key stored in RSA Lockbox
Note If you return to this window later during the installation process, the option you selected will be displayed in encrypted format (not in clear text).
27 The installer prompts for a database password. Type a password for Database. The password must contain minimum fifteen characters. The special characters that can be used for the database password are: n Tilde (~)
n Exclamation (!) n At (@) n Number (#) n Percent (%)
Step Action
28 The Summary window displays the product information (before installing), as well as the required disk space. Press Enter to start the installation. This portion of the installation may take several minutes.
Note If there is not enough available disk space, the installer displays an error message until sufficient disk space is free. You can continue once enough disk space is available.
Device Driver Installer Procedures
29 While the Device Driver installer is running, a progress bar displays the install status. This portion of the installation may take several minutes.
Note During installation of the device drivers, the files in the custompackage directory that matches the files in the device drivers directory are listed. These files will override similar files in the device drivers directories. For example, if you have modified the file stdfuncs.inc for CiscoIOSRouter, it would be placed in the custom package directory and will override the same file in the /opt/voyence/package/cisco/ios directory. After installing Combination server or Application server
31 Add distributed system hosts to the lockbox for remote servers.
Lockbox utility
Lockbox utility provides increased security for data. The lockbox is a file that serves as a local repository for storing the passphrase which is used for encryption of sensitive data such as user credentials. The encryption algorithm is upgraded from Blowfish to AES. The lockbox file can be opened only on the machine on which it is created.
Lockbox utility provides more information for Lockbox utility functionalities.
Add distributed system hosts for remote servers (standard or
advanced security)
Use the following steps to add distributed system hosts.
1 If you chose Standard Security mode during AS installation, copy lockb.ekey from [product directory]/data in the AS to [product directory]/data on the remote server (DS or Database). 2 If you chose Advanced Security mode during AS installation:
3 On the Application server, go to [Product directory]/bin directory. 4 Source the voyence.conf file
source /etc/voyence.conf
5 Add distributed system hosts to the lockbox using the cstdriver utility:
./cstdriver -lockbox [Product directory]/data/lockb.clb -passphrase <passphrase> -addHost <FQDN of Database server>
./cstdriver -lockbox [Product directory]/data/lockb.clb -passphrase <passphrase> -addHost <FQDN>
./cstdriver -lockbox [Product directory]/data/lockb.clb -passphrase <passphrase> -addHost <FQDN of Device server>
6 Go to [Product directory]/data directory.
7 Copy the lockbox file to any directory on each of the distributed system hosts. 8 For example:
scp lockb.clb Host2_DB_Server:/root/ scp lockb.clb Host3_Device_Server:/root/
Import Network Configuration Manager Certificates for remote
servers
For establishing a secure connection from Application server to remote Device server, you have to get the certificates from the Application server.
Follow these steps to get the certificates from Application server: 1 On a Linux server, run the command
# source /etc/voyence.conf
2 Go to [Product directory]/conf directory.
3 Copy the bundle.p12 certificate file to remote Device server. For example:
scp bundle.p12 Host3_Device_Server:/root/
Next step, go to Export and import certificates for EDAA and Smarts Adapter.
Export and import certificates for EDAA and Smarts Adapter
For establishing a secure connection to the Network Configuration Manager server:1 From the Network Configuration Manager Application or Combination server, export the self signed certificate from [ProductDirectory]/conf/voyence-ssl.keystore to a file using the steps:
2 source /etc/voyence.conf
3 $JAVA_HOME/bin/keytool export keystore [Product directory]/conf/voyencessl.keystore -alias selfsigned -file <CERTIFICATE>
To find the location of JAVA_HOME, type the command echo $JAVA_HOME. Ensure that JAVA_HOME is pointing to the right version of Java. For example, <<VOYENCE_HOME>>/ java.
Note <CERTIFICATE> can be any name and it is the file that is created from the export. Press Enter without entering a password.
4 Import the self signed certificate from the file <CERTIFICATE>.
$JAVA_HOME/bin/keytool keystore $JAVA_HOME/jre/lib/security/cacerts import file <CERTIFICATE> -alias selfsigned
5 Type the password changeit during the prompt.
6 This is the default password, unless otherwise modified.
7 Type Yes and click Enter when the Trust the certificate prompt appears. To view the imported certificate, type:
$JAVA_HOME/bin/keytool -keystore $JAVA_HOME/jre/lib/security/cacerts -list -alias selfsigned
Next step, install the Device server as described in “Install a Device server using console
installer” on page95.
Install a Device server using console installer
If you are installing a distributed server configuration, with separate Application server and Device servers, you must first install Network Configuration Manager on the Application server, and then install it on the Device servers.
Note Before installing Device servers, ensure the Application or Combination servers have the same date and time as the candidate Device server. If not, the Device server will not be able to register with the Application or Combination servers, and the installation will fail.
To install a Device server using the console-based installer, follow these steps: Step Action
1 Log into the server as the root user.
2 Type bash install.sh –i console to run the installer in the console-based installer mode, and press Enter. The command prompt screen appears:
n Type 1, and press Enter to install NCM Core product, and Device Drivers.
The installer begins to load. The install.sh script checks to ensure that all the prerequisites for the Network Configuration Manager are installed. The script automatically installs any missing prerequisites if the prerequisites are located in the Utils directory.
The Core Setup Installer begins to load. Core Setup Installer Procedures
Step Action
3 The introduction to the installer appears. Press Enter to continue.
4 The License Agreement appears.
Read the license agreement. Press Enter, and continue to press Enter to move through each page of the license agreement until you reach the final page.
5 On the final page of the license agreement, type Y, and press Enter to accept the terms of the license agreement.
6 The installer prompts you to select a server configuration.
Enter 3, and press Enter to select Device server as your configuration type. 7 The installer prompts you to choose an install folder.
Press Enter to accept the default, or enter a location for the install folder. This is the location where Network Configuration Manager will be installed.
8 Note This step only appears if the httpd.conf directory is not in the default location. The installer prompts you for the directory where httpd.conf is located.
Press Enter to accept the default, or type the location of the httpd.conf file. This is where the Apache configuration file httpd.conf is located.
9 Note This step only appears if the Java directory is not in the default location. The installer prompts you for the directory where Java is located.
Press Enter to accept the default, or type the location of the Java directory. This is the location where the Java application is installed.
10 Note This step only appears if the Tomcat directory is not in the default location. The installer prompts you for the directory where Tomcat is located.
Press Enter to accept the default, or type the location of the Tomcat directory. This is the location where the Tomcat application is installed.
11 The installer prompts you for the Application server IP.
Enter an IP Address for the Application server, and press Enter.
If you are installing Device server with a Cluster installation, then enter an IP Address for the active Network Configuration Manager Application server cluster, and press Enter.
The Device servers will be set to the appropriate node when the clustered Application server becomes active. Do not type the virtual IP address of the cluster.
12 The installer prompts you for the Device server alias.
Press Enter to accept the default, or enter an Alias for the Combination server.
This alias appears in the System Administration portion of Network Configuration Manager. This alias must not contain spaces or special characters.
13 The installer prompts you to import root CA certificates.
If you have any root CA certificates to import, provide the path for certificate root CA certificate file and then press Enter.
14 The installer prompts for Certificate file location. Provide the path for the certificate file bundle.p12 and press Enter.
15 The installer prompts for a password for Certificate. Type the same password that you entered while installing Application server and press Enter.
Step Action
16 Note You must perform this step irrespective of the mode of security you selected during the installation. The installer prompts for lockbox file location. Provide the path to the lockbox file lockb.clb that was copied earlier and press Enter.
17 The installer prompts for a database password. Type the same password that you entered while installing Application or Database server and press Enter.
18 The Summary window displays the product information (before installing), as well as the required disk space. Press Enter to start the installation. This portion of the installation may take several minutes.
When complete, the Device Driver Installer begins to load. Device Driver Installer Procedures
19 While the Device Driver installer is running, a progress bar displays the install status. This portion of the installation may take several minutes.
The installer displays the installation complete message.
Note During installation of the device drivers, the files in the custompackage directory that matches the files in the device drivers directory are listed. These files will override similar files in the device drivers directories. For example, if you have modified the file stdfuncs.inc for CiscoIOSRouter, it would be placed in the custom package directory and will override the same file in the /opt/smarts-ncm/package/cisco/ios directory. 20 If you had chosen Standard Security mode during AS installation, copy lockb.ekey from [product directory]
\data in the AS to [product directory]\data in DS. Change ownership of the file to root:cst.
Next step, go to Chapter 4 Post-Installation procedures.
Install Network Configuration Manager using silent installer
The Network Configuration Manager installer allows you to supply a configuration file containing the variables necessary for an installation, also known as a silent installation.
A sample configuration file is supplied in the following directory of the Network Configuration Manager distribution: silent-install.properties available in the Utils directory.
Creating the configuration file for a silent installation
Note Before you can run a silent installation, you must create a configuration file that the installer uses to complete your installation.
To create a configuration file, follow these steps:
Step Action
1 Copy the sample configuration file from the distribution (silent-install.properties) to a directory on the server where you are installing Network Configuration Manager.
2 Use the vi command to modify this file.
3 Define each of the properties in this file for your server type, according to the table below. Note Errors occur during installation if all required properties do not contain a value.
4 Save your changes to the file.
You are now ready to install Network Configuration Manager in silent mode.
Configuration parameters
Property Description
Applicable server configurations
API_VERSION Defines the versions of the API to install.
Note For maximum compatibility, it is highly recommended that 9.1 be selected. (space delimited if entering more than one version)
AS, CS
APPLICATION_SERVER_IP If you are installing a Device server, this property defines the IP address of the associated Application server. The
Application server must be installed, running, and available over the network before installing the Device server. If you are not installing a Device server, any value entered for this property is ignored.
DS
CERT_FILE Defines the location of the Certificate file. CERT_FILE=<FilePathFull>
DS
COMPANY_NAME Defines the company name that displays on the main screen of the application.
AS, CS
CRED_MODE Defines the Privilege Password Mode for Network Configuration Manager. Valid values are the following: Single-Level—Network Configuration Manager users accustomed to the previous credentials system should select this option.
Multi-Level—This mode allows multiple leveled privileged passwords to be created and associated within the Network Configuration Manager application.
Note that this setting is permanent.