KHARKIV NATIONAL UNIVERSITY OF RADIO ELECTRONICS
INFORMATICS
LABORATORY WORK #3
PICTURE VIEWER CREATION
Associate Professor A.S. Eremenko,
Lab work 3 – Picture viewer creation 2 Informatics LAB 3
Picture viewer creation
In this lab, you build a program that loads a picture from a file and displays it in a window. You learn how to drag controls like buttons and picture boxes on your form, set their properties, and use containers to smoothly resize the form. You also get started writing code. You learn how to:
Create a new project.
Test (debug) an application.
Add basic controls like check boxes and buttons to a form. Position controls on a form using layouts.
Add Open File and Color dialog boxes to a form. Write code using IntelliSense and code snippets. Write event handler methods.
When you finish, your program will look like the following picture.
Step 1: Create a Windows Forms Application Project
To create a Windows Forms application project: 1. On the File menu, click New Project.
2. If you’re not using Visual Studio Express, you need to select a language first. From the
Installed Templates list, select C#.
3. Click the Windows Forms Application icon, enter PictureViewer as the name, and then click OK. Visual Studio automatically creates the solution for you.
4. On the File menu, click Save All, or on the toolbar, click the Save All button, which appears as follows.
5. Make sure the project is saved in a folder under your My Documents folder. 6. Verify that the Create Directory for Solution check box is selected.
7. Click Save.
8. If your screen doesn't look like figure 1, on the Window menu, click Reset Window Layout. If any of the windows are missing, on the View menu, click Properties Window or Solution Explorer. If there's an extra window open, click the Close (x) button in the upper right.
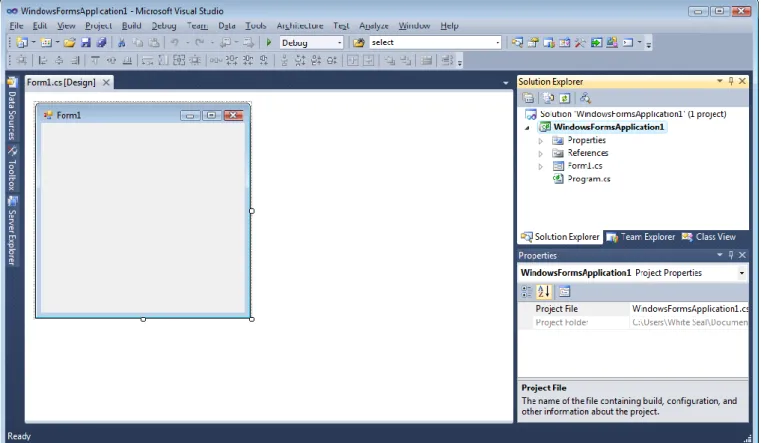
9. Look at the figure 1. From the upper left and going clockwise, the figure shows:
Main window. This is where you do most of your work. You use this window to work with forms and edit code. Currently, it shows a form in the Form Editor. At the top of the window, there are two tabs: the Start Page tab and the Form1.cs [Design] tab.
Lab work 3 – Picture viewer creation 3
double-click a code file (which ends in .cs in Visual C#), the code file or a designer for the code file opens.
Properties window. This is where you change the properties of items that you select in the other windows.
Figure 1 – IDE window
Step 2: Run your program
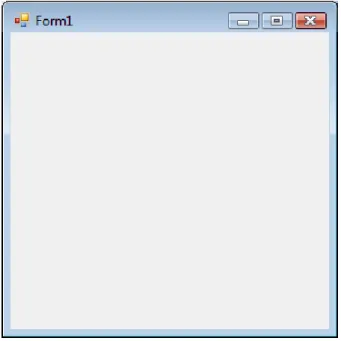
When you created a new solution, you actually built a program that runs. It doesn't do much yet –it just displays an empty window that shows Form1 in the title bar. But it does run, as you're about to find out.
To run your program
1.Press the F5 key or click the Start Debugging toolbar button.
Lab work 3 – Picture viewer creation 4
Figure 2 – Windows Form application program running
3.Go back to the IDE, and look at the new toolbar.
Figure 3 – Debugging toolbar
4.Click the square Stop Debugging button or from the Debug menu, click Stop Debugging. The program stops running, and the window closes. You can also just close the open window to stop debugging.
Step 3: Set your form properties
To set your form properties
1. Be sure you're looking at Windows Forms Designer. In the IDE, click the Form1.cs [Design] tab.
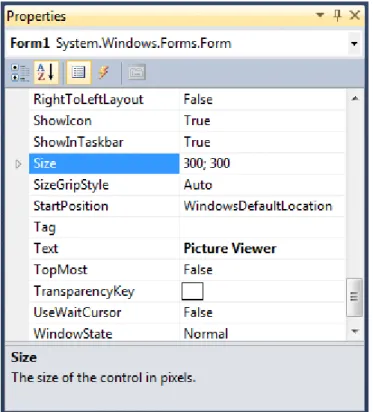
2. Click anywhere inside the form to select it. Look at the Properties window, which should now be showing the properties for the form. Forms have various properties. For example, you can set the foreground and background color, title text that appears at the top of the form, size of the form, and other properties.
Lab work 3 – Picture viewer creation 5
should now have the text Picture Viewer in its title bar, and the Properties window should look like the following picture.
Figure 4 – Properties window
4. Go back to Windows Forms Designer. Click the form's lower-right drag handle, which is the small white square in the lower-right of the form and appears as follows.
Lab work 3 – Picture viewer creation 6
Drag it to resize the form so the form is wider and a bit taller.
5. Look at the Properties window, and notice that the Size property has changed. The
Size property changes each time you resize the form. Try dragging the form to resize it to a form size of approximately 550, 350, which should work well for this project.
6. Run your program again. Press the F5 key or click the Start Debugging toolbar button. Just like before, the IDE builds and runs your program, and a window appears. 7. Before going to the next step, stop your program, because the IDE won't let you change your program while it's running.
Step 4: Lay out your form with a TableLayoutPanel control
In this step, you add a TableLayoutPanel control to your form.
To lay out your form with a TableLayoutPanel control:
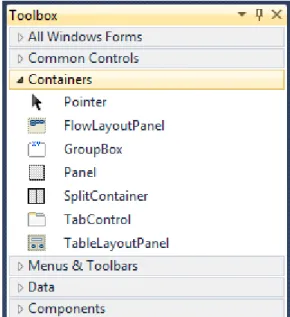
1. Go to Windows Forms Designer. Look at the left side of the form and locate the Toolbox tab. Point to and pause on the Toolbox tab, and the Toolbox appears. (or, from the View menu, click Toolbox.)
2. Click the plus sign next to the Containers group to open it, as shown in the following picture.
Figure 6 – Containers group
Lab work 3 – Picture viewer creation 7
Figure 7 –TableLayoutPanel control
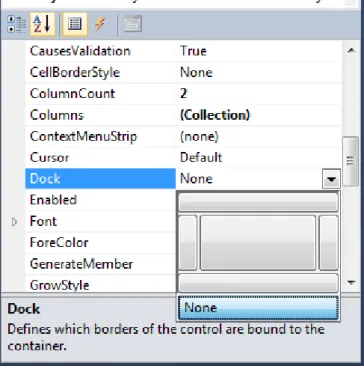
4. Be sure TableLayoutPanel is selected by clicking it. You can verify what control is selected by looking at the drop-down list at the top of the Properties window, as shown in the following picture.
Figure 8 – Properties window showing TableLayoutPanel control
Lab work 3 – Picture viewer creation 8
Figure 9 – Properties window with Fill selected
6. After you set the TableLayoutPanel Dock property to Fill, the panel fills the entire form. If you resize the form again, the TableLayoutPanel stays docked, and resizes itself to fit.
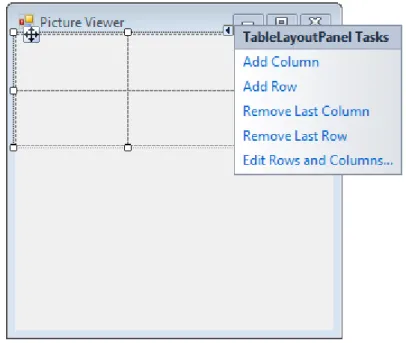
7. Currently, the TableLayoutPanel has two equal-size rows and two equal-size columns. You need to resize them so the top row and right column are both much bigger. In Windows Forms Designer, select the TableLayoutPanel. In the upper-right corner, there is a small black triangle button, which appears as follows.
8. Click the triangle to display the control's task list, as shown in the following picture.
Figure 10 – TableLayoutPanel tasks
Lab work 3 – Picture viewer creation 9
the OK button yet, because the window will close. (But if you do, you can reopen it using the task list.)
10. From the Show drop-down list at the top of the window, click Rows. Set Row1 to 90 percent and Row2 to 10 percent.
11. Click OK. Your TableLayoutPanel should now have a large top row, a small bottom row, a small left column, and a large right column. You can resize the rows and columns in the TableLayoutPanel by dragging their borders.
Step 5: Add Controls to Your Form
In this step, you add controls, such as a PictureBox control and a CheckBox control, to your form. You then add buttons to your form.
To add controls to your form:
1. Go to the Toolbox and expand the Common Controls group. This shows the most common controls that you see on forms.
2. Double-click the PictureBox control. The IDE adds a PictureBox control to your form. Because the TableLayoutPanel is docked to fill your form, the IDE adds the PictureBox control to the first empty cell.
3. Click the black triangle on the new PictureBox control to display its task list, as shown in the following picture.
Lab work 3 – Picture viewer creation 10
4. Click the Dock in parent container link. This automatically sets the PictureBox Dock
property to Fill. To see this, click the PictureBox control to select it, go to the Properties
window, and be sure that the Dock property is set to Fill.
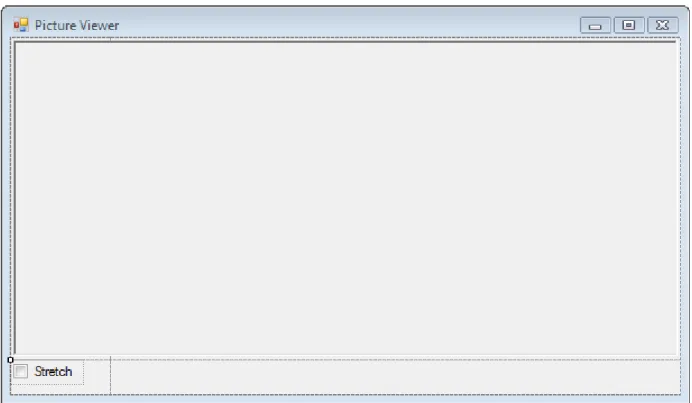
5. Make the PictureBox span both columns by changing its ColumnSpan property. Select the PictureBox control and set its ColumnSpan property to 2. Also, when the PictureBox is empty, you want to show an empty frame. Set its BorderStyle property to Fixed3D. 6. Add the CheckBox control to the form. Double-click the CheckBox item in the Toolbox to make the IDE add a new CheckBox control to the next free cell in your table. Because a PictureBox takes up the first two cells, a CheckBox control is added to the lower-left cell. Select the new CheckBox control and set its Text property to Stretch, as shown in the following picture.
Figure 12 – TextBox control with Stretch property
7. Go to the Containers group in the Toolbox (where you got your TableLayoutPanel control) and double-click the FlowLayoutPanel item to add a new control to the last cell in the PictureBox. Then dock it in the parent container (either by choosing Dock in parent container from the task list, or by setting its Dock property to Fill).
To add buttons:
Lab work 3 – Picture viewer creation 11
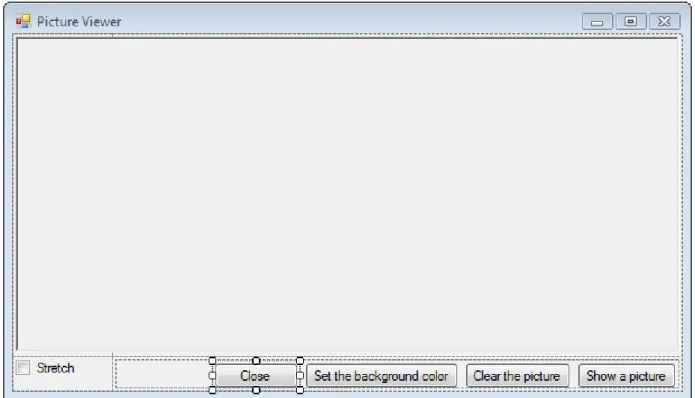
2. Typically, you add the other buttons using the Toolbox. This time, click button2, and then on the Edit menu, click Copy (or press Ctrl+C). On the Edit menu, click Paste (or press Ctrl+V) to paste a copy of your button. Now paste it again. The IDE has now added
button3 and button4.
3. Select the first button and set its Text property to Show a picture. Then set the Text
properties of the next three buttons to Clear the picture, Set the background color, and
Close.
4. The next step is to size the buttons and arrange them so they align to the left side of the panel. Select the FlowLayoutPanel and look at its FlowDirection property. Change it so it's set to RightToLeft. As soon as you do, the buttons should align themselves to the right side of the cell, and reverse their order so that the Show a picture button is on the right.
5. Click the Close button to select it. Hold down the CTRL key and click the other three buttons, so that they are all selected. While all the buttons are selected, go to the
Properties window and scroll up to the AutoSize property. This property tells the button to automatically resize itself to fit all of its text. Set it to true. Your buttons should now be sized properly and be in the right order. (As long as all four buttons are selected, you can change all four AutoSize properties at the same time.) The following picture shows the four buttons.
Figure 13 – Picture Viewer with four buttons
Lab work 3 – Picture viewer creation 12 Step 6: Name Your Button Controls
There's only one PictureBox on your form. When you added it, the IDE automatically named it pictureBox1. There's only one CheckBox, which is named checkBox1. Soon, you will write some code, and that code will refer to the CheckBox and PictureBox. Because there's only one of each of these controls, you will know what it means when you see pictureBox1 or checkBox1 in your code.
There are four buttons on your form, and the IDE named them button1, button2,
button3, and button4. By just looking at their current names, you don't know which button is the Close button and which one is the Show a picture button. That's why naming your button controls is helpful.
To name your button controls:
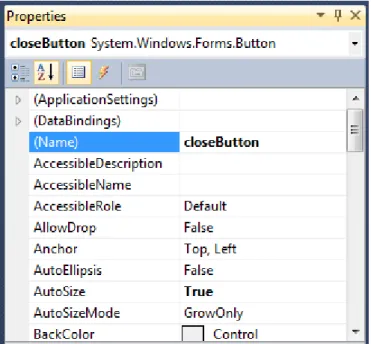
1. Click the Close button. (If you still have all the buttons selected, press the ESC key to cancel the selection.) Scroll in the Properties window until you see the (Name) property. (The (Name) property is near the top when the properties are alphabetical.) Change the name to closeButton, as shown in the following picture.
Figure 14 – Properties window with closeButton name
2. Rename the other three buttons to backgroundButton, clearButton, and showButton. You can verify the names by clicking the control selector drop-down list in the Properties
window. The new button names appear.
Lab work 3 – Picture viewer creation 13
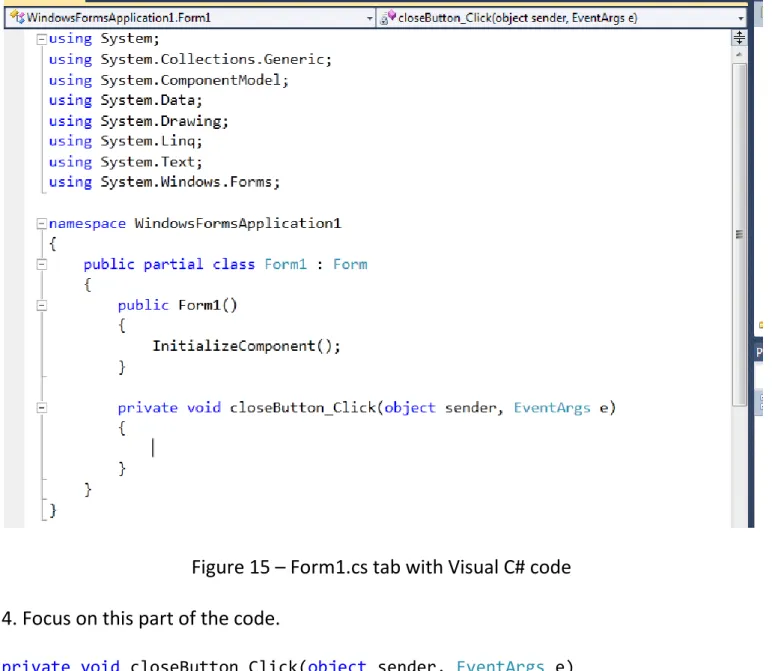
Figure 15 – Form1.cs tab with Visual C# code
4. Focus on this part of the code.
private void closeButton_Click(object sender, EventArgs e) {
}
You are looking at a method called showButton_Click(). The IDE added this when you double-clicked the showButton button. This method contains code that runs when the Show a picture button is clicked.
5. Go to the designer tab (the Form1.cs [Design] tab in Visual C#) and double-click the
Clear the picture button. Repeat this for the last two buttons. Each time, the IDE adds a new method to the form's code.
6. To add one more method, double-click the CheckBox control in Windows Forms Designer to make the IDE add a checkBox1_CheckedChanged() method. That method gets called whenever the user selects or clears the check box.
Lab work 3 – Picture viewer creation 14
private void closeButton_Click(object sender, EventArgs e) {
}
private void backgroundButton_Click(object sender, EventArgs e) {
}
private void clearButton_Click(object sender, EventArgs e) {
}
Step 7: Add Dialog Components to Your Form
To prepare for setting up the Open File dialog box and Color dialog box (to choose a background color), in this step, you add an OpenFileDialog component and a
ColorDialog component to your form.
A component is like a control in some ways. You use the Toolbox to add a component to your form, and you set its properties using the Properties window. But unlike a control, adding a component to your form doesn't add a visible item that the user can see on the form. Instead, it provides certain behaviors that you can trigger with code. It's a component that opens an Open File dialog box.
To add dialog components to your form:
1. Go to Windows Forms Designer and open the Dialogs group in the Toolbox.
2. To add a component called openFileDialog1 to your form, double-click
OpenFileDialog. To add a component called colorDialog1 to your form, double-click
Lab work 3 – Picture viewer creation 15
Figure 16 – Dialog components
3. Go to Windows Forms Designer and click the openFileDialog1 icon in the gray box at the bottom of the designer. Set two properties:
Set the Filter property to the following (you can copy and paste it): JPEG Files (*.jpg)|*.jpg|PNG Files (*.png)|*.png|BMP Files (*.bmp)|*.bmp|All files (*.*)|*.* Set the Title property to the following: Select a picture file
Step 8: Write Code for the Show a Picture Button Event Handler
In this step, you make the Show a picture button work like this:
When a user clicks that button, the program opens an Open File dialog box. If a user chooses a picture file, the program shows that picture in the PictureBox.
The IDE has a powerful tool called IntelliSense that helps you write code. As you enter code, the IDE opens a box with suggested completions for partial words that you enter. It tries to determine what you want to do next, and automatically jumps to the last item you choose from the list. You can use the up or down arrows to move in the list, or you can keep typing letters to narrow the choices. When you see the choice you want, press the TAB key to select it. Or, you can ignore the suggestions, if not needed.
To write code for the Show a picture button event handler:
1. Go to Windows Forms Designer and double-click the Show a picture button. The IDE immediately goes to the code designer and moves your cursor so it's inside the
showButton_Click() method that you added previously.
2. Type an i on the empty line between the two braces { }. An IntelliSense window opens, as shown in the following picture.
Figure 17 – IntelliSense with Visual C# code
Lab work 3 – Picture viewer creation 16
your code. Then press the TAB key again to use the if snippet. (If you clicked somewhere else and your IntelliSense window disappeared, backspace over the i and retype it, and the IntelliSense window opens again.)
Figure 18 – Visual C# code
4. Next, you use IntelliSense to enter more code to open an Open File dialog box. If the user clicked the OK button, the PictureBox loads the file that the user selected. The following steps show how to enter the code, and although it's numerous steps, it's just a few keystrokes:
a. Start with the selected text true in the snippet. Type op to overwrite it. (In Visual Basic, you start with an initial cap, so type Op.)
b. The IntelliSense window opens and displays openFileDialog1. Press TAB to select it.
c. Type a period (.) (Many programmers call this a dot.) Because you typed a dot right after openFileDialog1, an IntelliSense window opens, filled in with all of the
OpenFileDialog component's properties and methods. These are the same properties that appear in the Properties window when you click it in Windows Forms Designer. There are also methods that can tell the component to do things (like open a dialog box).
d. Start to type ShowDialog (capitalization is unimportant to IntelliSense). The
ShowDialog() method will show the Open File dialog box. After the window has highlighted ShowDialog, press TAB.
e. When you use a method on a control or a component (referred to as calling a method), you need to add parentheses. So enter opening and closing parentheses: ()
f. For Visual C#, add a space, and then add two equal signs (==). For Visual Basic, add a space, and then use a single equal sign (=). (Visual C# and Visual Basic use different equality operators.)
g. Add another space. As soon as you do, another IntelliSense window opens. Start to type DialogResult and press TAB to add it.
Lab work 3 – Picture viewer creation 17
i.Now add one more line of code. You can type it (or copy and paste it), but consider using IntelliSense to add it. The more familiar you are with IntelliSense, the more quickly you can write your own code. Your final showButton_Click()
method looks like the following.
private void showButton_Click(object sender, EventArgs e) {
if (openFileDialog1.ShowDialog() == System.Windows.Forms.DialogResult.OK)
{
pictureBox1.Load(openFileDialog1.FileName); }
}
Step 9: Review, Comment, and Test Your Code
Before you add a comment to your code and test it, take time to review the code concepts, because you will use these concepts frequently:
When you double-clicked the Show a picture button in Windows Forms Designer, the IDE automatically added a method to your program's code.
Methods are how you organize your code: It's how your code is grouped together. Most of the time, a method does a small number of things in a specific order, like how
your showButton_Click() method shows a dialog box and then loads a picture.
A method is made up of statements. Think of a method as a way to bundle statements together.
When a method is executed, or called, the statements in the method are executed in order, one after another, starting with the first one.
The following is an example of a statement:
pictureBox1.Load(openFileDialog1.FileName);
Statements are what make your programs do things. In Visual C#, a statement always ends in a semicolon.
You next add a comment to your code. A comment is a note that doesn't change the way the program behaves. It makes it easier for someone to understand what your code does. In Visual C#, two forward slashes (//) mark a line as a comment.
After you add a comment, you test your program. You just built something that works, and although it's not done yet, it can already load a picture.
To add comments 1. Add the following.
private void showButton_Click(object sender, EventArgs e) {
Lab work 3 – Picture viewer creation 18
// picture that the user chose.
if (openFileDialog1.ShowDialog() == System.Windows.Forms.DialogResult.OK)
{
pictureBox1.Load(openFileDialog1.FileName); }
}
2. Before you run your program, save your program by clicking the Save All toolbar button, which appears as follows.
Alternatively, to save your program, from the File menu, click Save All. It's a best practice to save early and often.
To test your program:
1. Press the F5 key or click the Start Debugging toolbar button.
2. Click the Show a picture button to run the code you just wrote. First, the program opens an Open File dialog box. Verify that your filters appear in the Files of type drop-down list at the bottom of the dialog box. Then navigate to a picture and open it. You can usually find sample pictures that ship with the Windows operating system in your
My Documents folder, inside the My Pictures\Sample Pictures folder.
3. Load a picture, and it appears in your PictureBox. Then try resizing your form. Because you have your PictureBox docked inside a TableLayoutPanel, which itself is docked inside the form, your picture area will resize itself so that it's as wide as the form, and fills the top 90 percent of the form. That's why you used the TableLayoutPanel and FlowLayoutPanel containers: They keep your form sized correctly when the user resizes it.
Step 10: Write Code for Additional Buttons and a Check Box
Now you're ready to complete the other four methods. You could copy and paste this code, but if you want to learn the most from this tutorial, type the code and use IntelliSense.
private void closeButton_Click(object sender, EventArgs e) {
// Close the form.
this.Close();
}
private void backgroundButton_Click(object sender, EventArgs e) {
// Show the color dialog box. If the user clicks OK, change the // PictureBox control's background to the color the user chose.
if (colorDialog1.ShowDialog() == DialogResult.OK)
Lab work 3 – Picture viewer creation 19 private void clearButton_Click(object sender, EventArgs e)
{
// Clear the picture.
pictureBox1.Image = null;
}
private void checkBox1_CheckedChanged(object sender, EventArgs e) {
// If the user selects the Stretch check box, // change the PictureBox's
// SizeMode property to "Stretch". If the user clears // the check box, change it to "Normal".
if (checkBox1.Checked)
pictureBox1.SizeMode = PictureBoxSizeMode.StretchImage;
else
pictureBox1.SizeMode = PictureBoxSizeMode.Normal;
}
Step 11: Run Your Program and Try Other Features
Your program is finished and ready to run. You can run your program and set the background color. To learn more, try to improve the program by changing the color of the form, customizing the buttons and check box, and changing the properties of the form.
To run your program and set the background color: 1. Press F5 or click the Start Debugging toolbar button.
2. Before you open a picture, click the Set the background color button. The Color dialog box opens.
Lab work 3 – Picture viewer creation 20
To try other features:
Change the color of the form and the buttons using the BackColor property. Customize your buttons and check box using the Font and ForeColor properties. Change your form's FormBorderStyle and ControlBox properties.