255
Appendix A
Drupal and Search Engine Optimization
Search engine optimization (SEO) is one of those nebulous terms that means many things to many people. In this appendix, I take a technical approach to Drupal and SEO and show how Drupal can be configured to follow many of the common SEO practices. I review several modules, including Pathauto, Path Redirect, and Global Redirect, and I discuss how they can be used to increase search ranking and how search engines “understand” your web site. I also talk about the importance of theming, header tags , and other settings configurable through Drupal. This appendix will help you leverage Drupal and achieve high search visibility.
What is SEO?
SEO is the process of developing, configuring, and theming a site so that search engines recognize important key words and phrases, resulting in higher search rankings when a user searches for those key words and phrases. To this end, SEO is not any of the following:
• A one-time “to-do” item to check off your list
• An exact science with guaranteed results
• Difficult to do in Drupal
As a Drupal developer and themer, I tend to categorize SEO into two aspects, technical and implementation. Technically, SEO involves configuring a site so that key words and phrases are placed in strategic locations, such as in the URL, header tags, meta tags, page titles, and more. Some of this is performed when theming the site (such as when placing node titles in <h1> tags), while other aspects are performed by modules (for example, placing node titles in URLs). Ill expand upon this later in the chapter. Implementation is both an art and a science. It involves selecting key words and phrases, generating content, building link campaigns, submitting your site to online directories, and more. Most of this happens after a site is built, and as such, I only lightly touch upon this. Note that I say “most of this happens after a site is built” because its only when a site is live and has been indexed by a search engine that you really know where its going to land in search results. Achieving first-page results can be challenging for competitive search terms and is often a mixture of trial and error and constantly tweaking a
APPENDIX A
256
site. When building a site, my initial goal is to provide the client with a foundation to start this process. I never guarantee first-page results—no one can—but I can promise to provide the tools to get their site there.
The goal of this chapter is to discuss the technical aspects of SEO, and as such, I discus s implementation only as it pertains to configuring a site.
Important configuration changes
In this section, I discuss several changes that you can make to core Drupal to help improve your SEO ranking. Changes to the .htaccess and robots.txt files are discussed, as well as enabling title and alt fields for images. This section focuses on core Drupal; contributed modules are discussed in the nex t section.
Update the .htacces s file
It is a good SEO practice to set a single point of origin for all content; search engines tend to penalize web pages that have duplicate content. For example, search engines will lower search rank if http://example-a.com, http://example-b.com, and http://example-b.com/foo all have the same content. There are a number of workarounds, such as using 301 “permanent” redirects or setting creation dates on meta tags, discussed in the next section.
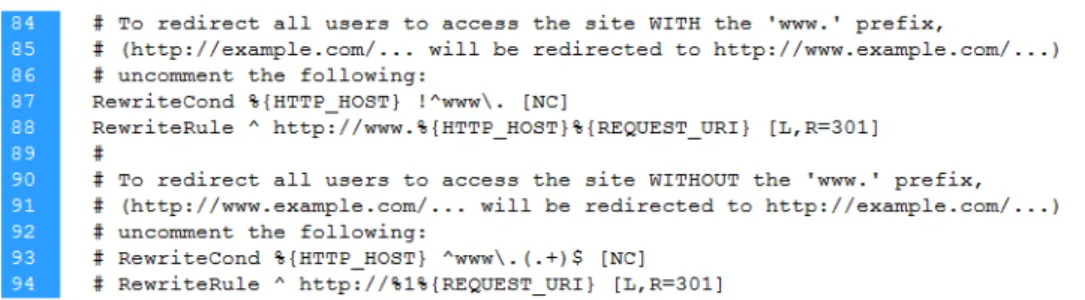
There is some speculation that search engines may differentiate between domains with and without the www (for example http://www.example.com and http://example.com). Although both are usually the same site, some search engines may penalize you simply because there are two sources. The bes t practice is to configure the .htaccess file so that the web site always resolves to either http://www.example.com or http://example.com, not both. Making the changes in Figure A-1 changes Apache to redirect all traffic to www.
Figure A-1. Uncomment lines 87–88 to direct all site traffic to http://www.example.com.
Note: Keep in that if you make this change, you will need to update .htaccess again when you update core.
DRUPAL AND SEARCH ENGINE OPTIMIZATION
257
Enable title and alt fields for images
When an image is displayed on a site, it has both a title, displayed on mouse hover, and alternate tex t, displayed when the image is unavailable or for users with screen readers. Search engines use this text to associate pages with key terms. My recommendation is to write a thorough and relevant alt term that describes the picture. For the title, I usually write what I think the end user will find relevant, trying to “salt” the sentence with key terms and words.
If the image is uploaded through a file upload field, not through the WYSIWYG editor, then you will need to enable alt and title fields on the image field configuration page. To enable, navigate to Structure ➤ Content types, and select manage fields next to the appropriate content type. Select the image field and scroll halfway down the page, as shown in Figure A-2.
Figure A-2.alt and title fields are enabled for each image field in each content type.
Revise robots.txt
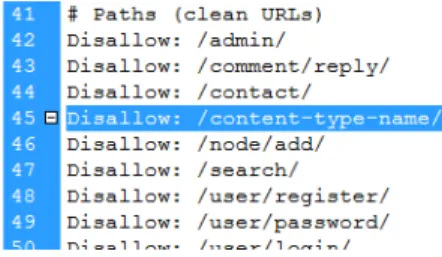
Sometimes there is content you do not want indexed in a search engine but yet the content is accessible to anonymous users and search engines. Other times, content is available on multiple pages, and you want to remove pages that may appear as duplicate content. For example, I frequently have content types I do not want to appear in search indexes. One such example is the FAQ module (http://drupal.org/project/faq). This module creates a content type allowing you to create a node with a question and a corresponding answer. Drupal displays this as a full-page node, while the FAQ module also displays all questions and answers on a single page. Some search engines may penalize you because it appears you have duplicate content appearing on multiple site page. To work around this, I configure the Pathauto module (discussed in Chapter 7) with a base URL that I tell search engines not to index.
The robots.txt file must be updated to work around this. It tells search engines which directories (tha t is, paths) should be included in search indexes (see Figure A-3). To ensure paths from specific content types are not indexed, you will need to set the base of the path to [content-type-name] and then add Disallow: /content-type-name/ to robots.txt.
Figure A-3. The robots.txt file is configured to tell search engines not to index pages of a specific content type.
APPENDIX A
258
SEO-friendly modules
A number of contributed modules are available to help increase your search engine rank. Some modules allow you to customize HTML output on both a global and a per-page basis, such as meta tags, page titles , and menu attributes. Other modules, such as Path Redirect and Global Redirect, help reduce the chance for duplicate content. Finally, the SEO Checklist module provides you with a list of “SEO to-do items” for you to check off.
SEO Checklist
The SEO Checklist module (http://drupal.org/project/seo_checklist) provides a checklist of SEO best practices to help you keep track of what needs to be done on your site. It checks to see all modules installed on your site and gives you a list of to-do items. It also provides you with a date stamp next to each item after its marked as completed. This is a great module to keep track of all SEO-related task s that need to be performed on a site, especially if multiple people are working on a site. Follow the conversation at http://drupal.org/node/610934 to learn when this module will be ported to Drupal 7.
Pathauto
Pathauto, discussed in Chapter 7, allows you to format URL paths for each node. This allows you to customize each URL so that a node can be accessed from both http://example.com/foo-bar and http://example.com/node/1. It is good practice to configure Pathauto so that URLs contain descriptive words that search engines will find useful. One practice I typically use is setting the URL to contain the node title and noting during site training that node titles should contain search-friendly terms. If the node title is not an option, you can always create a required field specifically for the URL.
Path Redirect and Global Redirect
In the previous section, we discussed how search engines may penalize sites with duplicate content. If you are using Pathauto, then a node can be accessed from two locations, http://example.com/foo-bar and http://example.com/node/1. Depending on your configuration, your front page may also be accessed from multiple locations. The Global Redirect module (http://drupal.org/project/ globalredirect) allows you to set a single location for all your pages, using permanent (301) redirects to the “source” page.
Global Redirect gives you a number of configuration changes, accessed at Configuration ➤ Global redirect. My recommendation is to use the default configuration settings during development and to enable all options during testing.
The Path Redirect module provides you with an interface to create and manage custom redirects, as well as the ability to create redirects when updating a node. This can be useful when you need to create a short URL that redirects to a long URL, such as in media promotions and advertisements. It also helps if you use Pathauto to customize the URL; if the node title is used in the URL and the node title is changed at some point, resulting in a new URL, Path Redirect automatically creates a redirect from the old URL to the new.
Meta tags
Meta tags were first used, and then abused, by web sites to increase search rank. Although they dont have as much influence on search rank as they once had, meta tags provide basic information to search
DRUPAL AND SEARCH ENGINE OPTIMIZATION
259 engines, such as keywords and physical location, that may or may not be used by search engines. The Meta tags module (http://drupal.org/project/metatags) allows you to enter meta tags on both a sitewide and an individual-node level. A number of configuration options are available, including which meta tags to use and if users and taxonomy terms should have meta tags. Make sure to enable the
Description meta tag, because this determines the text displayed when your site shows in search results. You should also set the Location meta tag if the business has a storefront or physical location. You will need to set the location using latitude and longitude; I use Google Earth for this.
Note: In the early days of search engine ranking, it was common practice to abuse meta tags to increase search rank, and search engines now tend to penalize you if meta tags are abused. My recommendation is to keep meta tags short and simple and to have a fresh set of eyes review how your site appears in search engine results.
Page Titles
Page titles are displayed in the title bar of the browser; by default, Drupal displays your site name and slogan on the front page. Search engines use this content for both search rank and when displaying search results, typically as a header that links to your site. The Page Title module (http://drupal.org/project/page_title) gives you precise control over what is displayed in the page title for all areas of your site, including the front page, comments, users, content types, and vocabulary. You can also use tokens to insert field values or other variables. The Page Title module is configured by navigating to content and selecting the PAGE TITLES tab, as shown in Figure A-4.
Figure A-4. The Page Title module is configured by navigating to the Content section and selecting the
PAGE TITLES tab.
Menu Attributes
The Menu Attributes module (http://drupal.org/project/menu_attributes) allows you to add additional attributes to menu items, such as an ID, name, and class. Important to SEO, it allows you to specify rel="nofollow" on certain menu items, telling the search engine not to use the link in determining search rank. For example, you may write a blog post about a specific product, but you dont want to give the site an “endorsement.” Some sites may use the nofollow attribute to sculpt page rank ; see http://mattcutts.com/blog/pagerank-sculpting for details.
APPENDIX A
260
Note: Page rank sculpting is not generally used on most sites but should be reserved for content-intensive sites with deep links or when a particular word or phrase is extremely competitive.
XML sitemap
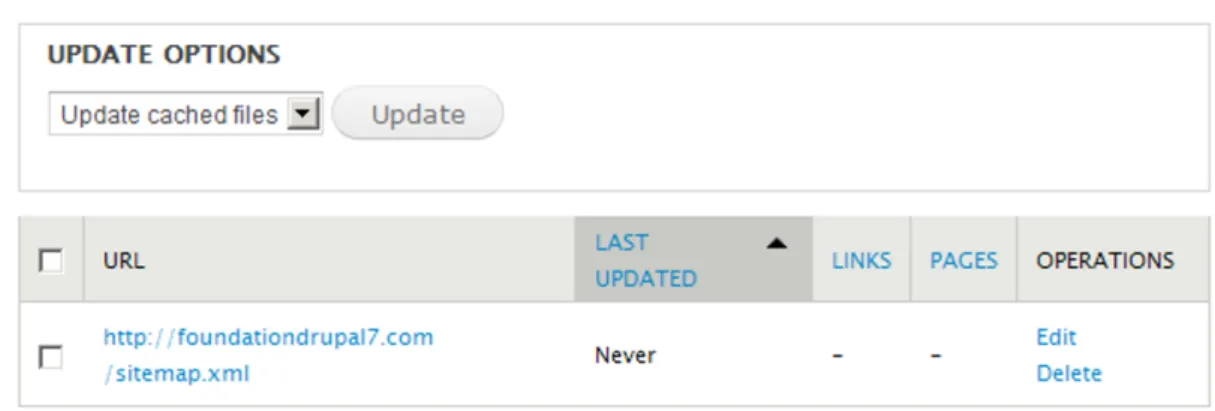
Site maps list all pages available on a web site and are used to make sure all pages are found by a search engine. The XML sitemap module (http://drupal.org/project/xmlsitemap) automatically creates and updates a site map, including automatic submission to several major search engines, as shown in Figure A-5. The module has a number of submodules, including those to create custom links, menu links , internalization, user links, and more; navigate to the Modules page to see all available submodules. Navigate to Configuration ➤ XML sitemap to set up and configure the module. A large number of configuration options are available, and although most default settings will work, I recommend the Drupal handbook for additional information: http://drupal.org/handbook/modules/xmlsitemap.
Figure A-5. Navigate to configuration ➤ XMLsitemap to set up and configure the module.
Boost
Google announced in April 2010 that it uses site download speed as a “new signal in our search ranking algorithms” (http://googlewebmastercentral.blogspot.com/2010/04/using-site-speed-in-web -search-ranking.html). The Boost module (http://drupal.org/project/boost) significantly decreases the amount of time it takes for your site to load by caching HTML pages and completely removing all database queries. The module works hand in hand with Drupals JavaScript and CSS caching,
DRUPAL AND SEARCH ENGINE OPTIMIZATION
261 providing GZIP compression as well as a number of configuration options to improve download speed. See http://drupal.org/node/545908 to learn more about installing and configuring Boost.
Note: The Boost module works only for anonymous users; you will need to use an alternate caching method for authenticated users, such as memcache (http://drupal.org/project/memcache). Note that as of publication, Google will never be an authenticated user, so memcache will never help search engine results.
Please note that, as of publication, Boost is not stable for Drupal 7; follow the conversation at http://drupal.org/node/325813.
Structure your theme
<h1> tags are heavily weighted by search engines, and a best practice is to ensure each page has only one <h1> tag that contains key search terms. By default, Drupal uses the node title within the <h1> tag and for blocks uses the block title within an <h2> tag. Youll need to make changes to the theme if you want, for example, a block header to use an <h1> tag.
Placing important and keyword-intense content earlier in the HTML file may influence search engine rankings. Simply stated, you want to output the nodes body as early in the template as possible. The Zen theme is ideal for this; it prints out the content region first and uses CSS to position sidebars and primary navigation afterward.
Page Optimization
As mentioned earlier, site speed influences site rank, and as such, a theme should be maximized for download speed. An easy way to optimize download speed is to reduce the number of HTTP GET requests . Every time a browser requests an image, it makes two GET requests, which dramatically increases download time when 30 or more images are required. The yslow module for Firefox provided by Yahoo! does a great job of helping you optimize your site, as well as providing you with additional optimization techniques not covered in this appendix.
To reduce the number of required images, you can start by limiting the number of images called from the CSS file; when a browser opens a web page, it downloads all CSS images, regardless of whether the image is used on the page. This means if you have 20 images embedded in your CSS file, the browser is going to make 20 separate image requests. A CSS sprite allows you to combine many of these images into a single image, significantly reducing the number of required image files. A program to help create CSS sprites is available at http://spriteme.org.
Furthermore, you can embed images using the src tag so that an image will be downloaded only when a user visits that specific page. For example, you may have an image that appears in the header of a blog section but not on the homepage. My recommendation is to create a block specifically for the blog section and add your src tag directly into the block body. Using this approach, the block will appear only in the blog section, at which point the image will be downloaded.
APPENDIX A
262
How to emphasize content in a WYSIWYG editor
Entering SEO-friendly content in a WYSIWYG editor is largely a process of emphasizing specific key words and phrases. Search engines weigh words that are in bold or italics. For this reason, you will want to “salt” your content with key words and phrases that are then emphasized through the editor.
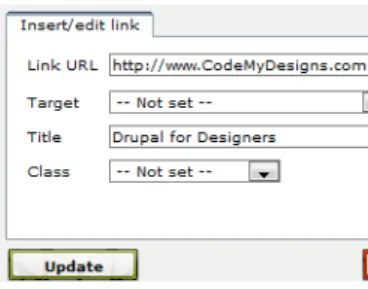
Its also good practice to make sure all links have a title, as shown in Figure A-6. Most editors have the ability to add this, including advanced configuration options to add rel tags as well.
263
Appendix B
Drush, the Command-Line Shell for Drupal
Drush is a command-line shell for Drupal. If you use the command prompt with any frequency or youre jus t looking to speed up the amount of time it takes to create and build a Drupal site, this is the module for you. Drush allows you to manage sites from the command prompt, including enabling modules, running cron, syncing Drupal sites and databases, and more.
What is Drush?
Drush, which is a portmanteau of the words Drupal and shell, is a command-line shell with a number of built-in commands designed specifically for managing Drupal and multiple Drupal sites. Drush will save you a significant amount of time if you work with Drupal on any type of regular or semiregular basis. It allows you to download and enable modules, run cron, rsync Drupal site files, sync databases, and more, all using commands structured in the familiar drush download backup_migrate style.
Drush commands are run from the command prompt, like Putty or Secure Shell Client. While you can run these commands by simply typing them in, you can also include them in command-line scripts to further customize your development environment. As an example, the Aegir hosting system (http://groups.drupal.org/hostmaster2), which is a front-end Drupal system to manage multiple Drupal sites, uses the power of Drush through custom scripting.
Drush can be used with cPanel or most other server administration software, as long as you have the required permissions to install and configure Drush (installation is discussed later in the chapter). I use Drush with cPanel on an almost-daily basis to automate a number of functions, such as creating sites , moving sites through the staging process, updating modules, and more. I hope after reading this chapter you have a love (or at least an appreciation) for Drush and the amount of time it can save if you plan to regularly build Drupal sites.
APPENDIX B
264
Expanding Drush functionality through contributed
modules
Many modules provide Drush commands; a complete list of modules is available a t http://drupal.org/taxonomy/term/4654. I have found a number of Drush modules I use on a frequent basis, discussed in the following sections.
Backup and Migrate
The Backup and Migrate module (http://drupal.org/project/backup_migrate) allows you to back up the database, the files directory, or both through the Drupal admin section. It also supplies several Drush commands that allow you to back up or restore databases through Drush.
Drush Cleanup
Drush Cleanup allows you to quickly and easily delete all text files not needed with Drupal, such as INSTALL.txt, UPGRADE.txt, and more. To run it, simply navigate to the directory of the Drupal site in question, and enter drush cleanup.
See http://drupal.org/project/drush_cleanup for details.
Drush EM
If you manage the Drupal web site staging process or a number of Drupal sites, you will eventually encounter the issue of pushing site changes from one site to another. That is, say you have three versions of a single site, all belong to different developers, and a developer makes a change to a view. How do you push the change to this view to all developers without requiring a sync of the databases? Generally speaking, Drupal is moving in the direction of creating “exportables” to solve this problem, in which data files are used to save database changes (views, content types, field changes, and so on). The eventual result is that you can make changes to one site and “push” changes to another site.
Drush EM (http://drupal.org/project/drush_em) helps you in this process. Technically it dumps and updates exportables from modules such as CTools and Views. This allows you to use a versioning system (or rsync) to sync exportables between sites, from which Drush EM can update the database. The process looks like this:
1. Developer A makes changes to a view.
2. Developer A runs the command drush em-dump, dumping the exportable into a module.
3. Developer A commits the module to the repository.
4. Developer B updates their local copy.
5. Developer B runs the command drush em-update, updating the local database to the current view.
DRUSH, THE COMMAND-LINE SHELL FOR DRUPAL
265
Drush Make
Drush Make is one of the most useful modules you will ever encounter. Drush Make allows you to create a single file that is used to download Drupal core and contributed modules into a single directory. That is , you can create a file that lists all required modules, run the Drush Make command, and the site is automatically built. See Figure B-1 for a sample Drush Make file.
Figure B-1. Sample make file for Drush Make
Drush Make files are saved with a .make extension and have a number of capabilities:
• Download core and contributed modules
• Check out code from the git, SVN, CVS, and bzr repositories
• Create a .tar, .gz, or .zip file of all modules defined in the makefile
• Fetch and apply patches
See the Drush Make project homepage (http://drupal.org/project/drush_make) for syntax , example usage, and more.
How to install Drush on cPanel
Drush is installed on cPanel on an account-by-account basis; that is, each user (for example, /home/fd7) has its own Drush installation and configuration. Installing Drush is a matter of downloading files , configuring .bashrc, and (optionally) creating a symlink.
You have a few options to think through for your first step: should cPanel users have their own version of Drush, or should users link to a single, master version? Depending on the number of developers on a team or how you configure your development environment, you may want all developers to have access to a shared version of Drush. The benefit of this is that you can create an “admin” account that has source versions of all software and scripts, which can help when troubleshooting software-based bugs.
First, download Drush into a directory on your server; youll need to create a new user if youre using shared software, as explained earlier. I usually create a folder named drush with two folders, drush and drush_mods, located within; if Im sharing scripts, I include them in the primary drush folder (see Figure B-2).
APPENDIX B
266
Figure B-2. The drush folder contains Drush, additional Drush commands (modules), and other shared scripts
Next, you need to configure .bashrc so that Drush is recognized as an executable script (see Figure B-3). .bashrc is modified on an account-by-account basis, so make sure to modify the correct users file . Users will need to log on and log in before updates are enabled.
Figure B-3.~/.bashrc is modified so that Drush is recognized as an executable script.
Finally, you need to enable Drush modules if you are using any. This is simply a matter of downloading all Drush modules to a single directory (see Figure B-4). Depending on how you share software, you may want to symlink to a single version or download all modules into ~/.drush.
Figure B-4. To enable Drush modules, add the modules into a drush_mods folder and symlink the folder .drush in the users home directory.
After enabling Drush, type drush help at the command prompt for a list of available commands.
Popular Drush commands
Table B-1 explains the Drush commands that I use on a frequent basis. Navigate to http://drupal.org/node/477684 to see the full list of Drush commands.
DRUSH, THE COMMAND-LINE SHELL FOR DRUPAL
267 Ta bl e B-1. Popular and commonly used Drush commands
Command De tails
cache clear (cc) Clear all Drupal caches or a specific cache.
cron Run all cron hooks.
disable (dis) Disable one or more modules or themes.
download (dl) Download core and contributed modules and themes; this is great when used in parallel with Drush Make.
enable (en) Enable one or more modules or themes; this is great when used in parallel with Drush Make.
statusmodules (sm) Print a list of all available modules and themes.
status Prints status information about the Drupal site, such as Drupal version, site path, database username/password, and so on. sql cli (sqlc) Open a SQL command-line interface using the sites database user
name and password.
sql dump Export the Drupal database using mysqldump.
sql sync Copy a source database to a target database using rsync; this is great when used to push staging sites from one location to another.
uninstall Uninstall one or more modules.
update (up) Update contributed modules and apply database updates (that is, run update.php); this works with many file versioning systems.
updatecode (upc) Update project code without applying database updates.
updatedb (updb) Run the update.php script from the command line; note that you may need to use the batch-process command to make this work (see http://drupal.org/node/873132).
variable delete (vdel) Delete a variable.
variable get (vget) List all or some site variables. variables set (vset) Set a variable.
APPENDIX B
268
Command De tails
watchdog delete (wd-del) Delete watchdog messages, also known as status messages. watchdog list (wdlist) Show all available status messages.
bam backup This requires the backup_migrate module; it backs up the sites database.
bam restore Requires the backup_migrate module; it restores the sites database. bam backups Print a list of previously created backup files.
269
Appendix C
50+ Contributed Modules to Spice Up Any
Site
Core Drupal is great; it provides the basic framework for creating some pretty cool web applications . However, the true greatness of Drupal comes with its modular framework and the thousands of contributed modules available to spice up and improve your site. When building a site, the common saying is “theres a module for that.”
In this appendix, I point out some of the more popular contributed modules, divided into a number of categories such as development tools, site-building tools, field types, site administration tools, theming tools, and more. Although this is not an exhaustive list by any means, these are some of the modules I install on most sites I build.
Development tools
I begin the appendix by discussing several modules that help during the development process. Many of these modules are for advanced users of Drupal who have a solid understanding of PHP.
Chao s to ol suite
The Chaos tool suite, more commonly called CTools, is a set of APIs and tools that help when developing modules or creating forms, among other things. The module currently has the following tools:
• Ajax responder, making it easier for modules to handle Ajax requests
• Content, to create content types used in panels and other modules
• Contexts, providing an API to create and accept objects as input
APPENDIX C
270
• Dependent, a widget to make form items appear and disappear depending upon other form items, which is much easier than using JavaScript to do the same
• Exportables, allowing modules to have objects that live in database or code, such as module configuration settings or user-entered data
• Form tools to help forms interact with Ajax.
• Form wizard to help make multistep forms
• Modal dialog to place forms in a modal dialog
• Object caching to edit and cache an object across multiple page requests, for example when adding a multipage form
• Plug-ins, so modules can let other modules implement plug-ins from include files
CTools is available at http://drupal.org/project/ctools; download the module and read documentation in the help directory. Currently, the module is not completely ported to Drupal 7. Follow the conversation at http://drupal.org/node/589636 to learn more about porting the module to Drupal 7.
Devel
Devel is a suite of modules that anyone who builds a Drupal site, regardless of experience, will find useful. It contains a number of helper functions for developing, building, and troubleshooting a site. It can print a summary of all database queries for a page, print well-organized dprint_r($array) and ddebug_backtrace() functions, generate dummy content, display node access entries for a node, switch between users, quickly empty all caches, view and log performance statistics, and more. It provides its own block with menu links but, more conveniently, integrates with the administrative menu (discussed later in the appendix). Devel is available at http://drupal.org/project/devel.
Drupal For Firebug
Firebug is a plug-in and web development tool for the Mozilla Firefox browser, available at http://getfirebug.com. Drupal For Firebug (http://drupal.org/project/drupalforfirebug) displays Drupal debugging and SQL query information in the Firebug window (Devel must be enabled to view SQL query information). Drupal For Firebug also works with the Google Chrome browser.
Features
The Features module, discussed in Chapter 11, allows you to package exportables into a module to be easily moved and implemented on other sites. Examples of features might include a blog, a media gallery , or a collection of views. I have found that Features can help sync changes made to multiple sites, such as if a view or content type is changed by one developer and the changes need to be pushed to other developers sites. Features is available at http://drupal.org/project/features.
Context
The Context module (http://drupal.org/project/context) allows you to manage conditions and reactions for different sections (aka contexts) of your site. For each context, you can choose the conditions that trigger the context and how Drupal should react. For example, you may want to create a blog context that displays certain blocks when a user is logged in. I find this module most beneficial to
50+ CONTRIBUTED MODULES TO SPICE UP ANY SITE
271 control the layout of blocks and then, through the Features module, sync changes made to the layout of blocks between staging sites.
Spaces
The Spaces module is an API that allows you to create a “space” that overrides the default values o f Drupal configuration settings. In the same way that the Context module is ideal for laying out the blocks on a section of your site, Spaces is ideal for creating “sections” of Drupal configuration settings. See http://drupal.org/project/spaces to download the module, and see the readme for details on how to use and implement it.
Strongarm
The Strongarm module (http://drupal.org/project/strongarm) allows you to override the default variable values provided by Drupal core and contributed modules. Although these variables can be changed through the Drupal UI, you may want to programmatically change values. For example, if you create an installation profile, you can use Strongarm to change default variable values when the install profile is run. Strongarm also uses CTools to provide exportables, meaning you can also use Strongarm to sync changes made to Drupal variables between multiple staging sites.
Site-building tools
Site building refers to creating a site through the Drupal UI, which is fundamentally different from developing a module; site building is more a matter of pointing and clicking to configure Drupal, while module development involves writing code to add Drupal functionality. In this section, I cover a number of modules that help make the site-building process flow as smoothly and quickly as possible without requiring the time-consuming task of writing a module.
Automatic Nodetitles
Every node created in Drupal requires a title. In some instances, you may not want the user to enter a title but rather have the title created automatically. Enter Automatic Nodetitles (http://drupal.org/ project/auto_nodetitle); this module allows you to automatically generate a node title based on token values. You can set the node title as optional, meaning it will be automatically generated if the field is left blank, or you can hide the node title entirely. Automatic Nodetitles is configured on the content type configuration page for each content type.
Custom Breadcrumbs
The Custom Breadcrumbs module (http://drupal.org/project/custom_breadcrumbs) allows you to fine-tune the display of breadcrumbs for content types in version 7.x-1.x and views, panels, taxonomy terms, paths, and more, in version 7.x-.2.x. For example, you can easily style the breadcrumbs on a blog content type to read “Home // All Blogs // User Blog // 2010 // September // Blog Title.”
APPENDIX C
272
Custom Search
Custom Search (http://drupal.org/project/custom_search) allows you to change both the appearance of the search block and how content is searched. Some of the options I use this module for on almost every site I build include the following:
• Specifying which content type(s) to search, for example if I want to restrict search to one or two content types
• Changing or removing the default search label (appears to the left of the search box)
• Adding default text within the search box (which disappears when the search box becomes active via JavaScript)
• Changing the default submit button image
• Changing the default submit button text The module also includes several submodules:
• Custom Search Blocks, providing multiple numbers of search blocks, each with different settings
• Custom Search Taxonomy, providing options to search taxonomy terms
• Custom Search Internationalization, providing locale settings
This module provides a number of settings not discussed; visit the project page for a full list of available configuration changes.
Flag
The Flag module (http://drupal.org/project/flag) is a bookmarking system in that it allows you to create an unlimited number of flags to flag content such as nodes, comments, users, or other items. This module is perfect for marking content as important, creating bookmarks, flagging content as inappropriate, and more. It integrates with the views, rules, and actions modules, allowing you to build out complex systems to display flagged content and create rules and actions when content is tagged. There are a number of flag-related modules:
• Flag Weights (http://drupal.org/project/flag_weights), used to add weights to flags to make items orderable (such as when displaying flagged content in a view)
• Flag Terms (http://drupal.org/project/flag_terms), used to flag taxonomy terms
Menu attributes
Menu attributes (http://drupal.org/project/menu_attributes) allows you to specify additional attributes for menu items, such as id, name, class, style, and rel. This module is perfect in a number of situations:
50+ CONTRIBUTED MODULES TO SPICE UP ANY SITE
273
• When theming and you want to apply a CSS style to a specific menu link
• When you want to add a nofollow to certain menu items
• When you want to easily select a menu items using jQuery or JavaScript
Menu block
Menu block (http://drupal.org/project/menu_block) allows you to create a block containing a menu tree starting at any arbitrary level of any menu. I find there are two circumstances where I most frequently use this module. First, lets say Im displaying primary menu items horizontally in the site header and using a module like nice_menus or superfish to display secondary menu items as drop-down menu items . However, I dont want tertiary (or deeper) menu items to display in the site header; I want them to display only in a sidebar (or other area) when Im on a secondary menu page. The Menu block module allows me to configure a menu block that displays only these menu links.
I also use this when it is better to group multiple menus into a single menu. For example, one common trend in web design is to place four or five columns of menu links into the footer of a site. It is easy to create four or five different menus and place each menu into the footer, but this can clutter the menu administration page and make it difficult to add menu links when creating nodes. Alternatively, I create a single menu and then create four or five menu blocks based on this menu, each starting at the secondary level. This results in multiple menu blocks managed through a single menu.
Nice Menus
Nice Menus (http://drupal.org/project/nice_menus) provides both horizontal and vertical expandable menus. It uses the Superfish jQuery plug-in for all browsers and falls back to CSS only if JavaScript is disabled on the browser; you can also disable Superfish to provide a CSS-only expandable menu. Navigate to the project page for a full description of this module, including documentation, troubleshooting tips, and more.
Nodequeue
Nodequeue (http://drupal.org/project/nodequeue) is similar to the Flag and Flag Weights modules in that it allows site administrators to place nodes in an arbitrarily ordered group. The main difference, aside from a few configuration options, is that Nodequeue automatically creates a “nodequeue” administration page accessed on every node page through a menu tab. I use this module when a site requires one or more blocks to which nodes are promoted. For example, the homepage of a site might have a block that rotates images using the views slideshow module, and the client may want to promote only four images to that block at a time. Using Nodequeue, I can add a “front-page slideshow” nodequeue that allows up to four nodes to be added at a time, to which the client can add, remove, and order nodes. The nodequeue is then added as a filter to the view so that only nodes added to the nodequeue are displayed.
Panels
The Panels module (http://rupal.org/project/panels) allows site builders to create customized page layouts using a simple drag-and-drop interface. One of the advantages of Panels is that it allows content placed on the page to be aware of what else is being displayed. For example, a block in the
APPENDIX C
274
sidebar region can be aware of content displayed in blocks in the footer region, something not possible in existing Drupal core. You can also create mini-panels, which makes it very easy to display content and blocks without needing to create custom regions or write a lot of CSS.
Panels is a powerful module with a vast number of options and configuration settings. Navigate to http://drupal.org/node/496278 for documentation and to learn more.
Rules
The Rules modules (http://drupal.org/project/rules) allows you to create actions that occur based on defined events. For example, you may want to create customized e-mails that are sent to users when a user account is created or create a custom redirection or system message after a user creates an account. Rules is a powerful and flexible module; navigate to http://drupal.org/node/298476 to learn more.
Site map
Not to be confused with XML sitemap, the Site map module (http://drupal.org/project/site_map) provides a one-page overview of your site, including nodes, taxonomy terms, RSS feeds, and more. This is an ideal module if youre looking for an easy, low-maintenance way to give users an overview of your site.
String Overrides
String Overrides (http://drupal.org/project/stringoverrides) provides a quick and easy way to replace any text on the site. It is so simple to use that it is easy to go overboard and use this module in ways that it should not be used. My recommendation is to use this module when another module provides default text and does not provide a way to change default text through the UI. For example, the core Blog module provides a page that displays all blog posts from all users, available at http://example.com/blogs, with the title “Blogs” displayed at the top of the page. Rather than hacking the Blog module (bad practice) or creating a custom theme template (time-consuming) to change the title, simply create a string override that replaces all occurrences of “Blogs” with the new page title. A word of caution: the module evaluates all strings passed through the t() function, which means all other occurrences of the string “Blogs” will be replaced.
Note: If you only need to make one or two strong overrides, see the “String overrides” section in settings.php. If you need a lot of changes and would prefer to keep all overrides in code (rather than saving them in the database), consider using a full-blown language translation, as discussed in Chapter 6.
50+ CONTRIBUTED MODULES TO SPICE UP ANY SITE
275
Workflow
The Workflow module (http://drupal.org/project/workflow) is a great solution for creating content publishing workflows. It allows you to create and assign workflows and workflow states to node types. For example, you can assign a workflow with the states Draft, Review, Revise, and Publish to a blog node type. Furthermore, actions can be assigned to changes between workflow states so that an e-mail is sent to users when a blog is moved from Draft to Review or a node is published when a blog is moved from Review to Publish. You have fine-tuned control over which user roles have permission to move a node between states; this means you can create two user groups, such as editor and publisher, and give permissions only to publishers to move a node from Review to Publish.
The Workflow module is currently being ported to Drupal 7; navigate to http://drupal.org/node/ 732578 to track its current status.
Modules that add additional field types
Fields, which are added to content types, user profiles, and comments, are rather simple in their current form; you can add text or file uploads. A number of modules are available that expand upon this functionality, giving you the ability to control how users enter and format field data, including date fields , phone fields, and more.
Content Construction Kit (CCK)
Prior to Drupal 7, the core fields module was part of the CCK module (http://drupal.org/ project/cck). Although much of the functionality of CCK was moved to core, there are still a few important modules within the CCK module that are useful. The nodereference module allows you to create a customized field to reference nodes. For example, you can create a field populated with all nodes from the Article content type. The userreference module works in the same way; it allows you to associate a user with a node.
Date
The date module (http://drupal.org/project/date) creates a date field type with an optional JavaScript calendar pop-up used to select dates. There are a number of options to configure how date data is saved and displayed, each on a node type by node type basis. It integrates with the Calendar module (discussed later in the appendix), creating the perfect solution for creating calendars in Drupal. Navigate to http://drupal.org/node/262062 to learn more about this awesome module.
The Email module (http://drupal.org/project/email) provides a field type for collecting and storing e-mail addresses. It includes many features, such as validation of e-mails and encryption of e-mail addresses, and integrates with both views and rules modules. Furthermore, you can change the display settings of the field so that instead of displaying the mail address, it displays a contact form to send e-mail to the e-e-mail address.
APPENDIX C
276
Embedded Media Field
Embedded Media Field (http://drupal.org/project/emfield) allows you to embed video, image, and audio files from various third-party providers such as YouTube and Flickr. It also includes an Embedded Media Thumbnail module, allowing you to override the default thumbnail provided by providers with your own.
Field Permissions
The Field Permissions module (http://drupal.org/project/field_permissions) allows you to set permissions to view and edit fields. For example, you may want to create a content type with three fields, and one of these fields should be viewed and edited only by users of the “administrator” role. This module is currently being ported to Drupal 7; see http://drupal.org/node/598924 for details.
Link
The Link module (http://drupal.org/project/link) allows you to add a field type specifically for links, including the URL, title, target attribute, and rel=nofollow attribute.
Name
The Name module (http://drupal.org/project/name) provides several components used to enter a persons name:
• Title, such as Mr., Mrs., Dr., and so on
• Given name, or first name
• Middle name
• Family name, or last name
• Generational suffix, such as II, III, Jr., and so on
• Credentials, such as CPA, and so on
All components are available to Views, meaning you can sort by last name while displaying the full name, making this a good alternative to using regular text fields when entering peoples names.
Phone
The Phone module (http://drupal.org/project/phone) provides a field for users to enter phone numbers. The module includes validation of phone numbers for a number of countries, support o f international phone numbers, formatting of phone numbers, and more.
Note: As of publication, the Phone module implements each country as its own field, which means that each field can validate for only one country. This means, for example, a Phone field configured for U.S. validation will not accept Swiss phone numbers, and vice versa.
50+ CONTRIBUTED MODULES TO SPICE UP ANY SITE
277
Site administration tools
In this section, I cover a number of modules to help with site administration and make your (or your clients) job easy!
Administration menu
The Administration menu (http://drupal.org/project/admin_menu) improves upon the core Drupal admin menu by rendering all administration menu items through a CSS-based menu. It also contains local tasks, giving you the ability to customize the menu, and integrates with Devel, providing you with fas t access to any administrative links and functions available in your Drupal site. This module is a must-have for all Drupal developers and site builders.
Advanced help
The Advanced help module (http://drupal.org/project/advanced_help) allows modules to store and display help documentation as .html files. Many popular modules include advanced help files, including Views, which can be displayed as a pop-up or inline.
Content Management Filter
The Content Management Filter (http://drupal.org/project/cmf) is an alternative to the conten t display page, giving administrators additional options for searching and filtering content. Furthermore, it gives you the ability to allow users to use the filter content page without needing to give users the “administer nodes” permission.
Feedback
Feedback (http://drupal.org/project/feedback) provides a fixed-position form for users to quickly send feedback messages about the currently displayed page to site administrators. The form is submitted via Ajax and collects a number of data points, including date submitted, page submitted from, and message. I typically use this module during user acceptance testing when the client is evaluating the site , giving them a mechanism to submit feedback and “wouldnt it be awesome if” recommendations for site changes. I rarely use this when a site is in production.
LoginToboggan
LoginToboggan (http://drupal.org/project/logintoboggan) provides many modifications to the user login and registration system:
• Users can log in with either user name or e-mail address.
• Users can register and log in immediately, rather than logging in through the login link provided during e-mail registration, and redirect to a specific page.
• Users must provide two e-mail fields during registration.
• It displays a customized message after login.
APPENDIX C
278
Transliteration
The Transliteration module (http://drupal.org/project/transliteration) takes Unicode text and translates it to US-ASCII characters for file uploads, URL paths, and other Drupal modules. Generally speaking, this module is a must-have if you allow users to upload files and then do some type of PHP processing on the files, such as resizing images. I have also found this module useful for ensuring user-submitted files can be imported into a versioning system such as Subversion, because the module removes many of the characters not supported by Subversion.
User Protect
User Protect (http://drupal.org/project/userprotect) allows you to prohibit either specific users or users of a certain role from editing user fields such as the user name, e-mail address, or password.
Theming tools
These are a few modules that I find indispensible when theming a site.
Content Template (Contemplate)
When working with content types and fields, one of the issues with Drupal is that it does not output fields (that is, everything within the $content variable) in a CSS-friendly manner. The solution is the Content Template module (http://drupal.org/project/contemplate), which allows you to modify output on a per-content-type basis. It allows you to rearrange fields, remove fields, add HTML such as <div> tags , and more. In addition to modifying full-page output, it also allows you to modify RSS feeds, search index results, and search summary (aka teaser) results.
Theme developer
The Theme developer module (http://drupal.org/project/devel_themer) gives you the ability to click any part of the page and view which theme functions and templates are used (and can be used) to output the HTML. Navigate to http://drupal.org/node/209561 for a great tutorial on how this module works.
ThemeKey
ThemeKey (http://drupal.org/project/themekey) allows you to define rules for when a theme should be used. For example, you may have a site that requires three different themes—one for the blog conten t type, one for user pages, and one for everything else.
Its very easy to get carried away with this module, especially for new themers; how do you know when to use a new theme and when to add more changes to your current theme? My general recommendation is to take a few things into consideration:
50+ CONTRIBUTED MODULES TO SPICE UP ANY SITE
279
• If you use the current theme, will it result in a doubling in length of the current CSS file? Are more than 50KB of image files required by CSS?
• Will it require a major reworking of the layout of blocks?
If you answered yes to any of these questions, chances are that your site requires more than two themes and may benefit from ThemeKey.
Zenophile
The Zenophile module (http://drupal.org/project/zenophile) automates the process of creating Zen subthemes, removing all manual tasks required when creating subthemes. It includes two submodules:
• Zenophile Midnight, which adds CSS and graphics for creating a light-on-dark subtheme
• Zenophile Sidebars, which allows you to adjust the width and placement of sidebars without manually changing code
JavaScript, jQuery, and Drupal
JavaScript is used by browsers to provide dynamic web sites and user interfaces; jQuery is a JavaScript library that handles animation, Ajax interactions, event handling, and more. If you want your web site to look like it belongs in the 2010s, then JavaScript and jQuery will be part of it. There are a number of modules that use JavaScript and integrate many popular jQuery libraries into your site, discussed in this section.
Colorbox
Colorbox is a customizable lightbox plug-in for jQuery 1.3 and 1.4, allowing for image pop-ups commonly seen on many sites where the web site is grayed out and the image is emphasized. There are many modules and jQuery plug-ins that achieve this effect; see http://drupal.org/node/266126 for details.
External Links
External Links (http://drupal.org/project/extlink) uses jQuery to find all external links on a page, optionally adding an icon for either external links or mailto: links. Additional configuration options include opening external links in a new window and providing a confirmation message when leaving the site.
jQuery UI
jQuery UI (http://drupal.org/project/jquery_ui) is a wrapper module around the jQuery UI effec t library (http://jqueryui.com), which provides advanced animation and effects for web sites. This module does not do anything on its own but rather is required by modules.
APPENDIX C
280
jQuery plugins
The jQuery plugins module (http://drupal.org/project/jquery_plugin) provides many jQuery plugins that can be called from any module or theme. GPL-licensed bundled plug-ins include the following:
• Cycle (http://plugins.jquery.com/project/cycle)
• Date input (http://plugins.jquery.com/project/dateinput)
• Expose (http://plugins.jquery.com/project/expose)
• Flash embed (http://plugins.jquery.com/project/flashembed)
• History (http://plugins.jquery.com/project/tabs)
• Metadata (http://plugins.jquery.com/project/metadata)
• Mousewheel (http://plugins.jquery.com/project/scrollable)
• Overlay (http://plugins.jquery.com/project/overlay)
• Range input (http://plugins.jquery.com/project/rangeinput)
• Scrollable (http://plugins.jquery.com/project/scrollable) • Tabs (http://plugins.jquery.com/project/tabs) • Tooltip (http://plugins.jquery.com/project/tooltips) • Validate (http://plugins.jquery.com/project/validate) • Validator (http://plugins.jquery.com/project/html5validator)
jQuery Update
The jQuery Update module (http://drupal.org/project/jquery_update) updates jQuery in Drupal core for any modules that require a newer jQuery version. There is no need to use this module unless its required.
Superfish
Superfish (http://drupal.org/project/superfish) integrates the jQuery Superfish plug-in (http://plugins.jquery.com/project/Superfish) with Drupal menus, creating a configurable number of Superfish menu blocks for each site. Although the Nice Menus module achieves the same thing, the benefit of this module is that it is purely Superfish, meaning that it does not have any of the additional functions provided by Nice Menus.
Quick Tabs
The Quick Tabs module (http://drupal.org/project/quicktabs) allows you to create blocks of tabbed content using jQuery and Ajax so that content in a block is available without requiring a page refresh. Content can be nodes, blocks, views, or other quick tabs, with the option to determine whether the quick tab should be displayed using Ajax. See http://drupal.org/node/507894 for the current port to Drupal 7 status.
50+ CONTRIBUTED MODULES TO SPICE UP ANY SITE
281
Mass e-mail
A number of modules for Drupal integrate with third-party e-mail providers, allowing users (anonymous or authenticated) to register for e-mail when registering for your site. That is, users have a Drupal account on your site with the option of creating an account on your e-mail provider as well. Two of the most popular include MailChimp (http://drupal.org/project/mailchimp) and Constant Contact (http://drupal. org/project/contstant_contact). If you or your client is committed to a specific e-mail provider other than these two, my recommendation is to search Drupal.org or Google.com to see whether someone else has developed a module.
Simplenews (http://drupal.org/project/simplenews) is a good solution if you are considering running a mass e-mail server from Drupal. Simplenews is a Drupal-based mass e-mailer with a number of related modules; see the project page for details.
E-commerce for Drupal
Currently, Ubercart (http://drupal.org/project/ubercart) is the most commonly used module that allows e-commerce integration. The module includes a number of payment gateways, including Authorize.net and PayPal. It also includes a number of modules yet-to-be-ported to Drupal 7, including Affiliate (http://drupal.org/project/uc_affiliate2), Discount Coupons (http://drupal.org/ project/uc_coupon), Recurring Payments (http://drupal.org/project/recurring), and Wishlis t (http://durpal.org/project/uc_wishlist). You will also want to keep your eye on the commerce module (http://drupal.org/project/commerce), because this is more of a “Drupalish” approach to e-commerce.
Social networking
A number of modules are available to create a Facebook or MySpace-like site using Drupal, allowing users to form relationships between one another. Although this is a short overview of some of the most common, a Google or Drupal.org search of the specific functionality you require will help you find the functionality you require.
Drupal for Facebo ok
The Drupal for Facebook module (http://drupal.org/project/fb) allows you to embed site content and features within Facebook or, alternatively, allow users to log in to your site via Facebook Connect. This is a powerful module with a number of options; see http://drupal.org/node/195035 for a full list of available functionality.
Facebo ok-style Statuses (Microblog)
Facebook-style Statuses (http://drupal.org/project/facebook_status) allows you to imitate Twitter or Facebooks “wall” feature where each user gets a “status” or microblog where they can share
APPENDIX C
282
messages with the entire community. Users can post on other users profiles or make references to other users.
Organic groups
The Organic groups module (http://drupal.org/project/og) allows users to create and manage their own groups, with each group having subscribed users and communication among themselves. There are a number of options and configuration settings; see the project page for details. Note that this module will be renamed to Groups (http://drupal.org/project/groups) at a future point.
Privatemsg
Privatemsg (http://drupal.org/project/privatemsg) allows site users to send private messages to each other, including between multiple users, threaded conversation, and more.
The Twitter module provides API integration with Twitter, allowing you to associate one or more Twitter accounts with Drupal users. This means you can give permission to users to post messages to Twitter and, more commonly, use the Views module to display users Twitter messages. You can also use the 3.x version of the module to allow users to log in using Twitter credentials; see http://drupal.org/node/649714. This is a relatively straightforward module to configure; see the project page for details (http://drupal.org/project/twitter).
User Relationships
The User Relationships module (http://drupal.org/project/user_relationships) allows user to create relationships between each other, such as friends, co-workers, neighbors, and more. There are a number of included modules; see the project page for details.
User Points
The User Points module (http://drupal.org/project/userpoints) allows users to gain points for doing things such as posting nodes, commenting, moderating modules, making purchases, and more. See http://drupal.org/project/userpoints_contrib for the full list of contributed modules.
283
Appendix D
Views Recipes
Views is a flexible query builder that can be used to format and display data in powerful ways. If you come from a background of hand-coding MySQL queries, you will absolutely love the point-and-click nature of building queries and the ability to override every step of the process. In this appendix, I show the flexibility of views by stepping through the process of creating a number of views I typically use when creating a site. My recommendation is to use this chapter as a starting point when creating views and then search Drupal.org for follow-up questions. Before reading this chapter, read the section on the Views module in Chapter 7.
Please note that I will frequently add to and update this chapter, which is available for download on the Apress web site (www.apress.com).
Article listing
A content-type listing is a simple list of nodes belonging to a single content type (see Figure D-1). In this example, a content type called Events has been created with a number of fields, including an event title, event description, event type (provided by a core taxonomy module), and event date (provided by the Date module). A second content type called Sponsor has been created with several fields, including the sponsor name, homepage link (provided by the Link module), logo, and sponsor description. In this setup, one or more sponsors are associated with a single event. When creating an event, site admins can selec t a “node reference” field (provided by the CCK module) to associate an unlimited number of sponsors with an event, assuming sponsor nodes have already been created. The site requires a mini-calendar bloc k view, a full-page calendar view of all job listings, a block listing the next two events, and a full-page view of each event. Full-page views and block views should display event information plus sponsorship information. Note that this view works pretty nicely with the sign-up module, which allows users to sign in for a node; refer to http://drupal.org/node/808310 for updates on a Drupal 7 port.
APPENDIX D
284
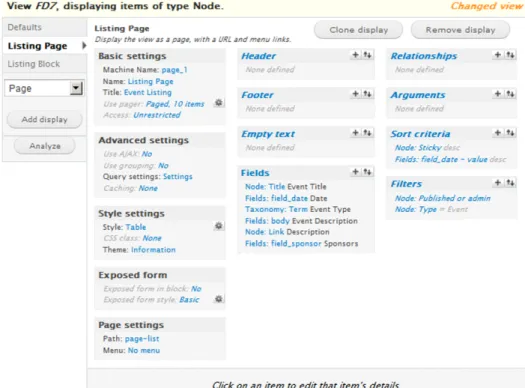
Figure D-1. A full-page listing of upcoming event posts
I always start with the full-page display and build out from there (see Figure D-2). Starting under Style se t tings, youll notice I set the style to Table; a number of styles are available, including ordered lists , unordered lists, grid view, and more, to style your list page as required. Selecting the gear icon next to the table style allows me to configure the table to sort rows if a user clicks a table header item.
Note: Items with italic text are shared across all subviews, while regular text is specific to a subview.
VIEWS RECIPES
285 I also set Use pager to Paged, 10 items, which places a pager at the bottom of the full-page view if there are more than ten items per page. The Use AJAX selector controls how content is queried—through Ajax, meaning the page does not refresh when paging, or via page refresh, which is better suited for search engine optimization (SEO). If entered, the title is displayed at the top of the view.
Next, I filled in Page se t tings, including the Path and, optionally, Menu links. A quick note about the
Menu link: I recommend setting this through the view rather than adding a menu item through the menu configuration screen, because I have found this helps with configuring active menu trails.
I did a few interesting things with the fields to get them to display as I wanted. I wanted two of the fields ,
Fields: body and Node: Link, to appear in a single column so that Fields: body displays only 200 characters with a more link displaying immediately afterward. First I configured Fields: body to be excluded from the display, and then I rewrote the output of the Node: Link field to include the previously excluded field (see Figure D-3).
Figure D-3. Field output can be modified to include previous fields, HTML, and more.
Sort criteria sorts the results by two fields, including Node: Sticky and Fields: field_date - value. The first field uses the Promote node to top of list check box when creating or editing a node, allowing users to promote one or more nodes to the top of the list. You can use a number of fields to sort a view; field da t e
APPENDIX D
286
is simply one of them. You can also use Global: Random to sort the list randomly (as long as Caching under
Advanced Se t tings is set to None), Node: Title to sort by title, or even Node: Updated da te to sort by the last time the node was updated.
Filters are used to filter nodes from the view. In this example, I wanted only nodes that were Published or
admin (meaning unpublished nodes will display to site administrators) and nodes that were of the type
Node: Type = Event to appear.
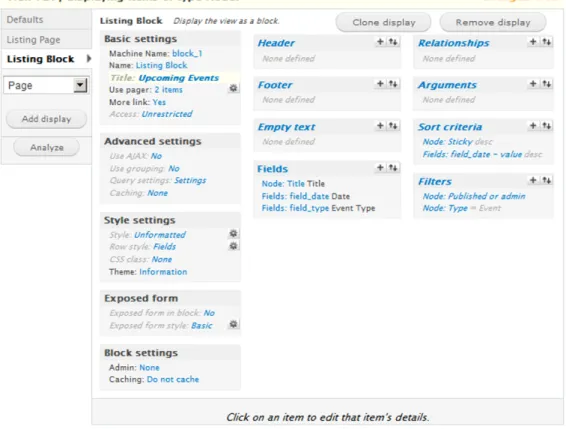
After creating the full-page block view, its relatively easy to create the block view (see Figure D-4). Youll notice there are a lot of shared field values between the full-page view and homepage block view. Mos t importantly, youll notice that I added a “yes” to the More link option, enabling a More link on the bloc k that links to the full-page list view. I also set Use pager to display 2 items.
Figure D-4. The homepage block view, which links to the full-page view
Archive
An archive is a block that displays monthly or yearly links to a full-page view containing all nodes within the selected week, month, or year (see Figure D-5). While this view groups by year, it is just as easy to group by month or week.
VIEWS RECIPES
287
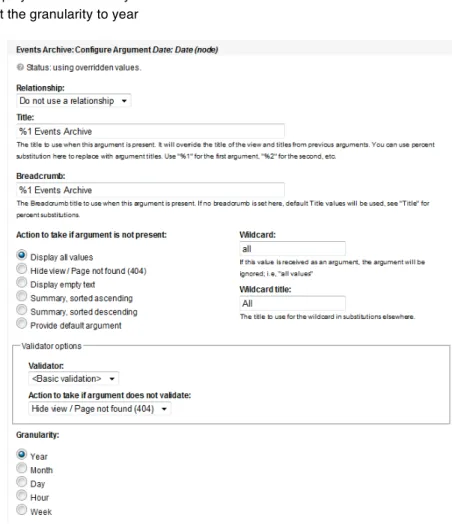
Figure D-5. A yearly archive block; each year links to a full-page view listing all events during that specific year. Views includes an archive with a block view, a full-page view, and an argument. I begin first by enabling the archive view. After I have configured basic settings, page settings, fields, sorting, and filters, I configure the argument for the date (see Figure D-6). In our case, an argument is a variable in the URL,
year, which will be appended to the end of the URL (for example, ev ents/2010). Following Figure D-6, I have configured the full-page view to do the following:
• Display the year, if available, before the phrase “Events Archive” in the title and breadcrumb
• Display all values if the year is not included in the URL
• Set the granularity to year
APPENDIX D
288
Next I create the block as discussed earlier in the appendix. However, instead of selecting to display all values as the action to take if an argument is not present, I select a summary, sorted in descending order. This tells Drupal that it should display a summary of results and gives you the option to select whether the summary should be presented as a jump menu, a list, or unformatted (see Figure D-7). After selecting the summary style, a gear icon will appear under the argument, allowing you to configure different options for the summary view, such as displaying the number of nodes in each month/year.
Figure D-7. When a summary is selected, views provides options to format the output.
Calendar
The Calendar module (http://drupal.org/project/calendar) creates a view containing a number of displays to display a full-size and mini-calendar on your site. It is disabled by default, so you will need to go to the list of all views, scroll to the bottom of the page, and click enable next to the calendar view. By default, a view is enabled that displays a full-page calendar, available at http://example.com/calendar (see Figure D-8).
VIEWS RECIPES
289 You will immediately notice a number of included displays and default settings in the calendar view, including a calendar page, calendar block (with mini-calendar), year view, month view, block view, feed, and more. My recommendation is to first update the default view and then update other views as required. Using the event example from earlier, I updated the fields, argument, sort criteria, and filters. You will also want to change the corresponding fields in both the iCal feed and the Upcoming block, because these two views have overridden fields and filters and do not use the default settings.
Next Ill go in and make a few updates to views as required. The calendar page, which configures how the full-page calendar displays, has a few interesting settings under Calendar se t tings, including the ability to include CSS classes depending on terms, allowing you to theme certain days depending on the taxonomy term assigned to the event node. There is also an option to display a pop-up Date changer. The calendar block is a miniature calendar that can be placed in sidebars or other relatively small areas . When displaying events in a year, month, day, or week view, the corresponding views can be used to change the display, such as outputting different fields.
Image slideshow
A number of views plug-ins are available to create image and node slideshows, the most popular of which is Views Slideshow (http://drupal.org/project/views_slideshow). This module allows you to create a jQuery slideshow that fades node fields from one node to the next. Another popular slideshow plug-in is Views Carousel (http://drupal.org/project/viewscarousel), based on the jCarousel jQuery plug-in, which allows you to move node fields either vertically or horizontally.
A related style appears in the style selection box after enabling the views plug-in; select the appropriate plug-in (Views Slideshow or Views Carousel), and select the default settings. Next, select the fields you want output; more than likely, if you want just a slideshow of images, you will select only one field to display (that is, the image). I recommend creating an image preset that automatically resizes the image for all slideshows simply because this makes sure the slideshow will fit and display properly within its area. The majority of the work in creating a slideshow is theming. Navigate to http://drupal.org/node/ 755010 for Views Slideshow documentation and http://drupal.org/node/324777 for Views Carousel documentation.
Image gallery
It is easy when working with Drupal to assume there must be an “image gallery” module responsible for displaying images. There is, and its called the Views module using the Style: Grid Style se t tings. The grid style allows you to output field data (in other words, images, content fields, and so on) in a grid pattern with a configurable number of columns. For example, you can display 50 images in a 5 column by 10 row full-page view. Combine this with an image-resizing preset that scales and crops images to a preset dimension, and youre ready to rock n roll.
First, create an image gallery content type and add all required fields, including an image upload field. Next, add a view and select the grid style; see Figure D-9 for the available options. Youll want to make sure to use a pager and set the items to display to a number