11.1 Introduction: Queries that
change data
11.1.1 What is an action query?
All of the queries that you have created to this point have been variations of “select” queries. Select que-ries are used to display data but do not actually change the data in any way.
Action queries, in contrast, are used to change the
data in existing tables or make new tables based on the query's results set. The primary advantage of action queries is that they allow you to modify a large number of records without having to write Visual Basic programs.
Access provides four different types of action que-ries:
1. Make table — creates a new table based on the results set of the query;
2. Append — similar to a make-table query, except that the results set of the query is appended to an existing table;
3. Update — allows the values of one or more fields in the result set to be modified; and,
4. Delete — deletes all the records in the results set from the underlying table.
Since the operation of all four types of action queries is similar, we will focus on update queries in this tuto-rial.
11.1.2 Why use action queries?
To motivate the examples in the first part of this tuto-rial, we are going to assume that the number of cred-its allocated to courses in certain departments need to be changed. For example, assume that you need to increase the number of credits for courses in the Commerce department by 1.5 times their current
val-ues. There are at least four different ways of accom-plishing this task:
1. Create a calculated field called NewCredits that multiplies the value of Credits by 1.5 — The query containing the calculated field can be used in place of the Courses table whenever credit information is required. Of course, the values stored in the Courses table are still the old val-ues. Although there might be some advantages to keeping the old values, it may cause confusion about which values to use. In addition, the use of a calculated field creates a computational load that becomes larger as the number of courses increases.
2. Go through the Courses table record by record and manually change all the values — This approach is tedious and error prone. Further-more, it is simply impractical if the number of courses is large.
3. Write a Visual Basic program to automate Step 2. This is a good approach; however, it clearly requires the ability to write Visual Basic pro-grams.
4. Create an update query that (a) selects only those courses that require modification and (b) replaces the value of Credits with Credits * 1.5. — This approach is computationally efficient and allows you to work with the QBE editor rather than a programming language.
11.2 Learning objectives
What is an action query? Why would I want to use one?
How do I make a backup copy of one of my tables?
How to I undo (rollback) an action query once I have executed it?
How do I update only certain records in a table?
How do I create a button on a form? How do I make an action query execute when the button is pressed?
11.3 Tutorial exercises
11.3.1 Using a make-table query to create
a backup
Since action queries permanently modify the data in tables, it is a good idea to create a backup of the table in question before running the query. An easy way to do this is to use a make-table query.
• Create a select query based on the Courses
table and save it as qryCoursesBackup.
• Project the asterisk (*) into the query definition so that all the fields are included in the results set.
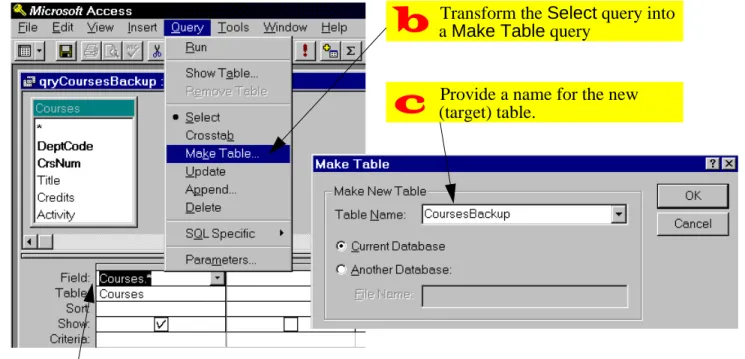
• While still in query design mode, select Query > Make Table from the main menu and provide a name for the target table (e.g., CoursesBackup) as shown in Figure 11.1.
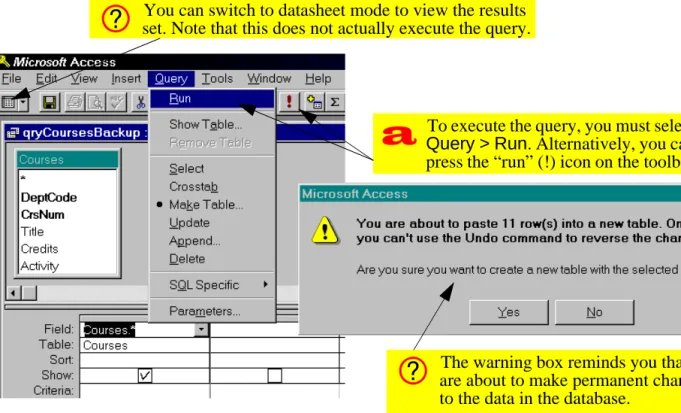
• Select Query > Run from the main menu to exe-cute the action query, as shown in Figure 11.2.
Action queries do not execute until you explic-itly run them. Switching to datasheet mode only provides a preview of the results set. • Save the query. If you switch to the database
win-dow, you will notice that the new make-table query has a different icon than the select queries.
11.3.2 Using an update query to rollback
changes
Having a backup table is not much use without a means of using it to restore the data in your original table. In this section, you will use an update query to
FIGURE 11.1: Use a make-table query to back up and existing table
Project all fields (*) into the query definition.
Transform the Select query into a Make Table query
Provide a name for the new (target) table.
FIGURE 11.2: Run the make-table query.
You can switch to datasheet mode to view the results set. Note that this does not actually execute the query.
The warning box reminds you that you are about to make permanent changes to the data in the database.
To execute the query, you must select
Query > Run. Alternatively, you can press the “run” (!) icon on the toolbar.
replace some of the values in your Courses table with values from your CoursesBackup table.
• Create a new query based on the Courses and
CoursesBackup tables.
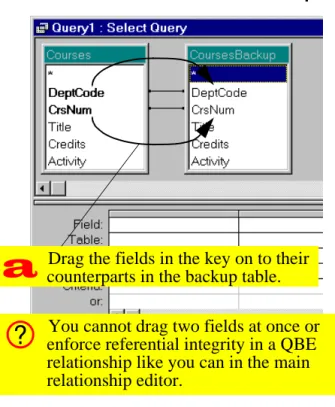
• Since no relationship exists between these tables, create an ad hoc relationship within the query as shown in Figure 11.3.
• Select Query > Update from the main menu. Note that this results in the addition of an Update To row in the query definition grid.
• Project Credits into the query definition and fill in the Update To row as shown in Figure 11.4. • Save the query as qryRollbackCredits. Now is a good point to stop and interpret what you have done so far:
1. By creating a relationship between the Courses
table and its backup, you are joining together the records from both tables that satisfy the
condi-FIGURE 11.3: Create an ad hoc relationship between the table and its backup.
Drag the fields in the key on to their counterparts in the backup table.
You cannot drag two fields at once or enforce referential integrity in a QBE relationship like you can in the main relationship editor.
tion:
Courses.DeptCode =
CoursesBackup.DeptCode AND Courses.CrsNum =
CoursesBackup.CrsNum.
2. By projecting Courses.Credits into the query, you are making it the target for the update. In other words, the values in Courses.Credits
are going to be modified by the update action. 3. By setting the Update To field to
Courses-Backup.Credits, you are telling Access to replace the contents of Courses.Credits with the contents of CoursesBackup.Credits. Whenever this query is run, it will replace whatever is in the Credits field of all the records in the
Courses table with values from the backup. You will use this query to “rollback” updates made later on.
FIGURE 11.4: Fill in the Update To field.
Select Query > Update to make the query an update query.
Use the <table name>.<field name>
syntax to disambiguate the field name.
11.3.3 Using an update query to make
selective changes
Now that you have an infrastructure for undoing any errors, you can continue with the task of updating credits for the Commerce department.
• Create an update query based on the Courses
table and save it as qryUpdateCredits. • Set the Update To field to [Courses]*1.5.
Note that if you do not include the square brack-ets, Access will interpret Courses as a literal string rather than a field name.
Since this particular query only contains one table, the <table name>.<field name>
syntax is not required for specifying the Update To expression.
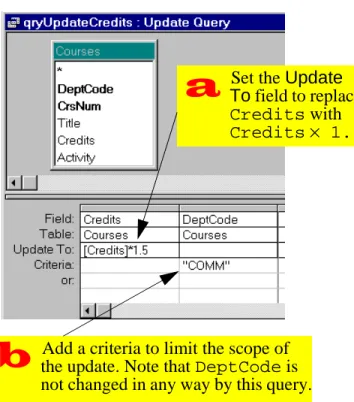
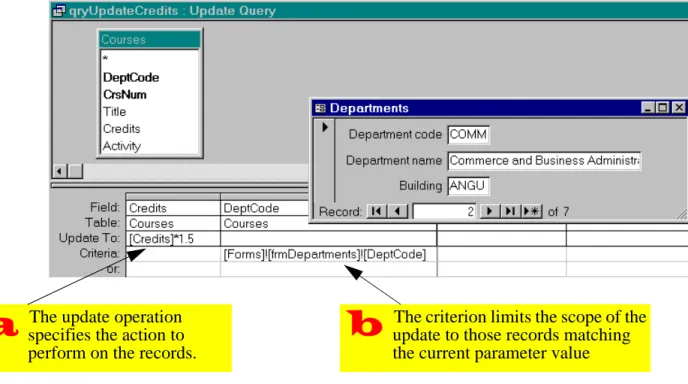
• Since you only want to apply the change to Com-merce courses, enter a criterion for the Dept-Code field, as shown in Figure 11.5.
FIGURE 11.5: Create an update query that updates a subset of the records.
Set the Update To field to replace
Credits with
Credits× 1.5
Add a criteria to limit the scope of the update. Note that DeptCode is not changed in any way by this query.
• Run the query and verify that update has been performed successfully.
11.3.4 Rolling back the changes
While testing the qryUpdateCredits query, your exuberance may have led you to execute it more than once. To return the Courses table to its state before any updates, all you need to do it run your rollback query.
• Run qryRollback credits by double-clicking its icon in the database window.
Once an action query is created, it has more in common with subroutines written in Visual Basic than standard select queries. As such, it is best to think of action queries in terms of procedures to be executed rather than virtual tables or views. Double-clicking an action query executes it.
11.3.5 Attaching action queries to
buttons
As a designer, you should not expect your users to understand your query naming convention, rum-mage through the queries listed in the database win-dow, and execute the queries that need to be
executed. As such, it is often useful to create buttons on forms and “attach” the action queries to the but-tons. When the button is pressed, the query is exe-cuted.
Although we have not yet discussed buttons (or
events in general), the button wizard makes the
cre-ation of this type of form object straightforward. • Modify qryUpdateCredits so that it updates
only those departments matching the DeptCode
value in the frmDepartments table (see
Figure 11.6).
• Save the resulting action parameter query as
FIGURE 11.6: Create an action parameter query to update Credits for a particular department.
The update operation specifies the action to perform on the records.
The criterion limits the scope of the update to those records matching the current parameter value• Switch to the design view of frmDepartments
and add a button as shown in Figure 11.7. • Attach the pqryUpdateCredits query to the
button as shown in Figure 11.8.
• Provide a caption and a name for the button as shown in Figure 11.9.
• Switch to form view. Press the button to run the query (alternatively, use the shortcut key by pressing Alt-U) as shown in Figure 11.10.
11.4 Application to the assignment
11.4.1 Rolling back your master tables
As you begin to implement the transaction process-ing component of your system, it is worthwhile to have a means of returning your master tables to their original state (i.e., their state when you started devel-oping the system).
• Create backup copies of your Products and
BackOrders tables using make-tables queries. Save these queries but note that they only need to be run once.
• Create a rollback query that allows you to return your Products table to its original state.
Rolling back the BackOrders table is more complex than rolling back the Products table. This is
because we are making the assumption that no products are ever added or deleted to the system. As such, all the information needed for the rollback is in the backup copy of Products.
In contrast, records are added to the BackOrders
table on a regular basis. As a result, the Back-Orders table and its backup may contain a different number of records. If so, the match-and-replace pro-cess used for rolling back Products is inappropri-ate.
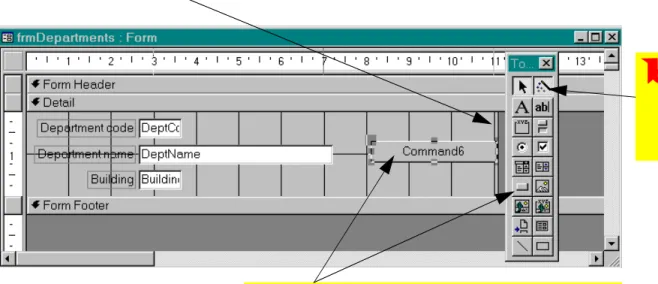
FIGURE 11.7: Add a button to the form using the button wizard.
Ensure that the wizard button in the toolbox is
depressed (wizards are activated).
Select the “command button” tool and click on an appropriate location on the form detail section. The button wizard should appear
If there is insufficient space for a button, drag the border of the detail section to the right
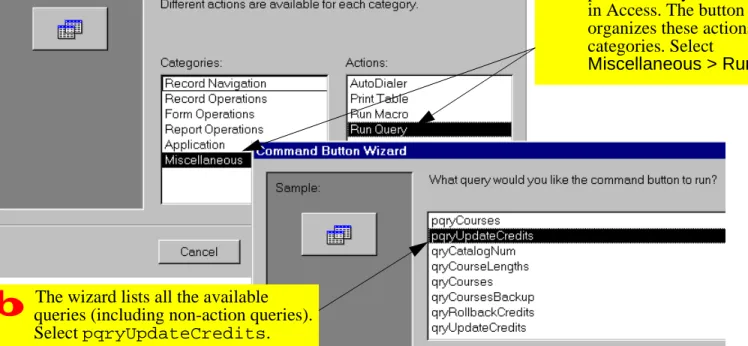
FIGURE 11.8: Use the wizard to attach an action query to the button.
Buttons can be created to perform many different actions in Access. The button wizard organizes these actions into categories. Select
Miscellaneous > Run Query.
The wizard lists all the available queries (including non-action queries). Select pqryUpdateCredits.
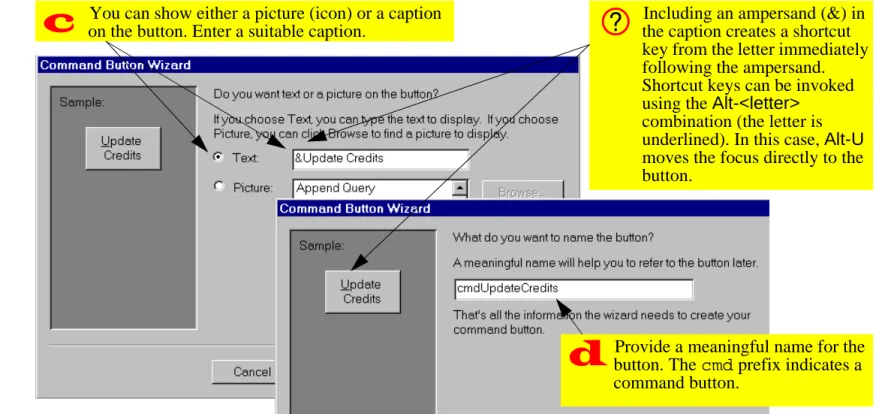
FIGURE 11.9: Use the wizard to attach a query to a button (continued)
You can show either a picture (icon) or a caption on the button. Enter a suitable caption.
Including an ampersand (&) inthe caption creates a shortcut key from the letter immediately following the ampersand. Shortcut keys can be invoked using the Alt-<letter>
combination (the letter is underlined). In this case, Alt-U
moves the focus directly to the button.
Provide a meaningful name for the button. The cmd prefix indicates a command button.
FIGURE 11.10: Execute the action query by pressing the button.
Press the button to execute the action query (or press Alt-U to use the shortcut).
The easiest way to rollback the BackOrders table is to delete all the records it contains and use an append query to replace the records from the backup.
• Open your BackOrders table in datasheet mode and select Edit > Select All Records from the menu (alternatively, press Control-A)
• Press the Delete key.
• Create an append query that adds the records in the backup table to the BackOrders table. Once you learn the Access macro language or Visual Basic for Applications, you will be able to write a small procedure to execute these steps for you. For the assignment, however, this “manual rollback” is sufficient.
11.4.2 Processing transactions
You are now in a position to combine parameter ries and action queries into parameter-action
que-ries. These queries will allow you to perform reasonably complex transaction processing opera-tions on your master tables.
• Create an update query to add all products in a shipment to inventory.
Note that this query should only process ship-ment details for the current shipship-ment (i.e., it should be based on a parameter query similar to the one you created in Section 10.4).
• Create a button on the shipments form to perform this update.
• Create an update query to subtract items from inventory when you process an order from your customers. Do not attach this query to a button at this point.
This query should only process order details from the current order.