Tooth intrusion using mini-implants
Telma Martins de Araújo*, Mauro Henrique Andrade Nascimento**,Fernanda Catharino Menezes Franco***, Marcos Alan Vieira Bittencourt****
Abstract
Introduction: Amongst the different types of orthodontically-induced tooth movements, intrusion undoubtedly features as one of the most difficult to achieve. Conventional in-trusive mechanics, although viable, involves a rather complex side effect control. This is due, to a large extent, to a difficulty in securing a satisfactory anchorage. Within this con-text, mini-implants offer an effective skeletal anchorage which has become an invalu-able asset to orthodontists since it renders the intrusion of both anterior and posterior teeth an increasingly streamlined procedure from a mechanical standpoint. Objective: It is the purpose of this article, therefore, to describe and demonstrate clinically the various ways in which mini-implant can be utilized as an anchorage device to promote intrusion. Keywords: Mini-implant. Intrusion. Skeletal anchorage.
* Phd and Master in Orthodontics from the UFRJ; Adjunct Professor of Orthodontics at UFBA; Coordinator of the Specialization Course on Orthodon-tics and Facial Orthopedics at UFBA and Director of the Brazilian Board of OrthodonOrthodon-tics and Facial Orthopedics.
** Post-Graduation Specializations in Orthodontics at UFBA.
*** Master Orthodontics from the UFRJ and Assistant Professor of Orthodontics at FBDC.
*** Phd and Master in Orthodontics from the UFRJ; Adjunct Professor of Orthodontics at UFBA and certified by the Brazilian Board of Orthodontics and Facial Orthopedics.
InTrODuCTIOn
In numerous orthodontic treatments, adequate anchorage planning is paramount for a successful therapy. Tooth intrusion, be it aimed at correcting an exaggerated overbite or an anterior open bite, be it for correcting extruded teeth due to miss-ing antagonists, poses a considerable mechanical challenge, given the difficulty in controlling un-desirable movements of the anchorage units. Ob-viously, throughout the years, the literature has reported satisfactory results with the use of aux-iliary intraoral appliances and extraoral headgear. Nevertheless, it is not always an easy task to en-list a patient’s cooperation owing to the physical discomfort and/or esthetic handicap inherent in these appliances.
In this case, mini-implants emerge as an ex-cellent alternative. The development of mini-im-plants in the few last years has enabled efficient anchorage, requiring no tooth support and with no esthetic compromise whatsoever. Additionally, no patient cooperation is required1,2. These devic-es have been used in the orthodontic office with increasing frequency in cases where an inadequate number of dental units stand in the way of an ef-fective anchorage, or even only to simplify orth-odontic mechanics and make it more predictable1. This article is aimed at summarizing and illus-trating the various situations where mini-implant use is possible, specifically focusing on tooth intru-sion. Some timely recommendations are also of-fered to ensure that the desired results are achieved.
FiGUre 1 - Upper and lower incisor intrusion when it is desirable to have these teeth tip buccally.
FiGUre 2 - Upper and lower incisor intrusion when it is desirable to maintain teeth’s axial tipping. InCISOr InSTruSIOn
Anterior teeth intrusion is indicated in some excessive overbite cases and has been performed traditionally by means of intrusion arch wires, the confection of stair-stepped archwires in the ante-rior region, or the use of steep curve arch wires on the upper arch, or reverse curve on the lower arch. In many situations, however, the side effects caused by this mechanics are unavoidable, espe-cially extrusion or tipping of the anchorage units. By resorting to skeletal anchorage with the use of mini implants, all other teeth are safe from any undesirable movements.
The ideal position for inserting mini-implants when the purpose is to intrude upper incisors will depend on how much tipping they have. When they are vertically positioned or tipped back-wards, as is the case with Angle’s Class II, Division 2, one single mini-implant is recommended8 to be placed on the median line, as high as possible and
close to the anterior nasal spine. To intrude lower incisors similarly positioned or tipped backwards, one mini-implant should be placed as low as pos-sible between the centrals6,8,11. In this position, the force line will extend across the front of the set’s resistance center, thereby generating an intrusion effect combined with the buccal tipping of these units (Fig. 1).
When incisors present with reasonable axial tipping and no changes are therefore required, the force action line should be made to run through as closely as possible to the resistance center of the set of teeth which are targeted to be moved6,11. To this end, the use of two mini-implants is rec-ommended, one on each side, positioned between lateral incisors and cuspids (Fig. 2). A typical example of two mini-implants being used with the aforementioned objective is shown in figure 3. In this case, since the patient had only three lower incisors, the choice was made to remove
A B
FiGUre 3 - lower anterior teeth intrusion with embedded mini-implants, inserted in the alveolar mucous membrane (A, B). C and D show Spee curve leveling. in E and F, a slight improvement in the buccolingual inclination of the intruded units can be observed.
one, which allowed the cuspids to drift and oc-cupy the position of the lateral incisors. This set of teeth was originally tipped towards the buccal (IMPA=109º). The aim was to induce an intru-sion, which would level the Spee curve without aggravating the inclination. As can be observed, the intrusion movement did take place and the lower incisor buccolingual inclination ultimately showed a slight improvement (IMPA=107º).
When performing lower teeth retraction, in Angle’s Class II, Division 1 or Angle’s
biprotru-sion Class I, treated with bicuspids extraction, an overbite increase may occur, along with incisor axial inclination as teeth move towards the pos-terior region. In this situation, it is recommended that a mini-implant be inserted at the median line, based on the reasoning described above. Another possibility is the use of vertical loop retraction arch wires, which promotes the incorporation of incisor root lingual torque and allows the ortho-dontist to make compensatory bends.
As intrusion occurs, it is advisable to check the
A C E B D F
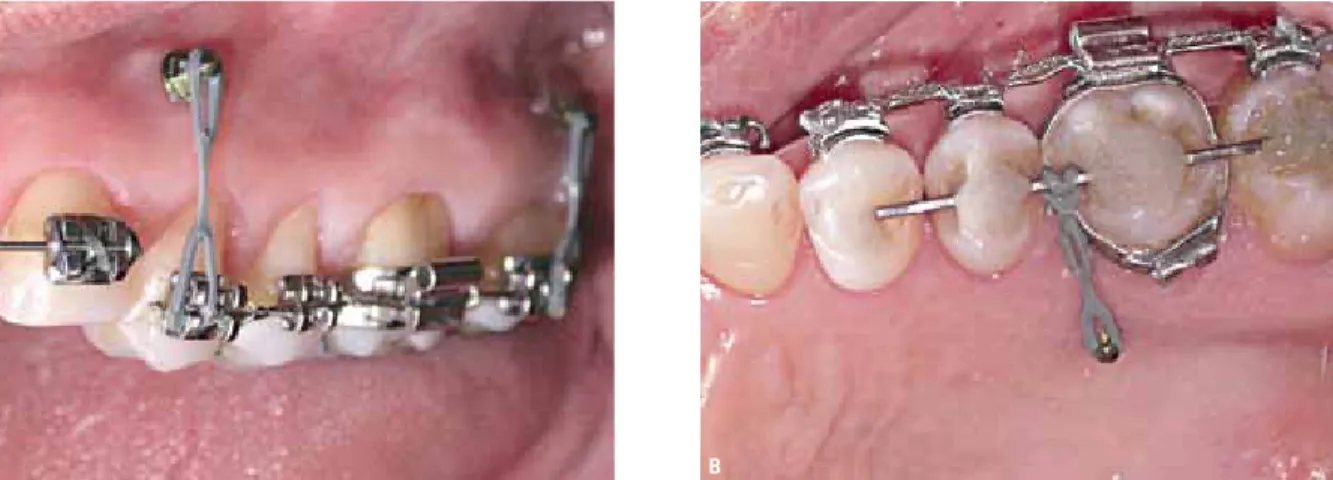
pending on mini-implant position - which is likely to tip the tooth. In this example, buccal activation alone will produce a root palatal torque compo-nent as cuspid intrusion occurs. To control this undesirable effect a straight .019” x .025” stain-less steel archwire could be fashioned and placed alongside the cuspid’s buccal surface immediately below the bracket. It should be underscored that a contact between the archwire and the teeth sur-face would be essential for controlling this effect. Such contact should, therefore, be monitored and adjusted at each new appointment1 (Fig. 4).
Another available alternative would be the insertion of a mini-implant in the buccal area, in the cuspid’s mesial region, and another one in the palatal area, in the distal region, or vice versa, and then activating the whole set by placing an elas-tic connecting the two mini-implants across the center of the cuspid crown. It is often necessary to place a strategic composite resin bridge on the cuspid crown to stabilize the elastic in its position. pOSTErIOr TEETh InTruSIOn
The need to intrude posterior teeth is mostly due either to a loss of antagonist units, or when there is vertical excess on the posterior region causing an anterior open bite3. Compared with an-terior tooth intrusion, posan-terior intrusion is harder to achieve owing to molars and bicuspids typically having more voluminous roots, which causes the arch wire form and the occlusal plane from an
anterior view, since changes may occur if intru-sion does not take place symmetrically on both the right and left hemi-arches. Another important factor to be monitored is lower anterior torque, which is often lost when intrusion is achieved us-ing light arch wires14.
CuSpID InTruSIOn
In conventional mechanics, cuspids are tradi-tionally intruded by means of arch wires with sec-ond order bends or bypass bends associated with elastics and using the neighboring teeth for an-chorage. In these cases, the extrusive component of the anchorage units cannot be avoided. Anoth-er altAnoth-ernative is the use of segmented arch wires relying on posterior teeth for anchorage. When a patient presents with dental losses in this area or with periodontal impairment in the existing teeth, this type of mechanics should be ruled out.
With the use of mini-implants, these undesir-able effects and/or limitations are no longer an is-sue. When one wishes to intrude a cuspid tooth while keeping its axial inclination, the buccal insertion of two mini-implants is recommended, one on the mesial and one on the distal region of the tooth targeted to be intruded. This approach is important since the use of only one mini-implant is bound to generate, in addition to the intrusive force, a distal or mesial force component -
de-FiGUre 4 - Upper cuspid intrusion using a .019”x .026”archwire alongside the unit to avoid buccal tipping.
alveolar bone to respond more significantly, ex-tending treatment length. The three-dimensional control of tooth position is instrumental in poste-rior intrusion success. As well as the vertical posi-tion, the arch form, inclination of the teeth, occlu-sal plane inclination and posterior torque should be planned according to the each individual treat-ment objectives14. Most cases require tooth body movement so that certain difficulties should be considered, such as the resistance center location, which is influenced, to a certain extent, by indi-vidual differences; the root shape and the amount of bone tissue, in addition to anatomical condi-tions, which often prevent the insertion of mini-implants in ideal sites7,14,21.
Single unit intrusion
A loss of dental units in the posterior region often brings about an extrusion in teeth on the antagonist arch. This extrusion not only compro-mises the space required for prosthetic rehabilita-tion but can also cause inconvenient results, such as periodontal defects and occlusal interferences during functional movements25. It is, thus, im-portant to correct this problem by intruding the tooth in question.
On the upper arch, in the event that one sin-gle posterior tooth requires intrusion, two mini-implants should be inserted, one buccally and one palatally, the former on the mesial and the latter on the distal region. The mini-implants, if
placed accordingly, will provide a controlled verti-cal movement without undesirable inclinations25. Force can be applied either by extending elastics between the mini-implants and the orthodontic accessories installed on the buccal and palatal surfaces of the tooth in question (Fig. 5A), or by extending elastics directly on the tooth’s occlusal surface and connecting one mini-implant to the other (Fig. 5B). In this case, caution should be ex-ercised not to allow the force action line to cause the elastic to drift towards the mesial or distal re-gion, which might lead the dental unit which is undergoing intrusion to tip1,2,16.
Intrusion of groups of teeth
Prior to the advent of mini-implants, the ma-jor alternatives for rehabilitating a patient who presented with a group of extruded teeth in the posterior region were often accomplished either by stripping the occlusal surfaces of these teeth or through a surgical procedure combined with impaction (embedding)5,17,23.
Nowadays, with the help of skeletal anchorage, a controlled orthodontic intrusion of these units can be achieved. In the event of a group of teeth requiring intrusion, the whole group should be handled all together in a group1,2,4. Brackets can be bonded to the buccal and palatal surfaces of the teeth involved and connected with segmented archwires; an orthodontic archwire segment can be bonded directly to the buccal and/or palatal
FiGUre 5 - Buccally and palatally placed mini-implants for intruding the upper first molar, activated with elastic on an archwire, via the buccal and palatal regions (A) and with an alastik chain, via the occlusal surface (B).
surfaces; alternatively, a single orthodontic arch-wire segment can be attached to the occlusal sur-faces, provided it does not cause any interference (Fig. 6).
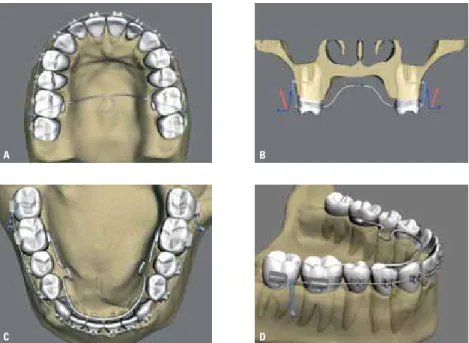
Even for a wider number of teeth, two mini-implants are usually sufficient to bear the load2,3. As can be seen in figure 7A, a loss of teeth in the right posterior segment of the lower arch deter-mined the extrusion of the second bicuspid and the first and second molars. Since the first mo-lar was more extruded than the other teeth, two mini-implants were initially inserted to achieve intrusion (Fig. 7B) until the teeth in the right
hemi-arch were leveled. An archwire was then attached to the occlusal surface of the bicuspid and the molars and the system was once again ac-tivated using elastic, and ultimately intruded all together in a group (Fig. 7C and 7D). Figure 7e shows the result achieved. Another example of the use of mini-implants with the same purpose can be viewed in figure 8.
Anterior open bite correction
Anterior open bite, especially in adult patients, is a condition which requires great effort to cor-rect and retain8,9,10. From a dentistry point of view, FiGUre 6 - Different forms of intrusion of a group of posterior teeth with some of the segments attached to brackets on the buccal and palatal regions (A, B and C); bonded directly to these surfaces (D) or attached to the occlusal surface (E, F). as can be seen, activation can be achieved using elastic on the archwire attached to the arch segments (A, B) or with an alastik chain running alongside the occlusal surface (C a F).
C D
E F
its etiology may be connected to a deficient al-veolar growth in the anterior region, an excessive alveolar growth in the posterior region, or both. In general, during dentition development, these issues can be easily addressed. However, as the growth phase ends, solutions become increasingly hard to work out through conventional methods.
When planning involves posterior teeth intru-sion, mini-implants once again emerge as an ex-cellent anchorage option. In the example shown in figure 9, an intrusion was necessary for both cases. Thus, a mini-implant was used on the buc-cal and one on the palatal region, on both the right and left sides. Since the teeth in the posterior region featured perfect alignment, the intrusion force was applied with straight wires. Under cer-tain conditions, attaching an arch segment to the teeth’s palatal surfaces is recommended in order
to prevent elastics or springs - which are used to achieve the intrusion - from touching the palatal mucous membrane.
Another alternative would be to insert mini-implants via the buccal region only. In this case, to control torque on the teeth undergoing intrusion it is suggested that a transpalatal bar be used on the maxilla, away from the palate by a distance identical with the number of millimeters planned for the intrusion; and on the mandible, a lingual bar, kept away from the incisors12,19,24 (Fig. 10). Should there be a transverse-related issue, the ap-pliance used for the upper arch expansion can be maintained, as shown in figure 11. In this case, the use of a Hyrax screw was preferred. It was placed away from the palate on a par with the desired intrusion.
Another detail requiring utmost attention is FiGUre 7 - a clinical case showing upper posterior teeth extrusion due to missing antagonist elements (A). in B, activation to achieve intrusion of a slightly extruded first molar, using two mini-implants. as can be observed, some resin was added to the mesiopalatal cuspid with the purpose of providing orientation for placement of an alastik chain, thereby preventing a drift to the mesial region, which might cause the cuspid to tip. an archwire was then attached to the occlusal surface C of the bicuspid and molars and the system was once again activated using elastic for group intrusion (D). in e, the resulting movement can be observed.
A B C
FiGUre 8 - intrusion of upper arch posterior units to allow rehabilitation using screws in the lower arch. a comparison between the models with the initial radiographs and the period after molar intrusion shows a clear improvement.
A B
E F
FiGUre 9 - Correction of anterior open bite using posterior segment intrusion of the upper arch. this movement was accomplished by means of mini-implantimplanted in the buccal and palatal surfaces between the first and second molars. illustration e shows the current condition.
FiGUre 10 - intrusion of posterior teeth using mini-implants via the buccal region only. to avert tipping toward the force line orientation, a palatal bar should be installed on the upper arch, but kept at a distance from the palate; and on the lower arch, a lingual bar, at a distance from the incisors.
A B
C D E
A B
the anteroposterior incisor relationship. If the ini-tial overjet is negligible, incisor trauma may ensue when closing the bite owing to the mandible’s counterclockwise rotation. Thus, to stave off this problem, the lower teeth should be retracted first, thereby creating the necessary overjet19.
With the purpose of avoiding a relapse, a high headgear traction force can be recommended for night use. It is also important for the patient to be monitored by a speech therapist to ensure proper tongue positioning, thus avoiding future problems related to changes in incisor position19,20.
OCCluSAl plAnE COrrECTIOn
In cases of occlusal plane inclination from a frontal view, both in the anterior and posterior re-gions, the insertion of mini-implants at strategic sites allows the use of a discrete force magnitude on either side, thereby facilitating the correction of such defect. The same applies to both the up-per and lower arches24. One example of such
pro-cedure in the anterior region can be seen in figure 12. The patient’s frontal view featured a significant difference between the right and left sides, with the right side looking clearly lower than the other side. A mini-implant was then installed between the cuspid and the bicuspid and the straight wire which was inserted in the orthodontic appliance was activated directly.
More severe occlusal inclinations can be found in patients who have lost dental units, patients featuring facial asymmetries, severe muscle dys-functions and certain localized pathologies. This issue is hard to address by means of conventional orthodontic resources alone. The use of mini-implants, in such cases, goes a long way towards streamlining the procedure for intruding an un-leveled arch segment6.
gEnErAl COnSIDErATIOnS
As mentioned above, when mini-implants are inserted for intrusion anchorage, these screws
FiGUre 11 - intrusion of posterior teeth using mini-implants via the buccal region only. a hyrax appliance was used to correct the transverse condition and provide control over buccolingual tipping during movement.
FiGUre 12 - Mini-implant insertion on the right hand side of the upper arch only, with the purpose of intruding this segment and correcting the occlusal plane.
A B C
should be placed as far apically as possible, both on the upper and lower arches, observing the overall limits of the keratinized mucous mem-brane. Such distance facilitates system activation in addition to decreasing the risk of damage to any adjacent dental units during intrusion, which was likely to occur given their proximity to a wider root surface area21. The alveolar region, however, should be avoided since this region is at a greater risk of local inflammation, which can impair mini-implant stability while increasing the likelihood of the miniscrews being covered with soft tissue. Within this context, some authors15,19 report that in the posterior region, the more apically placed a mini-implant, the more perpendicular to the cor-tical bone it should be positioned, to avoid perfo-rating the maxillary sinus21.
In some cases, however, when a patient has a very narrow keratinized mucous membrane, the mini-implant should be implanted in the alveolar mucous membrane. It is thus advisable, at first, to install an embedded mini-implant, under the gum, with a ligature tying it to the outer environment to allow activation with springs or elastics (Fig. 3). An incision is required to make way for a ta-pered bur or a spiral bur, depending on bone den-sity. At the time of insertion, the alveolar mucous membrane should be expanded and care should be taken to keep the incision borders out of the way, thereby preventing soft tissue from getting entangled in the mini-implant spires. After inser-tion and ligature placement, the incision should be sutured with one or two stitches.
As observed previously, the number of mini-implant and their insertion site depend directly on the number of teeth to be intruded and their location. In general, at least two mini-implants are necessary, one on the buccal and one on the palatal regions, strategically placed in the region where the orthodontist wishes to work. In this way, the appropriate teeth or segments are in-truded with utter buccopalatal tipping control. It should be emphasized that on the lower arch
the insertion of a mini-implant on the lingual side, although desirable for torque control, is a source of major discomfort for the patient. In this case, one alternative is to control the side ef-fects by placing a rather stiff stainless steel arch ire – such a .021” x .025”, for example – to in-crease the buccal root torque of the teeth target-ed for intrusion. In the event that there is only one tooth for intrusion, its buccal surface can be placed in contact with an orthodontic archwire, immediately above the bracket in like manner as the example shown for the upper cuspid (Fig. 4).
When the intrusion of a larger number of teeth is desired, more mini-implants can be used (Fig. 13). It should be born in mind13, however, that each mini-implant can sustain at most a load of 450cN, and that an optimum orthodontic force should be sufficient to stimulate cellular activity without completely occluding any blood vessels. By way of exemplification, the ideal20,22 force for an upper molar intrusion is approximately 150cN. Thus, in most cases, just a few mini-implants prove adequate in promoting an intrusion movement, although it is extremely relevant to consider the system being employed, the condition of the sup-porting alveolar bone and the patient’s individual response. It should be underscored that because the intrusive movement requires a greater bone resorption area, it tends to occur more slowly, on average, than other orthodontic movements. In some cases, there is a period of up to three months of inaction before any change in tooth position is noted. Movement should be allowed to start be-fore increasing the amount of force, since once the state of inertia is broken, the intrusion is bound to begin and continue with some consistency, at a rate of approximately 0.3 mm / month.
An important aspect which deserves consid-eration prior to intruding any given tooth is an analysis - using periapical and/or proximal radio-graphs - of the amount of bone present between such tooth and its adjacent elements. According to
Mathews and Kokich18, if the alveolar bone hap-pens to follow along the same irregular path as the marginal crests of the teeth in question, by leveling the crests through intrusion the bone will also be leveled. However, if the bone level be-tween the adjacent teeth is flat, the orthodontic intervention, by way of an intrusion, is likely to produce a vertical bone defect and, consequently, a periodontal pocket on the tooth’s proximal sur-face. In this case, according to the authors, the best approach would be to level out the occusal plane by stripping down the crown length.
Special care and continuous follow-up are required to ensure treatment success. Stringent control of oral hygiene, including professional at-tention before and after the orthodontic
move-ment, is essential since supragingival plaque can contribute to the formation of subgingival plaque during intrusion. Periodic periapical radiographs are also recommended to be taken at four to six month intervals, to monitor the risk of radicular resorption when predisposing factors are identi-fied, such as pipette-shaped roots or a record of previous traumas.
Finally, after intrusion has been achieved with the aid of mini-implants, it should be underscored that the same routine procedures should be tak-en as whtak-en utilizing convtak-entional mechanics. A three-month maintenance period should ensue to connect the tooth or set of teeth which were moved with ligature wire, thereby preventing a relapse.
FiGUre 13 - intrusion of four posterior teeth using two mini-implants via the buccal region. Since there were no antagonist teeth, buccolingual tipping control was achieved by means of an arch wire segment bonded to the occlusal surface of these units and tied to a mini-implant inserted in the palate.
Submitted in: July 2008
Revised and accepted in: August 2008
1. ARAUJO, T. M. Ancoragem esquelética com miniimplantes. In: LIMA FILHO, R. M. A.; BOLOGNESE, A. M. Ortodontia: arte e ciência. Maringá: Dental Press, 2007.
2. ARAUJO, T. M.; NASCIMENTO, M. H. A.; BEZERRA, F.; SOBRAL, M. C. Ancoragem esquelética em Ortodontia com miniimplantes. rev. Dental press Ortodon. Ortop. facial, Maringá, v. 11, n. 4, p. 126-156, jul./ago. 2006.
3. BAE, S. M.; PARK, H. S.; KYUNG, H. M.; KWON, O. W.; SUNG, J. H. Clinical application of micro-implant anchorage. J. Clin. Orthod., Boulder, v. 36, no. 5, p. 298-302, May 2002. 4. BAE, S. M.; KYUNG, H. M. Mandibular molar intrusion with
miniscrew anchorage. J. Clin. Orthod., Boulder, v. 40, no. 2, p. 107-108, Feb. 2006.
5. BELINFANTE, L. S.; ABNEY, J. M. A teamwork approach to correct a severe prosthodontic problem. J. Am. Dent. Assoc., Chicago, v. 91, no. 2, p. 357-359, Aug. 1975.
6. CARANO, A.; VELO, S.; LEONE, P.; SICILIANI, G. Clinical applications of the miniscrew anchorage system. J. Clin. Orthod., Boulder, v. 39, no. 1, p. 9-24, Jan. 2005.
7. COPE, J. B.; GRAHAM, J. W. Treatment planning for temporary anchorage device applications. In: COPE, J. B. OrthoTADS: the clinical guide atlas. Texas: Under Dog Media, 2007. 8. COSTA, A.; RAFFAINL, M.; MELSEN, B. Miniscrews as
orthodontic anchorage: a preliminary report. Int. J. Adult. Orthodon. Orthognath. Surg., Chicago, v. 13, no. 3, p. 201-209, 1998.
9. ERVERDI, N.; TOSUN, T.; KELES, A. A new anchorage site for the treatment of anterior open bite: zygomatic anchorage: case report. World J. Orthod., Carol Stream, v. 3, no. 2, p. 147-153, 2002.
10. ERVERDI, N.; USUMEZ, S.; SOLAK, A. New generation open-bite treatment with zygomatic anchorage. Angle Orthod., Appleton, v. 76, no. 3, p. 519-526, May 2006.
11. KANOMI, R. Mini-implant for orthodontic anchorage. J. Clin. Orthod., Boulder, v. 31, no. 11, p. 763-767, Nov. 1997. 12. KRAVITZ, N. D.; KUSNOTO, B. Posterior impaction with
orthodontic miniscrews for openbite closure and improvement of facial profile. World J. Orthod., Carol Stream, v. 8, no. 2, p. 157-166, Sept. 2007.
13. KYUNG, H. M. et al. handbook for the absoranchor orthodontic micro-implant. 3rd ed. [S.l.: s.n.], 2004.
14. LEE, J. S. Applications of orthodontic mini-implants. 1st ed. Canadá: Quintessence, 2007.
15. LINKOW, L. I. Implanto-orthodontics. J. Clin. Orthod., Boulder, v. 4, no. 12, p. 685-690, Dec. 1970.
16. MARASSI, C.; LEAL, A.; HERDY, J. L.; CHIANELLY, O.; SOBREIRA, D. O uso de miniimplantes como auxiliares do tratamento ortodôntico. Ortodontia SpO, São Paulo, v. 38, n. 3, p. 256-265, jul./set. 2005.
17. MASIOLI, D. L. C.; ALMEIDA, M. A. O.; BATITTUCC, E.; MEDEIROS, P. J. Intrusão ortodôntica de molares utilizando mini-placas e parafusos de titânio. rev. Clin. Ortodon. Dental press, Maringá, v. 4, n. 5, p. 81-87, out./nov. 2005.
18. MATHEWS, D. P.; KOKICH, V. G. Managing treatment for the orthodontic patient with periodontal problems. Semin. Orthod., Philadelphia, v. 3, no. 1, p. 21-38, Mar. 1997. 19. PARK, H. S.; KWON, O. W.; SUNG, J. H. Nonextraction
treatment of an open bite with microscrew implant anchorage. Am. J. Orthod. Dentofacial Orthop., St. Louis, v. 130, no. 3, p. 391-402, Sept. 2006.
20. PARK, H. S.; KWON, O. W.; SUNG, J. H. Uprighting second molars with micro-implant anchorage. J. Clin. Orthod., Boulder, v. 38, no. 2, p. 100-103, Feb. 2004.
21. POGGIO, P. M.; INCORVATI, C.; VELO, S.; CARANO, A. “Safe zones”: a guide for miniscrew positioning in the maxillary and mandibular arch. Angle Orthod., Appleton, v. 76, no. 2, p. 191-197, Mar. 2006.
22. REN, Y.; MALTHA, J. C.; KUIJPERS-JAGTMAN, A. M. Optimum force magnitude for orthodontic tooth movement: a systematic literature review. Angle Orthod., Appleton, v. 73, no. 1, p. 86-92, Feb. 2003.
23. ROSEN, P. S.; FORMAN, D. The role of orthognathic surgery in the treatment of severe dentoalveolar extrusion. J. Am. Dent. Assoc., Chicago, v. 130, no. 11, p. 1619-1622, Nov. 1999. 24. SUNG, J. H. et al. Microimplants in Orthodontics. Korea:
Dentos, 2006.
25. YAO, C. C.; WU, C. B.; WU, H. Y.; KOK, S. H.; CHANG, H. F.; CHEN, Y. J. Intrusion of the overerupted upper left first and second molars by mini-implants with partial-fixed orthodontic appliances: a case report. Angle Orthod., Appleton, v. 74, no. 4, p. 550-557, Aug. 2004.
Contact:
Telma Martins de Araújo
Av. Araújo Pinho, 62, Centro de Ortodontia e Ortopedia Facial Prof. José Édimo Soares Martins,
Faculdade de Odontologia da UFBA CEP: 40.110-150 - Canela - Salvador/BA E-mail: [email protected]