DEVELOPMENT GUIDE
ALTA DS 2
Copyright
Copyright © 2015 VIA Technologies Incorporated. All rights reserved.
No part of this document may be reproduced, transmitted, transcribed, stored in a retrieval system, or translated into any language, in any form or by any means, electronic, mechanical, magnetic, optical, chemical, manual or otherwise without the prior written permission of VIA Technologies, Incorporated.
Trademarks
All brands, product names, company names, trademarks and service marks are the property of their respective holders. Disclaimer
VIA Technologies makes no warranties, implied or otherwise, in regard to this document and to the products described in this document. The information provided in this document is believed to be accurate and reliable as of the publication date of this document. However, VIA Technologies assumes no responsibility for the use or misuse of the information in this document and for any patent infringements that may arise from the use of this document. The information and product specifications within this document are subject to change at any time, without notice and without obligation to notify any person of such change. VIA Technologies, Inc. reserves the right the make changes to the products described in this manual at any time without prior notice.
Revision History
Version Version Version
Version DateDate DateDate RemarksRemarks RemarksRemarks
0.1 2015/1/21 Initial external release
0.2 2015/2/10 Added display mode, changed section and adb
description
0.3 2015/4/20 Refined document
0.4 2015/4/20 Added adjust config and tool chain path
1.0 2015/4/27 Formal release version
1.01 2015/6/29 Applied document template and refined version code
1.02 2015/7/1 Refined document
1.03 2015/7/22 Refined document and documentation version
1.04 2015/7/24 Added OTA update steps
1.05 2015/7/31 Updated back page
1.06 2015/8/25 Added section 6.1 Setting Split/Clone Mode through S3
PCD Editor
1.07 2015/10/12 Removed ARTiGO A900, VAB-1000 in the document
Table of Contents
1.
1.
1.
1.
Introduction
Introduction
Introduction
Introduction ...
...
...
...
...
...
...
...
...
...
...
... 1
...
1
1
1
1.1.
Overview... 1
1.2.
Package Content ... 1
2.
2.
2.
2.
Establishing a Build Environment
Establishing a Build Environment
Establishing a Build Environment ...
Establishing a Build Environment
...
...
...
...
...
...
...
... 3
...
3
3
3
2.1.
Setting up a Linux build environment ... 3
2.2.
Installing the Tool Chain ... 3
2.3.
Installing the JDK... 4
2.4.
Installing the required packages... 6
3.
3.
3.
3.
Building the BSP
Building the BSP
Building the BSP
Building the BSP ...
...
...
...
...
...
...
...
...
...
...
...
... 7
7
7
7
3.1.
Prepare the BSP Source Tree ... 7
3.2.
BSP building procedure... 8
3.2.1.
Building the Kernel ... 8
3.2.2.
Building the Android... 9
3.2.3.
Building the U-Boot... 11
4.
4.
4.
4.
Making Android System Booting Media
Making Android System Booting Media
Making Android System Booting Media
Making Android System Booting Media ...
...
...
...
...
...
... 12
12
12
12
4.1.
Requirements... 12
4.2.
EVK Installation Package... 12
4.3.
Update the Firmware Package... 18
4.3.1.
How to update the U-Boot... 18
4.3.2.
How to update the boot.img ... 19
4.3.3.
How to update the system.img ... 19
4.3.4.
How to update the recovery.img ... 19
4.3.5.
How to update the userdata.img ... 20
4.3.6.
How to update the version information ... 20
4.3.7.
How to update the OTA package (Optional) ... 20
4.4.
Setup U-Boot additional environment variables... 22
4.5.
Adjust config file of Firmware Installation Package ... 23
5.
5.
5.
5.
Functionality
Functionality
Functionality
Functionality...
...
...
...
...
...
...
...
...
...
...
... 24
...
24
24
24
6.
6.
6.
6.
Platform Specific Setting
Platform Specific Setting
Platform Specific Setting ...
Platform Specific Setting
...
...
...
...
...
...
...
...
... 25
25
25
25
6.1.
Setting Split/Clone Mode through S3 PCD Editor ... 25
6.1.1.
Preparation... 25
6.1.2.
Setting Strategy... 26
Appendix A. Defi
Appendix A. Defi
Appendix A. Defi
Appendix A. Definitions
nitions
nitions
nitions ...
...
...
...
...
...
...
...
... 28
...
28
28
28
Appendix B. EVK Installation Package through vfat SD
Appendix B. EVK Installation Package through vfat SD
Appendix B. EVK Installation Package through vfat SD
Appendix B. EVK Installation Package through vfat SD ...
...
...
...
...
...
... 29
29
29
29
B.1. Requirements ... 29
B.2. EVK Installation Package... 29
Appendix C. Troubleshooting
Appendix C. Troubleshooting
Appendix C. Troubleshooting
Appendix C. Troubleshooting ...
...
...
...
...
...
...
...
... 31
...
31
31
31
C.1. Fail to login X Window or hang on Ubuntu 12.04.x ... 31
C.2. Fail to update the Firmware automatically ... 33
List of Figures
Figure 1 Debug port connection and setting... 13
Figure 2 Installation progessing ... 17
Figure 3 Finish installing and message shows up... 17
Figure 4 Finish installing and reboot count down procedure ... 18
List of Tables
Table 1 BSP content ... 1
Table 2 EVK content... 2
Table 3 Document content... 2
1.
1.
1.
1.
Introduction
Introduction
Introduction
Introduction
1.1.
Overview
The purpose of this Development Guide is to help you get started with
Android Board Support Package (BSP) for ALTA DS 2 platform
ALTA DS 2 platform
ALTA DS 2 platform
ALTA DS 2 platform.
This covers the topics such as:
Setting developmet environment
Creating your booting media and flash a new Android firmware / OS
image onto your system
Modifying the boot parameters to fit the case you use
1.2.
Package Content
The ALTA DS 2 Android BSP
ALTA DS 2 Android BSP
ALTA DS 2 Android BSP can be downloaded from the VIA Embedded
ALTA DS 2 Android BSP
website, it contains the following components:
BSP
BSP
BSP
BSP: The package includes U-Boot, Kernel, Android source code, Android
patches and tool chain.
BSP BSP BSP
BSP VersionVersion VersionVersion U
U U
U----BootBootBootBoot 2013.07
Kernel Kernel Kernel Kernel android-3.10 Android Android Android Android android-4.4.2_r2 Patch Patch Patch
Patch date code (YYMMDD.hhmm)
ToolChain ToolChain ToolChain ToolChain 2011.09 Table Table Table
Note: Note: Note: Note:
1. Android: Developers can download Android source code from Android Open Source Project as well.
2. Patch: Android patch code of ALTA DS 2.
3. ToolChain: The tool chain package is used to build u-boot and kernel.
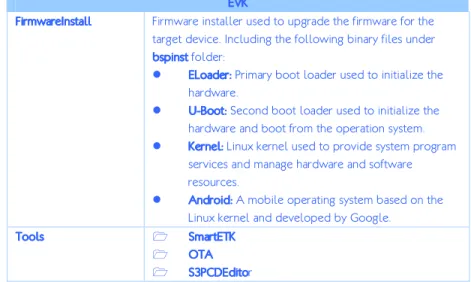
EVK (Evaluation Kit)
EVK (Evaluation Kit)
EVK (Evaluation Kit)
EVK (Evaluation Kit): The binary package includes eloader, U-Boot, Kernel,
Android and firmware installation package.
EVK EVKEVK EVK FirmwareInstall FirmwareInstall FirmwareInstall
FirmwareInstall Firmware installer used to upgrade the firmware for the target device. Including the following binary files under
bspinst bspinst bspinst bspinst folder:
ELoader:ELoader:ELoader:ELoader: Primary boot loader used to initialize the hardware.
UUUU----Boot:Boot:Boot:Boot: Second boot loader used to initialize the hardware and boot from the operation system.
Kernel:Kernel:Kernel:Kernel: Linux kernel used to provide system program services and manage hardware and software resources.
Android:Android:Android:Android: A mobile operating system based on the Linux kernel and developed by Google.
Tools Tools Tools
Tools SmartETKSmartETKSmartETKSmartETK OTAOTAOTAOTA S3PCDEditoS3PCDEditoS3PCDEditoS3PCDEditor
Table Table Table
Table 2222 EVK content EVK content EVK content EVK content
Document
Document
Document
Document: Includes the development guide and any other documents
required for the development.
Document DocumentDocument Document
Development Guide Evaluation Guide
Android Smart ETK SDK Programming Guide
Table Table Table
2.
2.
2.
2.
Establishing a Build
Establishing a Build
Establishing a Build
Establishing a Build
Environment
Environment
Environment
Environment
This chapter guides you through setting up your local working environment to
build the BSP.
2.1.
Setting up a Linux build environment
Developers have to setup a Linux environment for building the BSP. The
following Ubuntu branches are supported.
Version: Ubuntu 12.04 LTS 64-Bits
Developers can refer to
Android Source Code webpage
Android Source Code webpage
Android Source Code webpage
Android Source Code webpage
(
http://source.android.com/source/initializing.html
http://source.android.com/source/initializing.html
http://source.android.com/source/initializing.html
http://source.android.com/source/initializing.html
) to get more information
about setting up the development environment.
2.2.
Installing the Tool Chain
A tool chain installed is required before building the U-Boot and Linux Kernel
images. The following procedure would guide developers to setup the tool
chain properly.
Download the BSP Zip file from VIA Embedded website and
decompress it. Developers can get the Tool Chain under
BSP/ToolChain.
o
Package Na
Package Na
Package Na
Package Name
me
me
me:
:
:
: arm_201109_gcc4.6.1.tgz
o
Cross Compile
Cross Compile
Cross Compile
Cross Compile Name
Name
Name:::: arm-none-linux-gnueabi-
Name
o
Alias Name:
Alias Name:
Alias Name:
Alias Name: arm_1109_le-
Unpack arm_201109_gcc4.6.1.tgz
#The general user account is “user” and its home folder is /home/user in this example.
user@ubuntu:~$ mkdir ~/bin
user@ubuntu:~$ tar -zxf BSP/ToolChain/arm_201109_gcc4.6.1.tgz -C ~/bin
Export Tool Chain bin path.
The account for this example is a general user. To modify .bashrc
.bashrc
.bashrc
.bashrc this depends
on developer’s account home directory.
#The general user account is “user” and its home folder is /home/user in this example.
user@ubuntu:~$ vi ~/.bashrc
# Add Tool Chain bin path to $PATH
export PATH=~/bin/opt/codesourcery/arm-2011.09/mybin:$PATH
# Save and exit
user@ubuntu:~$ source ~/.bashrc
# Reload .bashrc
2.3.
Installing the JDK
The Android 4.4.2 requires Java JDK. A Java 6 SE needs to be installed
properly before building the Android framework. The following procedure
would guide developers through installing the Java JDK properly on Ubuntu.
There are two ways to install the Java JDK.
[Way
[Way
[Way
[Way 1]
1]
1]
1]
Install the JDK through apt package management
Default source list in Ubuntu 12.04 does not provide Java 6 JDK. Developers
have to add a new server manually.
user@ubuntu:~$ sudo add-apt-repository ppa:webupd8team/java user@ubuntu:~$ sudo apt-get update
Verify the JAVA version
user@ubuntu:~$ java –version java version "1.6.0_45"Java(TM) SE Runtime Environment (build 1.6.0_45-b06)
Java HotSpot(TM) 64-Bit Server VM (build 20.45-b01, mixed mode)
[Way 2]
[Way 2]
[Way 2]
[Way 2]
Download the corresponding version of Java JDK from Oracle official
website and install it. The Java 6 SE Development Kit is used by this
guide.
http://www.oracle.com/technetwork/java/javasebusiness/downloads/ja
va-archive-downloads-javase6-419409.html
Copy jdk binary to the library folder and execute the binary.
user@ubuntu:~$ cp jdk-xxxx-linux-xxx.bin /usr/libuser@ubuntu:~$ cd /usr/lib
user@ubuntu:~$ ./jdk-xxxx-linux-xxx.bin
# jdk-xxxx-linux-xxx.bin: is the JDK binary you downloaded.
Configure the Environment Variables for JDK.
user@ubuntu:~$ vi ~/.bashrc# Add JAVA_HOME, CLASSPATH and new PATH.
export JAVA_HOME=/<java install directory>/jdkx.xx.x_xx export CLASSPATH=.:$JAVA_HOME/lib
export PATH=$JAVA_HOME/bin:$PATH
# Save and exit
user@ubuntu:~$ source ~/.bashrc
# Reload .bashrc
# “x.xx.x_xx”: is the version number of java JDK. # <java install directory>: is the directory of JAVA
Verify the JAVA version
user@ubuntu:~$ java –version java version "1.6.0_45"Java(TM) SE Runtime Environment (build 1.6.0_45-b06)
Java HotSpot(TM) 64-Bit Server VM (build 20.45-b01, mixed mode)
2.4.
Installing the required packages
Developers should install the required packages according to the host OS
version. Developers should refer to
Android Source Code webpage
Android Source Code webpage
Android Source Code webpage
Android Source Code webpage
(
http://source.android.com/source/initializing.html
http://source.android.com/source/initializing.html)
http://source.android.com/source/initializing.html
http://source.android.com/source/initializing.html
)
)
)
to install the necessary
software packages before any development. Here is an example for
Ubuntu 12.04.x LTS 64-Bits:
user@ubuntu:~$ sudo apt-get install libglapi-mesa:i386
user@ubuntu:~$ sudo apt-get install git gnupg flex bison gperf build-essential zip curl libc6-dev libncurses5-dev:i386 x11proto-core-dev libx11-dev:i386 libreadline6-dev:i386 libgl1-mesa-glx:i386 libgl1-mesa-dev g++-multilib mingw32 tofrodos python-markdown libxml2-utils xsltproc zlib1g-dev:i386
user@ubuntu:~$ sudo ln -s /usr/lib/i386-linux-gnu/mesa/libGL.so.1 /usr/lib/i386-linux-gnu/libGL.so
user@ubuntu:~$ sudo apt-get install uboot-mkimage
Note: Note: Note: Note:
1. Due to libgl1-mesa-glx:i386 has dependence issue, please install it first. $ sudo apt-get install libglapi-mesa:i386
2. Please refer to Appendix C if developer encounters Ubuntu 12.04.3 (and above) booting hang issue after installing the “libglapi-mesa:i386” and “libgl1-mesa-glx:i386”.
3.
3.
3.
3.
Build
Build
Build
Building
ing
ing
ing the
the
the
the BSP
BSP
BSP
BSP
This chapter describes the BSP building procedure for the ALTA DS 2.
3.1.
Prepare the BSP Source Tree
The ALTA DS 2 Android BSP includes several source packages under BSP
BSP
BSP
BSP
directory and all the packages are packed as tgz format located in the
subdirectories with the same package name below.
Kernel Packages:
Kernel Packages:
Kernel Packages:
Kernel Packages:
o
KERNEL_Full_Src*.tgz
It is the full kernel source tree including the Linux 3.10.with
source code.
o
KERNEL_Modules_Src*.tgz
It is the module source code package working with the VIA
Elite E1000 graphic and video engines.
Android Package:
Android Package:
Android Package:
Android Package:
o
android-4.4.2_r2-140415.tgz
It is the android source code package downloaded from
Google.
https://android.googlesource.com
Patch Package:
Patch Package:
Patch Package:
Patch Package:
o
ANDROID_Patch_Src *.tgz
The patch is the modified sources from Google android
source package above.
o
U-BOOT_Full_Src*.tgz
It is the full U-Boot source code package.
3.2.
BSP building procedure
This section describes how to build the Kernel, Android and U-Boot.
3.2.1.
Building the Kernel
Followings are the reference commands to build the kernel:
# setup environment parameters
# The kernel source path in this example is BSP/Kernel
user@ubuntu:~$ export KERNEL_BASE_PKG=BSP/Kernel/KERNEL_Full_Src*.tgz user@ubuntu:~$ export KERNEL_MODULE_PKG=
BSP/Kernel/KERNEL_Modules_Src*.tgz
# my_dir can be changed to any folder name by developer
user@ubuntu:~$ export PROCESSING_PATH=my_dir
user@ubuntu:~$ export PROCESSING_KERNEL_PATH=$PROCESSING_PATH/kernel-3.10 user@ubuntu:~$ export PROCESSING_MODULE_PATH=$PROCESSING_PATH/kernel-3.10_modules
# build kernel
# decompress the full kernel source package to the processing folder
user@ubuntu:~$ tar zxf $KERNEL_BASE_PKG -C $PROCESSING_PATH user@ubuntu:~$ chmod +w $PROCESSING_KERNEL_PATH/* -R
user@ubuntu:~$ chmod +x $PROCESSING_KERNEL_PATH/build_emmc_dt.sh user@ubuntu:~$ cd $PROCESSING_KERNEL_PATH/
user@ubuntu:~$ ./build_emmc_dt.sh arm_1109_le- -j4
# build modules
# decompress the kernel module source package to the processing folder
user@ubuntu:~$ tar zxf $KERNEL_MODULE_PKG -C $PROCESSING_PATH user@ubuntu:~$ chmod +w $PROCESSING_MODULE_PATH/* -R
user@ubuntu:~$ make -C $PROCESSING_MODULE_PATH
KDIR=$PROCESSING_KERNEL_PATH MDIR=$PROCESSING_MODULE_PATH modules CROSS_COMPILE=arm_1109_le- -j4
# Check images generated under following directories after doing above procedures. Kernel : $PROCESSING_KERNEL_PATH/arch/arm/boot/zImage Modules : $PROCESSING_MODULE_PATH/s3g_core/s3g.ko $PROCESSING_MODULE_PATH/s3g_core/s3g_core.ko
3.2.2.
Building the Android
The Android image should be built according to the configuration. Followings
are the reference commands to build Android framework:
# setup environment parameters
# The Android source path in this example is BSP/Android
user@ubuntu:~$ export ANDROID_BASE_PKG=BSP/Android/android-4.4.2_r2-140415.tgz
# The Android patch files path in this example is BSP/Patch
user@ubuntu:~$ export ANDROID_PATCH_PKG=BSP/Patch/ANDROID_Patch_Src*.tgz
# my_dir can be changed to any folder name by developer
user@ubuntu:~$ export PROCESSING_PATH=my_dir
user@ubuntu:~$ export PROCESSING_ANDROID_PATH=$PROCESSING_PATH/android-4.4.2_r2
# build android
# decompress the Android original source package and the patch to the processing folder
user@ubuntu:~$ tar zxf $ANDROID_BASE_PKG -C $PROCESSING_PATH
user@ubuntu:~$ tar zxf $ANDROID_PATCH_PKG -C $PROCESSING_ANDROID_PATH
# update kernel (it's rename, not copy to kernel folder)
user@ubuntu:~$ cp -rf $PROCESSING_KERNEL_PATH/arch/arm/boot/zImage \ $PROCESSING_ANDROID_PATH/device/via/elite1000/kernel
user@ubuntu:~$ cp -rf $PROCESSING_MODULE_PATH/s3g_core/s3g.ko \ $PROCESSING_ANDROID_PATH/device/via/elite1000/
user@ubuntu:~$ cp -rf $PROCESSING_MODULE_PATH/s3g_core/s3g_core.ko \ $PROCESSING_ANDROID_PATH/device/via/elite1000/
user@ubuntu:~$ make -C $PROCESSING_ANDROID_PATH TARGET_PRODUCT=elite1000 \ TARGET_BUILD_VARIANT=user -j4
or
user@ubuntu:~$ make -C $PROCESSING_ANDROID_PATH TARGET_PRODUCT=elite1000 \ TARGET_BUILD_VARIANT=userdebug -j4
# build otapackage
user@ubuntu:~$ make -C $PROCESSING_ANDROID_PATH otapackage \ TARGET_PRODUCT=elite1000 TARGET_BUILD_VARIANT=user -j4
or
user@ubuntu:~$ make -C $PROCESSING_ANDROID_PATH otapackage \ TARGET_PRODUCT=elite1000 TARGET_BUILD_VARIANT=userdebug -j4
# Check images generated under following directories after doing above procedures. $PROCESSING_ANDROID_PATH/out/target/product/elite1000/boot.img $PROCESSING_ANDROID_PATH/out/target/product/elite1000/recovery.img $PROCESSING_ANDROID_PATH/out/target/product/elite1000/system.img $PROCESSING_ANDROID_PATH/out/target/product/elite1000/userdata.img $PROCESSING_ANDROID_PATH/out/target/product/elite1000/cache.img $PROCESSING_ANDROID_PATH/out/target/product/elite1000/*ota*.zip //ota package $PROCESSING_ANDROID_PATH/out/target/product/elite1000/obj/PACKAGING/target
_files_intermediates/*target_files*.zip //target file
# post build for release keys and sign (optional, for release purpose only)
3.2.3.
Building the U-Boot
The U-Boot would initiate the required hardware for booting and loading the
kernel image from boot storage into memory. Followings are the reference
commands to build the U-Boot:
# setup environment parameters
# The U-Boot source path in this example is BSP/U-Boot
user@ubuntu:~$ export UBOOT_FULL_PKG=BSP/U-Boot/U-BOOT_Full_Src*.tgz
# my_dir can be changed to any folder name by developer
user@ubuntu:~$ export PROCESSING_PATH=my_dir
user@ubuntu:~$ export PROCESSING_UBOOT_PATH=$PROCESSING_PATH/uboot-2013.07
# build uboot
# decompress the source package to the processing folder
user@ubuntu:~$ tar zxf $UBOOT_FULL_PKG -C $PROCESSING_PATH user@ubuntu:~$ chmod +w $PROCESSING_UBOOT_PATH/* -R user@ubuntu:~$ chmod +x
$PROCESSING_UBOOT_PATH/build_elite1000_evm_emmc_config.sh user@ubuntu:~$ cd $PROCESSING_UBOOT_PATH/
user@ubuntu:~$ ./build_elite1000_evm_emmc_config.sh arm_1109_le- -j4
# Check images generated under the directory after doing above procedures.
$PROCESSING_UBOOT_PATH/u-boot.bin $PROCESSING_UBOOT_PATH/u-boot.vcd
4.
4.
4.
4.
Making Android System
Making Android System
Making Android System
Making Android System
Booting Media
Booting Media
Booting Media
Booting Media
This chapter describes how to install and upgrade the firmware for ALTA DS 2
platform. Developers could follow the procedure described in section 4.1
below for installing the firmware provided by the EVK software package.
Developers could also prepare the firmware installation package for firmware
upgrade after the modification on BSP by following the rest of content in this
section.
4.1.
Requirements
Linux development computer
SD storage card
EVK package
o
Elite1000 Android4.4.2 EVK*.tgz (Support ext4 SD)
o
Elite1000 Android4.4.2 FirmwareInstall vfat bspinst*.tgz
(Support vfat SD)
Note: Note: Note: Note:
1. For the vfat EVK installation package, please refer to Appendix B to get more installation process.
4.2.
EVK Installation Package
The up-to-date firmware is included in the latest EVK package which could be
downloaded from VIA Embedded Website. Developers can follow the steps
to install the firmware package which is supported in ext4 formatted SD
storage card for evaluation from EVK without building the BSP directly.
Step 1:
Step 1:
Step 1:
Step 1: Prepare a SD storage card with ext4 formatted.
Step 2:
Step 2:
Step 2:
Step 2: Copy firmware package from /EVK/FirmwareInstall/*.* to SD storage
card root directory. Developers can check content in the SD storage card
when finish copying the files.
#The mount path of SD for this example is /mnt/tmp1
user@ubuntu:~$ ls /mnt/tmp1
bspinst _EXT4_SD_CARD_ONLY_ scriptcmd
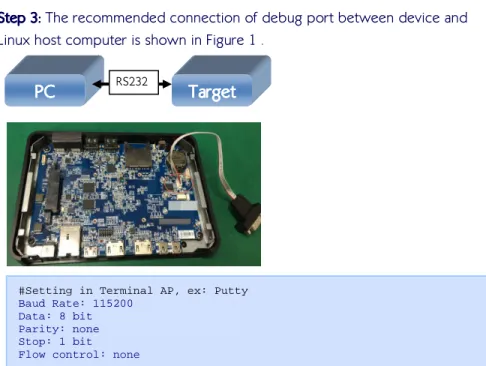
Step 3:
Step 3:
Step 3:
Step 3: The recommended connection of debug port between device and
Linux host computer is shown in Figure 1 .
#Setting in Terminal AP, ex: Putty
Baud Rate: 115200 Data: 8 bit Parity: none Stop: 1 bit Flow control: none
Figure Figure Figure
Figure 111 Debug port connection and setting1 Debug port connection and setting Debug port connection and setting Debug port connection and setting
The U-Boot will wait 3 seconds to stop booting after powering on by pressing
any key. When booting is stopped, that prompt sign will show up on terminal
PC
PC
PC
screen. Developers can skip to access U-Boot setting if nothing needs to be
changed.
#The booting message for this example is ALTA DS 2
eloader-32.00.01 start up! board_id:73a1
cpu_freq: 1G mclk: 667M
Product Version:unspecified Update List (Commit):unspecified
U-Boot 32.01.00-elite1000 (May 21 2015 - 11:38:29) Board: ELITE1000 EVM
I2C: ready
No support HDMI-IN u-boot, Only reserve 8MB for secure boot DRAM: 2 GiB
MMC: S3Graphics Elite SD/MMC: 0, S3Graphics Elite SD/MMC: 1, S3Graphics Elite SD/MMC: 2
connected devices = 0x8000 Bios connect devices is 0x8000. IGA1 device is 0x8000
IGA2 device is 0x0
Output for IGA1 is: 0x8000
SD/MMC: Select 400KHz as clock rate mask data:4
elite_mci_command: waiting for status update mask data:4
elite_mci_command: waiting for status update SD/MMC: Select 400KHz as clock rate
SD/MMC: Select 50MHz as clock rate
Loading boot logo BMP file w/ 502x302 from eMMC set mode on IGA[0]->DP5(Preferred Mode) [OK] source mode: 1920x1200, 32 bit
scaler size: 1920x1200 dest mode: 1920x1200@6000
Elite PCIe port 0: pp->base 0 0xd80b0000 RP before 0x250 0x20000007
RP middle 0x250 0x20000003 RP after 0x250 0x20000003
Elite PCIe port 1: pp->base 1 0xd80c0000 RP before 0x250 0x20000006
RP middle 0x250 0x20000002 RP after 0x250 0x20000002
Set 0 norm base address d80b1018 base c0000000, size 00001000 Set 1 perf base address d80b1020 base c0100000, size 00004000 In: serial
Out: serial Err: serial
press any key to abort fastboot! 0
Device is locked lba size = 512
========= ====================== ============== 34 4194304( 4M) bootlogo 8226 524288( 512K) deviceinfo 9250 2097152( 2M) devicetree 13346 16777216( 16M) misc 46114 33554432( 32M) recovery 111650 33554432( 32M) boot 177186 536870912( 512M) system 1225762 536870912( 512M) cache 2274338 2744630272( 2617M) userdata ========= ====================== ============== info partition magic 0x0 invalid, assuming none No existing device info found.
Setting serial number from constant (no dieid info) fastboot serial_number = 00123ABCDEF
Returning key pressed false boot_method is 1
fbt_preboot: request for a normal boot Net: REALTEK RTL8168 @ 0xc0000000 MCFG: RTL8168G/8111G (0020) RTL8168
Hit any key to stop autoboot: 3
#To type “pri” to print out current U-Boot parameter or type “boot” to boot up directly S3 # pri androidno=030a3d8408e49475 baudrate=115200 bootargs=console=ttyS1,115200n8 root=/dev/mmcblk0p1 rootflags=errors=remount-ro,commit=0 rootfstype=
ext4 rw init=/init rootdelay=1 androidboot.serialno=030a3d8408e49475 bootargs_default=console=ttyS1,115200n8 root=/dev/mmcblk0p1
bootargs_emmc=setenv bootargs ${kernelargs}
androidboot.serialno=${androidno} root=/dev/mmcblk0p9 rootwait rootflags=errors=remount-ro,commit=0 rootfstype=ext4 rw ${mtdparts} init=/init rw
bootargs_mmc=setenv bootargs ${kernelargs}
androidboot.serialno=${androidno} root=/dev/mmcblk0p1 ro
otwait rootflags=errors=remount-ro,commit=0 rootfstype=ext4 rw ${mtdparts} init=/init rw
bootargs_nand=setenv bootargs ${kernelargs}
androidboot.serialno=${androidno} root=/dev/mtdblock15 rootfstype=yaffs2 init=/init rw
bootcmd=emmc format;run bootargs_mmc; ext4load mmc 0:1 0x0 scriptcmd; if iminfo 0x0; then source 0;
else run bootcmd_mmc; fi
bootcmd_default=run bootargs_mmc; ext4load mmc 0:1 0x0 scriptcmd; if iminfo 0x0; then source 0; else
run bootcmd_mmc; fi
bootcmd_emmc=run bootargs_emmc && ext4load mmc 2:9 0x6000000 elite1000-emmc.dtb; ext4load mmc 2:9 0x
2800000 uImage; if iminfo 0x2800000; then bootm 0x2800000 - 0x6000000; else run bootcmd_nand; fi
bootcmd_mmc=run bootargs_mmc && ext4load mmc 0:1 0x6000000 bspinst/elite1000-emmc.dtb; ext4load mmc
0:1 0x2800000 bspinst/uImage; if iminfo 0x2800000; then bootm 0x2800000 - 0x6000000; else run bootcmd_emmc; fi
bootcmd_nand=run bootargs_nand; setenv bootcmd "booti boot"; boot; bootdelay=3 bootdir=/boot bootfile=uImage ethact=RTL8168 ethaddr=00:1a:32:b0:12:63 fastboot_unlocked=0 fdt_high=0xffffffff fdtaddr=0x10000000 fdtfile=undefined filesize=dc2 initrd_high=0xffffffff kernelargs=console=ttyS1,115200n8 rootdelay=1 loadaddr=0x80200000 mtdids=nand0=nand mtdparts=mtdparts=nand:4M(secureboot),4M(secureos),4M(audiofirmware),2M(ub oot_env),4M(uboot),4M(boot_logo),4M(nvram),12M(devicetree),32M(otaloader), 32M(iploader),16M(device_info),16M(misc),16M(boot),16M(recovery),384M(syst em),32M(package),384M(cache),-(data)
nand_setup=ext4load mmc 0:1 0x2000000 bspinst/boot_script.uimg; source 0x2000000
other_env=ext4load mmc 0:1 0x1000 bspinst/other_env.uimg; source 0x1000; rdaddr=0x81000000
setup_bootloader=ext4load mmc 0:1 0x1000 bspinst/bootloader_setup.uimg; source 0x1000;
setup_emmc=ext4load mmc 0:1 0x1000 bspinst/bootloader_setup.uimg; source 0x1000; ext4load mmc 0:1 0x1000 bspinst/uboot_emmc_setup.uimg; source 0x1000;
setup_img=ext4load mmc 0:1 0x1000 bspinst/img_setup.uimg; source 0x1000; setup_nand=ext4load mmc 0:1 0x1000 bspinst/bootloader_setup.uimg; source 0x1000; ext4load mmc 0:1 0x1000 bspinst/uboot_nand_setup.uimg; source 0x1000;
stderr=serial stdin=serial stdout=serial
Environment size: 2791/65531 bytes S3 # boot
Step 4:
Step 4:
Step 4:
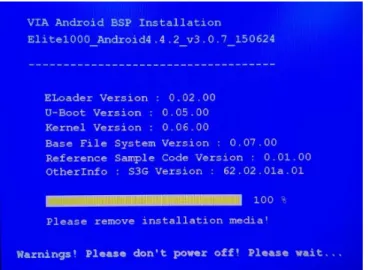
Step 4: Insert the SD storage card to the target device and power it on.
Installation will be executed automatically as shown in Figure 2~Figure 3.
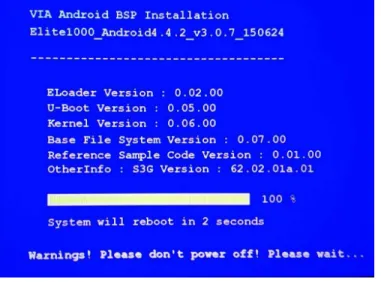
Step 5:
Step 5:
Step 5:
Step 5: Remove the SD storage card when “Please remove installation media”
message is shown (Figure 4). The device will reboot automatically and boot
up Android.
Figure Figure Figure
Figure 222 Installation progessing2 Installation progessing Installation progessing Installation progessing
Figure Figure Figure
Figure Figure Figure
Figure 444 Finish installing and reboot count down procedure4 Finish installing and reboot count down procedure Finish installing and reboot count down procedure Finish installing and reboot count down procedure
4.3.
Update the Firmware Package
Developers can skip 4.3.1~4.3.6 if it’s not needed to update the firmware
package which is built by them.
4.3.1.
How to update the U-Boot
Developers could update the U-Boot image in SD storage card then upgrade
the firmware for ALTA DS 2 after the U-Boot is modified. Follow the
procedure to update the U-Boot image in the firmware installation package.
Refer to “Build U-Boot” section of Development Guide to get the
u-boot.bin
4.3.2.
How to update the boot.img
Developers would need to update the boot.img image in SD storage card
then upgrade the firmware for ALTA DS 2 after the Android framework is
modified. Follow the procedure to update the boot.img image in the firmware
installation package.
Refer to “Build Android” section of Development Guide to get the
u-boot.img
Copy boot.img to the /bspinst/boot.img into SD storage card
4.3.3.
How to update the system.img
Developers would need to update the system.img image in SD storage card
then upgrade the firmware for ALTA DS 2 after the Android framework is
modified. Follow the procedure to update the system.img image in the
firmware installation package.
Refer to “Build Android” section of Development Guide to get the
system.img
Copy system.img to the /bspinst/system.img of SD storage card
4.3.4.
How to update the recovery.img
Developers would need to update the recovery.img image in SD storage card
then upgrade the firmware for ALTA DS 2 after the Android framework is
modified. Follow the procedure to update the recovery.img image in the
firmware installation package.
Refer to “Build Android” section of Development Guide to get the
recovery.img
4.3.5.
How to update the userdata.img
Developers would need to update the userdata.img image in SD storage card
then upgrade the firmware for ALTA DS 2 after the Android framework is
modified. Follow the procedure to update the userdata.img image in the
firmware installation package.
Refer to “Build Android” section of Development Guide to get the
userdata.img
Copy userdata.img to the /bspinst/userdata.img of SD storage card
4.3.6.
How to update the version information
Developers could set the proper version number by modifying the version file
below.
Modify /bspinst/version in SD storage card
4.3.7.
How to update the OTA package (Optional)
Developers can update the OTA package locally. The OTA package for this
example is obtained from EVK/Tools/signed-elite1000-ota-*.zip.
Step1
Step1
Step1
Step1:::: Copy zip file to the SD storage card or USB flash drive.
Step2
Step2
Step2
Step2:::: Insert the SD storage card or USB flash drive to the target device.
Step3
Step3
Step3
Step3:::: Make sure the debug port is connecting to the PC through the RS232
cable.
Step4
Step4
Step4
Step4:::: Power on the target device and wait for Andorid booting up
completely. Developers can see the prompt as below:
# Press “Enter” key in the terminal applaiction if Android boot up completely
Step
Step
Step
Step5:
5:
5: Execute the following command:
5:
# Press “Enter” key in the terminal applaiction if Android boot up completely
root@elite1000:/ #
root@elite1000:/ # mkdir /cache/recovery/
root@elite1000:/ # cp -f /mnt/<<Path of Storage>>
/signed-elite1000-ota-*.zip /cache //File name depend on the real full file name
root@elite1000:/ # echo "--update_package=/cache/signed-elite1000-ota-*.zip" > /cache/recovery/command
root@elite1000:/ #reboot recovery
Figure Figure Figure
Figure 555 OTA in progress5 OTA in progress OTA in progress OTA in progress
Step
Step
Step
Step6:
6:
6: System will reboot when OTA finish. Developer can check log file
6:
under /cache.
4.4.
Setup U-Boot additional environment
variables
U-Boot already has its own default environment variables after erasing and
flashing u-boot.bin to SPI ROM. If developers want to add additional variables,
developers could modify the script file ‘other_env.uimg’. Please prepare an
Ubuntu working system and make sure that ‘apt-get install uboot-mkimage’ has
been installed.
Make sure the uboot-mkimage has been installed.
4.4.1.
How to make ‘other_env.uimg’?
Follow U-Boot command rules and store the commands in a plain text file. For
example, create a <my_other_env>.txt
<my_other_env>.txt
<my_other_env>.txt file as follows:
<my_other_env>.txt
# create U-Boot image script file.
user@ubuntu:~$ mkimage -A arm -T script -C none -d <my_other_env>.txt other_env.uimg
4.5.
Adjust config file of Firmware Installation
Package
To modify /bspinst/bspinst.cfg
/bspinst/bspinst.cfg
/bspinst/bspinst.cfg
/bspinst/bspinst.cfg, developers can refer to the setting below
depending on the platform.
#Example setenv boot-target ds2-2G <!-- boot-target : vab1000 /* vab1000 */, a900 /* a900 */, ds2-1G /* ds2-1G */, ds2-2G /* ds2-2G */, -->
5.
5.
5.
5.
Functionality
Functionality
Functionality
Functionality
ALTA DS 2 is designed with enhanced features including UART and Watchdog
Timer support. These Functions can be controlled by Smart ETK Tool under
Android Environment. For more details of Smart ETK, please refer to " Android
" Android
" Android
" Android
Smart ETK SDK Programming Guide.pdf"
Smart ETK SDK Programming Guide.pdf"
Smart ETK SDK Programming Guide.pdf"
Smart ETK SDK Programming Guide.pdf" in the "Doc
"Doc
"Doc
"Document
ument
ument"""" Folder and install
ument
the same APK from /EVK/Tools/SmartETK
/EVK/Tools/SmartETK
/EVK/Tools/SmartETK
/EVK/Tools/SmartETK for evaluation directly.
6.
6.
6.
6.
Platform
Platform
Platform
Platform Specific Setting
Specific Setting
Specific Setting
Specific Setting
6.1.
Setting Split/Clone Mode through S3 PCD
Editor
The supported device is listed below.
ALTA DS 2 2GB RAM SKU
To enable the Split/Clone Mode Support in ALTA DS 2, VIA provides an
Editor Tool to enable HDMI2 output.
6.1.1.
Preparation
The S3 PCD Editor Tool was located in the "TestTool" Folder and named as
"S3 PCD Editor.exe". It is a Windows-Based Execution File and needs to be
used under Windows OS. To use the S3 PCD Editor, the following items need
to be prepared for S3 PCD Editor Reference:
1.
Target U-Boot Binary File
2.
The "u-boot.vcd" file which corresponds to Target U-Boot Binary
3.
S3 PCD Editor.exe
Items (1) and (2) will be generated in the root folder of U-Boot Source Code
after compiling the U-Boot. Refer to “Build U-Boot” section for details.
6.1.2.
Setting Strategy
Follow the steps:
1.
Execute the "S3 PCD Editor.exe" and open the "u-boot.bin" of the Target
U-Boot Binary.
# Make sure the corresponding "u-boot.vcd" is located in the same
folder.
2.
Select the "Supported Display Devices" Menu and enable the "DVO" to
support HDMI 2 output.
4.
Copy the modified u-boot.bin to the /bspinst/u-boot.bin to update
U-Boot. For more details, please refer to Chapter 4.
5.
To set Split/Clone Mode under Android OS:
Setting->Display
Appendix A.
Appendix A.
Appendix A.
Appendix A.
Definitions
Definitions
Definitions
Definitions
Android Android Android
Android Android is a trademark of Google Inc. ARM
ARM ARM
ARM ARM is a trademark of ARM Inc. BSP
BSP BSP
BSP Board Support Package HDMI
HDMI HDMI
HDMI High Definition Multimedia Interface SD
SD SD
SD Secure Digital Multimedia Card Micro SD
Micro SD Micro SD
Micro SD Micro Size Secure Digital Multimedia Card
Elite Elite Elite
Elite E E E1000 E100010001000 SoC Chipset Name VIA
VIA VIA
Appendix B.
Appendix B.
Appendix B.
Appendix B.
EVK Installation
EVK Installation
EVK Installation
EVK Installation
Package
Package
Package
Package through vfat SD
through vfat SD
through vfat SD
through vfat SD
B.1.
Requirements
Linux development computer
SD storage card
EVK package
o
Elite1000 Android4.4.2 FirmwareInstall vfat bspinst*.tgz
(Support vfat SD)
B.2.
EVK Installation Package
Step 1:
Step 1:
Step 1:
Step 1: Prepare a SD storage card with vfat formatted.
Step 2:
Step 2:
Step 2:
Step 2: Copy the firmware package from /EVK/FirmwareInstall_vfat_bspinst/*.*
to SD storage root directory.
Step
Step
Step
Step 3:
3:
3: Connect the debug port between device and Linux host computer.
3:
Step 4:
Step 4:
Step 4:
Step 4: Insert the SD storage card to the target device and power it on. Press
any key to access U-Boot setting.
Step 5:
Step 5:
Step 5:
Step 5: Modify U-Boot parameter
# Modify U-Boot parameter to set fat booting.
setenv bootcmd 'emmc format;run bootargs_mmc; fatload mmc 0:1 0x0 scriptcmd; if iminfo 0x0; then source 0; else run bootcmd_mmc; fi' setenv bootcmd_default 'run bootargs_mmc; fatload mmc 0:1 0x0 scriptcmd; if iminfo 0x0; then source 0; else run bootcmd_mmc; fi'
setenv bootcmd_mmc 'run bootargs_mmc && fatload mmc 0:1 0x6000000 bspinst/elite1000-emmc.dtb; fatload mmc 0:1 0x2800000 bspinst/uImage; if iminfo 0x2800000; then bootm 0x2800000 - 0x6000000; else run bootcmd_emmc;
fi'
setenv nand_setup 'fatload mmc 0:1 0x2000000 bspinst/boot_script.uimg; source 0x2000000'
setenv setup_bootloader 'fatload mmc 0:1 0x1000 bspinst/bootloader_setup.uimg; source 0x1000;'
setenv setup_emmc 'fatload mmc 0:1 0x1000 bspinst/bootloader_setup.uimg; source 0x1000; fatload mmc 0:1 0x1000 bspinst/uboot_emmc_setup.uimg; source 0x1000;'
setenv setup_nand 'fatload mmc 0:1 0x1000 bspinst/bootloader_setup.uimg; source 0x1000; fatload mmc 0:1 0x1000 bspinst/uboot_nand_setup.uimg; source 0x1000;'
setenv setup_img 'fatload mmc 0:1 0x1000 bspinst/img_setup.uimg; source 0x1000;'
setenv setup_bootloader 'fatload mmc 0:1 0x1000 bspinst/bootloader_setup.uimg\; source 0x1000\;'
setenv bootcmd_mmc 'run bootargs_mmc && fatload mmc 0:1 0x6000000 bspinst/elite1000-emmc.dtb\; fatload mmc 0:1 0x2800000 bspinst/uImage\; bootm 0x2800000 - 0x6000000\;'
# Boot up after setting.
boot
Step 6:
Step 6:
Step 6:
Step 6: Installation will be executed automatically.
Step 7:
Step 7:
Step 7:
Step 7: Remove the SD storage card when the message “Please remove
installation media” is shown. The device will reboot automatically and then
bootup Android.
Appendix C.
Appendix C.
Appendix C.
Appendix C.
Troubleshooting
Troubleshooting
Troubleshooting
Troubleshooting
C.1.
Fail to login X Window or hang on Ubuntu
12.04.x
Symptom:
OS may hang in the “login screen” shown when user has finished
installing the OS and reboot for the first time.
X window may hang after installing the package “
libglapi-mesa:i386
”
and “
libgl1-mesa-dri:i386
”.
Workaround:
Boot up the OS and press “ESC” until Grub screen is shown. (See the
PIC, please)
Edit the boot command by pressing “e” and user can enter the edit
progress.
To replace “quite splash” by “text”, press F10 to boot up OS.
User will enter the text mode.
Be sure the network is workable and user can install
xserver-xorg-lts-precisely to fix the X Window login issue.
$sudo apt-get install xserver-xorg-lts-precise
C.2.
Fail to update the Firmware automatically
If it cannot be updated automatically after powering on, developers can type
the command below in U-Boot to update the firmware manually.
ext4load mmc 0:1 0 scriptcmd; source 0 (please press any key on normal boot) press any key to abort fastboot! fbt_preboot: request for a normal boot Hit any key to stop autoboot: 0