user documentation
Table of Contents
Docsoft:TE Settings
3Editing Metadata
4Editing/Inserting Words
4How to Insert a New Word 4
How to Edit an Existing Word 5
Editing/Inserting Utterances
5How to Insert a New Utterance 5
How to Edit an Existing Utterance 5
Exporting
6Media Locations
6Media Location Errors 6
Changing the Media Location 6
Finder
7Go To Time
7Toolbars
7Timestamp Formats
8Supported File Types
9Docsoft Contact Information
9
Using Docsoft:TE to Edit Transcripts
Docsoft:TE’s primary function is to allow for easy correction and modification of transcripts that are generated automatically using the Docsoft:AV Audio Mining tool. With an easy to use, dynamic interface, Docsoft:TE makes editing transcripts in near real-time easier than you ever imagined.
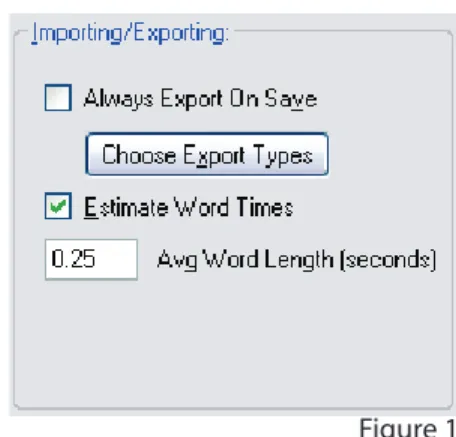
Docsoft:TE Settings
(Options > Settings)Docsoft:TE comes equipped with the tools to handle all transcription editing tasks. Use the Docsoft:TE settings menu to customize your editing experience.
Always Export On Save
Docsoft:TE will always export the selected types of files whenever a document is saved.
Choose Export Types
See the ‘Exporting’ section of this document for explanation.
Estimate Word Times
When Docsoft:TE encounters a word that has invalid information for the word’s length and offset, it will attempt to estimate these values based on the other words around the word.
Average Word Length (In Seconds)
If Docsoft:TE does not have enough information to make a reasonable estimate for the word length, it will use this value.
Change Font
Change the font of Docsoft:TE. Skip Time (In Seconds)
The time used to skip forward or backwards through keyboard shortcuts. Frame Rate Increment (max 10)
The value used when increasing/decreasing the media player frame rate through keyboard shortcuts. Autostart Media Player
Automatically start playing media after it is loaded. Pause the Player On Item Selection
Pauses the media player whenever an item is selected. Insert On Whitespaces
Docsoft:TE will begin inserting a new word when you start typing on a whitespace (when the
movie is paused). If this is not checked, you will not be able to insert a new word simply by typing.
Figure 2 Figure 1
Clear Whitespaces
Docsoft:TE refers to all types of punctuation as whitespaces. When you try to delete any punctuation, Docsoft:TE will clear the
punctuation and replace it with a whitespace. If this setting is not checked, the punctuation will be completely removed.
Show Confidence Levels
Underline words that are below the current confidence limit. Confidence Limit (%)
Docsoft:TE will not underline words above this value.
Editing Metadata
Editing the metadata of the file can have many benefits. From the ability to search across file information, down to the ease of file organization, the ability to edit metadata is a very useful and powerful tool.
Methods to edit metadata
Select ‘Edit > Edit Metadata...’ from the main menu Select the Edit Metadata icon from the toolbar Use the appropriate keyboard shortcuts
Media URL
Will be auto-populated with the source location of the original media file. Virtual URI
The Virtual URI is the playback file. This could be a streaming media server, or a compressed version of the file for playback over the internet.
Title
Create / Change title of the opened file.
Note - This does not change the file name, only the title in the metadata.
Author
Actual content creator / copyright holder Description
Keywords or phrases detailing the basic content of the file.
Editing/Inserting Words
When you edit a word, you are modifying one single word in a larger utterance. The utterance timestamp will not change when you add or delete a word. To edit utterance length,see ‘Editing/In-serting Utterances’ in the documentation.
• • •
How to Insert a New Word
To insert a new word in your current transcript, use one of the following methods:
Use the keyboard shortcut ‘Ctrl-I’ while editing the transcript. Ctrl-I will expand ‘Word’ window [Figure 4]
Text – New word addition, input must be valid to save document Offset – Distance (in seconds) from the utterance timestamp Length – The length (in seconds) of the word
If Insert On Whitespaces is enabled, start typing on any whitespace or punctuation.
Right-click or use the Context Menu Button at the location where you wish to insert a new word and select ‘Insert….’ Selected ‘Edit > Insert Word…’ from the main menu.
How to Edit an Existing Word
To edit an existing word, use one of the following methods:
Pause the movie (press Enter to pause, see keyboard shortcuts) and begin typing on the word you wish to edit.
Note that you cannot edit the word’s length or offset with this method.
Right-click or use the Context Menu button on the word you wish to edit and select ‘Edit….’ Select ‘Edit > Edit Word…’ from the main menu.
Note that you don’t have to pause the movie but it will continue playing otherwise.
Editing/Inserting Utterances
When you edit an utterance, you are only modifying the timestamp of the utterance. The addition of a sentence or multiple words would require the addition of a new utterance to continue the sync of audio to the transcript.
How to Insert a New Utterance
To insert a new utterance in your current transcript, use one of the following methods: Use the keyboard shortcut ‘Ctrl-U’ while editing the transcript.
Ctrl-U will expand ‘Utterance’ window [Figure 5]
Start Time – The time (in seconds) of the beginning of the utterance. Length – The length (in seconds) of the utterance.
Merge Options – Combine, or merge, the utterance with the previous or next utterance. This is only visible while editing an existing utterance.
Right-click or use the Context Menu button on any timestamp. Select ‘Edit > Add New Utterance…’ from the main menu. Use the toolbar and select Add > Utterance.
How to Edit an Existing Utterance
Note: If you are trying to edit a word in the utterance, see ‘Inserting/Editing Words’.
To edit an existing utterance, use one of the following methods: • • • • • • • • • • • • • • • • • Figure 4 Figure 5
Begin typing any number while the utterance timestamp is selected. This will edit the start time of the utterance only.
Right-click or use the Context Menu button on the utterance you wish to edit and select ‘Edit….’ Select ‘Edit > Edit Utterance…’ from the main menu.
Use the toolbar and select Edit > Utterance
Exporting
Note: Whenever you export any type of file, Docsoft:TE will always save the native transcript. To Export files select ‘File > Export…’ from the main menu or use the keyboard shortcut ‘Ctrl-E’ then select the file types you wish to export.
Exporting Text
[ Your basic plain text file ]
Docsoft:TE will generate the .txt file in the same location as the .transcript file.
Exporting ESX
[ ESX is an XML based format for storing audio transcripts with timecodes ]
Docsoft:TE will generate the .esx file in the same location as the .transcript file.
Exporting ASX
[ ASX is a metafile which contains data about another file, in this case it is in reference to an ASF file ]
Docsoft:TE will generate the .asx and .smi files in the same location as the .transcript file.
Exporting Smil (Quick Time)
[ QuickTime Smil documents specify what, when and where to present media elements related to the original QuickTime file ]
Docsoft:TE will generate the .qt.txt and .qt.smil files in the same location as the .transcript file. Exporting Smil (Real Player)
[ Real Smil documents specify what, when and where to present media elements related to the original RealMedia file ]
Docsoft:TE will generate the .rt and .rt.smil in the same location as the .transcript file. Exporting Timed Text (Flash / .flv)
[ The Timed Text XML format is used for caption insertion into your streaming flash video. ]
Docsoft:TE will generate a W3C compliant Timed Text XML file for immediate insertion into your streaming flash video. [ Adobe® Flash® CS3 and Flash Player v9 recommended ]
Media Locations
Use the media locater to browse for media files to associate with the current .transcript file. •
• • •
Figure 6
Media Location Errors
If the transcript editor cannot locate the media file associated with a transcript, or if the associated file causes an error in the media player, you will be prompted to locate the media file yourself. Changing the Media Location
To change the location of the associated media file, select ‘Edit > Change Media Location…’ from the main menu. If the media player detects an error, it will prompt you to change the location again.
Finder
The Finder tool is your basic text search tool. Use it to find exact words to modify or utterances that need attention.
Word Textbox – Contains the search word.
Find Previous – Search the document backwards for the word.
Find Next – Search the document forwards for the word.
Match Case – Specify if the finder is to match every letter exactly, or ignore case differences ( ex. The vs. the).
End of Document – Finder will notify you when there are no more words to be found. When the end of the document is reached, hit the find previous or find next to start the search again. If the word does not exist at all in the document, you will see the notification continuously.
Go To Time
Enter the time you wish to go to in the text box. The time must me in an accepted format. For an explanation of accepted formats, go to Timestamp Formats.
Toolbars
Basic Toolbar Use
Docsoft:TE provides four toolbars to make editing transcripts quicker and easier. The File toolbar is always enabled. The other three toolbars can be added and removed through the Options menu item on the main menu.
File Control Toolbar
Open – Open a .transcript file
Save – Save the current .transcript file
Save As – Save the current .transcript file under another name
Export – Select the types you wish to export. See Exporting for more information.
Edit Control Toolbar
Undo – Undo the last change made to the document
Add Word – Show the word dialog to add a new word
• • • • •
• • • •
• •
Open Save Save As Export
Undo Add Word/ Edit Word / Delete Merge Previous Merge Next Split Edit Metadata Edit Media Location
Figure 8
Add Utterance – Show the utterance dialog to add a new utterance
Edit Word – Show the word dialog filled with the information of the word that is currently selected
Edit Utterance – Show the utterance dialog to filled with the information of the utterance that is currently selected
Delete Current Item – Delete the current selection. If the current selection is a timestamp, it will delete the entire utterance, including all the words in the utterance
Merge With Previous – Merge the current utterance with the previous utterance
Merge With Next – Merge the current utterance with the next utterance
Split At Current Selection – Split the current utterance at the currently selected word. This will create a new utterance after the current utterance. The time for the new utterance will be the time of the word at which the utterance was split. If that word does not
contain a time, the transcript editor will search for the closest time to that word. Note, some times this could result in the new utterance’s timestamp to be set to the same time
as the old utterance’s timestamp.
Edit Metadata – Show the Edit Metadata Dialog. For more information on editing metadata, see Edit Metadata.
Edit Media Location – Show the Media Location Dialog. For more information on locating media, see Locating Media.
Finder Toolbar
Word Textbox – Contains the search word.
Find Previous – Search the document backwards for the word.
Find Next – Search the document forwards for the word.
Match Case – Specify if the finder is to match every letter exactly, or ignore case differences (The vs. the).
End of Document – When there are no more words to be found, Docsoft:TE will notify you. When the end of document is reached, hit the find previous or find next to start the search again. If the word does not exist at all in the document, you will see the notification continuously.
Media Player Toolbar
Play – Play the media player
Pause – Pause the media player
Stop – Stop the media player
Timestamp Formats
Displayed Timestamp – HH:MM:SS.ss
Editing Timestamps – Docsoft:TE interprets any whole or decimal number as total seconds. For example, 20.0 converts to 00:00:20.0 and 60.01 converts to 00:01:00.01. Entering a time stamp in the displayed format will remain unchanged.
• • • • • • • • • • • • • • • • • • •
Word Textbox Find Previous Find Next Match Case
File types supported by Docsoft:TE
.mpeg .mpg .mp3 .avi .wav .asf .wma .wmv
Other files may be supported through DirectShow codecs.
Docsoft Contact Information
Toll Free : 1.877.430.3502
Email : [email protected]
0
Keyboard Shortcuts
Keys Alternate Keys Action Component
- n/a Speed Down All
* n/a Revert to Normal Speed All
+ n/a Speed Up All
Alt - F4 Ctrl - F4 Quit All
Ctrl - [ n/a Skip Back All
Ctrl - ] n/a Skip Forward All
Ctrl - E n/a Export All
Ctrl - F n/a Find All
Ctrl - G n/a Go To All
Ctrl - O n/a Open File All
Ctrl - P Enter Play / Pause All
Ctrl - S n/a Save All
Ctrl - Shift - S n/a Save As All
Ctrl - W n/a Close Document All
F1 n/a Help All
F7 n/a Rewind All
F8 n/a Fast Forward All
Ctrl - D n/a Edit Metadata All
Ctrl - L n/a Edit Media Location All
Ctrl - Down n/a Scroll Down Editor
Ctrl - End n/a Move to End of Document Editor
Ctrl - Home n/a Move to Top of Document Editor
Ctrl - I n/a Insert Word Editor
Ctrl - Left n/a Move to Previous Word Editor
Ctrl - M n/a Merge Utterance Editor
Ctrl - Right n/a Move to Next Word Editor
Ctrl - ~ n/a Change capitalization Editor
Ctrl - T n/a Split Utterance Editor
Ctrl - U n/a Insert Utterance Editor
Ctrl - Up n/a Scroll Up Editor
Ctrl - Z n/a Undo Last Change Editor
Delete Backspace Delete Item Editor
Down n/a Move Cursor Down Editor
End n/a Move to End of Line Editor
Enter n/a Accept Changes Editor
Escape Ctrl - Z (while editing) Cancel Editing Editor
F2 n/a Edit Word / Timestamp Editor
Home n/a Move to Start of Line Editor
Insert n/a Change Insert Mode Editor
Left n/a Move Cursor Left Editor
Page Down n/a Move to Next Page Editor
Page Up n/a Move to Previous Page Editor
Right n/a Move Cursor Right Editor
Shift - Tab n/a Edit Previous Item Editor
Tab n/a Edit Next Item Editor