™
™
CimTrak™ Integrity & Compliance Suite
2.0.6.19
Master Repository
Management Console
App Server
File System Agent
Network Device Agent
Command Line Utility
Ping Utility
Proxy Utility
FTP Repository Interface
LEGAL NOTICES
The software described in this document is furnished under a license agreement and may be used only in accordance with the terms of the agreement.
COPYRIGHT NOTICE
Copyright 2001-2015 CIMCOR, Inc. All Rights Reserved. This document may not, in whole or in part, be copied, photocopied, reproduced, translated, or reduced to any electronic medium or machine-readable form without prior consent in writing from CIMCOR Inc., 8252 Virginia Street Suite C, Merrillville, IN 46410.
ALL EXAMPLES WITH NAMES, COMPANY NAMES, OR COMPANIES THAT APPEAR IN THIS DOCUMENT ARE IMAGINARY AND DO NOT REFER TO, OR PORTRAY ANY ACTUAL NAMES, COMPANIES, ENTITIES, OR INSTITUTIONS. ANY RESEMBLANCE TO ANY REAL PERSON, COMPANY, ENTITY, OR INSTITUTION IS PURELY COINCIDENTAL.
Every effort has been made to ensure the accuracy of this document. However, CIMCOR Inc. makes no warranties with respect to this documentation and disclaims any implied warranties of merchantability and fitness for a particular purpose. CIMCOR Inc. shall not be liable for any errors or for incidental or consequential damages in connection with the furnishing, performance, or use of this document or the examples herein. The information in this document is subject to change without notice.
TRADEMARKS
CimTrak™ is a trademark of CIMCOR Inc.
Microsoft, MS, Windows XP, Windows 2003, Windows Vista, Windows 2008, Windows 2012, Windows 7, and Windows 8 are trademarks of Microsoft Corporation in the United States and/or other countries.
Macintosh and Mac OSX are registered trademarks of Apple Inc. in the USA and other countries. Netscape is a registered trademark and Netscape Communicator is a trademark of Netscape Communications Corporation.
InstallShield is a registered trademark and service mark of InstallShield Software Corporation.
Linux is a registered trademark of Linus Torvalds. Solaris is a registered trademark of Sun Microsystems.
All other products mentioned are trademarks and/or registered trademarks of their respective owners.
TABLE OF CONTENTS
1. Introduction ... 8
1.1. CIMCOR™ CimTrak™ Integrity & Compliance Suite Introduction ... 8
1.2. CimTrak™ Master Repository ... 8
1.3. CimTrak™ Management Console... 9
1.4. CimTrak™ File System Agent ... 9
1.5. CimTrak™ Network Device Agent ... 10
1.6. CimTrak™ App Server ... 10
1.7. CimTrak™Tools ... 11
2. System Requirements... 11
2.1. CimTrak™ Master Repository System Requirements ... 11
2.1.1. Operating System Requirements ... 11
2.1.2. System Requirements... 11
2.1.3. Microsoft™ Windows Installation Pre-Requisites ... 12
2.1.4. CimTrak™ Installed Component Pre-Requisites ... 12
2.2. CimTrak™ Management Console System Requirements ... 12
2.2.1. Operating System Requirements ... 12
2.2.2. System Requirements... 12
2.2.3. Screen Resolution ... 12
2.2.4. Microsoft™ Windows Installation Pre-Requisites ... 12
2.2.5. CimTrak™ Installed Component Pre-Requisites ... 13
2.3. CimTrak™ File System Agent System Requirements ... 13
2.3.1. Operating System Requirements ... 13
2.3.3. Microsoft™ Windows Installation Pre-Requisites ... 13
2.3.4. Linux Installation Pre-Requisites ... 13
2.3.5. CimTrak™ Installed Component Pre-Requisites ... 14
2.4. CimTrak™ Network Device Agent System Requirements ... 14
2.4.1. Operating System Requirements ... 14
2.4.2. System Requirements... 14
2.4.3. Microsoft™ Windows Installation Pre-Requisites ... 14
2.4.4. Linux Installation Pre-Requisites ... 15
2.4.5. CimTrak™ Installed Component Pre-Requisites ... 15
2.5. CimTrak™ Tools – Command Line Utility System Requirements ... 15
2.5.1. Operating System Requirements ... 15
2.5.2. System Requirements... 15
2.5.3. Microsoft™ Windows Installation Pre-Requisites ... 16
2.5.4. Linux Installation Pre-Requisites ... 16
2.5.5. CimTrak™ Installed Component Pre-Requisites ... 16
2.6. CimTrak™ Tools – FTP Repository Interface System Requirements ... 16
2.6.1. Operating System Requirements ... 16
2.6.2. System Requirements... 16
2.6.3. Microsoft™ Windows Installation Pre-Requisites ... 16
2.6.4. Linux Installation Pre-Requisites ... 17
2.6.5. CimTrak™ Installed Component Pre-Requisites ... 17
2.7. CimTrak™ Tools – Ping Utility System Requirements ... 17
2.7.1. Operating System Requirements ... 17
2.7.2. System Requirements... 17
2.7.3. Microsoft™ Windows Installation Pre-Requisites ... 17
2.7.4. Linux Installation Pre-Requisites ... 17
2.7.5. CimTrak™ Installed Component Pre-Requisites ... 18
2.8. CimTrak™ Tools – Proxy Utility System Requirements ... 18
2.8.1. Operating System Requirements ... 18
2.8.2. System Requirements... 18
2.8.4. Linux Installation Pre-Requisites ... 19
2.8.5. CimTrak™ Installed Component Pre-Requisites ... 19
3. CimTrak™ Master Repository Installation ... 19
3.1. CimTrak™ Master Repository Pre-Installation Worksheet ... 19
3.2. CimTrak™ Master Repository Pre-Installation Integrity Verification ... 19
3.3. CimTrak™ Master Repository Installation – Windows Graphical ... 20
3.4. CimTrak™ Master Repository Installation – Windows Command Line... 36
3.5. CimTrak™ Master Repository Installation – Windows Silent ... 48
3.6. CimTrak™ Master Repository Installation – LINUX ... 56
4. CimTrak™ File System Agent Installation ... 62
4.1. CimTrak™ File System Agent Pre-Installation Integrity Verification ... 62
4.2. CimTrak™ File System Agent Installation – Windows Graphical ... 62
4.2.1. Agent-Level Private Keys Explained... 70
4.3. CimTrak™ File System Agent Installation – Windows Command Line ... 73
4.4. CimTrak™ File System Agent Installation – UNIX/Linux Command Line (PERL) ... 81
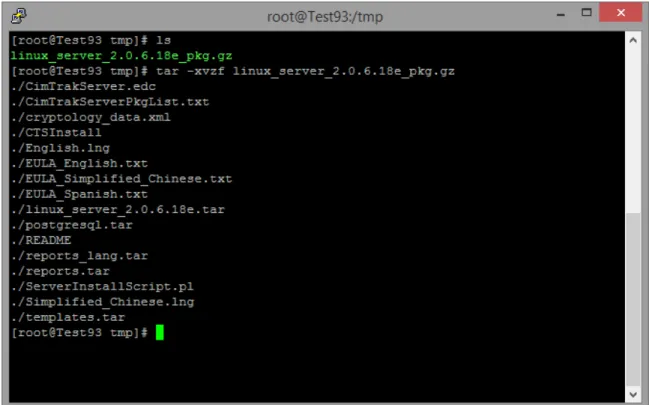
4.4.1. Unpack and Load Software ... 89
4.4.2. Configure Agent ... 91
4.4.3. Configure the Agent: Setup Method ... 92
4.4.4. Configure the Agent: Configure Method ... 94
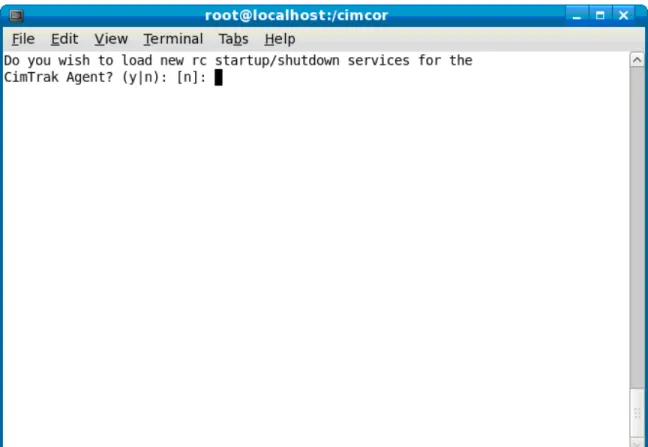
4.4.5. Install rc (Start/Stop) Services ... 96
4.4.6. Start Agent ... 98
4.5. CimTrak™ File System Agent Installation – UNIX/Linux Graphical ... 100
4.6. CimTrak™ File System Agent Installation – UNIX/Linux Command Line ... 110
4.7. CimTrak™ File System Agent Installation – Windows Silent ... 116
4.8. CimTrak™ File System Agent Installation – UNIX/Linux Silent ... 119
5. CimTrak™ Network Device Agent Installation ... 122
5.1. CimTrak™ Network Device Agent Pre-Installation Integrity Verification ... 122
5.2. CimTrak™ Network Device Agent Installation – Windows Graphical ... 122
5.3. CimTrak™ Network Device Installation – Windows Command Line ... 131 5.4. CimTrak™ Network Device Installation – UNIX/Linux Command Line (PERL) 138
5.4.1. Unpack and Load Softare... 145
5.4.2. Configure the Network Device Agent ... 148
5.4.3. Configure the Network Device Agent: Setup Method ... 149
5.4.4. Configure the Network Device Agent: Configure Method ... 150
5.4.5. Install rc (Start/Stop) Services ... 152
5.4.6. Start Network Device Agent ... 155
5.5. CimTrak™ Network Device Agent Installation – UNIX/Linux Graphical ... 156
5.6. CimTrak™ Network Device Agent Installation – UNIX/Linux Command Line 166 5.7. CimTrak™ Network Device Agent Installation – Windows Silent ... 173
5.8. CimTrak™ Network Device Agent Installation – UNIX/Linux Silent ... 177
6. CimTrak™ Management Console Installation ... 179
6.1. CimTrak™ Management Console Pre-Installation Integrity Verification ... 179
6.2. CimTrak™ Management Console Installation – Windows Graphical ... 179
6.3. CimTrak™ Management Console Installation – Windows Command Line ... 188
6.4. CimTrak™ Management Console Installation – Windows Silent ... 192
7. CimTrak™ App Server ... 194
7.1. CimTrak™ App Server Pre-Installation Integrity Verification ... 194
7.2. CimTrak™ App Server Installation – Windows GUI ... 195
7.3. CimTrak™ App Server Installation – Windows Silent ... 200
7.4. CimTrak™ App Server Installation – Linux GUI ... 201
7.5. CimTrak™ App Server Installation – Linux Command Line ... 206
7.6. CimTrak™ App Server Installation – Linux Silent ... 208
8. CimTrak™ Command Line Utility Installation ... 209
8.1. CimTrak™ Command Line Utility Pre-Installation Integrity Verification ... 209
8.2. CimTrak™ Command Line Utility Installation – Windows Graphical ... 209
8.3. CimTrak™ Command Line Utility Installation – Windows Command Line .. 216
8.4. CimTrak™ Command Line Utility Installation – Windows Silent ... 220
8.5. CimTrak™ Command Line Utility Installation – UNIX/Linux Silent ... 222
9. CimTrak™ FTP Repository Interface Installation ... 224
9.1. CimTrak™ FTP Repository Interface Pre-Installation Integrity Verification . 224 9.2. CimTrak™ FTP Repository Interface Installation – Windows Graphical ... 224
9.3. CimTrak™ FTP Repository Interface Installation – Windows Command Line 232
9.4. CimTrak™ FTP Repository Interface Installation – Windows Silent ... 237
10. CimTrak™ Ping Installation ... 240
10.1. CimTrak™ Ping Pre-Installation Integrity Verification ... 240
10.2. CimTrak™ Ping Installation – Windows Graphical ... 240
10.3. CimTrak™ Ping Installation – Windows Command Line ... 247
10.4. CimTrak™ Ping Utility Installation – Windows Silent ... 252
10.5. CimTrak™ Ping Utility Installation – UNIX/Linux Silent ... 254
11. CimTrak™ Proxy Installation ... 256
11.1. CimTrak™ Proxy Pre-Installation Integrity Verification ... 256
11.2. CimTrak™ Proxy Installation – Windows Graphical ... 256
11.3. CimTrak™ Proxy Installation – Windows Command Line ... 263
11.4. CimTrak™ Proxy Installation – Windows Silent ... 268
11.5. CimTrak™ Proxy Installation – UNIX/Linux Silent ... 270
12. Appendix A – Documentation History ... 273
12.1. CimTrak™ Installation Guidance Documentation History ... 273
13. Appendix B – Technical Support Information ... 274
13.1. CimTrak™ Technical Support Services ... 274
13.2. Support via Electronic Mail ... 274
13.3. Support via Fax ... 274
13.4. Support via Phone ... 274
14. Appendix C – Available Encryption Types ... 276
15. Appendix D – Key Exchange and Encryption Ciphers ... 277
16. Appendix E – Enterprise Worksheet ... 278
17. Appendix F – International Worksheet ... 281
1. INTRODUCTION
1.1. CIMCOR™CIMTRAK™INTEGRITY &COMPLIANCE SUITE INTRODUCTION
The CIMCOR™ CimTrak™ Integrity & Compliance Suite application provides a flexible file-based security solution that allows Administrators the capability to protect selected files, operating system components, and network device configurations against unauthorized changes from a centralized location within the network. CimTrak™ immediately identifies the change, determines if it is authorized and then institutes corrective action based on the application configuration. Since CimTrak™ maintains a master set of protected files, unauthorized changes can immediately be reversed to mitigate malicious activity or human error.
The CimTrak™ Integrity Suite presents a multifaceted approach to protecting key information system resources and provides comprehensive change control tracking. The application consists of three required components:
CimTrak™ Management Console – 1.3 CimTrak™ File System Agent – 1.4
Additionally the CimTrak™ Integrity Suite has a combination of multiple (optional) components including:
CimTrak™ Network Device Agent - 1.5
CimTrak™ App Server (required for the Web Management Console) – 1.6 CimTrak™ Tools - 1.7
These required and optional components will be discussed in subsequent sections of the documentation.
Note: Additional CimTrak™ optional components may exist based on your region. Please contact an authorized CimTrak™ sales representative for details.
1.2. CIMTRAK™ MASTER REPOSITORY
The CimTrak™ Master Repository component maintains a centralized store of protected files and change history within a centralized server. This store provides an isolated, compressed, and encrypted copy of critical files that allows for restoration in the event of unauthorized change and provides a basis for identifying changes made to protected files and configurations within the network. Additionally, the application supports a rollback capability which allows previous versions of a
protected file or configuration to be restored at a later date. For more information on installing the CimTrak™ Master Repository, please refer to section 3.
1.3. CIMTRAK™MANAGEMENT CONSOLE
The CimTrak™ Integrity Suite includes a Management Console which features a Graphic User Interface (GUI) that allows Administrators the capability to manage and configure the application from a separate Administrator management workstation within the network. The Management Console supports the selection of files and configurations on attached components to “lock” and configure an action to take in the event a change is detected. The Management Console provides access to a series of reports that detail changes made based on a series of saved baselines stored in the Master Repository. This capability can be used to superimpose changes over the stored baselines to immediately identify what aspects of the “locked” file were changed. For more information on the CimTrak™ installing Management Console, please refer to section 6.
1.4. CIMTRAK™ FILE SYSTEM AGENT
The CimTrak™ File System Agent is installed on protected resources within the Operational Environment. The File System Agent provides real-time or poll based monitoring of protected files and configurations and identifies changes made to protected files. When a change is detected, the File System Agent communicates with the CimTrak™ Master Repository to report change status and (when configured) transfer the master file (Authoritative Copy) from the Master Repository to the File System Agent server to overwrite unauthorized changes. The File System Agent utilizes CimTrak™ configuration data to determine if the change is allowed based on Administrator policy settings for the subject file or configuration. The File System Agent can then institute one of the following actions on the change: Allow the change and log the event, update the master file baseline stored within the Master Repository, disallow the change and immediately overwrite the change with the master file copy from the Master Repository, or Prompt the authorized user to either allow or disallow the file change attempt. Additionally the CimTrak™ File System Agent can be configured to allow a combination of remediation settings. For more information on installing the CimTrak™ File System Agent, please refer to section 4.
In addition to file change detection and remediation, the File System Agent provides configuration monitoring remediation.1 Windows™ file system configuration monitoring includes:
Read Access monitoring
1
Monitoring and remediation of the Windows™ Registry Monitoring of Windows™ Local User accounts
Monitoring of Windows™ Local Groups
Monitoring of Windows™ Local Security Policy settings Monitoring of Windows™ Local Services
Monitoring of Windows™ Local Device Drivers Monitoring of Windows™ Local Installed Software Monitoring of Windows™ Network Share Settings
1.5. CIMTRAK™ NETWORK DEVICE AGENT
The CimTrak™ Network Device Agent component is installed on device monitoring resources within the Operational Environment. The CimTrak™ Network Device Agent provides real-time (SNMPv3) or poll based (SSHv1, SSHv2, Telnet) monitoring of protected files and identifies changes made to protected files. When a change is detected, the CimTrak™ File System Agent communicates with the CimTrak™ Master Repository to report change status and/or transfer the master file (authoritative copy) from the Master Repository to the Agent Network Host server to overwrite unauthorized changes. The CimTrak™ Network Device Agent utilizes CimTrak™ configuration data to determine if the change is allowed based on Administrator policy settings for the subject file. The Agent can then institute one of the following actions on the change: Allow the change and log the event, Update the master file baseline stored within the Master Repository, Disallow the change and immediately overwrite the change with the master file copy from the Master Repository, or Prompt the authorized user to either allow or disallow the file change attempt. For more information on installing the CimTrak™ Network Device Agent, please refer to section 5.
1.6. CIMTRAK™ APP SERVER
The CimTrak™ App Server is a host for web-based applications which allow Administrators the capability to manage and configure the application from a separate Administrator management workstation from virtually anywhere. As various management applications are developed, these applications will be made available through the App Server for use at any workstation. Of the applications for the App Server, the Web Management Console acts as a web-based version of the classical Management Console which supports all of the features of the classical Management Console. The Web Management Console supports the selection of files and configurations on attached components to “lock” and configure an action to take in the event a change is detected. The Web Management Console provides access to a series of reports that detail changes made based on a series of saved baselines stored in the Master Repository. This capability can be used to superimpose changes over the stored baselines to immediately identify what aspects of the “locked” file were changed. For more information of how to use the Web Management Console, please review the Web Management Console User
Guide. For more information on installing the CimTrak™ App Server, please refer to section 7.
1.7. CIMTRAK™TOOLS
Optional CimTrak™ applications and command line tools exist allowing CimTrak™ Administrators to automate common CimTrak™ procedures. These tools include: CimTrak™ Command Line Utility
CimTrak™ FTP Repository Interface CimTrak™ Ping Utility
CimTrak™ Proxy Utility
2. SYSTEM REQUIREMENTS
2.1. CIMTRAK™ MASTER REPOSITORY SYSTEM REQUIREMENTS
The following categories indicate the System Requirements necessary for the proper configuration and operation of the CimTrak™ Master Repository component.
2.1.1. OPERATING SYSTEM REQUIREMENTS Microsoft™ Windows XP SP2 or SP3
Microsoft™ Windows Server 2003 R1 Release, SP1, or SP2 Microsoft™ Windows Server 2003 R2 Release, SP1, or SP2 Microsoft™ Windows Vista Release, SP1, or SP2
Microsoft™ Windows Server 2008 R1 Release, SP1, or SP2 Microsoft™ Windows Server 2008 R2 Release, SP1, or SP2 Microsoft™ Windows 7 Release, SP1
Microsoft™ Windows 8.x
Microsoft™ Windows Server 2012
Linux Kernel 2.6.32 and Above (Red Hat & CentOS Distributions)
2.1.2. SYSTEM REQUIREMENTS
Personal computer or server with Pentium-compatible processor Pentium 3 1.2 GHz or greater
512 MB RAM available 220 MB hard disk space
2.1.3. MICROSOFT™ WINDOWS INSTALLATION PRE-REQUISITES None
2.1.4. CIMTRAK™INSTALLED COMPONENT PRE-REQUISITES None
2.2. CIMTRAK™ MANAGEMENT CONSOLE SYSTEM REQUIREMENTS
The following categories indicate the System Requirements necessary for the proper configuration and operation of the CimTrak™ Management Console component.
2.2.1. OPERATING SYSTEM REQUIREMENTS Microsoft™ Windows XP SP2 or SP3
Microsoft™ Windows Server 2003 R1 Release, SP1, or SP2 Microsoft™ Windows Server 2003 R2 Release, SP1, or SP2 Microsoft™ Windows Vista Release, SP1, or SP2
Microsoft™ Windows Server 2008 R1 Release, SP1, or SP22 Microsoft™ Windows Server 2008 R2 Release, SP1, or SP23
Microsoft™ Windows 7 Release, SP1 Microsoft™ Windows 8.x
Microsoft™ Windows Server 2012
2.2.2. SYSTEM REQUIREMENTS
Personal computer or server with Pentium-compatible processor Pentium 3 1.2 GHz or greater
512 MB RAM available 200 MB hard disk space
2.2.3. SCREEN RESOLUTION 800x600 pixels
2.2.4. MICROSOFT™WINDOWS INSTALLATION PRE-REQUISITES None
2
2.2.5. CIMTRAK™ INSTALLED COMPONENT PRE-REQUISITES None
2.3. CIMTRAK™ FILE SYSTEM AGENT SYSTEM REQUIREMENTS
The following categories indicate the System Requirements necessary for the proper configuration and operation of the CimTrak™ File System Agent component.
2.3.1. OPERATING SYSTEM REQUIREMENTS Microsoft™ Windows XP SP3
Microsoft™ Windows Server 2003 R1 Release, SP1, or SP2 Microsoft™ Windows Server 2003 R2 Release, SP1, or SP2 Microsoft™ Windows Vista Release, SP1, or SP2
Microsoft™ Windows Server 2008 R1 Release, SP1, or SP2 Microsoft™ Windows Server 2008 R2 Release, SP1, or SP2 Microsoft™ Windows 7 Release, SP1
Microsoft™ Windows 8.x
Microsoft™ Windows Server 2012
Sun SPARC/x86 Solaris 10 Update 8 and above** OpenSolaris 2008.05 and above **
Linux Kernel 2.4.21 to 2.6.31 ** Linux Kernel 2.6.32 and above AIX 6.1 and above **
HP-UX Itanium 11i V2 (11.23) and above ** HP-UX PA-RISC 11i V2 (11.23) and above ** Mac Intel OS 10.4.4 and above
2.3.2. SYSTEM REQUIREMENTS
Personal computer or server with Pentium-compatible processor Pentium 3 1.2 GHz or greater
512 MB RAM available 200 MB hard disk space
2.3.3. MICROSOFT™WINDOWS INSTALLATION PRE-REQUISITES None
2.3.4. LINUX INSTALLATION PRE-REQUISITES TAR archiving utility
AWK pattern scanning and text processing language BC arbitrary precision calculator language
2.3.5. CIMTRAK™INSTALLED COMPONENT PRE-REQUISITES CimTrak™ Master Repository
2.4. CIMTRAK™ NETWORK DEVICE AGENT SYSTEM REQUIREMENTS
The following categories indicate the System Requirements necessary for the proper configuration and operation of the CimTrak™ Network Device Agent component.
2.4.1. OPERATING SYSTEM REQUIREMENTS Microsoft™ Windows XP SP2 or SP3
Microsoft™ Windows Server 2003 R1 Release, SP1, or SP2 Microsoft™ Windows Server 2003 R2 Release, SP1, or SP2 Microsoft™ Windows Vista Release, SP1, or SP2
Microsoft™ Windows Server 2008 R1 Release, SP1, or SP2 Microsoft™ Windows Server 2008 R2 Release, SP1, or SP2 Microsoft™ Windows 7 Release, SP1
Microsoft™ Windows 8.x
Microsoft™ Windows Server 2012 Sun SPARC/x86 Solaris 10 Update 8 OpenSolaris 2008.05 and above Linux 2.4.21 and above
AIX 6.1 and above
HP-UX Itanium 11i V2 (11.23) and above HP-UX PA-RISC 11i V2 (11.23) and above Mac Intel OS 10.4.4 and above
2.4.2. SYSTEM REQUIREMENTS
Personal computer or server with Pentium-compatible processor Pentium 3 1.2 GHz or greater
512 MB RAM available 200 MB hard disk space
2.4.3. MICROSOFT™ WINDOWS INSTALLATION PRE-REQUISITES None
2.4.4. LINUX INSTALLATION PRE-REQUISITES TAR archiving utility
GREP line and pattern matching utility STRINGS character string printer utility
AWK pattern scanning and text processing language BC arbitrary precision calculator language
2.4.5. CIMTRAK™ INSTALLED COMPONENT PRE-REQUISITES CimTrak™ Master Repository
2.5. CIMTRAK™ TOOLS – COMMAND LINE UTILITY SYSTEM REQUIREMENTS
The following categories indicate the System Requirements necessary for the proper configuration and operation of the CimTrak™ Tools component.
2.5.1. OPERATING SYSTEM REQUIREMENTS Microsoft™ Windows XP SP2 or SP3
Microsoft™ Windows Server 2003 R1 Release, SP1, or SP2 Microsoft™ Windows Server 2003 R2 Release, SP1, or SP2 Microsoft™ Windows Vista Release, SP1, or SP2
Microsoft™ Windows Server 2008 R1 Release, SP1, or SP2 Microsoft™ Windows Server 2008 R2 Release, SP1, or SP2 Microsoft™ Windows 7 Release, SP1
Microsoft™ Windows 8.x
Microsoft™ Windows Server 2012 Sun SPARC/x86 Solaris 10 Update 8 OpenSolaris 2008.05 and above Linux 2.4.21 and above
AIX 6.1 and above
HP-UX Itanium 11i V2 (11.23) and above HP-UX PA-RISC 11i V2 (11.23) and above Mac Intel OS 10.4.4 and above
2.5.2. SYSTEM REQUIREMENTS
Personal computer or server with Pentium-compatible processor Pentium 3 1.2 GHz or greater
512 MB RAM available 5 MB hard disk space
2.5.3. MICROSOFT™ WINDOWS INSTALLATION PRE-REQUISITES None
2.5.4. LINUX INSTALLATION PRE-REQUISITES TAR archiving utility
GREP line and pattern matching utility STRINGS character string printer utility
AWK pattern scanning and text processing language BC arbitrary precision calculator language
2.5.5. CIMTRAK™ INSTALLED COMPONENT PRE-REQUISITES None
2.6. CIMTRAK™TOOLS –FTPREPOSITORY INTERFACE SYSTEM REQUIREMENTS
The following categories indicate the System Requirements necessary for the proper configuration and operation of the CimTrak™ Tools component.
2.6.1. OPERATING SYSTEM REQUIREMENTS Microsoft™ Windows XP SP2 or SP3
Microsoft™ Windows Server 2003 Release, SP1, or SP2 Microsoft™ Windows Vista Release, SP1, or SP2
Microsoft™ Windows Server 2008 R1 Release, SP1, or SP2 Microsoft™ Windows Server 2008 R2 Release, SP1, or SP2 Microsoft™ Windows 7 Release, SP1
Microsoft™ Windows 8.x
Microsoft™ Windows Server 2012
2.6.2. SYSTEM REQUIREMENTS
Personal computer or server with Pentium-compatible processor Pentium 3 1.2 GHz or greater
512 MB RAM available 5 MB hard disk space
2.6.3. MICROSOFT™ WINDOWS INSTALLATION PRE-REQUISITES None
2.6.4. LINUX INSTALLATION PRE-REQUISITES Not Supported
2.6.5. CIMTRAK™INSTALLED COMPONENT PRE-REQUISITES CimTrak™ Master Repository
2.7. CIMTRAK™ TOOLS – PING UTILITY SYSTEM REQUIREMENTS
The following categories indicate the System Requirements necessary for the proper configuration and operation of the CimTrak™ Tools component.
2.7.1. OPERATING SYSTEM REQUIREMENTS Microsoft™ Windows XP SP2 or SP3
Microsoft™ Windows Server 2003 R1 Release, SP1, or SP2 Microsoft™ Windows Server 2003 R2 Release, SP1, or SP2 Microsoft™ Windows Vista Release, SP1, or SP2
Microsoft™ Windows Server 2008 R1 Release, SP1, or SP2 Microsoft™ Windows Server 2008 R2 Release, SP1, or SP2 Microsoft™ Windows 7 Release, SP1
Microsoft™ Windows 8.x
Microsoft™ Windows Server 2012 Sun SPARC/x86 Solaris 10 Update 8 OpenSolaris 2008.05 and above Linux 2.4.21 and above
AIX 6.1 and above
HP-UX Itanium 11i V2 (11.23) and above HP-UX PA-RISC 11i V2 (11.23) and above Mac Intel OS 10.4.4 and above
2.7.2. SYSTEM REQUIREMENTS
Personal computer or server with Pentium-compatible processor Pentium 3 1.2 GHz or greater
512 MB RAM available 5 MB hard disk space
2.7.3. MICROSOFT™ WINDOWS INSTALLATION PRE-REQUISITES None
GREP line and pattern matching utility STRINGS character string printer utility
AWK pattern scanning and text processing language BC arbitrary precision calculator language
2.7.5. CIMTRAK™ INSTALLED COMPONENT PRE-REQUISITES None
2.8. CIMTRAK™TOOLS –PROXY UTILITY SYSTEM REQUIREMENTS
The following categories indicate the System Requirements necessary for the proper configuration and operation of the CimTrak™ Tools component.
2.8.1. OPERATING SYSTEM REQUIREMENTS Microsoft™ Windows XP SP2 or SP3
Microsoft™ Windows Server 2003 R1 Release, SP1, or SP2 Microsoft™ Windows Server 2003 R2 Release, SP1, or SP2 Microsoft™ Windows Vista Release, SP1, or SP2
Microsoft™ Windows Server 2008 R1 Release, SP1, or SP2 Microsoft™ Windows Server 2008 R2 Release, SP1, or SP2 Microsoft™ Windows 7 Release, SP1
Microsoft™ Windows 8.x
Microsoft™ Windows Server 2012 Sun SPARC/x86 Solaris 10 Update 8 OpenSolaris 2008.05 and above Linux 2.4.21 and above
AIX 6.1 and above
HP-UX Itanium 11i V2 (11.23) and above HP-UX PA-RISC 11i V2 (11.23) and above Mac Intel OS 10.4.4 and above
2.8.2. SYSTEM REQUIREMENTS
Personal computer or server with Pentium-compatible processor Pentium 3 1.2 GHz or greater
512 MB RAM available 5 MB hard disk space
2.8.3. MICROSOFT™ WINDOWS INSTALLATION PRE-REQUISITES None
2.8.4. LINUX INSTALLATION PRE-REQUISITES TAR archiving utility
GREP line and pattern matching utility STRINGS character string printer utility
AWK pattern scanning and text processing language BC arbitrary precision calculator language
2.8.5. CIMTRAK™ INSTALLED COMPONENT PRE-REQUISITES CimTrak™ Master Repository
3. CIMTRAK™MASTER REPOSITORY INSTALLATION
3.1. CIMTRAK™MASTER REPOSITORY PRE-INSTALLATION WORKSHEET
Prior to installing the CimTrak™ Master Repository, CIMCOR™ recommends the installing user fill out the “Pre-installation Worksheet” located in the Appendix of this guide. Filling out the Pre-Installation Worksheet will provide the installing user with valuable configuration data necessary for completing installation dialogs. CIMCOR™ recommends installing the CimTrak™ Master Repository on a secured server or personal computer with all current operating system patches in place. This secured server or personal computer should be dedicated to only hosting the CimTrak™ Master Repository. The CimTrak™ Master Repository is not designed to be installed on a server or personal computer running Microsoft™ Active Directory or delegated to function as a Domain Controller.
Note: The installing user must have local or domain administrative privileges to successfully complete the installation. Failure to have appropriate privileges during the installation process may result in incorrect functionality of the product.
3.2. CIMTRAK™ MASTER REPOSITORY PRE-INSTALLATION INTEGRITY VERIFICATION
Before beginning the installation process CIMCOR™ recommends verifying the authenticity of the Installation file(s). Each CimTrak™ component has an associated SHA1 hash value calculated on installation components. The associated SHA1 hash value can be obtained from the CIMCOR™ website located at http://cimcor.com/downloads.
3.3. CIMTRAK™ MASTER REPOSITORY INSTALLATION – WINDOWS GRAPHICAL
Navigate to the where the CimTrak™ Install file is located and run “setupwin32.exe”. The Install Wizard should begin automatically, however, if it does not you may start the Install Wizard by opening a command prompt and typing the following command: “X\setupwin32.exe” where “X” is the path to the CimTrak™ Install file’s directory.
Once the CimTrak™ Installation has initiated a dialog will appear providing the installing user the opportunity to select their language.4 Please select the preferred language for the installation process and then click “OK” to continue the CimTrak™ Installation Wizard.
Figure 1: Language selection dialog
The CimTrak™ End User License dialog will appear. Please read through the agreement in its entirety. Once you have completed reading the CimTrak™ End User License agreement it is necessary to indicate whether or not you agree with the terms and conditions. It is necessary to accept the terms of the CimTrak™ license agreement in order to continue with the CimTrak™ Installation Wizard. To accept the terms and conditions click the “I accept the terms of the license agreement” radio button followed by clicking “Next”. To reject the terms and conditions click the “I do not accept the terms of the license agreement” radio button and then contact your CIMCOR™ sales representative immediately.
Figure 2: CimTrak™ End User License Agreement dialog
The CimTrak™ Installation Welcome dialog will appear. Please verify the installation version is consistent with your purchase order and then click “Next” to continue the installation process.
Figure 3: CimTrak™ Installation Welcome dialog
The installation location dialog will appear. CIMCOR™ recommends leaving the installation path as its default to facilitate with any future support needs or product update requirements. Changing the installation directory is possible by either
graphically selecting the installation location by clicking the “Browse” button. Select the intended installation destination and then click “Next” to continue the installation process.
Note: The installation directory will contain the supporting components necessary for the functionality of the CimTrak™ Integrity Suite components. The installing user will be prompted with the Master Repository authoritative copy and intrusion storage location in a subsequent dialog.
Note: Clicking “Back” on any CimTrak™ Installation Wizard dialog will return the installing user to the previous page of the installation.
Figure 4: CimTrak™ supporting component installation location dialog
The CimTrak™ Features dialog will appear prompting the installing user to select the desired CimTrak™ component(s) to install. CIMCOR™ recommends installing the File System Agent, Master Repository, and Management Console on separate systems. However, it is possible to install all the components on a single system if desired. To install the CimTrak™ Master Repository click “CimTrak™ Repository” followed by clicking ”Next” to continue the installation process.
Figure 5: CimTrak™ component selection dialog
The component installation conformation dialog will appear. Confirm the displayed features correspond with your selection and that your system has suitable disk space to facilitate the installation. To make changes to installation options click the “Back” button. Click “Install” to being the installation process. A progress screen will display while the selected component(s) are being installed.
Figure 6: Component installation confirmation dialog
customize the user-level service account required to run the integrated PostgreSQL database. This account is intended to add additional security to the Master Repository operating system by limiting the privileges available to the account in the event the account has been compromised. This account does not have Administrator, Auditor, or Standard User privileges granted for access to the CimTrak™ Management Console. To accept the defaults leave the “CimTrak™” username, click the “No, I would like to have the password automatically generated” radio button, and then click “Next” to continue the installation process. To modify the username click into the “Username” text box and enter a unique username. To generate a custom password click the “Yes, I would like to enter my own password” radio button and then enter a password in the “Please enter password” and “Please confirm password” text boxes.
Note: Randomly entered passwords may not conform to your organization’s password complexity requirements. When entering a custom password please make sure to take into consideration any password complexity requirements enforced by your organization. You will be prompted if the password’s complexity does not meet organizational requirements.
Note: If an existing username is entered you will be prompted to create a new account. The installer must create a new user on the system to continue the installation process.
Figure 7: Master Repository Database User dialog
The Backup Master Repository Database key dialog will display. The installing user has the option to save a backup of the Master Repository Database Key. This key can be used by CIMCOR™ CimTrak™ Technical Support Services to decrypt the
contents of the Master Repository database in the event of a CimTrak™ Master Repository host failure. This password key should be saved in a secure location. If the key is not saved and a CimTrak™ Master Repository host failure occurs the protected data will be irreversibly lost.
To create a backup Master Repository key enter a password in both the “Please enter password key” and “Please confirm password key” text boxes, select the location to save the backup key to, and then click “Next” to continue the installation process. To decline creating a backup key (not recommended) leave all text boxes empty, click the “No, I would not like to store a backup of the Repository key” radio button, and then click “Next” to continue the installation process.
Figure 8: Master Repository Database Backup Key dialog
Once the PostgreSQL database user-level service account and optional backup Master Repository key have been created the CimTrak™ Master Repository will initialize. The CimTrak™ Installation Wizard will prompt the installing user for approval to create a firewall rule to allow external required and optional CimTrak™ components the capability to communicate with the Master Repository through a Windows firewall. The opened port will correspond to the “Port” number specified in the following dialog. To approve the creation of the firewall rule click “Yes”. Click “No” to deny the creation of the firewall rule.
Note: Failing to create a firewall rule to facilitate communications with the Master Repository will prevent the CimTrak™ Integrity Suite from functioning properly. CIMCOR™ recommends creating the firewall rule. The creation of firewall rules only applies to a Windows firewall. If a third-party firewall is used it must be manually configured to allow communications between the
Figure 9: Repository firewall rule dialog
The CimTrak™ Installation Wizard will display the Master Repository Configuration dialog. This dialog allows the installing user to indicate the following configurations: TCP/IP port number used for Master Repository communications
Data Storage Directory used to store authoritative copy and intrusion files Master Repository Auto-Restart toggle and associated interval
Encryption, Key Length, and HMAC method used for Master Repository encryption and decryption
Toggle to enable/disable WebTrends™ log generation
It is necessary to configure the Master Repository to match the needs of your organization. Specify the TCP/IP port number (default is 3749) on which the Master Repository will communicate, the directory where the Master Repository authoritative copy and intrusion files will reside, the type of encryption used for encryption and decryption of data stored in the Master Repository (see Appendix for available cryptology settings for your version of CimTrak™), whether or not to automatically restart the Master Repository in the event of unexpected service termination, and whether or not to enable WebTrends™ Logging to use WebTrends™ with CimTrak™ log files. When finished, click “Next” continue the installation process. The Password Validation Requirements dialog will display.
Note: WebTrends™ logging is an output file format that is used by WebTrends™ specific file analysis programs. By default output for WebTrends Logging is stored in C:\Program Files\Cimcor\CimTrak™\CimTrak™Server\WTLogs.
Figure 10: CimTrak™ Master Repository configuration dialog
The Password Validation dialog allows the installing user to customize CimTrak™ password requirements to meet the needs of their organization. Available options for password validation requirements include:
None
¾ No password complexity requirements
Advanced Password Policy (AR 25-2 Compliant) – User-entered password ¾ User supplied password requiring the following:
Require 2 lower case, 2 upper case, 2 numbers, and 2 special characters Check against password dictionary
Require minimum password length of t10 characters Passwords expire after 30 days
Prevent the use of the last 10 passwords
Lock out the account after 10 password failures Lock out failed user for 60 minutes
Advanced Password Policy (AR 25-2 Compliant) – Randomly-generated password
¾ CimTrak™ supplied password requiring the following:
Require 2 lower case, 2 upper case, 2 numbers, and 2 special characters Random password generation
Check against password dictionary
Require minimum password length of 10 characters Passwords expire after 30 days
Lock out failed user for 60 minutes Custom Settings
¾ Combination of any or all of the following requirements:
Require 2 lower case, 2 upper case, 2 numbers, and 2 special characters Random password generation
Check against password dictionary
Require minimum password length of t10 characters Passwords expire after 30 days
Prevent the use of the last 10 passwords
Lock out the account after 10 password failures Lock out failed user for 60 minutes
Select your password validation requirements and then click “Next” to continue the installation process. The Repository SSL communication settings dialog will display.
Note: If an account is locked, the account can be locked for a specified number of minutes or locked out indefinitely.
All communications between CimTrak™ components are encrypted using user-specified key exchange and encryption ciphers. It is necessary for the installing user to specify the encryption cipher to use for communications. Please note that available cipher types vary for differing CimTrak™ releases. Please see the Appendix for a complete list of available key exchange and encryption ciphers for CimTrak™ releases. When completed, click “Next” to continue the installation process.
CimTrak™ provides various forms of external event alerting. These forms include WebTrends™, Syslog, SNMP, and SMTP. The following instructions detail configuring Syslog, SNMP, and SMTP notifications. Please note that it is possible to configure these notifications after the installation has completed using the CimTrak™ Management Console.
Syslog is a method and standard for logging message output from applications. CimTrak™ can be configured to send alerts to a Syslog manager. On the Syslog Configuration dialog enter the IP Address, Protocol, and Port number of a Syslog manager. Leave the Syslog IP Address text box empty if you do not have or do not wish to integrate with a Syslog manager. When finished click “Next” to continue the installation process.
Figure 12: Syslog Configuration dialog
SNMP (Simple Network management Protocol) is a networking protocol used with network management systems to monitor emergency conditions that may require administrative action. CimTrak™ allows alerts to be sent to a SNMP network management system (manager). On the SNMP Configuration dialog enter the IP Address, Port number, and SNMP Community name of a valid SNMP manager. Leave the SNMP IP Address text box empty if you do not have or do not wish to integrate with a SNMP manager. When finished click “Next” to continue the installation process.
Figure 13: SNMP Configuration Dialog
SMTP is a communication standard for sending electronic mail (e-mail). CimTrak™ provides support for SMTP communications. If you would like to configure e-mail alerts, enter the SMTP server IP Address, Port number, authenticating SMTP server username, authenticating SMTP server password, originating address, display name, and email transmission interval. Please note that the originating address (i.e. CimTrak™[email protected]) and display name (i.e. CimTrak™ Server) do not need to be valid accounts on the associated SMTP server. Leave the SMTP IP Address text box empty if you do not have or do not wish to transmit SMTP messages.
If your email server require TLS please make sure to select the TLS checkbox at the bottom of the SMTP configuration dialog.
When finished click “Next” to continue the installation process.
Note: The originating address and display name do not need to exist on the transmitting SMTP server. This information is simply appended to the e-mail header so that the receiving account can easily recognize the e-mail’s purpose and origination point.
Note: In order for CimTrak™ to send e-mail alerts, the Master Repository must be configured with additional information. This additional configuration is discussed in subsequent sections.
Note: Multiple alerts are grouped into a single e-mail message that is sent at the specified interval. Grouping messages prevents multiple emails to be sent that may represent a single change event.
Figure 14: SMTP configuration dialog
The CimTrak™ Serial Number dialog will display. Enter a valid CimTrak™ serial number to authenticate your copy of CimTrak™. Serial numbers may be obtained from your purchased License Certificate or an authorized CimTrak™ sales representative. If you are testing CimTrak™ or do not yet wish to enter your serial number it is possible to use CimTrak™ in limited trial mode5. It is possible to enter additional serial numbers through the CimTrak™ Management Console. When completed, click “Next” to continue the installation process. Once the serial number has been entered the CimTrak™ Installation Wizard will attempt to communicate with the CimTrak™ Activation server to activate the serial number.
5
Figure 15: CimTrak™ Serial Number dialog
In the event the installer cannot communicate with the Activation Server additional activation steps may be necessary to activate CimTrak™. The CimTrak™ Installation Wizard will display a dialog providing your entered Serial Number, Activation Key, and activation URL. It will be necessary to use a Web Browser to navigate to the URL listed in the dialog.
Complete the Serial, Activation Key, First Name, Last Name, Company, Address, City, State/Province, Zip/Postal Code, Country, Phone, and Email Address text boxes using the information provided when purchasing CimTrak™ and then click “Submit” on the webpage.
Figure 17: http://activation.cimcor.com
CimTrak™ will process the submitted information and then generate a unique Activation Code. Please note the Activation Code and then enter it in the Activation Code text box in the CimTrak™ Activation dialog. Click “Next” to continue. The CimTrak™ Serial Number is now activated.
The Management Console user account setup dialog will appear. It is necessary to set up the default administrator username and password for the CimTrak™ Management Console. Ensure that your password matches the validation requirements selected earlier.
Figure 18: CimTrak™ User Account Dialog
Note: The account you create is your first CimTrak™ Management Console administrative account. Do not lose this username/password as it is currently the only account capable of connecting to your CimTrak™ Management Console.
Note: All CimTrak™ user accounts are case sensitive.
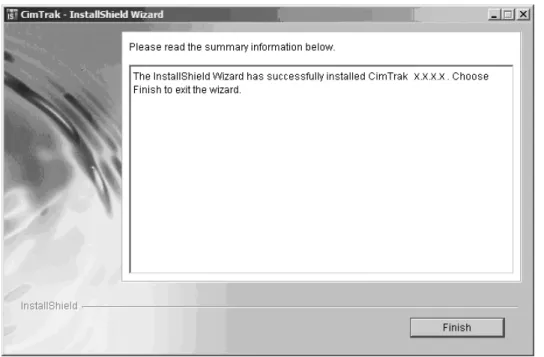
When the components have been completely installed, the installer will take you to the Summary Information Screen.
Figure 19 – Summary Information Screen
Click “Finish” to complete the installation. Installation of the CimTrak™ Master Repository is complete.
3.4. CIMTRAK™ MASTER REPOSITORY INSTALLATION – WINDOWS COMMAND LINE
The way in which the non-graphical installation of the CimTrak™ Master Repository is started, will depend on what operating system you are installing it on. After the installation is started, the process is the same for all operating systems. Determine which operating system you are using.
For Windows Platforms: Navigate to the location where the CimTrak™ Install file is
located and run “setupwin32.exe”. The Install Wizard should begin automatically, however, if it does not you may start the Install Wizard by opening a command prompt and typing the following command:
“X\setupwin32.exe” where “X” is the path to the CimTrak™ Install file’s directory.
NOTE: Agents, or object groups that have spaces in their names will require the use of double quotes in order to properly execute.
The first screen is language selection. Enter a “1” or “2” and press “Enter” to submit your selection. Then type “0” and press “Enter” to move to the next screen.
Figure 20 – Language Selection
NOTE: After every screen in which the user inputs configuration settings, the user is
given the option to go to the previous screen, cancel the installation, redisplay the current page, as well as continue to the next page.
The next screen is the End User License Agreement. You will need to read and accept the EULA to continue the installation and use CimTrak™. When done, type “1” and press “Enter” to accept the agreement, then type “0” and press “Enter” to move to the next screen.
A Welcome screen will appear. Press the “Enter” key to continue past this screen.
Figure 23 – CimTrak™ Welcome Screen
The next screen shows the directory where CimTrak™ will be installed. You may leave the default directory in place (recommended) or change the path to meet your specifications.
Figure 24 – Installation Directory
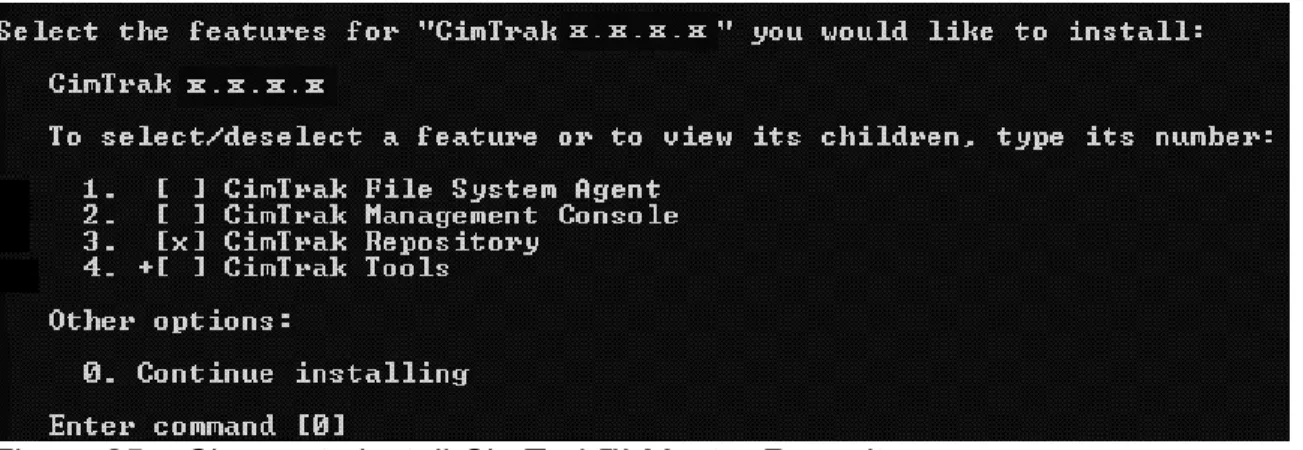
Now you can select the components to be installed. To select the components, enter the corresponding number of the component. When done, type “0” to move to the next screen.
The next screen will confirm your installation selections. Select “Next” to begin the install.
Figure 26 – Confirmation Screen
The installation of the CimTrak™ Master Repository will proceed.
The installer will ask the user if a firewall rule can be added to the Windows Firewall (see image below.) This allows communication between the CimTrak™ Master Repository and other components on different computers.
Figure 28 – Add Firewall Rule
If Yes is chosen, the CimTrak™ installer will set up an Exception in the Windows Firewall: all communication to and from the CimTrak™ Master Repository and the other CimTrak™ components will be allowed by the Windows Firewall, regardless of the port number used. This way any port number can be chosen during installation.
NOTE: This only affects the built-in Windows Firewall. If a third-party firewall package is used, that firewall must be configured so that communication between the CimTrak™ Master Repository and the other CimTrak™ components will be allowed.
Now that the files are installed, CimTrak™ must set up the CimTrak™ Master Repository database. CimTrak™ must create a user on the system. This user must have “User Level” privileges only. CimTrak™ can create a generic user with a default username of “CimTrak™.” By default, the password must be entered at this point. The password can also be randomly generated (However, in some cases the random password may not meet the password policies of certain networks or systems. In these cases, the password should be entered at this point.)
NOTE: If an existing username is entered, the installation cannot continue. The installer must create a new user on the system to continue the installation process; the user must enter a non-existing username.
Optional encryption may additionally be added to the CimTrak™ Database by entering a password. This password should be saved in a secure manner. In
the event that Cimcor, Inc. Support Technicians are asked to access the CimTrak™ Database, the password entered on this screen will be needed by Support. If no additional encryption is desired, then leave the password field blank.
Also, the administrator has the option to save a backup of the CimTrak™ Master Repository key. This key, separate from the above password, can be used to decrypt the data in the CimTrak™ Master Repository in the event of a system failure.
Figure 30 – Create Password for Repository database and Repository Key
Once the files have been installed and the CimTrak™ Master Repository initialization is complete, the CimTrak™ Master Repository will need to be configured. You will select the port that the CimTrak™ Master Repository will use to communicate with CimTrak™ File System Agents.
The default port is 3749.
Figure 31 – TCP/IP Port for Repository
Next, the location of the CimTrak™ Master Repository must be chosen. You may use the default directory (recommended) or select a directory based on your specific needs.
You then have the option to automatically restart CimTrak™ Master Repository in the event of program termination.
Figure 33 – Automatic Restart of Repository
Then, the encryption of the CimTrak™ Master Repository data will need to be determined.
Figure 34 – Encryption of Repository
Lastly, you may select whether WebTrends Logging will be used.
Figure 35 – Set WebTrends Logging
(WebTrends logging is an output file format that is used by WebTrends-specific file analysis programs. If you are not sure if you are using WebTrends logging, ask your system administrator. In a default installation, output for WebTrends Logging is stored in C:\Program Files\Cimcor\CimTrak™\CimTrak™Server\WTLogs)
The CimTrak™ Master Repository now needs to know what properties will be required for the user passwords. There are four basic choices:
1. No requirements
2. AR 25-2 Standard with a user-entered password
3. AR 25-2 Standard with a randomly-generated password 4. Custom Password settings:
• Require “2” lower case, “2” upper case, “2” numbers, and “2” special characters.
• Random Password Generation.
• Check against password dictionary. This prevents easy-to-crack passwords.
• Require minimum password length of a specified number of characters.
• Passwords expire after specified number of days.
• Prevent use of the last specified number of passwords.
• Lock out account after specified number of logon failures. If an account is locked, the account can be locked for a specified number of minutes (or locked out indefinitely.)
NOTE: If Custom settings are chosen, then the Administrator will define the following settings.
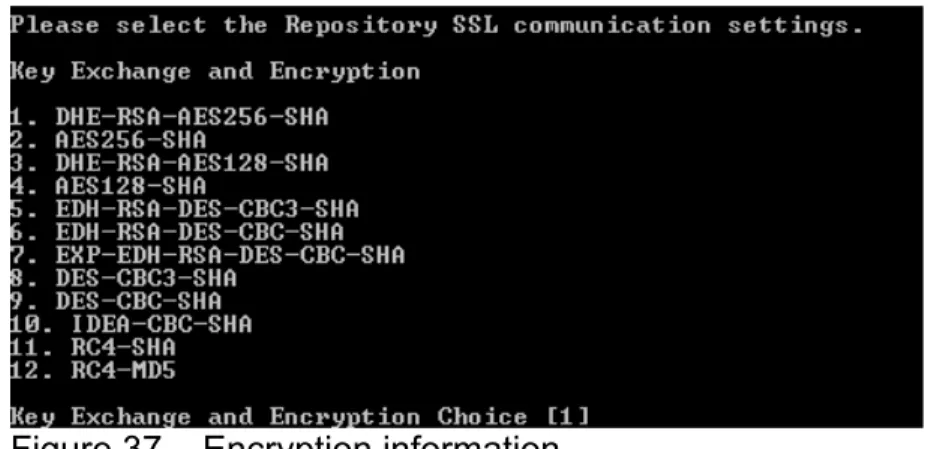
Next, you must determine how the data will be encrypted between the CimTrak™ components and the CimTrak™ Master Repository. Once you make this selection, click on “Enter.”
Figure 37 – Encryption information
The next screen allows you to set up Syslog alerts. If you will not use Syslog alerts, leave the IP Address blank.
Figure 38 – Syslog Information
Now, you will be asked to set up SNMP alerts. If you will not use SNMP alerts, leave the IP Address blank.
Figure 39 – SNMP Information
Next, you can set up email alerts. If you will not use the Email server to send alerts, leave the IP Address blank. See the User Guide for information on how to configure CimTrak™ to send Email alerts.
In order to use CimTrak™, you must enter a Serial number. If you do not enter a Serial number, CimTrak™ will only work as a 30-day trial version. Serial numbers may be obtained from your License Certificate or Sales Representative.
Figure 41 – Serial Number
Lastly, you will need to set-up the primary administrator account. Be sure that the password follows the rules you established earlier. Make sure you keep the password stored in a safe location.
Figure 42 – Create Administrator CimTrak™ User
This completes the set up process of the CimTrak™ Master Repository.
Figure 43 – Summary Information Screen
3.5. CIMTRAK™ MASTER REPOSITORY INSTALLATION – WINDOWS SILENT
The way in which the silent installation of the CimTrak™ Master Repository is started, will depend on what operating system you are installing it on. After the installation is started, the process is the same for all operating systems. Determine which operating system you are using.
For Windows Platforms: Navigate to the location where the CimTrak™ Install file is
located and run “setupwin32.exe”. The Install Wizard should begin automatically, however, if it does not you may start the Install Wizard by opening a command prompt and typing the following command:
“X\setupwin32.exe” where “X” is the path to the CimTrak™ Install file’s directory. NOTE: It is necessary to run the command prompt in administrator mode for Windows Vista operating systems and later.
Modifications have been made in this version of CimTrak™ to simplify the deployment of CimTrak™ components using a software deployment tool such as Microsoft SMS, Symantec/Altris Deployment Manager, IBM Tivoli, and others. There is multiple platform support for the silent installer.
The silent installer simplifies the deployment process of CimTrak™ to multiple servers. It reduces the time for deployment and allows administrators to more time to concentrate on policy and configuration tasks.
To install the Repository in silent mode, it must be called in this manner:
setupWin32.exe -silent -V InstallRepository="1" -V Username="[username]" -V Password="[password]"
Parameters:
- InstallationDirectory
The base directory for the installation (optional, default is "C:\Program Files\Cimcor\CimTrak™", must not exceed 4096 characters)
- LogFile
The path where log messages will be written (optional, default is no Log File))
- DBUsername
The name of the user that will be created on the operating system to run the Repository database process (must not exceed 20 characters, default is product name ("CimTrak™"))
- DBUserPassword
The password for the above user (must not exceed 127 characters, must adhere to your Network password policy, a password will be randomly generated if one isn't provided)
- DBKey
The password key for the Repository database (must not exceed 20 characters, default is no database key).
- DBKeyBackupPath
The directory where a file containing the above password key will be written (must not exceed 4096 characters, will be ignored if DBKey isn't provided)
- AddRepositoryFirewallRule
Whether to add a firewall rule for the Repository, if necessary ("0" for no, "1" for yes, default is "1")
The port the Repository will use for communication (must be between "1" & "65535", default is "3749")
- DataStoragePath
The directory where the data pertaining to watched files and well as intrusions will be stored (must not exceed 4096 characters, default is "[base installation path]\CimTrak™Server\Storage")
- AutoRestartRepository
The amount of seconds to wait before automatically restarting the Repository, if necessary (must be between "0" and "86400", "0" to not automatically restart, default is "0")
- RepositoryEncryption
The type of encryption used for the Repository data (must be one of the available encryptions, defaults are listed below)
- RepositoryKeyLength
The key length of the encryption used for the Repository data (must be one of the available key lengths for the selected encryption, defaults are listed below)
- RepositoryHMAC
The HMAC type used for the Repository data (must be one of the available HMACs, defaults are listed below)
- OpenSSLCommunication
The OpenSSL type used for Repository communication (must be one of the available OpenSSL communication types, defaults are listed below)
- WebTrendsLogging
Whether to add a firewall rule for the Repository, if necessary ("0" for no, "1" for yes, default is "0")
- PasswordPolicy
The set of password polices to use ("0" for none, "1" for AR 25-2 compliant policy, "2" for custom) - no AR 25-2 for Ether, "1" is custom (default is "0")
- RequireCharacters
Whether to require 2 uppercase, lowercase, numbers & special characters (won't be evaluated unless PasswordPolicy is custom, "0" for no, "1" for yes, default is "1")
- PasswordDictionary
Whether to use a password dictionary (won't be evaluated unless PasswordPolicy is custom, "0" for no, "1" for yes, default is "1")
- PasswordLength
The minimum password length requirement (won't be evaluated unless PasswordPolicy is custom, must be between "0" and "50", "0" for no length requirement, default is "10")
- PasswordAging
The amount of days that a password can be used before it expires (won't be evaluated unless PasswordPolicy is custom, must be between "0" and "365", "0" to have passwords never expire, default is "30")
- PasswordReuse
The amount of previous passwords that can't be reused (won't be evaluated unless PasswordPolicy is custom, must be between "0" and "30", "0" to be able to reuse all passwords, default is "10")
- PasswordLockout
The amount of failed logons that occur before the account will be locked out (won't be evaluated unless PasswordPolicy is custom, must be between "0" and "10", "0" to never lock out, default is "10")
- PasswordLockoutTime
The amount of minutes that a user will be locked out in the event that the maximum number of logon failures was exceeded (won't be evaluated unless PasswordPolicy is custom, must be between "0" and "4320", "0" to never lock out, default is "60")
- SyslogAddress
The IP address of the Syslog server (must not exceed 50 characters, default is no address)
- SyslogProtocol
The protocol of the Syslog server (won't be evaluated unless SyslogAddress is provided, must be either "UDP" or "TCP", default is "UDP")
- SyslogPort
The port of the Syslog server (won't be evaluated unless SyslogAddress is provided, must be between "1" & "65535", default is "514" for "UDP" protocol, "1465" for "TCP")
- SNMPAddress
The address of the SNMP server (must not exceed 50 characters, default is no address)
- SNMPPort
The port of the SNMP server (won't be evaluated unless SNMPAddress is provided, must be between "1" & "65535", default is "162")
- SNMPCommunity
The community of the SNMP server (must not exceed 100 characters, default is "Public")
- SMTPAddress
The address of the SMTP server (must not exceed 50 characters, default is no address)
- SMTPPort
The port of the SMTP server (won't be evaluated unless SMTPAddress is provided, must be between "1" & "65535", default is "25")
- SMTPUsername
The username used to log in to the SMTP server (won't be evaluated unless SMTPAddress is provided, must not exceed 50 characters, required if SMTPPassword is provided)
- SMTPPassword
The password used to log in to the SMTP server (won't be evaluated unless SMTPAddress is provided, must not exceed 50 characters, required if SMTPUsername is provided)
- SMTPEmail
The e-mail address from which the e-mail messages transmitted by the Repository originates (won't be evaluated unless SMTPAddress is provided, must not exceed 100 characters, required)
- SMTPDisplayName
The display name for the e-mail address from which the e-mail messages transmitted by the Repository originates (won't be evaluated unless SMTPAddress is provided, must not exceed 100 characters, required)
- SMTPInterval
The interval (in minutes) in which the Repository will transmit e-mail messages, if necessary (must be between "1" and "1440", default is "2")
- SMTPRequireTLS
An optional feature that when activated grants compatibility with TLS required email servers. ("0" for does not require TLS, "1" for Requires TLS, default is "0")
- Serial
The serial number for the Repository (not required. If not provided, the Repository will begin in evaluation mode)
The username of the first Repository user (must not exceed 19 characters, required)
- Password
The password of the first Repository user (must not exceed 31 characters, required)
Encryptions (if specifying the encryption):
ENTERPRISE
Defaults: AES, 256, SHA1, DHE-RSA-AES256-SHA
Encryptions
AES: 128, 192, 256 CAST256: 128, 256 IDEA: 128
DES: 64 DES_EDE3: 192 DES_EDE2: 192
RC2: 64, 128, 256, 512, 1024
BlowFish: 64, 128, 160, 192, 224, 256, 288, 320, 352, 384, 416, 448 CAST128: 64, 128
RC4: 64, 128, 256, 512, 1024, 2048 HMACs MD4 MD5 RIPEMD160 SHA1 SHA256 SHA384 SHA512 OpenSSL Communications DHE-RSA-AES256-SHA AES256-SHA DHE-RSA-AES128-SHA AES128-SHA EDH-RSA-DES-CBC3-SHA EDH-RSA-DES-CBC-SHA EXP-EDH-RSA-DES-CBC-SHA DES-CBC3-SHA DES-CBC-SHA IDEA-CBC-SHA RC4-SHA RC4-MD5
FIPS
Defaults: AES, 256, SHA1, DHE-RSA-AES256-SHA
Encryptions
AES: 128, 192, 256 DES_EDE3: 192 HMACs SHA1 OpenSSL Communications DHE-RSA-AES256-SHA AES256-SHA DHE-RSA-AES128-SHA AES128-SHA EDH-RSA-DES-CBC3-SHA DES-CBC3-SHA INTERNATIONAL/ETHER
Defaults: DES, 64, SHA1, EXP-EDH-RSA-DES-CBC-SHA Encryptions DES: 64 RC2: 64 BlowFish: 64 CAST128: 64 RC4: 64 HMACs MD4 MD5 RIPEMD160 SHA1 SHA256 SHA384 SHA512 OpenSSL Communications EXP-EDH-RSA-DES-CBC-SHA EXP-DES-CBC-SHA EXP-RC2-CBC-MD5 EXP-RC4-MD5