Americas Headquarters Cisco Systems, Inc. 170 West Tasman Drive San Jose, CA 95134-1706 USA http://www.cisco.com Tel: 408 526-4000 800 553-NETS (6387) Fax: 408 527-0883
Cisco Desktop Administrator User Guide
CAD 8.0 for Cisco Unified Contact Center Express Release 8.0Cisco Unified Communications Manager Edition
First Published: March 2010 Last Modified: March 6, 2013
OR LIMITED WARRANTY, CONTACT YOUR CISCO REPRESENTATIVE FOR A COPY.
The Cisco implementation of TCP header compression is an adaptation of a program developed by the University of California, Berkeley (UCB) as part of UCB’s public domain version of the UNIX operating system. All rights reserved. Copyright © 1981, Regents of the University of California.
NOTWITHSTANDING ANY OTHER WARRANTY HEREIN, ALL DOCUMENT FILES AND SOFTWARE OF THESE SUPPLIERS ARE PROVIDED “AS IS” WITH ALL FAULTS. CISCO AND THE ABOVE-NAMED SUPPLIERS DISCLAIM ALL WARRANTIES, EXPRESSED OR IMPLIED, INCLUDING, WITHOUT
LIMITATION, THOSE OF MERCHANTABILITY, FITNESS FOR A PARTICULAR PURPOSE AND NONINFRINGEMENT OR ARISING FROM A COURSE OF DEALING, USAGE, OR TRADE PRACTICE.
IN NO EVENT SHALL CISCO OR ITS SUPPLIERS BE LIABLE FOR ANY INDIRECT, SPECIAL, CONSEQUENTIAL, OR INCIDENTAL DAMAGES, INCLUDING, WITHOUT LIMITATION, LOST PROFITS OR LOSS OR DAMAGE TO DATA ARISING OUT OF THE USE OR INABILITY TO USE THIS MANUAL, EVEN IF CISCO OR ITS SUPPLIERS HAVE BEEN ADVISED OF THE POSSIBILITY OF SUCH DAMAGES.
Cisco and the Cisco logo are trademarks or registered trademarks of Cisco and/or its affiliates in the U.S. and other countries. To view a list of Cisco trademarks, go to this URL: www.cisco.com/go/trademarks. Third-party trademarks mentioned are the property of their respective owners. The use of the word partner does not imply a partnership relationship between Cisco and any other company. (1110R)
Any Internet Protocol (IP) addresses and phone numbers used in this document are not intended to be actual addresses and phone numbers. Any examples, command display output, network topology diagrams, and other figures included in the document are shown for illustrative purposes only. Any use of actual IP addresses or phone numbers in illustrative content is unintentional and coincidental.
Cisco Desktop Administrator User Guide
Contents
Preface 11
■ Introduction 11
What’s New In This Release 12
Cisco Desktop Administrator Feature Levels 12 Related Documentation 13
1
Getting Started with Cisco Desktop Work Flow
Administrator 15
■ Introduction 15
■ Starting Desktop Work Flow Administrator 16 ■ Modifying the Unified CCX Server IP Address 17 ■ Automated Updates 19
■ The Desktop Work Flow Administrator Interface 20 Toolbar 20
Navigation Tree Pane 21 Display Pane Navigation 21
■ User Privileges in Windows XP and Vista 22 ■ Passwords 23
Configuring a Password in Desktop Work Flow Administrator 23 Setting Up a Password 23
Changing a Password 24 Deleting a Password 24 Client Applications 24
■ Synchronizing Directory Services 25
2
Work Flow Configuration 27
■ Dial Strings 29
North American Dial String Format 29 Telephone Number Display Tab 30
Outgoing Calls Tab 31
Advanced Internal Dialing Tab 33 Advanced External Dialing Tab 34 Miscellaneous Tab 35
Variable Length Dial String Format 36 Telephone Number Display Tab 37 Phone Number Format Tab 38 Miscellaneous Tab 40
■ Phone Book 41
Using the Phone Book Filter 42 Creating Phone Books 43
Enabling or Disabling Phone Books 44 Importing and Exporting Phone Books 45
CSV File Format 45 ■ Reason Codes 48
Assigning Reason Codes 51
Enabling or Disabling Reason Codes 52 ■ Wrap-up Data 53
Creating Wrap-up Data Descriptions 54 Assigning Wrap-up Data Descriptions 56 Enabling or Disabling Wrap-up Data 56 Automatic State Changes 57
■ Record/Monitor Notification 58 ■ Work Flow Groups 59
Maintaining Work Flow Groups 60 ■ Enterprise Data 62
Data 62 Call Activity 63
■ CAD, CAD-BE, and IP Phone Agent 65 CAD Agent 65
CAD-BE Agent 65 IP Phone Agent 65
Contents
Adding and Removing Toolbar Buttons 67
Adding the Cisco Unified Outbound Dialer Toolbar 67 Associating Actions with Task Buttons 67
Changing a Task Button’s Hint 68 Customizing Button Icons 68 Show Data Fields 70
Configuring and Renaming Data Fields 70 Show Duration 71
Miscellaneous 72 Browser Setup 73
Enabling the Integrated Browser 74 Enabling Access to Other Websites 74 Enabling Hyperlink Dialing 74
Configuring the Number of Browser Tabs 75
Enabling Popups to be Displayed in a New Window 75 Setting Up the Home Page 76
Setting Up Work Sites 76 Remote Access 77
IPC Make Call Action 78 IPC High Priority Chat Action 79 IPC Record Action 79
IPC Agent Notification Action 79 IPC Set Variable Action 81 ■ Voice Contact Work Flows 82
Creating a Voice Contact Work Flow 83
Setting Up a New Voice Contact Classification 84 Setting Up a New Work Flow 85
Data Field Conditions 86 Wild Card Searches 88
Modifying a Voice Contact Work Flow 88
Voice Contact Work Flows and Outbound Dialer 89 Deleting a Voice Contact Work Flow 89
■ Agent Management Work Flows 91
■ Actions 96
Action Availability 97 Adding a New Action 98 Editing an Action 99 Deleting an Action 99
Importing and Exporting Actions 99 Agent Notification Action 103 Agent State Action 105
Automated Reason Codes for Agent State Changes 105 Call Control Action 107
Delay Action 108 HTTP Action 109
Reserved Characters 113
Example of an HTTP Request 114 IPC Action 117
Launch External Application Action 119 Run Macro Action 121
Macro Recording Tips 122 Allowed Macro Keystrokes 124 Recording Macros 125
Data Fields 129
Set Enterprise Data Action 132 Timer Action 134
Utility Action 135
High Priority Chat Messages 135
■ Cisco Unified CCX Outbound Preview Dialer 137 Outbound Dialer Actions 137
Outbound Dialer Toolbar 138
Contents
■ Accessing Desktop Administrator 142 ■ Using the Search Function 144
4
Services Configuration 145
■ Introduction 145
■ Configuring Enterprise Data 146 ■ Fields 147
Creating a Custom Field 147 Editing a Field 149
Deleting a Field 149 ■ Layouts 151
Creating a Custom Layout 151 Copying a Layout 152
Editing a Layout 153 Deleting a Layout 153
■ Configuring Desktop and Server Monitoring and Recording 154 Enabling Desktop Monitoring 154
Configuring a Default Monitor Service 155
Assigning Phone Devices to a Specific VoIP Monitor Service 156
Removing a VoIP Monitor or Recording & Playback Service from Directory Services 156
■ Synchronizing Directory Services 159
■ Releasing the Desktop Administrator Lock 160
5
Personnel Configuration 161
■ Introduction 161 ■ Configuring Agents 162
6
Cisco Unified Presence Settings 163
■ Introduction 163
■ Configuring the Cisco Unified Presence Cluster 164 ■ Configuring Contact Lists 166
Creating a Contact List 166 Finding a Contact List 167 Deleting a Contact List 168 Editing a Contact List 168
Adding SMEs to a Contact List 170 Finding SMEs 171
■ Configuring External Contacts 175 Adding External Contacts 175 Finding an External Contact 177 Editing an External Contact 178 Deleting an External Contact 178 ■ Configuring Work Flow Groups 180
Finding a Work Flow Group 180
Adding a Contact List to a Work Flow Group 181 Selecting Agents to Appear Offline 183
■ Configuring Supervisor Chat and Team Messages 184
7
Configuring Agent E-Mail 185
■ Introduction 185 Prerequisites 185 Overview 185
■ Configuring Global Settings 187
■ Configuring Contact Service Queue Settings 191 Finding a CSQ 191
Configuring a CSQ 192 Configuring Templates 194
Contents
Deleting a Template 196
8
CAD Configuration Setup 197
■ Introduction 197
■ Configuring CAD Configuration Setup Settings 198
Preface
Introduction
Cisco Desktop Administrator consists of two parts:
■ Desktop-based Cisco Desktop Work Flow Administrator ■ Web-based Cisco Desktop Administrator
Cisco Desktop Work Flow Administrator enables you to configure the following: ■ Dial strings
■ Phone book ■ Reason codes ■ Wrap-up data
■ Record/monitor notification ■ Work flow groups
Cisco Desktop Administrator enables you to configure the following: ■ Services Configuration
■ Personnel
■ Cisco Unified Presence Settings ■ Agent E-Mail Settings
■ CAD Configuration Setup
NOTE: Desktop Work Flow Administrator is not supported if installed on a virtual private network (VPN) desktop.
What’s New In This Release
■ Cisco Workflow Administrator — Enable/disable hyperlink dialing — Enable barge-in and intercept
— Always on top window options for real time displays and dial pad — Import and export phone books
— Phone book search filter ■ Cisco Desktop Administrator
— Single login credentials for accessing Cisco Desktop Administrator, Cisco Unified CCX Administration, and Cisco Unified CCX Serviceability
— Configure the CAD Configuration Setup settings
Cisco Desktop Administrator Feature Levels
There are three versions of Cisco Desktop Administrator: Standard, Enhanced, and Premium. The following chart outlines the features available in each version. All features not listed here are present in all three versions.
Feature Standard Enhanced Premium Cisco Desktop Administrator
Configure enterprise data × × ×
Configure desktop and server monitoring × ×
Configure agent e-mail ×
Configure Cisco Unified Presence × × ×
Cisco Workflow Administrator
Configure work flows × ×
Create work flow groups × × ×
Configure CAD interface × ×
Configure wrap-up data × ×
Configure integrated browser ×* ×
Cisco Unified CCX Outbound Dialer ×
Introduction
Related Documentation
The following documents contain additional information about CAD 8.0: ■ Cisco CAD Installation Guide
■ Cisco Agent Desktop User Guide
■ Cisco Agent Desktop—Browser Edition User Guide ■ Cisco Supervisor Desktop User Guide
■ Cisco IP Phone Agent User Guide ■ Cisco CAD Troubleshooting Guide ■ Cisco CAD Error Code Dictionary
■ Integrating CAD with a Thin Client Environment ■ Configuring and Troubleshooting VoIP Monitoring
1
Getting Started with Cisco Desktop
Work Flow Administrator
Introduction
Cisco Desktop Work Flow Administrator comes with one license, so only one person can view and/or edit data in it at any one time. More than one instance of Desktop Work Flow Administrator can be open concurrently.
If someone is using Desktop Work Flow Administrator when you try to access it, an error message appears that identifies the IP address of the other user’s computer. For this reason, it is important that you close Desktop Work Flow Administrator completely when you are done using it. As long as the application is running, a license is being used and others are blocked from accessing it.
Starting Desktop Work Flow Administrator
To start Desktop Work Flow Administrator:
1. Click Start > Programs > Cisco > Desktop > Admin. Desktop Work Flow Administrator starts.
2. Click the Call Center 1 node to expand the navigation tree. By default, Desktop Work Flow Administrator is not password-protected and the tree will expand. If a password has been configured, you are asked to enter it now. For more information about passwords, see "Passwords" on page 23.
Modifying the Unified CCX Server IP Address
Modifying the Unified CCX Server IP Address
When Desktop Administrator is installed, it is configured to point to the Unified CCX server IP address. If that Unified CCX server IP address changes, you need to reconfigure Desktop Administrator so that it points to the new Unified CCX server IP address by launching CAD Configuration Setup from Desktop Work Flow Administrator or running PostInstall.exe.
To modify the Unified CCX server IP address:
1. Start CAD Configuration Setup.
■ In Desktop Work Flow Administrator, select the Call Center 1 node in the left pane and then choose Setup > Configure Systems from the menu bar. ■ On a PC having CAD desktop applications installed, navigate to the
C:\Program Files\Cisco\Desktop\bin folder and double-click PostInstall.exe.
Configuration Setup starts and displays the Location of Unified CCX server(s) dialog box (Figure 1)..
2. Ensure that the correct primary (and optional secondary) Unified CCX server IP address is configured. If the Unified CCX server IP address is incorrect, enter the correct IP address, and then click OK.
If you are running CAD Configuration Setup on a PC that hosts Desktop Administrator and no other CAD desktop application, you will receive a message that this computer is configured to point to the Unified CCX server and no other CAD settings can be configured through CAD Configuration Setup on this computer.
3. Click OK. Your computer now points to the Unified CCX server.
If you are making changes in CAD Configuration Setup from Desktop Work Flow Administrator, choose File > Exit from the menu or click Close for changes to take effect.
NOTE: If you have installed other CAD desktop applications (Cisco Agent Desktop and Cisco Supervisor Desktop) on your PC, then the CAD Configuration Setup window appears (Figure 2). Choose File > Exit from the menu or click Close for changes to take effect.
Automated Updates
Automated Updates
Every time you start Desktop Work Flow Administrator, the application checks to see if there is an updated version available, or if there was a system configuration change that requires a Windows registry change. If either condition exists, the application automatically runs the update process.
NOTE: For automated updates to function correctly, Internet Explorer must be configured so that it checks for newer versions of stored pages. In Internet Explorer, choose Tools > Internet Options and select the General tab. In the Browsing history section, click Settings and ensure that any option other than Never is selected.
NOTE: If your system is configured with two Unified CCX servers, and one server is upgraded while your instance of Desktop Work Flow Administrator is connected to the older Unified CCX, and your system administrator performs a failover to switch all agents to the upgraded server, your instance of Desktop Work Flow Administrator will not automatically upgrade when you log into the new server. You must shut down Desktop Work Flow Administrator and start it again for the automatic upgrade to take place.
When an update is available, you will see a dialog box notifying you that your copy of Desktop Work Flow Administrator will be updated. Click OK to proceed with the update.
A progress bar is displayed to show you the status of the download.
When the update is finished, you will see a final dialog box that tells you the update is complete, and which applications were updated. If you have other CAD desktop applications (Cisco Agent Desktop and Cisco Supervisor Desktop) on your PC, they will all have been updated.
NOTE: Because Agent Desktop is automatically installed when Supervisor Desktop is installed, only Supervisor Desktop will be listed as having been updated in the final dialog box. Agent Desktop will be listed only if Supervisor Desktop is not present on your PC.
When you click OK to close the dialog box, any CAD desktop application that had been running on your desktop restarts automatically.
The Desktop Work Flow Administrator
Interface
The Desktop Work Flow Administrator interface has two panes (Figure 3). The left pane is a navigation tree similar to that found in Windows Explorer. The right pane displays the application that you choose in the left pane.
Toolbar
When you select a node on the navigation tree, the Desktop Work Flow Administrator menu bar and toolbar change to reflect the design of that node’s application. The toolbar buttons you see are among those listed in Table 1.
Figure 3. Desktop Work Flow Administrator interface
Table 1. Desktop Work Flow Administrator toolbar buttons
Button Name Description
About Displays copyright and version information Delete Removes the selected work flow group
The Desktop Work Flow Administrator Interface
Navigation Tree Pane
Use these mouse or keyboard actions in the left pane to navigate the tree.
Mouse
■ Double-click an icon/application name to expand or collapse the tree. ■ Click the plus sign ( + ) to expand the tree.
■ Click the minus sign ( – ) to collapse the tree.
■ Right-click to rename or delete a node (not available for all nodes).
Keyboard
With a node selected,
■ Press the up and down arrow keys to move from one node to the next. ■ Press the left arrow key to collapse the tree.
■ Press the right arrow key to expand the tree.
Display Pane Navigation
The applications displayed in the right pane are designed to use shortcut keys and the tab key as alternatives to using the mouse to navigate around a window. The shortcut keys that apply to a specific node are discussed in the section devoted to that node’s functions.
New Adds a new work flow group
Web Opens your web browser and accesses Cisco’s website
Table 1. Desktop Work Flow Administrator toolbar buttons — Continued
User Privileges in Windows XP and Vista
Because Desktop Work Flow Administrator users must be able to update registry settings, they must have Administrator or Power User privileges on Windows XP and Vista platforms.
Only a person with Administrator privileges can change user privileges on the Administrator PC if it is necessary to upgrade them.
Passwords
Passwords
A password is not required to access Desktop Work Flow Administrator. By default it is not password-protected. However, you can configure a password to protect access to Desktop Work Flow Administrator.
If you do not want Desktop Work Flow Administrator to be password-protected, you must not configure the password.
Configuring a Password in Desktop Work Flow
Administrator
If a password is configured, when you select the logical contact center node you will be prompted to provide the password before you can access any of the subnodes. If you forget the password, you can clear it so that no password is required for accessing Desktop Work Flow Administrator. See "Configuring CAD Configuration Setup Settings" on page 198for more information.
Setting Up a Password
To set up a password:
1. In the navigation pane, select the Call Center 1 node. 2. From the menu bar, choose Setup > Change Password.
The Administrator Password dialog box appears (Figure 4).
3. Leave the Old Password field blank, and enter a new password, type it again to confirm it, and then click OK.
Passwords are case sensitive and can consist of up to a maximum of 32 alphanumeric characters.
Desktop Work Flow Administrator is now password protected. You must restart the application for the change to go into effect.
Changing a Password
To change your password:
1. In the left pane, select the Call Center 1 node
2. From the menu bar, choose Setup > Change Password. The Change Password dialog box appears.
3. Enter your old password, a new password, and your new password again to confirm it, and then click OK.
The password is now changed. You must restart Desktop Work Flow Administrator for the change to go into effect.
Deleting a Password
To remove password protection:
When you remove the password from Desktop Work Flow Administrator, you
automatically reset the password in Desktop Administrator to the default value, which is blank.
1. In the left pane, select the Call Center 1 node
2. From the menu bar, choose Setup > Change Password. The Change Password dialog box appears.
3. Enter your old password, leave the New password and Confirm password fields blank, and then click OK.
4. You are asked to confirm that you want to leave Desktop Work Flow Administrator unprotected. Click Yes. The password is removed. You must restart the application for the change to go into effect.
Client Applications
User IDs and passwords are administered in Unified CM for the following applications: ■ Cisco Agent Desktop
■ Cisco Agent Desktop—Browser Edition ■ Cisco Supervisor Desktop
■ Cisco IP Phone Agent
Synchronizing Directory Services
Synchronizing Directory Services
The Directory Services database should be synchronized with the master Unified CCX agent database. The databases are synced automatically whenever the master Unified CCX database changes. However, you can manually sync them with the Synchronize Directory Services command.
NOTE: You can synchronize Directory Services manually from the Desktop Administrator web application also. See "Synchronizing Directory Services" on page 159 for more information.
To synchronize the databases manually:
1. In the left pane, select the Call Center 1 node.
2. From the menu, choose Setup > Synchronize Directory Services.
When the synchronization is complete, the system displays a confirmation message that Directory Services was successfully synchronized.
2
Work Flow Configuration
Introduction
Work Flow Configuration enables you to configure and maintain the appearance and behavior of Agent Desktop, Agent Desktop—Browser Edition, and IP Phone Agent. Work Flow Configuration has the following functions:
■ Dial Strings (page 29) ■ Phone Book (page 41) ■ Reason Codes (page 48) ■ Wrap-up Data (page 53)
■ Record/Monitor Notification (page 58) ■ Work Flow Groups (page 59)
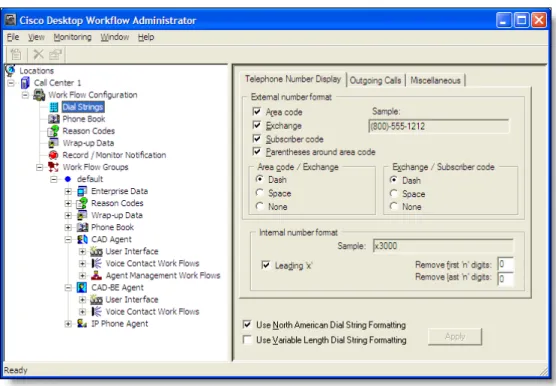
To use any Work Flow Configuration application, select its node in the left navigation pane of the Desktop Work Flow Administration window (Figure 5). The right display pane shows the selected node.
The CAD client applications must be restarted for any configuration changes you make to go into effect (Figure 5).
NOTE: When configuring the name or ID of objects (examples are work groups, work flows, agent login names, server names, and macro names), do not use the “=”character. This can cause problems when backing up and restoring data.
Dial Strings
Dial Strings
Use the Dial Strings option to configure the way desktop applications display and dial phone numbers.
NOTE: Dial strings for CAD-BE are not configurable.
Select the appropriate check box at the bottom of the Dial Strings pane to choose the dial string format you will use. The available formats are:
■ North American Dial String format ■ Variable Format Dial String format Different tabs display depending on your choice.
North American Dial String Format
If you choose the North American dial string format, the following three tabs are active:
■ Telephone Number Display Tab (page 30) ■ Outgoing Calls Tab (page 31)
Telephone Number Display Tab
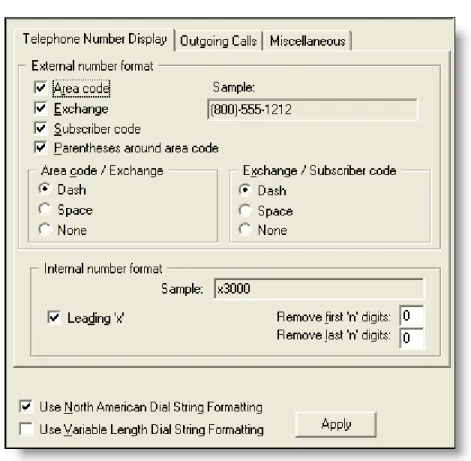
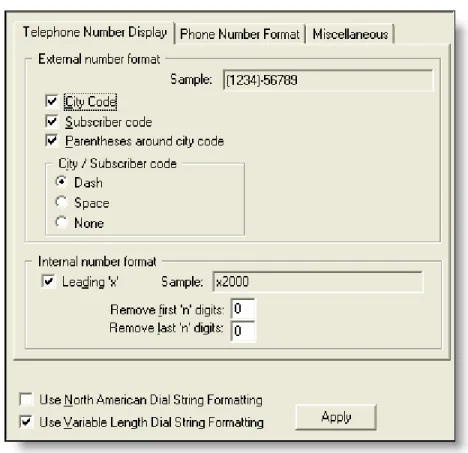
The Telephone Number Display tab (Figure 6) enables you to configure how phone numbers are displayed in Agent Desktop.
The selections you make are reflected in the Sample fields. (An exception is if you enter a value in either of the “Remove first ‘n’ digits” and “Remove last ‘n’ digits” fields. In that case, the sample does not change.)
Figure 6. Telephone Number Display tab
Table 2. Telephone Number Display tab fields
Tab Section Description
External number format Specify the calling number and called number phone numbers format
Area code/Exchange Specify the separator between the area code and exchange
Dial Strings
To configure the telephone number display:
■ Select or clear the check boxes and radio buttons on the Telephone Number Display tab as desired, and then click Apply to save your changes.
Outgoing Calls Tab
The Outgoing Calls tab (Figure 7) enables you to configure your local area codes and exchanges.
Internal number format Specify the internal phone numbers format. You can include an X (extension) and remove the leading or trailing digits (in the event that extension numbers are less than 4 digits long).
Figure 7. Outgoing Calls tab
Table 2. Telephone Number Display tab fields — Continued
To configure outgoing calls:
■ Enter information and select or clear the appropriate check boxes on the Outgoing Calls tab as desired, and then click Apply to save your changes.
Table 3. Outgoing Calls tab fields
Tab Section Description
Local area code Enter the local 3-digit area code.
Advanced Dialing… Click to configure advanced internal and external dialing (see page 33).
Prefixes • Local line access code. Enter the number required to access an outside local line.
• Long distance line access code. The number required to access an outside long distance line. • Ensure a 1 on long distance calls. Select to
automatically add a 1 at the beginning of a long distance phone number.
• Use area code for toll calls within the area code. Select to automatically add the local area code to any calls dialed to numbers not included in the local exchange list.
• Use area code for local calls. Select to automatically add the local area code to any calls dialed to numbers included in the local exchange list.
Local exchanges Select All exchanges are local or click Add to build a list of exchanges for which it is NOT necessary to add a 1 before dialing
Dial Strings
Advanced Internal Dialing Tab
The Advanced Internal Dialing tab (Figure 8) enables you to configure more internal dialing options. Access it by clicking the Advanced Dialing button on the Outgoing Calls tab.
Figure 8. Advanced Internal Dialing tab
Table 4. Advanced Internal Dialing tab fields
Tab Section Description
Extensions The maximum number of digits in an internal extension number, from 1–9. If you select 7, you must specify the internal exchange and the corresponding range of subscriber numbers so the application can distinguish between a 7-digit internal phone number and a 7-digit outgoing call.
7-digit extensions If you specified a 7-digit extension number, enter the internal exchange and the corresponding range of extension numbers from low to high. Click Add to add them to the list.
Advanced External Dialing Tab
The Advanced External Dialing tab (Figure 9) enables you to configure more external dialing options. Access it by clicking the Advanced Dialing button on the Outgoing Calls tab.
Figure 9. Advanced External Dialing tab
Table 5. Advanced External Dialing tab fields
Window Section Description
Neighboring area codes with local dialing privileges
The area codes to which you can place non-toll calls. Click Add to add a new area code to the list and click Delete to remove an area code from the list.
Exchanges for 7-digit local numbers
Choose the neighboring area code, then enter the exchanges within that area code which do not require you to dial 1 or the area code. Select All exchanges as 7-digit numbers if no exchange requires you to dial 1 or an area code.
Dial Strings
Miscellaneous Tab
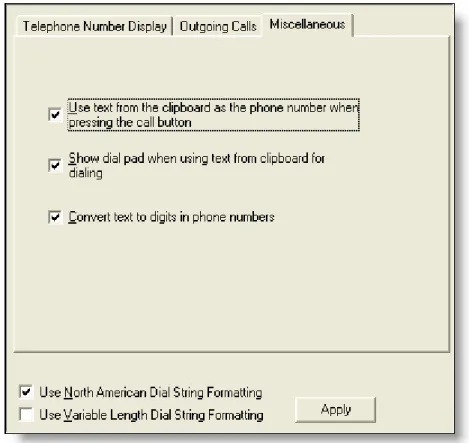
The Miscellaneous tab (Figure 10) sets up further dialing properties.
NOTE: This tab is the same for the North American and variable length dial string formats.
Exchanges for 10-digit local numbers
Choose the neighboring area code, then enter the exchanges within that area code that require you to dial the area code but not a 1. Select All exchanges as 10-digit numbers if all exchanges require you to dial an area code but not a 1.
Figure 10. Miscellaneous tab
Table 5. Advanced External Dialing tab fields — Continued
To configure the miscellaneous options:
■ Select or clear the appropriate check boxes on the Miscellaneous tab as desired, and then click Apply to save your changes.
Variable Length Dial String Format
If you choose the variable length dial string format, the following three tabs are active: ■ Telephone Number Display Tab (page 37)
■ Phone Number Format Tab (page 38) ■ Miscellaneous Tab (page 40)
Table 6. Miscellaneous tab fields
Tab Section Description
Use text from the clipboard as the phone number when pressing the call button
Select to enable CAD to use text on the clipboard as the dialed number when the Make Call button on the CAD toolbar is clicked, as long as the text on the clipboard is a valid text string.
Show the dial pad when using text from the clipboard for dialing.
Available only if “Use text from the clipboard…” is enabled. Select to display the dial pad before dialing a number copied from the clipboard. If this check box is not selected, CAD dials the number without displaying the dial pad.
Convert text to digits in phone numbers
Converts phone numbers expressed in alpha characters (for example, 1-800-ANYWORD) to their numeric equivalents before dialing.
Dial Strings
Telephone Number Display Tab
The Telephone Number Display tab (Figure 11) enables you to configure how phone numbers are displayed in Agent Desktop.
The selections you make are reflected in the Sample fields. (An exception is if you enter a value in either of the “Remove first ‘n’ digits” and “Remove last ‘n’ digits” fields. In that case, the sample does not change.)
NOTE: The number of digits displayed in each section of the sample phone number is for illustration only. The samples do not reflect the number format you set up on the Phone Number Format tab.
Figure 11. Telephone Number Display tab
Table 7. Telephone Number Display tab fields
Tab Section Description
External number format Specify how you want to view calling and called phone numbers.
To configure the telephone number display:
■ Enter data and select or clear the appropriate check boxes and radio buttons on the Telephone Number Display tab as desired, and then click Apply to save your changes.
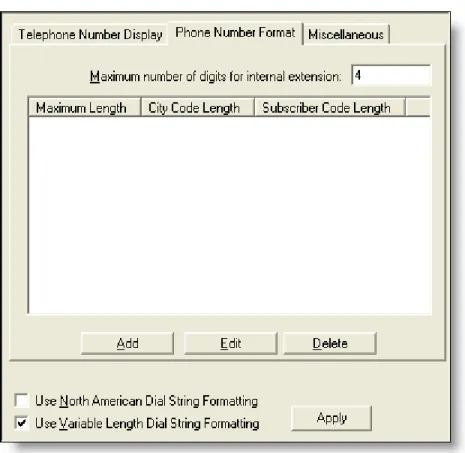
Phone Number Format Tab
The Phone Number Format tab (Figure 12) enables you to establish the format for phone numbers that do not follow the North American dial string format. You can also set the maximum number of digits in an internal phone extension.
City/subscriber code Specify the separator you want to display between the city code and the subscriber code.
Internal number format Specify how internal phone numbers are displayed. You can include an X (extension) and remove the leading or trailing digits (in the event that extension numbers are less than 4 digits long).
Table 7. Telephone Number Display tab fields — Continued
Dial Strings
You can establish as many formats as you want, as long as each one has a unique total length.
To add a new phone number format:
1. Click Add.
The Add City/Subscriber Code Lengths dialog box appears.
2. Enter the number of digits in the city code and the subscriber code, and then click OK.
The numbers you entered are displayed in the phone number format pane, along with the calculated total length of the format. You cannot enter another format with the same total length.
3. Click Apply.
The new phone number format is saved.
To edit a phone number format:
1. Choose the number format, and then click Edit.
The Edit City/Subscriber Code Lengths dialog box appears. 2. Make your changes, and then click OK.
3. Click Apply to save your changes. The phone number format is changed.
To delete a phone number format:
1. Choose the number format, and then click Delete. 2. Click Apply to save your changes.
The phone number format is deleted. Miscellaneous Tab
The Miscellaneous tab for the variable length dial string format is the same as the tab for the North American dial string format.
Phone Book
Phone Book
Agents have a number of phone number lists available to them:
■ The Recent Call List, a dynamic list of up to 100 recently-called phone numbers kept by Agent Desktop
■ A personal phone book, created and maintained by the agent (and enabled/disabled by the system administrator)
■ Up to 256 phone books (includes global and work flow group phone books). Each phone book supports a maximum of 3,000 directory entries.
■ CAD supports in total up to 10,000 directory entries that includes global, work flow group, or personal phone book entries.
■ Work flow group phone books, created by the system administrator with the work flow group Phone Book function
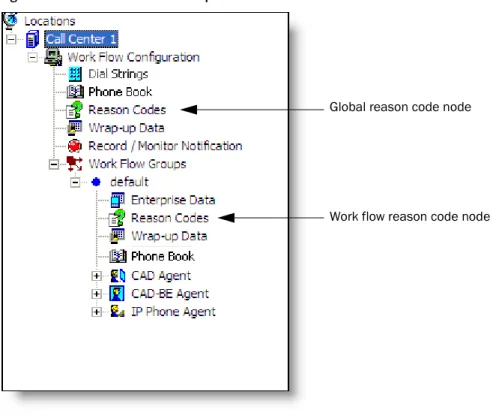
Global phone books, which are available to all agents, are created and maintained using the Phone Book node under the Work Flow Configuration node. Work flow groups phone books, which are available to agents only in that specific work flow group, are created and maintained using the Phone Book node under the specific work flow group’s node (Figure 13).
Figure 13. Global and work flow phone book nodes
Global phone book node
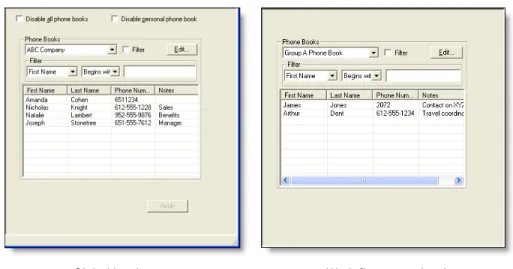
The global Phone Book window (Figure 14, left) enables you to set up and manage the global phone books that are shared by all agents, and to disable all phone books or just personal phone books.
The work flow group Phone Book window (Figure 14, right) enables you to set up and manage the work flow group phone books that are shared by agents in specific work flow groups.
Phone books and phone book entries are created and maintained in the Phone Book Editor dialog box (see “Creating Phone Books” on page 43).
Using the Phone Book Filter
You can use the phone book filter to find phone book entries more easily. The filter enables you to limit the entries listed in the phone book window. You can use any of the four phone book fields to filter the entries.
To use the phone book filter:
1. In the Phone Book window, select the Filter check box.
2. From the Filter drop-down lists, select how you want to filter the entries. In the first two drop-down lists, select your filter criteria: the field to filter by, and the filter method. In the third field, enter the filter string.
For example, if you want to see all phone book entries for persons whose last name begins with “J”, select “Last Name” from the first drop-down list, “Begins with” from the second drop-down list, and enter J in the third field.
Figure 14. Phone Book window
Phone Book
3. To stop filtering the phone book, clear the Filter check box or delete the filter string in the third field. The entire phone book will once again be visible.
Creating Phone Books
To set up a new phone book:
1. In the global or work flow group Phone Book window, click Edit. The Phone Book Editor dialog box appears (Figure 15).
2. Enter a new phone book name in the Phone Books field, and then click Add. The name of the new phone book is added to the list of phone books.
3. Click OK. The new phone book is saved and the Phone Book Editor dialog box closes.
To add phone book entries:
1. In the Phone Book window, choose the phone book you want to edit from the drop-down list, and then click Edit. The Phone Book Editor dialog box appears.
2. Enter a name, phone number, and note for a person or company, and then click Add to add the information to the phone book. The minimum amount of information required for a phone book entry is the phone number.
The Phone Number field allows only these characters: ■ Numbers [0–9]
■ Letters [aA–zZ] ■ Apostrophe [‘]
■ Left and right parentheses [( )] ■ Plus sign [+] ■ Forward slash [/] ■ Colon [:] ■ Period [.] ■ Equal sign [=] ■ Question mark [?] ■ Space
If you enter any other character you are advised you used a disallowed character. The disallowed character will be replaced by a question mark so you can change it to an allowed character.
3. Repeat Step 2 as needed to enter all entries to the phone book. When all entries are completed, click OK. Your entries are saved and the Phone Book Editor dialog box closes.
To edit phone book entries:
1. In the Phone Book window, choose the phone book you want to edit from the drop-down list, and then click Edit. The Phone Book Editor dialog box appears. 2. Choose an entry in the phone book, and then take one of these actions:
■ Click Edit, and then change the entry ■ Click Delete to delete the entry
3. When all edits are completed, click OK. Your changes are saved and the Phone Book Editor dialog box closes.
Enabling or Disabling Phone Books
Phone Book
■ Select or clear the Disable all phone books check box to remove agent access to all global phone books.
■ Select or clear the Disable personal phone book check box to remove access to all agents’ personal phone books.
NOTE: All agents must log out and close Agent Desktop in order for the disabling of phone books to take effect.
2. Click Apply.
Importing and Exporting Phone Books
Importing and exporting phone books makes creating and maintaining large phone books (up to 3000 entries) easier than with the Phone Book Editor window. Phone books can be created and edited in any third-party application that accepts
comma-separated value (CSV) files, such as a text editor or spreadsheet. Using the third-party application, you can edit exported phone books—make bulk changes (for example, changing an area code), and adding and deleting phone numbers. The updated file can then be imported into Desktop Administrator to replace the previous version.
NOTE: Phone books for double-byte languages must use UTF-8 character format in order for the double-byte characters to be imported successfully.
CSV File Format
The phone book CSV file contains the fields shown inTable 8.
An example of a phone book CSV file is shown below.
"First Name","Last Name","Phone Number","Notes" "Amanda","Cohen","6511234",""
"Nicholas","Knight","612-555-1228","Sales" "Natalie","Lambert","952-555-9876","Benefits" Table 8. Phone book CSV file details
Field Max Length Permitted Characters
Can Be Blank?
First Name 100 Any printable No
Last Name 100 Any printable No
Phone Number 40 0–9, aA–zZ, ‘ ( ) + / : . = ? No
"Joseph","Stonetree","651-555-7612","Manager"
A phone book CSV files must conform to this format and include the headers in the first line. During import the file is scanned for illegal characters. If any are found, they are replaced with question marks.
NOTE: Exported CSV files will always show each field enclosed in double quotes, as in the example above. This is to ensure that any commas or double quotes that are part of the actual field data are not mistaken for field delimiters. If your data does not include these characters, you can omit the double quotes in files you prepare for importing.
To import a phone book:
1. Make sure the phone book CSV file is formatted correctly, as specified in the section, “CSV File Format” on page 45.
2. In the Phone Book window, click Edit. The Phone Book Editor window appears (Figure 15 on page 43).
3. Click Import. The Import Select dialog box appears (Figure 16).
Any CSV files located in the default folder
C:\Program Files\Cisco\Desktop\config are listed. If your file is located somewhere else, click Find folder to browse to its location.
4. Select the file you want to import and then click OK. The phone book is imported and is added to the list of available phone books in the Current List pane.
Phone Book
The CSV file name (without the CSV suffix) becomes the phone book name. If that name is already in use, you will be asked if you want to replace the existing phone book with the imported phone book. If you do not want to replace the existing phone book, cancel the import, rename the CSV file, and try again.
NOTE: Phone book names are not case sensitive. For example, if you create a phone book named PBOOK1, and then create another phone book named pbook1, the second phone book will overwrite the first phone book.
5. Click OK to close the Phone Book Editor window.
To export a phone book:
1. In the Phone Book window, click Edit. The Phone Book Editor window appears (Figure 15 on page 43).
2. In the Current list pane, select the phone book you want to export, and then click Export. The Export Phone Book dialog box appears (Figure 17).
3. The default export location is the C:\Program Files\Cisco\Desktop\config folder. If you have imported or exported a phone book previously, the location you chose then is shown. If you want to export the phone book to a different location, click Browse to a different folder and navigate to that location. 4. Click OK. The phone book is exported to the selected location. The file name
is the name of the phone book with the CSV file extension.
Reason Codes
Reason codes describe why an agent has changed to the Not Ready agent state or has logged out.
A maximum of 999 reason codes can be set up for CAD and CAD-BE. IP Phone Agent has a limit of 100 reason codes.
Global reason codes, which are available to all agents, are assigned using the Reason Codes node under the Work Flow Configuration node. Work flow group reason codes, which are available only to agents in that specific work flow group, are assigned using the Reason Codes node under the specific work flow group’s node (Figure 18).
Reserved reason codes (identified by [Reserved List] after the description) are predefined in Directory Services and cannot be created or deleted.
There are also Unified CCX-generated reason codes that are entered when an agent is automatically put in the Not Ready or Logout state. For instance, when an agent receives a non-ACD call, the agent is put into the Not Ready state by Unified CCX and the reason code “32761–Non-ACD Call” is entered.
Figure 18. Global and work flow phone book nodes
Global reason code node
Reason Codes
The reserved reason codes are listed in Table 9.
Table 9. Reserved reason codes
Code State Description
22 Logout Supervisor logout. 33 Not Ready Supervisor Not Ready.
1000 ACD voice. The system issues this reason code when an agent is in the Ready state for both voice and e-mail, and then receives an ACD call and the e-mail state changes to the e-mail Not Ready state.
32755 Not Ready Call ended. The system issues this reason code when an agent is moved to the Not Ready state after handling a Unified CCX call.
32756 Not Ready Device in service (phone up). The system issues this reason code when the agent’s phone comes up after it has been through a Phone Down state.
32757 Not Ready CallManager failover. The system issues this reason code when the Unified CM fails over and the agent is moved to the Not Ready state.
32758 Not Ready Work timer expired. The system issues this reason code when an agent’s state is changed from Work to Not Ready. This change occurs if the Work state for that agent’s Contact Service Queue (CSQ) is associated with an expired wrap-up time.
32759 Not Ready Device out of service (phone down). The system issues this reason code if the agent’s phone crashes and that agent is placed in the unavailable state.
32760 Not Ready Logon. The system issues this reason code when an agent logs in and is automatically placed in the Not Ready state.
32761 Not Ready Non-ICD call. The system issues this reason code when the agent is logged on to Agent Desktop or IP Phone Agent and then receives a call that is not queued to the ACD.
32762 Not Ready Off hook. The system issues this reason code when the agent goes off the hook to place a call. If the agent remembered to do this task the corresponding agent-triggered reason code is displayed. If the agent did not remember to do this task, the system issues this reason code.
Not Ready and Logout reason codes are enabled or disabled on the work flow group level.
When creating reason codes, follow these guidelines:
■ Descriptions can consist of up to 40 alphanumeric characters. No punctuation or other characters are allowed.
■ No agent state can contain duplicate numbers and descriptions among its reason codes.
■ Reason code numbers can be any number from 0 to 999, excluding 22 and 33, which are predefined reserved reason codes. If you try to create a reason code using either of those numbers, CAD desktop applications will not function properly.
NOTE: While 0 is an allowed reason code number, it is strongly recommended that you do not use it. Using 0 as a reason code can result in control failures or missing agent state events in Unified CCX. ■ You cannot enable reason codes unless at least one user-defined reason
code exists for Logout and one exists for Not Ready.
32763 Not Ready Ring no answer. The system issues this reason code when the agent fails to answer a Unified CCX call within the specified timeout period.
32764 Logout CRS failover. The system issues this reason code when the active server becomes the standby server and the agent loses connection to the Unified CCX platform. 32765 Logout Connection down. The system issues this reason code
when IP Phone Agent or Agent Desktop crashes due to any reason or if the connection is disrupted.
32766 Logout Force logout (close Agent Desktop). The system issues this reason code when an agent closes Agent Desktop without logging off.
32767 Logout Force login (agent relogin). The system issues this reason code when an agent is already logg3ed in to one device (computer or phone) and then tries to relog in to a second device.
Table 9. Reserved reason codes — Continued
Reason Codes
NOTE: Agents must restart Agent Desktop, Agent Desktop–Browser Edition, and IP Phone Agent to see any changes you make to reason codes.
NOTE: For Chinese, Japanese, and Korean localized sites, reason codes might not appear correctly in IP PHone Agent due to the phone limitations on multi-byte characters.
Assigning Reason Codes
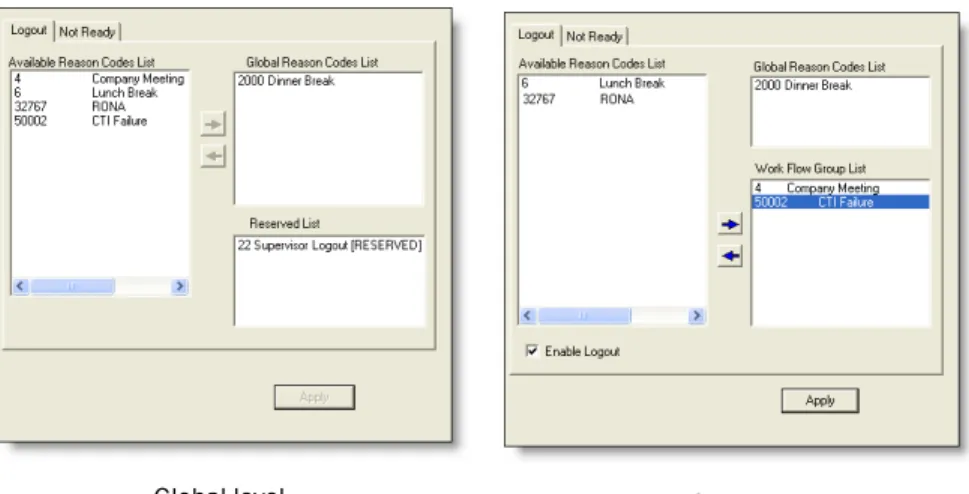
To assign global reason codes:
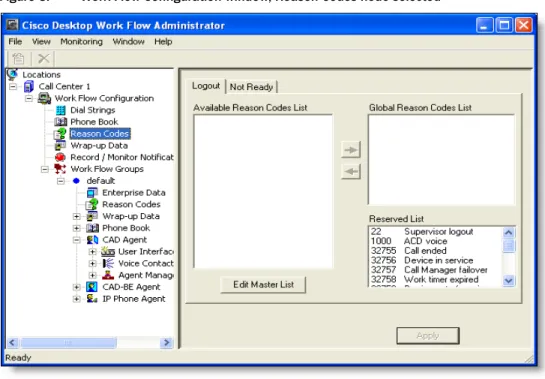
1. Select the global Reason Codes node in the navigation tree to display the Reason Codes window (Figure 19, left).
2. Select the appropriate tab for the type of reason codes you want to assign: Logout or Not Ready.
3. From the Available Reason Codes List, select the reason codes you want to make available to all agents, and then click the right arrow button to move them to the Global Reason Codes List.
4. Click Apply.
To assign work flow reason codes:
1. Select the Reason Codes node under the desired work flow group in the navigation pane to display the Reason codes window (Figure 19, right). 2. Select the appropriate tab for the type of reason codes you want to assign:
Logout or Not Ready.
Figure 19. Reason Code window
3. From the Available Reason Codes List, select the reason codes you want to make available to agents in that work flow group, and then click the right arrow button to move them to the Work Flow Group List.
4. Select the Enable Logout Reason Codes or Enable Not Ready Reason Codes check box to enable that type of reason code for the agents in that work flow group. This includes any global reason codes set up.
5. Click Apply.
Enabling or Disabling Reason Codes
Reason codes can be enabled or disabled only on the work flow group level, and must be done individually for every work flow group.
To enable or disable reason codes:
1. Select the Reason Codes node under the work flow group whose reason codes you want to enable or disable.
2. Select the appropriate tab and then select or clear the Enable Logout Reason Codes or Enable Not Ready Reason Codes check box.
Wrap-up Data
Wrap-up Data
Wrap-up data descriptions are used by contact centers for purposes such as tracking the frequency of different activities and identifying the account to which to charge a call, among others. Wrap-up data is set up and maintained, and automated state changes are enabled, using the Wrap-up Data window. Wrap-up data descriptions are used for both calls and e-mails.
There is no limit on how many wrap-up data descriptions can be set up for CAD and CAD-BE. IP Phone Agent has a limit of 100 wrap-up data descriptions.
NOTE: CAD, CAD-BE, and IP Phone agents must log out, exit, and restart the application for changes to take effect.
Global wrap-up data descriptions, which are available to all agents, are created and assigned using the Wrap-up Data under the Work Flow Configuration node. Work flow group wrap-up data descriptions, which are available to agents only in that specific work flow group, are created and assigned using the Wrap-up Data node under the specific work flow group’s node (Figure 20).
Figure 20. Global and work flow wrap-up data nodes
Global wrap-up data node
In Agent Desktop, CAD-BE, and IP Phone Agent, the agent selects the appropriate wrap-up data description at the beginning of the wrap-up work time for a call or sent e-mail.
When creating wrap-up data descriptions, follow these guidelines:
■ Descriptions can consist of up to 39 alphanumeric characters. No punctuation or other characters are allowed.
NOTE: For Chinese, Japanese, and Korean localized sites,
descriptions might not appear correctly in IP Phone Agent due to the phone limitations on multi-byte characters.
■ Duplicate descriptions are not allowed.
Creating Wrap-up Data Descriptions
You can create and modify wrap-up data descriptions on both the global and work flow group level.
To create a wrap-up data description:
1. Select the global or work flow group Wrap-up Codes node in the navigation tree to display the Wrap-up Codes window (Figure 21).
Figure 21. Wrap-up Data window
Wrap-up Data
2. Click Modify List to display the Wrap-up Data Editor dialog box (Figure 22).
3. Type the new wrap-up data description in the Description field, and then click Add. The wrap-up data description is added to the Wrap-up Data list.
4. Click OK close the dialog box, and then click Apply to save your changes.
To edit a wrap-up data description:
1. Select the global or work flow group Wrap-up Data node in the navigation tree to display the Wrap-up Data window (Figure 21).
2. Click Modify List to display the Wrap-up Data Editor dialog box (Figure 22). 3. Double-click the wrap-up data description you want to edit.
4. In the pop-up dialog box, edit the description as desired and then click OK. 5. Click OK to close the Wrap-up Data Editor dialog box, and then click Apply to
save your changes.
To delete a wrap-up data description:
1. Select the global or work flow group Wrap-up Data node in the navigation tree to display the Wrap-up Data window (Figure 21).
2. Click Modify List to display the Wrap-up Data Editor dialog box (Figure 22). 3. Select the wrap-up data description you want to delete, and then click Delete. 4. Click OK to close the dialog box, and then click Apply to save your changes.
Assigning Wrap-up Data Descriptions
Wrap-up data descriptions can be assigned at the global and at the work flow group level. Global wrap-up data descriptions are available to all agents. Work flow group level wrap-up data descriptions are available only to the agents in that specific work flow group.
To assign global wrap-up data descriptions:
1. Select the global Wrap-up Data node in the navigation tree to display the Wrap-up Data window (Figure 21, left).
2. From the Available Wrap-up Descriptions list, select the descriptions you want to make available to all agents, and then click the right arrow button to move them to the Global Wrap-up Descriptions list.
3. Click Apply.
To assign work flow wrap-up data descriptions:
1. Select the Wrap-up Data node under the desired work flow group in the navigation pane to display the Wrap-up Data window (Figure 21, right). 2. From the Available Wrap-up Data list, select the descriptions you want to
make available to agents in that work flow group, and then click the right arrow button to move them to the Work Flow Wrap-up Data list.
3. Select the Enable Wrap-up Data check box to enable wrap-up data for the agents in that work flow group. This includes any global wrap-up data descriptions set up.
4. Click Apply.
Enabling or Disabling Wrap-up Data
Wrap-up data can be enabled or disabled only on the work flow group level.
Wrap-up Data
2. Select or clear the Enable Wrap-up Data check box. 3. Click Apply.
Automatic State Changes
By default, automatic state changes are not enabled. After agents enter wrap-up data, they remain in the Work state for the length of time set for the wrap-up timer or until they change states manually, whichever happens first. (The wrap-up timer value is configured in Unified CCX Administration.)
If automatic state changes are enabled, agents are automatically changed from the Work state to the Ready state after they enter wrap-up data.
Automatic state changes can be enabled or disabled only on the work flow group level.
To enable or disable automatic state changes:
1. Select the Wrap-up Data node under the work flow group whose automatic state changes you want to enable or disable.
2. Select or clear the Enable Automatic State Change check box. 3. Click Apply.
Record/Monitor Notification
The Record/Monitor Notification window (Figure 23) is used at the global level to enable/disable supervisors from barging in and intercepting agents’ calls, and enable or disable messages to agents that they are being recorded or monitored, or both.
To enable or disable supervisor features for barging in and intercepting calls:
1. Select the Record/Monitor Notification node in the navigation tree. 2. In the Record/Monitor Notification window, select or clear the Enable
Barge In/Intercept check box, and then click Apply.
To enable or disable agent notification:
1. Select the Record/Monitor Notification node in the navigation tree. 2. In the Record/Monitor Notification window, select or clear the Notify
Monitoring and/or Notify Recording check boxes, and then click Apply. You can also enable/disable monitoring and recording from the menu bar.
To enable or disable agent notification from the menu bar:
■ From the menu bar, choose Monitoring > Notify Monitoring and/or
Monitoring > Notify Recording. A check mark appears next to the option when
Work Flow Groups
Work Flow Groups
Use the Work Flow Groups function to create and configure agent work flow groups (Figure 24).
Under the Work Flow Groups node are individual work flow groups. Initially there is a default work flow group, which can be edited, renamed, or deleted. You can also create additional work flow groups.
When you click on a work flow group, the elements that make up and apply only to that work flow group appear as subnodes:
■ Enterprise Data—Configure enterprise data on the agent desktop. ■ Reason Codes—Assign reason codes.
■ Wrap-up Data—Create and edit wrap-up data. ■ Phone Book—Create and edit phone books.
■ CAD Agent—Configure the user interface and voice contact work flow, and agent management work flows for agents using Agent Desktop.
■ CAD-BE Agent—Configure the user interface and voice contact work flows for agents using Agent Desktop—Browser Edition.
■ IP Phone Agent—Enable agent-initiated recording for agents using the Cisco IP Phone Agent service.
Maintaining Work Flow Groups
You can add, delete, or edit work flow groups under the Work Flow Groups node.
NOTE: If you choose to delete the default work flow group, make sure that all agents are assigned to a custom work flow group you have set up. If an agent is not assigned to a work flow group, and there is no default work flow group, that agent will not be able to start Agent Desktop.
To add a new work flow group:
1. In the Navigation pane, choose the Agents node or work flow group subnode (for example, under Agents, choose the Default work flow group).
2. From the menu bar, choose File > New. The Work Flow Group Name Editor dialog box appears (Figure 25).
3. Enter a new work flow group name. The name can be a maximum of 64
Work Flow Groups
If you want to copy an existing work flow group, select the “Copy the following work flow group” check box and choose a work flow group from the drop-down list.
4. Click OK. The new work flow group appears in the Navigation pane. The new work flow group has the same setup as the default work flow group.
To delete an existing work flow group:
1. In the Navigation pane, choose the work flow group you want to delete. 2. From the menu bar, choose File > Delete.
You are warned that all agents belonging to the work flow group you want to delete must be reassigned to other work flow groups. Click Yes to confirm the deletion, or No to cancel it. If you do not reassign the agents, you will not be able to delete the work flow group.
3. Click OK to close the dialog box.
To rename a work flow group:
1. Add a new work flow group.
Name the new work flow group with the name you want the existing work flow group to be renamed.
Select the “Copy the following work flow group” check box and select the existing work flow group from the drop-down list.
Enterprise Data
The Enterprise Data window enables you to:
■ Configure Agent Desktop so that agents in the selected work flow group can edit enterprise data
■ Set thresholds for call duration at a particular type of device while a call is in the contact center
Data
The Data tab (Figure 26) controls whether or not an agent in the work flow group is allowed to edit the enterprise data displayed in Agent Desktop.
To enable enterprise data editing:
■ Select the Allow agent to edit Enterprise Data check box, and then click Apply.
Enterprise Data
Call Activity
The Call Activity tab (Figure 27) enables you to set the thresholds for the selected work flow group for call duration at a particular type of device (CSQ and Agent) while a call is in the contact center.
If a call remains at a device longer than the defined Caution or Warning threshold, a Caution or Warning icon is displayed next to the device name in the Agent Desktop call activity pane.
To set up call activity thresholds:
1. On the Call Activity tab, enter the threshold times as desired.
Enter values in the Warning fields before entering values in the Caution fields. If you enter values in the Caution fields first, Desktop Work Flow Administrator automatically enters values one second greater in the Warning fields.
The Warning threshold value must be greater than the Caution threshold value. If you enter a greater value in the Caution field, Desktop Work Flow Administrator automatically changes it so that it is one second less than the Warning value.
Maximum Warning value: 59 minutes, 59 seconds
Maximum Caution value: 59 minutes, 58 seconds 2. Click Apply to save your changes.
CAD, CAD-BE, and IP Phone Agent
CAD, CAD-BE, and IP Phone Agent
The CAD Agent, CAD-BE Agent, and IP Phone Agent nodes enable you to configure various functions for each type of agent within the selected work flow group.
CAD Agent
You can configure the following for agents using Agent Desktop: ■ User Interface (page 66)
■ Voice Contact Work Flows (page 82) ■ Agent Management Work Flows (page 91)
CAD-BE Agent
You can configure the following for agents using CAD-BE: ■ User Interface (page 66)
■ Voice Contact Work Flows (page 82)
IP Phone Agent
The Recording node under the IP Phone Agent node enables agent-initiated recording for agents who use the IP Phone Agent service.
NOTE: If your CAD system is configured to use Unified CM-based monitoring, the IP Phone Agent node is not available.
When enabled, the IP Phone Agent service has soft key options for starting and stopping recording. The IPPA agent can then record his or her own phone conversations, and these recordings can be reviewed by the supervisor using Supervisor Record Viewer.
See the Cisco IP Phone Agent User Guide and the Cisco Supervisor Desktop User Guide for more information.
To enable IPPA agent-initiated recording:
1. Select the Enable IPPA Recording check box. 2. Click Apply to save your changes.
User Interface
The User Interface window enables you to configure the appearance and behavior of Agent Desktop (when accessed under the CAD Agent node) and CAD-BE (when accessed under the CAD-BE Agent node).
NOTE: The User Interface windows for CAD Agent and CAD-BE Agent are slightly different to allow for the differences in the two
applications. The following section will discuss the CAD Agent version and note where it is different for CAD-BE Agent.
Toolbar
The Toolbar tab (Figure 28) enables you to:
■ Adding and Removing Toolbar Buttons (page 67) ■ Associating Actions with Task Buttons (page 67) ■ Changing a Task Button’s Hint (page 68) ■ Customizing Button Icons (page 68) ■ Show Data Fields (page 70)
Figure 28. Toolbar tab
User Interface
Adding and Removing Toolbar Buttons
The pane on the left of the Toolbar tab displays the buttons that are available to be used on the Agent Desktop toolbar. Buttons that are assigned show an icon next to them; unassigned buttons do not show an icon.
You cannot change the hint or the shortcut key combination on any of the standard buttons, or assign an additional action to them. You can, however, customize the icon displayed on the button (see “Customizing Button Icons” on page 68).
To add a button to the toolbar:
1. In the list of buttons, select the available button you want to add. 2. Select the Visible check box, and then click Apply.
Removing a button from the toolbar:
1. In the list of buttons, select the button you want to remove. 2. Clear the Visible check box, and then click Apply.
Adding the Cisco Unified Outbound Dialer Toolbar
The Cisco Unified Outbound Dialer feature is available only for Agent Desktop Premium version users. You cannot add the Outbound Dialer toolbar to CAD-BE.
To add an Outbound Dialer toolbar to Agent Desktop:
■ In the Outbound Dialer Mode section, select the Direct Preview dialing mode check box and then click Apply. The Outbound Dialer buttons are added to the Agent Desktop toolbar.
For more information, see “Cisco Unified CCX Outbound Preview Dialer” on page 137.
Associating Actions with Task Buttons
You can associate as many actions with a task button as you need. The actions are executed sequentially in the order they are listed in the Actions window.
NOTE: Bear in mind the amount of time it takes to execute actions. Generally, a maximum of two or three actions per task button is recommended.
The default task buttons display icons of the numbers 1 through 10. You can customize these icons if you need.
To associate an action with a task button:
2. Select the Visible check box. The Actions pane and its associated buttons become enabled.
3. Under the Actions pane, click Add. The Select Action window appears. 4. Select the action you want to associate with the button.
You can select an existing action or set up a new action. (See “Actions” on page 96 for more information on setting up new actions.)
5. Click OK. The Toolbar tab is displayed.
6. Type a short description of the action in the Hint field. You can replace only the hint; you cannot change the shortcut key combination.
7. Repeat Steps 3–6 if you want to add other actions to the same task button. 8. Click Apply to save your changes.
Changing a Task Button’s Hint
You can change the hint (the text an agent sees when the mouse hovers over a button) associated with a task button.
You cannot change the hint associated with a standard button, or change the shortcut key combination of any button.
To change a task button’s hint:
1. Select the button whose hint you want to change.
2. In the Hint field, type the hint you want displayed to the agent. 3. Click Apply to save your changes.
Customizing Button Icons
Buttons can be customized by applying different icons to them. A library of available icons is supplied with Desktop Work Flow Administrator, or you can use icons of your own.
If you use your own icons, when applied to a button the icon file is written to Directory Services so it is available to all instances of Agent Desktop.
Custom icons must meet the following specifications. ■ ICO format
■ 50 Kb file size limit ■ 16 × 16 or 32 × 32 pixels ■ up to 256 colors
User Interface
To customize an icon:
1. Choose the button whose icon you want to customize.
2. Click Customize Icon. The Choose Icon dialog box appears (Figure 29).
3. Choose an icon. The icon is displayed in the Preview area.
You can also click Browse to navigate to another location if you want to use your own icon.
4. Click OK. The button is displayed with the new icon on it in the button list.
To reset a button icon:
1. Select the button that has the icon that you previously customized. The Reset button becomes enabled.
2. Click Reset. The original icon is displayed in the button list. 3. When you are finished, click Apply to save your changes.
Show Data Fields
The Show Data Fields tab (Figure 30) configures the data fields that appear in the contact appearance pane in Agent Desktop and CAD-BE, and enables you to rename data fields. It also allows you to enable/disable incrementing duration fields in CAD-BE.
NOTE: Agent Desktop and CAD-BE agents must log out, exit, and log in again for changes to take effect.
Configuring and Renaming Data Fields
The left pane displays the fields that appear in Agent Desktop and CAD-BE. The right pane displays the available fields.
NOTE: The left pane must contain at least one field.
To configure data fields:
1. Use the left and right arrows to move the available fields between the left and right panes, and the up and down arrows to set the left-to-right order in which the fields will appear.
2. Click Apply to save your changes.
Figure 30. Show Data Fields tab
User Interface
To rename a data field:
1. Double-click the field you want to rename. The Rename dialog box appears (Figure 31).
2. Enter a new name and then click OK. Show Duration
For CAD-BE agents, select the Show Duration check box to enable the Duration field in CAD-BE to increment during a call. By default this option is enabled. However, a continually changing field can cause difficulties for screen readers, so this field might be disabled for agents who are visually impaired.
For CAD agents, this feature is enabled/disabled in the Agent Desktop Preferences.
Miscellaneous
Use the Miscellaneous tab (Figure 32) to configure other user interface options. Select or check your desired settings, and then click Apply to save your changes.
Figure 32. Miscellaneous tab