Dominion KX II
User Guide
Release 2.0.5
Copyright © 2007 Raritan, Inc. DKX2-0E-E
September 2007 255-62-4023-00
This document contains proprietary information that is protected by copyright. All rights reserved. No part of this document may be photocopied, reproduced, or translated into another language without express prior written consent of Raritan, Inc.
© Copyright 2007 Raritan, Inc., CommandCenter®, Dominion®, Paragon® and the Raritan company logo are trademarks or registered trademarks of Raritan Computer, Inc. All rights reserved. Java® is a registered trademark of Sun Microsystems, Inc. Internet Explorer® is a registered trademark of Microsoft Corporation. Netscape® and Netscape Navigator® are registered trademarks of Netscape Communication Corporation. All other trademarks or registered trademarks are the property of their respective holders.
FCC Information
This equipment has been tested and found to comply with the limits for a Class A digital device, pursuant to Part 15 of the FCC Rules. These limits are designed to provide reasonable protection against harmful interference in a commercial installation. This equipment generates, uses, and can radiate radio frequency energy and if not installed and used in accordance with the instructions, may cause harmful interference to radio communications. Operation of this equipment in a residential environment may cause harmful interference.
VCCI Information (Japan)
Raritan is not responsible for damage to this product resulting from accident, disaster, misuse, abuse, non-Raritan modification of the product, or other events outside of Raritan's reasonable control or not arising under normal operating conditions.
iii
Contents
Chapter 1 Introduction
1
Dominion KX II Overview ... 2 Virtual Media ... 3 Product Photos... 3 Product Features... 4 Hardware ... 4 Software... 5 Terminology... 6 Package Contents ... 7 User Guide... 7 Organization of Information... 8 Related Documentation... 9Chapter 2 Getting Started
10
Login Information ... 10Default IP Address ... 10
Supported Operating Systems (Clients)... 10
Supported Browsers... 11
Supported Operating Systems and CIMs (Target Servers)... 12
D2CIM-USB G2 Note ... 13
Chapter 3 Installation and Configuration
14
Overview ... 14Step 1: Configure Target Servers... 15
Supported Video Resolutions... 15
Desktop Background ... 16
Mouse Settings... 16
Operating System Mouse and Video Settings... 16
Windows XP / Windows 2003 Settings ... 17
Windows 2000 Settings... 18
Windows Vista ... 18
Linux Settings (Red Hat 9) ... 19
Linux Settings (Red Hat 4) ... 21
SUSE Linux 10.1 Settings... 22
Make Linux Settings Permanent ... 23
Contents
iv
IBM AIX 5.3 Settings ... 26
Make UNIX Settings Permanent ... 27
Apple Macintosh Settings ... 27
Step 2 (Optional): Configure Keyboard Language ... 27
Change the Keyboard Layout Code (Sun Targets)... 28
Step 3: Configure Network Firewall Settings ... 28
Step 4: Connect the Equipment ... 29
1. AC Power ... 29
2. Network Ports... 30
3. Local Access Port (local PC)... 30
4. Target Server Ports... 31
Step 5: Dominion KX II Initial Configuration... 31
Changing the Default Password ... 32
Valid Special Characters... 32
Assigning an IP Address... 33
Naming Target Servers... 34
Specifying Power Supply Auto-detection... 35
Note to CC-SG Users ... 36
Remote Authentication... 36
Note to CC-SG Users ... 36
Supported Protocols... 36
Note on Microsoft Active Directory ... 36
Authentication vs. Authorization ... 37
Users, Groups, and Access Permissions... 38
Users... 38
Groups ... 38
Relationship between Users and Groups... 39
Chapter 4 Connecting to the Dominion KX II
40
User Interfaces ... 40KX II Local Console: KX II Devices ... 41
Dominion KX II Remote Console: Dominion KX II Devices ... 42
Multi-Platform Client (MPC): KX I and Dominion KX II Devices... 43
Raritan Remote Client (RRC): KX I Devices Only... 44
Language Support ... 44
Java Runtime Environment (JRE)... 44
Launching the Dominion KX II ... 45
Dominion KX II Console Layout... 46
Dominion KX II Console Navigation ... 46
Logging Out ... 47
Dominion KX II Console Menu Tree ... 47
Managing Favorites... 49
Manage Favorites Menu... 50
Favorites List... 51
Contents
v
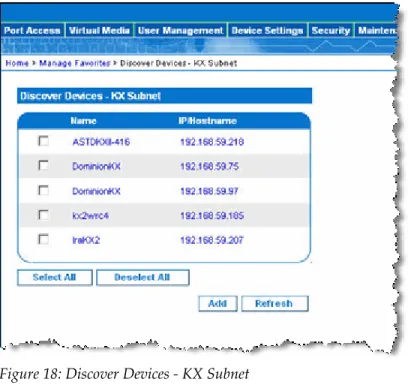
Discover Devices - KX Subnet ... 55
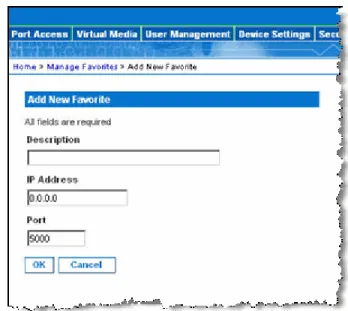
Add New Favorite ... 56
Chapter 5 Accessing Target Servers
57
Port Access Page... 58Connecting to a Target Server ... 59
Port Action Menu ... 60
Switching between Target Servers ... 61
Disconnecting Target Servers ... 61
Power Controlling a Target Server ... 62
Power Cycle a Target Server... 62
Power On a Target Server ... 62
Power Off a Target Server... 63
Chapter 6 Virtual KVM Client
64
Overview ... 65Options... 66
Menu Tree ... 66
Toolbar... 66
Mouse Pointer Synchronization ... 67
Mouse Synchronization Tips ... 68
Connection Menu ... 69 Properties Dialog... 69 Connection Info ... 71 Exit... 72 Keyboard Menu ... 73 Send Ctrl+Alt+Delete ... 73 Keyboard Macros ... 73
Creating a Keyboard Macro... 74
Running a Keyboard Macro... 76
Modifying a Keyboard Macro ... 76
Removing a Keyboard Macro... 76
Video Menu... 77
Refresh Screen... 77
Auto-sense Video Settings ... 77
Calibrate Color... 78
Video Settings ... 78
Mouse Menu ... 81
Synchronize Mouse... 81
Single Mouse Cursor... 82
Standard ... 83
Intelligent ... 83
Contents vi Virtual Media ... 84 Tools Menu... 84 Options ... 84 View Menu ... 85 View Toolbar... 85 Scaling... 85
Target Screen Resolution... 85
Help Menu... 86
About Raritan Virtual KVM Client... 86
Chapter 7 Virtual Media
87
Overview ... 88Prerequisites for Using Virtual Media... 90
Using Virtual Media... 91
Opening a KVM Session... 92
Connecting to Virtual Media ... 93
Local Drives ... 93
Conditions when Read-Write is not Available... 94
CD-ROM/DVD-ROM/ISO Images ... 94
Disconnecting Virtual Media ... 95
File Server Setup (File Server ISO Images Only)... 96
Chapter 8 User Management
98
User Management Menu ... 98User List... 99
Add New User ... 100
Modify Existing User... 101
User Group List ... 102
Add New User Group ... 103
Setting Permissions ... 105
Setting Port Permissions... 106
Group-based IP ACL (Access Control List)... 106
Modify Existing User Group ... 109
Set Permissions for Individual Group... 110
Change Password ... 111
Authentication Settings ... 112
Implementing LDAP Remote Authentication... 115
Returning User Group Information from Active Directory Server... 117
Implementing RADIUS Remote Authentication ... 118
Returning User Group Information via RADIUS ... 119
Contents
vii
Chapter 9 Device Management
121
Device Management Menu ... 121
Network Settings ... 122
Network Basic Settings... 123
Network Miscellaneous Settings... 124
LAN Interface Settings ... 125
Date/Time Settings ... 128
Event Management ... 129
Event Management - Settings... 130
SNMP Configuration ... 130
Syslog Configuration ... 131
Event Management - Destinations... 132
SNMP Agent Configuration ... 133
SNMP Trap Configuration... 133
Power Supply Setup Page ... 136
Port Configuration Page... 138
Power Control... 140
Connect the Power Strip... 140
Name the Power Strip (Port Page for Power Strips) ... 141
Associate Target Servers to Outlets (Port Page)... 143
Note for D2CIM-VUSB CIM Usage ... 145
Chapter 10 Security Settings
146
Security Settings Menu ... 146Security Settings ... 147
Login Limitations ... 148
Strong Passwords ... 149
User Blocking... 150
Encryption & Share... 151
Contents
viii
IP Access Control... 153
Chapter 11 Maintenance
156
Maintenance Menu... 156Maintenance Features (Local/Remote Console) ... 156
Audit Log... 157
Device Information... 159
Backup and Restore... 160
CIM Upgrade ... 162 Firmware Upgrade... 163 Upgrade Report ... 165 Reboot ... 165
Chapter 12 Diagnostics
167
Diagnostics Menu... 167Network Interface Page ... 168
Network Statistics Page ... 169
Ping Host Page... 171
Trace Route to Host Page ... 172
KX Diagnostics... 173
Chapter 13 KX II Local Console
176
KX II Local Console... 176Physical Connections ... 177
Reset Button ... 177
Starting the KX II Local Console ... 178
Simultaneous Users... 178
Security and Authentication ... 179
KX II Local Console Interface ... 179
Available Resolutions ... 179
Accessing Target Servers... 180
Server Display... 180
Hotkeys... 181
Accessing a Target Server ... 181
Returning to the KX II Local Console Interface ... 181
Local Port Administration... 182
Local Port Settings (KX II Local Console Only) ... 182
Contents
ix
Chapter 14 CC Unmanage
187
Overview ... 187
Removing Dominion KX II from CC-SG Management... 188
Appendix A Specifications
190
Environmental Requirements... 190Physical Specifications... 191
Electrical Specifications ... 192
Computer Interface Modules (CIMs) ... 192
Remote Connection ... 193
KVM Properties ... 193
TCP and UDP Ports Used... 194
Target Server Connection Distance and Video Resolution... 195
Network Speed Settings ... 195
Appendix B Updating the LDAP Schema
197
Returning User Group Information ... 197From LDAP ... 197
From Microsoft Active Directory ... 197
Setting the Registry to Permit Write Operations to the Schema ... 198
Creating a New Attribute... 198
Adding Attributes to the Class ... 199
Updating the Schema Cache ... 201
Editing rciusergroup Attributes for User Members ... 201
Appendix C Informational Notes
205
Overview ... 205Non-US Keyboards ... 205
French Keyboard ... 205
Caret Symbol (Linux Clients only) ... 205
Accent Symbol (Windows XP Clients only) ... 206
Numeric Keypad ... 206
Tilde Symbol ... 206
Java Runtime Environment (JRE)... 207
Contents
x
Macintosh Keyboard... 208
Mouse Pointer Synchronization (Fedora) ... 208
Resolving Fedora Core Focus ... 209
SUSE/VESA Video Modes... 209
CIMs ... 210
Windows 3-Button Mouse on Linux Targets... 210
Virtual Media ... 210
Dell OpTiplex and Dimension Computers ... 210
Virtual Media not Refreshed after Files Added ... 210
Target BIOS Boot Time with Virtual Media ... 210
CC-SG... 211
Virtual KVM Client Version not Known from CC-SG Proxy Mode ... 211
Proxy Mode and MPC ... 211
Appendix D FAQs
212
General Questions ... 213Remote Access ... 215
Universal Virtual Media ... 217
Ethernet and IP Networking... 218
Servers... 222
Installation... 224
Local Port... 226
Power Control... 228
Scalability... 229
Computer Interface Modules (CIMs)... 230
Security ... 231 Manageability ... 233 Miscellaneous... 234 Troubleshooting... 235
Index
237
xi
Table of Figures
Figure 1: Dominion KX II Configuration ... 2
Figure 2: Dominion KX2-116... 3
Figure 3: Dominion KX2-432... 4
Figure 4: Dominion KX II CIMs: D2CIM-VUSB (left); D2CIM-PWR (right) ... 4
Figure 5: Terminology and Topology... 6
Figure 6: Solaris Mouse Configuration... 24
Figure 7: Dominion KX II Connections ... 29
Figure 8: Network Settings... 33
Figure 9: Port Configuration ... 35
Figure 10: Authentication/Authorization Flow Diagram ... 37
Figure 11: Dominion KX II Remote Console Login Page ... 45
Figure 12: Sample Menu Hierarchy (breadcrumbs) ... 46
Figure 13: KX II Console Menu Tree (Local and Remote)... 47
Figure 14: Port Access ... 49
Figure 15: Favorites List ... 51
Figure 16: Edit (Favorite Information)... 52
Figure 17: Discover Devices - Local Subnet ... 53
Figure 18: Discover Devices - KX Subnet ... 55
Figure 19: Add New Favorite ... 56
Figure 20: Port Access ... 58
Figure 21: Port Action Menu ... 59
Figure 22: Port Action Menu (power options) ... 62
Figure 23: Virtual KVM Client Window ... 65
Figure 24: Virtual KVM Client Menu Tree ... 66
Figure 25: Dual Mouse Cursors ... 67
Figure 26: Properties Dialog... 69
Figure 27: Connection Info ... 71
Figure 28: Keyboard Macros... 74
Figure 29: Add Keyboard Macro ... 74
Figure 30: Keyboard Macro Example... 75
Figure 31: New Macro in Keyboard Menu ... 75
Figure 32: Video Settings... 79
Figure 33: Single Mouse Cursor Message ... 82
Figure 34: (Tools) Options ... 84
Figure 35: Virtual Media Connection... 89
Figure 36: Open KVM Session ... 92
Table of Figures
xii
Figure 38: Map Virtual Media CD/ISO Image... 94
Figure 39: File Server Setup ... 96
Figure 40: User List ... 99
Figure 41: User Page... 100
Figure 42: User Group List... 102
Figure 43: Group Page ... 104
Figure 44: Group-based IP Access Control List... 107
Figure 45: IP ACL Example... 108
Figure 46: Modify Group ... 109
Figure 47: Change Password ... 111
Figure 48: Authentication Settings ... 113
Figure 49: Authentication Settings (LDAP)... 115
Figure 50: Authentication Settings (RADIUS) ... 118
Figure 51: Network Settings... 122
Figure 52: Network Settings (Network Basic Settings)... 123
Figure 53: Network Settings (Network Miscellaneous Settings)... 124
Figure 54: Network Settings (LAN Interface Settings) ...125
Figure 55: Date/Time Settings... 128
Figure 56: Event Management - Settings ... 130
Figure 57: Syslog Configuration... 131
Figure 58: Event Management - Destinations... 132
Figure 59: Power Supply Setup ... 136
Figure 60: Port Configuration ... 138
Figure 61: Power Strip Connections ... 140
Figure 62: Port Page (power strips) ... 141
Figure 63: Port Page (KVM ports) ... 143
Figure 64: Port Page (Target Server Settings for D2CIM-VUSB) ... 145
Figure 65: Security Settings... 147
Figure 66: Security Settings (Strong Passwords)... 149
Figure 67: Security Settings (User Blocking) ... 151
Figure 68: Security Settings (Encryption & Share) ... 151
Figure 69: Security Settings (Encryption Mode Warning Message)... 152
Figure 70: IP Access Control... 154
Figure 71: Audit Log ... 157
Figure 72: Device Information ... 159
Figure 73: Backup/Restore ... 160
Figure 74: CIM Upgrade from KX Flash ...162
Figure 75: Firmware Upgrade ... 163
Figure 76: Firmware Upgrade Review... 164
Figure 77: Firmware Upgrade Successful ... 164
Figure 78: Upgrade Report... 165
Table of Figures
xiii
Figure 80: Reboot Confirmation... 166
Figure 81: Network Interface ... 168
Figure 82: Network Statistics (statistics)... 169
Figure 83: Network Statistics (interfaces)... 170
Figure 84: Network Statistics (route) ... 170
Figure 85: Ping Host... 171
Figure 86: Trace Route to Host... 172
Figure 87: KX Diagnostics... 174
Figure 88: Diagnostics Scripts... 174
Figure 89: File Download... 175
Figure 90: Dominion KX II Local Console... 176
Figure 91: Local User Panel on Dominion KX II ... 177
Figure 92: Reset Button (back of unit)... 177
Figure 93: Local Console Port Access ... 180
Figure 94: Local Port Settings... 182
Figure 95: Factory Reset (Local Console Only) ... 185
Figure 96: Device Managed by CC-SG Message... 187
Figure 97: Remove from CC-SG Management ... 188
Figure 98: Confirm CC Unmanage... 188
Figure 99: Device Removed from CC Management ... 189
Figure 100: Change Schema Master ... 198
Figure 101: Create New Attribute... 199
Figure 102: Adding the Attributes ... 200
Figure 103: Adding the Attributes to the Class ...200
Figure 104: ADSI Edit... 201
Figure 105: ADSI Edit (CN=Users)... 202
Figure 106: Administrator Properties (attribute editor) ... 203
Figure 107: User Properties... 204
Figure 108: Edit Attribute (adding user to KX II group) ... 204
1
In This Chapter
Dominion KX II Overview...2 Virtual Media ...3 Product Photos ...3 Product Features ...4 Terminology ...6 Package Contents...7 User Guide...7Chapter 1 Introduction
Dominion KX II Overview
2
Dominion KX II Overview
Dominion KX II is an enterprise-class, secure, digital KVM (Keyboard, Video, Mouse) switch that provides BIOS-level (and up) access, and control of up to 64 servers from anywhere in the world via Web browser. At the rack, Dominion KX II provides BIOS-level control of up to 64 servers and other IT devices from a single keyboard, monitor, and mouse. The integrated remote access capabilities of the Dominion KX II provide the same levels of control of your servers via Web browser. Dominion KX II is easily installed using standard UTP (Cat 5/5e/6) cabling. Its advanced features include virtual media, 128-bit encryption, dual power supplies, remote power control, dual Ethernet, LDAP, RADIUS, Active Directory, Syslog integration, and Web management. These features enable you to deliver higher uptime, better productivity, and bulletproof security - at any time from anywhere.
Dominion KX II products can operate as standalone appliances and do not rely on a central management device. For larger data centers and enterprises, numerous Dominion KX II units (along with Dominion SX units for remote serial console access and Dominion KSX for
remote/branch office management) can be integrated into a single logical solution using Raritan's CommandCenter Secure Gateway (CC-SG) management appliance.
Chapter 1: Introduction
3
Virtual Media
All Dominion KX II models support virtual media. The benefits of virtual media - mounting of remote drives/media on the target server to support software installation, and diagnostics - are now available in all of the Dominion KX II models.
Each Dominion KX II comes equipped with virtual media to enable remote management tasks using the widest variety of CD, DVD, USB, internal and remote drives and images. Unlike other solutions, the Dominion KX II supports virtual media access of hard drives and remotely mounted images for added flexibility and productivity. Virtual media sessions are secured using 128-bit AES or RC4 encryption. The new D2CIM-VUSB CIM (computer interface module) supports virtual media sessions to target servers supporting the USB 2.0 interface. This new CIM also supports Absolute Mouse Synchronization as well as remote firmware update.
Product Photos
Product Features
4
Figure 3: Dominion KX2-432
Figure 4: Dominion KX II CIMs: D2CIM-VUSB (left); D2CIM-PWR (right)
Product Features
Hardware
• Integrated KVM-over-IP remote access
• 1U or 2U (KX2-464) rack-mountable; brackets included
• Dual power supplies with failover; auto-switching power supply with power failure warning
• 16, 32, or 64 (on KX2-464) server ports
• Multiple user capacity (1/2/4 remote users; 1 local user)
• UTP (Cat5/5e/6) server cabling
• Dual Ethernet ports (10/100/1000 LAN) with failover
• Field upgradeable
• Local user port for in-rack access PS/2 keyboard/mouse ports
Chapter 1: Introduction
5 One front and three back panel USB 2.0 ports for supported USB
devices
Fully concurrent with remote user access
Local Graphical User Interface (GUI) for administration
• Centralized access security
• Integrated power control
• LED indicators for dual power status, network activity, and remote user status
• Hardware reset button Software
• Virtual media with D2CIM-VUSB CIM
• Absolute Mouse Synchronization with D2CIM-VUSB CIM
• Plug-and-Play
• Web-based access and management
• Intuitive Graphical User Interface (GUI)
• 128-bit encryption of complete KVM signal, including video and virtual media
• LDAP, Active Directory, RADIUS, or internal authentication and authorization
• DHCP or fixed IP addressing
• SNMP and Syslog management
• Power control associated directly with servers to prevent mistakes
• Integration with Raritan's CommandCenter Secure Gateway (CC-SG) management appliance
Terminology
6
Terminology
This manual uses the following terminology for the components of a typical Dominion KX II configuration:
Figure 5: Terminology and Topology
Remote PC (client)
Networked computers used to access and control target servers connected to the Dominion KX II. Refer to
Supported Operating Systems (Clients) (on page 10) for a list of the Operating Systems supported by Dominion KX II remotely.
Local Access Console (client)
An optional user console (consisting of a keyboard, mouse, and multi-sync VGA monitor) attached directly to Dominion KX II to control target servers locally (directly at the rack, not through the network).
CIMs
(Computer Interface Modules)
Dongles that connect to each target server and Raritan power strip. Available for all of the supported Operating Systems. Refer to Supported CIMs for information about the CIMs supported by Dominion KX II.
Target Servers Servers with video cards and user interfaces (e.g., Windows, Linux, Solaris, etc.) accessed remotely via Dominion KX II. Refer to Supported Operating Systems and CIMs (Target Servers) for a list of the supported Operating Systems and CIMs.
Power Strips Raritan power strips accessed remotely via the Dominion KX II.
Chapter 1: Introduction
7
Package Contents
Each Dominion KX II ships as a fully-configured stand-alone product in a standard 1U (2U for KX2-464) 19" rackmount chassis. Each Dominion KX II unit ships with the following contents:
(1) Dominion KX II Unit
(1) Dominion KX II Quick Installation and Setup Guide
(1) Raritan User Manuals CD-ROM (1) Rackmount Kit
(2) AC Power Cords (1) Cat5 Network Cable
(1) Cat5 Network Crossover Cable (1) Set of 4 Rubber Feet (for desktop use) (1) Application Note
(1) Warranty Card
User Guide
The Dominion KX II User Guide provides the information to install, set up and configure, access target servers and power strips, use virtual media, manage users and security, and maintain and diagnose the Dominion KX II.
This user guide is specific to Dominion KX II (version 2.0); for
information pertaining to version 1.4, refer to the Dominion KX 1.4 User Guide.
User Guide
8
Organization of Information The user guide is organized as follows:
• Chapter 1, Introduction. Overview, features, terminology, and package contents
• Chapter 2, Getting Started. Login information; default IP Address; supported operating systems, browsers, and CIMs
• Chapter 3, Installation and Configuration. Target server
configuration; firewall settings; physical device connections; initial KX II unit configuration; remote authentication; and users, groups, and access permissions
• Chapter 4, Connecting to the Dominion KX II. User interfaces; starting the KX II Remote Console; Dominion KX II Favorites
• Chapter 5, Accessing Target Servers. Access, control, and switching between target servers
• Chapter 6, Virtual KVM Client. Target server control, mouse pointer synchronization, keyboard macros, and video settings
• Chapter 7, Virtual Media. Virtual media configuration and access
• Chapter 8, User Management. User and group management, passwords, group-based IP access control, and authentication settings
• Chapter 9, Device Management. Network settings, date/time, event management, power supply setup, port configuration, and power control
• Chapter 10, Security Settings. Security settings and IP access control
• Chapter 11, Maintenance. Audit log; device information; backup and restore; firmware and CIM upgrades; and reboot
• Chapter 12, Diagnostics. Network interface, network statistics, ping host, trace route to host, and KX diagnostics
• Chapter 13, KX II Local Console. Starting the KX II Local Console, accessing target servers, and local port administration
• Chapter 14, CC Unmanage. Removing the KX II from CC-SG control
• Appendix A, Specifications. Physical specifications; ports used; target server connection distance and video resolution; and network speed settings
• Appendix B, Updating the LDAP Schema. Update LDAP schema (for experienced users)
• Appendix C, Informational Notes. Important notes on Dominion KX II usage
Chapter 1: Introduction
9
• Appendix D, FAQs. General questions, remote access, universal virtual media, Ethernet and IP networking, servers, installation, local port, power control, scalability, Computer Interface Modules (CIMs), security, manageability, miscellaneous, and troubleshooting
Related Documentation
For more information about the Raritan Multi-Platform Client (MPC), refer to the Raritan Multi-Platform Client (MPC) and Raritan Remote Client (RRC) User Guide.
For more information about the entire Raritan product line, refer to the Raritan User Manuals & Quick Setup Guides CD ROM or Raritan's Web site http://www.raritan.com/support/productdocumentation
10
In This Chapter
Login Information...10 Default IP Address ...10 Supported Operating Systems (Clients) ...10 Supported Browsers ...11 Supported Operating Systems and CIMs (Target Servers)...12 D2CIM-USB G2 Note ...13
Login Information
• The default Dominion KX II login user name is admin and the default password is raritan. This user has administrative privileges.
• Passwords are case sensitive and must be entered in the exact case combination in which they were created. For example, the default password raritan must be entered entirely in lowercase letters.
• The first time you start the Dominion KX II you are required to change the default password.
Tip: For backup and business continuity purposes, it is strongly recommended that you create a backup administrator user name and password and keep that information in a secure location.
Default IP Address
Dominion KX II ships with the default IP address of 192.168.0.192.
Supported Operating Systems (Clients)
The following operating systems are supported on the Dominion KX II Remote Console, Virtual KVM Client™, and Multi-Platform Client (MPC):
Client OS Virtual Media (VM) Support on Client
Windows XP Yes
Windows 2000 SP4 Yes
Windows Vista Yes
Chapter 2: Getting Started
11 Red Hat Linux 9.0 Yes; Locally held ISO image, Remote File
Server mounting directly from KX Red Hat Enterprise
Workstation 3.0 and 4.0
Yes; Locally held ISO image, Remote File Server mounting directly from KX SUSE Linux Professional 9.2
and 10
Yes; Locally held ISO image, Remote File Server mounting directly from KX Fedora™ Core 5 and above Yes; Locally held ISO image, Remote File
Server mounting directly from KX Mac No Solaris No
Supported Browsers
Dominion KX II supports the following browsers:
• Internet Explorer 6 and 7
• Firefox 1.5 and 2.0
• Mozilla 1.7
Supported Operating Systems and CIMs (Target Servers)
12
Supported Operating Systems and CIMs (Target Servers)
In addition to the new Dominion KX II D2CIMs, most Paragon® and Dominion KX I CIMs are supported. The following table displays the supported target server operating systems, CIMs, virtual media, and mouse modes:
Note: D2CIM-VUSB is not supported on Sun (Solaris) targets.
Supported CIMs Mouse Modes Target Server
Paragon CIMs Dominion KX IDCIMs
Dominion KX II D2CIMs V M A M IM S M Windows XP Windows 2000 Windows 2000 Server Windows 2003 Server Windows Vista P2CIM-PS2 P2CIM-AUSB UKVMPD UUSBPD DCIM-PS2 DCIM-USB DCIM-USB G2 D2CIM-VUSB 9 9 9 9
Red Hat Linux 9.0
Red Hat Enterprise Workstation 3.0 and 4.0 P2CIM-PS2 P2CIM-AUSB UKVMPD UUSBPD DCIM-PS2 DCIM-USB DCIM-USB G2 D2CIM-VUSB (excluding Red Hat Enterprise Workstation 3.0) 9 9 SUSE Linux Professional 9.2 and 10 P2CIM-PS2 P2CIM-AUSB UKVMPD UUSBPD DCIM-PS2 DCIM-USB DCIM-USB G2 D2CIM-VUSB 9 9 Fedora Core 3 and above P2CIM-PS2 P2CIM-AUSB UKVMPD UUSBPD DCIM-PS2 DCIM-USB DCIM-USB G2 D2CIM-VUSB 9 9
Chapter 2: Getting Started 13 Mac OS P2CIM-AUSB UUSBPD DCIM-USB DCIM-USB G2 D2CIM-VUSB 9 9 All Solaris OSs
supported in Dominion KX I P2CIM-SUN P2CIM-SUSB DCIM-SUN DCIM-SUSB DCIM-USB G2 9 IBM AIX P2CIM-PS2 P2CIM-AUSB UUSBPD DCIM-USB DCIM-USB G2 DCIM-PS2 9 HP UX P2CIM-PS2 P2CIM-AUSB UUSBPD DCIM-USB DCIM-USB G2 DCIM-PS2 9
Remote Power Strips D2CIM-PWR
Serial Devices P2CIM-SER Legend:
• VM: Virtual Media (D2CIM-VUSB only)
• AM: Absolute Mouse Synchronization (D2CIM-VUSB only)
• IM: Intelligent Mouse Mode
• SM: Standard Mouse Mode
• 9: Supported
Note: The DCIM-USB G2 provides a small slide switch on the back of the CIM. Move the switch to P for PC-based USB target servers; move the switch to S for Sun USB target servers.
A new switch position takes effect only after the CIM is cycled. To power-cycle the CIM, remove the USB connector from the target server and plug it back in a few seconds later.
D2CIM-USB G2 Note
Note: The DCIM-USB G2 provides a small slide switch on the back of the CIM. Move the switch to P for PC-based USB target servers; move the switch to S for Sun USB target servers.
A new switch position takes effect only after the CIM is cycled. To power-cycle the CIM, remove the USB connector from the target server and plug it back in a few seconds later.
14
In This Chapter
Overview...14 Step 1: Configure Target Servers ...15 Step 2 (Optional): Configure Keyboard Language...27 Step 3: Configure Network Firewall Settings ...28 Step 4: Connect the Equipment...29 Step 5: Dominion KX II Initial Configuration ...31 Remote Authentication ...36 Users, Groups, and Access Permissions ...38
Overview
This section provides a brief overview of the installation process. Each step is further detailed in the remaining sections of this chapter. ¾ To install and configure Dominion KX II:
1. Configure the target servers.
2. (Optional) Configure the keyboard language. 3. Configure the network firewall settings. 4. Connect the equipment.
5. Configure the Dominion KX II unit.
Chapter 3: Installation and Configuration
15
Step 1: Configure Target Servers
Target servers are the computers that will be accessed and controlled via the Dominion KX II. Before installing Dominion KX II, configure all target servers to ensure optimum performance. This configuration applies only to target servers, not to the client workstations (remote PCs) used to access Dominion KX II remotely. Refer to Chapter 1:
Introduction, Terminology (see "Terminology" on page 6) for additional information.
¾ To configure the target servers:
• Check the video resolution.
• Check the desktop background.
• Adjust the mouse settings.
• Perform OS-specific mouse and video configuration. Supported Video Resolutions
Ensure that each target server's video resolution and refresh rate are supported by Dominion KX II and that the signal is non-interlaced. Video resolution and cable length are important factors in the ability to obtain mouse synchronization. Refer to Target Server Connection Distance and Video Resolution (on page 195) for more information. Dominion KX II supports these resolutions:
640x350 @70 Hz 720x400 @85 Hz 1024x768 @90 Hz 640x350 @85 Hz 800x600 @56 Hz 1024x768 @100 Hz 640x400 @56 Hz 800x600 @60 Hz 1152x864 @60 Hz 640x400 @84 Hz 800x600 @70 Hz 1152x864 @70 Hz 640x400 @85 Hz 800x600 @72 Hz 1152x864 @75 Hz 640x480 @60 Hz 800x600 @75 Hz 1152x864 @85 Hz 640x480 @66.6 Hz 800x600 @85 Hz 1152x870 @75.1 Hz 640x480 @72 Hz 800x600 @90 Hz 1152x900 @66 Hz 640x480 @75 Hz 800x600 @100 Hz 1152x900 @76 Hz 640x480 @85 Hz 832x624 @75.1 Hz 1280x960 @60 Hz 640x480 @90 Hz 1024x768 @60 Hz 1280x960 @85 Hz 640x480 @100 Hz 1024x768 @70 Hz 1280x1024 @60 Hz
Step 1: Configure Target Servers
16
640x480 @120 Hz 1024x768 @72 Hz 1280x1024 @75 Hz 720x400 @70 Hz 1024x768 @75 Hz 1280x1024 @85 Hz 720x400 @84 Hz 1024x768 @85 Hz 1600x1200 @60 Hz
Note: Composite Sync and Sync-on-Green video require an additional adapter. Desktop Background
For optimal bandwidth efficiency and video performance, target servers running graphical user interfaces such as Windows, Linux, X-Windows, Solaris, and KDE require configuration. The desktop background need not be completely solid; but desktop backgrounds featuring photos or complex gradients might degrade performance.
Mouse Settings
The Dominion KX II operates in several mouse modes:
• Absolute Mouse Synchronization (see "Absolute" on page 83) (D2CIM-VUSB only)
• Intelligent Mouse Mode (see "Intelligent" on page 83) (do not use an animated mouse)
• Standard Mouse Mode (see "Standard" on page 83)
For both the Standard and Intelligent mouse modes, mouse parameters must be set to specific values, which are described later in this manual. Mouse parameters do not have to be altered for Absolute Mouse Synchronization; D2CIM-VUSB is required for this mode. Mouse configurations will vary on different target operating systems; consult your OS documentation for additional detail.
Intelligent mouse mode generally works well on most Windows platforms. Intelligent mouse mode may produce unpredictable results when active desktop is set on the target. For additional information on Intelligent Mouse mode, refer to the Raritan Multi-Platform Client (MPC) and Raritan Remote Client (RRC) User Guide (Appendix B: Conditions for Intelligent Mouse Synchronization) available on Raritan's Website http://www.raritan.com/support/productdocumentation, or on the Raritan User Manuals & Quick Setup Guides CD ROM included with your Dominion KX II shipment.
Operating System Mouse and Video Settings
This section provides video mode and mouse information specific to the Operating System in use on the target server.
Chapter 3: Installation and Configuration
17 Windows XP / Windows 2003 Settings
¾ To configure target servers running Microsoft Windows
XP/2003:
1. Configure the mouse settings:
a. Select Start > Control Panel > Mouse.
b. Open the Pointer Options tab. In the Motion group:
Set the mouse motion speed setting exactly to the middle speed.
Disable the Enhanced pointer precision option. Click OK.
2. Disable transition effects:
a. Select the Display option from Control Panel. b. Open the Appearance tab.
c. Click the Effects button.
d. Clear the Use the following transition effect for menus and tooltips option.
e. Click OK.
f. Close the Control Panel.
Note: For target servers running Windows 2000 or XP, you may wish to create a user name that will be used only for remote connections through Dominion KX II. This will enable you to keep the target server's slow mouse pointer motion/acceleration settings exclusive to the Dominion KX II connection. Windows XP and 2000 login screens revert to pre-set mouse parameters that differ from those suggested for optimal Dominion KX II performance. As a result, mouse synchronization may not be optimal for these screens. WARNING! Proceed only if you are comfortable adjusting the registry on Windows target servers. You can obtain better Dominion KX II mouse
synchronization at login screens by using the Windows registry editor to change the following settings (HKEY_CURRENT_USER\Control Panel\Mouse): MouseSpeed = 0; MouseThreshold 1= 0; MouseThreshold 2 = 0.
Step 1: Configure Target Servers
18
Windows 2000 Settings
¾ To configure target servers running Microsoft Windows
2000:
1. Configure the mouse settings:
a. Select Start > Control Panel > Mouse. b. Open the Motion tab.
Set the acceleration to None.
Set the mouse motion speed setting exactly to the middle speed.
Click OK.
2. Disable transition effects:
a. Select the Display option from Control Panel. b. Open the Effects tab.
c. Clear the Use the following transition effect for menus and tooltips option.
d. Click OK.
e. Close the Control Panel. Windows Vista
¾ To configure target servers running Microsoft Windows
Vista:
1. Configure the mouse settings:
a. Select Start > Settings > Control Panel > Mouse. b. Open the Pointer Options tab. In the Motion group:
Set the mouse motion speed setting exactly to the middle speed.
Disable the Enhanced pointer precision option. Click OK.
2. Disable animation and fade effects:
a. Select the System option from Control Panel.
b. Select Advanced system settings. The System Properties dialog opens.
Chapter 3: Installation and Configuration
19 c. Open the Advanced tab.
d. Click the Settings button in the Performance group. The Performance Options dialog opens.
e. Under Custom options, clear the following checkboxes:
Animation options:
Animate controls and elements inside windows Animate windows when minimizing and maximizing
Fade options:
Fade or slide menus into view Fade or slide ToolTips into view Fade out menu items after clicking f. Click OK.
g. Close the Control Panel. Linux Settings (Red Hat 9)
Note: The following settings are optimized for standard mouse mode only. ¾ To configure target servers running Linux (graphical
user interface):
1. Configure the mouse settings:
a. Select Main Menu > Preferences > Mouse. The Mouse Preferences dialog opens.
b. Open the Motion tab.
c. Within the Speed group, set the Acceleration slider to the exact center.
d. Within the Speed group, set the Sensitivity towards low.
e. Within the Drag & Drop group, set the Threshold towards small. f. Close the Mouse Preferences dialog.
Note: If these steps do not work, issue the xset mouse 1 1 command as described in the Linux command line instructions.
Step 1: Configure Target Servers
20
a. Select Main Menu > System Settings > Display. The Display Settings dialog opens.
b. From the Display tab, select a Resolution supported by Dominion KX II.
c. From the Advanced tab, verify that the Refresh Rate is supported by Dominion KX II.
Note: Once connected to the target server, in many Linux graphical environments, the <CTRL> <ALT> <+> command will change the video resolution, scrolling through all available resolutions that remain enabled in the XF86Config file.
¾ To configure target servers running Linux (command
line):
1. Set the mouse acceleration to exactly 1 and set the threshold to exactly 1. Enter this command: xset mouse 1 1. This should be set for execution upon login.
2. Ensure that each target server running Linux is using a resolution supported by Dominion KX II at a standard VESA resolution and refresh rate.
3. Each Linux target server should also be set so the blanking times are within +/- 40% of VESA standard values:
Go to the Xfree86 Configuration file XF86Config
Using a text editor, disable all non-Dominion KX II supported resolutions
Disable the virtual desktop feature (not supported by Dominion KX II)
Check blanking times (+/- 40% of VESA standard) Restart computer
Chapter 3: Installation and Configuration
21 Note: If you change video resolution, you must logout of the target server and log back in for the video settings to take effect.
Note for Red Hat 9 Target Servers
If you are running Red Hat 9 on the target server using a USB CIM, and are experiencing problems with the keyboard and/or mouse, there is an additional configuration setting you can try.
Tip: You might have to perform these steps even after a fresh OS installation. ¾ To configure Red Hat 9 servers using USB CIMs: 1. Locate the configuration file (usually /etc/modules.conf) in your
system.
2. Using the editor of your choice, make sure that the alias usb-controller line in the modules.conf file is as follows:
alias usb-controller usb-uhci
Note: If there is another line using usb-uhci in the /etc/modules.conf file, it needs to be removed or commented out.
3. Save the file.
4. Reboot the system in order for the changes to take effect. Linux Settings (Red Hat 4)
Note: The following settings are optimized for standard mouse mode only. ¾ To configure target servers running Linux (graphical
user interface):
1. Configure the mouse settings:
a. Select Main Menu > Preferences > Mouse. The Mouse Preferences dialog opens.
b. Open the Motion tab.
c. Within the Speed group, set the Acceleration slider to the exact center.
d. Within the Speed group, set the Sensitivity towards low.
e. Within the Drag & Drop group, set the Threshold towards small. f. Close the Mouse Preferences dialog.
Step 1: Configure Target Servers
22
Note: If these steps do not work, issue the xset mouse 1 1 command as described in the Linux command line instructions.
2. Configure the screen resolution:
a. Select Main Menu > System Settings > Display. The Display Settings dialog opens.
b. From the Settings tab, select a Resolution supported by Dominion KX II.
c. Click OK.
Note: If you change video resolution, you must logout of the target server and log back in for the video settings to take effect.
SUSE Linux 10.1 Settings
Note: Do not attempt to synchronize the mouse at the SUSE login prompt. You must be connected to the target server to synchronize the mouse cursors. ¾ To configure the mouse settings:
1. Select Desktop > Control Center. The Desktop Preferences dialog opens.
2. Select Mouse. The Mouse Preferences dialog opens. 3. Open the Motion tab.
4. Within the Speed group, set the Acceleration slider to the exact center position.
5. Within the Speed group, set the Sensitivity slider to low.
6. Within the Drag & Drop group, set the Threshold slider to small. 7. Click Close.
¾ To configure the video:
1. From Desktop Preferences, select Graphics Card and Monitor. The Card and Monitor Properties dialog opens.
2. Verify that a Resolution and Refresh Rate is in use that is supported by Dominion KX II. Please refer to Supported Video Resolutions for more information.
Note: If you change video resolution, you must logout of the target server and log back in for the video settings to take effect.
Chapter 3: Installation and Configuration
23 Make Linux Settings Permanent
Note: These steps may vary slightly depending on the specific version of Linux in use.
¾ To make your settings permanent in Linux (prompt): 1. Select Main Menu > Preferences > More Preferences > Sessions. The
Sessions dialog opens.
2. Open the Session Options tab.
3. Check the Prompt on logout checkbox and click OK. This option prompts you to save your current session when you logout. 4. Upon logging out, check the Save current setup option from the
dialog presented. 5. Click OK.
Tip: If you do not want to be prompted upon logout, follow these procedures instead.
¾ To make your settings permanent in Linux (no prompt): 1. Select Main Menu > Preferences > More Preferences > Sessions. The
Session dialog opens.
2. Open the Session Options tab.
3. Clear the Prompt on logout checkbox.
4. Check the Automatically save changes to the session checkbox and click OK. This option automatically saves your current session when you logout.
Sun Solaris Settings
¾ To configure target servers running Sun Solaris: 1. Set the mouse acceleration value to exactly 1 and the threshold to
Step 1: Configure Target Servers
24
From the graphical user interface:
Figure 6: Solaris Mouse Configuration With the command line:
xset mouse a t
(where “a” is the acceleration and “t” is the threshold.) 2. All target servers must be configured to one of the display
resolutions supported by Dominion KX II. The most popular supported resolutions for Sun machines are:
Display Resolution
Vertical Refresh Rate Aspect Ratio 1600 x 1200 75 Hz 4:3 1280 x 1024 60,75,85 Hz 5:4 1152 x 864 75 Hz 4:3 1024 x 768 60,70,75,85 Hz 4:3 800 x 600 56,60,72,75,85 Hz 4:3 720 x 400 85 Hz 9:5 640 x 480 60,72,75,85 Hz 4:3
3. Target servers running the Solaris operating system must output VGA video (H-and-V sync, not composite sync).
¾ To change your Sun video card output from composite
sync to the non-default VGA output:
1. Issue the Stop+A command to drop to bootprom mode. 2. Issue the following command to change the output resolution:
setenv output-device screen:r1024x768x70 3. Issue the “boot” command to reboot the server.
Chapter 3: Installation and Configuration
25 You can also contact your Raritan representative to purchase a video output adapter:
If you Have: Use this Video Output Adapter:
Sun 13W3 with composite sync output
APSSUN II Guardian converter
Sun HD15 with composite sync output
1396C converter to convert from HD15 to 13W3 and an APSSUN II Guardian converter to support composite sync
Sun HD15 with separate sync output APKMSUN Guardian converter Note: Some of the standard Sun background screens may not center precisely on certain Sun servers, with dark borders. Use another background or place a light colored icon in the upper left hand corner.
Mouse Settings
¾ To configure the mouse settings (Sun Solaris 10.1): 1. Select Launcher. Application Manager - Desktop Controls opens. 2. Select Mouse Style Manager. The Style Manager - Mouse dialog
opens.
3. Set the Acceleration slider to 1.0. 4. Set the Threshold slider to 1.0. 5. Click OK.
Accessing the Command Line 1. Right click.
2. Select Tools > Terminal. A terminal window opens. (It is best to be at the root to issue commands.)
Video Settings (POST)
Sun systems have two different resolution settings: a POST resolution and a GUI resolution. Please Note that 1024x768x75 is used as an example here; substitute the resolution and refresh rate you are using. Run these commands from the command line.
¾ To check current POST resolution:
Step 1: Configure Target Servers
26
¾ To change POST resolution:
1. # eeprom output-device=screen:r1024x768x75 2. Logout or restart computer.
Video Settings (GUI)
The GUI resolution can be checked and set using different commands depending on the video card in use. Please Note that 1024x768x75 is used as an example here; substitute the resolution and refresh rate you are using. Run these commands from the command line.
The following table is organized by card:
Card To Check Resolution: To Change Resolution:
32-bit # /usr/sbin/pgxconfig -prconf 1. # /usr/sbin/pgxconfig -res 1024x768x75 2. Logout or restart computer.
64-bit # /usr/sbin/m64config -prconf 1. # /usr/sbin/m64config -res 1024x768x75 2. Logout or restart computer.
32-bit and 64-bit
# /usr/sbin/fbconfig -prconf 1. # /usr/sbin/fbconfig -res 1024x768x75 2. Logout or restart computer.
IBM AIX 5.3 Settings
Follow these steps in this section to configure target servers running IBM AIX 5.3.
¾ To configure the mouse: 1. Go to Launcher.
2. Select Style Manager.
3. Click Mouse. The Style Manager - Mouse dialog opens.
4. Use the sliders to set the Mouse acceleration to 1.0 and Threshold to 1.0.
5. Click OK.
¾ To configure the video:
1. From the Launcher, select Application Manager. 2. Select System_Admin.
Chapter 3: Installation and Configuration
27 3. Select Smit > Devices > Graphic Displays > Select the Display
Resolution and Refresh Rate. 4. Select the video card in use.
5. Click List. A list of display modes is presented.
6. Select a resolution and refresh rate supported by the Dominion KX II. Please refer to Supported Video Resolutions for more information. Note: If you change video resolution, you must logout of the target server and log back in for the video settings to take effect.
Make UNIX Settings Permanent
Note: These steps may vary slightly depending on the type of UNIX (e.g., Solaris, IBM AIX) and the specific version in use.
1. Select Style Manager > Startup. The Style Manager - Startup dialog opens.
2. Select the Logout Confirmation Dialog option of On. This option prompts you to save your current session when you logout. Apple Macintosh Settings
For target servers running an Apple Macintosh operating system, the preferred method is to use the D2CIM-VUSB and Absolute Mouse Synchronization.
Note: Enable the Absolute mouse scaling for MAC server option in the Port (see "Note for D2CIM-VUSB CIM Usage" on page 145) page.
Step 2 (Optional): Configure Keyboard Language
Note: This step is not required if you are using the US/International language keyboard.
If you are using a non-US language, the keyboard has to be configured for the appropriate language. In addition, the keyboard language for the client machine and the target servers has to match.
Please consult the documentation for your operating system for additional information about changing the keyboard layout.
Step 3: Configure Network Firewall Settings
28
Change the Keyboard Layout Code (Sun Targets)
Use this procedure if you are using a DCIM-SUSB and would like the keyboard layout changed to another language.
¾ To change the keyboard layout code (DCIM-SUSB only): 1. Open a Text Editor window on the Sun workstation.
2. Check that the NUM LOCK key is active and press the left CTRL key and the DEL key on your keyboard. The Caps Lock LED starts to blink, indicating that the CIM is in Layout Code Change mode. The text window displays: Raritan Computer, Inc. Current keyboard layout code = 22h (US5 UNIX).
3. Type the layout code desired (for example, 31 for the Japanese keyboard).
4. Press Enter.
5. Shut down the unit and power ON once again. The DCIM-SUSB performs a reset (power cycle).
6. Using MPC, type something to verify that the characters are correct.
Step 3: Configure Network Firewall Settings
To access Dominion KX II through a network firewall, your firewall must allow communication on TCP Port 5000 or another port that you designate. Refer to Network Settings (on page 122) for additional information about designating another discovery port.
To take advantage of the Dominion KX II:
The firewall must allow inbound communication on:
Web-access capabilities Port 443 - standard TCP port for HTTPS communication
Automatic redirection of HTTP requests to HTTPS
(i.e., so users can type the more common “http://xxx.xxx.xxx.xxx” instead of “https://xxx.xxx.xxx.xxx”)
Port 80 - standard TCP port for HTTP communication
Chapter 3: Installation and Configuration
29
Step 4: Connect the Equipment
Connect the Dominion KX II to the power supply, network, local PC, and target servers. The numbers in the diagram correspond to the sections describing the connection.
Figure 7: Dominion KX II Connections 1. AC Power
¾ To connect the power supply:
1. Attach the included AC power cord to the Dominion KX II and plug into an AC power outlet.
2. For dual power failover protection, attach the second included AC power cord and plug it into a different power source than the first power cord.
Note: If you only attach one power cord, the power LED on the Dominion KX II front panel will display red because the system is set to automatically detect both sources. Refer to the Power Supply Setup Page (on page 136) for information about turning off automatic detection for the power source not in use.
Step 4: Connect the Equipment
30
2. Network Ports
Dominion KX II provides two Ethernet ports for failover purposes (not for load-balancing). By default, only LAN1 is active and the automatic failover is disabled. When enabled, if the Dominion KX II internal network interface or the network switch to which it is connected becomes unavailable, LAN2 will be enabled using the same IP address. ¾ To connect the network:
1. Connect a standard Ethernet cable (included) from the network port labeled LAN1 to an Ethernet switch, hub, or router.
2. To make use of the optional Dominion KX II Ethernet failover capabilities:
Connect a standard Ethernet cable from the network port labeled LAN2 to an Ethernet switch, hub, or router.
Enable Automatic Failover on the Network Configuration screen (refer to Network Settings, LAN Interface Settings (see "LAN Interface Settings" on page 125) for more information). Use both network ports only if you want to use one as a failover port. 3. Local Access Port (local PC)
For convenient access to target servers while at the rack, use the Dominion KX II Local Access port. While the local port is required for installation and setup, it is optional for subsequent use. The local port provides the KX II Local Console graphical user interface for
administration and target server access. ¾ To connect the local port:
Attach a multi-sync VGA monitor, mouse, and keyboard to the respective Local User ports (using either a PS/2 or USB keyboard and mouse).
Chapter 3: Installation and Configuration
31 4. Target Server Ports
Dominion KX II uses standard UTP cabling (Cat5/5e/6) to connect to each target server. Refer to Appendix A: Specifications (see "Specifications" on page 190) for additional information.
¾ To connect a target server to the Dominion KX II: 1. Use the appropriate Computer Interface Module (CIM). Refer to
Supported CIMs for more information about the CIMs to use with each operating system.
2. Attach the HD15 video connector of your CIM to the video port of your target server. Ensure that your target server's video has already been configured to a supported resolution and refresh rate. For Sun servers, also ensure that your target server's video card has been set to output standard VGA (H-and-V sync) and not composite sync. 3. Attach the keyboard/mouse connector of your CIM to the
corresponding ports on your target server. Using a standard straight-through UTP (Cat5/5e/6) cable, connect the CIM to an available server port on the back of your Dominion KX II unit.
Note: The DCIM-USB G2 provides a small slide switch on the back of the CIM. Move the switch to P for PC-based USB target servers; move the switch to S for Sun USB target servers.
A new switch position takes effect only after the CIM is power-cycled. To power-cycle the CIM, remove the USB connector from the target server and plug it back in a few seconds later.
Step 5: Dominion KX II Initial Configuration
The first time you power up the Dominion KX II unit, there is some initial configuration that you need to perform through the KX II Local Console:
• Change the default password.
• Assign the IP Address.
• Name the target servers.
Step 5: Dominion KX II Initial Configuration
32
Changing the Default Password
The Dominion KX II ships with a default password. The first time you start the Dominion KX II you are required to change that password. ¾ To change the default password:
1. Power ON the Dominion KX II using the power switch(es) at the back of the unit. Please wait for the Dominion KX II unit to boot. (A beep signals that the boot is complete.)
2. Once the unit has booted, the KX II Local Console is visible on the monitor attached to the Dominion KX II local port. Type the default username (admin) and password (raritan) and click Login. The Change Password screen is displayed.
3. Type your old password (raritan) in the Old Password field. 4. Type a new password in the New Password field; retype the new
password in the Confirm New Password field. Passwords can be up to 64 characters in length and can consist of English alphanumeric characters and the special characters identified in the table following these steps.
5. Click Apply.
6. You will receive confirmation that the password was successfully changed. Click OK. The Port Access page is displayed.
Note: The default password can also be changed from the Raritan Platform Client (MPC). For more information, refer to the Raritan Multi-Platform Client (MPC) and Raritan Remote Client (RRC) User Guide. Valid Special Characters
Character Description Character Description
! Exclamation point : Colon
" Double quote ; Semi-colon
# Pound sign = Equal sign
$ Dollar sign > Greater than sign
% Percent sign ? Question mark
& Ampersand @ At sign
' Single quote [ Left bracket
Chapter 3: Installation and Configuration
33
) Right parenthesis ] Right bracket
* Asterisk ^ Caret
+ Plus sign _ Underscore
, Comma ` Grave accent
- Dash { Left brace
. Period | Pipe sign
/ Forward slash } Right brace
< Less than sign ~ Tilde
Assigning an IP Address
These procedures describe how to assign an IP Address using the Network Settings page. For complete information about all of the fields and the operation of this page, refer to Network Settings (on page 122). 1. From the KX II Local Console, select Device Settings > Network
Settings. The Network Settings page opens.
Step 5: Dominion KX II Initial Configuration
34
2. Specify a meaningful Device Name for your Dominion KX II unit; up to 16 alphanumeric characters, special characters (see "Valid Special Characters" on page 32), and no spaces.
3. Select the IP auto configuration from the drop-down list:
None (Static IP). This option requires that you manually specify the network parameters. This is the recommended option because the Dominion KX II is an infrastructure device and its IP Address should not change.
DHCP. With this option, network parameters are assigned by the DHCP server.
4. If you specify an IP configuration of None, type the TCP/IP
parameters for your Dominion KX II unit: IP address, Subnet mask, Gateway IP address, Primary DNS server IP address, and (optional) Secondary DNS server IP address.
5. When finished, click OK.
Your Dominion KX II unit is now network accessible.
Note: In some environments, the LAN Interface Speed & Duplex setting default of Autodetect (auto-negotiation) does not properly set the network parameters, resulting in network issues. In these instances, setting the Dominion KX II LAN Interface Speed & Duplex field to 100 Mbps/Full Duplex (or whatever option is appropriate to your network) addresses the issue. Refer to the
Network Settings (on page 122) page for more information.
Naming Target Servers
¾ To name the target servers:
1. Connect all of the target servers if you have not already done so (as described in Step 3: Connect the Equipment, Target Server Ports (see "4. Target Server Ports" on page 31)).
Chapter 3: Installation and Configuration
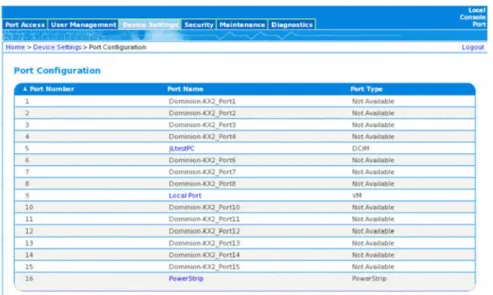
35 2. Using the KX II Local Console, select Device Settings > Port
Configuration. The Port Configuration page opens:
Figure 9: Port Configuration
3. Click on the Port Name of the target server you want to rename. The
Port Page (see "Associate Target Servers to Outlets (Port Page)" on page 143) opens.
4. Assign a name to identify the server connected to that port. The name can be up to 32 characters; alphanumeric and special characters (see "Valid Special Characters" on page 32) are allowed. 5. Click OK.
Specifying Power Supply Auto-detection
The Dominion KX II provides dual power supplies, and can
automatically detect and provide notification regarding the status of these power supplies. Proper configuration ensures that the Dominion KX II sends the appropriate notifications should a power supply fail. The Power Supply Setup page is configured to automatically detect both power supplies; use this page to disable automatic detection of the power supply not in use.
¾ To disable power supply auto-detection for the power
supply not in use:
1. Using the KX II Local Console, select Device Settings > Power Supply Setup. The Power Supply Setup page opens.
Remote Authentication
36
For more information, refer to Power Supply Setup Page (on page 136). Note to CC-SG Users
If you are using Dominion KX II in a CC-SG configuration, perform the installation steps as outlined above, and when finished, consult the CommandCenter Secure Gateway User Guide, Administrator Guide, or Deployment Guide to proceed (all found on Raritan's Website under Support: http://www.raritan.com/support/productdocumentation). Note: The remainder of this user guide applies primarily to deploying Dominion KX II unit(s) without the integration functionality of CC-SG.
Remote Authentication
Note to CC-SG Users
When the Dominion KX II is controlled by CommandCenter Secure Gateway, CC-SG authenticates users and groups, except for local users (requiring local port access). When CC-SG is controlling the Dominion KX II, local port users will be authenticated against the local user database or the Remote Authentication server (LDAP or RADIUS) configured on the Dominion KX II; they will not be authenticated against the CC-SG user database.
For additional information about CC-SG authentication, refer to the CommandCenter Secure Gateway User Guide, Administrator Guide, or Deployment Guide at:
http://www.raritan.com/support/productdocumentation. Supported Protocols
In order to simplify management of usernames and passwords, the Dominion KX II provides the capability to forward authentication requests to an external authentication server. Two external authentication protocols are supported: LDAP and RADIUS. Note on Microsoft Active Directory
Microsoft Active Directory uses the LDAP protocol natively, and can function as an LDAP server and authentication source for Dominion KX II. If it has the IAS (Internet Authorization Server) component, a
Microsoft Active Directory server can also serve as a RADIUS authentication source.
Chapter 3: Installation and Configuration
37 Authentication vs. Authorization
Authentication is the process of verifying that a user is who he says he is. Once a user is authenticated, the user's group is used to determine his system and port permissions. The user's assigned privileges determine what type of access is allowed. This is called authorization.
When Dominion KX II is configured for remote authentication, the external authentication server is used primarily for the purposes of authentication, not authorization.
The flow diagram illustrates this process:
Users, Groups, and Access Permissions
38
Note the importance of the group to which a given user belongs, as well as the need to configure the group named, “Unknown”. If the external authentication server returns a group name that is not recognized by the Dominion KX II, that user's permissions are determined by the
permanent group named “Unknown”.
Refer to Implementing LDAP Remote Authentication (on page 115) and
Implementing RADIUS Remote Authentication (on page 118) to determine how to configure your authentication server to return user group information to the Dominion KX II as part of its reply to an authentication query.
Users, Groups, and Access Permissions
The Dominion KX II stores an internal list of all user and group names to determine access authorization and permissions. This information is stored internally in an encrypted format. There are several forms of authentication and this one is known as “local authentication”. All users have to be authenticated; if Dominion KX II is configured for LDAP or RADIUS, that authentication is processed first, followed by local authentication.
Users
User names and passwords are required to gain access to the Dominion KX II unit. This information is used to authenticate users attempting to access your Dominion KX II unit. Refer to User Management for more information about adding and editing users.
Groups
Every Dominion KX II unit is delivered with three default user groups; these groups cannot be deleted:
Admin Users that are a member of this group have full administrative privileges. The original, factory-default user is a member of this group and has the complete set of system privileges.
Unknown This is the default group for users who are
authenticated externally using LDAP or RADIUS. If the external LDAP or RADIUS server does not identify a valid user group, the Unknown group is used.
Chapter 3: Installation and Configuration
39 Individual
Group
An individual group is essentially a “group” of one. That is, the specific user is in its own group, not affiliated with other real groups. Individual groups can be identified by the “@” in the Group Name. The individual group allows a user account to have the same rights as a group.
In addition to the system-supplied default groups, you can create groups and specify the appropriate permissions to suit your needs. Refer to User Management for more information about creating and editing user groups.
Relationship between Users and Groups
Users belong to a group and groups have privileges. Organizing the various users of your Dominion KX II into groups saves time by allowing you to manage permissions for all users in a group at once, instead of managing permissions on a user-by-user basis.
You may also choose not to associate specific users with groups. In this case, you can classify the user as “Individual.”
Upon successful authentication, the device uses Group information to determine the user's permissions - which server ports are accessible, whether rebooting the unit is allowed, and other features.