RDS Directory Synchronization. SSL Guide
Full text
Figure

Related documents
accounts a subscriber added The BlackBerry Internet Service encrypts email messages that it sends and receives using SSL if the external messaging server (POP over SSL, IMAP over SSL,
Under the political background of deepening reform and development of state-owned enterprises as instructed by report at 18th Party Congress, King Long Bus, held by
The purpose of this paper is to provide a background to and guide for mainstreaming Disaster Risk Man- agement (DRM) into higher education and training institutions in Small
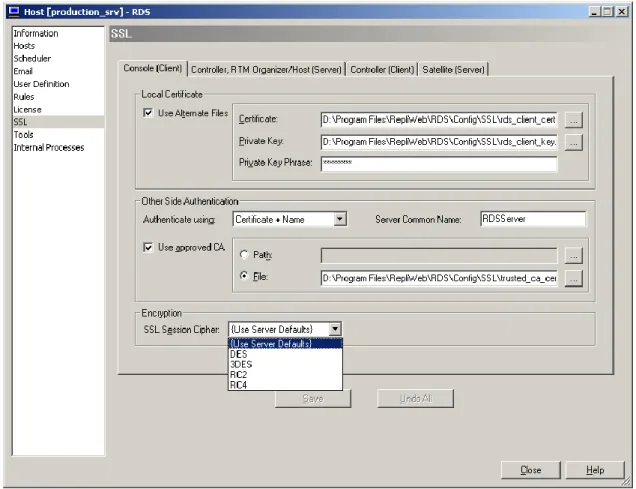
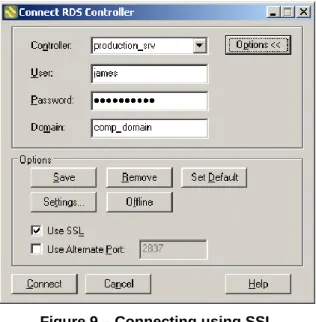
** Note – I have not configured SSL certificates with NCS or PI. I will try that later and update this guide. If you have installed an SSL certified for your NCS or PI server.
When InvEng is compared to the accents of the Lowlands they seem to have many features in common; the increase in T- Glottaling, the Wine-whine merger, and FACE diphthongisation
Best placed in the DMZ, the HOB WebSecureProxy is an SSL gateway that SSL-encrypts the e-mail traffic on the client side and transfers it unencrypted to the mail server on the
Конкурентоспроможна продукція є передумовою формування конкурентних переваг торгової марки (бренду) і в процесі управління
For example, if the StreamServer is both an SSL server (specified using an HTTPS input connector) and an SSL client (specified using an HTTPS Submit output connector or HTTPS
