AT&T Global Network Client
Administrator’s Guide
Every effort was made to ensure that the information in this document was complete and accurate at the time of publication. However, information is subject to change.
Microsoft Public License
The Application uses Open Source Software that is licensed under the Microsoft Public License (the “License”). You may not use this file except in compliance with the License. You may obtain a copy of the License at http://dotnetzip.codeplex.com/license. Unless required by applicable law or agreed to in writing, software distributed under the License is distributed on an “AS IS” BASIS, WITHOUT WARRANTIES OR CONDITIONS OF ANY KIND, either express or implied. See the License for the specific language
© 2015 AT&T Intellectual Property. All rights reserved. AT&T, the AT&T logo and all other AT&T marks contained herein are trademarks of AT&T Intellectual Property and/or
Microsoft Public License ... 2
Overview ... 10
Using this Document ... 10
Related Documents ... 10
Your Network Service... 11
Remote Access Service ... 11
Managed Virtual Private Network Services ... 11
Supplementary Service Options ... 11
Extended Access ... 11
AT&T Global Network Client Firewall ... 11
Lightweight Policy Enforcement ... 12
Authentication Types ... 12
AT&T Authentication Server ... 13
RADIUS ... 13
Authentication Providers ... 13
LDAP/Digital Certificates ... 13
AT&T Global Network Client Overview ... 14
Preparing for Installation ... 15
System Requirements ... 15
Requirements for Installation & Use ... 16
Installation ... 17
AT&T Global Network Client Installation Packages ... 17
Obtaining the AT&T Global Network Client ... 18
Distribution ... 18
Local Installation ... 19
Group Policy Distribution ... 19
Upgrading Previous Releases ... 19
Selecting Your Language Support ... 20
Configuration ... 22
The Connection Sequence ... 22
Automatic Prompting for Configuration during Dial Connections ... 24
Advanced Configuration ... 26
Central Configuration ... 26
Profile Management ... 26
Login Properties ... 26
Profile Manager ... 27
Network Services ... 27
Servers ... 28
Preferences ... 29
Autostart... 30
Post Connection Script ... 31
Programs ... 32
Timeouts ... 33
Connection Features ... 34
Persistent Connections ... 34
Configuration for AT&T Services (AT&T VPN or Business Internet Services) ... 34
User Preference ... 34
Persistent Connection Mode ... 35
Enabling Persistent Connections during Installation ... 35
VPN Mobility ... 36
Limitations ... 36
Configuration ... 37
Advanced Configuration ... 37
User Preference ... 39
AutoReconnect ... 39
Prevent Multi-Homing ... 40
© 2015 AT&T Intellectual Property. All rights reserved. AT&T, the AT&T logo and all other AT&T marks contained herein are trademarks of AT&T Intellectual Property and/or
AutoConnect Feature ... 40
Software Updates ... 41
Suppress Program Updates ... 41
User Permissions ... 41
Software Update Process ... 41
Automated Check for Updates ... 41
Manual Check for Updates ... 42
Feature Specific Updates ... 43
Uninstall ... 44
Local Uninstall ... 44
Uninstall ... 44
Remove Warning ... 47
Remote Uninstall ... 47
Command Line Uninstall ... 47
Customizations ... 48
Advanced Customizations Using Windows Installer ... 48
AT&T Global Network Client Features ... 48
Public Properties ... 50
Shortcuts ... 55
Common Windows Installer Properties ... 57
Using the Command Line to Customize Installation ... 57
Example Command Line Customizations ... 58
Creating a Windows Installer Transform ... 58
Tools to Create a Transform ... 59
Common Changes Customized via a Transform ... 59
Things That Must Be Avoided ... 60
Recommended Actions via a Transform ... 60
Adding Files ... 60
Changing the Installation Directory ... 61
Changing the Application Name ... 61
Making the Transform Apply To Future Versions ... 61
Customization Using a config.xml File ... 62
Global Customizations (FastPath Replacement) ... 62
Trusted Domain Customization ... 62
Trusted Domain Configuration ... 63
Trusted Domain Customization Limitations ... 63
Client Profiles Customization ... 63
Client Profiles Configuration File ... 63
Other Commonly Requested Customizations ... 66
Network Login Option Customizations ... 67
Hide Options Button ... 67
Use Digital Certificates ... 67
Password Format ... 68
Other Network Login Options ... 68
Limiting Connections Per Operating System ... 69
Profile Customization Limitations ... 69
Controlling the AT&T Global Network Client Firewall ... 69
Network Awareness Customization ... 69
Defining Networks and Corresponding Actions ... 71
Approved Mobile Device Customization ... 73
Approved Connection Type Customization ... 73
Secondary Method of Customizing Network Login Options ... 73
Customizing Default Login Options ... 74
Customization Services ... 76
SDK Prioritization ... 76
Accessibility Features ... 77
© 2015 AT&T Intellectual Property. All rights reserved. AT&T, the AT&T logo and all other AT&T marks contained herein are trademarks of AT&T Intellectual Property and/or
Extended Access... 78
Extended Access and AT&T Business Internet Service (BIS) ... 78
Internet Extended Access Authentication Options ... 78
Extended Access and AT&T VPN Services (AT&T VPN Tunneling Services) ... 78
AT&T Lightweight Policy Enforcement ... 79
Asset Based Connection Prevention ... 79
Operating System ... 79
Application Monitoring ... 80
Types of Applications Monitored ... 80
Limitations ... 81
Lightweight Policy Enforcement Customization Examples ... 81
AT&T Global Network Client Firewall ... 87
Overview... 87
OPSWAT Certified Firewall ... 87
Operating Modes ... 88
Default ... 88
Trusted Domains ... 88
User Controlled ... 88
Disabled ... 88
Firewall Settings Window ... 88
Managed VPN Access Control Lists ... 89
Limitations ... 90
AT&T VPN Services ... 91
Using Managed IPSec VPN Services ... 91
Local Resources ... 91
Sharing Local Resources ... 91
Registering VPN IP Address with Dynamic DNS ... 91
Encryption for IPSec VPN connections ... 92
Configuring UDP Encapsulation ... 92
Cisco Passwords... 93
Using Managed SSL VPN Services ... 93
Network Layer Solution ... 93
Security/Authentication ... 93
Configuring the AT&T Global Network Client to Establish a VPN Connection through a Proxy ... 94
Importing a Proxy File for SSL connections ... 94
Proxy.ini File ... 94
proxy.ini Field Information: ... 95
Importing the Proxy.ini file ... 95
Switching to IPSec Over Dial Connections ... 96
Dynamically VPN Connect ... 96
IPv6 Support ... 97
IP version preference ... 98
IP version failover ... 98
OPSWAT Certified VPN ... 98
Integrating with Third Party Software ... 99
ThinkVantage® Access Connections™ ... 99
WireShark® and Microsoft Network Monitor ... 99
Help/Customer Support ... 100
Support Forum ... 100
Contact AT&T ... 100
Frequently Asked Administration Topics ... 101
Using Digital Certificates for Authentication ... 101
Using Mobile Monitoring Programs ... 101
Connecting Directly to a Mobile or Wi-Fi Network ... 101
Troubleshooting Installation ... 102
Appendix A: Central Configuration ... 103
© 2015 AT&T Intellectual Property. All rights reserved. AT&T, the AT&T logo and all other AT&T marks contained herein are trademarks of AT&T Intellectual Property and/or
Additional Service Information ... 113
Appendix B: Supported Mobile Devices... 114
AT&T Supported Mobile Devices ... 114
Mobility SDK Technology Use ... 119
Embedded Modules ... 120
Other Supported Mobile Devices ... 120
Appendix C: Third-Party Firewall Support ... 139
Network Firewalls ... 139
SMiX List ... 140
Personal/Client Firewalls ... 141
Dial Authentication ... 142
Disconnect warning ... 142
Software updates ... 142
SLA data collection ... 142
Configuration Updates ... 142
Appendix D: Using the Command Line Program ... 144
AT&T Client ... 144
Parameters: ... 144
AT&T Global Network Client Firewall ... 148
Appendix E: AT&T T6 Client ... 149
Corporate Networks ... 149
Operating Systems ... 149
Components of the T6 Client... 149
System Tray Icon ... 149
Software Updates ... 150
Tray Icon Menu ... 150
Overview
The AT&T Global Network Client is a program that enables your Windows computer to easily connect to the Internet or your company’s private network.
Using this Document
This document is intended for IT professionals that are deploying the AT&T Global Network Client to their employees, or IT professionals that wish to gain a better understanding of the administration of AT&T remote access services.
The reader is assumed to be an IT administrator with a technical knowledge of Microsoft Windows® and computer networking and is referred to in this document as the customer account administrator.
Related Documents
AT&T Global Network Client User’s Guide
ftp://ftp.attglobal.net/pub/client/win32/9.6.0/usersguide.pdf
AT&T Domain Login Guide
© 2015 AT&T Intellectual Property. All rights reserved. AT&T, the AT&T logo and all other AT&T marks contained herein are trademarks of AT&T Intellectual Property and/or
Your Network Service
AT&T enterprise mobility consists of a portfolio of managed services for remote access, VPN, and endpoint security. AT&T provides the service and the support for your managed network service; however, account administration and user configuration is controlled by you, the Customer Account Administrator, for all users associated with your account. AT&T provides you with central tools to manage and configure your individual account and user experience, storing the settings in the AT&T administration server. The AT&T Global Network Client interfaces with the AT&T administration server to receive configuration information.
Your administration of the AT&T Global Network Client requires basic knowledge of the features of your network service.
Remote Access Service
Remote Access Service (RAS) provides a remote computer with basic IP connectivity to the Internet.
Managed Virtual Private Network Services
Managed Virtual Private Network (VPN) Services provide a remote computer with connectivity to a private Intranet.
AT&T IP-VPN Services use the AT&T Global Network Client to perform all aspects of the network service, including establishing and maintaining the VPN connection.
Supplementary Service Options
Extended Access
Extended Access is an AT&T service feature that allows remote users to access the network through local points of presence that are owned and managed by another Internet Service Provider (ISP). Extended Access provides local access in countries where AT&T does not have points of presence. There is an hourly access charge for the use of Extended Access – the amount of which is based on the region in which the Extended Access takes place.
AT&T Global Network Client Firewall
The AT&T Global Network Client Firewall is a component of the AT&T Global Network Client which provides basic firewall capabilities. The AT&T Global Network Client Firewall uses the Windows firewall engine for the firewall and fencing.
Lightweight Policy Enforcement
AT&T Lightweight Policy Enforcement (LPE) is an optional service which performs basic application monitoring and can be customized by the Customer Account Administrator at installation time.
Authentication Types
AT&T allows each customer to select the type of authentication engine implemented for users of their account.
© 2015 AT&T Intellectual Property. All rights reserved. AT&T, the AT&T logo and all other AT&T marks contained herein are trademarks of AT&T Intellectual Property and/or
Many customers allow AT&T to manage their user authentication via the AT&T authentication server (a.k.a. AT&T Service Manager). You, as the Customer Account Administrator, can define and administer the users within your account using central tools.
RADIUS
It may be possible for the AT&T authentication server to interface with your RADIUS server for user authentication. User accounts are defined in the AT&T authentication server for administration and all authentication requests proxy to your RADIUS server via the AT&T authentication server for validation.
Authentication Providers
Several authentication providers are supported with the AT&T Global Network Client. Both hardware token as well as software token solutions are supported. For software solutions, the applicable software must be installed on the workstation to enable the token-based authentication. RSA SecurID®1,
SafeWord, SoftToken, CryptoCard and Defender are all supported via RADIUS.
LDAP/Digital Certificates
AT&T offers the use of Entrust and Microsoft digital certificates to authenticate users for Internet and AT&T IP-VPN services.
1
EMC2, EMC, RSA and the RSA logo are registered trademarks or trademarks of EMC Corporation in the United States and other countries. Aladdin, SafeWord, PremierAccess, RemoteAccess, and SecureWire are trademarks of Aladdin.
AT&T Global Network Client Overview
The AT&T Global Network Client is software that allows Windows computers to easily access the Internet and your company’s private network from many locations around the world. It provides a simple,
powerful interface designed to automatically detect and connect over mobile, Wi-Fi, broadband, dial, and ISDN networks. It also is designed to provide security policy enforcement, offline hotspot and dial
directory browsing, detailed connection history, and in-depth diagnostic logging.
The AT&T Global Network Client is available in two installation packages. The AT&T Global Network Client installation package includes all required and optional features and can be used for the majority of installations. The AT&T Global Network Client for Export installation package does not contain VPN encryption software for use in countries which restrict the import of such technology. More information about the AT&T Global Network Client installation packages can be found in the Installation Chapter of this document.
© 2015 AT&T Intellectual Property. All rights reserved. AT&T, the AT&T logo and all other AT&T marks contained herein are trademarks of AT&T Intellectual Property and/or
Preparing for Installation
System Requirements
The AT&T Global Network Client and its components are supported* on the following operating systems and hardware. (The AT&T Global Network Client may function properly on other operating systems and lesser hardware, but it is not formally tested or supported):
Operating System Software Hardware
Windows® Vista
Windows® 7
Windows® 8/Windows 8.1
Administrator Rights Required: The user must have administrator rights when the installation is executed.
Windows Installer 3.5 or later
.Net Framework 4.0 or 4.5
MSXML 3 or 4
IBM PC or 100% compatible 1 gigahertz (GHz) or faster 32-bit (x86) or 64-bit (x64) processor 2 MB RAM or higher
recommended
250 MB free disk space
Dial connection: 14,400 modem recognized & configured by Windows
Wi-Fi connection: wireless adapter that adheres to NDIS 5 specifications and tested by AT&T
Mobile connection: PC Mobility Card
*The following limitations apply to support for Windows 8:
• As with previous releases, drivers for embedded devices are provided by the laptop manufacturer (check for availability before upgrading)
• When connecting to AT&T Wi-Fi and certain Partner Hot Spots, the operating system may unnecessarily display the browser
Requirements for Installation & Use
Before starting the AT&T Global Network Client installation and setup, verify you have the information required in the following checklist. If you are missing any information, please contact your Customer Account Administrator.
• Administrator rights to install or upgrade
• Your Windows install media (CD or installed MSI files) may be required.
• Hardware/Equipment necessary to establish basic network connectivity. For example, an existing Internet connection via cable or DSL, Wi-Fi, Mobile modem/card, ISDN terminal adapter, or a Dial modem & phone line.
For connections which require credentials:
• Account
• User ID
© 2015 AT&T Intellectual Property. All rights reserved. AT&T, the AT&T logo and all other AT&T marks contained herein are trademarks of AT&T Intellectual Property and/or
Installation
The AT&T Global Network Client installation is packaged using Microsoft Windows Installer and
InstallShield® 20132 and can be installed and updated locally. Terminology specific to Windows Installer is used in this document and a basic knowledge of Windows Installer is useful when administrating the installation of the AT&T Global Network Client package. More information about Windows Installer can be found by consulting the “Roadmap to Windows Installer Documentation” at
http://msdn.microsoft.com/en-us/library/aa371366(VS.85).aspx
AT&T Global Network Client Installation Packages
The AT&T Global Network Client is available in two installation packages. The AT&T Global Network Client installation package should be used for the majority of installations. The AT&T Global Network Client for Export installation package is available for use in countries that prohibit the import of VPN encryption technology.
An overview of the installation package to be used with each service is shown in the table below.
AT&T Global Network Client
AT&T Global Network Client for Export
Remote Access Services
AT&T VPN Services
Extended Access AT&T Global Network Client Firewall
Lightweight Policy
Enforcement Mobile Drivers
Figure 1: AT&T Global Network Client Installation Packages
2
Flexera Software, AdminStudio, FlexNet Connect, InstallShield, and InstallShield Professional are registered trademarks or trademarks of Flexera Software LLC in the United States of America and/or other countries.
Obtaining the AT&T Global Network Client
The AT&T Global Network Client is distributed through a public Internet download. If you have previously installed from a private FTP/Intranet download location you may be using a custom version of the AT&T Client; contact your Customer Account Administrator to request an updated version.Two different installation packages are available for download. The single file executable (.exe) installation package is used for most user based installations. The single file executable has the benefit of detecting previous AT&T Global Network Client installations and automatically performing the correct upgrade. The compressed single file MSI (.msi) installation package is useful if you wish to use a software distribution
technology to push software updates out to your users.
Package Downloads
AT&T Global Network Client
ftp://ftp.attglobal.net/pub/client/win32/9.6.0/agnc.exe ftp://ftp.attglobal.net/pub/client/win32/9.6.0/msi/agnc.msi
AT&T Global Network Client for Export
ftp://ftp.attglobal.net/pub/client/win32/9.6.0/agnc_export.exe ftp://ftp.attglobal.net/pub/client/win32/9.6.0/msi/agnc_export.msi
Figure 2: Download Location Table
Distribution
The AT&T Global Network Client is distributed for local installation. Customization and pre-installation configuration are supported. Microsoft Windows Administrator rights are required when the AT&T Global Network Client is installed.
Users of Custom
Versions: Do not manually
download new releases. Contact your AT&T Account Representative to request an updated
© 2015 AT&T Intellectual Property. All rights reserved. AT&T, the AT&T logo and all other AT&T marks contained herein are trademarks of AT&T Intellectual Property and/or
Local Installation
A local installation is initiated by the user on the target machine by executing one of the AT&T Global Network Client installation packages.
Group Policy Distribution
When installing the AT&T Global Network Client using an Active Directory Group Policy you must define a new object in your Group Policy manager and define the Software Installation Package with the
full network path to the installation files, not the local path to the files. The installation files must be copied to the local machine to do the installation.
Upgrading Previous Releases
If you already have the AT&T Global Network Client (version 7 or later) installed on your workstation, the installation can perform an upgrade to version 9.x. During the upgrade, the previous AT&T Global
Network Client will be uninstalled, the workstation may be rebooted, and then the new AT&T Global Network Client will be installed. Administrators can suppress the reboot after the previous AT&T Global Network Client has been uninstalled by setting the installation property
“SUPPRESS_UPGRADE_REBOOT=1” for the installation package but this feature is not recommended and will require detailed testing on your part prior to selection. For more information, refer to the chapter titledAdvanced Customizations Using Windows Installer.”
As part of the upgrade process, the user’s data and AT&T Global Network Client customizations will be preserved whenever possible. This is accomplished by renaming, then restoring the user’s data directory and the custom data directory. Installation package customizations, such as a custom desktop icon, will not be preserved. More information about customizations can be found in the Customizations chapter of this guide.
Administrator
Rights Required:
The user must have Microsoft Windows Administrator
rights/privileges when the installation is
The AT&T Global Network Client
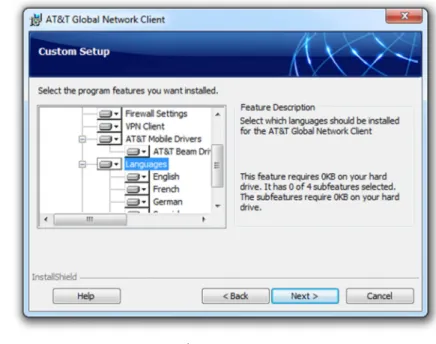
automatically installs support for running in English, French, German, and Spanish. If the installation is being performed on a Japanese version of the operating system, the installation will also install support for running in Japanese3.
Installing the files necessary to support English is required. Support for other languages is configurable using the Custom installation path.
The default language for the installation dialogs is English. To display the
installation dialogs in French, German,
Japanese or Spanish, or to automatically configure the languages installed for use by the AT&T Global Network Client, an installation Transform can be used. For more information on customizing the AT&T Global Network Client installation program, see the section titled Advanced Customizations Using Windows Installer
Filter Driver Installation
If a workstation has several filter drivers installed, such as if it has multiple VPN client installed, the AT&T Global Network Client installation may reach the default maximum number of filter drivers allowed, which would prevent installation of the client. The installation program will attempt to automatically prevent a driver installation error when installing the AT&T Global Network Filter Driver on Windows 7 and later. Upon detection of the error, the installation program is designed to increase the
MaxNumFilters key by 1. It will then continue with the installation. The installation program will continue incrementing the MaxNumFilters until it is able to complete the installation.
© 2015 AT&T Intellectual Property. All rights reserved. AT&T, the AT&T logo and all other AT&T marks contained herein are trademarks of AT&T Intellectual Property and/or
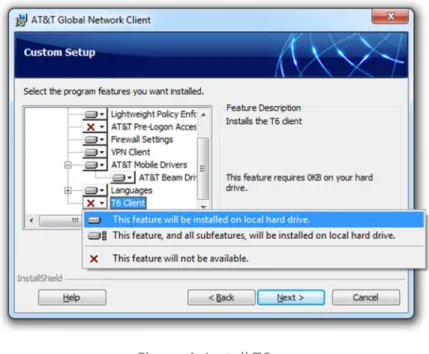
The AT&T T6 Client provides support for IPv6. IPv6 is designed to succeed IPv4, the current version of Internet Protocol. The AT&T Global Network Client does not automatically install the AT&T T6 client. Use the Custom installation path to install the AT&T T6 client.
Figure 4: Install T6
Configuration
Most users are able to establish a connection with no manual configuration prior to their first connection attempt, benefitting from the AT&T Global Network centralized administration and the AT&T Global Network Client automatic connection feature.
AT&T Global Network Client basic configuration is achieved through automatic prompting; advanced configuration is performed using central configuration settings or manually using the Login Properties.
The Connection Sequence
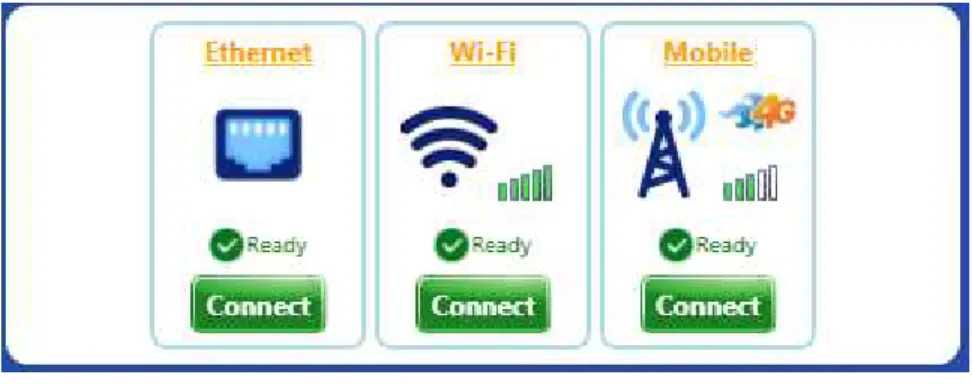
The AT&T Global Network Client attempts to connect using each of the available connectivity methods in the order they are shown on the main window.
Figure 5: Connection Sequence
The Dial connection type is not available and is not shown by default. It can be added if needed at install time using the SHOW_DIAL Public Property. End users can enable the Dial connection type by selecting ‘Show Dial Connection’ from the Settings menu.
Figure 7: Main Window with Dial Connection Shown
If a connectivity type is unavailable, the panel for that connectivity type will be disabled and will appear grayed out.
Figure 8: Connection Panel with Unavailable Connection Methods
If you would prefer to select a specific connectivity method to use for the connection attempt, click on the smaller green Connect button beneath the method desired, e.g. Wi-Fi.
Automatic Prompting for Configuration during Dial Connections
After you click Connect on the Main Window, the AT&T Global Network Client will prompt you for information required for a connection.
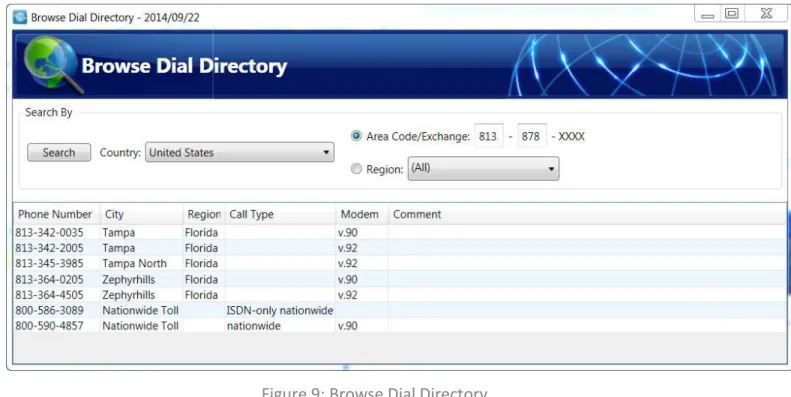
For dial connections, the Browse Dial Directory window will prompt you to select a phone number using your location information.
Figure 9: Browse Dial Directory
Select your country using the Country drop down list. You can then find nearby phone numbers either by entering the area code and exchange of the location from which you are calling, or by browsing your current region. Change the modem by selecting a modem using the Connect using drop down list. Verify the information for Dial Prefix and Number to dial. Click OK to continue.
You may also be prompted to supply your Network Login credentials (Account, User ID and Password) if you have not entered them previously.
Figure 10: Network Login Window
Once entered, your Account and User ID will automatically be stored for future connections. Your Password will be stored only if you click the checkbox next to Save Password. Customer Account Administrators can customize the AT&T Global Network Client so the Save Password option is not available. Refer to the chapter on Customizations on page 48 of this guide for additional information on hiding the Save Password option. Click change… to change your password. Click OK to continue.
Hardware Token Users: If you are using an
authentication type which requires a PIN and token, enter your PIN immediately followed by the current token in the Password field.
Figure 11: Network Login Window – PIN and Token
Advanced Configuration
Central Configuration
The AT&T Global Network Client interfaces with the AT&T administration server to retrieve values set by you, the Customer Account Administrator. Configuration of the values can be done by your AT&T representative or by you, via an AT&T provided administration tool. Refer to Appendix A on page 103 of this guide for additional information on central configuration.
It is recommended that you review the list of values supported by the AT&T Administration Server in Appendix A on page 103 of this guide and set values prior to the distribution of the AT&T Global Network Client to your users.
Profile Management
AT&T Global Network Client profiles store user information. A profile includes:
• Account
• User ID
• Advanced Login Properties (Service, WINS, DNS, Domain Suffix, Windows Login)
• Service
Most users connect with the same information a majority of the time and will only require one profile. Users that connect with different user IDs may want to define profiles for their common user
combinations to easily switch between them. AT&T Global Network Client profiles can be assigned common names to help you remember when to use them, for example, ‘My Internet Profile’ or ‘VPN Servers – Germany’.
Login Properties
To access Login Properties click the Settings Menu > Login properties on the main window of the AT&T Global Network Client.
The AT&T Global Network Client - Login Properties window allows you to configure the settings and properties for your current connection. It is recommended you use the default values and values defined in the AT&T administration server.
Central
Configuration
Simplifies Client
Administration:
Review all centrally configured values prior to distribution of the AT&T Global Network Client.
Figure 12: Login Properties Window
Profile Manager
Use the drop down box to activate an existing profile. Click New… to create a new profile. Click Rename
to rename a profile. Click Remove to delete a profile.
Network Services
Click Configure… to change the Account, User ID, or Network Service. Your default network service is the service defined in the AT&T administration server for your specified Account and User ID. If you override the network service in the AT&T Global Network Client, you must be authorized for the new service in the AT&T administration server for a successful connection.
Figure 13: Configure Network Services Screens
Servers
DNS, WINS, and Domain Suffix configuration information is normally stored in the AT&T administration server. The AT&T Global Network Client automatically retrieves the values and updates the device to use the supplied values throughout the connection. Click Configure… to to verify or define your server information.
Figure 14: Servers Configure Button
To override the values defined in the AT&T administration server select Use the following manual settings and enter the corresponding values.
For WINS and Domain Suffix you also have the ability to select Do not update and the AT&T Global Network Client will not alter the specified settings when connected.
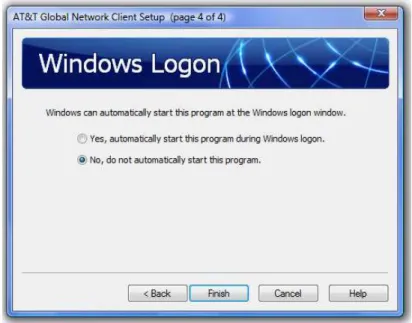
If you are required to be authenticated by a Windows Domain to logon to your Windows workstation, you can enable Windows Logon. Select Yes, automatically start this program during Windows logon to establish a network connection using the AT&T Global Network Client prior to your Windows logon. If you do not require a Windows Domain authentication to logon to your workstation, select No, do not automatically start this program.
Figure 15: Server Configure - Windows Logon Window
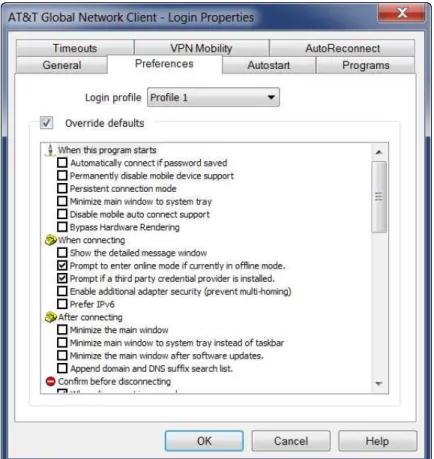
Preferences
Preferences define the settings for your connection. Preferences are organized by AT&T Global Network Client Profile. For more information about profiles see Profile Management in this guide.
Figure 16: Login Properties - Preferences Window
Autostart
Autostart allows you to define programs to automatically launch at any of the following times:
• Before Connecting
• After Connecting
• After Performing Network Updates
• Before Disconnecting
• After Disconnecting
Autostart settings are organized by AT&T Global Network Client Profile. For more information about profiles see Profile Management earlier in this chapter of this guide.
Click the Add…, Change…, and Remove buttons to configure the program information. Click on the arrow buttons to move a program up and down in the launch order.
Figure 17: Login Properties - Autostart Window
Post Connection Script
In addition to starting the programs configured in the Autostart Preferences, the AT&T Global Network Client has been designed to automatically run a custom VBScript after connecting if provided by the Customer Account Administrator. The application will run a VBScript file named PostConnectScript.vbs if it is present in the directory in which the AT&T Global Network Client is installed. The system
administrator may have to give execute permissions to this file. By having a script file
(PostConnectScript.vbs), you have the flexibility to do a variety of common post connection tasks such as:
• Drive Mapping
• Launch your own VPN Client
• Launch messages to the User
Figure 18: VBScript File Location and Name
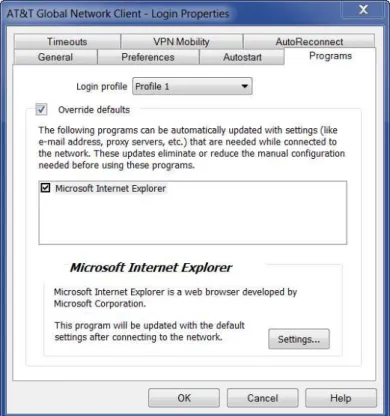
Programs
The Programs tab allows you to specify which programs will be configured when connected to the network. Temporary updates are useful to eliminate or reduce the manual configuration needed before using the programs. The update values can be defined in the AT&T administration server by the
Customer Account Administrator. No values are defined by default.
Figure 19: Login Properties - Programs Window
To prevent the use of the values from the AT&T administration server or to define new values, click
Override defaults and select the program you wish to change. Click Settings to review the values and make any changes.
For example, using the Programs tab, you can remove Microsoft Internet Explorer proxy settings while connected by clicking Override Defaults, selecting Microsoft Internet Explorer, clicking Settings, clicking to highlight Auto-Proxy URL, clicking Manually update to, and leaving the Auto Proxy URL to use field blank.
Timeouts
The AT&T Global Network Client supports two variations of Timeouts which can be configured by clicking
Override defaults.
Connection Features
The AT&T Global Network Client accommodates common transitions in network connectivity when users roam between networks or locations.
Persistent Connections
When enabled, the Persistent Connections feature will automatically connect or reconnect the AT&T Global Network Client with little or no user interaction. Persistent Connections can be used with all AT&T services as well as credential-less connections. For AT&T services, it must be configured both in the AT&T Global Network Client and the AT&T administration server. For Credential-less internet connections, the setting can be controlled with just the AT&T Global Network Client.
One example of the Persistent Connection advantage is a user with an active AT&T Global Network Client connection whose machine enters hibernation state, automatically disconnecting the AT&T Global Network Client connection. When the user returns and resumes their work, the AT&T Global Network Client enabled with Persistent Connections is designed to automatically initiate a connection attempt to establish connectivity, without action from the user. If the Save Password option is enabled, no user interaction is required to establish the new connection.
Persistent Connections does not maintain the current connection; when enabled, a new connection is established when necessary.
Configuration for AT&T Services (AT&T VPN or Business Internet Services)
The Persistent Connections feature requires:
• The Persistent Connection option must be enabled in the AT&T administration server. See Appendix A Central Configuration for additional information.
• The “Persistent connection mode” must be checked in the Login Properties of the AT&T Global Network Client.
User Preference
The user can be given the option to disable the use of Persistent Connections for one or more profiles using the Allow Persistent Connections property on the Preferences tab of the Login Properties dialog.
Persistent Connection Mode
When the Persistent connection mode property in the Login Properties dialog is disabled, a Persistent Connection will not be supported regardless of the value of the Persistent Connection Mode option in AT&T administration server.
The Persistent connectionmode uses broadband, Wi-Fi or Mobile connections.
Enabling Persistent Connections during Installation
To simplify the end user experience for setting up and using Persistent Connections, a user can select the Custom setup type during installation and enable the default settings for the Persistent Connection mode. On the Installation Options dialog, under the Network Access Options, enable the checkbox next to Default settings for Persistent Connection mode.
When this checkbox is checked, the installation program will:
• Create a shortcut to the AT&T Global Network Client executable in the All Users Startup folder.
• Enable the Minimize main window to system tray checkbox in the When this program starts
section of the Preferences tab of Login Properties.
• Enable the Minimize main window to system tray instead of taskbar checkbox in the After connecting section of the Preferences tab of Login Properties.
Default Persistent Connection preferences can also be enabled by the Customer Account Administrator through customization. See the chapter on Customizations for more information on public properties of the AT&T Global Network Client.
VPN Mobility
When enabled, VPN Mobility attempts to maintain your VPN connection regardless of transitions in underlying network connectivity. VPN Mobility will not renegotiate a new VPN tunnel, but rather attempt to maintain an existing tunnel.
One example of the VPN Mobility advantage is a user with an active AT&T Global Network Client
connection who is using a wired Ethernet network. The user unplugs his or her Ethernet cable to connect to the nearest Wi-Fi Hotspot Directory. The VPN tunnel will remain available in a suspended state on the VPN Server for a specified duration. VPN Mobility will automatically attempt to move the tunnel to the new network once the user associates to the Wi-Fi hotspot, without additional interaction from the user. Most applications will be unaware of the transition of the tunnel4.
Unlike Persistent Connections, VPN Mobility attempts to maintain the same VPN connection, if it is unsuccessful, Persistent Connections must also be enabled for a new VPN connection to be established.
VPN Mobility does not require the Save Password option to be enabled.
Limitations
This feature is supported using AT&T propriety design; therefore the following limitations are required:
VPN Mobility can only be supported using an AT&T SIG VPN Server as the tunnel terminating device for AT&T VPN Tunneling Services or the AT&T VIG with the AT&T Network-Based IP VPN Remote Access service.
VPN Mobility can only be supported using single-sign-on as the authentication method.
VPN Mobility will not work if the device enters the low power/hibernation state. If the user’s device enters a low power or hibernation state the connection is automatically terminated.
Configuration
The VPN Mobility feature requires:
• The VPN Mobility option must be enabled in the AT&T administration server. See Appendix A Central Configuration for additional information.
• The VPN Mobility Duration option must be set to a value greater than zero in the AT&T administration server. See Appendix A Central Configuration for additional information.
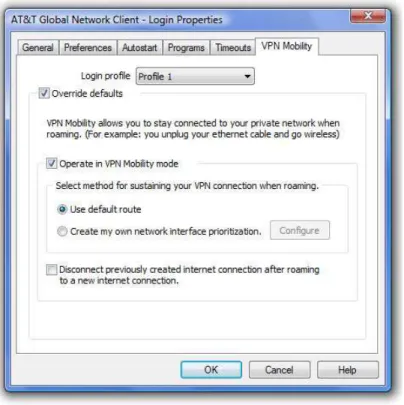
Advanced Configuration
By default the VPN Mobility feature will sustain the VPN Connection using the default route. If multiple paths are available the prioritization is Ethernet, Wi-Fi, Mobile, Dial.
Users and administrators can define a custom network interface prioritization using the Login Properties dialog. Select Login Properties, VPN Mobility tab, enable the checkbox next to Override defaults, enable the checkbox next to Operate in VPN Mobility mode, select Create my own network interface
Figure 22: Login Properties/VPN Mobility
The VPN Mobility Network Interface Prioritization dialog allows the definition of the preference. Click
OK to save.
It is important to note that when a custom network prioritization is defined, the VPN connection will automatically be moved to the highest priority network interface even if the current network interface is still available.
User Preference
The user can be given the option to disable the use of VPN Mobility for one or more profiles using the
Operate in VPN Mobility mode property on the VPN Mobility tab of the Login Properties dialog.
AutoReconnect
The AT&T Global Network Client supports connecting and reconnecting sessions for connection drops or for switching to AT&T Wi-Fi or AT&T Partner Hotspots when connected with a Mobile connection. These settings can be specified by your Customer Account Administrator in the AT&T Service Manager.
By setting the Automatically reconnect option, the existing connection will be re-established with another available connection. VPN sessions can also be re-established without having to re-enter credentials.
The Automatically Switch to attwifi... option will switch your connection over to one of AT&T's free Wi-Fi hotpots or partner hotspot when connected with a Mobility connection. The target hotspot must have a “strong” signal of at least 60% before the client will switch to Wi-Fi. The Time before switch option is a
safeguard against switching to AT&T's Wi-Fi in a drive-by/drive away siutation and losing your existing session altogether. The switch can be automatic or prompted depening on the Prompt to switch setting. Advanced reconnect settings allow you to control how the Autoreconnect will happen: Automatically, Prompt or after the VPN session times out.
Prevent Multi-Homing
When enabled, the Prevent Multi-Homing feature prevents the ability for other network interfaces to be made available once a connection has been established through the AT&T Global Network Client. For example, this feature prevents an Ethernet or Wi-Fi connection from becoming active while connected over a mobile connection.
Additionally, the user will not be able to install or enable any new network interfaces through the Windows Control Panel while connected.
Configuration
The Prevent Multi-Homing feature can be enabled by the user unless
the option to do so is disabled by the Customer Account Administrator through customization. See the chapter on Customizations for more information on public properties of the AT&T Global Network Client.
User Preference
The user can be given the option to enable the Prevent Multi-Homing feature for one or more profiles using the Enable additional adapter security (prevent multi-homing) property on the Preferences tab of the Login Properties dialog.
AutoConnect Feature
Certain Mobile devices allow the AT&T Global Network Client to monitor the Connected state. When supported by the mobile device, if the AT&T Global Network Client recognizes a mobile connection is active, and the default Profile is Internet, the AT&T Global Network Client will reflect the Connected state when the AT&T Global Network Client is launched.
Prevent Multi-Homing Feature insures all traffic flows through the active connection established by the AT&T Client: Use it if you have multiple connections and need additional adapter security.
Software Updates
The AT&T Global Network Client is designed to automatically attempt to update the following components after initial installation and on regular intervals thereafter:
• Hotspot Directory (Wi-Fi locations, phone numbers, etc.)
• AT&T Global Network Client software
• Mobile firmware, Mobile SDK, Mobile Drivers
• Lightweight Policy Enforcement files
• Dynamic customizations files
Depending on your Operating System, Microsoft Windows Administrator Rights may be required for automatic software update of the AT&T Global Network Client software.
Suppress Program Updates
Because many customers want to control deployment of software to their corporate devices, the
Customer Account Administrator can opt to suppress the check for Program Updates. This capability can be suppressed using a Windows Installer public property. See the Public Properties section later in this guide for additional details.
User Permissions
Administrator rights are required to update the AT&T Global Network Client software. Hotspot Directory updates, mobile firmware updates and dynamic customization updates can be applied without
Administrator rights.
Software Update Process
Updates for the AT&T Global Network Client software are downloaded from ftp://165.87.194.246. Updates to the Hotspot Directory are downloaded from http://32.97.166.118. The update service attempts to download the current version file from the server directly, without using any proxy settings. If the attempt fails, the update service will attempt to retrieve the version file using the proxy settings stored in Microsoft Windows Internet Options. If the file was successfully retrieved using the attempt through the proxy server, future attempts will automatically be retrieved using the proxy.
The available versions are compared against the installed versions of the AT&T Global Network Client software and the Hotspot Directory to determine if a newer version is available.
Automated Check for Updates
A service that periodically checks for updates to all AT&T Global Network Client software components is installed with the AT&T Global Network Client and runs in the background when your Windows machine boots up. It does not require the AT&T Global Network Client to be running.
If an update is available, the download is initiated. Downloads in the background run at low priority and only occur when the workstation is idle. A system tray icon will be displayed when checking or retrieving and installing updates. If the user holds the mouse pointer over the icon, the current status of the operation will be shown. If the user double-clicks the icon, the Software Updates application will be run, showing the detailed status of the update and allowing the end user to cancel the update if they wish. The software update service will check for new updates for all software components every 14 days. The interval between updates can be customized by the Customer Account Administrator.
If the Hotspot Directory, Lightweight Policy Enforcement files, or Dynamic customizations files are newer than the installed files, the updates will be automatically downloaded and installed without prompting the user.
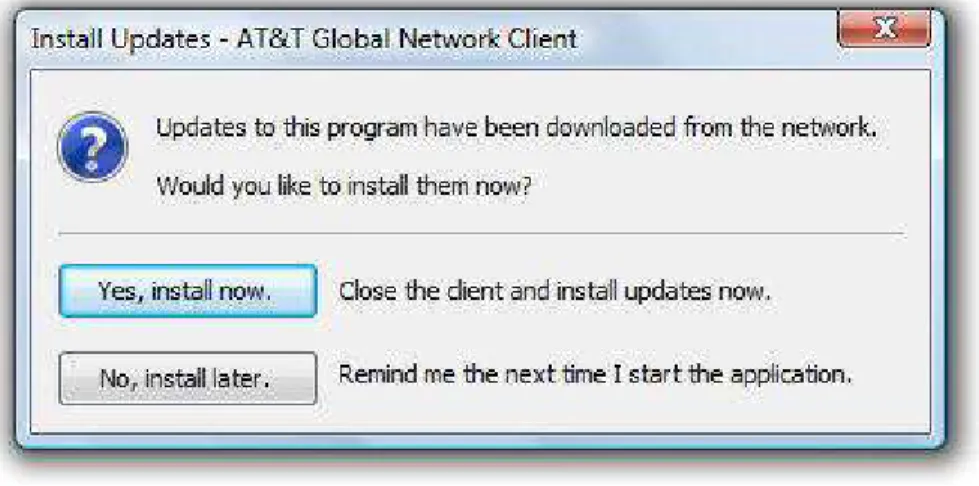
If a Software Update is available, the updated installation package will be downloaded. The next time the user launches the AT&T Global Network Client, the user will be prompted to install the newer version of the AT&T Global Network Client. If mobile firmware needs to be updated, the user is also prompted.
Figure 24: Install Updates
Manual Check for Updates
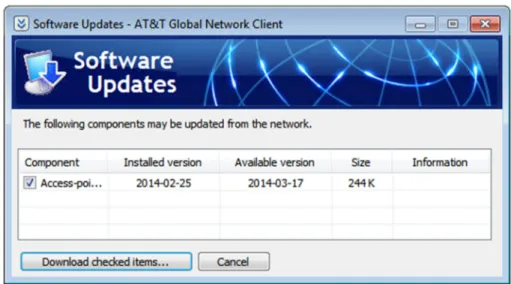
To manually initiate a check for updates, click Check for Updates from the Help panel on the left hand side of the main window.
Figure 25: Software Updates Window
The Software Updates window will list the components and the version information. If an update is available, the component will be checked. Click Download checked items… to complete the update
process. All checked components will be updated.
Feature Specific Updates
Some of the features of the AT&T Global Network Client can be updated independently of the AT&T Global Network Client. Those features are:
• Lightweight Policy Enforcement
• Mobile SDK
• AT&T Mobile Drivers
• AT&T Mobile Device Firmware
Installation packages which update each of these features independent of the complete AT&T Global Network Client installation package are made available with each new version of the AT&T Global Network Client. Significant programming interface changes may necessitate an update in order to take advantage of the latest features of the AT&T Global Network Client. The feature specific installation packages can be used to upgrade an existing installation of the AT&T Global Network Client to a newer version of the selected feature without upgrading the entire AT&T Global Network Client. As an
administrator, you can deploy these updates using your preferred software distribution tool, or, you can request AT&T to host the update packages on a custom download location on an AT&T server. Having AT&T host the downloads will require Service Manager configuration or a customized installation package, both of which can be arranged with your AT&T account team.
Uninstall
Local Uninstall
The AT&T Global Network Client is removed via the Windows Control Panel, Programs and Features
option.
Figure 26: Programs and Features Window
Uninstall
The Programs and Features Uninstall option is not supported for the AT&T Global Network Client; to uninstall click Change and follow the directions below.
Change
Click Change on the Programs and Features
window list to Modify, Repair or Remove the AT&T Global Network Client program
Program files will be removed. You can also select which user settings are removed. Select Leave all user settings on the computer. (default) to leave user information such as account and user ID as well as profile information on the computer. Select
Remove only my user settings to remove only the settings stored for the current user. Select Remove settings for all users on this computer to remove all AT&T Global Network Client user settings on the computer. Click Next> to continue.
Figure 29: Remove User Data Window
Click Remove to continue.
Click Finish.
Figure 30: Remove the Program Warning
Figure 31: Removal Complete
Reboot May Be Required:
You will be prompted if you must reboot your workstation after removing the AT&T Client.Remove Warning
The AT&T Global Network Client cannot be removed while it is running. If you attempt to remove the AT&T Global Network Client when it is running you will receive an error.
Figure 32: Client Running, Remove Warning Window
Remote Uninstall
If you used a desktop software management server to distribute the AT&T Global Network Client, you may be able to use the server to remove the package. You must initiate a reboot or have users manually restart or shutdown after the AT&T Global Network Client is removed to confirm the software is fully uninstalled.
Command Line Uninstall
Advanced users can uninstall using the command line. When using the command line, Windows Installer public properties can be used to control the type of uninstall performed. More information can be found in the Public Properties table on page 50; reference the REMOVE_USER_SETTINGS property.
Customizations
The AT&T Global Network Client can be customized by you, the Customer Account Administrators to streamline setup and define specific features for your users.
Advanced Customizations Using Windows Installer
The AT&T Global Network Client installation is packaged using Microsoft Windows Installer and
InstallShield® 2013. The installation of the AT&T Global Network Client can be customized. A number of Windows Installer public properties are available to specify details of the installation. Additionally, Windows Installer provides native capabilities that can be used to specify features to be installed and to control the installation experience.
AT&T Global Network Client Features
The AT&T Global Network Client contains a number of Windows Installer Features. Each Feature defines a required or optional component of the AT&T Global Network Client. The AT&T Global Network Client Ffeatures are described below.
Feature Description
Net_Client Installs the AT&T Global Network Client that is used for all AT&T Services. This feature is required.
Firewall_GUI Allows a user to turn the AT&T Global Network Client Firewall on and off while the AT&T Global Network Client is not running.
VPN_Client Installs VPN software for connecting to your company's private network.
NOTE: Not available in the installation package used for export
APD-NA Hotspot Directory Database for North America
APD-EMEA Hotspot Directory Database for Europe, Middle East and Africa APD-SA Hotspot Directory Database for
APD-AP Hotspot Directory Database for Asia Pacific
APD-PRC Hotspot Directory Database for People’s Republic of China
APD-DIAL Directory Database for Global Dial Locations
PLAP Provides the ability to connect to the network before logging onto Windows 7 and Windows 8. This feature can be seen by selecting Custom Installation Path in any Edition.
LPE Installs the Lightweight Policy Enforcement Feature and provides for the visibility of the Security Status portion of the AT&T Global Network Client Main Window. Languages Installs English, French, German, Japanese,
and Spanish language support. Each language is a sub-feature under the Languages feature. English is required, other languages are optional.
T6_Client Installs device drivers for the T6 Client. This provides support for IPv6.
CellularDrivers, ATTBeamDrivers
Installs the Mobile Device Drivers. This feature is an optional feature. Drivers are available for Netgear/Sierra Wireless devices.
Public Properties
The installation packages contain a number of public properties that can be set on the command line or within a transform. The properties in the table below govern some behaviors of the setup.
Important Note: Some public properties should not be used along with the CONFIG_FILE public property. Some public properties (noted with “Use XML”) will generate a config.xml which will be overwritten by the CONFIG_FILE. If using CONFIG_FILE, please include all customizations in the config.xml only.
Property Use
XML
Intended Use & Value Information
ACCOUNT
X This property can be set to pre-configure the account used to connect to the network
AUTOCONNECT_CONTROL_ALLOWED X
Set this property to “yes” to show the Automatic Mobile Connection option on the Mobile Menu.
Default: “yes”
CELLULAR_ROAMING_ALLOWED Set this property to “yes” to allow the AT&T Global Network Client to connect while the mobile device is roaming, OR “no” to prevent the AT&T Global Network Client from connecting while the mobile device is roaming, OR “prompt” to prompt the user before connecting while the mobile device is roaming. Default: “prompt”
CERT_SHOW
X
Set this property to “Y” to set the AT&T Global Network Client to show the “Login using a Digital Certificate or Smart Card” checkbox on the User ID panel of the Setup Wizard.
Default: blank (not set) CERT_SHOW_SET
X
Set this property to “Y” to select the “Login Using a Digital Certificate or Smart Card” checkbox for all new user profiles.
Default: blank (not set)
CERT_DEFAULT_USE Set this property to “1” to make the AT&T Global Network Client look for certificates only on the Smart Card.
Property Use XML
Intended Use & Value Information
CONFIG_FILE This property can be set to the name of an xml file which contains the settings for a Trusted LAN configuration or Client Profiles configuration. If a full path is not
specified, the installation package will look for a file in the same directory as the installation source. See page 62 for customizations in the CONFIG_FILE section for more information.
Default: blank (not set)
CUSTOM_APN Set this property if you are using a custom APN to connect with your Mobility device.
CUSTOM_APN_USERNAME Set this property if you are using a custom APN and need a user name to connect with your Mobility device. * Only do so if directed by your AT&T Account
Representative
CUSTOM_APN_PASSWORD Set this property if you are using a custom APN and need a password to connect with your Mobility device. * Only do so if directed by your AT&T Account
Representative
DEFAULT_AUTOCONNECT_MODE Set this property to “ENABLE” to enable auto-connect on client start if the detected hardware supports the
autoconnect feature. Set to “DISABLE” to disable the autoconnect feature when the AT&T Global Network Client starts.
Default: “NOCHANGE”
DESKTOP_SHORTCUT Set this property to “1” to install a desktop shortcut. Set it to an “” (empty string) (i.e. DESKTOP_SHORTCUT= “”) to not install a desktop shortcut.
Default: “1”
DISABLE_CELLULAR_SDK Set this property to “1” to disable mobile SDK integration.
Property Use XML
Intended Use & Value Information
FIREWALL_STATE Set this property to “on”, “off” or “disabled” on the command line to control the initial state of the AT&T Global Network Client Firewall. Setting the state to “on” defaults the AT&T Global Network Client Firewall on causing it to discard unsolicited traffic. Setting the state to “off” causes the AT&T Global Network Client Firewall to allow all traffic. Setting the firewall to “disabled” makes it so the AT&T Global Network Client Firewall will not be used as a firewall.
HIDE_SAVE_PASSWORD
X
Set this property to “1” to hide the Save Password or Save Pin option on the Network Logon dialog. See Figure 10 for the checkbox option described. Default: “0”
INTERNET_ONLY
X
Set this value to “1” to allow the users to connect directly to mobile and Wi-Fi (private and free) Internet networks without entering AT&T Global Network credentials (Account, User ID, and Password). Default: “0”
LAUNCHPROGRAM Set this value to “1” to pre-select the launch program checkbox on the setup complete dialog of the
installation. Default: “1”
LOCK_TO_3G Set this value to “1” set and lock a mobility device to 3G mode when using a 3G Custom APN. Set this value to “0” to set the mode to default service.
LPE_COMPLIANCE_THRESHOLD Set this value to the number of failed compliance checks allowed before the AT&T Global Network Client
performs the compliance failure action; with a default value of “0”, the AT&T Global Network Client will immediately handle compliance failures.
LPE_FILE
X
Set this value to prevent connections if a specificied file does not exist on the system. Example:
LPE_FILE=C:\Windows\compid.txt
Property Use XML
Intended Use & Value Information
LPE_OS_RANGE
X
Set this value to prevent connections on specific Operating Systems. Use the numeric version of an Operating System(s) you wish to block. Example: Windows Vista through Windows 7 RTM:
LPE_OS_RANGE=6.0.6000-6.1.7600
Note: The LPE feature does not need to be installed. LPE_REG
X
Set this value to prevent connections if a specificied registry hive does not exist in the
HKEY_LOCAL_MACHINE branch. Example: LPE_REG="SOFTWARE\YourCompany\Asset"
Note: The LPE feature does not need to be installed. MINIMIZE_AFTER_CONNECTING Set this property to “1” to minimize the main window to
task bar after connecting. Default: “0”
MINIMIZE_TO_SYSTEM_TRAY Set this property to “1” to minimize the main window to system tray after connecting.
Default: “0”
MULTIHOMING_CLIENT_ADDITIONS Specifies the VPN Clients to exclude when preventing multi-homing:
Cisco Client: Cisco All Cisco Clients: CiscoAll Juniper Client: Juniper CheckPoint Client: Checkpoint
Example: MULTIHOMING_CLIENT_ADDITIONS=Cisco NS_FROM_VPN_SERVER Use the name servers supplied by the VPN server
instead of the values supplied from the Service Manager PASSWORD
Property Use XML
Intended Use & Value Information
PROFILENAME
X Used to specify the profile name for a pre-configured profile
PROGRAM_GROUP Set this property to full path to the start menu program group (i.e. C:\Documents and Settings\<Username/All Users>\Start Menu\Programs\Group Name) in order to specify an alternate Program Group for the installation. Default: <blank>
QUICKLAUNCH_ SHORTCUT
Set this property to “1” to install a program shortcut in the Quick Launch bar. By default no Quick Launch shortcut is created. If a shortcut is created in the Quick Launch bar, but the user’s Quick Launch bar is not already shown, they will need to display their Quick Launch bar. The installation package will not alter the current state of a user’s Quick Launch bar.
Default: <blank> REMOVE_USER_
SETTINGS
This property controls whether to remove user settings during uninstallation. Specifying “None” causes the setup to leave user settings on the computer. Specifying “Me” causes the setup to delete the entire
[LocalAppDataFolder]AGNS directory. Specifying “All” causes the setup to remove the entire
[LocalAppDataFolder]AGNS for every user account on the computer.
Default: “None”
SHARED_SETTINGS Set this to “1” for the AT&T Global Network Client to use the Common Application Data folder on the
workstation, instead of the users application data folder for settings and profiles. This enables all users on a workstation to share the same settings and profiles. This value is automatically set to “1” for new
installations that include the GINA feature. Default: “0” (“1” for new PLAP installations)
Property Use XML
Intended Use & Value Information
SHOW_DIAL Set this to “1” for the AT&T Global Network Client to show the Dial Connection. By default, the Dial method of connecting is not shown. Default: “0”
SKIPWINLOGONCHECK Set this property to “1” to bypass the check for the install running on the WinLogon desktop.
Default: <blank>
SUPPRESS_UPGRADE_REBOOT Set this property to “1” to suppress the upgrade reboot when installing a new version of the AT&T Global
Network Client to a system which already has a previous version installed. Set to “0” to allow a reboot during upgrade.
Default: “0”
SUPPRESS_PROGRAM_UPDATES Set this property to “1” to suppress the check for program updates. Other updates, such as Hotspot Directory database updates, will still occur. This property is not set by default.
TRUSTED_DOMAINS Set this property to a comma delimited list of
Connection-specific DNS Suffixes for which the firewall should be disabled for the Trusted Domain Configuration UPDATE_OVER_METERED Used to control whether or not the updates are downloaded
over metered/low-bandwidth connections (mobile and dial). The possible value are “yes”, “no”, and “prompt”. The default value is “prompt”.
USERID
X This property can be set to pre-configure the User ID used to connect to the network.
VNIC_CON_NAME This is the name of the network connection that will be show in the Windows Network Connections window. Ideally this value SHOULD NOT be changed.
Default: “AT&T Global Network Virtual Network Adapter”
Shortcuts
AT&T Global Network Client
Desktop NetClient.exe
AT&T Global Network Client
[ProgramMenuFolder]AT&T Global Network Client
NetClient.exe
Customer Support
[ProgramMenuFolder]AT&T Global Network Client
NetHelp.exe
Firewall Settings
[ProgramMenuFolder]AT&T Global Network Client
Common Windows Installer Properties
Network administrators frequently deploy applications via a command line or with a transform. Properties can be set in a transform and on the command line, as well.
Property Example Intended Use
ADDLOCAL ADDLOCAL=PLAP List the features you want to install locally,
separated by commas. INSTALLDIR INSTALLDIR=C:\Program
Files\AT&T Global Network Client
The main installation directory for the product.
PRODUCTNAME AT&T Global Network Client
The name of the application.
Using the Command Line to Customize Installation
Using the Public Properties and understanding the Features available in each AT&T Global Network Client Edition, you can customize your installation package using command line switches and parameters. When using command line customization, any default parameters normally set by the AT&T Global Network Client installation are superceded by the parameters set on the command line. If using
command line customization you must replicate the default parameters normally set by the AT&T Global Network Client program (such as generation of an installation log).
Windows Installer command line switches are described on the Microsoft MSDN site at: http://msdn2.microsoft.com/en-us/library/aa367988.aspx
Example Command Line Customizations
Example Command
Silent installation with a Desktop Shortcut
msiexec /i agnc.msi /qb
Silent installation with No Desktop Shortcut
msiexec /i agnc.msi DESKTOP_SHORTCUT="" /qb
Install only specific Mobile Drivers
msiexec /i agnc.msi
ADDLOCAL=Net_Client,ATTBeamDrivers/qb! Completely Silent
Installation5
msiexec /i agnc.msi /qn
Installation with logging
msiexec /I agnc.msi /l*v install.txt
Executable installation with logging
agnc.exe /v”/l*v install.txt”
Interactive Hook Mode GINA installation
msiexec /i agnc.msi ADDLOCAL=ALL
Silent installation without AT&T Global Network Client Firewall
msiexec /i agnc.msi
ADDLOCAL=Net_Client,VPN_Client,PLAP /qb
Silent Uninstallation Using the MSI Package
msiexec /x agnc.msi /qb
Suppress Reboots msiexec /i agnc.msi REBOOT=ReallySuppress
Creating a Windows Installer Transform
A transform is available if you are unable to create the customization you desire using only command line options. A transform provides advanced customization which is applied to the standard installation package at the time of installation.
One important capability of a transform is that if done properly, it can be written to apply to several versions of the AT&T Global Network Client Installer packages. Also, patches that are created for the