CREATIVE TECHNOLOGY BACHELOR THESIS JULY 2018
SMART RAINWATER
BUFFER DIY INSTRUCTIONS
Sefora Tunc
FACULTY OF ELECTRICAL ENGINEERING, MATHEMATICS AND COMPUTER SCIENCE (EEMCS)
Suoervisor: ir. ing. R.G.A. Bults Critical Observer: ir. J. Scholten
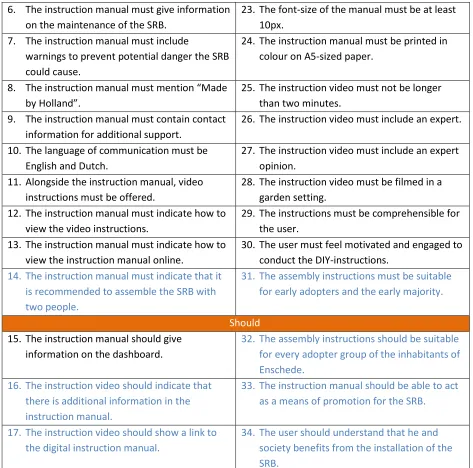
ii
Abstract
Due to the impact of climate change, Enschede is affected by flooding, leading to severe damage and high risks for the inhabitants. To fight this problem, a solution called the Smart Rainwater Buffer was developed. If it was deployed on a large scale it could buffer sufficient water, preventing the city from flooding. Therefore, research was conducted on deployment opportunities and it was found that a DIY-approach, as known from IKEA, was the most affordable and best-accepted approach of distributing the SRB amongst the inhabitants of Enschede. Consequently, this initiated the research of this bachelor thesis: developing a DIY-solution enabling large-scale deployment of the SRB for every SRB-user.
Following the Creative Technology Design process, a state of the art research was conducted on existing work, yielding results on variations of instruction methods as well as guidelines on best practices. These have been used as a reference to develop concepts relating to the SRB. Using an iterative approach, a detailed DIY-solution concept has been specified in collaboration with stakeholders, resulting in requirements that must be incorporated in the definitive DIY-solution.
iii
Token of Appreciation
Several people have contributed to my success and deserve a token of appreciation. Without you this would have not been possible.
Firstly, I want to thank the teaching staff of Creative Technology for broadening my horizon in many subjects and directions. I have learned a lot in every module and always felt that Creative Technology was the right choice for me. Secondly, I want to thank Richard Bults and Hans Scholten for guiding me during this bachelor thesis when it was my turn to become an expert rather than learning something existing. The knowledge and expertise you shared with me helped to deliver a project I am proud of. I want to thank my friends, Betina Markova and Niels van Huizen, who have made the years at the UT even more enjoyable.
v
Table of Contents
1.
Introduction _______________________________________________________________________________________ 1
1.1 Situation __________________________________________________________________________________________ 1 1.2 Challenges and Objectives _____________________________________________________________________ 2 1.3 Research Question ______________________________________________________________________________ 2 1.4 Outline ____________________________________________________________________________________________ 22
State of the Art ____________________________________________________________________________________ 4
2.1 Smart Rainwater Buffer Concept _____________________________________________________________ 4 2.1.1 Challenges: Waterstress in Enschede __________________________________________________________________ 4 2.1.2 Solutions: Activities for Improvement of the Situation _______________________________________________ 5 2.1.3 Conclusion: What the SRB still lacks and needs to be optimized _____________________________________ 7 2.2 Literature Research on DIY-instructions Guidelines ______________________________________ 7 2.3 Modular Systems ________________________________________________________________________________ 9 2.3.1 LEGO A/S _________________________________________________________________________________________________ 9 2.3.2 IKEA ______________________________________________________________________________________________________ 10 2.3.3 Sony Playstation and Microsoft Xbox__________________________________________________________________ 12 2.3.4 RainGrid Inc. ____________________________________________________________________________________________ 13 2.3.5 Conclusion _______________________________________________________________________________________________ 14 2.4 Review: DIY Rainwater Harvesting/Buffering Systems __________________________________ 16
2.4.1 Second Rain [107] ______________________________________________________________________________________ 16 2.4.2 Rain Saucer [108] _______________________________________________________________________________________ 17 2.4.3 JOJO Rainwater System [109] __________________________________________________________________________ 18 2.4.4 Conclusion _______________________________________________________________________________________________ 18 2.5 Methods for production of DIY-assembly-instructions __________________________________ 19
2.5.1 Text-based instructions ________________________________________________________________________________ 19 2.5.2 Image-based instructions ______________________________________________________________________________ 19 2.5.3 Video-based instructions _______________________________________________________________________________ 21 2.5.4 Conclusion _______________________________________________________________________________________________ 22 2.6 State of the Art Conclusion ___________________________________________________________________ 22
3
Creative Technology Design Process: Methods and Techniques _______________________ 24
3.1 Ideation __________________________________________________________________________________________ 25 3.1.1 Research _________________________________________________________________________________________________ 25 3.1.2 Stakeholder Analysis ___________________________________________________________________________________ 25 3.1.3 Idea Generation: Brainstorming _______________________________________________________________________ 27 3.1.4 Prototypes _______________________________________________________________________________________________ 27 3.2 Specification ____________________________________________________________________________________ 28vi 3.3 Realization ______________________________________________________________________________________ 29 3.4 Evaluation _______________________________________________________________________________________ 30 3.4.1 Functional Testing ______________________________________________________________________________________ 31 3.4.2 User Testing _____________________________________________________________________________________________ 31
4
Ideation ___________________________________________________________________________________________ 34
4.1 Stakeholder Analysis __________________________________________________________________________ 34 4.1.1 Decision-Maker: Municipality of Enschede – Hendrik-Jan Teekens _________________________________ 34 4.1.2 Decision-Maker: Waterboard Vechtstromen – Jeroen Buitenweg __________________________________ 35 4.1.3 Decision-Maker: University of Twente – Richard Bults ______________________________________________ 35 4.1.4 Co-Developer: Jeroen Waterink ________________________________________________________________________ 36 4.1.5 Co-Developer: Thijs Dortmann ________________________________________________________________________ 36 4.1.6 User: Inhabitants of Enschede _________________________________________________________________________ 37 4.2 Concept Brainstorming Session _____________________________________________________________ 38 4.3 Modular Systems _______________________________________________________________________________ 394.3.1 Concepts: of Modular Systems _________________________________________________________________________ 40 4.3.2 Evaluation: Modular Systems __________________________________________________________________________ 42 4.4 First Iteration DIY Instructions ______________________________________________________________ 42
4.4.1 First Iteration Instructions Concepts __________________________________________________________________ 43 4.4.2 Evaluation of Concepts: Interview with Decision-Makers ___________________________________________ 45 4.4.3 Preliminary Requirements I ___________________________________________________________________________ 46 4.5 Second Iteration DIY Instructions ___________________________________________________________ 47
4.5.1 Second Iteration Instruction Concepts ________________________________________________________________ 47 4.5.2 Evaluation of Concepts: Interview with Decision-Makers ___________________________________________ 49 4.6 Conclusion ______________________________________________________________________________________ 49
5
Specification ______________________________________________________________________________________ 52
5.1 Functional Specification ______________________________________________________________________ 525.1.1 Instruction Manual _____________________________________________________________________________________ 53 5.1.2 Website __________________________________________________________________________________________________ 54 5.2 Experience Specification ______________________________________________________________________ 55
5.2.1 Personas _________________________________________________________________________________________________ 55 5.2.2 Scenarios ________________________________________________________________________________________________ 57 5.2.3 Context of SRB use ______________________________________________________________________________________ 59 5.2.4 Technologies ____________________________________________________________________________________________ 60 5.3 Final Requirements ____________________________________________________________________________ 60
6
Realisation: Instruction Manual _____________________________________________________________ 62
vii 6.2.1 Information______________________________________________________________________________________________ 65 6.2.2 Assembly Instructions __________________________________________________________________________________ 66 6.2.3 Maintenance _____________________________________________________________________________________________ 68 6.3 Final Design _____________________________________________________________________________________ 69
6.3.1 First Iteration ___________________________________________________________________________________________ 69 6.3.2 Second Iteration ________________________________________________________________________________________ 72
7
Realisation: Expert Opinion Video ___________________________________________________________ 80
7.1 Tools and Methods _____________________________________________________________________________ 807.1.1 Pre-Production __________________________________________________________________________________________ 80 7.1.2 Production _______________________________________________________________________________________________ 81 7.1.3 Post-Production _________________________________________________________________________________________ 82 7.2 Decomposition of Final Concept _____________________________________________________________ 83
7.2.1 Expert ____________________________________________________________________________________________________ 83 7.2.2 Storyboard ______________________________________________________________________________________________ 84 7.2.1 Script _____________________________________________________________________________________________________ 85 7.3 Final Design _____________________________________________________________________________________ 86
8
Evaluation ________________________________________________________________________________________ 90
8.1 Functional Test _________________________________________________________________________________ 90 8.2 User Test Protocol _____________________________________________________________________________ 91 8.2.1 Test Setup _______________________________________________________________________________________________ 92 8.2.2 Participants _____________________________________________________________________________________________ 92 8.2.3 Interaction Method _____________________________________________________________________________________ 92 8.2.4 Data Collection Method _________________________________________________________________________________ 92 8.3 User Test Results _______________________________________________________________________________ 93 8.3.1 Quantitative Data _______________________________________________________________________________________ 93 8.3.1 Qualitative Data _________________________________________________________________________________________ 93 8.4 User Test Conclusion __________________________________________________________________________ 99 8.4.1 Are the DIY instructions understandable? If not, what aspects need revision? ____________________ 99 8.4.2 Are the DIY instructions suitable for all adopter groups? _________________________________________ 102 8.4.1 Are the DIY instructions suitable for people without technical background? ____________________ 102 8.4.2 Is the DIY approach engaging the users to purchase and assemble the SRB? ____________________ 103 8.4.3 What is the average assembly time?_________________________________________________________________ 104 8.5 Client Feedback ______________________________________________________________________________ 104viii 9.2 Further Recommendations _________________________________________________________________ 111
References ___________________________________________________________________________________________ 114
Appendices
1
1. Introduction
As an introduction to the present bachelor thesis, this chapter will act as a description of the current situation relating to Smart Rainwater Buffers in Enschede (Netherlands), define the challenges, elaborate on the resulting research questions and finally, it will give an outline on how the answers will be embraced over the complete thesis.
1.1 Situation
Since 26% of the Netherlands are below sea level [1], the country has developed deep knowledge and experience in relation to water and water systems to protect citizens from its threats, e.g. flooding [2] and to take advantage of it, e.g. in the tourism sector [3]. However, global warming has caused new challenges in water management, resulting from an increase in rainfall. In the last 108 years, an increase of 27% - from 695mm to 880mm - of the overall rainfall was documented in the Netherlands, with an ongoing trend [4], which the Dutch sewerage system is not designed to deal with [5]. This leads to flooded streets and buildings, damaging property and injuring people, being a costly and dangerous situation for Dutch communities.
As for the geographical situation of Enschede, the city is located on a hill, causing the excessive rainwater to flow downwards in direction of the city centre, flooding the West of the city. To relieve the pressure on the sewerage system in the city of Enschede, the University of Twente has developed a prototype of a Smart Rainwater Buffer (SRB) [6] [7]. Placing one in every household in Enschede potentially creates a buffer-effect designed to prevent the city from being flooded and engages the use of rainwater in a more sustainable manner. Even though there is a working prototype, final touches need to be made for a pilot-run and the official launch.
2
1.2 Challenges and Objectives
Based on previous research conducted by Dico Defize [8], a DIY-approach has been identified as the most affordable solution, which was well-accepted by participants in his study. This principle saves production and delivery costs as it arrives fragmented and compactly packaged, ready to be set-up by the user. However, the DIY-instructions must be well-planned and prepared to allow a successful and efficient assembly, leaving the user with a positive experience.
Since these instructions do not exist yet, it is the objective of this bachelor thesis to create DIY-instructions that are understood by a wide range of people with different demographic backgrounds, as it is the case in Enschede. The exact amount of parts, materials and packaging must be identified and packaged in a manner guaranteeing a successful an efficient assembly, keeping the user engaged and motivated. The DIY cannot be a factor that discourages people to make use of the SRB and prevent a successful distribution.
1.3 Research Question
Resulting from the described situation and challenges in section 1.1 and 1.2, this bachelor thesis will deal with the research question: “How to develop a DIY solution for all SRB-users to enable large scale deployment of SRBs?”
For a more elaborate answer sub-questions were identified:
1. How to develop SRB DIY-instructions, suitable for people without technical background? 2. How to design DIY-instructions that encourage users to execute them?
Answering the sub-questions will lead to a solution that allows every possible user of the SRB to assemble it successfully. Furthermore, it supports the deployment when adding a motivational factor to the instructions. Based on the findings for the sub-questions, instructions will be developed and tested to find an answer for the main-question, creating an optimized DIY-experience.
1.4 Outline
3
4
2 State of the Art
This section covers the background research on the situation in the city of Enschede, introduces the concept of the Smart Rainwater Buffer and continues with a literature research on DIY-instruction production guidelines. It presents different methods of DIY assembly instructions and illustrates examples of DIY Rainwater Buffers. This is followed by methods for DIY-instructions production and ends with a conclusion on the novelty of the research question to be covered in this bachelor thesis.
2.1 Smart Rainwater Buffer Concept
Hendrik-Jan Teekens works as a ‘Water Designer’ in Enschede and is responsible for the water management projects in the city [10]. As he represents the main stakeholder - the city of Enschede - he was interviewed on 15th March 2018 to gain further insight into the challenges and solutions that the city is dealing with and what the SRB is supposed to achieve. His information served as a foundation to enrich with further research as summarised in this section.
2.1.1 Challenges: Waterstress in Enschede
Enschede is located on a Moraine, a hill that has a grown-in water source system, entailing constant supply of water [11]. In the past, this property has allowed Enschede to grow to the largest textile producer of the Netherlands, by making constant use of the groundwater without gravely side-effects [12]. However, along with the decay of the textile industry in the 1960s, water problems emerged due to rising groundwater levels [11] [13]. Moreover, considering the effects of climate change, such as more excessive rainfall, effects of the problems were enhanced [11] [14]. Especially since the city is situated on a hill with 44m difference between the highest point (Enschede East) and the lowest point (Enschede West), the lower parts of the city have become vulnerable to flooding as rain will flow down the hill [11].
5
2.1.2 Solutions: Activities for Improvement of the Situation
Multiple projects have been introduced by the municipality of Enschede to fight the flooding problem, such as brooks, wadis, green roofs and the groene linie. Ideas and functions of each project will be briefly described in this section to provide an overview of why the utilization of an SRB is different and how it adds value to decreasing rainwater problems in Enschede.
Brook [16]
As mentioned earlier, Enschede has been the largest textile producer in the Netherlands. Due to textile factories needing groundwater, ponds dried out and were transformed into open sewers. The city of Enschede, however, wants them to return to their old state and recreates the ponds in order to achieve a method to drain the water slowly, that else would flow too fast to lower parts of Enschede and flood the city. Additionally, ponds do cool the city during hot, dry times. Successful examples are the “Beek aan de Zuiderval”, “Beek ’t Zwering”, “Beek Auke Vleerstraat” and “de Stadsbeek”.
Wadis [17]
A wadi is a lower area where water is accumulated and then infiltrates. As a result, it forms a buffer during excessive rainfall and contributes to the purification of water. Additionally, wadis prevent high groundwater via drainage. Wadis were invented in Enschede in 1993 and are used throughout the Netherlands ever since.
Green Roofs [18] [19]
Green roofs are roofs covered with plants. They contribute to a healthy environment by regulating CO2 emission as well as the consequences of climate change, such as reducing heat stress in cities and buffer water during excessive rainfall. Moreover, they cool buildings, increase the biodiversity and offer an extended isolation of roof coverings.
Groene Linie [20]
6
Smart Rainwater Buffer [6] [7]
Being affected by flooding due to excessive rainfall as a result of climate change, a 20Creathon themed “Waterstress and Climate Change in the City of the Future” was organized by the University of Twente, Kennispark, waterboard Vechtstromen and the municipality of Enschede in November 2015. As a solution to the postulated problem, the Ensketon Smart Rainwater Buffer became subject for several graduation projects, pursued by Steeghs [21], Rindt [22], Vetter [23] and Defize [8] in 2017.
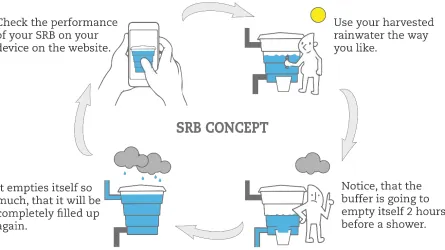
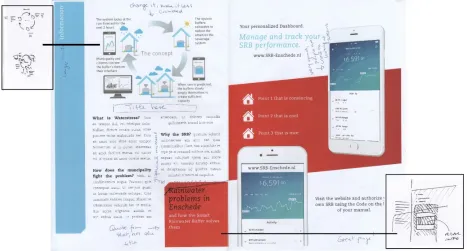
A rainwater buffer functions by accumulating the rainwater during rainfall, reducing strain on the sewerage system and avoiding flooding. The implementation of sensors and actuators allow remote monitoring of e.g. occupied capacity or remote control, automatic drainage for instance. Steeghs [21] and Rindt [22] realized a prototype of an SRB with different functionalities for both the users of the SRB (inhabitants of Enschede) and the municipality. The prototype is connected to the internet and has insight on the rain forecast. When it is supposed to rain in two hours, the buffer empties itself slowly, maximizing buffer capacity during rainfall. An interface allows the monitoring of the buffer by the inhabitants and the municipality. These functions are summarized in figure 2.1.
Figure 2.1 Functions of a SRB visualized in an infographic by Gelieke Steehgs [21]
7
continued his research by adding the option of a DIY-kit, concluding in his research that a DIY-kit was posed as the most favourable solution [8]. Based on further findings of Defize [8], the prototype has to be developed into a DIY-concept in order to be accepted and tested by early adopters. This research lays the foundation of this Bachelor Thesis, aiming to create DIY-instructions for a modularized SRB.
2.1.3 Conclusion: What the SRB still lacks and needs to be optimized
To conclude from this section, the Smart Rainwater Buffer proves to be a different kind of approach than other projects the city of Enschede has introduced. It relieves the stress of the city by utilizing the help of the inhabitants. However, to be successful with this project, the necessities of the municipality and inhabitants must be determined, and the project must be tailored to match these. This has been done partly by identifying that a modularized DIY-solution is an approach that may be accepted by the inhabitants. Nonetheless, to create this modularized DIY-solution more information has to be collected in order to further develop the idea in a user-centred design approach. Only latter can guarantee the development of a successful product.
2.2 Literature Research on DIY-instructions Guidelines
Due to avoidance of cognitive overload and simple production, it has been established that images are more suitable than video and text to present assembly instructions. Supporting this opinion, [46] states that the use of text is less cost-effective since it creates language barriers and thus is not universally applicable without translation. Moreover, [48] establishes in their research that the use of text requires increased cognitive demand that can be reduced by visualizing the components and assembly process through video and images. Nonetheless, [47] claims the best method is to use images that are supported by text, whereas [50] points out that the use of images with single steps is sufficient. Compared with video instructions, [51] demonstrates that sequenced images have the same effect and videos do not offer any additional benefit. Referring to internationally successful companies that offer DIY kits, IKEA’s assembly instructions consist of sequenced images without the use of text being compliant with previously mentioned aspects. Consequently, sequenced images are proven to be the best media to present DIY instructions.
8
supported by [50]. This is the case as multiple angles tend to confuse the user since it aggravates the assembly process. In addition, [48] advises to guide the user during the assembly process and the inclusion of an image that displays the finished product. [50] emphasizes this aspect as well. The visual representation of the finished product gives the user an impression on how he or she should assemble it. Furthermore, numbers and zoom help the user understand which step he or she has to take in order to complete the task at hand [48]. Considering the previous example, IKEA applies these supportive measures to their manuals also. Hence, the use of a consistent point of view, supported by numbers and zoom, leads to a more pleasant assembly experience.
The images themselves, however, should consist of simplistic pictures, representing the object without redundant information to further decrease the cognitive effort. Therefore, [52] argues that illustrations are more suitable than photographs since the presented information becomes more easily accessible. Both, [49] and [50] agree as illustrations only display relevant details. Moreover, [50] emphasizes utilising different line weights to illustrate the product. This is the case, as line weights highlight important aspects within the image. Another way to distinguish between sections and components is the use of different colours, as described by [46] and [52]. Continuing with the example of IKEA, all aspects are incorporated besides the use of colour. Accordingly, the most important aspects to consider are the use of illustrations with different line weights and a sparingly use of colour.
9
Concluding from these findings, it becomes apparent that different guidelines on the correct design of DIY instructions exist. However, none of them exactly answer the research question on how to design non-technical user-friendly instructions by themselves. Overall, the main goal of the guidelines is to reduce the cognitive load of the user in order to allow him a simple assembly without encountering difficulties. As the DIY SRB is a product that has to be distributed on a large scale, it is important to obey to these rules and achieve the simplest assembly possible. However, it is still arguable whether images are the best approach to present a DIY since the motivational aspect regarding the narrative may have a better effect during a video with expert opinion. This is object to further research to be explored throughout this Bachelor Thesis.
2.3 Modular Systems
Systems which use a design approach that decomposes them into individual parts (modules) are called "modular systems". These modules are created independently, are interchangeable without affecting the rest of the system and allow simple assembly and maintenance. TVs, Computers and cars are examples of modular systems [24]. While these come readily assembled, other companies like LEGO or IKEA use modularized DIY-kits.
2.3.1 LEGO A/S
LEGO A/S is a Danish company [25] and largest toy producer in the world. It is famous for its modularized DIY-kits, consisting of LEGO blocks that are used to build objects based on provided assembly instructions.
The company produces a variety of sets with different themes for different target groups. A selection can be found in figure 2.2. The DIY-kits are ordered from youngest (2 years) to oldest (12 years <) target group and show rising complexity and number of parts [26] [27] [28] [29]. In addition, the size of the parts decreases with rising recommended age. Considering their assembly instructions, with rising age instructions become longer and more complex.
10
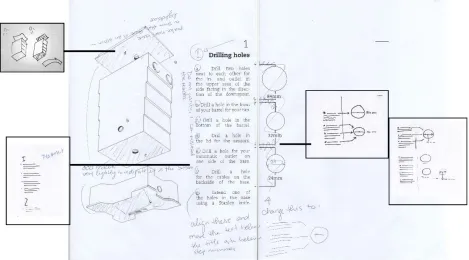
[image:18.612.87.352.130.341.2]instructions must be very detailed and show every step in an individual image in order to comprehend the instructions correctly. To conclude, great detail in instructions allows the assembly of complex objects.
Figure 2.2 DIY-kits by LEGO [26] [27] [28] [29] ordered by age and page numbers.
2.3.2 IKEA
Being a company that built its foundation on flatpack furniture, IKEA is the largest distributor of DIY-furniture-kits [30]. The Swedish company uses the flatpack principle to save labour and shipping costs. Everything besides tools is included for a successful assembly. Buyers assemble the furniture based on provided instructions or may find instructions with or without expert opinions online. These are either published officially by IKEA or by private instances. To illustrate these different methods of assembly instructions applied, two pieces of furniture were chosen: the corner sofa bed “Friheiten” and the chest of drawers “Malm”. While there have been found two videos with expert opinions for the corner sofa bed, there was one animated instructions video for the chest of drawers.
Corner Sofa Bed “Friheiten”
11 Figure 2.3 PP FlatPack assembly instructions [33]. Figure 2.4 IKEA assembly instructions example [31].
In contrast to these provided instructions, videos of the assembly process including expert opinions are published on online platforms, making constant use of words to verbalize explanations and recommendations. An example is the YouTuber PP FlatPack [32] whose video instructions for “Friheiten” take 11 minutes and show him assembling the sofa bed [33]. He makes use of time lapses and voice-overs minimizing the video-length and maximizing valuable insights, like in 1:30 “Key is, to put the corners on the corner” while showing the correct application of the sofa’s fabric.
These privately recorded instruction videos may result from the lack of availability of videos including an expert opinion by the company itself. However, since IKEA is an international company, this does not apply to every country. While IKEA USA [34] only provides instructional videos without an expert opinion, IKEA Espana [35] has dedicated their channel to professionally recorded and edited videos with expert opinions [36]. What may add value to their videos, which is missing in PP FlatPack’s case, is the sterile environment putting the focus on the to be assembled object, a timeline on the left that allows to skip to the section of interest and animations and drawings that indicate the necessary components and create a relation to the original printed instructions manual. Nonetheless, a language barrier does exist for people not speaking Spanish, that takes away the insights on the expert opinion that may be overcome by PP FlatPack using English as a widely spoken standard.
12
footage, it supports the finding that people are more motivated to do DIY if these are enriched with personal experiences. This phenomenon must be examined throughout this Bachelor Thesis to determine the most suitable DIY instructions method for people without technical background.
Chest of Drawers “Malm”
The “Malm” Chest of Drawers is another modularized piece of furniture in IKEA’s offer. It comes with 11 modules, 111 additional parts for assembly and instructions [37]. Using only sequenced line-art images, the 29 assembly steps are explained on 24 pages, including warnings and a listing of components. Overall, the instructions delivered with the components follow the same structure as the instructions for the corner sofa bed “Friheiten” and in similar fashion as previously mentioned, it is possible to find additional instruction-material online. For example, instructions with an expert opinion by PP Flatpack have been found, but besides videos with or without expert opinions, a 23-minutes animation video visualizing the assembly process was discovered [38].
In comparison with other instruction-methods, the video does not give further insights into what to consider during the assembly process, nor does it feature a subject assembling the chest with drawers. It rather emphasizes the process as a whole and can be contemplated as an extension of the provided instructions by IKEA, adding transitions between the sequenced images. Consequently, on the one hand it supports the comprehension and lowers the cognitive load by making fluent transitions, but on the other hand, it does not add further value to the original instructions and the creation of the instructions poses to be an increased workload for the producer.
2.3.3 Sony Playstation and Microsoft Xbox
13
The most recent versions of the consoles are the PS4 Pro and Xbox One. By default, the consoles come in a box with their power cables, one controller and their instructions [42] [43]. Despite being very extensive, both instruction manuals have only one page dedicated to the actual assembly. Both companies use an exploded view where all parts are associated with each other at once. This may result from the fact that there are not many parts, making an exploded view more suitable than sequenced images or a video with expert opinion. Looking at the components, it also becomes apparent that they are designed to fit only in one place, so mistakes of plugging the cables in wrongly can be avoided.
Figure 2.5 Playstation Assembly instructions [42] Figure 2.6 Xbox assembly instructions [43]
2.3.4 RainGrid Inc.
The company RainGrid Inc. [44] is considered the leading company in stormwater management since 1996. In 2002 it has introduced a rain barrel called RainGrid Cistern [45] that works similarly to the previously introduced Smart Rainwater Buffer in section 2.1.2. However, in contrast to the SRB, it is not smart and has to be operated manually. The main function of the RainGrid Cistern is buffering rainwater during storms in order to relieve the stress on sewerage systems and prevent flooding. It is a modularized system consisting of 9 modules that can be scaled up to a larger system.
14
images do not give valuable insight into the assembly process self and would not work without text. Especially since text may not be universally understood due to cultural differences. Still, the text acts as an aid to understand the images, adding value to the instructions when being able to understand it.
Figure 2.7 Instructions for the Rainwater System RainGrid Cistern [45]
2.3.5 Conclusion
Different conclusions can be drawn from these examples. Firstly, information about the average user is presented. Secondly, important aspects of instruction design are emerging when inspecting the presented products. And lastly, certain style and number of components are more suitable to be presented by certain instruction methods.
As all these examples originate from famous and successful companies supplying modularized products to be assembled by their customers, it becomes apparent on what technical level the average person can master component assembly tasks. To summarize, the average person can handle standard tools such as screwdrivers, bolts and nuts and can connect cables to a module in the correct way when explicitly stated where each cable belongs to. This means that these skills can be expected from the user when designing the SRB-modules and instructions. Other aspects to be considered during the module-design are, e.g. with increasing components and decreasing size, the difficulty of the assembly increases. Hence, as many components as possible should be summarized into one, so the component number decreases and the size increases.
DIY-instructions-15
method can be chosen when considering the findings. However, most companies do not rely on one instruction method but offer multiple options, such as illustrations and videos. As their customers consist of a wide range of different people, each has their own preference. Therefore, having multiple kinds of instructions fits the preference of a larger portion of people.
Instructions
Method Advantages Disadvantages
LEGO: Sequenced Photographs
+ Simplified notion of parts due to association with real-life + Distinction between parts
enhanced by color + Step-by-step increased
comprehensibility
- More details allow more distraction from what is essential
- Sequenced images are not useful when there is a small amount of parts
IKEA: Sequenced
Line-Art Images ++ Emphasis on essential parts No distraction by details + Step-by-step increased
comprehensibility
- No use of color increases difficulty of distinction between parts
- Sequenced images are not useful when there is a small amount of parts
IKEA Espana:
Expert Opinion + Provide help and tips while assembling + Clean environment allows to focus
on the assembly process
+ Timeline indicates what parts are going to be assembled
+ Relation to line-art instructions provide additional help
+ Subject allows identification with oneself as motivational factor
- Language barriers
- Assembly in own pace is not possible unless pausing the video after each step
- Only works in connection with initially delivered IKEA instructions
IKEA: Animated
Video ++ No distraction by other factors Focus on the assembly process self + Transitions are made by
visualization and do not have to be made by oneself
- No additional value to sequenced images other than transitions - Production has higher workload than
images
Sony + Microsoft: Exploded View
+ Fast and easy to produce + Fast and easy recognition of
relations when low amount of parts
- Not suitable for many connections - Not suitable when using similar
components that may be mixed up
RainGrid Inc: Line-Art Images with Text
+ Better understanding of images
+ More detailed explanation - Language may not be understood universally - Images are not meaningful without
text
16
Insights that do not relate to the instruction method itself but rather to the sections that are included in instructions are a summary of components that are delivered, warnings and other relevant information, such as maintenance of the purchased product. Combining these findings to create instructions, these will allow a simple assembly possibly leading to a large-scale deployment of the SRB.
2.4 Review: DIY Rainwater Harvesting/Buffering Systems
Having examined instructions of products from e.g. IKEA [30] and Lego [25] to gain insight on best practices of leading companies, general knowledge has been obtained that could be put in association with results from scientific research. Nonetheless, it is also relevant to conduct research on similar products of less renowned companies, i.e. rainwater buffering or harvesting systems to understand how they design their instructions. Hence, a selection of four different systems with an own interpretation of instructions will be reviewed and conclusions on their approaches will be drawn.
2.4.1 Second Rain [107]
Second Rain founded their business based on garden furniture that can act as a rainwater harvesting system. To be more precise, their offer includes a cube covered in durable wood with a plastic lining inside collecting water. These cubes can be combined with each other, resulting in a diversity of furniture such as tables, benches or a bar. As it is a modularized system that can be individualized by their customers, the furniture coms in a DIY-kit with instructions. These consist of images accompanied with texts on how to assemble it (see figure 2.8).
17 Figure 2.8 Second Rain furniture rainwater tank and instructions.
2.4.2 Rain Saucer [108]
Different than Second Rain, Rain Saucer does not sell a container to harvest water but a DIY-kit to upgrade regular barrels for an improved rainwater harvesting experience. In other words, they allow a simple installation of a spigot for the simplified use of harvested water. The company achieves this by selling a universal solution that can be applied to any container. Their set of components comes with text instructions that have a few images to aid in the installation process (see figure 2.9). Overall, the instructions are well-structured and the steps are easy to identify and follow. They are very extensive and precise, i.e. it is possible to follow them without visual aid. Nonetheless, images do raise the quality of instructions as they are more meaningful than words. Using more images could have reduced the number of words significantly, making the instructions more appealing and allowing the user to comprehend the steps faster. Also, they do reference a source for more images, but these are not in form of instructions and therefore do not enhance the quality of the provided text.
18
2.4.3 JOJO Rainwater System [109]
In contrast to the previous two examples, builders is a more advanced company offering a wide range of products. One of their sections is dedicated to rainwater harvesting systems including many components to improve the harvesting experience. Their rainwater tank e.g. comes with two sets of instructions. One features text with photographs, the other is a video with an expert opinion (see figure 2.10). While their static instructions are very short, the video instructions are more elaborate and feature a lot of additional information that aids in installing the water tank. Despite being filmed outside, the video is still does not have distracting elements but has a clear focus on the overall assembly. It utilizes methods such as close-ups, voice-overs and time-lapses effectively.
The image instructions do feature images but they are not very meaningful as they only show a rough overview of a person working on the assembly rather than the process and single components. Still, it is more appealing than the instructions of Rain Saucer. And considering that they can be used as a guide after having watched the video instructions, they are sufficient to assemble the water tank.
Figure 2.10 JOJO Rainwater System Image/Text and Expert Opinion Instructions.
2.4.4 Conclusion
19
2.5 Methods for production of DIY-assembly-instructions
Different methods of DIY-assembly instructions were discussed and presented in section 2.2, each having its own method of realization. Therefore, a list of potential programs and equipment to produce instructions was compiled in this section. The list serves as a reference of possibilities with regards to the experience of the author. It gives an indication on programs that can aid in the production rather than the process of production self.
2.5.1 Text-based instructions
As text-based instructions do not include images and therefore can be written down in a text-editor, Microsoft Word [55] and Google Docs [56] are a suitable and widespread option. In this case, the only graphical element to be considered is the font. From a functional aspect, Colin Wheildone [57] has found that serif font supports the comprehension of text and is therefore more suitable in the context of assembly instructions. The difference between serif and sans serif is described in figure 2.11.
Figure 2.11 Serif vs Sans Serif font comparison.
2.5.2 Image-based instructions
20
Sketch
As it is possible to make traditional pen and paper sketches that are scanned and processed, the use of a combination of hardware and software offers more convenient options in the creation of instructions. It allows a simpler correction of mistakes and simple editing by scaling and flipping, it is cleaner and saves space by compressing all tools and colours in one program, you can use images as a reference to draw on to achieve the correct proportions and it is immediately ready to be further processed as it can be exported as different files [60]. Latter applies especially on the program Adobe Photoshop Sketch [61], that is a mobile application allowing professionals to sketch using e.g. their iPad Pro in combination with an Apple Pencil [62] and export it immediately via the Creative Cloud to other Adobe programs to receive final touches. The iPad Pro and the Apple Pencil allow to draw very precisely as they function as digital pen and paper, even simulating pen pressure via thicker lines at increased pressure. Another application supported by the iPad is ProCreate [63], offering a wider range of tools than Adobe Sketch but is not immediately connected to programs allowing further processing. However, it does offer the export as a variety of files, making it simple to implement. A less expensive option is the use of a drawing tablet connected to a computer, such as a Wacom Intuos [64] that is commonly used in the graphic design industry for the creation of sketches in programs such as Clip Studio Ex [65] and offers the same advantages as the iPad Pro. The only difference is that the user is drawing on a different device than he is looking at. After all, sketches are used for indication and do not have to be perfect. Therefore, the choice of method is not as relevant as in the next step. However, it does decrease the difficulty of the creation of the final image when having a high-quality sketch.
Refine
Differing between two different kind of image-based instructions: illustrations and photographs, different methods and programs need to be used for refining.
21
Photoshop [67] that uses raster images. An open-source alternative allowing precise tracing is the program Paint.Net [68], which is however limited in its functions compared to Illustrator and Photoshop that offer a large variety of tools. Nonetheless, it satisfies the basic needs for a successful creation of line-art images.
2. Photography: Whereas photography does not need explicit sketches in order to transform them into more refined illustrations, it rather needs raw images that can be made using a camera. These are then refined via cropping, colour-editing, etc. This can only be done in raster image programs, since photographs do not consist of vectors but pixels. As mentioned before, a suitable program may be Adobe Photoshop that is commonly used for photography editing. Alternatively, the open-source program Photoscape [69] can be used, being more intuitive than Photoshop but also having less functions.
Present
Not only is the look of each graphical element important but the correct presentation enhances the viewing experience and aids in understanding the displayed process. To achieve this effect, lay-out programs such as Adobe inDesign [70] can be used. The programs focus is on the placement of elements and is designed to be simple and intuitive. An open source alternative offers Scribus [71], offering similar functions as inDesign. These programs are to finalize the image-based instructions by presenting them in a way that makes sense and allows to put the images in association with text.
2.5.3 Video-based instructions
Video-instructions may have many different formats, as they can be with- and without expert opinions, on a white and sterile background or in a regular setting or they can be completely animated. However, to create material for the instructions, equipment such as cameras, lightboxes, microphones and a background may be necessary. Differing from real-life recordings, animations have to be produced using an animation program. However, both recordings and animations need to be edited using video-editing-software order to be presentable. Only then can the produced material be finalized in useful instructions, meeting the user’s needs and expectations.
Animation
22
objects or import them from different sources and then have a function to animate them. The output are images, that have to be further processed in order to result in a video.
Editing
When having created the animation or finished filming the assembly process, the material can be transferred into a video-editing program that finalizes the instructions. There are common practices such as time-lapses, clean cuts, voice or music in the background and text that are used to aid the understanding of the video. Programs that offer these functions are e.g. Adobe Premiere Pro [74] as well as Techsmith Camtasia [75]. Each is suitable for editing video-instructions.
2.5.4 Conclusion
To conclude from this section, the graphic design industry standard is the use of Adobe products. The Adobe Creative Cloud offers enough resources to create instructions successfully. It only lacks the possibility to create 3D-animations, but this gap is filled by other programs such as Autodesk Maya. Also, for each listed program there are free alternatives when these are not available. Another aspect that needs to be considered when creating instructions is the equipment. While this section is dedicated to the programs and only briefly mentions the use of e.g. cameras, this area needs further research in order to produce suitable images and video-material.
2.6 State of the Art Conclusion
23
The research on other kits in different fields (furniture, consumer electronics) and of other DIY-rainwater harvesting systems gave insight on how instructions can be designed, and which aspects have to be customized based on product and distributor. These are aspects to be specified in accordance to the stakeholders as their needs need to be considered when designing the instructions. Pros and Cons, and other recommendations such as the availability of tools to design instructions have been summarized. Therefore, due to the availability of a diversity of methods to create instructions, a general solution cannot be found and has to be determined by using scientific research as it will be used in this thesis.
24
3 Creative Technology Design Process: Methods
and Techniques
As the focus of Creative Technology is designing products enhancing people’s lives, the process of creation is built on user-centred design. Therefore, this section covers the procedure of how the research questions will be answered according to the Creative Technology Design Process as introduced by Mader and Eggink [9]. The process can be divided into four phases: ideation, specification, realization and evaluation
visualized in figure 7. From the graphical representation it becomes apparent that the design process is iterative as well as utilizing a combination of divergence-convergence, emphasizing human-centred design by repeatedly incorporating user opinion to improve the envisioned product. In the course of this bachelor thesis, DIY-instructions will be created based on this concept. As working DIY-instruction concepts already exist, these are to be further explored and developed in order to adapt them to the SRB allowing large-scale deployment. The phases and the methods that will be applied to specify the design will be described in the following sub-sections.
25
3.1 Ideation
The initial focus for the ideation phase is learning about and understanding the user to set up requirements. These result from initial ideas about concepts for a product, an instruction from a client, or a creative inspiration. Early ideas can then be prototyped and evaluated by referring to the opinion of clients, users or experts. This is done using multiple low-fidelity prototypes that are evaluated with users’ assistance. The aim of the ideation phase is to get a more elaborated impression about the envisioned product with possible ideas and associated requirements. Methods used in the ideation phase are: scientific research, research on similar systems as in the state of the art research, and ethnographic methods used in stakeholder analysis.
3.1.1 Research
In order to develop a guiding design concept, research on similar products has to be conducted. This gives an insight on the possibilities and limitations on the feasibility of ideas and can also serve as a source of inspiration in terms of development and improvement of already existing products. Scientific sources are to be collected and to be able to set requirements based on validated insights. The State of the Art (Chapter 2) already contains part of this research and may be extended in the ideation in terms of requirements.
3.1.2 Stakeholder Analysis
26 Figure 3.2 Stakeholder Matrix by Bryson [88]
In other words, stakeholders act as a data source to determine requirements for the development of the envisioned product. The method of data collection must be chosen based on the type of information to be collected, i.e. qualitative or quantitative data [76]. Qualitative research collects data that cannot be summarized in numbers and is used to understand the subject’s situation and thoughts, whereas quantitative research can be evaluated using statistical analysis and is used to measure variables. Three research methods will be utilized and further specified: interviews, focus groups and surveys.
Qualitative Data: Interview [76]
27
Qualitative Data: Focus Group [76]
Characteristic for some stakeholders is that they may differ between each other, having different concerns and expectations towards a product despite forming one entity. Therefore, a larger population needs to be asked for their opinion to be able to cover multiple design aspects. As interviews are time-intensive, other methods have been introduced, such as focus groups. Focus groups gather several people matching the target user-group and allow them to discuss about questions asked by a supervisor. As the focus is on obtaining relevant requirements, this method accelerates this process by combining multiple interviews into one being able to consider opinions of a diversity of people.
Quantitative Data: Survey [76]
In contrast to focus groups, surveys do not require the attendance of a supervisor/interviewer and due to the simplicity of spreading it, a large amount of answers can be gathered. Therefore, surveys are suitable when many answers are required. However, surveys can only specify certain questions, such as “Yes” and “No” or a Likert Scale [76]. Individually typed information does not aid in evaluation of results, leading to only a limited diversity of insights. The collected data can be used to confirm assumptions or show tendencies that should be further explored.
3.1.3 Idea Generation: Brainstorming
As the ideation phase aims to generate multiple concepts to find a suitable solution for the opposed problem, an idea generation technique must be applied. One of these techniques is brainstorming, introduced by Osborne in 1939 [85]. Brainstorming describes the process of idea generation individually or in a group. This process adheres to a set of rules:
1. The problem needs to be clearly stated.
2. All ideas need to be documented, also when not feasible. This can be done using e.g. a mind-map.
3. One cannot interrupt other participants.
4. The brainstorming phase finalizes with an evaluation, i.e. discussion of every idea, potentially leading to new ideas.
3.1.4 Prototypes
low-28
fidelity prototypes [82], allowing the iteration of multiple design-approaches relatively quickly in order to find the most suitable solution. Methods for low-fi prototyping are pen and paper or video prototypes.
1. Pen and Paper Prototypes are the fastest and simplest method. One can create prototypes using drawings resembling multiple pages of an interface where one “click” leads to the next. It offers a first impression of functionalities and a possible look and feel. Whereas the pen and paper prototype may be made from sketches or well-designed in a more advanced version, depends on what purpose it serves, i.e. what should be tested. For example, instructions for the SRB may be presented as a pen and paper prototype in a sense of showing where elements could be placed and how the user feels about it.
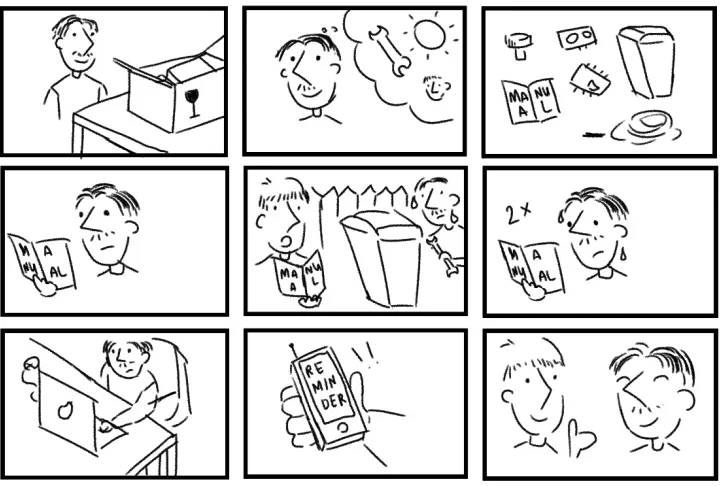
2. Video prototyping is based on storyboards in order to examine what may be positive and what may be negative. As video-instructions such as animations may be considered for the final prototype, a simplified video-prototype could be created for testing.
After having created the concepts, they serve to gain insights from stakeholders. Therefore, meetings need to be arranged. This includes inviting stakeholders and preparing questionnaires.
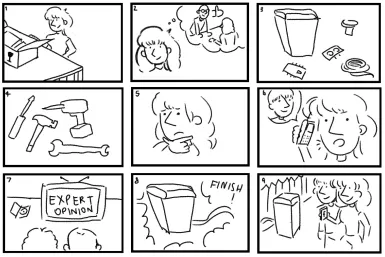
3.2 Specification
As the ideation serves as the concept iteration for finding the final solution, the specification explores functionalities and user specification to conclude with further specifications. Overall, this section covers the specification of user experiences, functions and the requirements for a final prototype to be implemented in the realization phase. Each step requires different methods for successful specification. In the end, the requirements are re-evaluated, forming the final version of requirements.
3.2.1 Functional Architecture
29
3.2.2 Experience Specification
Human-centred design requires an experience specification of the user-group. While the required information can be retrieved from the earlier conducted stakeholder-analysis, the specification can be done using a PACT-analysis [80] standing for people, activities, contexts and technologies.
1. People can be specified using personas representing the average user of the product.
2. Activities can be specified using storyboards representing the usage process of an average user. 3. Contexts can be specified using scenarios in different physical or social contexts, such as
inside/outside a building.
4. Technologies can be specified by explaining how the envisioned product uses technology to achieve the user’s desired effect.
3.2.3 Requirement Analysis
After having collected information using background- and state of the art research, as well as a stakeholder analysis, the insights are evaluated and transformed into functional and non-functional requirements. These allow to fulfil the needs and expectations of the stakeholders as emphasized in human-centred-design. When the requirements are set, they are categorized based on importance using the MoSCoW-technique, i.e. stating which requirement must, should or could be implemented in the final product [79].
3.3 Realization
The realization finalizes the product by developing the concept into the envisioned product. It is based on previously set specifications and requirements resulting from stakeholder-opinions. It is the result of user-centred design and multiple iterations.
30 Figure 3.3 A model of the design process (Felker, 1980) [86].
“Review and Edit” however, will use the evaluation method of asking a professional to review the first version to identify the biggest problems in terms of design [86]. This evaluation does not determine the usability of the envisioned product but allows to quickly improve the overall appearance in order to avoid mistakes for a more detail-oriented user-testing process.
3.4 Evaluation
31
3.4.1 Functional Testing
Conducting a functional test, it can be determined whether all functionalities were incorporated. With reference to the functional requirements, this test can determine if at least all the must-requirements were met, and the envisioned product can be used for user testing or needs revision.
3.4.2 User Testing
During a user test a representative of the target group interacts with the designed prototype. The purposes of user testing in this graduation project are to test the usability of the prototype and to find out whether the prototype fulfils the user’s needs [76]. Thus, problems with the prototype can be identified, if present. Before conducting a user test, a user testing protocol is created in advance to ensure that testing is smooth as well as consistent and yields interpretable results.
User Test Protocol
The user test protocol defines the purpose of the test, the test setup, the participants, the interaction device, the interaction method and the data collection method.
1. Test Setup: The test setup describes the schedule, location and equipment.
2. Participants: The participants section describes the participant recruitment criteria.
3. Interaction method: Interaction method illustrates how the participants will interact with the
envisioned product which is usually the prototype of the envisioned product.
Two different interaction methods can be defined for usability testing: free interaction and task-based interaction. Free interaction means that the participant can interact with the prototype without any predefined tasks. In contrast to that, task-based interaction provides the participant with tasks which the participant needs to execute. When referring to the task-based interaction, it might be necessary to interrupt the testing and give the participant a hint, in case he or she does not understand how to perform a certain task. During the user test the observer is supposed to collect data on how the test participants interact with the envisioned product.
4. Data collection method: The data collection method defines how this is accomplished and
32
34
4 Ideation
The ideation phase is dedicated to the development of an idea and requirements based on information provided by stakeholders. Therefore, firstly a stakeholder analysis will be conducted in which they will be identified, described and categorized based on power and interest. After that, a collection of concepts that potentially fulfil their expectations and needs are brainstormed and illustrated. Choosing the most influential stakeholders, an interview will be conducted in which these concepts are presented for a first screening. Evaluating the latter, preliminary functional and non-functional requirements for further development of the final concept can be extracted, building the conclusion of the chapter.
4.1 Stakeholder Analysis
Based on previous research on the SRB [21] and discussion with the supervisor Richard Bults, multiple stakeholders could be identified. These are:
1. the Municipality of Enschede, 2. Waterboard Vechtstromen, 3. the University of Twente,
4. the co-developers Jeroen Waterink and 5. Thijs Dortmann and
6. the inhabitants of Enschede.
As some of the stakeholders represent a larger entity, the contact persons are summarized in table 4.1 including the role they have during this project. This is relevant due to the different power and interest of each stakeholder, determining whether they only will be informed or will participate actively in the development of the final product. These factors are visualized in an interest/power matrix in figure 4.1.
4.1.1 Decision-Maker: Municipality of Enschede – Hendrik-Jan Teekens
35
implementation of the SRB, buffering the rainwater and reducing the load on the sewerage system, which is overstrained during heavy rainfall leading to flooding of parts of the city. The municipality is represented by the water landscape designer Hendrik-Jan Teekens who is working on multiple water management projects in Enschede. His interest in the SRB is based on finding an affordable solution that also raises awareness of the inhabitants by including them in the execution of the project.
Stakeholder
Contact Person
Role
Participation
Municipality of Enschede Hendrik-Jan Teekens Decision-Maker
Encourage and
Influence
Waterboard
Vechtstromen
Jeroen Buitenweg
Decision-Maker
Encourage and
Influence
University of Twente
Richard Bults
Decision-Maker
Keep Satisfied
Co-Developer
Jeroen Waterink
Co-Developer
Encourage and
Influence
Co-Developer
Thijs Dortman
Co-Developer
Keep informed
Inhabitants of Enschede
-
Users
Keep informed
Table 4.1 Listing of Stakeholders with contact person, role and participation grade.
4.1.2 Decision-Maker: Waterboard Vechtstromen – Jeroen Buitenweg
The Waterboard Vechtstromen is a client and thus also a decision-maker. In contrast to the municipality, their responsibility is not the safety of the inhabitants but the functional reliability of the sewerage system. Therefore, both entities cooperate in finding a solution – which is the SRB in this case. As the sewerage system is the main concern in this challenge, the contact person is Jeroen Buitenweg, Senior Policy Maker and responsible for the sewerage system and climate in the city.
4.1.3 Decision-Maker: University of Twente – Richard Bults
36 Figure 4.1 Stakeholder analysis in an interest/power matrix by Bryson [88]
4.1.4 Co-Developer: Jeroen Waterink
While this Bachelor Thesis documents the development of DIY instructions for the modularized SRB, the co-developer Jeroen Waterink will realize the actual product the instructions are designed for. His focus is on the functionality and creation of modules that allow an easy assembly. A close collaboration is necessary in order to create the instructions as the project pursued by this bachelor thesis is heavily dependent on his progress and decisions. Therefore, both parties need to communicate their needs and concerns and keep each other up to date to achieve a good result that can be used for a pilot-run.
4.1.5 Co-Developer: Thijs Dortmann
37
4.1.6 User: Inhabitants of Enschede
The inhabitants of Enschede will be the future users of the SRB as they will place it in their gardens to harvest and buffer rainwater to improve the living quality of the city in preventing flooding and acting environmentally friendly using the harvested water. Therefore, their opinion is important in the implementation of the project. As the inhabitants consist of a large group, their characteristics such as age, education and interests can widely differ, meaning that there is a need of a solution that can be applied to a generalized audience. Overall, the inhabitants can be divided in sub-sets using the graph of innovation [84] (see figure 4.2). This must be considered as each sub-set has a different relation to innovative products, their assembly and usage.
Figure 4.2 Graph of Innovation [84] showing the possible division of the inhabitants of Enschede using the diffusion theory by Everett.
Meeting certain characteristics, inhabitants can be assigned to an adopter category as described by Everett [84].
1. Innovators do not hesitate to take risks in adopting new products. This results from their financial
resources that are not highly affected by failures. Other characteristics are a high social status, a relation to science and connections to other innovators.
2. Early Adopters have similar traits as innovators, such as a high social status, financial liquidity and
38
3. The Early Majority adopts innovations (significantly) later than early adopters. Although they have
a high social status, they do not inherit opinion leadership in their circle but connect with early adopters who do so.
4. The Late Majority is more sceptical towards innovation than previous adopters and only adopt
innovation when most people already have. They have a lower social status and only little financial liquidity.
5. Laggards finalize the adoption process. They do not like changes and rather retain tradition. They
tend to have the lowest social status, to have little financial resources and to be the oldest among all adopters.
These findings can be used to determine users for the evaluation of the envisioned product in order to test whether each adopter group can follow the instructions as intended or if the instructions have to be improved for a certain adopter group.
4.2 Concept Brainstorming Session
Resulting from the stakeholder analysis, it becomes apparent that collaborating and communicating with the SRB’s co-creator is an essential aspect for being successful. Therefore, a joint brainstorming session with Jeroen Waterink has been arranged to devise multiple concepts of a potential modular SRB system that matched the needs of modular systems and DIY instructions. The brainstormed ideas have been summarized in a mind-map (see figure 4.3).
39 Figure 4.3 Mind-map summarizing brainstormed concepts in- and without collaboration of Jeroen Waterink.
4.3 Modular Systems
As Jeroen Waterink has the responsibility to build a modularized SRB, whereas the purpose of this Bachelor Thesis is the development of suitable DIY instructions for this future system, a joint brainstorming session has been arranged to devise different potential concepts to be realized. Having conducted research on modular systems and how their assembly is perceived by the user, certain characteristics to be considered have been established. These characteristics are summarized in table 4.2 determining the suitability of each brainstormed concept for the purpose of a DIY-assembly. The suitability is independent of the needs of Jeroen Waterink, as he has a different focus, i.e. the components and technology. However, the final concept is to be determined by the decision-makers who are to consider both point of views.
![Figure 2.2 DIY-kits by LEGO [26] [27] [28] [29] ordered by age and page numbers.](https://thumb-us.123doks.com/thumbv2/123dok_us/9711876.472210/18.612.87.352.130.341/figure-diy-kits-lego-ordered-age-page-numbers.webp)