•
•
•
•
• • • •
•
•
• •
•
•
•
• • •
•
•
S
P R I
N T
@
THE
PROFESSIONAL WORD
PROCESSOR
SPRINT®
The Professional Word Processor
Borland's No-Nonsense License Statement!
This software is protected by both United States copyright law and international treaty provisions. Therefore, you must treat this software just like a book, with the following single exception. Borland International authorizes you to make archival copies of the software for the sole purpose of backing-up our software and protecting your investment from loss. By saying, "just like a book," Borland means, for example, that this software may be used by any number of people and may be freely moved from one computer location to another, so long as there is no possibility of it being used at one location while it's being used at another. Just like a book that can't be read by two different people in two different places at the same time, neither can the software be used by two different people in two different places at the same time. (Unless, of course, Borland's copyright has been violated).
LIMITED WARRANTY
With respect to the physical diskette and physical documentation enclosed herein, Borland International, Inc. ("Borland") warrants the same to be free of defects in materials and workmanship for a period of 60 days from the date of purchase. In the event of notification within the warranty period of defects in material or workmanship, Borland will replace the defective diskette or documentation. If you need to return a product, call the Borland Customer Service Department to obtain a return authorization number. The remedy for breach of this warranty shall be limited to replacement and shall not encompass any other damages, including but not limited to loss of profit, and special, incidental, consequential, or other similar claims.
Borland International, Inc. specifically disclaims all other warranties, expressed or implied, including but not limited to implied warranties of merchantability and fitness for a particular purpose with respect to defects in the diskette and documentation, and the program license granted herein in particular, and without limiting operation of the program license with respect to any particular application, use, or purpose. In no event shall Borland be liable for any loss of profit or any other commercial damage, including but not limited to special, incidental, consequential or other damages.
GOVERNING LAW
This statement shall be construed, interpreted, and governed by the laws of the state of California.
sprntLftChgx (cm7)
NOTE: Boldface items are available in Advanced (SPADV.UI) user interface only.
FILE New
Open CtI·F3
Close CtI·F4
Insert
Save CtI·F2
Write As
Revert to Saved Translate File Manager Pick File from List CtI·F9
FILE MANAGER Duplicate·Copy Rename·Move Erase C: \ SPRINT -Change Directory List Directory
TRANSLATE
I
Import ExportEXPORT TO ASCII file
DlsplayWrlte 4 (DCA RFn Microsoft Word MultlMate MultlMate Advantage Wang (lWP) WordPerfect 4.2 WordStar WordStar 2000
IMPORT FROM ASCII file
DlsplayWrlte 4 (DCA RFT) Microsoft Word MultlMate MultlMate Advantage Wang (IWP) WordPerfect 4.2 WordStar WordStar 2000 SKPlus Outlook
EDIT Undelete Copy Move·Cut Insert·Paste Erase F4 F5 F6
Block Select ---11----.
Write Block
Search·Replace -
t--Go to Page Jump to Line F9 Place Mark
PLACE MARK
Set Alt·M
Go to Alt·G
SEARCH
Find F7
Next Occurrence CtI·L Search & Replace Fa Direction
Case Sensitive Match Words Only Use Wildcards Entire File
BLOCK SELECT Word
Line Sentence Paragraph
Reselect Block Alt·B Turn Select Mode Column Mode
F3
INSERT
Variable Define Text Variable
TYPEmLE
Normal Bold Italic Underline Word Underline Large + Superscript - Subscript Strikethrough Font Character Size Hidden HEADINGS
Numbered -chapter section subsection paragraph appendix appendixsectlon
Unnumbered -headingA headlngB headingC headingD
SPRINT MENU TREE
(with Keyboard Shortcuts)
mLE
Center
Modify
, - - - 1 Headings
, - - - 1 Lists
LISTS Outline Numbered Multilevel Description Asterisks Bullets Hyphens GRAPHICS EPS Picture KeyCaps Bar Draw Box
Table Figure
r - - - I Graphics Index References X·Reference Word other Format CROSS-REFERENCE Define a Tag Reference a Tag
REFERENCES Footnote Endnote Notes
INDEX
Reference Word Master Keyword See Also See Index Under Page Range RULER
Insert Alt·R Edit on Screen Alt·A Precise Settings -
Justification -Line Spacing - 1
I LINE SPACING
Single 1.5 Double OTHER JUSTIFICATION left Right Both Center
PRECISE SETTINGS
Font Size
Initial (first line) Indent left Indent Right Indent Tab Stops
PAGE BREAKS
Insert (Unconditional)
Conditional Page Break
Reserve Space Blank Page(s)
Group Together on Page Keep with Following Text
Wldow·Orphan Control
LAYOUT
Ruler
,--- Page Breaks
r- Columns
Document·Wlde -
f----Header Footer Title Page
FOOTER
All Pages TIlle Page Odd Pages Even Pages Position
HEADER
All Pages TIlle Page Odd Pages Even Pages Position
COLUMNS
Snaking Columns
Column Break DOCUMENT·WIDE
Gutter Between Left Margin Right Margin Top Margin Bottom Margin
Offset
Alt·N Paper Size
Word Spacing Inter·Paragraph Spread
SPRINT
File Alt-F Edit Alt-E Insert Alt-I Typestyle Atl-T Style Alt-S Layout Alt-L
, - - - - Print Alt-P Window Alt-W
-Utilities Alt-U Customize Alt-C Quit Alt-Q
PRINT WINDOW
Go! Open Sh-F3
Destination Close Sh·F4
Screen Preview CtI·Fa Shut All Sh·F9 Merge
Paginate CtI·F7 Remove Formatter
Page Breaks Options
I
Advanced Options Current Printer ADVANCED OPTIONS Number of Passes FormaHed Print Wordwrap AscII Flies Log Errors to FileOPTIONS
-Starting Page Ending Page Number of Copies Pause Between Pages
PAPER SIZE 8.S x 11 In. 8.5 x 12 in.
Zoom Sh·FS Resize Sh·F2 Next Sh·F6 Previous
SPELLING Word Block File Rest of File Last Bad Word Every Bad Word CtI·F1 AutoSpell
Main Dictionary User Dictionary
SORT Ascending Descending
MERGE Go! Screen Preview Letter File Record File Data Format Inilial Record Ending Record Order Crlleria
sprint-right (cm7)
I
UTILITIES CUSTOMIZE
, - - - - Spelling Sh·F1 User Interface
Hyphenation .--- Colors USER INTERFACE
Thesaurus Alt·F1 Screen Function Keys
Glossary ~ AscII File Handling Reset Shortcuts
Menu Shortcuts
.--- Arrange·Sort Load
.-- Line Drawing Options Save
Potpourri QulckCard
Macros ASCII FILE HANDLING
Tab Expansion
DOS Command Auto·lndent
Wrap Long Lines
MACROS
Load OPTIONS
Enter Preserve Editing Session
Run Background Save Period
Menu Display Delay Insert Mode
GLOSSARY Tone
Recall F2
Assign to Key COLORS
i-Color Set 1 SCREEN
Define 2-Color Set 2 Paragraph Marks
Keyboard Record 3-Monochrome Set Tabs
Erase Indents
Modify Spaces
Merge Undo Non-Breaking Spaces
List Wide Spaces (Springs)
Glossary Codes Alt·Z
Bottom Status Line
HYPHENATION Word
Block
File CHANGE COLORS
Typestyles
Minimum Word Length formatting - r - - TYPESTYLES
Space Allowed ~ System Normal
Bold italic
CHARACTER Underline
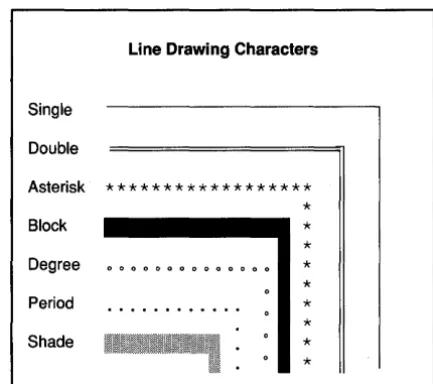
1. Single Word Underline
2. Double
+ Superscript
3. Asterisk - Subscript
4. Block SYSTEM Strikethrough
5. Degree Status Line
6. Period Highlighted Text Large
7. Shade Menu
Info Box Error Messages
FORMAniNG Index
Format Commands Variable Reference Ruler
SPRINT
®The Professional Word Processor
Reference Guide
Copyright ©1988
All rights reserved
Borland International
4585 Scotts Valley Drive P.O. Box 660001
All Borland products are trademarks or registered trademarks of Borland International, Inc. or Borlandl Analytica, Inc. Other brand and
product names are trademarks or registered trademarks of their respective holders. Copyright ©1988 Borland International.
Printed in the U.S.A.
1098765432
Table of Contents
Inuoducnon 1
What's in This Manual 0 0 0 0 0 0 0 0 0 0 0 0 0 0 0 0 0 0 0 0 0 0 0 0 0 0 0 0 0 0 0 0 0 0 0 0 0 0 0 0 0 0 0 0 1 Typographic Conventions 0 0 0 0 0 0 0 0 0 0 0 0 0 0 0 0 0 0 0 0 0 0 0 0 0 0 0 0 0 0 0 0 0 0 0 0 0 0 0 0 0 2 The Distribution Disks 0 0 0 0 0 0 0 0 0 0 0 0 0 0 0 0 0 0 0 0 0 0 0 0 0 0 0 0 0 0 0 0 0 0 0 0 0 0 0 0 0 0 0 0 2 Hardware and Software Requirements 0 0 0 0 0 0 0 0 0 0 0 0 0 0 0 0 0 0 0 0 0 0 0 0 0 0 0 0 0 0 3 Borland's No-Nonsense License Statement 0 0 0 0 0 0 0 0 0 0 0 0 0 0 0 0 0 0 0 0 0 0 0 0 0 0 0 3 How to Contact Borland 0 0 0 0 0 0 0 0 0 0 0 0 0 0 0 0 0 0 0 0 0 0 0 0 0 0 0 0 0 0 0 0 0 0 0 0 0 0 0 0 0 0 4
Chapter 1 The Sprint Menu Encyclopedia 5
Overview 0 0 0 0 0 0 0 0 0 0 0 0 0 0 0 0 0 0 0 0 0 0 0 0 0 0 0 0 0 0 0 0 0 0 0 0 0 0 0 0 0 0 0 0 0 0 0 0 0 0 0 0 0 0 0 5 Encyclopedia Functional Index 0 0 0 0 0 0 0 0 0 0 0 0 0 0 0 0 0 0 0 0 0 0 0 0 0 0 0 0 0 0 0 0 0 0 0 0 0 5 Getting Around 0 0 0 0 0 0 0 0 0 0 0 0 0 0 0 0 0 0 0 0 0 0 0 0 0 0 0 0 0 0 0 0 0 0 0 0 0 0 0 0 0 0 0 0 5 File Maintenance 0 0 0 0 0 0 0 0 0 0 0 0 0 0 0 0 0 0 0 0 0 0 0 0 0 0 0 0 0 0 0 0 0 0 0 0 0 0 0 0 0 0 0 6 Editing 0 0 0 0 0 0 0 0 0 0 0 0 0 0 0 0 0 0 0 0 0 0 0 0 0 0 0 0 0 0 0 0 0 0 0 0 0 0 0 0 0 0 0 . 0 0 0 . 0 0 0 6 Customization 0 0 0 0 0 0 0 0 0 0 0 0 0 0 0 0 0 0 0 0 0 0 0 0 0 0 0 0 0 0 0 0 0 0 0 0 0 • 0 0 0 0 0 0 0 6 Creating Large Documents 0 0 0 0 0 0 0 0 0 0 0 0 0 0 0 0 0 0 0 0 0 0 0 0 0 0 0 0 0 0 0 0 0 0 6 Basic Formatting 0 0 0 0 0 0 0 0 0 0 0 0 0 0 0 0 0 0 0 0 0 0 0 0 0 0 0 0 0 0 0 0 0 0 0 0 0 0 0 0 0 0 0 7 Special Formats 0 0 0 0 0 0 0 0 0 0 0 0 0 0 0 0 0 0 0 0 0 0 0 0 0 0 0 0 0 0 0 0 0 ~ 0 0 0 0 0 0 0 0 0 0 7 Printing 0 0 0 0 0 0 0 0 0 0 0 0 0 0 0 0 0 0 0 0 0 0 0 0 . . 0 0 0 0 0 0 0 0 0 0 0 0 0 0 0 0 0 0 . 0 0 0 0 0 0 0 8 Miscellaneous Concepts 0 0 0 0 0 0 0 0 0 0 0 0 0 0 0 0 0 0 0 0 0 0 0 0 0 0 0 0 0 • 0 0 0 0 0 0 0 8 How the Encyclopedia Is Organized 0 0 0 0 0 0 0 0 0 0 0 0 0 0 0 0 0 0 0 0 0 0 0 0 • 0 0 0 • • 0 0 8
Clipboard ... .. 34
Close (File) ... 35
Codes ... 37
Colors ... 38
Columns ... 39
Comments ... 42
Conditional Page Break ... 43
Control Characters (General Information) ... 44
Copy ... 47
Current Printer ... 48
Customize Menu . . . .. 49
Define Text Variable ... 50
Delete a Block ... 51
Deleting (General Information) ... 52
Description . . . .. 54
Dimensions ... 56
Document-Wide Menu. . . .. 59
DOS Command .. . . .. 62
Edit Menu. . . .. 64
Endnote ... 66
Erase ... 68
Error Messages and Warning Messages. . . .. 69
Figure ... 71
File Manager Menu. . . .. 73
File Menu ... 75
Font ... 77
Font Size . . . .. 79
Footer Menu. . . .. 81
Footnote ... 84
Formats (General Information) ... 87
Function Keys ... 88
Glossary ... 91
Graphics ... 95
Group Together on Page ... 97
Hard and Soft Returns ... ~ . . . .. 98
Header Menu. . . ... 100
HeadingA ... 103
HeadingB ... 104
HeadingC . . . .. 105
HeadingD ... 106
Headings Menu . . . .. 107
Help ... 108
Hyphenation Menu. . . .. 108
[image:12.504.85.429.42.568.2]Ruler ... 198
Save ... 205
Screen Menu ... ~ . . . .. 206
Scrolling ... 210
Searching ... 211
Section ... 217
Special Hyphen ... . . .. 221
Spelling Menu ... 222
Status Line ... 225
Style Menu .. . . .. 226
Subsection ... 228
Tab Expansion .. . . .. 229
Table .. " ...•... 230
Tabs (General Information) ... 233
Tab Stops ... 235
Tags ... 235
TCapt and TCaption ... 238
Thesaurus ... 240
Title Page ... ".... 241
Tone ... 241
Translate . . . .. 242
Typestyle Menu . . . .. 244
Undelete . . . .. 247
User Interface Menu . . . .. 248
Utilities Menu ... 252
Variables (General Information) ... 252
Wide Space (Spring) .. .. .. . .. . .. . . .. . . .. . .. . .. . . .. . .. . . .. . .... 257
Window ... 259
WordStar (User Interface) ... 263
Wordwrapping ... 264
Write As ... 264
Write Block. . . .. 265
Chapter 2 Miscellaneous Formats 267 How to Enter Non-Menu Formats ... 267
Address. . . .. 269
Begin and End (Formats) ... 270
Case ... 271
Char ... 276
Closing ... 278
Column ... 279
Display ... 281
Escape ... 282
Example ... 285
[image:14.505.88.420.40.562.2]Hsp ... 0 • • • • • • • • • • • • 287
Include ... 0 • • • 0 • • 0 • • • • • 0 • • 0 • 0 • • 0 • • • • 0 0 0 • • • • • • • • • • 288 Incr 0 • • • • • • • • • • • • • • • • • 0 • • • • • • • • • • 0 • • • • • 0 • • • • 0 0 0 0 . 0 . 0 . 0 . 0 . 0 0 .
o.
290 Justify ... 0 • • • 0 • • • • • • • 0 • • • • • • • 0 0 • • • • • 0 • • • • • 291 Kern ... 0 • • • • • • • • • • • • • • • • • • • • • • • 0 . 0 • • • 0 • • • • • • 0 • • • • 0 . 0 • • • 0 • • • • • 0 292 Label .. 0 • • • 0 0 • • 0 • 0 0 • • 0 0 0 0 0 . 0 0 0 • ~ • 0 0 0 • • 0 • 0 0 • • • 0 • • 0 0 0 • • . • • o. 0 0 0 • 0 293 MakeTOC ... 0 0 • • • • • • • • • 0 • • • • • • • • • • • • 0 • • • • 0 0 0 0 • • 0 0 • • • • 296 Message ... 0 • • • • • • • • • • 0 0 0 0 0 0 0 • 0 0 • 0 0 0 • 0 0 0 0 0 • 0 0 0 0 0 0 0 0 296 Modify .... 0 • • • 0 • • • • • 0 0 . 0 • • 0 • • • • • • • • • • • • • • • • 0 0 • • • 0 • • • • • • • • • • • 0 297 NeedSpace ... 0 • • • • 0 • • 0 0 0 0 0 0 0 • 0 • 0 0 0 • • 299 NoteChapter 0 . 0 . 0 • • • • 0 0 • • • • • • • • • • 0 0 0 0 0 0 . 0 0 • • 0 0 0 0 0 0 0 0 0 . 0 0 0 0 0 . 0 . 300 N oteSection 0 • • • • • • 0 • • • 0 • • • • • 0 • 0 • • • • • • • • • 0 • 0 0 • 0 0 0 • 0 0 • 0 • • • 0 • • • • 0 300o
and Ovp 0 0 0 0 0 0 0 0 0 • • • 0 • • • • • 0 • • • • 0 • • • 0 0 0 0 0 • • 0 0 0 • 0 0 • 0 0 0 0 0 0 0 • • 0 0 301 Place· 0 • • • • 0 0 • • • • 0 0 0 0 0 • • • • 0 0 . 0 0 0 0 0 0 0 • • • • • 0 o. 0 0 0 0 0 0 0 0 0 • • • 0 0 0 0 . 0 0 302 Quotation 0 0 0 0 0 0 0 0 0 0 0 0 . 0 • • • 0 " 0 • • • • • 0 • • • 0 . 0 • • • 0 0 • • 0 • • 0 0 0 0 • • • • 0 0 303 Scale o . 0 0 0 " o . 0 • • • 0 • • • 0 • • • • • • • • • 0 0 0 0 0 0 0 0 0 . 0 o . 0 0 0 0 0 0 0 o . 0 " • 0 0 0 0 304 Set ...o.
0 0 0 0 0 0 0 0 0 0 0 • • • 0 0 0 0 . 0 • • • • • • 0 • • • • 0 0 0 • • 0 0 0 .o.
0 0 0 0 • • • 304 StringInput ... 0 • • • • • • • • 0 • • • • • • • • • • • 0 0 0 0 0 • • • • 0 0 • • • 0 0 • • 0 0 • • • 0 • 0 o. 308 Style 0 0o.
0 0o.
0 0 0 . 0 0 0 0 • • • • • • • • 0 0 • • • 0 0 0 0 0 0 0 . 0 0 0 0 0 0 0 0 0 0 0 0 0 0 0 0 0 • • 0 0 309 Tab ... o. 0 . 0 • • 0 • • • • • • 0 0 0 • • • 0 • • • • • 0 0 0 0 . 0 0 • • 0 0 0 0 • • • 0 . 0 . 0 0 0 311 Tab Divide ... 0 • • 0 0 • • 0 0 0 0 • 0 • • • • • • • 0 • • 0 • 0 0 0 0 • 0 0 0 • 0 • 0 0 • 0 0 • 0 • 0 • • • • • 311 TagString ... 0 . 0 • • • • • 0 0 • • • • • • 0 • • • • 0 • • • 0 • 0 • 0 0 • • 0 0 0 • 0 • 0 • 0 0 o • • 0 • • • 312 TCTjNoTCT ... 0 • • • • • 0 • • 0 • • • 0 0 • • 0 • • • 0 • • • 0 0 • • 0 • • • 0 313 Template .. 0 • • • • • • • 0 • • 0 • • • • • • 0 • 0 0 0 0 • • • • 0 • 0 0 0 • 0 0 0 0 • 0 0 • • 0 • 0 0 0 0 0 o. 315 Text. 0 0 0 • • 0 0 0 • • 0 0 0 0 . 0 0 0 0 . 0 • • 0 • • • • • • 0 0 0 0 0 0 . 0 0 . 0 0 . 0 0 • • • 0 0 0 . 0 • • • • 320 Timestamp . 0 • • • • • 0 0 • • • • • • • 0 • • • • • • • • • • • 0 • • • • • • 0 0 • 0 0 • • 0 • • • 0 • • • • • 321 Title. 0 • • • • 0 0 . 0 0 . 0 . 0 o . 0 • • • • • • • • • • 0 0 • • • 0 • • • • • 0 0 0 0 0 0 • • 0 • • • 0 . 0 0 • • • 322 Undent .... 0 • • • • • 0 0 • • 0 0 • • • 0 0 0 0 0 0 . 0 0 • • • • 0 . 0 • • 0 0 0 0 . 0 0 0 0 0 • • 0 • • • • 0 322 Verbatim 0 • 0 • 0 0 0 • • • 0 • • • • 0 0 0 • • • • • 0 0 ' 0 0 0 0 0 • 0 • • • 0 0 0 0 0 0 0 • • • • • 0 0 0 ' o. 324 Word ... 0 • • • • 0 0 0 • • 0 0 0 0 • • 0 0 0 0 • • 0 . 0 0 0 . 0 0 0 0 0 . 0 0 0 . 0 0 0 0 0 0 0 0 0 • • • 0 325! 0 • • 0 • • • • 0 • • 0 • • • 0 0 0 • • 0 0 0 0 • • • • 0 • • • • • 0 . 0 . 0 0 0 0 . 0 0 • • 0 0 . 0 0 . 0 0 0 • • • • 0 326
< 0 0 0 • • o . o . 0 0 0 o . 0 o . o . 0 0 0 0 0 • • • 0 0 0 0 0 0 . 0 0 0 o . o . 0 • • 0 0 . 0 0 0 0 0 0 0 . 0 0 0 0 0 . 327
Chapter 3 @-Sign Commands 329
Chapter 4 Running Sprint from DOS 343
Running Sprint ... 343
Printing from DOS ... 344
Command-Line Options ... 345
-# (Number of Copies) . . . .. 346
-dname{=value} (Defining Variables) ... 346
-f (Fill Paragraphs) ... 346
-f=name (Use Alternative Font) .. ~ . . . .. 347
-1 (Create .LOG File) ... 347
-o{=name} (Send Output to a File) ... 348
-p (Print Unformatted) ... 348
-pi (Number of Passes) ... 348
-p=name (Using Another Printer) ... 349
-page=# (Prints a Single Page) ... 350
-pause (Pause between Pages) ... 350
-start=# (Starting Page #) ... 351
-stop=# (Ending Page #) ... 351
-s{=name} (Use Alternative Screen) ... 351
-t=# (Set Tab Stops) ... 352
-v (Preview File) ... 352
Merging Files from DOS ... 352
Appendix A Formatter Error Messages
Appendix B ASCII Character Set
Index
List of Figures
Figure 1.1: Sprint's Line-Drawing Characters ... 130
Figure 1.2: Sprint's Special Screen Characters ... 209
Figure 4.1: Sprint SPFMT Command-Line Options ... 345
List of Tables
Table 1.1: Control Codes (Standard User Interface) ... .46
Table 1.2: Formatting Dimensions ... 58
Table 1.3: Function Key Assignments (Standard User Interface) ... 90
Table 1.4: The SprintMerge Program Commands ... 144
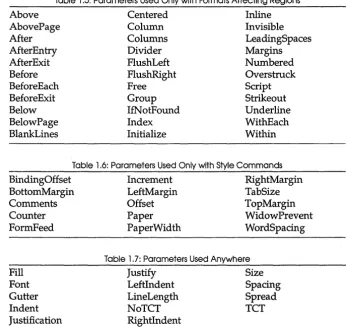
Table 1.5: Parameters Used Only with Formats Affecting Regions ... 148
Table 1.6: Parameters Used Only with Style Commands ... 148
Table 1.7: Parameters Used Anywhere ... 148
Table 1.8: Format Parameters (Complete List) ... 149
Table 1.9: Potpourri Menu Commands ... 183
Table 1.10: Typestyle Commands ... 246
Table 1.11: Built-in Formatting Variables ... 253
Table 1.12: Variables Defined in STANDARD.FMT ... 256
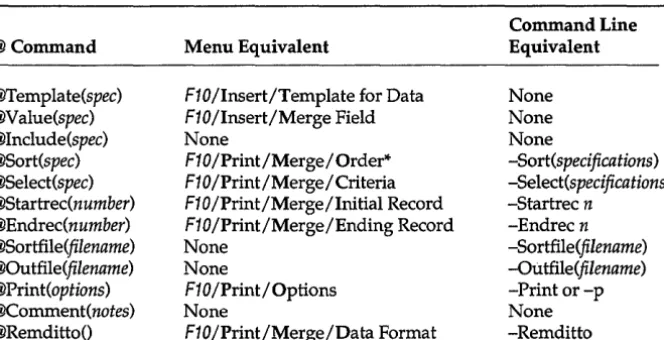
Table 3.1: @-Commands and Menu Equivalents ... 336
Table 3.2: Menu Commands and @-Command Equivalents ... 339
N T R
o
Du
c
To
NThis book, the companion volume to the Sprint User's Guide and Advanced User's Guide, is a complete reference manual for Sprint: The Professional Word Processor.
You'll want to refer to this book for complete, no-nonsense information about Sprint. The bulk of this manual is made up of the Sprint IIMenu Encyclopedia" -an alphabetical listing of all Sprint menu commands and concepts.
To become familiar with the program, you'll probably first want to work through the Getting Started section of the User's Guide. That volume contains tutorials and how-to information about the Sprint editor and formatter. The
Advanced User's Guide discusses editor macros, large-document formatting, and customizing commands.
What's in This Manual
This Reference Guide contains the following chapters and appendixes:
Chapter 1, liThe Sprint Menu Encyclopedia," comprises the bulk of the book and contains an alphabetical list of all the Sprint menu commands as well as general information entries on Sprint concepts.
Chapter 2, uMiscellaneous Formats," is a separate alphabetical listing of all the commands accessible through the Style/ Other Format menu command.
Chapter 3, "Using @~Commands," explains why and when you would use the @-sign commands in Sprint. The chapter contains a list and descriptions of commands you would use exclusively when modifying format (.FMT) files. This chapter also contains a list of @-sign equivalents for menu commands.
Appendix A, "Error Messages," lists and explains all Sprint error messages.
Appendix B, "ASCII Character Set," is a table of the standard ASCII characters with decimal equivalents.
Typographic Conventions
All typefaces and styles used in this manual were produced by Sprint, and output on a PostScript printer. Their uses are as follows:
Monospace type
Bold Monospace
Italic
Keycaps
This typeface represents text as it appears on the screen and anything you must type. For example, "At the Sprint prompt, type 2 for the number of columns desired."
This typeface represents highlighted text that Sprint inserts on the screen, for example, "BEGIN FNOTEThis is a footnote . END FNOTE."
Italic type is used to introduce a new term or to emphasize a word. We also use italic to represent variables and parameters, as opposed to commands. For example, "Use the Spread parameter to modify the distance between paragraphs."
This special typeface indicates a key on your keyboard.
It is often used when describing a particular key you should press, for example, "Press Esc to cancel a menu."
The Distribution Disks
• SP.EXE, the main Sprint program.
• SP-SETUP.COM is the Sprint installation program that you use to select your printer, computer screen, and user interface.
• SP.SWP, the so-called swap file, is the file that holds your current work session and provides a backup in case of system creashed or power failure.
• SP.SPM, Borland's default user interface.
• STANDARD.FMT, is the default style sheet, that is, a text file that contains a number of formatter commands. You can modify or copy any of the commands in this file, but always keep an uncorrupted backup copy.
• SPRECOVE.COM is the program Sprint uses to recover a swap file. • Files with the .SPM extension are macro files that you can load into
Sprint. What the macro file does can vary widely. Sprint has an extensive macro programming language built in.
• Files with the .SPL extension are printer drivers that Sprint needs to work with different printers.
Hardware and Software Requirements
Sprint runs on the IBM PC family of computers, including the XT and AT, along with true IBM compatibles.
Sprint requires
• DOS 2.0 or higher • at least 256K of RAM
The Sprint program is in the file called SP.EXE. It is not copy-protected, so you can easily transfer it to a hard disk or RAM disk. You should, how€~:er,
read Borland's No-Nonsense License Agreement (which follows) for an explanation of your responsibilities with respect to copying Sprint. Also be sure to read your warranty card, and then sign it and mail it to Borland.
Borland's No-Nonsense License Statement
By saying, "just like a book," Borland means, for example, that this software may be used by any number of people and may be freely moved from one computer location to another so long as there is no possibility of its being used at one location while it's being used at another. Just like a book that can't be read by two different people in two different places at the same time, neither can the software be used by two different people in two different places at the same time. (Unless, of course, Borland's copyright has been violated.)
How to Contact Borland
The best way to contact Borland is to log on to Borland's Forum on CompuServe: Type GO BORAPP from the main CompuServe menu and select "Enter Business Products Forum" from the Borland main menu. Leave your questions or comments there for the support staff to process.
If you prefer, write a letter detailing your comments and send it to:
Technical Support Department Borland International
P.O. Box 660001,4585 Scotts Valley Dr. Scotts Valley, CA
95066-0001, USA
You can also telephone our Technical Support department (at 408-438-5300). Please have the following information handy before you call:
c
H A p T E R1
The Sprint Menu Encyclopedia
Overview
This chapter contains a comprehensive, alphabetical listing of Sprint concepts, menus, and commands. Commands not found in the menus are in Chapter 2; @-sign commands are in Chapter 3.
Encyclopedia Functional Index
Even though the entries in this chapter are in alphabetical order, we also include a "functional index," which presents almost every entry in the encyclopedia organized by category. Using this list, you can easily scan the possible entries for a particular topic or task, and then look them up alphabetically.
And if you don't find what you're looking for, don't forget to check the index.
Getting Around
Canceling DOS Command Go to Page Help
Jump to Line
Menu Shortcuts Mouse Commands Quit
File Maintenance
ASCII Files
Background Save Period Canceling
File Menu Close a File File Manager Insert Open
Pick from List Revert to Saved Save
Translate Write As
Preserve Editing Session
Editing
Case Clipboard Deleting Edit Menu Copy Go to Page Jump to Line Place Marker Searching Modifying Formats Insert Menu Control Character Special Hyphen Spelling Menu AutoSpell Hyphenation Thesaurus Block Commands Block Select Menu Deleting Erase Insert-Paste Move-Cut Undelete Write BlockCustomization
Customize Menu Colors Menu Shortcuts Options MenuBackground Save Period Insert Mode
Preserve Editing Session Tone
Screen Codes
Non-Breaking Spaces Wide Spaces (Springs) User Interface
Function Keys Reset Shortcuts WordPerfect User
Interface
WordStar User Interface Macros Utilities Menu Glossary Potpourri QuickCard
Creating Large
Documents
CaseConditional Page Break Document-Wide Menu Empty Page(s)
Headings Menu Appendix AppendixSection Chapter HeadingA HeadingB HeadingC HeadingD Paragraph Section Subsection
Insert (Unconditional) Page Break Other Format Page Breaks Page Numbers Paginate Style Menu Title Page Text References
Define Text Variable Index Index Under References Menu Endnote Footnote Tags
Basic Formatting
Auto-Indent Centering Text Formats (General Information)Group Together on Page Hard and Soft Returns Hyphenation Menu Indenting
J
ustifica tionKeep with Following Text Layout Menu Footer Header Page Breaks Ruler Line Spacing
Precise Settings Menu Title Page
Margins (General Information) Paragraphs (General
Information)
Tabs (General Information) Tab Stops
Typestyle Wordwrapping
Special Formats
Begin and End (Formats) Blank Space (Horizontal) Caption
Columns
Snaking Columns Conditional Page Break Description Dimensions Figure Font Font Size Large Lists Bulleted Multilevel Numbered Outline Other Format Place Repeat Character Reserve Space Table
TCapt and TCaption Title Page
Printing
Miscellaneous Concepts
Conditional Page Break Error Messages and
ASCII Files Clipboard Warning Messages
Graphics
Control Characters Deleting
Line Drawing Nonprinting Text
Formats Merge
Print Menu Mouse Commands
Status Line Variables Advanced Options
Current Printer Merge
Paginate
Remove Formatter Page Breaks
How the Encyclopedia Is Organized
All entries in this menu encyclopedia follow the same general format, sketched out as follows:
Command or Menu Name
Keystrokes This section lists the keystrokes required to enter a com-mand. Since there is often more than one way to enter a command, we list all methods in this section. You will see one or more of these entries here:
• A list of the menu options required to perform the command. (All menus listed in this reference guide are for the standard advanced user interface as defined in the file SPADV.UI.)
Function
How To
Tips
See Also
Command or Menu Name
A brief explanation of what the entry does, followed by a more detailed explanation of the entry. If the item listed is a menu, this section also lists the commands available from the menu and briefly explains the function of each command.
Examples and explanatory text about how to perform the command or function. Examples often include the printed results.
A catch-all that explains various other ways to use the command, technical notes, or things to consider when using this command to format your text. If the command is defined in STANDARD.FMT, this fact is mentioned here. (Any file defined in STANDARD.FMT is modifi-able by editing its definition in that file.)
A cross-reference to other entries in this chapter or in other chapters.
This chapter serves as a reference guide for all but the most advanced com-mands and provides specific information about Sprint functions, menus, and concepts. If you need more background information, such as how to move the cursor
Or
how to choose a command from the menus, refer to the Sprint User's Guide.The "Menu Encyclopedia" is arranged alphabetically. To save space, the explanations of many entries have been grouped. Every menu command has an alphabetical entry, however, which either goes into detail about the command or refers you to the entry that does.
Advanced Options
Keystrokes
Function
Alt-P (or FlO, Print), Advanced Options
Displays a menu of "special-case" print options.
The Advanced Options menu displays the following list of options:
Number of Passes
This command tells the formatter how many "passes" through your document it should complete before printing your document. The default value is Auto, which means the formatter tries to correctly judge how many passes to make before printing. (For example, if it detects a tag in your file, it will automatically make rn;o passes instead of one.) The formatter performs the folloWing functions during each pass:
1 Pass The formatter prints the file while looking for errors. If it finds any errors, it stops printing. Cross-references (tags) are printed with three question marks (???) when printing with 1 Pass.
2 Passes The formatter formats the text of your pages, looking for errors and recording the values of all tags for later substitution. If it finds no errors, it prints the document.
3 Passes The formatter takes a third "cleanup" pass to make sure all cross-references are right and that no filled-in cross-references caused page breaks to change.
Formatted Print
This command determines whether Sprint interprets your formatting commands before printing it. If
Formatted Print is Yes (the default), the formatter interprets your formatting commands before printing. If
How To
Tips
See Also
All Pages
Advanced Options
this command when printing program listings, for example.
Wordwrap ASCII Files
When this option is set to Yes, and you print an ASCII file, the formatter ignores single hard returns and for-mats the text using the default margin settings. Two hard returns in a row define a paragraph ending. The default setting is No, which means that lines in ASCII files end wherever the formatter sees a hard return character. Use this command only when you want to print an ASCII file that you want formatted.
Log Errors to File
When this option is set to Yes, and you format a file with formatting errors, the formatter writes all error messages to a file on disk. The formatter gives this file the same name as the file being formatted but adds a .LOG extension to distinguish between the two files. The default setting is No, which means the formatter displays error messages onscreen but does not write them to a file during formatting.
For detailed information on printing and a list of all Sprint print options, refer to the "Printing" chapter in the User's Guide. (Typing SPFMT at the DOS command line also gives you a list of print options.)
To select one of these advanced options, choose Advanced Options from the Print menu.
Note to two-floppy system users: Sprint may have to prompt you to insert the correct Program Disk into Drive A in order to print a file.
You can print the resulting log file, but you must first choose Print/Advanced Options and toggle Formatted Print to No. Then choose Go from the Print menu.
ASCII Files, Error Messages and Warning Messages
Also See
Also See
Refer to the Index entry for details.
Appendix
Keystrokes
Function
How To
See Also
Alt-S (or FtO, Style), Headings, Appendix
Starts an appendix and makes an entry for it in the table of contents.
The Appendix command begins an appendix on a new, odd-numbered page (inserting a blank page if neces-sary) and prints a large, centered, boldfaced, lettered appendix heading. This heading is preceded by six blank lines and followed by three blank lines. Sprint also enters this heading into the table of contents.
Appendix is similar to Chapter, except that the boiler-plate text is Appendix, and the "numbering" system is letters (starting with A). Chapter produces numbered chapters (beginning with 1).
You will find this command defined in the Sprint file STANDARD.FMT.
You can choose the Appendix command and then type the text of the appendix heading, or type the appendix heading, select it, and then choose Appendix from the Headings menu.
If you choose Appendix before typing your text, Sprint prompts you to enter the title. In either case, Sprint displays the appendix title as highlighted text and inserts the command word APPENDIX. For example,
APPENDIX Further Reading
AppendixSection
AppendixSection
Keystrokes
Function
How To
Tips
See Also
Alt-S (or F10, Style), Headings, AppendixSection
Numbers and prints the title of a section within an appendix and enters the title in the table of contents.
AppendixSection prints the specified title of a section within an appendix, numbers the section, and creates an entry in the table of contents. The appearance of the title is similar to the one produced by Section, but AppendixSection numbers are preceded by the letter of the appendix, such as A.1 and A.2.
You will find this command defined in the Sprint file STANDARD.FMT.
Choose the AppendixSection command from the Headings menu and type the section title. You can also type the section title, select it, and then choose AppendixSection from the Headings menu. Sprint highlights the command and title onscreen.
There isn't a variable named
AppendixSection.
Instead, Sprint reuses the variableSection
to number appendix sections.Appendix, Section
AppendixTitle (Variable)
Refer to the Variables entry for details.
Appendix (Variable)
Arrange-Sort
Arrange-Sort
Keystrokes
Function
How To
Tips
See Also
Alt-U (or F10, Utilities), Arrange-Sort
Lets you sort a selected block of text in alphabetical order.
Select the text you want sorted, then choose this com-mand. Sprint prompts for you to choose Ascending (A to Z) or Descending (Z to A) order. Sprint redisplays your text in the new order.
When sorting paragraphs of text, Sprint treats each paragraph as if it were one (long) line and sorts them by their initial characters.
Note that the order used is actually according to ASCII numbers (see Appendix B). This means that uppercase letters precede lowercase ones, and some symbols (like % and &) come before numbers, while other (like> and
=) come after them. Because of these anomalies inherent
in an ASCII sort, you may have to fine-tune the order by hand.
Note to two-floppy system users: Sprint may have to
prompt you to insert the correct Program Disk into Drive A in order to sort files with Arrange-Sort.
You can sort one column of a table independently from the others by selecting the column of text using the Column Mode from the Block Select menu. Then press
F3 and choose Arrange-Sort as usual.
Remember, you must select all the text that you want sorted. If you want a column of words in alphabetical order, you must select all the words, not just their first characters.
Block Select Menu
Ascending Order
ASCII File Handling
ASCII File Handling
Refer to the ASCII Files entry for details.
ASCII Files (General Information)
Keystrokes
Function
AIt-F (or F10, File), Translate, Import, ASCII File
A/t-F (or F10, File), Translate, Export, ASCII File
A/t-P (or F10, Print), Advanced Options, Wordwrap ASCII Files
A/t-C (or F10, Customize), ASCII File Handling
Commands for creating, editing, and importing and exporting ASCII files.
Import! ASCII File
Reads an ASCII file on disk, converts it to Sprint format, and displays the converted file on screen.
Export/ASCII File
Writes a Sprint file to a file in pure ASCII format. The new file has the same name as the original but has the extension .ASC added to it.
Wordwrap ASCII Files
Sets a wrap margin in an ASCII file (one without a ruler line).
ASCII File Handling
Displays the following menu to let you make settings for your ASCII files:
Tab Expansion Lets you set the number of characters to move the cursor for each press of the Tab key. Default setting is 5.
Auto-Indent If set to On, Sprint automatically indents however many spaces and tabs the preceding line is indented whenever you press Enter. Default is
Off.
ASCII Files (General Information)
is 65). When set to 0, this onscreen wordwrap is turned off.
If you've formatted a paragraph with the Wrap Long Lines command and later edit the paragraphs so that the wordwrap is no longer accurate, you can "refresh" the screen appearance by pressing etr/-B. Sprint reformats the text.
Pure ASCII files are text files that contain universally understood ASCII characters only; that is, files that contain standard printing characters and these control codes:
1\ I ASCII tab character
I\J
Line feed (hard return) 1\ L Form feed1\ M Carriage return
These control codes are universally understood by virtually every computer. This is the advantage of pure ASCII.
ASCII files are typically used for program files, files you want to be read or edited with another word processor, or files you prepare for electronic mail applications. Under "normal" circumstances, you don't create pure ASCII files when you use Sprint. Sprint's ruler line, menu options, and commands insert nonstandard control codes in your file (see Table 1.1 on page 46 for a complete list). As long as you have these control codes in your file, you don't have a pure ASCII file.
Nonetheless, it's important to understand that Sprint files are still considered ASCII (albeit nonpure) because its files are composed of ASCII characters from
°
to 128. Any word processor or editor can open and read a Sprint file without translation. The only confusion will be when that word processor tries to interpret Sprint's use of certain control codes (for example, the "K that makes up a Sprint ruler).How To
ASCII Files (General Information)
There are three ways to create a pure ASCII file using Sprint:
1. You can create and edit your file normally, using Sprint rulers and menus, and then choose the Export command from the File/Translate menu. Sprint automatically creates an ASCII version of your file in which it strips all control codes (except those listed in the previous "Function" section), replacing all soft newline characters with hard return characters (I\J). 2. You can delete the ruler line in your Sprint file and
press Enter whenever you want to start a new line. Avoid using menu commands that insert control characters (you should use @-sign commands instead).
3. You can delete the ruler line in your Sprint file, choose Wrap Long Lines from the Customize/ASCII File Handling menu, and specify the column at which you want Sprint to wrap your text. When your line extends beyond the column number you specified, the editor automatically inserts a hard return character (1\ J), and begins the next line of text. This is similar to having a ruler line in your file and entering a right bracket (]) on it to specify the right indent. The difference is that Wrap Long Lines inserts a hard return, while the right indent on the ruler inserts a soft return (1\ _) at the end of each line (unless you press Enter).
Note to two-floppy system users: Sprint may have to prompt you to insert the correct Program Disk into Drive A in order to use this command.
When creating pure ASCII files, use either formatter tabs (press the Tab key) or the Tab Expansion command on the Customize/ASCII File Handling menu to produce columns of text. Do not use editor tabs (that is, those set on the ruler line or with the Precise Settings commands on the Layout/Ruler menu), since these tabs require a ruler line in your file.
ASCII Files (General Information)
Tips
See Also
mail. If you don't want to manually enter hard returns, set tne Wrap Long Lines command. Then you can create short, easy-to-view lines and have Sprint wrap the lines automatically, without inserting a ruler line. Your file remains a pure ASCII file.
Before printing an ASCII file, remember to choose Wordwrap ASCII Files on the Print/Advanced Options menu.
If you want to create a pure ASCII file, and also want to take advantage of Sprint's formatting capabilities, use the @-sign method of entering formatting commands. @-sign commands don't insert control codes in your file; they are comprised of ASCII characters only and have no effect on your text until you print or preview your file.
Auto-Indent, File Menu, Hard and Soft Returns, Translate, and Chapter 3
Assign to Key
Refer to the Glossary entry for details.
Asterisks
Refer to the Bulleted Lists entry for details.
Auto-Indent
Keystrokes
Function
AIt-C (or F10, Customize), ASCII File Handling, Auto-Indent
Causes the first-line indent of the next line to match that of the preceding line.
combi-How To
See Also
AutoSpel1
Keystrokes
Function
Auto-Indent
nation of tabs and spaces to move the cursor to match the line above the current line.
Set Auto-Indent to On from the ASCII File Handling menu. Once you've selected Auto-Indent (On), you can begin typing at the desired column. Whenever you press
Enter, the cursor automatically moves to the column at which you began the preceding line. When you want to change the indent value manually, move the cursor forward or backward to the desired column. Thereafter, whenever you press Enter, lines will match this new indent value.
Note to two-floppy system users: Sprint may have to prompt you to insert the correct Program Disk into Drive A in order to use this command.
ASCII Files, Indenting, Tabs
Alt-U (or F10, Utilities), Spelling, AutoSpell
Shift-F1, AutoSpell
Toggles the automatic spelling checker on and off.
When this command is set to On, Sprint loads the spelling program if necessary, and then automatically checks each typed word against the words listed in its dictionary. If you type a word that's either misspelled or not in Sprint's dictionary, you'll hear a short warning beep. (If you don't like AutoSpell's warning tone, you can change the beep with the Customize/Options/Tone command.) You can correct the word immediately by backspacing and retyping or wait until later.
AutoSpell
How To
Tips
See Also
Choose AutoSpell from the Utilities/Spelling menu. This command is a toggle, so, if it was set to Off, choosing the command changes it to On. If AutoSpell is already on, choose AutoSpell to turn it off.
AutoSpell checks words when you press the Spacebar or
Enter, which in normal typing indicates the end of a word. When you're editing and retype a word, but don't press the Spacebar or Enter, AutoSpell won't check your word.
If you're typing text or program code that contains technical words or terms not usually found in a dictionary, it's probably a good idea to turn off Sprint's spell-checking facility.
Warning: Don't use AutoSpell if you're not using a hard disk. (You won't have enough disk space with most floppy disks.)
Customize Menu, Spelling Menu, Thesaurus, Tone
Background Save Period
Keystrokes
Function
How To
AIt-C (or F10, Customize), Options, Background Save Period
Determines how often Sprint updates the contents of its backup file on disk.
The default setting is 3 seconds, which means whenever you stop typing for 3 seconds (or more), Sprint updates the contents of its swap file on disk. This activity is called swapping and is a great crash-recovery tool.
Even if you seldom explicitly choose Save from the File menu, Sprint tirelessly saves your entire work session (including as many files as you have open) to the special swap file. This saving is done in the background, virtually invisible to you.
Choosing this command displays the following prompt:
Background save period (in seconds): 3
Tips
See Also
Bar
Background Save Period
before Sprint updates the swap file. For example, enter
10 to tell Sprint to wait until you stop typing for 10 seconds before updating the swap file. Valid delay values are from 1 to 60 seconds; entering 0 prevents all swap file updates.
Note to two-floppy system users: Sprint may have to prompt you to insert the correct Program Disk into Drive A in order to use this command.
Backing up your files can briefly interrupt the screen display, so it might seem that Sprint takes a little extra time to display the keystrokes you enter. To avoid this, delay the backup period by increasing the Background Save Period value. Remember, though, the smaller the delay period, the better protection you have against crashes!
Remember also, if you enter the value of 0, you will have no backup file to rely on if your system crashes.
Open (File), Options Menu, Preserve Editing Session, Save
Refer to the Graphics entry for details.
Begin (Format)
Refer to the Begin and End (Formats) entry in Chapter 2 for details.
Blank Page(s)
Keystrokes
Function
Alt-L (or F10, Layout), Page Breaks, Blank Page(s)
Creates one or more blank pages after printing the current page.
Blank Page(s)
How To
Tips
See Also
two blank pages in succession; BlankPage 1 (default) inserts a single blank page). This command does not cause the current page to end immediately; the for-matter creates the blank page(s) after it fills the current page. (If you want the formatter to insert the blank pages immediately, you can follow the command with a Page Breaks/Insert (Unconditional) command.)
Choose Blank Page(s) from the Layout/Page Breaks . menu. Sprint displays the prompt:
Number of blank pages to insert: 1
After you type in the number of blank pages you need and press Enter, Sprint inserts the command BlankPage
n, where n is the number you entered at the prompt.
This command is useful when you want to leave room for full-page figures, diagrams, or tables. Since the blank pages contain page numbers, headers, and footers, your document looks more polished than if you paste-up figures on a totally blank sheet of paper and inserted these. You can, however, insert blank pages if necessary.
If you want completely blank pages (no page numbers, headers, or footers), use the Blank Page(s) command and physically insert the blank piece(s) of paper after printing your document, replacing the blank page(s) supplied by Sprint.
Page Breaks
Blank Space (Horizontal)
Keystrokes
Function
A/t-/ (or F10, Insert), Non-Breaking Space
etr/-Spacebar
A/t-/ (or F10, Insert), Wide Space (Spring)
The first two commands insert a single, non-breaking, fixed-width blank space.
See Also
Blank Space (Horizontal)
your printer can't print, or you can use others to help format non-breaking text or columns in a table. For a complete description of a particular command, refer to its entry in this menu encyclopedia.
The Non-Breaking Space command tells Sprint to insert a single blank space at the current cursor position and keep the words on either side of the command together on a line.
Wide Space (Spring) inserts enough blank space to align text at the right margin or next tab stop.
Non-Breaking Space, Wide Space, and Chapter 2 (Hsp, Tab)
Blank Space (Vertical)
Refer to the Reserve Space entry for details.
Block (Hyphenate)
Refer to the Hyphenation Menu entry for details.
Block (Spelling)
Refer to the Spelling Menu entry for details.
Block Select Menu
Keystrokes
Function
Alt-E (or F10, Edit), Block Select
F3 (toggles selection mode)
Ctrl-KB, then Ctrl-KK (begins and ends block selection)
Ctrl-KK (displays End Region menu)
Displays a menu of commands for selecting a block.
Block Select Menu
it to a different place in your file, make a copy of it elsewhere, write it to a new or existing file, or change the typeface or format of all text within the block. When you select text, the word "Sel" appears in the status line.
Selecting a block means identifying an area of text (anything from a single character to an entire file) so that you can easily change the appearance or location of the text. Rather than retype three paragraphs of boilerplate text, for example, you can select these paragraphs as a block, and then copy the block to the desired location. If
you decide that a paragraph would look better if it appeared in italic rather than plain text, you can mark the block and then choose the Italic typestyle command.
When you choose the Block Select menu, Sprint lists a variety of options for you to use:
Word
Selects the word the cursor is on or immediately after.
Line
Selects the line the cursor is on.
Sentence
Selects the entire sentence the cursor is on. Sprint looks for a normal sentence terminator (like a period or question mark) followed by a space or hard return in order to determine a sentence.
Paragraph
Selects the entire paragraph the cursor is on. Sprint looks for a hard return in determining where a paragraph starts and stops.
Reselect Block Alt-8
Instantly marks the block of text that was last selected.
Turn Select Mode F3
Toggles selection mode. As you type or use the arrow keys, text will be selected. When you've ended the selection, you can choose any command that affects a block of text. The shortcut for this command is F3.
Column Mode Ctrl-KN
Tips
See Also
Block Select Menu
"Col" appears in the status line. Use the cursor keys to highlight the column of text.
If you are used to WordStar-like commands, use the shortcuts Ctrl-KB and Ctrl-KK to select text, and Ctrl-KH to "hide" it.
The End Region menu appears when you choose Ctrl-KK
and affects your selected block in one of three ways: Copy, Move-Cut, or Cancel Selection. Choosing X unmarks your selected block.
If you're using a mouse, the left button toggles text selecting (same as F3), and double-clicking the left button selects the word the cursor is in.
Before you start using these Block commands, you should be familiar with the concept of Sprint's Clipboard.
The Clipboard is an in-memory "holding tank" for text that you mark and then move, delete, or copy. For instance, when you mark a block and enter the Move-Cut command, Sprint removes the block from the screen and places it on the Clipboard. Once you move the cursor to where you want this text to appear, you choose the Insert-Paste command, which copies the Clipboard text to the current cursor position.
A block remains on the Clipboard until you replace it with new text. This means you can paste numerous copies of the Clipboard text, but once you enter a com-mand that puts new text on the Clipboard (like Move-Cut or Copy), you overwrite what's currently there. Therefore, it's important to immediately paste text that you moved or copied to the Clipboard.
When you're selecting text, you can press any key to have the selection automatically extended to the next occurrence of that character. This means, for example, you can press Spacebar to ad vance the selection one word at a time (that is, the selection jumps to the next space character every time you press Spacebar).
Bold
Bold
Refer to the Typestyle Menu entry for details.
Bottom Margin
Refer to the Document-Wide Menu entry for details.
Bottom Status Line
Refer to the Screen entry for details.
Bulleted Lists
Keystrokes
Function
Alt-S (F10, Style), Lists, Asterisks
Alt-S (F10, Style), Lists, Bullets
Alt-S (F10, Style), Lists, Hyphens
Places a "bullet" character before each new paragraph in
an unnumbered list. The shape of these bullets depends on which list command you choose, what kind of printer you're using, and how many levels of "nesting" there are. On non-PostScript printers, for example, an Asterisk list item is preceded by a regular asterisk (*); a Bullets list has lowercase o's (0); and a Hyphens list has regular hyphens (-). Second-level (nested) lists shift the symbol (Asterisks has o's, Bullets has hyphens, and Hyphens has asterisks).
On PostScript printers, however, the "bullet" characters are a bit fancier. In this case, Asterisks uses a diamond character (.) and Bullets uses a filled in 0 (.). Hyphens still uses a hyphen on PostScript printers.
How To
Bulleted Lists
line before each item. Otherwise, Sprint considers the next paragraph to be part of the preceding item.
If you want a list with hyphens, choose Lists from the Style menu and then choose Hyphens. Sprint automatically inserts the Begin and End commands if
your text was selected before you chose the command. Otherwise, Sprint displays the prompt:
Press (B) for Begin command, (E) for End command, or ESC to cancel:
Type the text of the list, making sure there's a blank line between each paragraph, and choose the command to end the format (type E). Sprint needs the blank lines to determine where one paragraph ends and the other begins. For example,
BEGIN HYPHENS 1/2 cup milk
3/4 cup cocoa powder
1/2 cup butter
1/2 cup sugar
TabBlend
these four ingredients together until creamy.1 egg, beaten
1/2 tsp. vanilla
TabAdd
these two ingredients to the mixture, and stir well. Place the batter in a greased oblong pan and bake until done.END HYPHENS
Bulleted Lists
Tips
The printed result looks like this:
-1/2 cup milk
- 3/4 cup cocoa powder
- 1/2 cup butter
-1/2 cup sugar
Blend these four ingredients together until creamy.
-1 egg, beaten
-1/2 tsp. vanilla
Add these two ingredients to the mixture, and stir well. Place the batter in a greased oblong pan and bake until done.
If you don't want blank lines in the printout, modify the bulleted list format and add the parameter Spread O. For example,
BEGIN HYPHENS Spread 0
Follow these same steps for the Bullets and Asterisks commands. The same list using bullets (with the Spread 0 parameter) prints out like this:
-1/2 cup milk
- 3/4 cup cocoa powder - 1/2 cup butter
-1/2 cup sugar
Blend these four ingredients together until creamy.
- 1 egg, beaten - 1/2 tsp. vanilla
Add these two ingredients to the mixture, and stir well. Place the batter in a greased oblong pan and bake until done.
You can nest these formats (insert a format within another format); the next two levels use the other two symbols, and then the cycle starts over. You can nest these commands to any depth, so long as there is room between the indents.
See Also
Bullets
Bulleted Lists
an Apple LaserWriter Plus (or any PostScript printer with the Dingbats font) and want to achieve the same effect, open a copy of POSTSCR.TCT, go to the last line and replace
@symbol(@char(168))
with
@dingbat(@char(110))
Description, Lists, Multilevel, Numbered
Refer to the Bulleted Lists entry for details.
Canceling
Keystrokes
Function
AIt-F (or F10, File), Revert to Saved
Esc
Shift-Esc
Ctr/-U
Ctr/-C (for SprintMerge and formatting only)
Aborts, cancels, or stops Sprint's current activity or menu display.
Use the Revert to Saved command to cancel (discard) all changes you've made to a file since the last time you explicitly chose a save command.
Use Esc to remove the last-displayed menu or to cancel a prompt on the status line.
Use Shift-Esc or Ctr/-U to remove all displayed menus in one fell swoop.
Canceling
See Also
Caption
Keystrokes
Function
How To
Ctrl-C cancels the current operation in the SprintMerge program and also aborts a formatting pass, prior to printing a document.
Deleting, Merge
Alt-S (or F10, Style), Figure
Numbers and creates a caption (title) for the current figure.
This command works in conjunction with the Figure command. In fact, when you choose Figure from the Style menu, Sprint prompts you for the caption text.
When the formatter finds a Caption command in your file, it determines the current value of Figure and then automatically centers and prints the word Figure in a small font, followed by the correct figure number and its caption.
You will find this command defined in the Sprint file STANDARD.FMT.
Choose the Figure command from the Style menu. At the Caption: prompt, type in your figure caption (title) and press Enter. Sprint displays the following onscreen:
BEGIN FIGURE
CAPTION Block Diagram END FIGURE
If you're going to paste-in the figure, you'll need to add the formatter command, Reserve dimension after the Begin Figure command; choose Layout/Page Breaks/ Reserve Space. If you're going to type in the figure, the text goes here instead. Your caption prints after the figure drawing.
Tips
See Also
BEGIN FIGURE
CAPTION Block Diagram RESERVE 180 points
END FIGURE
Caption
In this case, Sprint prints the figure caption before the figure drawing.
If you want a caption with your figure but don't want it in the List of Figures, you should use the FCapt command. Choose Style/Other Format and enter FCapt, followed by the caption text. When prompted, press C to tell Sprint that this command does not affect a region of text.
If your file is set up so that your page numbers include a chapter or section number (for example, page 3-3, 4-1, and so on), you can specify that your figure numbers also follow this format (Figure 1-1, Figure 1-2, Figure 2-1, and so on). See the Parent entry in Appendix C (UStyle Sheet Commands") of the Advanced User's Guide
for details.
You can use the Define a Tag command after the Caption command to cross-reference the figure in text. The Define a Tag command must follow the Caption command and equal figure, or Sprint won't print the correct figure number in your text.
Note that the Style/Table command also prompts for a caption but inserts a TCaption command onscreen instead of the Caption command.
Figure, Page Numbers, Reserve Space, Tags, TCapt and TCaption
Case Sensitive
Refer to the Searching entry for details.
Centering Text
Centering Text
Function
How To
Alt-L (or F10, Layout), Ruler, Edit on Screen, and type c (or just press Alt-A or Alt-R and type c)
Alt-L (orF10, Layout), Title Page
Alt-I (or F10, Insert), Wide Space (Spring)
Alt-U (or F10, Utilties), Potpourri, CenterTab
Ctrl-DC (centers line)
Centers text.
If no text is selected, the Center command (or Ctrl-DC)
centers the line of text the cursor is on between the left and right margins by putting wide spaces (/\ F characters) at each end. If a block is selected, Sprint surrounds the block with the onscreen commands BEGIN CENTER and END CENTER. This command centers each line of text both onscreen and when you print.
C, when typed on a ruler, centers all text governed by this ruler.
The Title Page command centers all the text on a page
vertically around the specified point (the default is .5 pages). Page headers and footers are not centered; they print as they normally would within the top and bottom margins of the page.
This command is useful for such things as positioning titles on the first page of a document. The Title Page entry in this menu encyclopedia explains this command in greater detail.
You use the Wide Space command to center text between margins by inserting wide spaces at each end.
You can use the Potpourri/CenterTab command to center text between two tab stops.
Choose Style/ Center Line (or Ctrl-DC) wherever you have one line of text to be centered.
Tips
See Also
Center
Centering Text
Don't try to center a line in the middle of a word-wrapped paragraph. The center commands work best when the line to be centered ends with a hard return.
Justification, Ruler, Wide Space
Refer to the Centering Text entry for details.
Change Directory
Refer to the File Manager Menu entry for details.
Chapter
Keystrokes
Function
How To
Alt-S (or F10, Style), Headings, Chapter
Starts a numbered chapter on a new page, and enters the title in the table of contents.
This command specifies the beginning of a new chapter. Sprint automatically begins a new page on an odd-numbered page (adding a blank page if necessary), leaves six blank lines at the top, and p~ts a large, bold, centered, and numbered heading for the chapter. It also makes an entry for the chapter in the table of contents. Chapter entries in the table of contents are double-spaced.
You will find this command defined in the Sprint file STANDARD.FMT.
If you haven't yet typed the chapter title, choose Chapter from the Style/Headings menu. At the prompt, type the title of your chapter, and press Enter.
Chapter
CHAPTER Executive Summary
See Also Appendix, Headings Menu, HeadingB, Section
Chapter (Variable)
Refer to the Variables entry for details.
ChapterTitle (Variable)
Refer to the Variables entry for details.
Character Size
Refer to the Font Size and Typestyle Menu entries for details.
Clipboard
Keystrokes Alt-E (or F10, Edit), Undelete (returns the contents of the Clipboard to where it was cut from)
Alt-E (or F10, Edit), Copy (copies the selected text to the Clipboard)
Alt-E (or F10, Edit), Move-Cut (removes the selected text and places it in th