MONARCH
MP/M · 86
.
411149 Rev .. B
MONARCH
MP/M--86
All rights reserved. No p:lrt of this pd:>lication may be reproduced, recorded or stored in a retrieval system, or transmitted, in any form or by any means, whether electronic, mechanical, photographic, or otherwise, without prior wr itten permission of Dynabyte.
Copyright
@
1983 by Dynabyte.All specifications are subject to changewitbout notice. Dynabyte does not assume any liability arising out of the application or use of any product described herein; neither does it corwey any license under its p:ltent rights nor the rights of others.
Dynabyte
521 Cottonwood Drive Milpitas, CA .95035
K>NARQi
MP,tM-86
UBm'S GOIDE
P!N
411149Rev. B
TABLE OF CDNTEN1'S
• • • • • • • • • . • • • • • • • • • • • • • • • • • . . • i
Monarch MP,tM-86 Features . • • • • • • • • • • • • • • • • • • • • • i Scope of this Manual • • • • • • • • •
•
• • • • • • • • • • • • • iiDocumentation Conventions • • • • • • • • • • • • • • • • • • • • • iii
Section 1
GE'l-l:DG smR'.l'ED
wrm
MP,tM-86 • • • • • ••
• • • • • • • • • • • • • • • 1-1 Getting Started from Diskettes. • • • • • •Getting Started from Cartridge Tape • • • • • • • • • • • • • • • • •
• 1-1
• • • • • • • • • • 1-15
Section 2
FORMAT • • • • • • • • • • • • • • • • • • • • • • • • • • • • • • • • • 2-1
OVerview. • • • • • • • • • • • • • • • • • • • • • • • • • • • • Logical versus Physical Drives. •
·
• • • • • • • • • • • • • FORt-tAT'S Relationship to DYNASYS. • • • • • • • • • • • • • • Comp:ltibi1ity Between ~rating Systens • • • • • • • • • • • System Warm-up. • • • • • • • • • • • • • • • • • • • • • • • Reformatting. • • • • • • • • • • • • • • • • • • • • • • • • Diskettes • • • ' • • • • • • • • • • • • • • • • • • • • • • • • •J)escr iption • • • • • • • • • • • • • • • • • • • • • • Formatting Diskettes. • • • • • • • • • • • • • • • • •
Menu Prompt ro~T
• • • • • • • • • • • • • • • • • • •
Side, Selection • • • • • • • • • • • • • • • • • •
• • •
·
.
.•
• • • • • •
I)eruaity • • • • • • • • • • • • • • • • • • • • • • • • • Directory Entries • • • • • • • • • • • • • • • • • • •
Ra.pid FORJIAT. '. • • • • • • • • • • • • • • • • • • • • • • • Standard Options FOmAT • • • • • • • • • • • • • • • • • • • AOOrting FOR!AT • • • • • • • • • • • • • • • • • • • • • • •
Transferring Data Between Carputers • • • • • • • • • • • • • Winchester Hard Disks. • • • • • • • • • • • • • • • • • • • • • •
Oescr iption • • • • • • • • • • • • • • • • • • • • • • • • • Formatting Winchester Hard Disks. • • • • • • • • • • • • • • Configuring the Winchester Bard Disk. • • • • • • • • • • • •
[image:4.626.54.550.62.761.2]Reformatting. Logical Winchester Drives. • • • • • • • • • • • 2-15 '!'he Drive Check Option • • • • • • • • •• • • • • • • • • • • • • 2-16
Section 3
DYNASTAT and D!NASYS • • • • • • • • • • • • • • • • • • • • • • • • • • 3-1
DYNASTAT • • • • • • • • • • • • • • • • • • • • • • • • • • • • • 3-1 Console Assignments • • • • • • • • • • • • • • • • • • • • • 3-3 Console Mask • • • • • • • • • ,. • • • • • • • • • • • • • • • 3-3 Printer Assignments •• • • • • • • • • • • • • • • • • • • • 3-4 Disk Drive Assignments • • • • • • • • • • • • • • • • • • • • 3-5 Memory Disk • • • • • • • • • • • • • • • • • • • • • • • • • 3-5
Port Setup Parameter Values • • • • • • • • • • • • • • • • • 3-5
Memory Disk • • • • • • • • • • • • • • • • • • • • • • • • • • • • 3-7
DYNASYS Overview. • • • • • • • • • • • • • • • • • • • • • • • • • 3-9
DYNASYS
. .
..
.
• • • • • • • • • • • • • • • • • • • • • • • • • • 3-12EZ Option: Fasy Configuration • • • • • • • • • • • • • • • • 3-13
AL Option: Assign / Setup All Parameters • • • • • • • • • • 3-13 CA Option: Character I/O Assignments • • • • • • • • • • • • 3-14
AS Option: Asynchronous Port setup • • • • • • • • • • • • • 3-18
SS Option: Synchronous Port Setup • • • • • • • • • • • • • • 3-19
~ Option: ,Disk Drive Assignments • • • • • • • • • • • • • • 3-22 Floppy Disk Drives • • • • • • • • • • • • • • • • • • • 3-24 Winchester Hard Disk Drives • • • • • • • • • • • • • • • 3-24
Memory Disk • • • • • • • • • • • • • • • • • • • • • • • 3-25 OS Option: Disk Drive Setup • • • • • • • • • • • • • • • • • 3-25 DC Option: Display CUrrent Configuration • • • • • • • • • • 3-25 LS Option: Load / Save Parameter File • • • • • • • • • • • • 3-27
'!be Load (LP) Option • • • • • • • • • • • • • • • • • • 3-27
The Save
(SP) Option • • • • • • • • • • • • • • • • • • 3-28 '!'he Clear (CP) Option • • • • • • • • • • • • • • • • 3-28 CD Option: Create System Disk • • • • • • • • • • • • • • • • 3-29 '!he Write (WR) Option • • • • • • • • • • • • • • • • • • 3-29 Gmsys •• • • • • • • • • • • • • • • • • • • • • • • • 3-30Section
4
FILESAVE and BACI«JP. • • • • • • • • • • • • •
•
• • • • • • • • • • • • 4-1FILESAVE • • • • • • • • • • • • • • • • • • • • • • • • • • • • • • 4-1
Section 5
'J::2\PE • • •
Using FILESAVE •
Restoring Files • • • • • • • • • • • • • • • • • • • • • • • • • • • • • • • • • •
• • • • • • 4-2 • • • • • • 4-4
• • • • • • • • • • • • • • • • • • • • • • • • • • • • • •
BACI«JP versus PIP • • • • • • • • • • • • • • • • • • • • • • 4-6 Inv'okirlg BACI«JP • • • • • • • • • • • • • • • • • • • • • • • 4-7 Copying from Hard Disk to a Diskette Set • • • • • • • • • • •
4-7
Choosing Track or File Mode • • • • • • • • • • • • • • • 4-8 FUe by FUe Copy • • • • • • • • • • • • • • • • • • • • 4-9Restor ing File by File, Diskette Set to Bard Disk • • • • 4-10 Track by Track Copy • • • • • • • • • • • • • • • • 4-11 Restoring Track by Track, Diskette Set to Hard Disk. 4-12 Copying Between Like Devices • • • • • • • • • • • • • • • • • 4-13 Diskette to Diskette Copy • • • • • • • • • • • • • • • • 4-13 Hard Disk to Bard Disk Copy • • • • • • • • • • • • • • • 4-14 Error Messages • • • • • • • • • • • • • • • • • • • • • • • • 4-15
• • • • • • • • • • • • • • • • • • • • • • • • • • • • • • • 5-1
Description • • • • • • • • • • • • • • • • • • • • • • • • • • • • 5-1
cartridge '!ape Media • • • • • • • • • • • • • • • • • • • • • 5-1 Testing the Cartridge Tape System • • • • • • • • • • • • • • 5-1 Invoking Tape • • • • • • • • • • • • • • • • • • • • • • • • 5-2
TAPE Options • • • • • • • • • • • • • • • • • • • • • • • • • • • 5-3
Save Set Featur e
· .
.
.
. .
. .
. . .
.
.
. .
.
.
. .
.
.
5-5Examples • • • • • • • • • • • • • • • • • • • • • • • • • • • • • 5-5
Executable Instruction File • • • • • • • • • • • • • • • • • • • • 5-10
Error Messages • • • • • • • • • • • • • • • • • • • • • • • • • • 5-12
~ Error Messages
Tape Abort Errors • • • • • • • • • • • • • •
• • • • • • • 5-12
• • • • • • • • • • • • • • • • • • • • • • 5-12
Preventive Maintenance • • • • • • • • • • • • • • • • • • • • • • 5-13
Technical Data • • • • • • • • • • • • • • • • • • • • • •
~E Record Format • • • • • • • Cartridge Drive D:ita Format •• OS-100, DZ-80B I/O Connections •
• • • • • • • • • • • • • • • • • • • • • •
• • • • • • • • • • •
• • • • 5-14
• • • • 5-14 • • • • 5-15
APPE:IDlCES
A. -B.
c.
D.
E.
F. G.t7I'II.~ .. ~ • • • • '. • • • • • • • • • • • • • • • •• • • • • • A-1
MP/M-86 COMMAND GUIDE • • • • • • • • • • • • • • • • • • • • • • • • B-1
I/o
~.LmES • • • • • • • • • • • • • • • • • • • • • • • • • C-1 OOTAI.J:,l}I; M IPIa PI01 • • • • • • • • • • • • • • • • • • • • • • • • D-1RECOMMENDED MEMORY PARTITIONS. • • • • • • • • • • • • • • • • • • • • E-1 HEXADECIMAL PARAGRAPH VALDES • • • • • • • • • • • • • • • • • • • • • F-1
Monarch
MfIM-86 tJser I s Guide IntroductionMonarch MP/M-86 is a multi-user, multi-tasking operating system that enhances the Digital Research MP/M-86. Monarch MP/M-86 allows up to 16 consoles and up
to 16 printers to be attached to a single Monarch computer. It also allows multi-tasking, permitting an individual operator to perform up to 16 separate tasks on the computer from a single console.
Dynabyte's enhanced version of MP/M-86 -is totally COInJ:8tible with the Digital Research MP/M-86. You may use every one of the Digital ReSearch facilities and features as outlined in the Digital Research MP/M-86 manuals. 'Ibis manual describes Dynabyte's enhanced MP/M-86 utilities that are identified by the
label I7JN.n (Dynabyte Version N.n). All Monarch MP/M-86 utilities run under Digital Research MP/M-86 V2.l.
Monarch MP/M-86 Features
Dynabyte has developed a nwnber of utilities that enhance your MP/M-86 oper-ating system. '!bese utilities allow you to format diskettes and Winchester hard disks, copy whole disks or individual files onto diskettes or
earn
idge tape, configure the operating system to your hardware, generate a new MP/M-86 system disk and display your system's current configuration.• DYNASYS utility
DYNASYS allows you to alter MP/M-86 system plrameters such as logical drive designations and printer and console baud rates. When you add I/O expansion boards to your Monarch computer, DYNASYS will configure your system to accommodate your new hardware.
• FORttAT Utility
FORMAT allows you to format diskettes and Winchester hard disks.
FORMAT supports single or double-sided diskettes. You may format diskettes in standard IBM single-density or Ck>uble-density for greater storage capacity.
• FILESAVE, BACKDPand TAPE Utilities
FILESAVE copies files from the Winchester hard disk to diskette and restor·es them back to the hard disk. FILESAVE can copy files that
exceed the size of a diskette.
BACKUP' copies data between diskettes and hard disks. BACKUP copies files of any size,and in all user areas of a disk. BACKUP can also copy system tracks.
TAPE performs several tape uni t functions. TAPE initializes the tape
unit, creates copies of data and command files from floppy or hard disk
Monarch ME/M-86 User' s Qlide Introduction
onto magnetic cartridge tape by drive name and restores data to the disks.
• Memory Disk
The· memory disk is a portion of memory that is configured as a disk. 'lbe menory disk temporarily· stores files for high speed access.
• Hardware Supp>rt
Monarch MP/M-86 supp>rts all of the features of the Mooarch computer. 'lbese include
IS
standard serial ports,8
optional serial ports, high speed RS-422 communications ports, floPF.{ disk drives, Winchester hard disk drives and 1/4" cartridge tape.Scope of this Manual
'Ihls manual provides a cookbook approach to installing Monarch MP/M-86 for the first time user and a detailed description of each Dynabyte utility. These utilities enhance rather than replace the MP/M-86 software. All Dynabyte utili ties are identified by the label DVN.n - Oynabyte Version N.n.
This Monarch MP/M-86 User's Guide supplements the Digital Research MP/M-86
User's Guides. Dynabyte's Monarch MP/M-86 utilities run under the Digital Research MP/M-86 V2.l.
'lheMonarcb MpJM-86 User's Guide is written for the user who is new to busi-ness microcomputer systems, and also for the advanced user who is already familiar with microcomputers but not well a~inted with Monarch MP/M-86.
You should also have a copy of the Monarch User's. Guide which describes how to install and operate your Mooarch computer. The Monarch User's Guide provides the necessary information for attaching consoles, printers, and cables to your computer. '!be Monarch Technical Manual will help you interpret any diagnostic messages that may appear when the computer is turned on.
I f you are new to microcomputers, we recommend that you read one of the many texts on basic computer concepts available at bookstores and computer stores.
A glossary of terms is also provided in an appendix of your Monarch User's Glide.
'!he Monarch MP/M-86 User's Guide is organized into the following sections:
section 1: Getting started With MP/M-86
This section will get you started with your new MP/M-86 operating system. It shows you how to format diskettes and hard disks, configure . your system, make a copy of the MP/M-86 Distr ibution Diskettes and
install MP/M-86 onto the Winchester hard disk from diskettes or cart-ridge tape •. Once installed onto the hard disk, you may boot MP/M-86
dl.rectly from the hard disk.
Monarch MPIM-86 User' s Guide Introduction
Section 2: PORMAT
'Ibis section details how to format diskettes and the Winchester hard disk. FORMAT allows you to configure your hard disk drive(s) into multiple logical drives.
section .3: nnmsTAT and onmsYS
Section 3 details the DYNASYS utility that customizes your MP/M-86
operating system. It includes instructions for assigning logical disk drives, assigning character I/O devices, defining port setup parameter values, generating a new system and writing your new system to disk. DYNASTAT, also descr Wed in this section. displays your current system ex>nfiguration.
Section 4: PILESAVE and BACImP
Section 4 discusses the FILEEAVE and BACImP utilities that copy data to
and from diskettes and hard disk drives.
Section 5: TAPE
~s section describes the Dynabyte TAPE utility, and contains instruc-tions for using cartridge tape media. It also provides detailed instructions for tr ansferrinq (or backing up) files from . the Winchester drive or diskettes to cartridge tape.
Appendix A summarizes the Dynaby1:e utilities that enhance MP/M-86.
Appendix B acquaints you with the most commonly used MP/M-86 commands
and provides examples of the! ruse.
Appendix C describes how MP/M-86 handles the I/O han&haking lines. Appendix D describes how to install an IPL PlO1.
Appendix E is a User's comment Form. We ask that you complete and return this form so that we can accommodate your infornation needs.
Documentation Conventions
'!be definitions and use of terms in this manual are consistent with those used throughout the microcomputer industry. We have also developed conventions to help you identify screen displays and user entries.
screen Displays
'!his manual contains many examples of console scr~ displays. '!hese displays are shown in bold type, for example:
Monarch MP/M-86 USer' s QIide
User Entries
DYNASYS Version N.n -For Monarch MP/l4-86 DVN.n MPjM-86V2.1System RegenerationUtillty
Pressing the RE'ItJRN key is represented as
<CR>_
Pressing· the ESCape key is represented as<f.CiC> ..Introduction
Entries you make at your console keyboard are in boldface and underlined. For example, a typical screen display with your keyboard entry would appear as:
In the above display, the Monarch MP/M-86 version ntnnber is displayed first and then the MP/l+-86 system level prompt 8A>. When you receive the system prompt, you may may enter a command to the systen. In the example above, the user has entered the DIRectory command by typing DIR and then pressing a carriage return.
Monarch MP/M-86 User I s Glide
1. GEtJ.-rnri STARmD
wrm
MP/M-86In most cases, your Monarch computer arrives without any software on the hard disk. We recommend that you transfer the operating system files from the Distribution Diskettes onto your Winchester hard disk.
Depending on whether· your distribution media is diskette or
tape,
follow the instructions in the appropriate section:To Install Fran Diskettes
cartridge tape
Follow Section 1.1 Section 1.2
1.1 Getting Started fran Distribution Diskettes ibis section will show you how to:
1) make backup copies of your Distribution Diskettes,
2) transfer your MP/M-86 software onto your Winchester hard disk, and
3) reconfigure your system to boot fran the hard disk.
'!he two Dynabyte MP/M-86 Distribution Diskettes contain the complete MP/M-86 operating system and utility files. You should always use your backup copies whenever you need to boot from a diskette. Put your original diskettes in a secure place for safekeeping.
When MP/M-86 is first booted from Distribution Diskette il, drive A is auto-matically assigned to the floppy drive, drives Band C are assigned to the Winchester hard disk and drive D is assigned to the memory disk. Drive E is aSSigned to the second floppy drive in case you have added one to your Monarch.
'!he Dynabyte utility .DYNASTAT displays your current system configuration. 'Ibis
is how the DYNASTAT canmand would display the original oonfiguration:
Disk Drive Assignment
A:=
FlB:= WINIl
c:= WINI2
D:=
MEMlE:= F2
To have quick and convenient access to the MP/M-86 operating system on the hard disk, you need to be able to boot tOe system directly from your hard disk. To 00 this, you must reassign drive A to the Winchester hard disk.
'!he steps described below will change the drive assignments so that you will
Monarch M121M-86 User's Guide Getting. started
be able to boot from the hard disk. When you are finished, your new drive assignments will look like this:
Disk Drive Assignment
A:= WINIl
B:= WINI2
c:= MEJU
D:= Fl
You may wish to reconfigure MP/M-86 later in some other manner. This procedure describes a standard first-time installation for a MOMrch computer wi th one 19MB Winchester hard disk.
Note: Although an assignment is made for the memory disk, you cannot use the memory disk until you allocate memory space to it. If you want to use the memory disk, read Section 3.2.
OVerview.
Section 1 covers the following steps:
1. Boot MP/M-86 from Distribution Diskette tl.
2. Fornat the Winchester hard disk.
3. Log onto the Winchester hard disk.
4. Copytbe MP/M-86 operating system and utility files onto the Winchester hard disk.
5. Forma t two diskette:;.
6. Copy the MP/M-86 operating system onto one of the fornatted diskettes.
7. Copy the MP/M-86 utility files from the Winchester onto the formatted diskettes.
8. Reconfigure your disk drives.
9. Install MP/M-86 onto the Winchester hard disk. 10. Reboot MP /M-86 fran the Winchester hard disk.
Monarch
MPIM-86
User's Guide Getting startedBefore you begin.
• Always wait at least 3ft) minutes after the computer has been turned on before formatting a diskette or the Winchester hard disk. If you format a disk while the computer is cold, you may find errors when you attempt to read the disk later.
• Be sure that you have read your Monarch USer's Guide and properly installed
your Morarch computer.
• You should have at least two blank diskettes on which to OOFl your Distri-bution Diskettes.
• Follow the steps below while you are at the ex>nsole.
It is very important that you do not alter the Distribution Diskettes. '!he steps in this section show you how to make a copy of the Distr ibution Diskettes. Use the copy for your work and store the originals in a safe place.
STEP 1 - Boot MP/M-86 fran Distribution Diskette II
1. Turn on the computer and the ex>nsole. '!he computer will run a series of diagnostics, and then prompt you for the boot medium:
Boot Menu:
F - Boot Flom'
T - Boot Tape
B - Boot Bard Disk
R - Repeat Diagnostics
2. Insert Distribution Diskette II in the floppy drive and turn the lever down. '!he label on the distribution diskette should face up and the long open slot should plint toward the computer.
3.
'!YPe
F to boot from the floppy drive.Your Selection? ~
4. ·You will see the MP/M-86 logon display and the operating system pranpt SA>. Your system is ready to accept commands.
OA>
Dynabyte Page 1-3
MonarQhMP/M-86. User I s . Guide Getting Started
STEP 2 -Fornat the Winchester hard disk
You should NOT perform this step if you have previouslv formatted your Winchester qrive using a Digital Research operating system. Skip to Step 3
"Copy the MP/M-86 files onto the Winchester hard disk."
You MUST format your Winchester if your Winchester has never been formatted or if you want to change the number of logical, drives that your Winchester has been configured for. Formatting erases all files. If you need to format a hard disk that already has files on it, be sure to make a backup copy of those files by copying them to a flO,PP.{ disk.
FORMAT formats and checks the hard disk for any bad sectors. This example shows you how to format a system with one 19MB Winchester hard disk. Refer to Section 2 ot this manual if you need to format 'other than one 19MB hard disk. For first time installation there should be no files on the hard disk.
1. At the system prompt (SA», type: SA>IDRMAT<CR>
2. The FORMAT menu will appear on the screen and you will be prompted for a selection.
'!YPe
FP to format the Winchester drive.Your selection ?
FP<CR>
3. You will be prompted for the number of physical drives to format. Enter format option or <RE'ltlRN> to exit option: 1<CR>
4. You will see the screen display below. Press <CR>. '!his option will mASE E.VERITHIR:; on the drive
that you have· just ·selected.
Press <RE'ltlRN> to start for:nat or <E5C><RE'ltlRN>
to
Exit:~5. Formatb.ng will take about 10 minutes. When completed, the screen will display a bad track table and flag all the bad sectors. The operating system automatically substitutes good tracks for any bad ones which may be flagged. To accept the operating system's substitu-tions, type
<CR>.
Enter One of the Above Options or<RE'ltlRN> to' Accept:~
6. You will then
see
the Winchester oonfigurationoptions· menu. Select Option S to configure a single physical drive.Enter configuration option or <RE'ltlRN> 'for main menu: S<CR>
Monarch MP/M-B6 User I s Guide
·7. Your next prompt will be for the number of logical drives on your systen. Since you want option B (2 drives), press <CR>:
Select option or <RE'lURN> for option B: ~
When the message below appears, press <CR>:
*****
Format Completed O.K.*****
Press <REmRN> For ~
You will then be returned to the Winchester Confiquration Options
menu.
8. Press~. You will return to the FOR-!AT menu.
9. Select the EX option and press
<m>
to return to the operating system pranpt.STEP 3 - Log onto the Winchester
You will now need to work from the system files located on the Winchester drive (drive B) ~ To log onto the Winchester drive, type:
9A>B:<CR>
'!he system prompt will now look like this:
BB>
STEP 4 - Copy the MP/M-86 files onto the Winchester hard disk
Distr ibution Diskette II should still be in the floppy disk drive. Use the
MP/M-86 PIP utility to copy the MP/M-86 files onto the Winchester.
1. 'J.Ype:
SS>PtpB::A:*.*[QVR1<CR>
The screen will display the files as they are being copied onto the hard disk.
2. Wai t until your console displays the system prompt 9A>.
3. Take Distribution Diskette II out of the floppy drive.
4. Insert Distribution Diskette 12 into the floppy drive and tyPe the
following command: .
9B>DSKRESm'<CR>
5. Copy the files from Distribution Diskette 12 onto the Winchester hard disk.
Monarch MfIM-86 USer' s Guide Getting started
9B>PIP B I =AI
* . *
[OVRl <CR>6. Wait until your console displays the system prompt 9B> and then remove Distribution Diskette 12 framthefloppydrive.
STEP S - Fornat two diskettes
Remember that formatting a disk erases everything that is already on it. So
be sure that the diskette you format doesn't have data that you need on it. Remember also that you can write on an a-inch diskette only if the write-protect notch is covered.
1. Make sure that your Distr ibution Diskette 12 is not in the floppy disk drive.
2. Insert a blank diskette into the floppy dr ive. Insert the diskette with its label face up. If the diskette has no label, insert it with the smooth unseamed side up. 'Ibis diskette must be in
the drive before you try to run the FORMAT utility.
3. ~:
9B>FORMAT A: SSl<CR>
where
A.is the floppy drive
S designates single-sided diskette Sdesignates single-density
1 designates 64 directory entries
Your system will confirm these values before prompting you to press the carriage return to start the actual fornatting of the diskette. 4. Press ~ to start the formatting. If FORMAT tells you that the
diskette is bad, verify that it is in the drive pro~rlyand that the floppy drive door is closed completely. Try to format again. If thisdoesn't work, try another .. diskette.
S. When the format operation is complete, your console will display the message below and the system pranpt will reappear.
*****
Formatoompleted O.K.*****
Remove the formatted diskette from the floppy disk drive and insert the other blank diskette. ReP=1t the above steps to format the second diskette.
When you have formatted the seool'xl diskette, leave it in the floppy disk drive and proceed to the next step.
Monarch MfIM-86 User' s .}llGuM.1~·dd:le"""' _ _ _ _ _ _ _ _ _ _ _ _ _ --.lIGe .... tt ... 1DIII6~ .t:;g ... sta ...
rwtQlea~-STEP 6 - Copy the MP/M-86 operating system onto a fornatted diskette
After you have formatted the two diskettes, you will write the system image onto one of the diskettes so that you can boot from it. 'Ibis is done by using DYNASYS to copy the MP/M-86 operating system onto the diskette you just formatted.
1.. At the systen prompt, type:
8B>DYN1\SXS<CR>
2. Select the CD (Create Systen Disk) option of DYNASYS.
Enter menu iten ? CXCR>
3. Select the WR option fran the Create Systen Disk menu. Your selection ? WR<CR>
4. You will be asked where the system files are located and onto which drive they will be written.
(WR) Systen files Located on Disk Drive (A-P) ?B<CR>
Write System To Disk Drive (A-P) ? A<CR>
Please insert proper disks and
press <REmRN> to start or <ESC><RmURN> to exit:~
Now creating system. Please wait.
5. The MP/M-86 system generation program, GENSYS, now takes control. GENSYS queries you for the values of each of its system parameters. For each parameter listed below, the default value is given in paren-theses. We recommend using the default values for these parameters. For mor e information on GENSYS and the GENSYS parameters. see Section
3.4.9.1.
MOnarch MP/M-86 Qser's
Guide
MP/M-86 W.n Systen Generation
All Values in BmC, Default in Parentheses Delete MB+-86.SYS File (N) ?y<CR>
Reading M9l Modules
Starting Paragra}iil of Operating System (48) .~
Getting
Started
Numberof System. Consoles (8) = (number of. consoles you will use) Nuni;)erof System Printers (4) ~
Total ClJaracter' Control Blocks (28) =~ Enable CclDpatibility Attributes (N) =~
*
Number of Ticks Per Seoond (3C) =~System Drive (A) =~
Temporary File Drive (A) =~
MaxiDJDl Locked Records per Process (18) .~ Total Locked Records in System (28) =~
MaxjDlJDlOpen Files per Process .(18) .~ Total Open Files in System (28) =~ ray File Logging at Console (Y) .~
Number of Flags (28) =~
Nl.miJer of Extra Process Descriptors (18) ~
MaxiIm.unParagraphs Per Process (2889) =~ Nuni;)er of Queue Control Blocks (28) .~
Size of Queue Buffer Area·in Bytes (289) =~ Nl.miJer of Extra Meoory Descriptors (18) : I ~
*The number of ticks should be set to:
3C for- 69Hz (American)
32 for 50Hz (International)
6. You will now need to enter in the values for the memory p:lrtitions. There are no defaults given, as the values will depend upon your hardware. Suggested values are 9i ven below. If you have added one or more memory expansion. boards to your system, refer to Appendix E for add; tional memory tarti tion values.
ME!IJ)ty Partitions, End List With IFFFF'
Starting. Paragrcq::b =40<CR>
Length =FC0<CR> Starting Paragrcqn =1000<CR>
Length =400<CR> Starting Paragrapt =1400<CR>
Length =400<CR> Starting Paragra(il =1810<CR>
Length =400<CR> Starting Paragrcq:il =lQlI<CR>
Length =411<CR> Starting Paragrcq:il =2000<CR>
Length=400<CR> Starting Paragrapt =2400<CR>
Length =400<CR> Starting Paragr8Pl =2800<CR>
Length =400<CR> Starting Paragrcqil =2C90<CR>
Monarch MPIM-86 User' s Guide
"Length
=
4ea<CR>
Starting Paragr~ =FFFF<CR>Include Resident System Processes
aocK (Y) ?Y<CR>
EXlD (Y) ?N<CR>
MHfSTAT (Y) ?N<CR>
'lHP (Y)
?Y<CR>
Reading 0SPs
You should see the following messages:
Operating System Begins At Paragraph 40
Enas
At XXXGetting started
****
Meoory Partition Overlaps Operating System - Trinming****
Starting Paragraph
was
40 Wi th Length reg" New starting Paragr~ XX With Length XXXPlease wait for Dynasys to finish.
Operation cauplete. Press <RE'lDRN> to continue:.<CR>.
7. You will return to the Create System Disk menu. ~ EX<CR> to return
to the DYNASYS main menu. ~ EX<CR> to exit DYNASYS and return to
the operating system. You will see:
DYNASYS cauplete.
0B>
8. Leave the new system diskette in the floppy disk drive. This new system diskette is now "bootable" - MP/M-86 can now be booted from it.
STEP 7 - Copy the MP/M-86 files from the Winchester hard disk to the formatted diskettes
You should still be logged onto the Winchester hard disk drive,
as
indicated by the IB> prompt. Be sure also that your new diskette with the operating system is still in the floppvdisk drive. Enter the following command exactlyas shown because the spaces are very important.
1. 0B>SIJBMIT roPY! B A<CR>
Your screen will display the files as they are copied from the Winchester onto the diskette. When this is complete you will receive the following message:
0B>; subnit CCJIi'lete
MQnarcbMPIM-86 User r s Guide Getting. Started
ibe system pranpt will reappear:
OB>
2. Remove the diskette from the drive and label it COpy - MP/M-86
Disk 1 of 2 DVN.n, where N.n is the version number on the
Distribu-ti on Diskette. .
3. Insert the second formatted diskette into the floppy drive.
'!YPe:
SB)DSKRF$E'l'<CR>
e>SOII1IT
mPX2· B MCR>4. Your screen will display the files as they are copied from the Winchester onto the diskette. When this is complete you will receive the follCMing message:
8B>; sutmit caup1ete
'!he system. pranpt will reapp:ar:
8B>
5. Remove the diskette from the drive and label it Q)PY - MP/M-86 Disk 2 of 2 D'lN.n.
STEP 8 - Reconfigure Your System
You will next reconfigure your system with DYNASYS so that MP/M-86 will root directly from the Winchester hard disk. To do this, you must run DYNASYS to reassign the Winchester as logical drive A. You should still be logged onto the Winchester di~k drive 0B>.
1.
'!YPe:
OB>Dm\SYS<CR>
2. Select the llt\. option from the main Dni\SYS menu.
Enter Menu lten? Dl\<CR>
3. Select A when it asks you which drive you want to change.
Drive to change A-P (<RE'llJRN> To Leave As Is)? MeR>
4. The following prompts appear, line by line. Type in the indicated response.
Monarch MEIM-B6 tJser IS Guide Getting started
A: == ? <RE'lDRN> To Set To Null
WINU<CR>
B:
== ?c:
-=?
D: == ?
E: = ?
WINI2<CR>
MEZ1l<01> Fl<CR>
~
After you enter that last carriage return, the top part of the screen display should look like this: •
A: WINIl
B: WOO2
C: HEM!
D: Fl E: F2
5. If your system has only one floppy drive, you should remove the E:F2 desigration from the configuration. You will be prompted again for the drive to change:
Drive to change A-P (<RE'lURN> To Leave As Is)? E<CR>
To make the E drive null, enter <CR> when prompted for the E drive assigmnent:
E: == ? <RE'lDRN> To
set
To Null ~6. Your screen display should now look like this:
A: WINIl
B:WINI2
C:MEJU
D:F1Press<CR> to confirm the new assignments. You will return to the
main DYNASYS menu.
R>TE: 'Blese new assignments will not be in effect \nltil the computer is reset (step 19).
STEP 9 - Install a new system on the Winchester
You will now generate a new system onto the Winchester hard disk while you
are still inDYNASYS.
1. From~, you will be pranpted to select a menu item. Enter Menu Iten ? Q)<CR)
2. You will be prompted to select an option from the Create System Disk
Menu.
Your Selection ? WR<CR>
Monarch .. MEIM-86 USer' s Guide Getting started
3.. You will be asked where the source files are located and then onto which . drive . to write the new system. For the current configuration,
the source and destination drives are the same.
(WR) Source Files Located on Disk Drive (A-P) ?B<CR>
Write &ystem To Disk Drive (A-P)·? B<CR>
Now creating system. Please wait.
4. '!he MP/M-86 system generation program, GENSYS, now takes control. For each parameter listed below, the default value is given in paren-theses. We recommend using the default values for these parameters. For more information on GENSYSand the GENSYS parameters, see Section 3.4.9.1.
MPIM-86 W.n System Generation
All Values in HEX, Default in Parentheses
Delete MPM-86.SYS File (N) ?Y<CR>
Reading. HIM Modules
Starting Paragrcq:b of Operating Systen (48) =~
NuJlt)er of System Consoles (8) =(nuniler of consoles you will use)
Nl.:alt>er of System Printers (4) =~
Total Olaracter Control Blocks (28) =~
bble Coorpatibility Attributes (N) =~ *Nunt>er of Ticks Per.Second (3C) =~
System Drive (A) =~
TalIX>rary File Drive (A) =~
Maximum Locked Records per Process (18) .~
Total Locked Records in System (28) =.<CR>.
Maximum Open Files per Process (19) -~
Total Open Files in System (29) =~
D:ly File Logging at Console (Y) -~
NuJlt)er of Flags (29) =~
NuJlt)er of Extra.Process Descriptors (18) .~ Maximum Paragral,Xls Per Process (2988) =~
Nl.:alt>er of Queue Control Blocks (28) -~
Size of ()leue Buffer Area in Bytes (298) =~ R.mber of Extra Meoory Descriptors (18) .~ ~ number of ticks should be set to:
3C for 69 Hz (American) 32 for 59 Hz (International)
5. You will now need to enter in the values for the memory partitions, as you did in Step 6.
Mellx)ry Partitions, End List With .' FFFF'
starting Paragraph =4e<CR>
Length =FC0<CR>
starting ParagraJ;il=leee<CR>
Length =4BQ<CR>
Monarch MPIM-86 User I s Guide
Starting Paragraph =14iU'<CR>
Length =48S<CR>
Starting Paragraph =1888<CR>
Length =488<CR>
starting Paragraph =lCfJ8<CR>
Length =488<CR> starting Paragraph =2QQ"<CR>
Length =48S<CR>
Starting Paragraph -24SfJ<CR>
Length =4fJS<CR>
Starting Paragraph =2880<CR>
Length =4QS<CR> starting Paragraph =2CfJ0<CR>
Length =40Q<CR>
starting Paragraph
-FFFF<CR>
Include Resident Sys1:eu Processes
aOCK (Y) ?Y<CR>
PX3) (Y) ?N<CR> MPMSTAT (Y) ?N<CR>
~ (Y) ?X<CR>
Reading 0SPs
You should see a trim message:
Operating System Begins At ParagraPl 48 Ends At XXX
Getting Started
****
Meoory ·Partition OVerlaps .Operating System - TriDminq****
starting Paragraph
was
40 With Length FeeNew Starting ParagraIil xx With Length xxx
When the system is catplete, you will see the following:
**
GENSYS OONE**
Operation canplete. Press <RE'ltJRN> to continue:~
6. You will then return to the Create System Disk menu. . Press SC<CR> to
return to the main DYNASYS menu. Press EX<CR> to exit DYNASYS and return to the operating system prompt. You will see:
ImmSYS cauplete.
e>
STEP 19 - Reboot fran the Winchester hard disk
You may now boot the system from the Winchester hard disk. The new system configuration that you entered in STEP 8 . will become effective when you tx>ot fran the hard disk.
1. Rsnove any diskette fran the f1oPF.{ disk drive.
MOnarch MP/M-86 USer's
GUide
Getting started2. Press the reset button on the rear of the caDputer.
3. '!he· computer will run a series of diagnostics and prompt you for the
boot drive. Select 8to boot from the hard disk. Your Selection ? 11
4. You are now logged onto the Winchester hard disk, logical drive A.
Your system is now configured as afour-drive system. Drives A and B are on the Winchester hard disk, drive C is the memory disk, and drive 0 is the floppy disk drive. This can be seen from the following list of disk drive
asSignments, as it would appear using DYNASrAT.
Disk Drive Assignment
A:= WINIl
B:= WINI2
c:=
ME24lD:= Fl
Note: Although the memory disk is assigned as drive C, remember that you cannot use it until you have allocated memorysIace to it. If you want to use the memory disk, Section 3.2 explains how to cb this.
MOnarch ~1M-86 User's Guide Getting started
1 .• 2 Getting Started fran cartridge Tape
To install MP/M-86 from cartridge tape to the Winchester hard disk, you must follow the steps in this section. You can run MP/M-86 from the Winchester hard disk only. You cannot run MP/M-86 fran cartridge tape. MP/M-86 that is distributed on cartridge tape sets up your. drive asSignments like this:
Disk Drive Assignment
A:- WINIl B:= WINI2 c:= MEJtU
D:= P1
You may wish to reconfigure MP/M-86 later in some other manner. This procedure describes a standard first-time installation for a Monarch computer with one 19MB Winchester hard disk. Note that the tape unit is not assigned as·a drive. The tape unit does not provide on-line data storaqe, and so is not a drive •. It is simply an external backup or load device.
sirdware Requirements.
To boot MP/M-86 from the cartridge tape, your Monarch must have an IPL (Ini-tial Program Load) PRCM, version 2.2 or higher, on the main logic board. See
Appendix D if you need to install the IPL !=ROM.
OVerview.
1. Boot MP/M-86 fran cartridge tape.
2. Format the Winchester hard disk.
3. Copy MP /M-86 fran cartridge tape to the Winchester.
4. Reboot MP/M-86 fran the Winchester.
Before You Begin.
• Always wait at least 39 minutes after the computer has been turned on before initializing a tape or formatting the Winchester hard disk. If you format media while the oomputer is cold, you may find errors when you later attempt to read the disk or tape.
• Be sure that you have read your MOnarcb User's Guide and properly installed
Monarch MP/M-86 User IS Guige Gettj,ng Started
your Monarch catq?uter.
• Follow the steps below while you are at the
oonsole.
Follow the instructions below to boot
MP/M-86
from cartriCigetape,format the Winchester hard disk, copy MP/M-86 from tape to the Winchester hard disk and rebootMP/M-86
from the Winchester.STEP I - Boot MP/M-86 fran cartr idge tape
1. Turn on the computer and the console. 'Ihe computer will run a series of diagnostics and then prompt you for the, boot medium.
2.' Carefully insert the cartridge tape in the cartridge drive slot. The label on the cartridge tape should face up and the tape head point toward
the coriJputer.
3.
'!YPe
T to boot fran the tape. Your Selection ? %STEP 2 - Fornat the Winchester hard disk
You will be prompted to fornat the Winchester or to make the Winchester hard diskbootable. You will first format the Winchester.'Ihis example shows you how to format one 19MB Winchester hard disk. Refer to Section 2 of this manual if you need to format other than one 19MB hard disk. For first time installation, there should be no files on the hard disk.
1.
'!YPe
FW to format the Winchester. Enter uenu itf;ml EW<CR>2. '!he.ro1f.1AT menu will etpI:ear on the screen. Choose the FP option.
Your selection ? FP<CR>
3. You will be pranpted for the number of :thysical drives to format.
Enter fOIIIBt option or <RE'ltJRN> to exit option: 1<CR)
4. You will receive, the following warning. Press~.
'lbis option will mASE FNERnBnG on the drive
that you have just selected.
Press <RE'1DRN> to start format (any other key exits to menu) ~
5. Formatting takes about 19 minutes. When formatting is complete, the screen will display a bad track table and flag
all
the bad sectors. The operating system autanatically stbsti tutes good tracks for any bad onesMonarch MfIM-86 User I s Guide Getting Started
which are flagged. To accept the operating system's substitutions, type
<CR>.
Enter one of the above· options or <RE'ltJRN> to accept: ~
6. You will then see the h:lrd disk a>nfiguration menu. Select option
s.
Enter configuration option or <RE'ltJRN> for main menu:
S<CR>
7. You will next be prompted for the number of logical drives on your system. Press a
<at>.
You will be informed when the operation is complete.Select option or <RE'ltJRN) for option B: ~
Operation cauplete, Press <RE'IDRN> to resume: ~
8. You will then be returned to the Winchester Configuration Options menu. Press ~ twice. You will return to the FOR-tAT menu.
9. Select the EX option and press ~ to return to the main menu.
S'lEP 3 - Copy MP/M-B6 fran cartridge tape to the Winchester
1. At the main menu, row select the
we
Option to write the MP/M-86 operating system and files onto the Winchester hard disk.Enter menu iten
wa<CR>
2. The menu will ask you which operating system you want to write onto the
Winchester hard disk. You must choose option 4, which generates an
MP/M.-86 systen onto the Winchester. Your Selection? 4<01>
3.
You will be informed when the operation is complete. Type<CR>
to exit the WB option.Please wait. Writing system. Operation canplete.
Press Return for menu. ~
STEP 4 - Reboot MP/M-86 fran the Winchester
1. Remove the cartridge tape fran the tape slot. 2. Press the reset button on Monarch's back panel.
3. '!he computer will rtm a series of diagnostics and prompt you for the boot drive. Select H to boot fran the hard disk.
MQnarchMPGM-86 gser'sGuide Getting Started
Your Selection? 11
4. You are now logged onto the Winchester hard disk, logical drive A.
MP/M-86 is nON ready to acceptcamnands.
SA>
If you want any other configuration, you may useDYNASYS to change the de-faults. See Section 3 for a complete description of ~S.
Monarch MP/M-86
User'
s Guide FPEMAT2.8 FORMAT CNerview
. FORMAT is the first utility you run on a new Monarch computer. FORMAT pa.rti-tions the disks, providing a -map" for future disk. access. You should need to format a disk only once -- when you first use it. FORMAT completely erases
arr:/ previous data that may be on a disk.
Disk drives write data onto a disk and read information from them. MP/M-86 supports two kinds of disks - 8-inch diskettes and Winchester hard disks.
Both diskettes and Winchester hard disks must be formatted before you can use
them. Diskettes are encased in a square plastic jacket and resemble flexible
45 RPM records. Winchester disks are invisible to the user since they reside inside the computer. Sections 2.1 and 2.2 discuss diskettes and Winchester disks. See Section 5 for information on using tapes.
When disks are formatted, some of the storage capacity is allotted to the operating system and the directory areas. Storage capacity refers to the maximum number of bytes that can be stored on a disk. A byte is equal to a Single typed character. For example, a 299-word report takes up approximately 1 kilobyte (abbreviated as K) or 1,924 bytes of space. A formatted 19 mega-byte Winchester hard disk contains 16.68 megamega-bytes (abbreviated as MB) or 16,900,000 bytes of storage capacity. The storage capacity of a formatted diskette is either 256K for single-density or Sl2K for double-density.
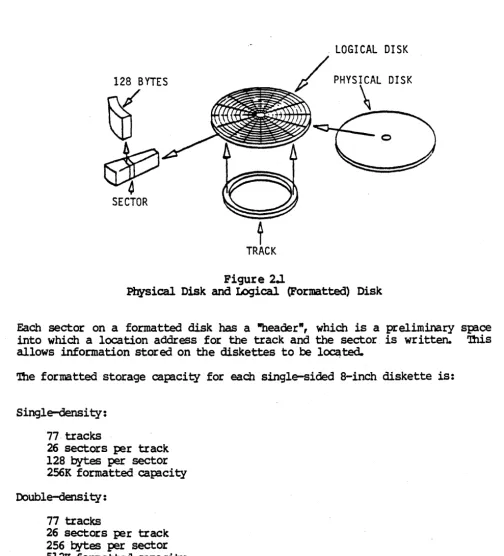
Loc:1ical versus Physical Drives
MP/M-86 distinguishes between logical and physical drives. '!he !hYsical drive in your system is the actual Winchester hard disk. '!hat Winchester, however, may be formatted into one or several logical drives. The idea of logical drives makes an operating system more versatile. Figure· 2.1 illustrates the relationship between the I:'ilysical and the logical drive.
FORMAT's Relationship to DYNASYS
In Section 1, you prepared your Winchester drive by booting from either diskette or cartridge tape. In general, you must first run FORMAT to choose the number of logical drives to set up on your Winchester drive, then you run DYNASYS to assign drive letters to each logical drive. If you booted from cartr idge tape, however, these utili ties were run autanatically.
Compatibility between Operating Systems
When a disk is formatted by an operating system, it creates a directory area for that disk. Because the directory structures vary, disks formatted under one operating system often cannot be read under a different operating. system. '!he follOWing guidelines apply to MP/M-86:
• MP /M-86 can read disks formatted under another Digital ReSearch opera-ting system, such as MP/M II, cp/M-8e and CP/M-86.
Mona,ch MP/M-86 User' s" Guide FORMAT
• MP/M-86 cannot read disks formatted under a non-Digital Research operating system without a specializedutili~.
• 'It.le O~IS and UNI-OOL operating systems can read disks formatted under
MP/M-86
i f you use a special software utility.System warm-Up
Always wait at least 39 minutes after the computer has been turned on before you format a disk -- whether you use a floppy disk or Winchester hard disk. This allows time for the temperature of the computer to stabilize. If you format a disk while the computer is cold, you may find errors when you attempt to read the disk later.
Reformatting
Disks are rarely reformatted because doing so erases the disk's entire con-tents. FORMAT erases the system tracks, the directory, and all program and
data files that may reside on the disk.
If data resides on a hard disk that must be reformatted, the disk must first
be backed up. Some IX>Ssible reasons for reformatting a hard disk are: • System errors are detected on the Winchester drive
• The directory or data is damaged
• A new operating system will be installed on the hard disk
FORMAT provides an FL option that allows you to reformat a logical drive instead of the entire physical drive.
2.1 Diskettes 2.1.1 Description
Diskettes offer an inexpensive way to store data. 'lbeyalsoallow data to be
easily transported because they are small and light. Unlike the Winchester hard disk, they can be removed from the computer. They provide virtually unlimited data storage 'cap:lcity since you can always buy more diskettes.
A diskette is magnetically coated on both sides. Its plastic jacket has a slot through which the drive's read and write mechanism can reach the magnetic surface. ~edisk drive engages and moves the magnetic medium through a hole
in the jacket. -A notch on the edge of the jacket indicates whether or not the disk can be wr i ttenon. If the notch is covered on an 8-inch floppy, then
data can be stored or "written" onto the diskette. If the notch is uncovered, the disk is "writ~ protected" and cannot be written to.
All Monarch floppy disk drives are 8-inch single-sided drives. You should use only single-sided diskettes in your Monarch disk drives. '!he diskettes
Monarch MPIM-86 USer I s Glide FORMAT
selves may be formatted either double-density or single-density, depending on the diskettes you roy.
128 BYTES
~
~
SECTOR. LOGI CAL 01 SK
/ PHYSICAL DISK
[image:32.624.53.557.93.649.2]~
\~
Figure 2.1
Physical Disk and Logical (Formatted) Disk
Each sector on a formatted disk has a "header", which is a preliminary sp:iee into which a location address for the track and the sector is written. '!his allows information stored on the diskettes to be l~ted.
The formatted storage capaci~ for each single-sided 8-inch diskette is:
Single-density: 77· tracks
26 sectors per track 128 bytes per sector
256K formatted· cap:lcity Double-density :
77 tracks
26 sectors per track
256 bytes per sector 512Kformatted capacity
If you intend to format your disk as double-density, you must purchase an 8-inch diskette that is specified as double-density. Always remember to purchase certified media. Your Monarch User's Guide provides a list of certified
brands.
Monarch MP/M-86 User' s Guide FORMAT
2.1.2 Formatting Diskettes
The FORMAT utility is used to prepare a diskette for use by MP/M-86. The
densityofa diskette and the maximum number of directory entries are
also
determined by theEURMATutility. Remember that the EURMATutility
erases
alldata that exist on adiskett~
'!he following sections address the three ways you can use FORMAT on diskettes. You Illay format diskettes by:
Menu prompt
Rapid Format
Standard options
2.1.3 Menu Prompt EURMAT
PORMAT prompts you with menus to set each
formatting p:trameter.
You s{:ecify all EURMAT parameters in one command line.
FORMAT assigns default values to the formatting para:neters.
Insert the diskette to be formatted into the floppy disk drive and close the drive door. To invoke FORMAT, type FORMAT and press <00.
SA>FPRMAT(CR>
FORMAT then asks you which option you want:
******
Monarch Format Utility Version ~ For MP/M-86 ~******
FF) Format Flam' Disk
FP) Format Physical Winchester Drive
Fr.) Reformat ·Logical Winchester Drive
CK) Oleck Drive Format
EX) Exit Format Utility Your selection ?
EnterFF to indicate that you want to format a diskette. You will then be
asked to enter the drive letter of the flop!?'{ disk dr iv~
Floppy Format Option
Enter drive to format (A-P) or <lW!tJRN)to exit to main menu:
MOnarch MPIM-86 USer's Guide FORMAT
If you are not sure which drive letter is assigned to your floppy drive, exit FORMAT and run the DYNASTAT utility. It will display your current system configuration. For more information on this utility see Section 3.
If you make an invalid resp:>nse, you will receive one of the following error messages:
Invalid Reply
Drive Not On System
Not a Flog?{ Drive
If you have a single-sided drive, FORMAT next asks you to select single or oouble-density fornatting. If you have a double-sided drive with a
double-sided diskette inserted in it, FORMAT next prompts you for side selection.
2.1.3.1
Side Selection'!be standard flcg;Jy disk drive on a Monarch computer is a single-sided drive. Unless you have added a double-sided drive to your system, the FORMAT utility will automatically format all single-sided diskettes as single-sideCL If you have added a double-sided drive and if there is a double-sided diskette in that drive, then FORMAT will prompt for side selection. (Make sure that you are using double-sided diskettes.)
Side Selection
S - For Single Sided
D - For Double Sided
Enter side selection or <RE'lURN) for single sided :
2.1.3.2 Densi~
FORMAT next prompts you for density selection. All a-inch drives on Monarch computers are capible of fornatting either single or double-density.
The IBM standard format for an 8-inchdiskette is Single-density with 64
directory entries. A Monarch diskette formatted this way can be read by most
8-inch floppy disk systems from other manufacturers.
If you format your diskette for double-density, the diskette is in a non-standard format. Some other manufacturers' . systems can read a Monarch double-density diskette, but some cannot. However, double-double-density provides you with twice the storage capacity on the same disk, so if the disk is going to be
used exclusively on a Monarch computer ,we recommend that you format it for double-density to gain the extra storage space. To select density, FORMAT prompts you with:
Monarch MP/r:1-86 User' s Glide
Densi ty Fomat selection
S - For Single.Density D - For Double Density
Enter density format or <RE'lURN> for .Single· Density :
You may enter S or D followed by <at> to select the density you want to use, or just press <at> to
select
single-density format.2.1.3.3 Directory Entries
FORMAT now prompts for the number of directory entries to reserve on the diskette. You have a choice of 64, 128, or 256 directory entries. A
directo-ry is similar to a table of contents of a book. It tells MP/M-86 where files are located.
We recommend that you use 64 directory entries with sided, single-density8-inchdiskettes if you want them to be compatible with other single-densi ty systems from other manufacturers. 'nle greater the number of directory entries, the less disk space is available for files. Ik> not make the directo-ry larger than necessadirecto-ry. We recommend the following number of directodirecto-ry entries for each configuration:
a:>NFlGURATlON .
Single-sided, single-density Single-sided, double-density Double-sided, double-density
ID. OFDIRB:TORY EN'IRIES
64
128 256
To determine the number of directory entries to reserve, FORMAT prompts:
1 - For 64 Directory Entries 2 - For 128 Directory Entries
3 - For 256 Directory Entries
Enter' of directory entries or <REmRN> for 128 Entries :
Follow your choice with
<CR>.
Or you may simply press<CR>
to select 128 entries. r ! " "-After typing your entry, your se1ectionsare confirmed:
·-poarch MgIM-86 User I s Glide
Floppy Drive X Selected For FOrDBt
Xl I ¥ I I-Sided, XXzxxx-Densi ty, And
nnn
Directory EntriesInsert Disk To Formt In Drive X
And
Press <RE'lURN> to format or <ES:><RImlRN> to exit :
Press return to begin formatting. FORMAT then displays a rWlning count of each track as it is being formatted:
Formatting Track B'"
If, during the format process, FORMAT finds a bad sector, on the diskette and
is unable to format it, the error is reported as follows: Format Error on Track nn. Press <RE'ltJRN) For Menu
FORMAT will try several times to format that sector and if unsuccessful, will give up and report the above message. This usually indicates a damaged diskette. If this occurs, you will be returned to the Selection Confirmation display and prompted to insert a new flopF.i disk into the floppy dr ive. '!he damaged diskette should be removed and discarded. You maytben insert the new diskette into the floppy drive. Press return, and FORMAT will then begin to format the new diskette with the options you have previously selected.
The screen will prompt you for another diskette to format. You may format multiple diskettes in this manner. To exit from the format routine, press the escape key and carriage return and then choose the exit option from the format
menu.
2.1.4 Rapid ~
1he rapid FORMAT option allows you to specify the format p!rameters with a single line entry. To use this option, first insert the diskette to be formatted into the floppy disk drive and close the drive (bor. ~ FORMAT,
the drive letter of the floppy disk drive, a colon, and the codes that specify the parameters you want. For example, if you want to use floppy drive D to format a diskette as single-sided, double-density, 128 directory entries, enter:
OA>FOEMAT P;SP2<CR>
'!be following chart prESents all available FORMAT options and their codes.