QIAGEN
®Plasmid Purification
Handbook
QIAGEN Plasmid Mini, Midi, Maxi, Mega,
and Giga Kits
For purification of ultrapure, transfection-grade
plasmid DNA
QIAGEN Sample and Assay Technologies
QIAGEN is the leading provider of innovative sample and assay technologies, enabling the isolation and detection of contents of any biological sample. Our advanced, high-quality products and services ensure success from sample to result.
QIAGEN sets standards in:
I Purification of DNA, RNA, and proteins I Nucleic acid and protein assays I microRNA research and RNAi
I Automation of sample and assay technologies
Our mission is to enable you to achieve outstanding success and breakthroughs. For more information, visit www.qiagen.com.
Contents
Kit Contents 4 Storage 5 Intended Use 5 Safety Information 5 Quality Control 6 Introduction 6Principle and procedure 6
Equipment and Reagents to Be Supplied by User 10
Important Notes 11
Protocols
Plasmid or Cosmid DNA Purification using
QIAGEN Plasmid Mini Kit 13
Plasmid or Cosmid DNA Purification using
QIAGEN Plasmid Midi and Maxi Kits 17
Plasmid or Cosmid DNA Purification using
QIAGEN Plasmid Mega and Giga Kits 22
Very Low-Copy Plasmid/Cosmid Purification using
QIAGEN-tip 100 or QIAGEN-tip 500 27
Troubleshooting Guide 33
Appendix A: Agarose Gel Analysis of the Purification Procedure 39
Appendix B: Composition of Buffers 42
Kit Contents
QIAGEN Mini Mini Midi Midi Maxi Maxi Maxi
Plasmid Kit (25) (100) (25) (100) (10) (25) (100) Catalog no. 12123 12125 12143 12145 12162 12163 12165 QIAGEN-tip 25 100 – – – – – 20 QIAGEN-tip – – 25 100 – – – 100 QIAGEN-tip – – – – 10 25 4 x 25 500 Buffer P1 20 ml 2 x 110 ml 500 ml 110 ml 2 x 8 x 20 ml 150 ml 150 ml Buffer P2 20 ml 2 x 110 ml 500 ml 110 ml 2 x 8 x 20 ml 150 ml 150 ml Buffer P3 20 ml 2 x 110 ml 500 ml 110 ml 2 x 8 x 20 ml 150 ml 150 ml Buffer QBT 60 ml 2 x 2 x 500 ml 2 x 2 x 8 x 60 ml 60 ml 60 ml 200 ml 200 ml Buffer QC 2 x 2 x 3 x 5 x 3 x 4 x 16 x 60 ml 240 ml 205 ml 500 ml 240 ml 500 ml 500 ml Buffer QF 30 ml 140 ml 200 ml 4 x 200 ml 510 ml 4 x 140 ml 510 ml RNase A* 2 mg 2 x 11 mg 50 mg 11 mg 2 x 8 x 2 mg 15 mg 15 mg LyseBlue® 20 µl 2 x 110 µl 500 µl 110 µl 2 x 8 x 20 µl 150 µl 150 µl Quick-Start 1 1 1 1 1 1 1 Protocol * Provided in a 10 mg/ml or 100 mg/ml solution.
QIAGEN Mega (5) Mega (25) Giga (5) Plasmid
Plasmid Kit Buffer Set
Catalog no. 12181 12183 12191 19046 QIAGEN-tip 2500 5 25 5 – QIAGEN-tip 10000 – – – – Buffer P1 2 x 150 ml 3 x 500 ml 3 x 250 ml 110 ml Buffer P2 2 x 150 ml 3 x 500 ml 3 x 250 ml 110 ml Buffer P3 2 x 150 ml 3 x 500 ml 3 x 250 ml 110 ml Buffer QBT 200 ml 2 x 500 ml 2 x 200 ml 2 x 60 ml Buffer QC 5 x 240 ml 11 x 500 ml 7 x 500 ml 3 x 240 ml Buffer QF 200 ml 2 x 510 ml 510 ml 2 x 85 ml RNase A* 2 x 15 mg 3 x 50 mg 3 x 25 mg 11 mg LyseBlue 2 x 150 µl 3 x 500 µl 3 x 250 µl 110 µl Quick-Start Protocol 1 1 1 1 * Provided in a 10 mg/ml or 100 mg/ml solution.
Storage
QIAGEN-tips should be stored dry and at room temperature (15–25°C). They can be stored for at least 2 years without showing any reduction in performance, capacity, or quality of separation.
QIAGEN Plasmid Kits should be stored at room temperature. After adding RNase A, Buffer P1 should be stored at 2–8°C and is stable for 6 months. Other buffers and RNase A stock solution can be stored for 2 years at room temperature.
Intended Use
QIAGEN Plasmid Kits are intended for molecular biology applications. These products are not intended for the diagnosis, prevention, or treatment of a disease.
All due care and attention should be exercised in the handling of the products. We recommend all users of QIAGEN®products to adhere to the NIH guidelines that have
been developed for recombinant DNA experiments, or to other applicable guidelines.
Safety Information
When working with chemicals, always wear a suitable lab coat, disposable gloves, and protective goggles. For more information, please consult the appropriate material safety
data sheets (MSDSs). These are available online in convenient and compact PDF format at www.qiagen.com/ts/msds.asp where you can find, view, and print the MSDS for each QIAGEN kit and kit component.
24-hour emergency information
Emergency medical information in English, French, and German can be obtained 24 hours a day from:
Poison Information Center Mainz, Germany Tel: +49-6131-19240
Quality Control
In accordance with QIAGEN’s ISO-certified Total Quality Management System, each lot of the QIAGEN Plasmid Kit is tested against predetermined specifications to ensure consistent product quality.
Introduction
QIAGEN Plasmid Purification Kits are based on the remarkable selectivity of patented QIAGEN resin, allowing purification of ultrapure supercoiled plasmid DNA with high yields.
Anion-exchange–based QIAGEN-tips yield transfection-grade DNA, which is highly suited for use in a broad variety of demanding applications such as transfection, in vitro transcription and translation, and enzymatic modifications. QIAGEN offers the most comprehensive portfolio of tailored plasmid purification kits for any scale, throughput, or downstream application. Select the optimum kit for your requirements by visiting our online selection guide at www.qiagen.com/products/plasmid/selectionguide. For transfection, QIAGEN also offers the advanced PolyFect®, SuperFect®, and Effectene® transfection
reagents. These reagents, combined with the high-quality plasmid DNA obtained from QIAGEN, QIAfilter, HiSpeed®, and EndoFree®Plasmid Kits, provide optimal transfection
results (for ordering information, see page 37).
Principle and procedure
QIAGEN plasmid purification protocols are based on a modified alkaline lysis procedure, followed by binding of plasmid DNA to QIAGEN resin under appropriate low-salt and pH conditions. RNA, proteins, dyes, and low-molecular–weight impurities are removed by a medium-salt wash. Plasmid DNA is eluted in a high-salt buffer and then concentrated and desalted by isopropanol precipitation.
Pelleted bacteria
Clear lysate by centrifugation
QIAGEN Plasmid Kits
Alkaline lysate
Wash
Isopropanol precipitate
Ultrapure plasmid DNA Elute Bind DNA
Equipment and Reagents to Be Supplied by User
When working with chemicals, always wear a suitable lab coat, disposable gloves, and protective goggles. For more information, consult the appropriate material safety data sheets (MSDSs), available from the product supplier.
For all protocols:
I Standard microbiological equipment for growing and harvesting bacteria (e.g., inoculating loop, culture tubes and flasks, 37°C shaking incubator, and centrifuge with rotor and tubes or bottles for harvesting cells)
I QIArack or equivalent holder (see “Setup of QIAGEN-tips”, page 11) I Ice
I Isopropanol I 70% ethanol
I Plasmid resuspension buffer (e.g., TE buffer, pH 8.0, or Tris·Cl, pH 8.5) For the QIAGEN Plasmid Mini Kit protocol:
I Microcentrifuge
I 1.5 ml or 2 ml microcentrifuge tubes
For QIAGEN Plasmid Midi, Maxi, Mega, and Giga Kit protocols:
I Centrifugation tubes or vessels with suitable capacity for the volumes specified in the appropriate protocol
I Refrigerated centrifuge capable of≥20,000 xgwith a rotor for the appropriate centrifuge tubes or bottles
Important Notes
Please take a few moments to read this handbook carefully before beginning the DNA preparation. If QIAGEN Plasmid Purification Kits are new to you, please visit our plasmid resource page at www.qiagen.com/goto/plasmidinfo and click on the link “General Considerations for Optimal Results”. Also be sure to read and follow the appropriate detailed protocol.
Plasmid size
Plasmids up to approximately 150 kb can be purified using QIAGEN plasmid purification protocols. Constructs larger than 45–50 kb, however, may exhibit somewhat reduced elution efficiencies. Prewarming the elution buffer to 65°C may help to increase the yield of large plasmids. For the isolation of large cosmid and plasmid DNA constructs, the QIAGEN Large-Construct Kit is available (see ordering information on page 37). Plasmid/cosmid copy number
Plasmid and cosmids vary in copy number, depending on the origin of replication they contain, their size, and the size of insert. The protocols in this handbook are grouped according to the copy number of the plasmid or cosmid to be purified. High- and low-copy plasmids and cosmids should be purified using the standard protocols on pages 14–24. Very low-copy plasmids and very low-copy cosmids (<10 copies per cell) should be purified using the protocol on page 29, which uses extremely large culture volumes to obtain good yields. For more details, visit our plasmid resource page at www.qiagen.com/goto/plasmidinfo and click on the link “General Considerations for Optimal Results”.
Host strains
The strain used to propagate a plasmid can have a substantial influence on quality of the purified DNA. Host strains such as DH1, DH5®α, and C600 yield high-quality DNA with
QIAGEN protocols. The slower growing strain XL1-Blue also yields DNA of very high quality.
Strain HB101 and its derivatives, such as TG1 and the JM100 series, contain large amounts of carbohydrates that are released during lysis and can inhibit enzyme activities if not completely removed. In addition, some strains, such as JM101, JM110, and HB101, have high levels of endonuclease activity and yield DNA of lower quality. If the quality of purified DNA is not as expected, a change of host strain should be considered. If difficulty is encountered with strains such as TG1 and Top10F, we recommend either reducing the amount of culture volume or doubling the volumes of Buffers P1, P2, and P3 to improve the ratio of biomass to lysis buffers for optimized lysis conditions.
Table 1. Origins of replication and copy numbers of various plasmids and cosmids Origin of
DNA construct replication Copy number Classification Plasmids
pUC vectors pMB1* 500–700 High copy
pBluescript®vectors ColE1 300–500 High copy
pGEM®vectors pMB1* 300–400 High copy
pTZ vectors pMB1* >1000 High copy
pBR322 and derivatives pMB1* 15–20 Low copy
pACYC and derivatives p15A 10–12 Low copy
pSC101 and derivatives pSC101 ~5 Very low copy
Cosmids
SuperCos pMB1 10–20 Low copy
pWE15 ColE1 10–20 Low copy
* The pMB1 origin of replication is closely related to that of ColE1 and falls in the same incompatibility group. The high-copy plasmids listed here contain mutated versions of this origin.
Culture media
QIAGEN plasmid purification protocols are optimized for use with cultures grown in standard Luria Bertani (LB) medium to a cell density of approximately 3–4 x 10⁹cells/ml,
which typically corresponds to a pellet wet weight of approximately 3 g/liter medium. Please note that a number of slightly different LB culture broths, containing different concentrations of NaCl, are commonly used. We recommend growing cultures in LB medium containing 10 g NaCl per liter (Table 2) to obtain the highest plasmid yields. Rich media are not recommended for plasmid preparation with QIAGEN-tips. If rich media must be used, growth time must be optimized, and culture volumes reduced. For more details, visit our plasmid resource page at www.qiagen.com/goto/plasmidinfo and click on the link “General Considerations for Optimal Results”.
Table 2. Composition of Luria Bertani medium
Contents Per liter
Tryptone 10 g
Culture volume
Do not exceed the maximum recommended culture volumes given at the beginning of each protocol (and on the card inside the back cover of this handbook). Using larger culture volumes will lead to an increase in biomass and can affect the efficiency of alkaline lysis, leading to reduced yield and purity of the preparation.
The protocol for QIAGEN Plasmid Kits is optimized for use with cultures grown in standard Luria Bertani (LB) medium (see page 12), grown to a cell density of approximately 3–4 x 10⁹cells per ml. We advise harvesting cultures after approximately 12–16 hours
of growth, which typically is the transition from logarithmic into stationary growth phase. It is best to assess the cell density of the culture and, if that is too high, to reduce the culture volumes accordingly or increase the volumes of Buffers P1, P2, and P3. A high ratio of biomass to lysis buffers will result in poor lysis conditions and subsequently low DNA yield and purity. For determination of cell density, calibration of each individual spectrophotometer is required to facilitate accurate conversion of OD600measurements
into the number of cells per milliliter. This can be achieved by plating serial dilutions of a culture onto LB-agar plates in the absence of antibiotics. The counted colonies are used to calculate the number of cells per milliliter, which is then set in relation to the measured OD600values.
Capacity of QIAGEN-tips
QIAGEN-tips are available in a variety of sizes for preparation of as little as 20 µg or as much as 10 mg plasmid DNA (Figure 1, next page). The maximum plasmid binding capacities of the QIAGEN-tips 20, 100, 500, 2500, and 10000 are at least 20 µg, 100 µg, 500 µg, 2.5 mg, and 10 mg, respectively. Actual yields will depend on culture volume, culture medium, plasmid copy number, size of insert, and host strain. For more details, visit our plasmid resource page at www.qiagen.com/goto/plasmidinfo and click on the link “General Considerations for Optimal Results”.
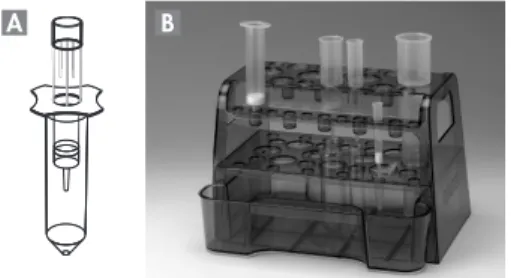
Setup of QIAGEN-tips
QIAGEN-tips may be held upright in a suitable collection vessel such as a tube or flask, using the tip holders provided with the kits (Figure 2A). Alternatively, the QIAGEN-tips 20, 100, 500, and 2500 may be placed in the QIArack (cat. no. 19015) (Figure 2B). Analytical gel analysis
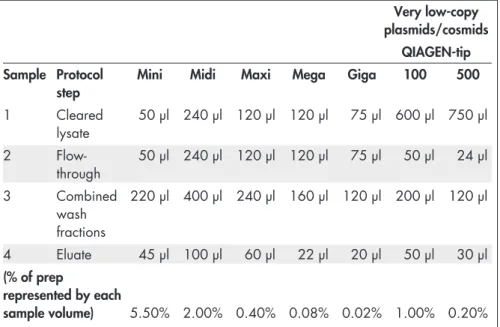
The success of the plasmid purification procedure can be monitored on an analytical gel (see Figure 3, page 42). We recommend removing and saving aliquots where indicated during the purification procedure (samples 1–4). If the plasmid DNA is of low yield or quality, the samples can be analyzed by agarose gel electrophoresis to determine the stage of the purification where the problem occurred (see page 41).
Convenient stopping points in protocols
For all protocols, the purification procedure can be stopped and continued later by freezing the cell pellets obtained by centrifugation. The frozen cell pellets can be stored at –20°C for several weeks. In addition, the DNA eluted from the QIAGEN-tip can be stored overnight at 2–8°C,* after which the protocol can be continued. These stopping points are indicated by the symbol .
Using LyseBlue reagent
LyseBlue is a color indicator that provides visual identification of optimum buffer mixing. This prevents common handling errors that lead to inefficient cell lysis and incomplete precipitation of SDS, genomic DNA, and cell debris. This makes LyseBlue ideal for use by researchers who have not had much experience with plasmid preparations, as well as experienced scientists who want to be assured of maximum product yield.
LyseBlue can be added to the resuspension buffer (Buffer P1) bottle before use. Alternatively, smaller amounts of LyseBlue can be added to aliquots of Buffer P1, enabling single plasmid preparations incorporating visual lysis control to be performed.
LyseBlue reagent should be added to Buffer P1 at a ratio of 1:1000 to achieve the required working concentration (e.g., 10 µl LyseBlue into 10 ml Buffer P1). Make sufficient LyseBlue/Buffer P1 working solution for the number of plasmid preps being performed. LyseBlue precipitates after addition into Buffer P1. This precipitate will completely dissolve after addition of Buffer P2. Shake Buffer P1 before use to resuspend LyseBlue particles. The plasmid preparation procedure is performed as usual. After addition of Buffer P2 to Buffer P1, the color of the suspension changes to blue. Mixing should result in a homogeneously colored suspension. If the suspension contains localized regions of colorless solution or if brownish cell clumps are still visible, continue mixing the solution until a homogeneously colored suspension is achieved.
Upon addition of neutralization buffer (Buffer P3 or Buffer N3), LyseBlue turns colorless. The presence of a homogeneous solution with no traces of blue indicates that SDS from
Figure 2. Setup of QIAGEN-tips with tip holder or with the QIArack.
B
A
Figure 1. QIAGEN-tip 20 to QIAGEN-tip 10000.
Pla
sm
id
M
in
iK
it
Protocol: Plasmid or Cosmid DNA Purification using
QIAGEN Plasmid Mini Kit
This protocol is designed for preparation of up to 20 µg of high-copy plasmid or cosmid DNA using the QIAGEN Plasmid Mini Kit. For additional protocols, such as for cosmid, low-copy-number plasmid, BACs, PACs, P1s, and double-stranded M13 replicative form purification, see the recommendations at www.qiagen.com/goto/plasmidinfo.
Important notes before starting
I New users are advised to familiarize themselves with the detailed protocol provided in this handbook. In addition, extensive background information is provided on our plasmid resource page www.qiagen.com/goto/plasmidinfo.
I Optional: Remove samples at indicated steps to monitor the procedure on an analytical gel (see page 41)
Things to do before starting
I Add the provided RNase A solution to Buffer P1 before use. Use 1 vial RNase A (centrifuge briefly before use) per bottle Buffer P1 for final concentration of 100 µg/ml. I Check Buffer P2 for SDS precipitation due to low storage temperatures. If necessary,
dissolve the SDS by warming to 37°C. I Pre-chill Buffer P3 at 4°C.
I Optional: Add the provided LyseBlue reagent to Buffer P1 and mix before use. Use 1 vial LyseBlue reagent per bottle Buffer P1 for a final dilution of 1:1000 (e.g., 10 µl LyseBlue into 10 ml Buffer P1). LyseBlue provides visual identification of optimum buffer mixing thereby preventing the common handling errors that lead to inefficient cell lysis and incomplete precipitation of SDS, genomic DNA, and cell debris. For more details see “Using LyseBlue reagent” on page 14.
Procedure
1. Pick a single colony from a freshly streaked selective plate and inoculate a starter culture of 2–5 ml LB medium containing the appropriate selective antibiotic. Incubate for approximately 8 h at 37°C with vigorous shaking (approx. 300 rpm).
Use a tube or flask with a volume of at least 4 times the volume of the culture. 2. Dilute the starter culture 1/500 to 1/1000 into 3 ml selective LB medium. Grow at
37°C for 12–16 h with vigorous shaking (approx. 300 rpm).
Use a flask or vessel with a volume of at least 4 times the volume of the culture. The culture should reach a cell density of approximately 3–4 x 10⁹cells per milliliter,
which typically corresponds to a pellet wet weight of approximately 3 g/liter medium.
Pl
a
sm
id
M
in
iK
it
3. Harvest the bacterial cells by centrifugation at 6000 xgfor 15 min at 4°C. If you wish to stop the protocol and continue later, freeze the cell pellets at –20°C. 4. Resuspend the bacterial pellet in 0.3 ml of Buffer P1.
Ensure that RNase A has been added to Buffer P1.
If LyseBlue reagent has been added to Buffer P1, vigorously shake the buffer bottle before use to ensure LyseBlue particles are completely resuspended. The bacteria should be resuspended completely by vortexing or pipetting up and down until no cell clumps remain.
5. Add 0.3 ml of Buffer P2, mix thoroughly by vigorously inverting the sealed tube 4–6 times, and incubate at room temperature (15–25°C) for 5 min.
Do not vortex, as this will result in shearing of genomic DNA. The lysate should appear viscous. Do not allow the lysis reaction to proceed for more than 5 min. After use, the bottle containing Buffer P2 should be closed immediately to avoid acidification from CO2in the air.
If LyseBlue has been added to Buffer P1, the cell suspension will turn blue after addition of Buffer P2. Mixing should result in a homogeneously colored suspension. If the suspension contains localized colorless regions or if brownish cell clumps are still visible, continue mixing the solution until a homogeneously colored suspension is achieved.
6. Add 0.3 ml of chilled Buffer P3, mix immediately and thoroughly by vigorously inverting 4–6 times, and incubate on ice for 5 min.
Precipitation is enhanced by using chilled Buffer P3 and incubating on ice. After addition of Buffer P3, a fluffy white material forms and the lysate becomes less viscous. The precipitated material contains genomic DNA, proteins, cell debris, and KDS. The lysate should be mixed thoroughly to ensure even potassium dodecyl sulphate precipitation. If the mixture still appears viscous, more mixing is required to completely neutralize the solution.
If LyseBlue reagent has been used, the suspension should be mixed until all trace of blue has gone and the suspension is colorless. A homogeneous colorless suspension indicates that the SDS has been effectively precipitated.
Pla
sm
id
M
in
iK
it
7. Centrifuge at maximum speed in a microcentrifuge for 10 min. Remove supernatant containing plasmid DNA promptly.
Before loading the centrifuge, the sample should be mixed again. Centrifugation should be performed at maximum speed in 1.5 ml or 2 ml microcentrifuge tubes (e.g., 10,000–13,000 rpm in a microcentrifuge). Maximum speed corresponds to 14,000–18,000 xgfor most microcentrifuges. After centrifugation, the supernatant should be clear. If the supernatant is not clear, a second, shorter centrifugation should be carried out to avoid applying any suspended or particulate material to the column. Suspended material (which causes the sample to appear turbid) will clog the column and reduce or eliminate flow.
Optional: Remove a 50 µl sample from the cleared lysate and save it for an analytical gel (sample 1).
8. Equilibrate a QIAGEN-tip 20 by applying 1 ml Buffer QBT, and allow the column to empty by gravity flow.
Place QIAGEN-tips into a QIArack over the waste tray or use the tip holders provided with each kit (see “Setup of QIAGEN-tips” page 13). Flow of buffer will begin automatically by reduction in surface tension due to the presence of detergent in the equilibration buffer. Allow the QIAGEN-tip to drain completely. QIAGEN-tips can be left unattended, since the flow of buffer will stop when the meniscus reaches the upper frit in the column.
9. Apply the supernatant from step 7 to the QIAGEN-tip 20 and allow it to enter the resin by gravity flow.
The supernatant should be loaded onto the QIAGEN-tip promptly. If it is left too long and becomes cloudy due to further precipitation of protein, it must be centrifuged again before loading to prevent clogging of the QIAGEN-tip.
Optional: Remove a 50 µl sample of the flow-through and save for an analytical gel (sample 2).
10. Wash the QIAGEN-tip 20 with 2 x 2 ml Buffer QC.
Allow Buffer QC to move through the QIAGEN-tip by gravity flow.
Optional: Remove a 220 µl sample of the combined wash fractions and save for an analytical gel (sample 3).
11. Elute DNA with 0.8 ml Buffer QF.
Collect the eluate in a 1.5 ml or 2 ml microcentrifuge tubes (not supplied).
Note: For constructs larger than 45–50 kb, prewarming the elution buffer to 65°C may help to increase yield.
Optional: Remove a 45 µl sample of the eluate and save for an analytical gel (sample 4).
12. Precipitate DNA by adding 0.7 volumes (0.56 ml per 0.8 ml of elution volume) of room-temperature isopropanol to the eluted DNA. Mix and centrifuge immediately at≥15,000 xgrpm for 30 min in a microcentrifuge. Carefully decant the supernatant. All solutions should be at room temperature to minimize salt precipitation. Isopropanol pellets have a glassy appearance and may be more difficult to see than the fluffy, salt-containing pellets that result from ethanol precipitation. Marking the outside of the tube before centrifugation allows the pellet to be easily located. Isopropanol pellets are also more loosely attached to the side of the tube, and care should be taken when removing the supernatant.
13. Wash DNA pellet with 1 ml of 70% ethanol and centrifuge at 15,000 xgfor 10 min. Carefully decant the supernatant without disturbing the pellet.
The 70% ethanol removes precipitated salt and replaces isopropanol with the more volatile ethanol, making the DNA easier to redissolve.
14. Air-dry the pellet for 5–10 min, and redissolve the DNA in a suitable volume of buffer (e.g., TE buffer, pH 8.0, or 10mM Tris·Cl, pH 8.5)
Redissolve the DNA pellet by rinsing the walls to recover the DNA. Pipetting the DNA up and down to promote resuspension may cause shearing and should be avoided. Overdrying the pellet will make the DNA difficult to redissolve. DNA dissolves best under slightly alkaline conditions; it does not easily dissolve in acidic buffers. Determination of yield
To determine the yield, DNA concentration should be determined by both UV spectrophotometry at 260 nm and quantitative analysis on an agarose gel. For reliable spectrophotometric DNA quantification,A260readings should lie between 0.1 and 1.0.
Agarose gel analysis
We recommend removing and saving aliquots during the purification procedure (samples 1–4). If the plasmid DNA is of low yield or quality, the samples can be analyzed by agarose gel electrophoresis to determine the stage of the purification procedure where the problem occurred (see page 41).
Pl
a
sm
id
M
in
iK
it
Pla
sm
id
M
id
ia
nd
M
a
xi
K
its
Protocol: Plasmid or Cosmid DNA Purification using
QIAGEN Plasmid Midi and Maxi Kits
This protocol is designed for preparation of up to 100 µg of high- or low-copy plasmid or cosmid DNA using theQIAGEN Plasmid Midi Kit, or up to 500 µg using theQIAGEN Plasmid Maxi Kit. For additional protocols, such as for purification of very low-copy plasmids or cosmids of less than 10 copies per cell, see page 29 or visit www.qiagen.com/goto/plasmidinfo.
Low-copy plasmids that have been amplified in the presence of chloramphenicol should be treated as high-copy plasmids when choosing the appropriate culture volume. Table 3. Maximum recommended culture volumes*
QIAGEN-tip 100 QIAGEN-tip 500
High-copy plasmids 25 ml 100 ml
Low-copy plasmids 100 ml 500 ml
* For the QIAGEN-tip 100, the expected yields are 75–100 µg for high-copy plasmids and 20–100 µg for low-copy plasmids. For the QIAGEN-tip 500, the expected yields are 300–500 µg for high-copy plasmids and 100–500 µg for low-copy plasmids.
Important points before starting
I New users are advised to familiarize themselves with the detailed protocol provided in this handbook. In addition, extensive background information is provided on our plasmid resource page www.qiagen.com/goto/plasmidinfo.
I If working with low-copy vectors, it may be beneficial to increase the lysis buffer volumes to increase the efficiency of alkaline lysis, and thereby the DNA yield. In case additional Buffers P1, P2, and P3 are needed, their compositions are provided in Appendix B: Composition of Buffers, on page 44. Alternatively, the buffers may be purchased separately (see page 49).
I Optional: Remove samples at the indicated steps to monitor the procedure on an analytical gel (see page 41).
I Blue(marked with aL) denotes values forQIAGEN-tip 100 using the QIAGEN Plasmid Midi Kit;red(marked with aG) denotes values forQIAGEN-tip 500 using the QIAGEN Plasmid Maxi Kit.
Things to do before starting
I Add the provided RNase A solution to Buffer P1 before use. Use 1 vial RNase A (centrifuge briefly before use) per bottle Buffer P1 for final concentration of 100 µg/ml. I Check Buffer P2 for SDS precipitation due to low storage temperatures. If necessary,
dissolve the SDS by warming to 37°C. I Pre-chill Buffer P3 at 4°C.
I Optional: Add the provided LyseBlue reagent to Buffer P1 and mix before use. Use 1 vial LyseBlue reagent per bottle Buffer P1 for a final dilution of 1:1000 (e.g., 10 µl LyseBlue into 10 ml Buffer P1). LyseBlue provides visual identification of optimum buffer mixing thereby preventing the common handling errors that lead to inefficient cell lysis and incomplete precipitation of SDS, genomic DNA, and cell debris. For more details see “Using LyseBlue reagent” on page 14.
Procedure
1. Pick a single colony from a freshly streaked selective plate and inoculate a starter culture of 2–5 ml LB medium containing the appropriate selective antibiotic. Incubate for approx. 8 h at 37°C with vigorous shaking (approx. 300 rpm).
Use a tube or flask with a volume of at least 4 times the volume of the culture. 2. Dilute the starter culture 1/500 to 1/1000 into selective LB medium. For high-copy
plasmids, inoculate L 25 ml or G 100 ml medium with L 25–50 µl or
G 100–200 µlof starter culture. For low-copy plasmids, inoculateL 100 ml or
G500 mlmedium withL100–200 µlorG250–500 µlof starter culture. Grow at 37°C for 12–16 h with vigorous shaking (approx. 300 rpm).
Use a flask or vessel with a volume of at least 4 times the volume of the culture. The culture should reach a cell density of approximately 3–4 x 10⁹cells per milliliter,
which typically corresponds to a pellet wet weight of approximately 3 g/liter medium.
3. Harvest the bacterial cells by centrifugation at 6000 xgfor 15 min at 4°C. If you wish to stop the protocol and continue later, freeze the cell pellets at –20°C. 4. Resuspend the bacterial pellet inL4 mlorG10 mlBuffer P1.
For efficient lysis, it is important to use a vessel that is large enough to allow complete mixing of the lysis buffers. Ensure that RNase A has been added to Buffer P1. If LyseBlue reagent has been added to Buffer P1, vigorously shake the buffer bottle before use to ensure LyseBlue particles are completely resuspended. The bacteria should be resuspended completely by vortexing or pipetting up and down until no cell clumps remain.
5. AddL4 mlorG10 mlBuffer P2, mix thoroughly by vigorously inverting the sealed
Pl
a
sm
id
M
id
ia
nd
M
a
xi
K
its
tube 4–6 times, and incubate at room temperature (15–25°C) for 5 min.
Do not vortex, as this will result in shearing of genomic DNA. The lysate should appear viscous. Do not allow the lysis reaction to proceed for more than 5 min. After use, the bottle containing Buffer P2 should be closed immediately to avoid acidification from CO2in the air.
If LyseBlue has been added to Buffer P1, the cell suspension will turn blue after addition of Buffer P2. Mixing should result in a homogeneously colored suspension. If the suspension contains localized colorless regions or if brownish cell clumps are still visible, continue mixing the solution until a homogeneously colored suspension is achieved.
6. AddL 4 mlorG10 mlof chilled Buffer P3, mix immediately and thoroughly by vigorously inverting 4–6 times, and incubate on ice forL15 minorG20 min. Precipitation is enhanced by using chilled Buffer P3 and incubating on ice. After addition of Buffer P3, a fluffy white material forms and the lysate becomes less viscous. The precipitated material contains genomic DNA, proteins, cell debris, and KDS. The lysate should be mixed thoroughly to ensure even potassium dodecyl sulfate precipitation. If the mixture still appears viscous, more mixing is required to completely neutralize the solution.
If LyseBlue reagent has been used, the suspension should be mixed until all trace of blue has gone and the suspension is colorless. A homogeneous colorless suspension indicates that the SDS has been effectively precipitated.
7. Centrifuge at≥20,000 xgfor 30 min at 4°C. Remove supernatant containing plasmid DNA promptly.
Before loading the centrifuge, the sample should be mixed again. Centrifugation should be performed in non-glass tubes (e.g., polypropylene). After centrifugation the supernatant should be clear.
Note: Instead of centrifugation steps 7 and 8, the lysate can be efficiently cleared by filtration using a QIAfilter Kits or Cartridges (see www.qiagen.com/products/ plasmid/LargeScaleKits).
Pla
sm
id
M
id
ia
nd
M
a
xi
K
its
8. Centrifuge the supernatant again at ≥20,000 x g for 15 min at 4°C. Remove supernatant containing plasmid DNA promptly.
This second centrifugation step should be carried out to avoid applying suspended or particulate material to the QIAGEN-tip. Suspended material (causing the sample to appear turbid) can clog the QIAGEN-tip and reduce or eliminate gravity flow. Optional: Remove a L 240 µl or G 120 µl sample from the cleared lysate supernatant and save for an analytical gel (sample 1) to determine whether growth and lysis conditions were optimal.
9. Equilibrate a L QIAGEN-tip 100 orG QIAGEN-tip 500by applyingL 4 mlor
G10 mlBuffer QBT, and allow the column to empty by gravity flow.
Flow of buffer will begin automatically by reduction in surface tension due to the presence of detergent in the equilibration buffer. Allow the QIAGEN-tip to drain completely. QIAGEN-tips can be left unattended, since the flow of buffer will stop when the meniscus reaches the upper frit in the column.
10. Apply the supernatant from step 8 to the QIAGEN-tip and allow it to enter the resin by gravity flow.
The supernatant should be loaded onto the QIAGEN-tip promptly. If it is left too long and becomes cloudy due to further precipitation of protein, it must be centrifuged again or filtered before loading to prevent clogging of the QIAGEN-tip.
Optional: Remove aL240 µlorG120 µlsample from the flow-through and save for an analytical gel (sample 2) to determine the efficiency of DNA binding to the QIAGEN resin.
11. Wash the QIAGEN-tip withL2 x 10 mlorG2 x 30 mlBuffer QC.
Allow Buffer QC to move through the QIAGEN-tip by gravity flow. The first wash is sufficient to remove contaminants in the majority of plasmid DNA preparations. The second wash is especially necessary when large culture volumes or bacterial strains producing large amounts of carbohydrates are used.
Optional: Remove aL400 µlorG240 µlsample from the combined wash fractions and save for an analytical gel (sample 3).
12. Elute DNA withL5 mlorG15 mlBuffer QF.
Collect the eluate in a 15 ml or 50 ml tube (not supplied). Use of polycarbonate centrifuge tubes is not recommended as polycarbonate is not resistant to the alcohol used in subsequent steps.
Note: For constructs larger than 45–50 kb, prewarming the elution buffer to 65°C may help to increase yield.
Optional: Remove aL 100 µl orG 60 µlsample of the eluate and save for an analytical gel (sample 4).
Pl
a
sm
id
M
id
ia
nd
M
a
xi
K
its
Pla
sm
id
M
id
ia
nd
M
a
xi
K
its
13. Precipitate DNA by addingL3.5 mlorG10.5 ml(0.7 volumes) room-temperature isopropanol to the eluted DNA. Mix and centrifuge immediately at≥15,000 xgfor 30 min at 4°C. Carefully decant the supernatant.
All solutions should be at room temperature to minimize salt precipitation, although centrifugation is carried out at 4°C to prevent overheating of the sample. Alternatively, disposable conical bottom centrifuge tubes can be used for centrifugation at 5000 xgfor 60 min at 4°C. Isopropanol pellets have a glassy appearance and may be more difficult to see than the fluffy, salt-containing pellets that result from ethanol precipitation. Marking the outside of the tube before centrifugation allows the pellet to be more easily located. Isopropanol pellets are also more loosely attached to the side of the tube, and care should be taken when removing the supernatant.
14. Wash DNA pellet withL 2 mlorG 5 mlof room-temperature 70% ethanol, and centrifuge at≥15,000 x gfor 10 min. Carefully decant the supernatant without disturbing the pellet.
Alternatively, disposable conical-bottom centrifuge tubes can be used for centrifugation at 5000 xgfor 60 min at 4°C. The 70% ethanol removes precipitated salt and replaces isopropanol with the more volatile ethanol, making the DNA easier to redissolve.
15. Air-dry the pellet for 5–10 min, and redissolve the DNA in a suitable volume of buffer (e.g., TE buffer, pH 8.0, or 10 mM Tris·Cl, pH 8.5).
Redissolve the DNA pellet by rinsing the walls to recover the DNA, especially if glass tubes have been used. Pipetting the DNA up and down to promote resuspension may cause shearing and should be avoided. Overdrying the pellet will make the DNA difficult to redissolve. DNA dissolves best under slightly alkaline conditions; it does not easily dissolve in acidic buffers.
Determination of yield
To determine the yield, DNA concentration should be determined by both UV spectrophotometry at 260 nm and quantitative analysis on an agarose gel. For reliable spectrophotometric DNA quantification,A260readings should lie between 0.1 and 1.0.
Agarose gel analysis
We recommend removing and saving aliquots during the purification procedure (samples 1–4). If the plasmid DNA is of low yield or quality, the samples can be analyzed by agarose gel electrophoresis to determine the stage of the purification procedure where the problem occurred (see page 41).
Pl
a
sm
id
M
eg
a
a
nd
G
ig
a
K
its
Protocol: Plasmid or Cosmid DNA Purification using
QIAGEN Plasmid Mega and Giga Kits
This protocol is designed for preparation of up to 2.5 mg of high- or low-copy plasmid or cosmid DNA using theQIAGEN Plasmid Mega Kit, or up to 10 mg using theQIAGEN Plasmid Giga Kit. For additional protocols, such as for purification of very low-copy plasmids or cosmids of less than 10 copies per cell, see page 29 or visit www.qiagen.com/goto/plasmidinfo.
Low-copy plasmids that have been amplified in the presence of chloramphenicol should be treated as high-copy plasmids when choosing the appropriate culture volume. Table 4. Maximum recommended culture volumes*
QIAGEN-tip 2500 QIAGEN-tip 10000
High-copy plasmids 500 ml 2.5 liters
(1.5 g pellet wet weight)† (7.5 g pellet wet weight)†
Low-copy plasmids 2.5 liters 5 liters†‡
(7.5 g pellet wet weight)† (15 g pellet wet weight)†‡ * For the QIAGEN-tip 2500, the expected yields are 1.5–2.5 mg for high-copy plasmids and 0.5–2.5 mg for
low-copy plasmids. For the QIAGEN-tip 10000, the expected yields are 7.5–10 mg for high-copy plasmids and 1–5 mg for low-copy plasmids.
†On average, a healthy 1 liter shaker culture yields a pellet with a wet weight of approximately 3 g. When
working with fermentation cultures, however, the pellet wet weight may be significantly higher. Therefore, when using fermented cultures, please refer to the pellet wet weight instead of the recommended culture volumes.
‡Requires doubled amounts of alkaline lysis buffers.
Important points before starting
I New users are advised to familiarize themselves with the detailed protocol provided in this handbook. In addition, extensive background information is provided on our plasmid resource page www.qiagen.com/goto/plasmidinfo.
I If working with low-copy vectors, it may be beneficial to increase the lysis buffer volumes to increase the efficiency of alkaline lysis, and thereby the DNA yield. In case additional Buffers P1, P2, and P3 are needed, their compositions are provided in Appendix B: Composition of Buffers, on page 44. Alternatively, the buffers may be purchased separately (see page 49).
I Optional: Remove samples at the indicated steps to monitor the procedure on an analytical gel (see page 41).
Pla
sm
id
M
eg
a
a
nd
G
ig
a
K
its
Things to do before starting
I Add the provided RNase A solution to Buffer P1 before use. Use 1 vial RNase A (centrifuge briefly before use) per bottle Buffer P1 for final concentration of 100 µg/ml. I Check Buffer P2 for SDS precipitation due to low storage temperatures. If necessary,
dissolve the SDS by warming to 37°C. I Pre-chill Buffer P3 at 4°C.
I Optional: Add the provided LyseBlue reagent to Buffer P1 and mix before use. Use 1 vial LyseBlue reagent per bottle Buffer P1 for a final dilution of 1:1000 (e.g., 10 µl LyseBlue into 10 ml Buffer P1). LyseBlue provides visual identification of optimum buffer mixing thereby preventing the common handling errors that lead to inefficient cell lysis and incomplete precipitation of SDS, genomic DNA, and cell debris. For more details see “Using LyseBlue reagent” on page 14.
Procedure
1. Pick a single colony from a freshly streaked selective plate and inoculate a starter culture of 5–10 ml LB medium containing the appropriate selective antibiotic. Incubate for approx. 8 h at 37°C with vigorous shaking (approx. 300 rpm). Use a tube or flask with a volume of at least 4 times the volume of the culture. 2. Dilute the starter culture 1/500 to 1/1000 into selective LB medium. For high-copy
plasmids, inoculateL 500 ml or G 2.5 liters medium with L 500–1000 µl or
G 2.5–5 ml of starter culture. For low-copy plasmids, inoculate L 2.5 liters or
G5 litersmedium withL2.5–5 mlorG5–10 mlof starter culture. Grow at 37°C for 12–16 h with vigorous shaking (approx. 300 rpm).
Use a flask or vessel with a volume of at least 4 times the volume of the culture. The culture should reach a cell density of approximately 3–4 x 10⁹cells per milliliter,
which typically corresponds to a pellet wet weight of approximately 3 g/liter medium.
3. Harvest the bacterial cells by centrifugation at 6000 xgfor 15 min at 4°C. Note: For Giga preparations of low-copy plasmids using 5 liters of culture, volumes of Buffers P1, P2, and P3 in steps 4–6 should be doubled, due to the very large number of cells harvested. For routine Giga preparation of low-copy plasmids, additional Buffers P1, P2, and P3 may need to be purchased (see page 49) or prepared (see page 44).
4. Resuspend the bacterial pellet inL50 mlorG125 mlof Buffer P1.
For efficient lysis, it is important to use a vessel that is large enough to allow complete mixing of the lysis buffers. We recommend a 500 ml bottle for Mega preparations and a 1000 ml bottle for Giga preparations. Ensure that the RNase A has been added to Buffer P1.
If LyseBlue reagent has been added to Buffer P1, vigorously shake the buffer bottle before use to ensure LyseBlue particles are completely resuspended. The bacteria should be resuspended completely by vortexing or pipetting up and down until no cell clumps remain.
5. AddL 50 mlorG 125 mlof Buffer P2, mix thoroughly by vigorously inverting 4–6 times, and incubate at room temperature (15–25°C) for 5 min.
Do not vortex, as this will result in shearing of genomic DNA. The lysate should appear viscous. Do not allow the lysis reaction to proceed for more than 5 min. After use, the bottle containing Buffer P2 should be closed immediately to avoid acidification of Buffer P2 from CO2in the air.
If LyseBlue has been added to Buffer P1, the cell suspension will turn blue after addition of Buffer P2. Mixing should result in a homogeneously colored suspension. If the suspension contains localized colorless regions or if brownish cell clumps are still visible, continue mixing the solution until a homogeneously colored suspension is achieved.
6. AddL50 mlorG125 mlof chilled Buffer P3, mix immediately and thoroughly by vigorously inverting 4–6 times, and incubate on ice for 30 min.
Precipitation is enhanced by using chilled Buffer P3 and incubating on ice. After addition of Buffer P3, a fluffy white material forms and the lysate becomes less viscous. The precipitated material contains genomic DNA, proteins, cell debris, and KDS. The lysate should be mixed thoroughly to avoid localized potassium dodecyl sulfate precipitation.
If LyseBlue reagent has been used, the suspension should be mixed until all trace of blue has gone and the suspension is colorless. A homogeneous colorless suspension indicates that the SDS has been effectively precipitated.
7. Centrifuge at≥20,000 xgfor 30 min at 4°C. Remove supernatant containing plasmid DNA promptly.
Before loading the centrifuge, the sample should be mixed again. Centrifugation should be performed in 250 ml or 500 ml non-glass tubes (e.g., polypropylene; not supplied).
Note: Instead of centrifugation steps 7 and 8, the lysate can be efficiently cleared by filtration using a QIAfilter Kits or Cartridges (see www.qiagen.com/products/ plasmid/LargeScaleKits).
Pl
a
sm
id
M
eg
a
a
nd
G
ig
a
K
its
Pla
sm
id
M
eg
a
a
nd
G
ig
a
K
its
8. Centrifuge the supernatant again at ≥20,000 x g for 15 min at 4°C. Remove supernatant containing plasmid DNA promptly.
This step should be carried out to avoid applying suspended or particulate material to the QIAGEN-tip. Suspended material (causing the sample to appear turbid) can clog the QIAGEN-tip and reduce or eliminate gravity flow.
Optional: Remove aL120 µlorG75 µlsample from the cleared lysate supernatant and save for an analytical gel (sample 1) to determine whether growth and lysis conditions were optimal.
9. Equilibrate aLQIAGEN-tip 2500orGQIAGEN-tip 10000by applyingL35 mlor
G75 mlBuffer QBT, and allow the column to empty by gravity flow.
Flow of buffer will begin automatically by reduction in surface tension due to the presence of detergent in the equilibration buffer. Allow the QIAGEN-tip to drain completely. QIAGEN-tips can be left unattended, since the flow of buffer will stop when the meniscus reaches the upper frit in the column.
10. Apply the supernatant from step 8 to the QIAGEN-tip and allow it to enter the resin by gravity flow.
The supernatant should be loaded onto the QIAGEN-tip promptly. If it is left too long and becomes cloudy due to further precipitation of protein, it must be centrifuged again or filtered before loading to prevent clogging of the QIAGEN-tip.
Optional: Remove aL 120 µlorG75 µlsample from the flow-through and save for an analytical gel (sample 2) to determine efficiency of DNA binding to the QIAGEN resin.
11. Wash the QIAGEN-tip with a total ofL200 mlor a total ofG600 mlBuffer QC. Allow Buffer QC to move through the QIAGEN-tip by gravity flow. The first half of the volume of wash buffer is sufficient to remove contaminants in the majority of plasmid DNA preparations. The second half is particularly necessary when large culture volumes or bacterial strains producing large amounts of carbohydrates are used.
Optional: Remove aL160 µlorG120 µlsample from the combined wash fractions and save for an analytical gel (sample 3).
12. Elute DNA withL35 mlorG100 mlBuffer QF.
Use of polycarbonate centrifuge tubes for collection is not recommended as polycarbonate is not resistant to the alcohol used in subsequent steps.
Optional: Remove a L 22 µlor G 20 µl sample of the eluate and save for an analytical gel (sample 4).
Note: For constructs larger than 45–50 kb, prewarming the elution buffer to 65°C may help to increase yield.
13. Precipitate DNA by addingL24.5 mlorG70 ml(0.7 volumes) room-temperature isopropanol to the eluted DNA. Mix and centrifuge immediately at≥15,000 xgfor 30 min at 4°C. Carefully decant the supernatant.
All solutions should be at room temperature to minimize salt precipitation, although centrifugation is carried out at 4°C to prevent overheating of the sample. Alternatively, disposable conical bottom centrifuge tubes can be used for centrifugation at 5000 x gfor 60 min at 4°C. Isopropanol pellets have a glassy appearance and may be more difficult to see than the fluffy, salt-containing pellets that result from ethanol precipitation. Marking the outside of the tube before centrifugation allows the pellet to be more easily located. Isopropanol pellets are also more loosely attached to the side of the tube, and care should be taken when removing the supernatant.
14. Wash DNA pellet withL7 mlorG10 mlof room-temperature 70% ethanol, and centrifuge at ≥15,000 x gfor 10 min. Carefully decant the supernatant without disturbing the pellet.
Alternatively, disposable conical-bottom centrifuge tubes (not supplied) can be used for centrifugation at 5000 x g for 60 min at 4°C. The 70% ethanol removes precipitated salt and replaces isopropanol with the more volatile ethanol, making the DNA easier to redissolve.
15. Air-dry the pellet for 10–20 min, and redissolve the DNA in a suitable volume of buffer (e.g., TE buffer, pH 8.0, or 10 mM Tris·Cl, pH 8.5).
Redissolve the DNA pellet by rinsing the walls to recover the DNA, especially if glass tubes have been used. Pipetting the DNA up and down to promote resuspension may cause shearing and should be avoided. Overdrying the pellet will make the DNA difficult to redissolve. DNA dissolves best under slightly alkaline conditions; it does not easily dissolve in acidic buffers.
Determination of yield
To determine the yield, DNA concentration should be determined by both UV spectrophotometry at 260 nm and quantitative analysis on an agarose gel. For reliable spectrophotometric DNA quantification,A260readings should lie between 0.1 and 1.0.
Agarose gel analysis
We recommend removing and saving aliquots during the purification procedure (samples 1–4). If the plasmid DNA is of low yield or quality, the samples can be analyzed by agarose gel electrophoresis to determine the stage of the purification procedure where the problem occurred (see page 41).
Pl
a
sm
id
M
eg
a
a
nd
G
ig
a
K
its
V
er
y
Lo
w
-C
op
y
Pla
sm
id
/C
os
m
id
Protocol: Very Low-Copy Plasmid/Cosmid Purification
using QIAGEN-tip 100 or QIAGEN-tip 500
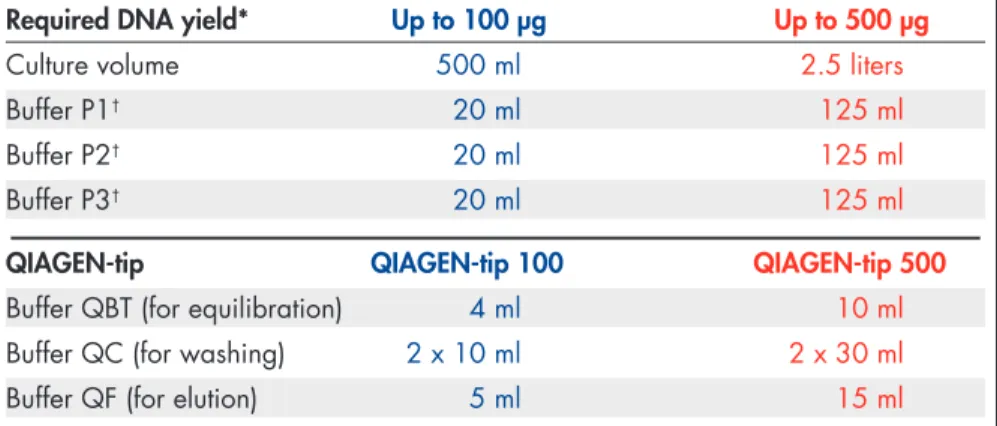
Very low-copy plasmids and cosmids of less than 10 copies per cell often require large culture volumes to yield significant amounts of DNA (for additional information see www.qiagen.com/goto/plasmidinfo). This protocol is suitable for QIAGEN-tip 100or QIAGEN-tip 500. After alkaline lysis, there is an additional isopropanol precipitation step to decrease the amount of lysate before DNA is bound to the QIAGEN-tip. Culture volumes and tip sizes are selected to match the quantity of DNA expected to the capacity of the QIAGEN-tip. For purification of P1 and BAC DNA using QIAGEN-tips, please contact one of our technical service groups or your local distributor (see back cover). For purification of large cosmid and plasmid DNA constructs, for example, BAC, PAC, or P1 DNA, the QIAGEN Large-Construct Kit is available (see ordering information on page 48). Details of yields, culture volumes, QIAGEN-tip sizes, and buffer volumes to be used for purification of very low-copy plasmids and cosmids are given in Table 3.
Table 5. Parameters for purification of very low-copy plasmids and cosmids of less than 10 copies per cell
Required DNA yield* Up to 100 µg Up to 500 µg
Culture volume 500 ml 2.5 liters
Buffer P1† 20 ml 125 ml
Buffer P2† 20 ml 125 ml
Buffer P3† 20 ml 125 ml
QIAGEN-tip QIAGEN-tip 100 QIAGEN-tip 500
Buffer QBT (for equilibration) 4 ml 10 ml
Buffer QC (for washing) 2 x 10 ml 2 x 30 ml
Buffer QF (for elution) 5 ml 15 ml
* For very-low-copy plasmids, expected yields are 20–100 µg for the QIAGEN-tip 100 and 100–500 µg for the QIAGEN-tip 500.
†Volumes of lysis Buffers P1, P2, and P3 are higher than in the standard protocols on pages 19–23 to
Important points before starting
I New users are advised to familiarize themselves with the detailed protocol provided in this handbook. In addition, extensive background information is provided on our plasmid resource page www.qiagen.com/goto/plasmidinfo.
I If working with low-copy vectors, it may be beneficial to increase the lysis buffer volumes to increase the efficiency of alkaline lysis, and thereby the DNA yield. In case additional Buffers P1, P2, and P3 are needed, their compositions are provided in Appendix B: Composition of Buffers, on page 41. Alternatively, the buffers may be purchased separately (see page 49).
I Optional: Remove samples at the indicated steps to monitor the procedure on an analytical gel (see page 41).
I Blue (marked with aL) denotes values forQIAGEN-tip 100 using the QIAGEN Plasmid Midi Kit;red(marked with aG) denotes values forQIAGEN-tip 500 using the QIAGEN Plasmid Maxi Kit.
Things to do before starting
I Add the provided RNase A solution to Buffer P1 before use. Use 1 vial RNase A (centrifuge briefly before use) per bottle Buffer P1 for final concentration of 100 µg/ml. I Check Buffer P2 for SDS precipitation due to low storage temperatures. If necessary,
dissolve the SDS by warming to 37°C. I Pre-chill Buffer P3 at 4°C.
I Optional: Add the provided LyseBlue reagent to Buffer P1 and mix before use. Use 1 vial LyseBlue reagent per bottle Buffer P1 for a final dilution of 1:1000 (e.g., 10 µl LyseBlue into 10 ml Buffer P1). LyseBlue provides visual identification of optimum buffer mixing thereby preventing the common handling errors that lead to inefficient cell lysis and incomplete precipitation of SDS, genomic DNA, and cell debris. For more details see “Using LyseBlue reagent” on page 14.
Procedure
1. Pick a single colony from a freshly streaked selective plate and inoculate a starter culture of 2–10 ml LB medium containing the appropriate selective antibiotic. Incubate for approx. 8 h at 37°C with vigorous shaking (approx. 300 rpm). Use a tube or flask with a volume of at least 4 times the volume of the culture.
V
er
y
Lo
w
-C
op
y
Pl
a
sm
id
/C
os
m
id
V
er
y
Lo
w
-C
op
y
Pla
sm
id
/C
os
m
id
2. Dilute the starter culture 1/500 to 1/1000 intoL500 mlorG2.5 litersof selective LB medium usingL500–1000 µlorG2.5–5 ml of starter culture. Grow at 37°C for 12–16 h with vigorous shaking (approx. 300 rpm).
Use a flask or vessel with a volume of at least 4 times the volume of the culture. The culture should reach a cell density of approximately 3–4 x 10⁹cells per ml, which
typically corresponds to a pellet wet weight of approximately 3 g/liter medium. 3. Harvest the bacterial cells by centrifugation at 6000 xgfor 15 min at 4°C.
If you wish to stop the protocol and continue later, freeze the cell pellets at –20°C. 4. Resuspend the bacterial pellet inL20 mlorG125 mlBuffer P1.
For efficient lysis it is important to use a vessel that is large enough to allow complete mixing of the lysis buffers. Ensure that RNase A has been added to Buffer P1. If LyseBlue reagent has been added to Buffer P1, vigorously shake the buffer bottle before use to ensure LyseBlue particles are completely resuspeded. The bacteria should be resuspended completely by vortexing or pipetting up and down until no cell clumps remain.
5. AddL 20 mlorG 125 mlBuffer P2, mix thoroughly by vigorously inverting the sealed tube 4–6 times, and incubate at room temperature (15–25°C) for 5 min. Do not vortex, as this will result in shearing of genomic DNA. The lysate should appear viscous. Do not allow the lysis reaction to proceed for more than 5 min. After use, the bottle containing Buffer P2 should be closed immediately to avoid acidification of Buffer P2 from CO2in the air.
If LyseBlue has been added to Buffer P1, the cell suspension will turn blue after addition of Buffer P2. Mixing should result in a homogeneously colored suspension. If the suspension contains localized colorless regions or if brownish cell clumps are still visible, continue mixing the solution until a homogeneously colored suspension is achieved.
6. AddL 20 mlorG125 mlchilled Buffer P3, mix immediately and thoroughly by vigorously inverting 4–6 times, and incubate on ice for 30 min.
Precipitation is enhanced by using chilled Buffer P3 and incubating on ice. After addition of Buffer P3, a fluffy white material forms and the lysate becomes less viscous. The precipitated material contains genomic DNA, proteins, cell debris, and KDS. The lysate should be mixed thoroughly to avoid localized potassium dodecyl sulfate precipitation.
If LyseBlue reagent has been used, the suspension should be mixed until all trace of blue has gone and the suspension is colorless. A homogeneous colorless suspension indicates that the SDS has been effectively precipitated.
7. Centrifuge at≥20,000 xgfor 30 min at 4°C. Remove supernatant containing plasmid DNA promptly.
Before loading the centrifuge, the sample should be mixed again. Centrifugation should be performed in non-glass tubes (e.g., polypropylene; not supplied). After centrifugation, the supernatant should be clear.
8. Centrifuge the supernatant again at ≥20,000 x g for 15 min at 4°C. Remove supernatant containing plasmid DNA promptly. Alternatively, the sample can be filtered over a prewetted, folded filter.
This second centrifugation step clears the lysate completely of precipitated material. Optional: Remove a L 600 µl or G 750 µl sample from the cleared lysate supernatant and save for an analytical gel (sample 1) to determine whether growth and lysis conditions were optimal.
9. Precipitate the DNA by adding L 42 mlor G 262.5 ml(0.7 volumes) of room-temperature isopropanol to the lysate. Centrifuge at≥15,000 xgfor 30 min at 4°C, and carefully decant the supernatant.
This isopropanol precipitation reduces the sample volume to facilitate loading of the column. It also serves to remove unwanted metabolites such as proteins and lipopolysaccharides.
10. Redissolve the DNA pellet in 500 µl TE buffer, pH 8.0, and add Buffer QBT to obtain a final volume ofL5 mlorG12 mlfor selectedLQIAGEN-tip 100orG QIAGEN-tip 500, respectively.
TE buffer is used to facilitate redissolving of the DNA. Buffer QBT provides optimal DNA binding conditions.
11. Equilibrate aL QIAGEN-tip 100 orG QIAGEN-tip 500by applyingL 4 mlor
G10 mlBuffer QBT, and allow the column to empty by gravity flow.
Flow of buffer will begin automatically by reduction in surface tension due to the presence of detergent in the equilibration buffer. Allow the QIAGEN-tip to drain completely. QIAGEN-tips can be left unattended, since the flow of buffer will stop when the meniscus reaches the upper frit in the column.
12. Apply the DNA solution from step 10 to the QIAGEN-tip and allow it to enter the resin by gravity flow.
Optional: Remove aL50 µlorG24 µlsample from the flow-through and save for an analytical gel (sample 2) to determine the efficiency of DNA binding to the QIAGEN resin.
V
er
y
Lo
w
-C
op
y
Pl
a
sm
id
/C
os
m
id
V
er
y
Lo
w
-C
op
y
Pla
sm
id
/C
os
m
id
13. Wash the QIAGEN-tip withL2 x 10 mlorG2 x 30 mlBuffer QC.
Allow Buffer QC to move through the QIAGEN-tip by gravity flow. The first wash is sufficient to remove contaminants in the majority of plasmid DNA preparations. The second wash is particularly necessary when large culture volumes or bacterial strains producing large amounts of carbohydrates are used.
Optional: Remove aL200 µlorG120 µlsample from the combined wash fractions and save for an analytical gel (sample 3).
14. Elute DNA withL5 mlorG15 mlBuffer QF.
Use of polycarbonate tubes (not supplied) to collect the eluate is not recommended as polycarbonate is not resistant the alcohol used in subsequent steps.
Note: For constructs larger than 45–50 kb, prewarming the elution buffer to 65°C may help to increase yield.
Optional: Remove a L 50 µlor G 30 µlsample of the eluate and save for an analytical gel (sample 4).
If you wish to stop the protocol and continue later, store the eluate at 4°C. Storage periods longer than overnight are not recommended.
15. Precipitate DNA by adding L 3.5 ml or G 10.5 ml (0.7 volumes) of room-temperature isopropanol to the eluted DNA. Mix and centrifuge immediately at
≥15,000 xgfor 30 min at 4°C. Carefully decant the supernatant.
All solutions should be at room temperature to minimize salt precipitation, although centrifugation is carried out at 4°C to prevent overheating of the sample. Alternatively, disposable conical bottom centrifuge tubes (not supplied) can be used for centrifugation at 5000 xgfor 60 min at 4°C. Isopropanol pellets have a glassy appearance and may be more difficult to see than the fluffy, salt-containing pellets that result from ethanol precipitation. Marking the outside of the tube before centrifugation allows the pellet to be more easily located. Isopropanol pellets are also more loosely attached to the side of the tube, and care should be taken when removing the supernatant.
16. Wash DNA pellet with L 2 ml orG 5 ml room-temperature 70% ethanol, and centrifuge at≥15,000 x gfor 10 min. Carefully decant the supernatant without disturbing the pellet.
Alternatively, disposable conical-bottom centrifuge tubes (not supplied) can be used for centrifugation at 5000 x g for 60 min at 4°C. The 70% ethanol removes precipitated salt and replaces isopropanol with the more volatile ethanol, making the DNA easier to redissolve.
17. Air-dry the pellet for 5–10 min, and redissolve the DNA in a suitable volume of buffer (e.g., TE buffer, pH 8.0, or 10 mM Tris·Cl, pH 8.5).
Redissolve DNA pellet by rinsing the walls to recover the DNA, especially if glass tubes have been used. Pipetting the DNA up and down to promote resuspension may cause shearing and should be avoided. Overdrying the pellet will make the DNA difficult to redissolve. DNA dissolves best under alkaline conditions; it does not easily dissolve in acidic buffers.
Determination of yield
To determine the yield, DNA concentration should be determined by both UV spectrophotometry and quantitative analysis on an agarose gel.
Agarose gel analysis
We recommend removing and saving aliquots during the purification procedure (samples 1–4). If the plasmid DNA is of low yield or quality, the samples can be analyzed by agarose gel electrophoresis to determine the stage of the purification procedure where the problem occurred (see page 41).
V
er
y
Lo
w
-C
op
y
Pl
a
sm
id
/C
os
m
id
Troubleshooting Guide
This troubleshooting guide may be helpful in solving any problems that may arise. For more information, see also the Frequently Asked Questions page at our Technical Support Center: www.qiagen.com/FAQ/FAQList.aspx. The scientists in QIAGEN Technical Services are always happy to answer any questions you may have about either the information and protocols in this handbook or sample and assay technologies (for contact information, see back cover or visit www.qiagen.com).
Comments and suggestions Low or no DNA yield
No DNA in lysate (sample 1)
a) Plasmid did not Please read ”Growth of Bacterial Cultures” on our Web propagate page www.qiagen.com/goto/plasmidinfo, and check
that the conditions for optimal growth were met. b) Alkaline lysis was If cells have grown to very high densities or a larger
inefficient amount of cultured medium than recommended was used, the ratio of biomass to lysis reagent is shifted. This may result in poor lysis conditions, because the volumes of Buffers P1, P2, and P3 are not sufficient for setting the plasmid DNA free efficiently. Reduce culture volume or increase volumes of Buffers P1, P2, and P3.
Also insufficient mixing of lysis reagents will result in reduced yield. Mix thoroughly after addition of Buffers P1, P2, and P3 to achieve homogeneous suspensions. Use LyseBlue to visualize efficiency of mixing.
c) Insufficient lysis for For low copy-plasmid preparations, doubling the low-copy plasmids volumes of lysis buffers P1, P2, and P3 may help to increase plasmid yield and quality (see page 29 and background on our Web page www.qiagen.com/ goto/plasmidinfo).
d) Lysate incorrectly Check Buffer P2 for SDS precipitation resulting from low prepared storage temperatures and dissolve the SDS by warming. The bottle containing Buffer P2 should always be closed immediately after use. Lysis buffers prepared in the laboratory should be prepared according to the instructions on page 45.
Comments and suggestions DNA in flow-though fraction (sample 2)
a) Column was Check the culture volume and yield against the capacity overloaded of the QIAGEN-tip, as detailed at the beginning of each protocol. Reduce the culture volume accordingly, or select a larger QIAGEN-tip if a higher yield is desired. For very low-copy number plasmid and cosmid preps requiring very large culture volumes, please see page 29. b) SDS (or other ionic Chill Buffer P3 before use. If the lysate is cleared by detergent) was in lysate centrifugation, load onto QIAGEN-tip promptly after centrifugation. If lysate is too viscous for effective mixing of Buffer P3, reduce culture volume or increase volumes of Buffers P1, P2, and P3.
Use LyseBlue to visualize efficiency of mixing.
c) Inappropriate salt Ensure that any buffers prepared in the laboratory were or pH conditions prepared according to the instructions provided on
in buffers page 45.
d) Column flow was Store QIAGEN-tips at room temperature (15–25°C). uneven If stored under cold, damp conditions for prolonged periods of time, the resin may clump. This problem can be overcome by shaking the column before use. DNA in Buffer QC wash fraction (sample 3)
a) Column was Check the culture volume and yield against the capacity overloaded of the QIAGEN-tip, as detailed at the beginning of each protocol. Reduce the culture volume accordingly, or select a larger QIAGEN-tip if a higher yield is desired. For very low-copy-number plasmid and cosmid preps requiring very large culture volumes, please see page 29. b) Buffer QC was Check pH and salt concentration of Buffer QC. Recover incorrect DNA by precipitation, and purify on a new QIAGEN-tip as detailed in “Purification of plasmid DNA prepared by other methods” on our Web page www.qiagen.com/goto/plasmidinfo.