Access 2013
Access 2013: The Missing Manual
by Matthew MacDonaldCopyright © 2013 Matthew MacDonald. All rights reserved. Printed in the United States of America.
Published by O’Reilly Media, Inc.,
1005 Gravenstein Highway North, Sebastopol, CA 95472.
O’Reilly books may be purchased for educational, business, or sales promotional use. Online editions are also available for most titles (http://my.safaribooksonline.com). For more information, contact our corporate/institutional sales department: (800) 998-9938 or [email protected].
April 2013: First Edition.
See http://http://oreilly.com/catalog/errata.csp?isbn=0636920028406 for release details.
The Missing Manual is a registered trademark of O’Reilly Media, Inc. The Missing Manual logo, and “The book that should have been in the box” are trademarks of O’Reilly Media, Inc. Many of the designations used by manufacturers and sellers to distinguish their products are claimed as trademarks. Where those designations appear in this book, and O’Reilly Media is aware of a trademark claim, the designations are capitalized.
While every precaution has been taken in the preparation of this book, the publisher assumes no responsibility for errors or omissions, or for damages resulting from the use of the information contained in it.
Contents
The Missing Credits
. . .ix
Introduction
. . .1
What You Can Do with Access . . . 1
The Access Ribbon . . . 7
The Changes in Access 2013 . . . 12
About This Book . . . 14
About the Online Resources . . . 18
Safari® Books Online . . . 19
Part One:
Storing information
in Tables
CHAPTER 1:Creating Your First Database
. . .23
Understanding Access Databases . . . .24
Starting a Database . . . .25
Building Your First Table . . . .30
Saving Databases . . . 40
Opening Databases . . . .44
The Navigation Pane . . . .49
CHAPTER 2:
Building Smarter Tables
. . .55
Understanding Data Types . . . 55
Design View . . . .56
Access Data Types . . . 61
The Primary Key . . . .88
Six Principles of Database Design . . . .89
CHAPTER 3:
Mastering the Datasheet: Sorting, Searching, and
Filtering
. . .97
Datasheet Customization . . . .98
CHAPTER 4:
Blocking Bad Data
. . .129
Data Integrity Basics . . . 130
Input Masks . . . 138
Validation Rules . . . 146
Lookups . . . 155
CHAPTER 5:
Linking Tables with Relationships
. . . .161
Relationship Basics. . . 162
Using a Relationship . . . 166
More Exotic Relationships . . . 184
Relationship Practice . . . 190
Part two:
Manipulating Data
with Queries
CHAPTER 6:Queries That Select Records
. . .201
Query Basics . . . .202
Creating Queries . . . .203
Queries and Related Tables . . . .225
CHAPTER 7:
Essential Query Tricks
. . .237
Calculated Fields . . . .237
Query Functions . . . 244
Query Parameters . . . 260
CHAPTER 8:
Queries That Summarize Data
. . .263
Totals Queries . . . .263
Crosstab Queries . . . .270
CHAPTER 9:
Queries That Change Tables
. . .283
Understanding Action Queries . . . .283
Update Queries . . . .285
Append Queries . . . 291
Delete Queries . . . .297
Tutorial: Flagging Out-of-Stock Orders . . . 301
Part three:
Printing Reports
CHAPTER 10:Creating Reports
. . .307
Report Basics . . . 309
CHAPTER 11:
Designing Advanced Reports
. . . .345
Improving Reports in Design View . . . .345
The Report Wizard . . . .357
The Label Wizard . . . 360
Fine-Tuning Reports with Properties . . . .365
Expressions . . . .369
Grouping . . . 371
Part Four:
Building a User interface
with Forms
CHAPTER 12:Creating Simple Forms
. . .383
Creating Forms . . . 384
Using Forms . . . 391
Sorting and Filtering in a Form . . . .396
Creating Fancy Forms . . . 401
The Form Wizard . . . 416
CHAPTER 13:
Designing Advanced Forms
. . .419
Customizing Forms in Design View . . . 419
Taking Control of Controls . . . .438
Forms and Linked Tables . . . .453
CHAPTER 14:
Building a Navigation System
. . . .459
Mastering the Navigation Pane . . . 460
Building Forms with Navigation Smarts . . . .470
Navigation Forms . . . .479
Linking to Related Data . . . 485
Part Five:
Programming Access
CHAPTER 15:Automating Tasks with Macros
. . . .495
Macro Essentials . . . 496
Macros and Security . . . 510
Three Macro Recipes . . . 519
Managing Macros . . . .523
CHAPTER 16:
Connecting Macros to Forms and Tables
. . . .529
CHAPTER 17:
Automating Tasks with Visual Basic
. . .561
The Visual Basic Editor . . . .562
Putting Code in a Form . . . 566
Understanding Objects . . . .573
Using Objects . . . 581
CHAPTER 18:
Writing Smarter Code
. . .591
Exploring the VB Language . . . 591
Dealing with Trouble . . . 605
Deeper into Objects . . . 612
Using VB to Run a Better Business . . . 618
Part six:
Going Large: Access
Databases for Many Users
CHAPTER 19:Sharing a Database on Your Network
. . .639
Opening Up Your Database to the World . . . .639
Preparing Your Database . . . .642
Playing Well with Others . . . .658
Data Corruption . . . 666
Securing Your Database . . . 668
CHAPTER 20:
Building an Access Web App
. . .675
Assessing Web Apps . . . .676
Preparing for Web Apps . . . .677
Building a Simple Web App . . . .678
Running Your Web App . . . 690
Customizing Views . . . 698
Creating More Advanced Views . . . 706
Tutorial: Creating a Web App from an Access Database . . . 717
CHAPTER 21:
Linking Access to SQL Server
. . .727
How Access and SQL Server Can Work Together . . . .728
Getting Started with SQL Server Express . . . .734
Building a SQL Server Database . . . 742
Editing SQL Server Tables in Access . . . .752
Migrating an Access Database to SQL Server . . . .758
CHAPTER 22:
Linking Access to SharePoint
. . .763
Understanding SharePoint . . . .764
CHAPTER 23:
Importing and Exporting Data
. . . .789
Case for Importing and Exporting . . . .789
Using the Clipboard . . . 791
Import and Export Operations . . . .796
Access and XML . . . 810
Part seven:
Appendix
APPENDIX A:Customizing Access
. . .823
Adding Your Favorites to the QAT . . . .824
Personalizing the Ribbon . . . .829
The Missing Credits
ABoUT The AUThoR
Matthew MacDonald is a four-time Microsoft MVP and a technol-ogy writer with well over a dozen books to his name. Office geeks can follow him into the world of spreadsheets with Excel 2013: The Missing Manual. Web fans can build an online home with him in Creating a Website: The Missing Manual. And human beings of all descriptions can discover just how strange they really are in the quirky handbooks Your Brain: The Missing Manual and Your Body: The Missing Manual.
ABoUT The CReATive TeAM
Nan Barber (editor) has worked with the Missing Manual series since the previ-ous millennium. She lives in Massachusetts with her husband and iMac. Email: [email protected].
Kara Ebrahim (production editor) lives, works, and plays in Cambridge, MA. She loves graphic design and all things outdoors. Email: [email protected].
Nan Reinhardt (proofreader) lives in the Midwest, where she enjoys summer week-ends at the lake, boating, swimming, and reading voraciously. Nan is not only a freelance copyeditor and proofreader, but she’s also a published romance novelist. Check out her work at www.nanreinhardt.com. Email: [email protected].
Ron Strauss (indexer) specializes in the indexing of information technology publica-tions of all kinds. Ron is also an accomplished classical violist and lives in northern California with his wife and fellow indexer, Annie, and his miniature pinscher, Kanga. Email: [email protected].
Andrew Vickers (technical reviewer) has been building bespoke Access databases for his clients since Access 97 in 1999. He has also developed a number of database products for the property industry through his company Hartlebury Software in Worcestershire, UK (www.hartleburysoftware.co.uk).
ACknowLeDGeMenTS
Writing a book about a program as sprawling and complex as Access is a labor of love (love of pain, that is). I’m deeply indebted to a whole host of people who helped out with this edition and the two previous ones. They include Nan Barber, Brian Saw-yer, and Nellie McKesson, and technical reviewers Andrew Vickers, Paloma Fautley, John Pierce, James Turner, Juel Bortolussi, and Michael Schmalz. I also owe thanks to many people who worked to get this book formatted, indexed, and printed—you can meet many of them on the Missing Credits page.
Completing this book required a few sleepless nights (and many sleep-deprived days). I extend my love and thanks to my daughters, Maya and Brenna, who put up with it without crying most of the time, my dear wife, Faria, who mostly did the same, and our moms and dads (Nora, Razia, Paul, and Hamid), who contributed hours of babysitting, tasty meals, and general help around the house that kept this book on track. So thanks everyone—without you, half of the book would still be trapped inside my brain!
—Matthew MacDonald
The MiSSinG MAnUAL SeRieS
Missing Manuals are witty, superbly written guides to computer products that don’t come with printed manuals (which is just about all of them). Each book features a handcrafted index and cross-references to specific pages (not just chapters). Recent and upcoming titles include:
Access 2010: The Missing Manual by Matthew MacDonald Adobe Edge Animate: The Missing Manual by Chris Grover Buying a Home: The Missing Manual by Nancy Conner
Creating a Website: The Missing Manual, Third Edition by Matthew MacDonald CSS3: The Missing Manual by David Sawyer McFarland
David Pogue’s Digital Photography: The Missing Manual by David Pogue Dreamweaver CS6: The Missing Manual by David Sawyer McFarland Droid 2: The Missing Manual by Preston Gralla
Droid X2: The Missing Manual by Preston Gralla
Excel 2010: The Missing Manual by Matthew MacDonald Excel 2013: The Missing Manual by Matthew MacDonald
FileMaker Pro 12: The Missing Manual by Susan Prosser and Stuart Gripman Flash CS6: The Missing Manual by Chris Grover
Google+: The Missing Manual by Kevin Purdy HTML5: The Missing Manual by Matthew MacDonald
iMovie ’11 & iDVD: The Missing Manual by David Pogue and Aaron Miller iPad: The Missing Manual, Fifth Edition by J.D. Biersdorfer
iPhone: The Missing Manual, Fifth Edition by David Pogue
iPhone App Development: The Missing Manual by Craig Hockenberry iPhoto ’11: The Missing Manual by David Pogue and Lesa Snider
iPod: The Missing Manual, Tenth Edition by J.D. Biersdorfer and David Pogue JavaScript & jQuery: The Missing Manual, Second Edition by David Sawyer McFarland Kindle Fire HD: The Missing Manual by Peter Meyers
Living Green: The Missing Manual by Nancy Conner Mac OS X Lion: The Missing Manual by David Pogue
Microsoft Project 2010: The Missing Manual by Bonnie Biafore Microsoft Project 2013: The Missing Manual by Bonnie Biafore Motorola Xoom: The Missing Manual by Preston Gralla Netbooks: The Missing Manual by J.D. Biersdorfer NOOK HD: The Missing Manual by Preston Gralla
Office 2010: The Missing Manual by Nancy Conner and Matthew MacDonald Office 2011 for Macintosh: The Missing Manual by Chris Grover
Office 2013: The Missing Manual by Nancy Conner and Matthew MacDonald OS X Mountain Lion: The Missing Manual by David Pogue
Personal Investing: The Missing Manual by Bonnie Biafore Photoshop CS6: The Missing Manual by Lesa Snider
Photoshop Elements 11: The Missing Manual by Barbara Brundage PHP & MySQL: The Missing Manual, Second Edition by Brett McLaughlin QuickBooks 2012: The Missing Manual by Bonnie Biafore
QuickBooks 2013: The Missing Manual by Bonnie Biafore
WordPress: The Missing Manual by Matthew MacDonald Your Body: The Missing Manual by Matthew MacDonald Your Brain: The Missing Manual by Matthew MacDonald Your Money: The Missing Manual by J.D. Roth
P
eople have tried a variety of techniques to organize information. They've used Rolodexes, punch cards, cardboard boxes, vertical files, Post-it notes, 10,000-page indexes, and (when all else failed) large paper piles on flat surfaces. But after much suffering, people discovered that computers were far better at dealing with information, especially when that information is large, complex, or changes frequently. That's where Microsoft Access comes into the picture. Access is a tool for managing databases—carefully structured catalogs of information (or data). Databases can store just about any type of information, including numbers, pages of text, and pictures. Databases also range wildly in size—they can handle everything from your list of family phone numbers to a ginormous product catalog for Aunt Ethel's Discount Boutique.In this book, you'll learn how to design complete databases, maintain them, search for valuable nuggets of information, and build attractive forms for quick and easy data entry. You'll delve into the black art of Access programming, where you'll pick up valuable tricks and techniques that you can use to automate common tasks, even if you've never touched a line of code before. And you'll even explore the new web app feature that lets you put your database online so anyone can use it—provided you have a SharePoint server or an Office 365 hosting plan.
WhaT You Can
Do WiTh aCCess It's impossible to describe even a fraction of the different databases that Access fans create every day. But just to get you thinking like a database maven, here are some common types of information that you can store handily in an Access database:
• Catalogs of books, CDs, rare wine vintages, risqué movies, or anything else you want to collect and keep track of.
• Mailing lists that let you keep in touch with friends, family, and coworkers. • Business information, like customer lists, product catalogs, order records, and
invoices.
• Lists of guests and gifts for weddings and other celebrations. • Lists of expenses, investments, and other financial planning details.
Think of Access as a personal assistant that can help you organize, update, and find any type of information. This help isn't just a convenience—it also lets you do things you could never accomplish on your own.
WhaT You Can Do WiTh aCCess
FiGURe i-1
WhaT You Can Do WiTh aCCess
UP To SPEED
The Benefits of a Good Database
Many people use an address book to keep track of close friends, distant relatives, or annoying coworkers. For the most part, the low-tech address book works great. But consider what happens if you decide to store the same information in an Access data-base. Even though your contact list isn't storing Google-sized volumes of information, it still offers a few features that you wouldn't have without Access:• Backup. If you've ever tried to decipher a phone number through a coffee stain, you know that sometimes it helps to have things in electronic form. Once you place all your contact information into a database, you'll be able to preserve it in case of disaster, and print as many copies as you need (each with some or all of the information showing). You can even share your list with a friend who needs the same numbers.
• Space. Although most people can fit all the contacts they need into a small address book, a database ensures you'll never fill up that "M" section. Not to mention that you can cross out and rewrite the address for your itinerant Uncle Sid only so many times before you run out of room. • Searching. An address book organizes contacts in one
way—by name. But what happens once you've entered everyone in alphabetical order by last name, and you need to look up a contact you vaguely remember as Joe? Access can effortlessly handle this search. It can also find a matching entry by phone number, which is great if your phone gives you a log of missed calls by number only, and you want to figure out who's been pestering you. • Sharing. Only one person at a time can edit most ordinary
files like Microsoft Word documents and spreadsheets. This limitation causes a problem if you need your entire office team to collaborate on a potluck menu. But Access lets multiple people review and change your data at the same time, on different computers. Chapter 19 has the full story.
• Integration with other applications. Access introduces you to a realm of timesaving possibilities like mail merge. You can feed a list of contacts into a form letter you create in Word, and automatically generate dozens of individually addressed letters.
All these examples demonstrate solid reasons to go electronic with almost any type of information.
The Two Sides of Access
As you'll see in this book, you'll actually perform two separate tasks with Access: • Designing your database. This task involves creating tables to hold data, queries
that can ferret out important pieces of information, forms that make it easy to enter information, and reports that produce attractive printouts.
WhaT You Can Do WiTh aCCess (eventually) spend more time on task #2. For example, you might spend a couple
of hours creating a database to keep track of your favorite recipes, but you'll wind up entering new information and looking up recipes for years (say, every time you need to cook up dinner).
Access vs. Excel
Access isn't the only Office product that can deal with lists and tables of information. Microsoft Excel also includes features for creating and managing lists. So what's the difference?
Although Excel's perfectly good for small, simple amounts of information, it just can't handle the same quantity and complexity of information as Access. Excel also falters if you need to maintain multiple lists with related information (for example, if you want to track a list of your business customers and a list of the orders they've made). Excel forces you to completely separate these lists, which makes it harder to analyze your data and introduces the possibility of inconsistent information. Access lets you set up strict links between tables, which prevents these problems. Access also provides all sorts of features that don't have any parallel in the spread-sheet world, such as the ability to create customized search routines, design fine-tuned forms for data entry, and print a variety of snazzy reports.
Of course, all this isn't to say that Access is better than Excel. In fact, in many cases you might want Excel to partner up with Access. Excel shines when crunching reams of numbers to create graphs, generate statistics, or predict trends. Many organiza-tions use Access to store and manage information, and then export a portion of that information to an Excel spreadsheet whenever they need to analyze it. You'll learn how to take this step in Chapter 23.
TIP Looking to polish up your Excel skills? Check out Excel 2013: The Missing Manual.
Access vs. SQL Server
Microsoft provides another database product—the industrial-strength SQL Server, which powers everything from Microsoft's own search engine to the NASDAQ stock exchange. Clearly, SQL Server is big business, and many Access fans wonder how their favorite database software compares.
WhaT You Can
The aCCess Ribbon
WoRD To ThE WISE
When Access Isn't Enough
If you've picked up this book, you probably have a good sense that Access will meet your needs. But if you're in any doubt, a quick reality check will confirm whether you're on the right path.
The following list describes a few warning signs that suggest you and Access just aren't a good fit. If you don't fall into any of these categories, congratulations—you're ready to use the most straightforward and productive database software anywhere! • You need to store huge volumes of information (more than 2 gigabytes of data). You're unlikely to hit this mark unless you're storing large pictures or other types of digital content inside a database. Even a big Access database is usually less than 100 megabytes (about 20 times smaller than the 2 GB limit).
• You need to share your database over the Web. Ordinary Access databases just aren't cut out for the Web. But Access 2013 introduces a new web app feature that uses Microsoft SharePoint behind the scenes, so your database can serve far more people than it could through Access
alone. However, there are disadvantages—for example, some Access features don't carry over to the web application, and you must invest in SharePoint server or a SharePoint hosting service. Chapter 22 describes Access's web database feature in detail.
• You're going to share your database on a network, and more than a dozen people need to use it at once. It's difficult to correctly interpret this limit. It's perfectly fine for hundreds of people to use your database from time to time, but problems occur when many people are all jockeying to make changes to the same database file at the same instant. You need to test your database to figure out whether you can cross this limit without introducing problems, and you may need to switch to a web app (Chapter 20) or use Access in conjunction with SQL Server (Chapter 21). For more information about sharing Access—and for some help deciding what's the best way to satisfy large crowds of people—see page 641.
The Access Ribbon
The aCCess Ribbon
FiGURe i-2
When you hover over a button in the ribbon, you don't see a paltry two- or three-word description in a yellow box. Instead, you see a friendly pop-up box with a complete mini-description. Here, the mouse is hovering over the Table command.
Here's a quick rundown of the basic ribbon tabs:
• File looks like a tab, but it's actually the gateway into backstage view. Page 11 explains how backstage view works.
• home gathers together a variety of common commands including the familiar copy-and-paste tools and formatting commands for tweaking fonts and colors. You'll also find handy features like sorting, searching, and filtering, all of which you'll tackle in Chapter 3.
• Create has commands for inserting all the different database objects you'll learn about in this book (see page 24 for the lowdown). These include the tables that store data, the queries that search it, the forms that help you edit it, and the reports that help you print it.
• External Data has commands for importing data into Access and exporting it to other programs. You'll also find features for integrating with Microsoft SharePoint Server. You'll use these commands in Part Six.
The aCCess Ribbon TIP If you have a scroll mouse, you can breeze through the tabs by moving the mouse pointer over the
ribbon, and then rolling the scroll wheel up or down.
One nice ribbon feature is the way it adapts to different window sizes. In a wide Access window, there's room to spread out, and text appears next to almost every button. But in a narrow Access window, where space is more limited, Access strips the text off less important buttons to make room (Figure I-3).
FiGURe i-3
Here are three sections from the Home tab in the ribbon (Sort & Filter, Records, and Find). When the Access window is wide, there's plenty of room to show buttons and text (top). But if you resize the Access window down to super-skinniness, the ribbon removes text so it can keep showing the same set of commands. If you want to know what a no-text button does, hover your cursor over it to see its name.
TIP Want to reclaim the screen real estate that the ribbon occupies? Just double-click the current tab, and the ribbon collapses, leaving only the row of tab titles visible. Double-click the tab again to pop the buttons back into sight.
Using the Ribbon with the Keyboard
If you're a diehard keyboard lover, you'll be happy to hear that you can trigger ribbon commands with the keyboard. The trick is to use keyboard accelerators, a series of keystrokes that starts with the Alt key (the same keys you used to use to get to a menu). When using a keyboard accelerator, you don't hold down all the keys at the same time. (As you'll soon see, some of them have enough letters to tie your fingers up better than the rowdiest game of Twister.) Instead, you press the keys one after the other.
The trick to keyboard accelerators is to understand that once you press the Alt key, you do two things, in this order:
The aCCess
Ribbon Before you can trigger a specific command, you you're already there). Every accelerator requires at least two key presses after you must select the right tab (even if press the Alt key. You'll need even more if you need to dig through a submenu. By now, this whole process probably seems hopelessly impractical. Are you really expected to memorize dozens of different accelerator key combinations?
Fortunately, Access is ready to help you out with a feature called KeyTips. Here's how it works: Once you press the Alt key, letters magically appear over every tab in the ribbon. Once you press a key to pick a tab, letters appear over every button in that tab. You can then press the corresponding key to trigger the command. Figure I-4 shows how it works.
FiGURe i-4
Top: When you press Alt, Access pins KeyTips next to every tab, over the File menu, and over the but-tons in the Quick Access toolbar.
Bottom: If you follow up by pressing Y (for the Database Tools tab), you'll see letters next to every command in that tab. Now you can press another key to run a command (for example, W moves your data to SQL Server).
TIP Don't bother trying to match letters with tab or button names—the ribbon's got so many features packed into it that in many cases, the letters don't mean anything at all.
In some cases, a command may have two letters, and you need to press both keys, one after the other. You can back out of KeyTips mode at any time without triggering a command by pressing the Alt key again.
The aCCess Ribbon
The Quick Access Toolbar
Keen eyes will notice the tiny bit of screen real estate that sits just above the ribbon (Figure I-5). This bit of screen holds a series of tiny icons, and it's called the Quick Access toolbar (or QAT to Access nerds).
FiGURe i-5
The Quick Access toolbar puts the Save, Undo, and Redo commands right at your fingertips. Access singles out these commands because people use them more frequently than any other commands. But as you'll learn in the appendix of this book, you can add anything you want here.
If the Quick Access toolbar were nothing but a specialized shortcut for three com-mands, it wouldn't be worth the bother. However, the nifty thing about the Quick Access toolbar is that you can customize it. In other words, you can remove com-mands you don't use and can add your own favorites.
Microsoft has deliberately kept the Quick Access toolbar very small. It's designed to give a carefully controlled outlet for those customization urges. Even if you go wild stocking the Quick Access toolbar with your own commands, the rest of the ribbon remains unchanged. (And that means a coworker or spouse can still use your computer without suffering a migraine.) However, Access also lets you get more radical by revising the arrangement of tabs, sections, and buttons in the ribbon. To learn how to customize the QAT and the ribbon, check out the appendix.
Backstage View
Your data is the star of the show. That's why Access's creators refer to databases as being on stage. Sure, it's a strange metaphor, but the rationale for Access's backstage view makes sense: It temporarily takes you away from your database and lets you concentrate on other tasks that don't involve entering or editing data. These tasks include creating a new database, converting your database to a different format, printing part of its contents, and changing Access settings.
The Changes in aCCess 2013
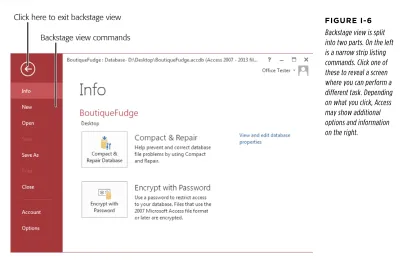
FiGURe i-6
Backstage view is split into two parts. On the left is a narrow strip listing commands. Click one of these to reveal a screen where you can perform a different task. Depending on what you click, Access may show additional options and information on the right.
Along with creating and opening databases, you can also use Access's backstage view to:
• Compact, repair, and encrypt your database file (choose Info) • Save a copy of your database (choose Save As)
• Print some of the information in your database (choose Print) • Quit Access (choose Close)
• Configure all sorts of Access options (choose Options) or change your user information (choose Account)
You'll return to backstage view to perform all of these tasks in the chapters ahead.
The Changes in Access 2013
The Changes in aCCess 2013 stirred up more than a little controversy among old-hand Access programmers,
and much of it is justified. However, the ultimate goal—to make sure that Access remains a viable, thriving platform for businesses, individuals, and all kinds of data lovers—is a worthy one.
The most significant addition to Access 2013 is an Internet-enabled feature that Microsoft calls web apps (covered in Chapter 20). Web apps allow ordinary Access users to create databases that live on the Web, where hundreds or thousands of people can use them. Best of all, web apps require no extra skills beyond a basic knowledge of Access, and they are underpinned by Microsoft's SQL Server data engine, ensuring good performance and offering the sort of data integration possibili-ties that make programmers drool. However, the tradeoffs are significant. Web apps have far fewer features than traditional desktop apps, and they require a SharePoint 2013 server to host them. Businesses that aren't already using SharePoint 2013 may want to consider Microsoft's Office 365 subscription plan (described in the box on page 14), but the cost of licensing a team of people adds up quickly.
Beside web apps, the only other significant changes in Access are feature removals. Here are the key features that are no longer offered in Access 2013:
• Access data projects. This nifty feature let Access experts create and manage SQL Server databases without leaving the comfort of Access. Its removal is the most controversial change in Access 2013. Now, Access fans who want to link Access and SQL Server together need to master SQL Server's management tools, as described in Chapter 21.
• The upsizing wizard. In the past, the upsizing wizard could take an overtaxed Access database and convert it to a SQL Server database. To do that now, you need the help of another tool, called SSMA. Fortunately, it's free (page 758). • Support for Access 97 files. Access 2013 can't open or convert Access 97 files.
Sixteen years after Access 97 was first introduced, this shouldn't come as much of a surprise. But if you still have an extremely old database kicking around, make sure you convert it using an older version of Access, like Access 2010 or 2007. In a similar vein, Access 2013 has finally given up on dBASE, which means you can't import information from this long-dead database software either. • Pivot tables and pivot charts. Pivot tables and charts provided a powerful way
to analyze huge quantities of data. However, the Access pivot table feature only had a subset of the full pivot table capabilities found in Excel. Now, Microsoft recommends that people who want to analyze their data do so in Excel. (Excel has a handy data connection feature that can grab the latest information from a database and insert it into a workbook.)
abouT This book
UP To SPEED
The Office 365 Subscription Service
Office 365 is a set of subscription services for businesses, educational institutions, and government workers. When a company signs up, they give each of their employees a separate Office 365 account that they can use to run Office (either online or on the desktop, if the subscription plan includes desktop use). The Office 365 plan also includes online services, such as email, messaging, document sharing, project tracking, and more. The exact set of features depends on the plan you use—higher-end plans include SharePoint and support Access's new web app feature.The drawback to Office 365 is that each person who uses it needs a separate subscription plan, and each subscription plan
entails a monthly payment to Microsoft (ranging from $4 to over $20 per month). For big businesses, the cost of giving their employees Office 365 subscriptions is often less than buying multiple copies of the shrinkwrapped Office software, and it saves them many of the administration, because Microsoft manages most of the administration, from spam filtering to setting up SharePoint. However, Office 365 probably won't interest families, hobbyists, or self-employed people. To learn more about Office 365 and compare the different subscription plans, visit http://office.microsoft.com.
About This Book
Despite the many improvements in software over the years, one feature hasn't im-proved a bit: Microsoft's documentation. In fact, with Office 2013, you get no printed user guide at all. To learn about the thousands of features included in this software collection, Microsoft expects you to read the online help.
Occasionally, these help screens are actually helpful, like when you're looking for a quick description explaining a mysterious programming command. On the other hand, if you're trying to learn how to, say, create a summary with subtotals, you'll find nothing better than terse and occasionally cryptic instructions.
This book is the manual that should have accompanied Access 2013. In these pages, you'll find step-by-step instructions and tips for using almost every Access feature, including those you haven't (yet) heard of.
About the outline
This book is divided into seven parts, each containing several chapters.
abouT This book • Part Two: Manipulating Data with Queries. In this part, you'll build queries—
specialized commands that can hunt down the data you're interested in, apply changes, and summarize vast amounts of information.
• Part Three: Printing Reports. This part shows you how to use reports to take the raw data in your tables and format it into neat printouts, complete with fancy formatting and subtotals.
• Part Four: Building a User Interface with Forms. In this part, you'll build forms—customized windows that make data entry easy, even for Access newbies. • Part Five: Programming Access. Now that you've mastered the essentials of
databases, you're ready to delve into the black art of Access programming. In this part, you'll use macros and Visual Basic programming to automate complex tasks and solve common challenges.
• Part Six: Going Large: Access Databases for Many Users. In this part, you'll learn to let groups of people use your database at the same time. You'll start by learning how to split your Access database and host it on a network. Then you'll consider other options, such as putting your database online in a web app, or linking your database to SQL Server or SharePoint. Finally, you'll learn about the import and export features that can transport data into your database and copy it to other types of files.
• Part Seven: Appendix. This book wraps up with an appendix that shows how to customize the ribbon to get easy access to your favorite commands.
About
→
These
→
Arrows
Throughout this book, you'll find sentences like this one: "Choose Create→Tables →Table." This method is a shorthand way of telling you how to find a feature in the Access ribbon. It translates to the following instructions: "On the ribbon, click the
Create tab. On the tab, look for the Tables section. In the Tables box, click the Table
button." (Look back to Figure I-2 to see the button you're looking for.)
As you saw back in Figure I-3, the ribbon adapts itself to different screen sizes. De-pending on your Access window's size, the button you need to click may not include any text. Instead, it shows up as a small icon. In this situation, you can hover over the mystery button to see its name before deciding whether to click it.
abouT This book
FiGURe i-7
In this example, Access doesn't have the room to dis-play the Home tab's Views, Records, or Find sections, so they're all replaced with buttons. If you click any of these buttons, then a panel appears with the content you're looking for.
CoNTExTUAL TABS
Although nice, predictable tabs are a great idea, some features obviously make sense only in specific circumstances. Say you start designing a table. You may have a few more features than when you're entering data. Access handles this situation by adding one or more contextual tabs to the ribbon, based on your current task. These tabs have additional commands that are limited to a specific scenario (Figure I-8).
FiGURe i-8
When you're working on a table, two new contextual tabs appear, named Fields and Table, under the heading Table Tools. Contextual tabs always appear on the ribbon's right side and have the word "Tools" in their names.
abouT This book includes the contextual tab title (Table Tools) and the tab name (Fields), separated
by the | character.
DRoP-DoWN BUTToNS
From time to time you'll encounter buttons in the ribbon that have short menus at-tached to them. Depending on the button, this menu appears as soon as you click the button, or it appears only if you click the button's drop-down arrow, as shown in Figure I-9.
FiGURe i-9
Access lets you switch between several differ-ent views of your database. Click the bottom part of the View button to see the full list of choices, or click the top part to switch to the next view in the list, with no questions asked.
When dealing with this sort of button, the last step of the instructions in this book tells you what to choose from the drop-down menu. For example, say you're directed to "Home→Views→View→Design View." That tells you to select the Home tab, look for the Views section, click the drop-down part of the View button (to reveal the menu with extra options), and then choose Design View from the menu.
NoTE Be on the lookout for drop-down arrows in the ribbon—they're tricky at first. You need to click the
arrow part of the button to see the full list of options. If you click the other part of the button, then you don't see the list. Instead, Access fires off the standard command (the one Access thinks is the most common choice), or the command you used most recently.
BACKSTAGE VIEW
abouT The online
ResouRCes As you've already seen, the ribbon has taken the spotlight from traditional toolbars oRDINARY MENUS and menus. However, in a couple of cases, you'll still use the familiar Windows menu, like when you use the Visual Basic editor (in Chapter 18). In this case, the arrows refer to menu levels. The instruction "Choose File→Open" means "Click the File menu heading. Then, inside the File menu, click the open command."
About Shortcut Keys
Every time you take your hand off the keyboard to move the mouse, you lose a few microseconds of time. That's why many experienced computer fans use keystroke combinations instead of toolbars and menus wherever possible. Ctrl+S, for one, is a keyboard shortcut that saves your current work in Access (and most other programs). When you see a shortcut like Ctrl+S in this book, it's telling you to hold down the Ctrl
key, and, while it's down, press the letter S, and then release both keys. Similarly, the finger-tangling shortcut Ctrl+Alt+S means hold down Ctrl, then press and hold Alt, and then press S (so that all three keys are down at once).
About the Online Resources
As the owner of a Missing Manual, you've got more than just a book to read. Online, you'll find example files so you can get some hands-on experience, as well as tips, articles, and maybe even a video or two. You can also communicate with the Missing Manual team and tell us what you love (or hate) about the book. Head over to www. missingmanuals.com, or go directly to one of the following sections.
Missing CD
As you read this book, you'll see a number of examples that demonstrate Access features and techniques for building good databases. Most of these examples are available as Access database files in a separate download. Go to to www. missingmanuals.com/cds/access2013mm, where you can download a Zip file that includes the examples, organized by chapter. And so you don't wear down your fingers typing long web addresses, the Missing CD page also offers a list of clickable links to the websites mentioned in this book.
Registration
If you register this book at oreilly.com, you'll be eligible for special offers—like discounts on future editions of Access 2013: The Missing Manual. Registering takes only a few clicks. To get started, type http://oreilly.com/register into your browser to hop directly to the Registration page.
Feedback
safaRi® books online share your interest in Access. To have your say, go to www.missingmanuals.com/
feedback.
Errata
In an effort to keep this book as up to date and accurate as possible, each time we print more copies, we'll make any confirmed corrections you've suggested. We also note such changes on the book's website, so you can mark important corrections into your own copy of the book, if you like. Go to http://tinyurl.com/acc2013-mm to report an error and view existing corrections.
Safari® Books Online
Safari® Books Online is an on-demand digital library that lets you easily search over 7,500 technology and creative reference books and videos to find the answers you need quickly.
Storing Information
in Tables
PART
1
CHAPTER 1:
Creating Your First Database
CHAPTER 2:
Building Smarter Tables
CHAPTER 3:
Mastering the Datasheet: Sorting,
Searching, and Filtering
CHAPTER 4:
Blocking Bad Data
CHAPTER 5:
ChAPTeR
1
A
lthough Microsoft won't admit it, Access can be intimidating—intimidating enough to trigger a cold sweat in the most confident office worker. Even though Microsoft has spent millions of dollars making Access easier to use, most people still see it as the most complicated Office program on the block. They're probably right.Access seems more daunting than any other Office program because of the way that databases work. Quite simply, databases need strict rules. Other programs aren't as obsessive. For example, you can fire up Word, and start typing a letter straight away. Or you can start Excel, and launch right into a financial report. But Access isn't nearly as freewheeling. Before you can enter a stitch of information into an Access database, you need to create that database's structure. And even after you've de-fined that structure, you'll probably want to spend more time creating other useful tools, like handy search routines and friendly forms that you can use to simplify data lookup and data entry. All of this setup takes effort and a good understanding of how databases work.
In this chapter, you'll conquer any Access resistance you have, and learn to create a simple but functional database. Along the way, you'll get acquainted with the slick Access user interface, and you'll learn exactly what you can store in a database. You'll then be ready to tackle the fine art of database design, which is covered in detail throughout this book.
unDeRsTanDing aCCess DaTabases
FREQUENTLY ASKED QUESTIoN
Using Someone Else's Database
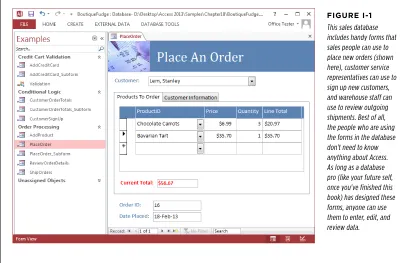
Can I use an Access database I didn't design?Although every database follows the same two-step process: first somebody creates it and then people fill it with information, the same person doesn't need to perform both jobs. In fact, in the business world, different people often work separately on these two tasks. For example, a summer student whiz-kid at a beer store may build a database for tracking orders (task #1). The sales department can then use the database to enter new orders (task #2), while other employees look up orders and fill them (also task #2). Warehouse staff can make
sure stock levels are OK (again, task #2), and the resident accountant can keep an eye on total sales (task #2).
If task #1 (creating the database) is done well, task #2 (using the data-base) can be extremely easy. In fact, if the database is well designed,
people who have little understanding of Access can still use it to enter, update, and look up information. Amazingly, they don't even need to know they're running Access at all!
You'll learn more about sharing Access with groups of people in Part Six.
Understanding Access Databases
As you already know, a database is a collection of information. In Access, every database is stored in a single file. That file contains database objects, which are the components of a database.
Database objects are the main players in an Access database. Altogether, you have six different types of database objects:
• Tables store information. Tables are the heart of any database, and you can create as many tables as you need to store different types of information. A fitness database could track your daily running log, your inventory of exercise equipment, and the number of high-protein whey milkshakes you down each day, as three separate tables.
• Queries let you quickly perform an action on a table. Usually, this action involves retrieving a choice bit of information (like the 10 top-selling food items at Ed's Roadside Diner or all the purchases you made in a single day). However, you can also use queries to apply changes.
• Forms are attractive windows that you create, arrange, and colorize. Forms provide an easy way to view or change the information in a table.
sTaRTing a DaTabase • Modules are files that contain Visual Basic code. You can use this code to do
just about anything—from updating 10,000 records to firing off an email. Access gurus refer to all these database ingredients as objects because you manage them all in essentially the same way. If you want to use a particular object, you add it to your database, give it a name, and then fine-tune it. Later on, you can view your objects, rename them, or delete ones you don't want anymore.
NoTE Designing a database is the process of adding and configuring database objects. For those keeping score, an Access database can hold up to 32,768 separate objects.
In this chapter, you'll consider only the most fundamental type of database object: tables. But first, you need to create a blank database you can work with.
Starting a Database
When you start Access, you begin at the welcome page. From there, you're just a few clicks away from generating a database of your very own.
In this chapter, you'll slap together a fairly straightforward database. This example is designed to store a list of prized bobblehead dolls. (For those not in the know, a bobblehead doll is a toy figure with an oversized head on a spring, hence the sig-nature "bobbling" motion. Bobblehead dolls usually resemble a famous celebrity, politician, athlete, or fictional character.)
TIP You can get the Bobblehead database, and all the databases in this book, on the Missing CD page at
www.missingmanuals.com/cds/access2013mm.
Here's how to create a blank new database:
1. Start Access.
sTaRTing a DaTabase
FiGURe 1-1
When you start Access, you see this two-part welcome page. On the left is a list of recently opened databases (if you have any). On the right is a list of templates that you can use to create a new database.
TIP If you already have Access open and you've been working with another database, just choose File→New to create a new database. You'll get the same list of templates as when you first launch Access.
2. Click the "Blank desktop database" template.
When you choose to create a blank database, that's exactly what you get—a new, empty database file with no tables or other database objects. Starting from scratch is the best way to learn about Access. It's also the favorite choice of database experts, who prefer to create everything themselves so it's exactly the way they like it.
sTaRTing a DaTabase No matter which template you click, Access pops open a new window that lets
you choose a name and location for your new database (Figure 1-2).
UP To SPEED
Templates: One Size Fits Some
The example in this section shows you how to create a blank database. However, if you scroll down (on the right side of the Figure 1-1), you'll find a long list of prebuilt databases, which are known as templates. Templates aim to save you the work of creating a new database and let you jump straight to the fine-tuning and data-entry stage.
As you might expect, there's a price to be paid for this con-venience. Even if you find a template that stores the type of information you want to track, you might find that the pre-defined structure isn't quite right. For example, if you choose to use the Home Inventory template to track all the stuff in your basement, you might find that it's missing some information you want to use (like the projected resale value of your stuff
on eBay) and includes other details you don't care about (like the date you acquired each item). To make this template work, you'll need to change the design of your table, which involves the same Access know-how as creating one.
In this book, you'll learn how to build your own databases from the ground up and customize every square inch of them. Once you're an Access master, you can spend many fun hours playing with the prebuilt templates and adapting them to suit your needs. To give it a whirl, click one of a dozen or so templates that are shown in the main Access window. Or, even better, hunt for more by using the Search box at the top of the Access window, which scans through the thousands of templates available on Microsoft's Office website.
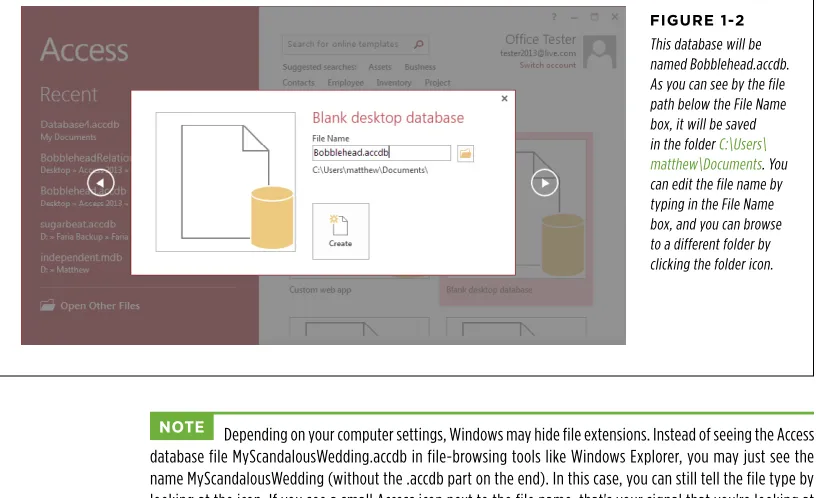
3. Type a file name for the database you're about to create.
Access stores all the information for a database in a single file with the extension .accdb (which stands for "Access database"). Don't stick with the name Access picks automatically (like "Database1.accdb"). Instead, pick something more descriptive. In this example, Bobblehead.accdb does the trick.
sTaRTing a DaTabase
FiGURe 1-2
This database will be named Bobblehead.accdb. As you can see by the file path below the File Name box, it will be saved in the folder C:\Users\ matthew\Documents. You can edit the file name by typing in the File Name box, and you can browse to a different folder by clicking the folder icon.
NoTE Depending on your computer settings, Windows may hide file extensions. Instead of seeing the Access database file MyScandalousWedding.accdb in file-browsing tools like Windows Explorer, you may just see the name MyScandalousWedding (without the .accdb part on the end). In this case, you can still tell the file type by looking at the icon. If you see a small Access icon next to the file name, that's your signal that you're looking at an Access database.
4. Choose the folder where you want to store your database.
sTaRTing a DaTabase
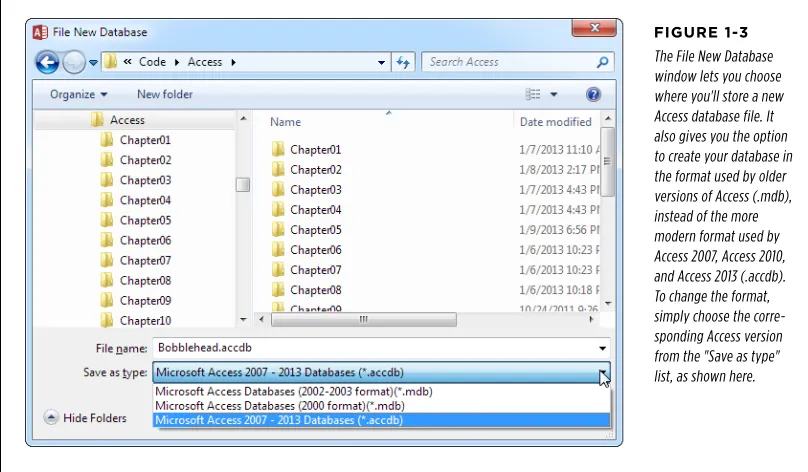
FiGURe 1-3
The File New Database window lets you choose where you'll store a new Access database file. It also gives you the option to create your database in the format used by older versions of Access (.mdb), instead of the more modern format used by Access 2007, Access 2010, and Access 2013 (.accdb). To change the format, simply choose the corre-sponding Access version from the "Save as type" list, as shown here.
5. Click the big Create button (under the File Name box).
Access creates your database file and then shows a datasheet where you can get to work creating your first table.
PoWER USERS' CLINIC
Telling Access Where to Store Your Databases
Access always assumes you want to store databases in yourDocuments folder. And though you can choose a different location every time you save or open a database, if there's another folder you need to visit frequently, then it makes sense to make that your standard database storage location. You can configure Access to use this folder with just a few steps:
1. Make sure you've opened a database or created a new one. You can't make this change from the window you
see when you first start Access.
2. Choose File→Options. The Access Options window appears.
3. In the list on the left, choose General.
builDing YouR
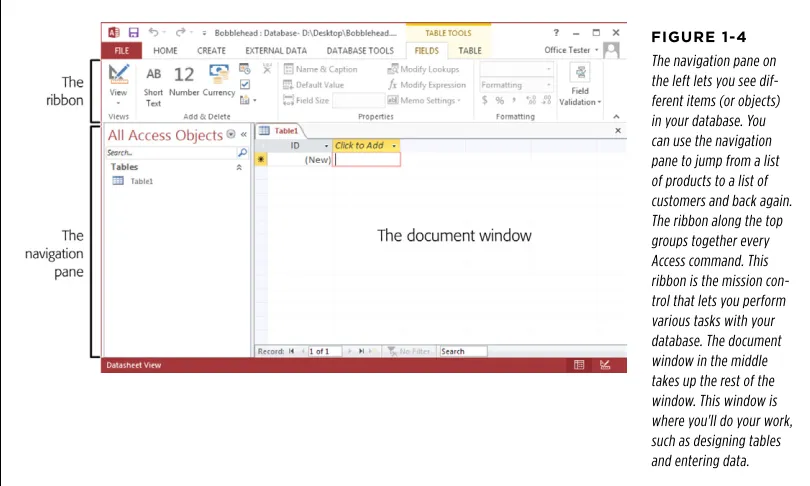
[image:44.504.35.440.90.333.2]fiRsT Table Navigation Pane shows up on the left. You're now in the control center where you'll perform all your database tasks (Figure 1-4).
FiGURe 1-4
The navigation pane on the left lets you see dif-ferent items (or objects) in your database. You can use the navigation pane to jump from a list of products to a list of customers and back again. The ribbon along the top groups together every Access command. This ribbon is the mission con-trol that lets you perform various tasks with your database. The document window in the middle takes up the rest of the window. This window is where you'll do your work, such as designing tables and entering data.
If you haven't used the ribbon before (either in Access or in another Office program), the Introduction covers the basics of how the ribbon works. Otherwise, carry on to the next section, where you'll learn how to add a table to your brand-new, empty database.
Building Your First Table
builDing YouR fiRsT Table
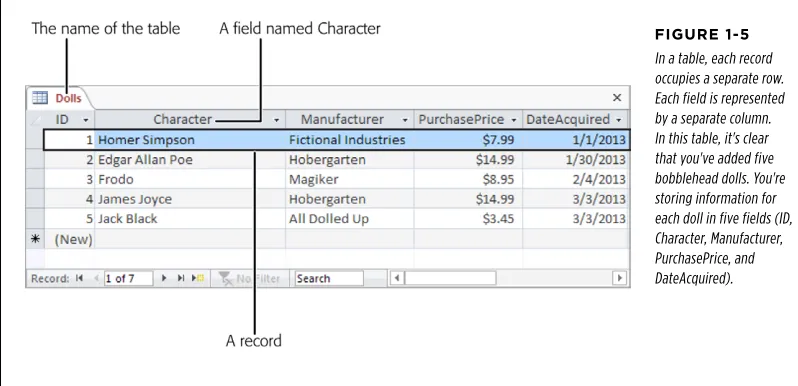
FiGURe 1-5
In a table, each record occupies a separate row. Each field is represented by a separate column. In this table, it's clear that you've added five bobblehead dolls. You're storing information for each doll in five fields (ID, Character, Manufacturer, PurchasePrice, and DateAcquired).
Before you start designing this table, you need to know some very basic rules: • A table is a group ofrecords. A record is a collection of information about a
single thing. In the Dolls table, for example, each record represents a single bobblehead doll. In a Family table, each record would represent a single rela-tive. In a Products table, each record would represent an item that's for sale. You get the idea. When you create a new database, Access starts you out with a new table named Table1, although you can choose a more distinctive name when you decide to save it.
• Each record is subdivided intofields. Each field stores a distinct piece of in-formation. For example, in the Dolls table, one field stores the person on whom the doll is based, another field stores the price, another field stores the date you bought it, and so on.
• Tables have a rigid structure. In other words, you can't bend the rules. If you create four fields, every record must have four fields (although it's acceptable to leave some fields blank if they don't apply).
builDing YouR fiRsT Table
UP To SPEED
Database Planning for Beginners
Many database gurus suggest that before you fire up Access, you should decide exactly what information you want to store by brainstorming. Here's how it works. First, determine the type of list you want by finishing this sentence "I need a list of.…" (One example: "I need a list of all the bobblehead dolls in my basement.")Next, jot down all your must-have pieces of information on a piece of paper. Some details are obvious. For example, for the bobblehead doll collection, you'll probably want to keep track of the doll's name, price, and date you bought it. Other
details, like the year it was produced, the company that created it, and a short description of its appearance or condition may require more thought.
Once you've completed this process and identified all the important bits of data you need, you're ready to create the corresponding table in Access. The bobblehead doll example demonstrates an important theme of database design: First you plan the database, and then you create it using Access. In Chapter 5, you'll learn a lot more about planning more complex databases.
Creating a Simple Table
When you first create a database, it's almost empty. But to get you started, Access creates your first database object—a table named Table1. The problem is, this table begins life completely blank, with no defined fields (and no data).
If you followed the steps in the previous section to create a new database, you're already at the Datasheet view (Figure 1-5), which is where you enter data into a table. All you need to do is customize this table so that it meets your needs.
You can customize a table in two ways:
• Design view lets you precisely define all aspects of a table before you start using it. Almost all database pros prefer Design view, and you'll start using it in Chapter 2.
• Datasheet view is where you enter data into a table. Datasheet view also lets you build a table on the fly as you insert new information. You'll use this ap-proach in this chapter.
The following steps show you how to turn a blank new table (like Table1) into the Dolls table by using the Datasheet view:
1. To define your table, simply add your first record.
In this case, that means choosing a bobblehead doll to add to the list. For this example, you'll use a nifty Homer Simpson replica.
builDing YouR fiRsT Table
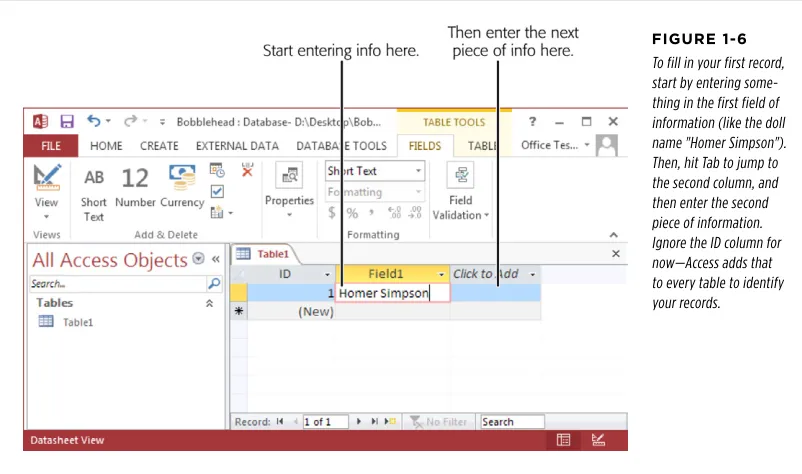
2. In the datasheet's rightmost column, under the "Click to Add" heading, type the first piece of information for the record (see Figure 1-6).
[image:47.504.61.462.167.404.2]Based on the simple analysis you performed earlier, you know that you need to enter four fields of information for every doll. For the Homer Simpson doll, this information is "Homer Simpson" (the name), "Fictional Industries" (the manu-facturer), "$7.99" (the price), and today's date (the purchase date). Although you could start with any field, it makes sense to begin with the name, which is clearly an identifying detail.
FiGURe 1-6
To fill in your first record, start by entering some-thing in the first field of information (like the doll name "Homer Simpson"). Then, hit Tab to jump to the second column, and then enter the second piece of information. Ignore the ID column for now—Access adds that to every table to identify your records.
3. Press Tab to move to the next field, and return to step 2.
Re-builDing YouR fiRsT Table
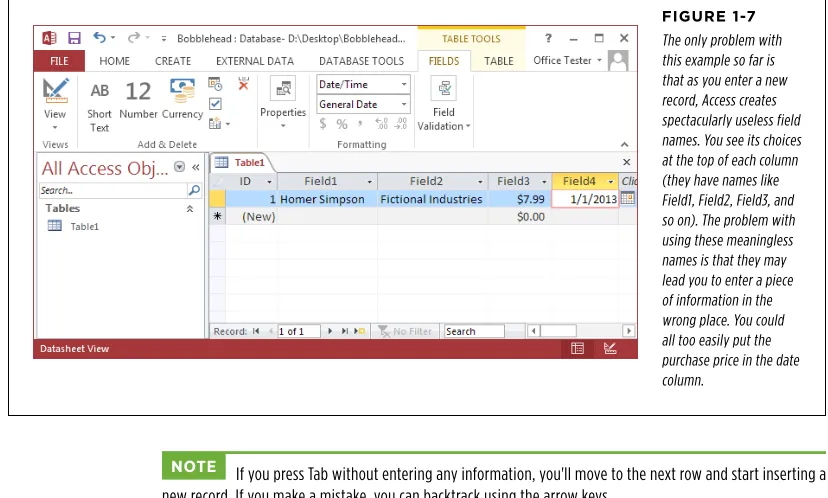
FiGURe 1-7
The only problem with this example so far is that as you enter a new record, Access creates spectacularly useless field names. You see its choices at the top of each column (they have names like Field1, Field2, Field3, and so on). The problem with using these meaningless names is that they may lead you to enter a piece of information in the wrong place. You could all too easily put the purchase price in the date column.
NoTE If you press Tab without entering any information, you'll move to the next row and start inserting a new record. If you make a mistake, you can backtrack using the arrow keys.
UP To SPEED
Putting Big Values in Narrow Columns
A single field can hold entire paragraphs of information. But if you have lengthy values, you may find yourself running out of viewing space while you're typing them into a narrow column. And although you're free to scroll forward and backward through your field, this gets annoying fast. Most people prefer to see the entire contents of a column at once.Fortunately, you don't need to suffer in silence with cramped columns. To expand a column, just position your mouse at the right edge of the column header. (To expand a column
named Field1, move your mouse to the right edge of the Field1 box.) Then, drag the column to the right to resize it as big as you want.
If you're just a bit impatient, there's a shortcut. Move the mouse over the right edge of the column, so it turns into a two-way arrow. Then, simply double-click the column edge. The column resizes itself to fit its largest piece of information (as long as doing so doesn't stretch the column beyond the edge of the Access window).
builDing YouR fiRsT Table
5. Type a new name, and then press Enter.
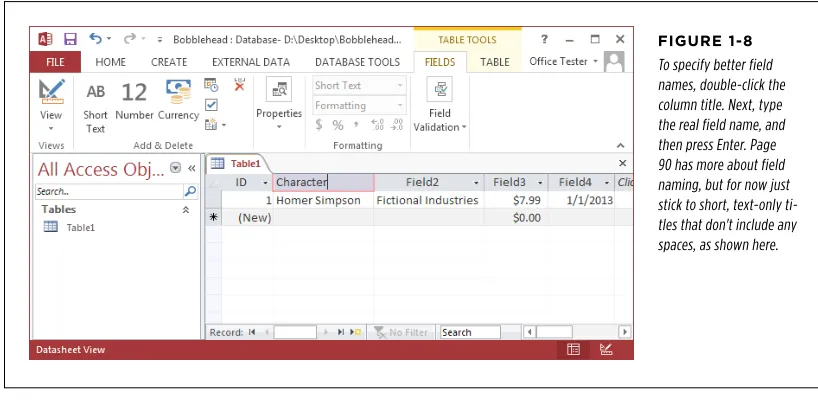
Repeat this process until you've cleaned up all the field names. The proper field names for this example are Character, Manufacturer, PurchasePrice, and DateAcquired. Figure 1-8 shows how it works.
FiGURe 1-8
To specify better field names, double-click the column title. Next, type the real field name, and then press Enter. Page 90 has more about field naming, but for now just stick to short, text-only ti-tles that don't include any spaces, as shown here.
TIP Don't be too timid about tweaking your table. You can always rename fields later, or even add entirely new fields. (It's also possible to delete existing fields, but that has the drawback of also clearing out all the data that's stored in the field.)
6. Press Ctrl+S or choose File→Save to save your table.
[image:49.504.58.467.118.324.2]Access asks you to supply a table name (see Figure 1-9).
FiGURe 1-9
A good table name is a short text title that doesn't have any spaces (like Dolls here).
7. Type a suitable table name, and then click oK.
builDing YouR
fiRsT Table As you can see, creating a simple table in Access is almost as easy as laying out infor-mation in Excel or Word. If you're itching to try again, you can create another table in your database by choosing Create→Tables→Table from the ribbon. But before you get to that stage, it makes sense to take a closer look at how you edit your table.
Editing a Table
You now have a fully functioning (albeit simple) database, complete with one table, which in turn contains one record. Your next step is filling your table with useful information. This often-tedious process is data entry.
To fill the Dolls table, you use the same datasheet you used to define the table. You can perform three basic tasks:
• Editing a record. Move to the appropriate spot in the datasheet (using the arrow keys or the mouse), and then type in a replacement value. You may also want to use Edit mode, which is described in the next section.
• Inserting a new record. Move down to the bottom of the table to the row that has an asterisk (*) on the left. This row doesn't actually exist until you start typing some information. At that point, Access creates the row and moves the asterisk down to the next row. You can repeat this process endlessly to add as many rows as you want (Access can handle millions).
• Deleting a record. You have several ways to remove a record, but the easiest is to right-click the margin immediately to the left of the record, and then choose Delete Record. Access asks you to confirm that you really want to remove the selected record, because you can't reverse the change later on.
WoRD To ThE WISE
When in Doubt, Don't Delete
Most seasoned database designers rarely delete records from their databases. Every ounce of information is important. For example, imagine you have a database that lists the prod-ucts that a mail-order origami company has for sale. You might think it makes sense to delete products once they've been discontinued and can't be ordered anymore. But it turns out that it makes sense to keep these old product records around. For example, you might want to find out what product cate-gories were the best sellers over the previous year. Or maybe a manufacturer issues a recall of asbestos-laced paper, and you need to track down everyone who ordered it. To perform either of these tasks, you need to refer to past product records. This hang-onto-everything rule applies to any kind of data-base. For example, imagine you're tracking student enrollment
at a top-flight culinary academy. When a class is finished, you can't just delete the class record. You might need it to find out whether a student has the right prerequisites for another course, which teachers she's had in the past, and so on. The same is true for employees who retire, sales promotions that end, items that you used to own but you've sold, and so on. You need them all (and you probably need to keep them indefinitely).
builDing YouR fiRsT Table
EDIT MoDE
You'll probably spend a lot of time working with the datasheet. So settle in. To make your life easier, it helps to understand a few details.
[image:51.504.61.466.181.407.2]As you already know, you can use the arrow keys to move from field to field or row to row. However, you may have a bit of trouble editing a value. When you start typing, Access erases any existing content. To change this behavior, you need to switch into Edit mode by pressing F2; in Edit mode, your typing doesn't delete the stuff that's already in that field. Instead, you get to change or add to it. To switch out of Edit mode, you press F2 again. Figure 1-10 shows a close-up look at the difference.
FiGURe 1-10
Top: Normal mode. If you start typing now, you'll immediately erase the existing text ("Hobergarten"). The fact that all the text in the field is selected is a big clue that you're about to wipe it out.
Bottom: Edit mode. The cursor shows where you're currently positioned in the current field. If you start typing now, you'll insert text in between "Hober" and "garten."
Edit mode also affects how the arrow keys work. In Edit mode, the arrow keys move through the current field. For example, to move to the next cell, you need to move all the way to the end of the current text, and then press the right arrow key again. But in Normal mode, pressing the arrow keys always moves you from cell to cell.
DATAShEET ShoRTCUT KEYS
builDing YouR
fiRsT Table TABLe 1-1 Keys for Moving Around the Datasheet
KEY RESULT
Tab (or Enter) Moves the cursor one field to the right, or down when you reach the edge of the table. This key also turns off Edit mode if it's currently switched on.
Shift+Tab Moves the cursor one field to the left, or up when you reach the edge of the table. This key also turns off Edit mode.
→ Moves the cursor one field to the right (in Normal mode), or down when you reach the edge of the table. In Edit mode, this key moves the cursor through the text in the current field.
← Moves the cursor one field to the left (in Normal mode), or up when you reach the edge of the table. In Edit mode, this key moves the cursor through the text in the current field.
↑ Moves the cursor up one row (unless you're already at the top of the table). This key also turns off Edit mode.
↓ Moves the cursor down one row (or it moves you to the "new row" position if you're at the bottom of the table). This key also turns off Edit mode.
Home Moves the cursor to the first field in the current row. This key brings you to beginning of the current field if you're in Edit mode. End Moves the cursor to the last field in the current row. This key brings
you to the end of the current field if you're in Edit mode.
Page Down Moves the cursor down one screenful (assuming you have a large table of information that doesn't all fit in the Access window at once). This key also turns off Edit mode.
Page Up Moves the cursor up one screenful. This key also turns off Edit mode. Ctrl+Home Moves the cursor to the first field in the first row. This key doesn't do
anything if you're in Edit mode.
Ctrl+End Moves the cursor to the last field in the last row. This key doesn't do anything if you're in Edit mode.
Table 1-2 lists some convenient keys for editing records. TABLe 1-2 Keys for Editing Records
KEY RESULT
[image:52.504.112.446.61.437.2]builDing YouR fiRsT Table
KEY RESULT
Ctrl+Z Reverses the last edit. Unfortunately, the Undo feature in Access isn't nearly as powerful as it is in other Office programs. For exam-ple, Access lets you reverse only one change, and if you close the datasheet, you can't even do that. You can use Undo right after you insert a new record to remove it, but you can't use the Undo feature to reverse a delete operation.
Ctrl+" Copies a value from the field that's immediately above the current field. This trick is handy when you need to enter a batch of records with similar information. Figure 1-11 shows this often-overlooked trick in action.
Ctrl+; Inserts today's date into the current field. The date format is based on computer settings, but expect to see something like "12-24-2013." You'll learn more about how Access works with dates on page 73. Ctrl+Alt+Space Replaces whatever value you've entered with the field's default value.
[image:53.504.57.470.50.395.2]You'll learn how to designate a default value on page 133.
FiGURe 1-11
An Access user has been on an eBay buying binge and needs to add several doll records. With a quick Ctrl+" keystroke, you can copy the date from the previous record into the DateAcquired field of the new record.
CUT, CoPY, AND PASTE