SWsoft, Inc.
Virtuozzo™ for
Windows
User's Guide
Version 3.5
Suite 325
Herndon, VA 20171 USA
Tel: +1 (703) 815 5670 Fax: +1 (703) 815 5675
Copyright © 1999-2005 by SWsoft, Inc. All rights reserved
Distribution of this work or derivative of this work in any form is prohibited unless prior written permission is obtained from the copyright holder.
Virtuozzo, Plesk, HSPcomplete, and corresponding logos are trademarks of SWsoft, Inc. Intel, Pentium, and Celeron are registered trademarks of Intel Corporation.
Microsoft Windows, Windows 2003 Server, Windows XP, Windows 2000, Windows NT, Windows 98, Windows 95, Microsoft SQL Server, Microsoft Desktop Engine (MSDE), Microsoft Management Console are trademarks or registered trademarks of Microsoft Corporation
IBM DB2 is a registered trademark of International Business Machines Corp. MegaRAID is a registered trademark of American Megatrends, Inc.
Contents
Preface
9
About This Guide ...9
Who Should Read This Guide ...10
Organization of This Guide ...11
Documentation Conventions...12
Typographical Conventions...12
Prompts in Command Examples ...12
General Conventions ...13
Feedback ...13
Virtuozzo Philosophy
14
About Virtuozzo Software ...14What is Virtuozzo...14
What is VPS ...15
Virtuozzo Applications...15
Virtuozzo 3.5 for 64-bit Processors ...16
Distinctive Features of Virtuozzo ...17
OS Virtualization...18
Network Virtualization ...19
Virtuozzo File System (VZFS)...20
Templates ...21
Resource Management ...21
Main Principles of Virtuozzo Operation...22
Basics of Virtuozzo Technology ...22
Understanding Templates ...24
VZMC Overview...25
VZCC Overview...27
VPS Administrators' Tools ...28
Understanding Licensing...29
Hardware Node Availability Considerations ...30
Operations on Virtual Private Servers
31
Creating New VPS...31Before You Begin...32
Choosing VPS ID ...33
Creating VPS ...35
Starting, Stopping, and Querying Status of VPS ...40
Accessing VPS...41
Terminal Services Client ...41
Remote Desktop Connection ...42
Windows File Sharing ...43
Citrix MetaFrame XP ...43
Listing VPSs ...44
Backing Up and Restoring VPSs ...45
Backups Overview...46
Assigning Default Backup Node ...47
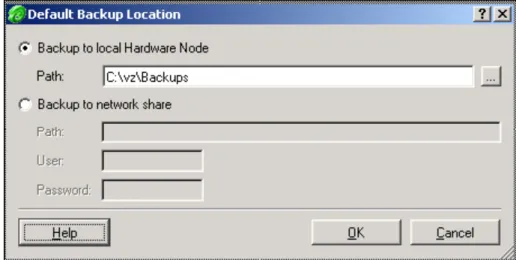
Setting Default Backup Location...48
Backing Up Group of VPSs...51
Restoring Single VPS ...51
Restoring VPS Files ...53
Restoring Group of VPSs ...55
Managing Backup Node ...56
Searching for VPS Backups ...58
Searching for VPS ...60
Changing VPS ID ...62
Copying VPS Within Hardware Node ...64
Migrating VPS ...66
Deleting VPS ...68
Changing Administrator Password ...69
Operations Inside VPS...70
Managing Users and Groups ...71
Managing Files ...73
Managing Templates
78
Creating Application Template...79Creating Template From Manually Added Data ...80
Creating Template From Application Data ...83
Uploading and Installing New Virtuozzo Templates on Hardware Node...87
Listing Templates ...89
Adding Application Templates to VPSs ...90
Removing Virtuozzo Template From Hardware Node ...91
Managing Resources
93
Managing VPS Disk Space Quota ...93Setting Up Disk Space Quota ...93
Checking Disk Quota Status...94
Managing VPS CPU Usage ...96
Managing VPS System Resources...98
Managing Network Resources...99
Enabling QoS Scheduler for VPS...100
Enabling Network Browsing for VPS ...102
Managing VPS Resources Configurations...103
Creating VPS Configuration Sample File...104
Copying VPS Configuration Sample File...107
Saving and Uploading Configuration Sample to/from Local Computer ...108
Managing Hardware Nodes
110
Managing Virtuozzo Licenses ...110Generating License Request ...111
Uploading License to Hardware Node ...113
Viewing Current License...115
Virtuozzo License Expiration ...116
Updating Hardware Node Software...116
Updating Virtuozzo Software ...117
Updating Windows Server 2003...122
Managing Node Cluster ...122
Creating Cluster...123
Adding Nodes to Cluster ...123
Configuring IP Addresses Pool ...124
Configuring Virtual Private Server IDs Pool...125
Specifying Cluster Network Settings...126
Logs and Monitors
128
Monitoring Resources...128
Using Charts Representation ...129
Using Table Representation...136
Viewing Network Traffic Summary ...137
Viewing System and Virtuozzo Logs ...137
Subscribing for VZMC Alerts ...138
Monitoring Hardware Node by Using vzwdog...140
Configuring vzwdog Parameters ...142
Monitoring Top Resources Consumption ...143
Top CPU Resource Consuming VPSs ...144
Top Physical Memory Consuming VPSs ...145
Top Disk Space Consuming VPSs ...146
Top Incoming Traffic Receiving VPSs ...147
Top Outgoing Traffic Consuming VPSs ...148
Auditing Objects Inside VPS ...149
Managing Services and Processes
153
What Are Services and Processes ...154Main Operations on Services and Processes...155
Managing Services and Processes ...155
Managing Processes ...156
Managing Services ...157
Customizing VZCC/VZPP
158
Overview ...159Common Tasks ...160
Adding VZCC/VZPP Links...160
Setting Auto Logout Time ...162
Setting Maximal Backups Number...164
VZCC/VZPP Architecture...165
Customizing Individual Pages ...166
Modifying Existing Page ...167
Adding New Page...169
Customizing VZCC/VZPP Menu ...172
Customizing VZCC/VZPP Layout ...174
Adding Skins to VZCC/VZPP ...175
Configuring VPS Offline Management ...177
Advanced Tasks
179
Customizing VPS Desktop ...180Managing External Drives and Image Files for VPS...181
Managing VPS Virtual Disks ...182
Managing Hardware Node Drives ...187
Changing VPS Network Adapter...191
Configuring VZAgent...195
Viewing Global Virtuozzo Parameters ...196
Troubleshooting
198
General Considerations...198Problems With VPS Management ...199
Failure to Start VPS...199
Failure to Access VPS From Network...199
Failure to Log In to VPS...200
Failure to Manage VPSs in PAE-disabled System ...201
Failure to Run Sound Files in VPS...202
Failure to See Mounted Drives Inside VPS ...203
Submitting Problem Report to Technical Support ...203
Establishing Secure Channel to SWsoft Support ...204
Reference
205
Configuring VPSs...205Adding Custom Action Scripts ...207
Virtuozzo Command Line Interface ...210
vzctl ...211
vzlist ...221
vzquota ...222
Licensing Utilities ...224
Migration Utilities ...225
Backing-Up Utilities...227
Template Management Utilities ...242
Supplementary Tools...244
Glossary
248
Index
251
Table of Figures
Figure 1: Network Virtualization ...19
Figure 2: Virtuozzo Technology ...22
Figure 3: VZMC Main Window ...25
Figure 4: VZMC Network Architecture ...26
Figure 5: VZMC - Viewing Existing VPSs ...34
Figure 6: VZMC - Choosing Sample Configuration File ...35
Figure 7: VZMC - Specifying Network Settings ...37
Figure 8: VZMC - Viewing Created VPS ...39
Figure 9: VZMC - Starting VPS ...40
Figure 10: VZMC - Listing VPSs ...44
Figure 11: Backup Overview ...46
Figure 12: VZMC - Setting Default Backup Location...48
Figure 13: VZMC - Backing Up VPSs Wizard ...50
Figure 14: VZMC - Restoring VPSs Wizard ...52
Figure 15: VZMC - Choosing Files For Restoring...54
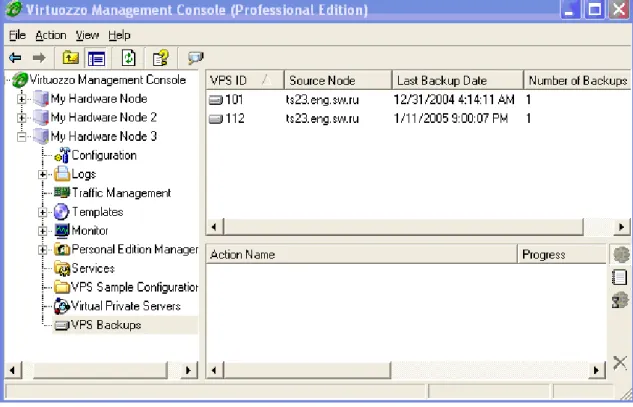
Figure 16: VZMC - Listing Backups...56
Figure 17: VZMC - Searching for Backups...58
Figure 18: VZMC - Finding VPS...60
Figure 19: VZMC - Specifying IP Address...62
Figure 20: VZMC - Cloning VPS ...64
Figure 21: VZMC - Migrating VPSs ...67
Figure 22: VZMC - Deleting VPS...68
Figure 23: VZMC - Setting Administrator Password...69
Figure 24: VZMC - Managing Users and Groups ...71
Figure 25: VZMC - File Manager...73
Figure 26: VZMC - Uploading Files to VPS ...75
Figure 27: VZMC - Choosing Creation Variant ...79
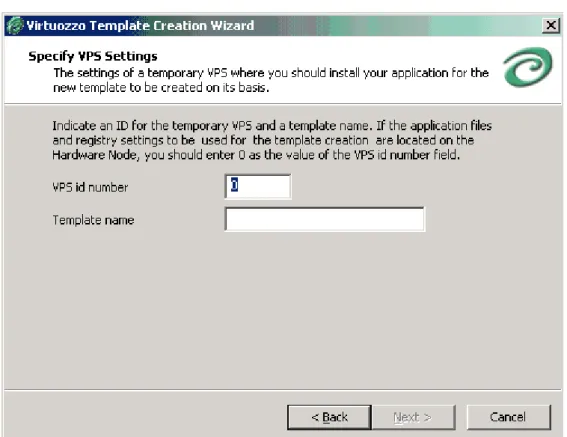
Figure 28: VZMC - Specifying VPS ID and Name ...80
Figure 29: VZMC - Adding Files and Registry Entries...81
Figure 30: Creating Application Template - Creating Template ...82
Figure 31: Creating Application Template - Defining VPS Settings...83
Figure 32: Creating Application Template - Specifying Path and Application Name ...84
Figure 33: Creating Application Template - Creating Template ...85
Figure 34: VZMC - Choosing Templates for Uploading ...87
Figure 35: VZMC - Reviewing Virtuozzo Templates Distribution Settings ...88
Figure 36: VZMC - Listing Templates...89
Figure 37: VZMC - Adding Templates to VPSs...90
Figure 38: VZMC - Installing Templates in VPS Manager ...91
Figure 39: VZMC - Removing Template From Hardware Node ...92
Figure 40: VZMC - Setting Disk Space Quota ...94
Figure 41: VZMC - Viewing VPS Disk Space Statistics ...95
Figure 42: VZMC - Managing CPU Usage...97
Figure 43: VZMC - Managing System Parameters ...99
Figure 44: Enabling QoS Scheduler for VPS ...101
Figure 45: VZMC - Enabling Network Browsing ...102
Figure 46: VZMC - Entering Sample Configuration Name and Description...104
Figure 47: VZMC - Choosing VPS Configuration Sample ...105
Figure 48: VZMC - Defining QoS parameters ...106
Figure 50: VZMC - Uploading Sample File...109
Figure 51: VZMC - Entering Personal Information...111
Figure 52: VZMC - Specifying Number of VPSs ...112
Figure 53: VZMC - Entering Number of CPUs ...113
Figure 54: VZMC - Viewing Current Virtuozzo License ...115
Figure 55: Defining Virtuzzo Update Settings...117
Figure 56: Running Virtuozzo Update Wizard ...119
Figure 57: Installing Virtuozzo - Specifying Proxy Parameters ...120
Figure 58: List of Virtuozzo Updates ...121
Figure 59: VZMC - Setting DNS Servers...126
Figure 60: VZMC - Adding Monitoring Counters...129
Figure 61: VZMC - Editing Monitor Update Interval...130
Figure 62: VZMC - Adjusting Charts Scale ...131
Figure 63: VZMC - Adjusting Charts View ...132
Figure 64: VZMC - Accelerating Logs...134
Figure 65: VZMC - Replaying Logs ...135
Figure 66: VZMC - Monitoring Traffic Parameters ...136
Figure 67: VZMC - Viewing Network Traffic Summary ...137
Figure 68: VZMC - Top CPU Resource Consuming VPSs ...144
Figure 69: VZMC - Top Physical Memory Consuming VPSs ...145
Figure 70: VZMC - Top Incoming Traffic Receiving VPSs...147
Figure 71: VZMC - Top Outgoing Traffic Consuming VPSs ...148
Figure 72: Auditing Objects in VPS - Displaying Security Settings...149
Figure 73: Auditing Objects Inside VPS - Defining Permissions...150
Figure 74: Auditing Objects Inside VPS - Enabling Audit ...151
Figure 75: VZMC - Monitoring Active Processes ...156
Figure 76: VZMC - Viewing Services...157
Figure 77: VZMC - Setting VZCP Auto Logout Time ...163
Figure 78: VZCC/VZPP Transformations ...166
Figure 79: VZMC - Adding New Drive to VPS ...183
Figure 80: VZMC - Configuring VPS Drive...185
Figure 81: VZMC - Removing Drive From VPS...186
Figure 82: VZMC - Mounting Hardware Node Drive...187
Figure 83: VZMC - Removing Hardware Node Drive ...188
Figure 84: VZMC - Mounting Hardware Node Drive...189
Figure 85: Hardware Node With Several Adapters...191
Figure 86: VZMC - Changing Network Adapter for VPS ...193
Figure 87: VZMC - Viewing Global Virtuozzo Parameters ...197
In This Chapter
About This Guide... 9
Who Should Read This Guide... 10
Organization of This Guide... 11
Documentation Conventions... 12
Feedback ... 13
About This Guide
This guide is meant to provide comprehensive information on Virtuozzo for Windows – high-end server virtualization software for Windows-based computers. The issues discussed in this guide cover the necessary theoretical conceptions as well as practical aspects of working with Virtuozzo. The guide will familiarize you with the way to create and administer Virtual Private Servers (sometimes also called Virtual Environments, or VEs) on Virtuozzo-based Hardware Nodes and to employ both the graphical and command line interfaces for performing various tasks.
Note: The guide does not familiarize you with the process of installing, configuring, and deploying your Virtuozzo system. Detailed information on all these operations is provided in the
Virtuozzo 3.5 for Windows Installation Guide shipped with Virtuozzo.
According to the task-oriented approach, most topics of this guide are devoted to a particular task and the ways to perform it. However, Virtuozzo is equipped with as many as three different tools to perform various administrative tasks:
1 Virtuozzo Management Console (VZMC) with graphical user interface;
2 Virtuozzo Control Center (VZCC) with web interface;
3 Virtuozzo command line utilities.
Besides, there is another tool for managing VPSs - Virtuozzo Power Panels. However, this tool is mainly regarded as a means for individual VPS customers to manage their personal VPSs and is therefore not described in this guide.
VZMC is considered the primary tool for administering Virtuozzo and performing main administrative tasks on Hardware Nodes and in the VPS context. Therefore, when describing the ways to perform this or that task, we have provided the corresponding procedures for Virtuozzo Management Console only. Besides, if you are used to working in the command line, you can turn to the Reference chapter to learn to manage Hardware Nodes and VPSs by means of Virtuozzo command line utilities. As for VZCC, a web counterpart of VZMC, it is provided with its own guide as well as a comprehensive online help system.
C
H A P T E R1
Preface
Who Should Read This Guide
The primary audience for this book is anyone responsible for administering one or more systems running Virtuozzo 3.5 for Windows. To fully understand the major Virtuozzo notions and learn to perform the main administrative operations, no more than basic Windows administration habits is required.
Organization of This Guide
Chapter 2, Virtuozzo Philosophy, is a must-read chapter that helps you grasp the general principles of Virtuozzo operation. It provides an outline of Virtuozzo architecture and lets you understand the Virtuozzo licensing policy.
Chapter 3, Operations on Virtual Private Servers, covers those operations that you may perform on Virtual Private Servers by means of VZMC: creating and deleting Virtual Private Servers, starting and stopping them, migrating between Hardware Nodes, etc.
Chapter 4, Managing Templates, shows you the way to handle Virtuozzo application templates properly – create your own templates, upload and install them on the Hardware Node, add templates to Virtual Private Servers, etc.
Chapter 5, Managing Resources, zeroes in on configuring the resource control parameters for different VPSs. These parameters include disk quotas, CPU time, and a set of memory-related resources.
Chapter 6, Managing Hardware Nodes, centers on all those operations you as Hardware Nodes administrator can perform on your Nodes.
Chapter 7, Logs and Monitors, explains the ways to keep track of all system events and the consumption of all kinds of resources by the running Virtual Private Servers and the Hardware Node itself.
Chapter 8, Managing Services and Processes, familiarizes you with the operations you can perform on processes and services in Virtuozzo by using the VZMC graphical interface.
Chapter 9, Customizing VZCC/VZPP, contains instructions for experienced administrators on the way to customize Virtuozzo Control Center and Virtuozzo Power Panels by changing their layout and appearance and modifying certain VZCC/VZPP settings.
Chapter 10, Advanced Tasks, enumerates those tasks that are intended for advanced system administrators who would like to obtain deeper knowledge about Virtuozzo capabilities.
Chapter 11, Troubleshooting, suggests ways to resolve common inconveniences should they occur during your work with the Virtuozzo software.
Chapter 12, Reference, is a complete reference on the main VPS parameters, action scripts that can be executed on performing certain VPS-related operations, and all Hardware Node command-line utilities. You can read this chapter if you wish to learn how to configure VPS parameters by editing its configuration file, wish to do additional actions by specifying your own scripts, need help for a particular command, or are looking for a command to perform a certain task.
Documentation Conventions
Before you start using this guide, it is important to understand the documentation conventions used in it. For information on specialized terms used in the documentation, see the Glossary at the end of this document.
Typographical Conventions
The following kinds of formatting in the text identify special information.
Formatting
convention Type of Information Example
Preformatted On-screen computer output in your
command-line sessions; source code in XML, C++, or other programming languages.
Saved parameters for VPS 101
Preformatted
Bold What you type, as contrasted with
on-screen computer output.
C:\Documents and
Settings\Administrator> vzlist
Monospace The names of commands, files, and directories.
Use vzctl start to start a VPS.
Monospace Italics
Designates a command line placeholder, which is to be replaced with a real name or value.
To destroy a VPS, type vzctl destroy
VPSID.
Special Bold All elements of the graphical user interface (GUI): menu items, menu options, menu buttons, etc.
Go to the QoS tab.
Titles of chapters, sections, and subsections.
Read the Basic Administration chapter.
Italics Used to emphasize the importance of a point or to introduce a term.
Host Operating System is an operating system installed on the Hardware Node. CAPITALS Names of keys on the keyboard. SHIFT, CTRL, ALT
KEY+KEY Key combinations for which the user must press and hold down one key and then press another.
CTRL+P, ALT+F4
Prompts in Command Examples
Command line examples throughout this guide presume that you are using the standard Windows command line that can be launched by entering cmd in the standard Windows Run dialog window. Inasmuch as you are supposed to work with Virtuozzo with an administrator's privileges, the commands presented in this guide are prepended with the following command line prompt: C:\Documents and Settings\Administrator>.
General Conventions
Be aware of the following conventions used in this book.
Chapters in this guide are divided into sections, which, in turn, are subdivided into subsections. For example, Documentation Conventions is a section, and General Conventions is a subsection.
When following steps or using examples, be sure to type double-quotes (") and single-quotes (') exactly as shown.
Feedback
If you spot a typo in this guide, or if you have thought of a way to make this guide better, we would love to hear from you!
If you have a suggestion for improving the documentation (or any other relevant comments), try to be as specific as possible when formulating it. If you have found an error, please include the chapter/section/subsection name and some of the surrounding text so we can find it easily. Please submit a report by e-mail to [email protected].
In This Chapter
About Virtuozzo Software ... 14
Distinctive Features of Virtuozzo ... 17
Main Principles of Virtuozzo Operation ... 22
Hardware Node Availability Considerations ... 30
About Virtuozzo Software
What is Virtuozzo
Virtuozzo is a complete server automation and virtualization solution based on a patent-pending technology developed by SWsoft. Virtuozzo creates multiple isolated Virtual Private Servers (VPSs) on a single physical server to share hardware, licenses, and management effort with maximum efficiency. Each VPS performs and executes exactly like a stand-alone server for its users and applications as it can be rebooted independently and has its own Administrator access, Active Directory domain users, IP addresses, memory, processes, files, applications, system libraries, and configuration files. Light overhead and efficient design of Virtuozzo makes it the right virtualization choice for production servers with live applications and real-life data.
The basic Virtuozzo capabilities are:
Dynamic Real-time Partitioning – Partition a physical server into tens of VPSs, each with full dedicated server functionality.
Resource Management – Assign and control VPS resource parameters and re-allocate resources in real-time.
Virtualization - Move VPSs and its application(s) between physical servers transparently with near-zero or zero downtime.
Mass Management - Manage a multitude of physical servers and Virtual Private Servers in a unified way.
C
H A P T E R2
What is VPS
VPS is a virtual private server, which is functionally identical to an isolated standalone server: Each VPS has its own processes, Active Directory domain users, files and provides full
administrative access.
Each VPS has its own IP addresses, port numbers, filtering and routing rules.
Each VPS can have its own configuration for the system and application software, as well as its own versions of Dynamic Link Libraries (DLLs), system libraries, and registry. It is possible to install or customize software packages inside a VPS independently from other VPSs or the host system. Multiple distributions of a package can be run on one and the same Windows box.
Each VPS has its own unique Administrator user with full control over the given VPS and full access to other user accounts inside this VPS.
Each VPS can be a member of a Windows domain (e.g. access any of the network shares to which the VPS user has rights). Moreover, any Virtual Private Server can act as a domain controller granting other VPSs and stand-alone servers users access to a set of network resources (applications, printers, etc.).
Virtuozzo Applications
Virtuozzo can be efficiently applied in a wide range of areas: enterprise server consolidation, web and applications hosting, software development and testing, user training, and so on. If you administer a number of Windows dedicated servers within an enterprise, you can benefit from the Virtuozzo solution in the following ways:
Reduce the number of required physical servers and corresponding support by grouping a multitude of your enterprise servers onto a single computer without losing a bit of valuable information and without compromising performance.
Increase server utilization and maximize server potential.
Provision servers in minutes by using the technology of Virtuozzo templates.
Migrate Virtual Private Servers in the time of network data transfer, nearly eliminating the planned downtime and enabling fast reaction to unplanned downtime situations.
Monitor OS and application versions and update/upgrade the current software easily across all of your physical servers running Virtuozzo and their Virtual Private Servers.
Guarantee Quality-of-Service (QoS) in accordance with a corporate service level agreement (SLA).
Automate routine tasks such as upgrades and updates. Minimize software license and support requirements, etc.
Due to its unique efficiency and completeness, Virtuozzo has also a wide variety of profitable uses for Hosting Service Providers allowing them to:
Sell new powerful and popular services such as:
Advanced Shared for shared hosting with customized application sets and QoS; True VPS for a cheaper, secure, and easier alternative to dedicated servers;
Split Dedicated allowing your customers to split the servers for their better utilization, etc.
Provide complete self-administration panels (Virtuozzo Power Panels) including system backup/restore and monitoring tools.
Have a multitude of customers with their individual full-featured Virtual Private Servers sharing a single physical server.
Transparently move customers and their environments between servers, without any manual reconfiguration.
Increase profitability through the better management and leverage of hardware and software investments.
Automate service provisioning by using the technology of Virtuozzo templates, etc.
Besides, Virtuozzo proves invaluable for IT educational institutions that can now provide every student with a personal Windows server, which can be monitored and managed remotely. Software development companies may use Virtual Private Servers for testing purposes and the like.
Virtuozzo 3.5 for 64-bit Processors
Virtuozzo 3.5 is released in two variants – for common 32-bit processors and for the x86-64 64-bit processors. Depending on the kind of processors to be used, this or that variant of the Virtuozzo distribution set should be chosen.
A list of supported 64-bit processors is presented below: AMD Opteron;
AMD Athlon 64;
Intel Xeon with EM64T support; Intel Pentium with EM64T support.
The Virtuozzo 32-bit version has been fully ported to support x86-64 64-bit processors, therefore, all its functionality is retained in the 64-bit version. So, you can use any Virtuozzo tool and utility in exactly the same way as you would use it on the computers with standard 32-bit processors.
However, while working with the 64-bit version of Virtuozzo, you should keep in mind the following:
1 The Virtuozzo 64-bit version should be installed on the computer running Windows Server 2003 x64 Edition (English or Japanese). In all other respects, installing Virtuozzo is the same as is described in Chapter 3 of the Virtuozzo 3.5 for Windows Installation Guide.
2 The Virtual Private Servers created under Virtuozzo for x86-64 should use the 64-bit OS template.
3 The Virtuozzo version for the 64-bit processors allows you to add only 64-bit application templates to your Virtual Private Servers.
4 You cannot migrate Virtual Private Servers residing on a Hardware Node running the Virtuozzo 32-bit version to Hardware Nodes running the Virtuozzo 64-bit version and vice versa. Detailed information on how to migrate VPSs from one Node to another is given in the Migrating VPS section (on page 66).
5 You can use any Hardware Node as a Backup Node irrespective of the Virtuozzo version installed on this Node. So, you can back up a VPS from the Node running the Virtuozzo 32-bit version and store it on the Node running the Virtuozzo 64-32-bit version and vice versa. More information on VPS backups is provided in the Backing Up and Restoring VPSs section (on page 45).
Except for these points, installing and using Virtuozzo 3.5 for 64-bit processors does not differ from working with its 32-bit counterpart.
Note: The 64-bit versions of Virtuozzo allows you to create Virtual Private Servers running German, Spanish, or French versions of Windows Server 2003 x64 Edition with the help of Multilingual User Interface Pack (MUI). Detailed information on MUI is provided in the
Preparing Virtuozzo 64-bit for Creating Localized VPSs subsection of the Installing and
Configuring Virtuozzo on Hardware Node chapter in the Virtuozzo 3.5 for Windows Installation
Guide.
Distinctive Features of Virtuozzo
The concept of Virtuozzo Virtual Private Servers is distinct from the concept of traditional virtual machines in the respect that Virtual Private Servers (VPSs) always run the same OS kernel as the host system (Linux on Linux, Windows on Windows, etc.). This single-kernel implementation technology allows to run Virtual Private Servers with a near-zero overhead. Thus, Virtuozzo VPSs offer an order of magnitude higher efficiency and manageability than traditional virtualization technologies.
OS Virtualization
From the point of view of applications and Virtual Private Server users, each VPS is an independent system. This independence is provided by a virtualization layer over the kernel of the Host OS. Note that only a small part of the CPU resources is spent on virtualization (around 1-2%). The main features of the virtualization layer implemented in Virtuozzo are the following:
VPS looks like a normal Windows system. Software from vendors can run inside any VPS without Virtuozzo-specific modifications or adjustment;
VPS has its own unique Administrator user with full control over the given VPS and can have a number of other local users with different rights and permissions assigned to them in respect of this VPS;
Users can install additional application and system software inside VPSs;
VPS can be a member of an Active Directory domain (e.g. access any of the network shares to which the VPS user has rights). Moreover, any Virtual Private Server can act as an Active Directory domain controller granting other VPSs and stand-alone servers users access to a set of network resources (applications, printers, etc.);
Virtual Private Servers are fully isolated from each other in respect of their users, processes, services, file systems, and installed applications;
Virtual Private Servers share the same executable code, which greatly saves both RAM and disk space;
Processes belonging to a VPS are scheduled for execution on all available CPUs. Consequently, VPSs are not bound to only one CPU, and any application inside each VPS can use all available CPU power.
Network Virtualization
The Virtuozzo network is designed in such a way as to make Virtual Private Servers communicate with each other and computers on external networks. The picture below demonstrates the structure of such a network:
Figure 1: Network Virtualization
In Virtuozzo-based systems, all VPSs on the Node use the Virtuozzo Network Adapter
as the default gateway to send and receive data to/from other networks (shown as the Public Network in the picture above). The network adapter is automatically created on the Hardware Node during the Virtuozzo installation and has a private IP address assigned to it. All IP packets from Virtual Private Servers come to this address (gateway) and are redirected thru a public IP address of the Hardware Node to the corresponding computer on the Public Network. In the same way, all IP packets coming from the outer world and destined for VPS IP addresses reach the public IP address of the Hardware Node first and, afterwards, are sent to the addresses of the corresponding Virtual Private Servers. In the latter case, the Node acts as an ARP (Address Resolution Protocol) server translating IP addresses to network addresses of Virtual Private Servers.
The Virtuozzo Network Adapter is also used to exchange the traffic among all the VPSs hosted on the given Hardware Node. All the network traffic of a VPS is isolated from that of the other VPSs, i.e. all Virtual Private Servers are protected from each other in the way that makes traffic snooping impossible.
Like any other stand-alone computer on a network, each VPS on the Hardware Node should have not only a valid IP address (several IP addresses per VPS are allowed), but a subnet mask which is used to unite Virtual Private Servers as well as any other stand-alone computers on the network into one or several subnets. It is not recommended to have all the VPSs on a Node from a single subnet, as in this case you will have to manually change the VPS IP address(es) every time you migrate a VPS to another Node. Instead, use the subnets of your entire datacenter. Thus, all the Hardware Node administrator has to do while setting up their network is make sure that:
One or more public IP addresses are assigned to the Hardware Node;
At least one valid IP address is assigned to each Virtual Private Server created on the Node; All VPSs belong to subnets not limited to the given Hardware Node;
IP packets sent to VPS IP addresses successfully reach the Node public IP address(es). All the other operations (creating the private IP address of the Virtuozzo Network Adapter, delivering IP packets to the corresponding IP addresses, etc.) are performed by Virtuozzo.
Virtuozzo File System (VZFS)
VZFS is a file system that allows to share common files among multiple VPSs without sacrificing security. Any VPS user can modify, update, replace, and delete any application file inside a Virtual Private Server like s/he does it on an isolated stand-alone server. When a user modifies a shared file, VZFS creates a private copy of the file transparently for the user. Thus, the modifications do not affect the other users of the file. Main benefits of VZFS are the following:
It saves memory required for executables and Dynamic Link Libraries (DLLs). A typical VPS running a simple web site might consume around 30–50 MBytes of RAM just for executable images. Sharing this memory improves scalability and total system performance; It saves disk space. A typical Windows server installation occupies several hundred MBytes
Templates
A template in Virtuozzo is a set of application files and registry settings installed on the Host operating system in such a way as to be usable by any VPS by mounting over Virtuozzo File System. Virtuozzo provides tools for creating templates, installing and removing them on/from the Hardware Node, adding them to a VPS, etc. Using templates lets you:
Securely share the RAM among similar applications running in different VPSs to save hundreds of megabytes of memory;
Securely share the files comprising a template among different VPSs to save gigabytes of disk space;
Install applications and patches simultaneously in many VPSs.
There are two types of templates in Virtuozzo. These are OS templates and application templates. An OS template is an operating system and the standard set of applications to be found right after the installation. Virtuozzo uses OS templates to create new Virtual Private Servers with a preinstalled operating system. An application template is a set of files and registry settings pertaining to this or that application. Virtuozzo uses application templates to add extra software to the existing Virtual Private Servers. For example, you can create a Virtual Private Server on the basis of the Windows Server 2003 OS template and add the Microsoft SQL server application to it with the help of the MSSql template.
Resource Management
Virtuozzo Resource Management controls the amount of resources available to Virtual Private Servers. The controlled resources include such parameters as CPU power, disk space, a set of memory-related parameters. Resource management allows Virtuozzo to:
Effectively share available Hardware Node resources among VPSs;
Guarantee Quality-of-Service (QoS) in accordance with a service level agreement (SLA); Provide performance and resource isolation and protect from denial-of-service attacks; Simultaneously assign and control resources for a number of Virtual Private Servers;
Manage a multitude of Hardware Nodes in a unified way by means of Virtuozzo Management Console (VZMC);
Collect usage information for system health monitoring, etc.
Resource Management is much more important for Virtuozzo than for a standalone computer since computer resource utilization in a Virtuozzo-based system is considerably higher than that in a typical system.
Main Principles of Virtuozzo
Operation
Basics of Virtuozzo Technology
In this section we will try to let you form a more or less precise idea of the way the Virtuozzo software operates on your computer. Please see the figure below:
Figure 2: Virtuozzo Technology
This figure presumes that you have a number of physical servers united into a network. In fact, you may have only one dedicated server to effectively use Virtuozzo. If you have more than one Virtuozzo-based physical server, each one of the servers will have a similar architecture. In Virtuozzo terminology, such servers are called Hardware Nodes (or HN, or just Nodes), because they represent hardware units within a network.
Virtuozzo for Windows is installed on a computer running Windows Server 2003 or Windows Server 2003 Service Pack 1 (shown as Host Operating System in the figure above). After Virtuozzo is installed, you will be able to run Virtuozzo services supporting virtualization on your computer. This support is presented above as Virtuozzo Layer. The Virtuozzo layer ensures that Virtual Private Servers, sharing the same Hardware Node and the same OS kernel, are isolated from each other. A Virtual Private Server is a kind of ‘sandbox’ for processes and users. Before you are able to create a Virtual Private Server, you should install the corresponding OS template in Virtuozzo. This is displayed as Virtuozzo Templates in the scheme above. In the current version of Virtuozzo for Windows, Virtual Private Servers can run only the Windows Server 2003 OS and the Windows Server 2003 OS with Service Pack 1 installed (English, German, French, Spanish, or Japanese Standard or Enterprise Edition). In this case we say that a VPS is based on the Windows Server 2003 OS template.
After you have installed at least one OS template, you can create any number of VPSs with the help of various Virtuozzo management tools (VZMC, VZCC, or the command line tools), configure their network and/or other settings, and work with these VPSs as with fully functional Windows servers.
Note: Hereafter, the Windows Server 2003 OS denotation is used to indicate both Windows Server 2003 and Windows Server 2003 Service Pack 1.
Understanding Templates
Templates are part and parcel of the Virtuozzo philosophy because they provide a way of sharing resources among lots of Virtual Private Servers, thus enabling huge savings in terms of disk space and memory. All Virtuozzo templates are divided into OS templates and application templates. OS templates are used to create new Virtual Private Servers. In Virtuozzo 3.5, only the Windows Server 2003 OS template can be used for creating new VPSs. Application templates are added to VPSs after the latter have been created; more than one application template may be added to one and the same VPS. Examples of application templates are the
msde, openssh, Plesk templates, or a template with any other application (possibly more than one application in a single template) not included into the OS template for some reason.
Note: The Windows Server 2003 OS template installed on the Node and used to create new VPSs can be updated like any other application template by installing the corresponding OS updates for this template.
Let us take, for example, the Plesk application template, representing the Plesk comprehensive server management software. It is created by SWsoft on the basis of the original Plesk application. When you install this application template in Virtuozzo, Virtuozzo creates the
C:\vz\Templates\Plesk\ directory containing all the application files that can be shared among Virtual Private Servers. When the template is added to a VPS, it contains only special placeholders (stubs, in Virtuozzo terminology) of the necessary template files. These stubs occupy very little space on the hard disk, the size of the stub files being 0 bytes. They are situated in the so-called private area of the VPS. The corresponding directory is
C:\vz\private\<VPS_ID>\root. The private area of a VPS contains not only stubs, but also those files that have been changed by the VPS user and all the private VPS files.
Note: During the Virtuozzo installation, the Templates subdirectory is automatically created in the directory you specify for storing all VPS data. By default, the C:\vz\ directory is used. However, you may define another path for this directory.
Thanks to the fact that the real application files are written to the hard disk only once, gigabytes of disk space are saved that would be lost if the application were installed separately into each and every VPS. Moreover, the application is also loaded only once into the Node memory, so memory savings are also tangible.
Thus, in order to add a template application to any number of VPSs, you should perform the following steps:
1 Install the Virtuozzo template on the Hardware Node. Upon installation, the corresponding
C:\vz\Templates\<application_name>\ directory is created on the Hardware Node in order to enable sharing common application files among VPSs.
2 Add the installed template to any number of Virtual Private Servers of your choice.
All these steps can be performed by using VZMC, VZCC, or by means of the command line tools.
It goes without saying that in case you want to install an application in only one VPS, there is no need in working with templates: you can work inside the corresponding VPS as well.
VZMC Overview
Virtuozzo Management Console (VZMC) is a remote management tool for Virtuozzo with graphical user interface. It is intended to be installed on the administrator's computer and allows the administrator to control multiple Hardware Nodes, to manage all their Virtual Private Servers, and to monitor the system. The main window of VZMC consists of two parts: the tree pane on the left and the view pane on the right.
Figure 3: VZMC Main Window
There is a list of Hardware Nodes in the tree pane. The Hardware Node subtree contains a number of items providing convenient access to various aspects of the Hardware Node management, e.g. Configuration, Logs, etc. The contents of the view pane depend on the item selected in the tree pane.
VZMC uses a typical client/server architecture. The client VZMC program runs on Microsoft Windows 2000/XP/2003 or Linux. The client application with the graphical user interface connects to the Virtuozzo Agent software, which is running in the special Service VPS on the Hardware Node. Virtuozzo Agent communicates with the client via the well-documented open VZAgent XML API and controls the Hardware Node itself and its Virtual Private Servers.
Note: For more information on Virtuozzo Agent and on how to access its services by using XML, please turn to the VZAgent Developer's Guide and the Getting Started With VZAgent SOAP guide shipped with Virtuozzo.
Figure 4: VZMC Network Architecture
The client may control multiple Hardware Nodes simultaneously by connecting to multiple Virtuozzo Agents. As the communications between the client and Virtuozzo Agents are secure, the VZMC workstation may be located virtually anywhere on the net.
More detailed information on the VZMC installation, licensing, and functioning is provided in the Installing Virtuozzo Management Console chapter of the Virtuozzo 3.5 for Windows Installation
Guide.
VZMC Restrictions
Though Virtuozzo Management Console is considered the primary tool for administering Virtuozzo and allows you to perform most administrative tasks on your Hardware Nodes and inside Virtual Private Servers, it does not have graphical counterparts of all the Virtuozzo command line utilities.
Among such utilities are the following:
vzctl restart - used to consecutively perform the stopping and starting of the corresponding VPS;
vzexport - used to back up the given VPS to some file on the Hardware Node;
vzimport - used to restore the backed up VPS to its original state;
vzcache - used to scan the specified Virtual Private Servers for common files and cache these files in the Hardware Node template area;
vzlscache - used to display a list of cache directories created by the vzcache utility;
vzuncache - used to copy the regular files from the specified cache directory on the Hardware Node back to the private area of the specified VPS.
On the other hand, all operations that can be performed in VZMC can also be performed by means of Virtuozzo command line utilities. Detailed information on all Virtuozzo utilities is provided in the Reference chapter.
VZCC Overview
Virtuozzo Control Center (VZCC) is designed for Hardware Node administrators and provides you with the ability to manage a particular Hardware Node and all Virtual Private Servers residing on it with the help of a standard Web browser on any platform. A list of supported browsers is given below:
Internet Explorer 6.0 and above; Mozilla 1.7 and above;
Firefox 1.0 and above.
Chances are that you will also be able to use other browsers, but Virtuozzo has not been extensively tested with them.
In the current version of Virtuozzo, you are able to perform the following main operations on the Hardware Node and in the VPS context by using VZCC:
View and install Virtuozzo licenses; Create new Virtual Private Servers; Manage VPS backups;
Edit the VPS hostname, IP address, and DNS server parameters; Manage VPS applications;
Manage VPS configuration templates;
Manage both VPS groups and individual VPSs;
Manage and monitor Hardware Node and VPS resources; Start, stop, and restart certain services inside the VPS;
View the processes currently running on the Node and inside Virtual Private Servers and send signals to them;
View the Virtuozzo logs;
Customize the VZCC interface, etc.
Note: Detailed information on Virtuozzo Control Center is given in its comprehensive online help system and the VZCC Administrator's Guide delivered with VZCC.
VPS Administrators' Tools
Wherever Virtuozzo is applied, there are people that are supposed to be administrators of particular VPSs only, with no access rights to Hardware Nodes as such. This is only but natural as it corresponds directly to the concept of virtualization technology. Such people can be subscribers to a hosting provider, university students, administrators of a particular server within an enterprise, etc. Personal VPSs can be managed with the help of Virtuozzo Power Panels (VZPP). VZPP is a means for administering personal VPSs thru a common browser - Internet Explorer, Mozilla, and others. It allows VPS administrators to:
Start, stop, or restart the VPS; Back up and restore the VPS;
Change the Administrator password of the VPS; Start, stop, or restart certain services inside the VPS;
View the processes currently running in the VPS and send signals to them; View the current resources consumption and resources overusage alerts; Connect to the VPS by means of RDP;
View the system logs;
Customize the VZPP interface, etc.
Access rights to administer particular VPSs by means of VZPP are determined by the Hardware Node administrator. The Setting VZCC/VZPP to Work section provides instructions on how to control access rights to particular Virtual Private Servers thru VZPP.
Note: Apart from VZPP, VPS administrators are able to use the standard Windows Remote Desktop Connection (RDP) or MS Terminal Service Client (MS TSC) to connect to their VPSs and work inside them.
Understanding Licensing
Running Virtuozzo 3.5 for Windows involves dealing with a number of licenses. Here we will try to make an overview of all these licenses - either those issued by SWsoft directly or related to the Windows Server 2003 operating system.
All the licenses can be divided into two groups:
Licenses that are to be installed on the Hardware Node. This group includes a standard Windows Server 2003 license, a Virtuozzo license, and a VZCC license. While the first two licenses are mandatory and required for installing Virtuozzo and starting to work with it, the latter one is needed only in case you are going to use Virtuozzo Control Center for managing your Node and Virtual Private Servers.
Licenses that can be installed on a computer other than the Hardware Node. Currently, there is only one license in this group - a VZMC license. You should obtain this license to use Virtuozzo Management Console - a Virtuozzo tool facilitating the management of your Hardware Nodes and Virtual Private Servers.
First of all, Virtuozzo is installed on computers running Windows Server 2003 (English, German, French, Spanish, or Japanese Standard or Enterprise Edition). Before the Virtuozzo 3.5 installation you should install and activate a licensed Windows Server 2003 operating system on your computer. Besides, while running the Virtuozzo initial configuration wizard, you will be prompted to use the same licensed CD with the Windows Server 2003 OS to add the necessary binary files to the Hardware Node to make the Windows Server 2003 OS template fully functional.
Another license is needed to be able to start using Virtuozzo 3.5 itself. To this effect, you should load a special Virtuozzo license to the Hardware Node after installing Virtuozzo 3.5 on the computer with Windows Server 2003. Every Hardware Node shall have its own Virtuozzo license file. License files (or simply “licenses”) are issued by SWsoft and define the number of VPSs the Node may run. One license file can contain one or several Virtuozzo licenses; in the latter case, the license file can be uploaded to several Hardware Nodes. Licenses can be time-limited or permanent. Virtuozzo licenses have a start date and, if they are time-time-limited, may also have an expiration date specified in them. You shall have to set up your system clock correctly; otherwise, the license validation may fail.
If you plan to use VZMC and/or VZCC to manage your Hardware Node(s) and VPSs (which is normally the case), you should additionally have valid VZMC and/or VZCC license serial numbers to enter them the first time you launch Virtuozzo Management Console or log in to Virtuozzo Control Center. However, a VZCC license is uploaded to the Hardware Node and allows you to manage your Node and VPSs from any computer by means of a standard browser, whereas a VZMC license is installed on a separate workstation (it can be the Node itself) where Virtuozzo Management Console is to be run.
Thus, before installing Virtuozzo 3.5, make sure you have the mandatory licenses to run:
Windows Server 2003 (English, German, French, Spanish, or Japanese Standard or Enterprise Edition) and
Virtuozzo 3.5 itself
and two additional licenses if you wish to use: Virtuozzo Management Console and
Virtuozzo Control Center
for managing your Nodes and Virtual Private Servers.
Hardware Node Availability
Considerations
Hardware Node availability is more critical than the availability of a typical server. Since it runs multiple Virtual Private Servers providing a number of critical services, Hardware Node outage might be very costly. Hardware Node outage can be as disastrous as the simultaneous outage of a number of servers running critical services.
In order to increase Hardware Node availability and security, we suggest you follow the recommendations below:
Use RAID storage for critical VPS private areas. Do prefer hardware RAID, but software mirroring RAID might suit too as a last resort.
Do not run software on the Hardware Node itself. Create special Virtual Private Servers where you can host necessary services such as FTP, IIS, and so on. Virtuozzo does not need any standard Windows Server 2003 services to be run on the Node. Therefore, we recommend that you disable all the services on the Node except for the Virtuozzo services. Use firewalls to make the Hardware Node accept connections from a pre-defined set of IP
addresses only.
Do not create users on the Hardware Node itself. You can create as many users as you need in any Virtual Private Server. Remember: compromising the Hardware Node means compromising all Virtual Private Servers as well.
Do not remove any of the components installed on the Hardware Node. Removing an installed component (for example, Internet Information Server), even if you do not use it, might cause Virtuozzo to malfunction.
Virtual Private Server (or VPS) is functionally identical to an isolated standalone server, having its own IP addresses, processes, files, Active Directory domain users, its own configuration files, its own applications, Dynamic Link Libraries (DLLs), system libraries, registry, and so on. Virtual Private Servers share the same Hardware Node and the same OS kernel. However, they are isolated from each other. A Virtual Private Server is a kind of ‘sandbox’ for processes and users.
Virtual Private Servers behave just like isolated stand-alone servers:
Each VPS has its own processes, users, files and provides full administrative access; Each VPS has its own IP addresses, port numbers, filtering and routing rules;
Each VPS can have its own configuration for the system and application software, as well as its own versions of system libraries. It is possible to install or customize software packages inside a VPS independently from other VPSs or the host system. Multiple distributions of an application can be run on one and the same Windows computer.
In This Chapter
Creating New VPS ... 31 Starting, Stopping, and Querying Status of VPS ... 40 Accessing VPS... 41 Listing VPSs ... 44 Backing Up and Restoring VPSs ... 45 Searching for VPS... 60 Changing VPS ID ... 62 Copying VPS Within Hardware Node ... 64 Migrating VPS ... 66 Deleting VPS ... 68 Changing Administrator Password ... 69 Operations Inside VPS ... 70
Creating New VPS
This section guides you through the process of creating and configuring a Virtual Private Server. We assume that you have successfully installed Virtuozzo and the Windows Server 2003 OS template and created the Service VPS. If you have not, please turn to the Virtuozzo 3.5
for Windows Installation Guide first.
C
H A P T E R3
Before You Begin
Before you start creating a Virtual Private Server, you should:
Check that the Hardware Node is visible on your network. You should be able to connect to/from other hosts. Otherwise, your VPSs will not be accessible from other computers. Check that you have at least one IP address per a VPS and the addresses belong to the same
network as the Hardware Node or routing to the Virtual Private Servers has been set up via the Hardware Node.
Choosing VPS ID
Every Virtual Private Server has a numeric ID, also known as VPS ID, associated with it. The ID is a 32-bit integer number beginning with zero and unique for a given Hardware Node. When choosing an ID for your VPS, please follow the simple guidelines below:
ID 0 is used for the Hardware Node itself. You cannot and should not try to create a VPS with ID 0.
This version of Virtuozzo uses ID 1 for the Service VPS.
Virtuozzo reserves the IDs ranging from 0 to 100. Though Virtuozzo 3.5 uses only IDs 0 and 1 from them, the next version might use additional Virtual Private Servers IDs for internal needs. To facilitate upgrading, pleasedo not create VPSs with IDs below 101.
The only strict requirement for a VPS ID is to be unique for a particular Hardware Node. However, if you are going to have several computers running Virtuozzo, we recommend assigning different VPS ID ranges to them. For example, on Hardware Node 1 you create VPSs within the range of IDs from 101 to 1000; on Hardware Node 2 you use the range from 1001 to 2000, and so on. This approach makes it easier to remember on which Hardware Node a VPS has been created, and eliminates the possibility of VPS ID conflicts when a Virtual Private Server migrates from one Hardware Node to another.
Another approach to assigning VPS IDs is to follow some pattern of VPS IP addresses. Thus, for example, if you have a subnet with the 10.0.x.x address range, you may want to assign the 17015 ID to the VPS with the 10.0.17.15 IP address, the 39108 ID to the VPS with the 10.0.39.108 IP address, and so on. This makes it much easier to run a number of Virtuozzo utilities eliminating the necessity to check up the VPS IP address by its ID and similar tasks. You can also think of your own patterns for assigning VPS IDs depending on the configuration of your network and your specific needs.
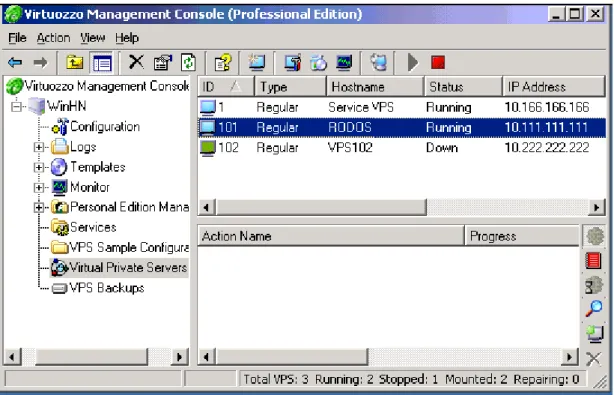
Before you decide on a new VPS ID, you may want to make sure that no VPS with this ID has yet been created on the Hardware Node. It is enough to click on the name of your Hardware Node in the left pane, and then on the Virtual Private Servers item. The VZMC right pane will display a list of existing VPSs on the Node:
Figure 5: VZMC - Viewing Existing VPSs
You can see that currently the Service VPS with ID 1 and regular VPSs 101 and 102 exist on the Hardware Node.
Creating VPS
VZMC uses one wizard to create and initially configure a Virtual Private Server. You can launch the Create New Virtual Private Servers wizard by selecting the Virtual Private Servers item under the corresponding Hardware Node name in the VZMC left pane and choosing the Create
Virtual Private Server option on the Action menu:
Figure 6: VZMC - Choosing Sample Configuration File
The main VPS parameters, including the templates and resource management parameters, can be retrieved on the basis of the VPS configuration sample indicated in the very first option (detailed information on VPS configuration samples is provided in the Managing VPS Resources
Configurations section (on page 103)) and the cluster settings, if the given Hardware Node belongs to a cluster of Nodes. To know more about clusters, turn to the Managing Node Clusters section of the Managing Hardware Nodes chapter. In particular, the Assign Virtual Private Server
ID automatically... checkbox, if selected, tells VZMC to retrieve a VPS ID(s) from the cluster database.
The Hostname group of options on the first page of the wizard shown above might help you make use of your DNS server. If your DNS server has records for the IP addresses that will be assigned to the newly-created VPSs, select the Assign hostname automatically radio button. The hostnames will be assigned on the basis of DNS records found. Selecting the Hostname radio button allows you to manually set a hostname for the Virtual Private Server. In case of creating several VPSs at once, you should use the $VPSID placeholder which is automatically replaced with the ID of the VPS being created. For example, if you are creating Virtual Private Servers in the range from 101 to 110 and enter MyVPS$VPSID into the Hostname field, your VPSs will have the following hostnames: MyVPS101, MyVPS102, ..., MyVPS110.
You should set the Administrator password for the VPS being created on the first page of the wizard by typing the desired password in the Password and Confirm password fields. You will need this password in future to connect to the VPS by means of Virtuozzo Power Panels (VZPP) or by using the standard Microsoft Terminal Services Client/Windows Remote Desktop Connection applications. If you are creating several Virtual Private Servers, all VPSs will be given the same Administrator password. However, you can change the password for each Virtual Private Server at a later time (see page 69).
Pressing the Next button displays the window where you should specify VPS network settings:
Figure 7: VZMC - Specifying Network Settings
On this screen, you should use the provided Add, Delete, and Edit icons for the corresponding operations on VPS IP addresses, their subnet masks, and DNS servers:
Each VPS is bound to have at least one IP address assigned to it, so you cannot leave the IP
Addresses field blank. In the Subnet mask field, you should additionally specify a subnet mask to define to what subnetwork the VPS being created will belong. We strongly recommend that you specify the same subnet for all Virtual Private Servers on all your Nodes. In this case you will not have to manually change the VPS IP address(es) every time you migrate a VPS to another Node.
Note: Make sure that the IP address you wish to assign to the Virtual Private Server differs from that assigned to your Hardware Node.
You may indicate one or more DNS servers that this VPS is supposed to use in the DNS
servers field or leave it blank.
In case there are several network interface cards installed on the Hardware Node, Virtuozzo allows you to specify the preferred network adapter for the Virtual Private Server by clearing the Use system default checkbox, selecting the corresponding network adapter, and clicking on the Enable button. This network adapter will be used to connect the VPS to the network, i.e. to handle the whole network traffic for this VPS. By default, all network adapters on the Node are used to control the network flows of the Virtual Private Server. Detailed information on how to manage network interface cards on the Node is provided in the Changing Network Adapter for
VPS section (on page 191).
The Obtain network settings automatically radio button becomes available only in case your Hardware Node belongs to a cluster of Nodes. This option allows you to automatically select and assign an IP address to your VPS from the range of IP addresses specified in the cluster. Detailed information on clusters is provided in the Managing Node Clusters section.
You can click on the Finish button on this step of the wizard and create the VPS with the configuration parameters specified in the configuration sample you chose on the first step of the wizard. If you do not rely on any configuration sample, press the Next button instead of Finish. In this case you will have to go through a number of steps of the wizard and set all the parameters of the new VPS separately. However, you can click Finish on every of the following steps of the wizard to start creating the VPS. All the pages of the wizard are self-explanatory, so there is no need in dwelling upon them here in detail. You have the possibility to choose the application templates to be added to the VPSs, to set the path to the VPS private area, to configure Quality of Service parameters, to specify whether the VPS is to be started on the Hardware Node boot, to enable the Quality of Service packet scheduler and network browsing for the VPS, and to allow the offline management for the VPS for it to be directly managed by its Administrator from any browser at the VPS IP address. Besides, you can save all the defined parameters as a configuration sample file to be used in future for creating new Virtual Private Servers on its basis. The information on Quality of Service parameters and VPS samples is provided in the Managing Resources chapter (on page 93). Please consult it to gather more understanding of these topics.
Creating a new Virtual Private Server may take some time. You can see the progress in the
Actions pane.
After you have created, for example, a VPS with ID 101, you can see it in the right pane of the VZMC window:
Figure 8: VZMC - Viewing Created VPS
You can also use the vzctl create command to create a new VPS. Detailed information on this command is provided in the Reference chapter.
Starting, Stopping, and Querying
Status of VPS
When a Virtual Private Server is created, it may be started up and shut down like an ordinary computer. In VZMC, you can see the status of all the Virtual Private Servers of the given Hardware Node simply by selecting the Virtual Private Servers item under the corresponding Node.
There are two kinds of Virtual Private Servers in the Virtual Private Servers table. You may change the properties of and control those that are marked with grey monitor icons. The Virtual Private Servers marked with pink monitor icons provide critical services for Virtuozzo (for example, the Service VPS). You cannot change the properties of or stop such Virtual Private Servers.
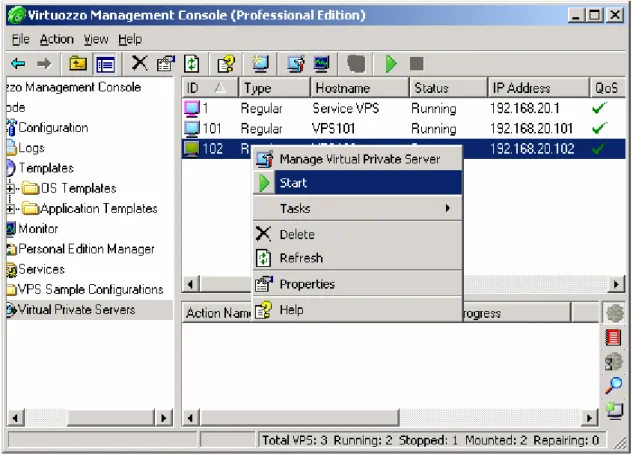
To start or stop one or more Virtual Private Servers, right-click it (them) in the Virtual Private
Servers table in the right pane and choose Start/Stop on the context menu:
Figure 9: VZMC - Starting VPS
You can use CTRL+Click to select or deselect an entry, SHIFT+Click to select a range of Virtual Private Servers, CTRL+A to select all Virtual Private Servers. Then press the Start or
When a VPS is being started or stopped, all the typical operations are performed that happen during the startup and shutdown of the Windows operating system on a standalone computer. Therefore, starting or stopping a considerable number of Virtual Private Servers may take a rather long run. The progress is displayed in the Actions pane.
In the command line, you can perform all the aforementioned operations by using the vzctl
utility. Detailed information on this utility is provided in the Reference chapter.
Note: Before stopping a VPS, make sure that there are no users connected to the VPS by means of Microsoft Terminal Services Client or Remote Desktop Protocol. To this effect, open Virtual Private Server Manager of the corresponding VPS, select Monitor --> QoS, and check that the
Number of TS sessions parameter value is equal to 0.
Accessing VPS
There are a number of ways for you to access a VPS as you would normally access a standalone computer:
Launching the standard Microsoft Terminal Services Client (MS TSC) application. Launching the standard Windows Remote Desktop Connection application. Accessing the files inside the VPS by the Windows file sharing protocol. Using the Citrix MetaFrame XP application (http://www.citrix.com).
In all these cases, the access is ensured by using the IP address or hostname of the VPS and the administrator's or other users' credentials entered when creating and maintaining the given VPS.
Note: Please do not install and run Microsoft Terminal Server and Citrix MetaFrame XP inside Virtual Private Servers. You are able to open terminal sessions with VPSs and use Citrix ICA clients to access VPSs thanks to the MS Terminal Server and Citrix MetaFrame XP applications installed on the Host OS, respectively. Terminal Server and Citrix MetaFrame XP installed inside a VPS are completely irrelevant and may interfere with normal VPS operation.
Terminal Services Client
Microsoft Terminal Services Client (MS TSC) is a standard Windows application to be used when connecting to any Virtuozzo-based VPS:
1 Launch MS TSC in the host operating system or on another computer on the network by selecting Programs -->Terminal Services Client --> Terminal Services Client on the Windows
Start menu;
2 Enter the hostname or the IP address of the VPS in the Server field;
3 Press Connect.
4 A new window is launched with an invitation to provide the user name and password for logging in to the Virtual Private Server. Type Administrator as the user name and the Administrator's password into the corresponding fields and press OK.