Unreal Engine 4 RPG
Cal Poly Computer Engineering
Senior Project
Developed by Jeffrey Nunez and Jacob Russ
2
Table of Contents
Table of Contents 2
Abstract 4
Game Design 4
Planning 4
Gantt Chart 4
Weekly Brainstorming Sessions 5
Essential Game Mechanics 6
Deciding on a Theme 6
Prototyping 7
Locating Assets 7
Game Perspective 7
Camera Transition 8
Interaction Highlighting 9
Development 10
Overworld Mechanics 10
Overworld Controls 10
Character Heat Bar 11
Shopkeeper 12
Quest System 13
Dialogue System 14
Character Progression 14
Game Save / Load System 15
Map Switching System 16
Battle Initiation 17
Overworld Sound Effects 18
Item Acquisition Animation 18
Battle Mechanics 19
Radial Menu 19
Attack Options 19
Attacking and Blocking Timing Event 20
Heat Bar Battle Queue 21
3
Attack Animations 22
Enemy Spawning 23
Enemy Targeting 24
Battle Sound Effects 24
Victory Screen 24
Preliminary Level Design 25
Initial Environment Test Level 25
Three Layer Texture for Landscapes 26
Environmental Asset Design Choices 27
Lighting 27
Final Level Design 28
Opening Tutorial Area 28
Quest Giver Aesthetic 28
Foliage Density and Placement 30
Backdrop Design and Reasoning 30
Treasure Chests 31
Static Mesh Based Gravel Road 32
Open Battle Area and Level Boundaries 33
Conclusion 35
4
Abstract
Classic RPG videogames have become few and far between in the Western market over the years as modern RPG systems have gained popularity. The purpose of this project is to present a vertical slice of a hybrid RPG game that takes the gameplay mechanics and styles of classic RPG videogames and infuses them with a modern presentation. Through the use of the powerful Unreal Engine 4 graphics engine, this project is able to combine impressive graphical fidelity with modernized systems to fuel a videogame that is undeniably a classic RPG at heart. This is not a full game, but a “vertical slice”, which is a term used in the videogame industry to refer to a condensed segment of gameplay that contains the major features and mechanics of the game. A vertical slice is used to demonstrate what the finished product would look and feel like if the developers receive the time and money from the publishers to turn it into a full product. This project showcases a turn-based battle system that takes place in the world, a save/load system, a quest system, various character and popup animations, a character inventory system, modernized character controls, and a carefully designed playable level.
Game Design
Planning
Gantt Chart
5
Figure 1: Gantt chart used for the planning and prototyping phase of the project
Weekly Brainstorming Sessions
In order to carry out the goals that were set in the Gantt chart seen in Figure 1, there were three weekly brainstorming sessions where ideas were generated and documented. These brainstorming sessions were typically 2 hours long and were dedicated to the relevant topic for that day that was specified within the Gantt chart. The main goal of these sessions was to ensure that there was a complete agreement and understanding of all the initial groundwork and designing of the project. It was crucial to make all decisions about the game together so that all opinions and potential
6
was able to blossom into the modernized take on a classic RPG that the project is today. Everything seen in the finished project, from the battle system down to polygon-based art style for the
environments, was decided upon during these sessions which paved the way for the development phase of the Spring 2017 Quarter.
Essential Game Mechanics
Perhaps the most important portion of the planning process was deciding upon the game mechanics that were to be implemented. Classic RPG games feature turn-based combat sequences that take place in a pre-rendered battle scene, in a setting separate from the world the player explores outside of combat. To modernize the turn-based battle concept and give a unique spin on the genre, we decided that all of the battles within the project would take place in the game world at the same location where the player encounters the enemy. This helps make the project stand out from other games while also providing a more immersive experience.
The other game mechanic we decided upon was to have a fast-paced combat system that is an evolution of the common combat system found in classic RPG videogames. Classic RPG games typically implement a turn-based combat system where the player has an indefinite amount of time to queue up their moves. Taking that concept, the combat system that this project uses removes the indefinite time given to contemplate moves. Instead, the enemies continue to attack should the player take too long to queue up their moves. This approach not only contributes to a unique combat system, but also increases difficulty and engagement, as players have to quickly calculate the cost and benefit of every choice they make.
Deciding on a Theme
7
environment be as simplistic and metallic-looking as possible. We found low-polygon meshes and used semi-reflective materials on these meshes to achieve the artificial look we wanted.
Prototyping
Locating Assets
We decided to purchase all of the character and environment assets from the Unreal Engine
Marketplace. This ensured that everything that was purchased was easily integrated into the project and guaranteed to function properly. For the characters, two content packs were purchased from a single artist that allowed a cohesive look.[1, 2] For the environment, another two content packs were purchased from different authors that had a very similar artistic style that was in sync with our theme.[3, 4]
Instead of limiting ourselves to one source for audio assets, we integrated open-source audio files from multiple locations.[5, 6, 7] In some cases, the audio that worked best was in the middle of a particular audio sample. For those assets, we used the program Audacity to cut and trim the audio files in order to isolate the sounds that were desired. Once the audio files were finalized, we once again used Audacity to convert them to a format compatible with Unreal Engine 4. Adjustments to the pitch and volume of audio assets were all made within Unreal Engine 4. Links to all assets that were used can be found in the references section of this report.
Game Perspective
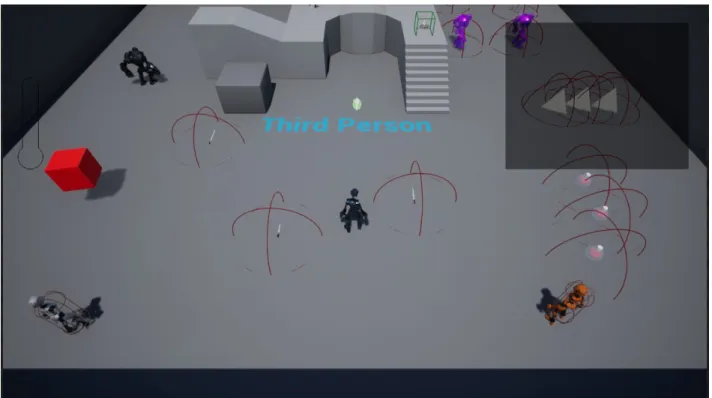
Before diving into full development mode, we decided to begin working on a software prototype within Unreal Engine 4’s third person example map to develop some of the basic foundational mechanics of our game. Our first priority was to find the desired perspective for the overworld gameplay to take place in. In order to not stray from the feel of a classic RPG, we decided to go with a camera angle that is reminiscent of both isometric perspective, which was used to create the illusion of three-dimensional environments in games like Diablo and Baldur’s Gate, and a traditional
8
sense of the depth and placement of objects in the game world, while still feeling like they’re playing a top-down RPG. Within the example map shown in Figure 2, we were able to place the main
character and several other characters to get a feel for what the player would be able to see when playing.
Figure 2: Software Prototype within the Unreal Engine 4 Third Person example map
Camera Transition
As discussed in the Essential Game Mechanics section of this report, it was important for us to have the combat of this project take place in the game world instead of a pre-rendered battle scene. To achieve that while also maintaining the style of gameplay we sought, it was imperative to develop a camera transition system for battles. The ideal execution of this would be having the camera rotating from above the player’s character to a side view of the battle with the player on the left of the screen. Initially this sounded like a simple task of rotating and translating the camera down to the side view upon initiation of a battle, and then rotating and translating the camera back to its original location once the battle had completed. Unfortunately, this was not possible due to some difficulties
9
that was suggested on an official Unreal Engine 4 forum by an Epic Games staff member [8]. Using the suggestions found on that forum for camera manipulation, we were able to successfully implement the camera transition so that battles could take place seamlessly in world seam.
Interaction Highlighting
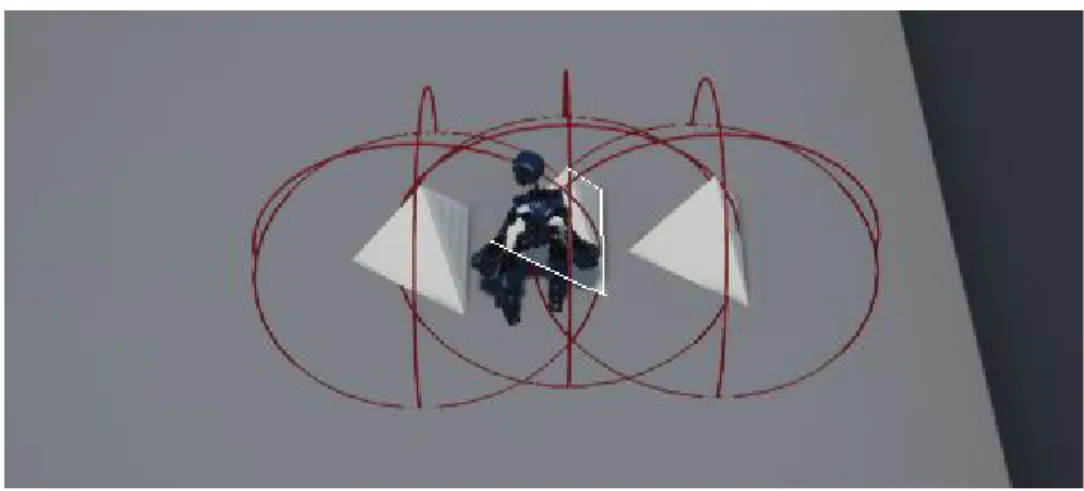
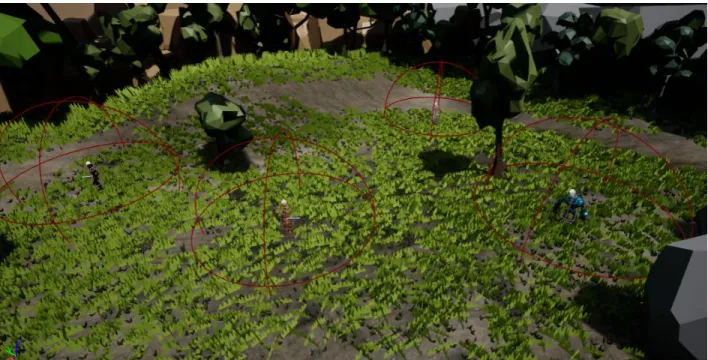
Most RPG videogames that feature interacting with objects and other characters have some form of visual feedback that allows the player to know exactly who or what they will interact with when they press the interact button. For this project, it made sense to have visual feedback as well, since it makes the experience far less confusing for the player. As shown in Figure 3, the feedback that this project uses is a highlighting scheme for the nearest object that the player can interact with. In Figure 3, the player is standing near a grouping of placeholder objects that can be interacted with. The red hemispheres around each object represent the maximum distance from which the player can potentially interact with that object. The visual feedback system will locate the nearest valid object to the player and give that object a clearly visible outline. Through this feedback, all confusion is removed about which object will be interacted with in the case that multiple objects are in range simultaneously.
The logic for determining which interactable object to highlight was inspired by a YouTube tutorial series [13]. We built onto it by incorporating a method using different-colored highlights for different types of interactions: white around items and savepoints, bright red around enemies, purple around shopkeepers. This highlighting functionality was implemented with the help of a separate YouTube tutorial [14].
10
Development
Overworld Mechanics
Overworld Controls
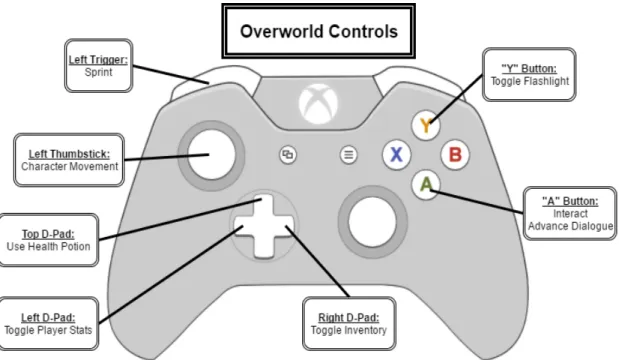
Throughout the development cycle, an Xbox One controller was used as the preferred controller. The detailed button map seen in Figure 4 makes use of an Xbox One controller, but an Xbox 360
controller works fine as well, since the button layout is nearly identical. We opted to keep the controls similar to other classic RPG games. Player movement is handled through the use of the left thumbstick. The face buttons and triggers are used for various actions. The D-Pad buttons are used as hotkeys for important items and menus for the player.
11
Character Heat Bar
In order to give the player more control of their character in a modernized fashion, we decided to implement a heat bar system that allows the player to sprint up to a certain point. If the player sprints for too long, they must wait until their heat bar cools down a before they are able to sprint again. The top left of Figure 5 shows a heat bar that is cooling down after a player sprinted for the maximum duration.
Figure 5: Character Heat Bar starting to cool down after player sprinting
The heat bar’s condition also carries over into the battle system. Attacks performed by the player fill their heat bar, which cools over time. Attacks can’t be performed unless the meter is below a certain threshold, so the hotter the bar is, the longer the player will have to wait before attacking. This adds a twist to the sprint mechanic as it makes the player make a conscious choice about sprinting. They might benefit from quickly navigating the map, but they could be left in a tight position if they
12
Shopkeeper
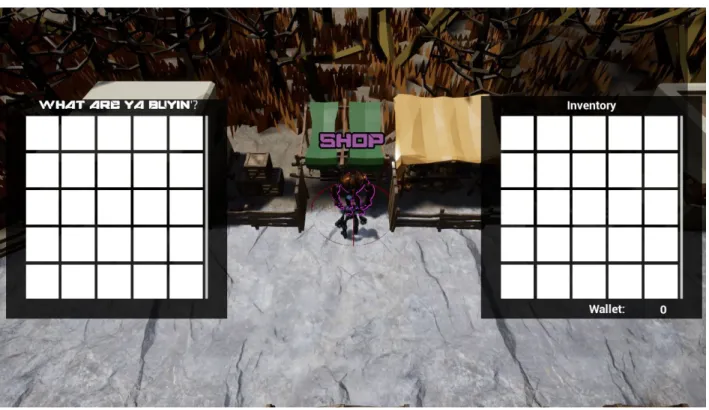
The shopkeeper character is designed to showcase the inventory system that is in place. The player is able to interact with the shopkeeper which will spark the opening of the shop and the player’s inventory (if it was not already open). While interacting with the shopkeeper, the player’s inventory is locked open so that they can better make their decisions while shopping. Either ending the interaction or walking away from the shopkeeper will close the shop and the player’s inventory. Figure 6 shows the shopkeeper during an interaction. As can be seen, there is text above the
shopkeeper to indicate to the player who he is. The purple highlighting is also used to show that the player can interact with the shopkeeper. The red sphere around the shopkeeper in Figure 6 shows the interactable range for the shopkeeper. If the player leaves that sphere, the interaction will end. As for the shop itself, the placement of crates and tents hiding various goods was used in order to visually indicate to the player from a distance that this character potentially has something useful for the player which will cause the player to gravitate towards the shopkeeper.
13
Quest System
In an RPG, quests represent short- or long-term in-game goals that the player can choose to pursue. Quests are often used as a primary method of motivating the player to explore the game world, with the promise of interesting stories or beneficial items as rewards.
In some classic RPG videogames, “quests” are initiated and completed “behind the scenes”. For example, in games like Pokemon Red Version or Final Fantasy IX, the player is responsible for reading in-game dialogue and text to determine specific goals, like bringing a certain type of Pokemon to a particular character to trade, or speaking to a specific character after finding a lost letter addressed to them. Specifically, these “quests” are not consolidated in a convenient in-game interface to notify and remind the player of available tasks.
In contrast, most modern RPGs, and many modern videogames in general, feature a “Journal” or “Quest Log” interface which details each and every active and completed quest: which character assigned it to you, what you need to do, and whom to speak with after you do it, and sometimes even what specific reward you will be granted. It is interesting to compare the many classic games in The
Legend of Zelda series to its most recent entry, Breath of the Wild. Older games in the series relied on
the player to keep track of all their active tasks and adventures, but Breath of the Wild has a detailed in-game Journal very similar to modern RPGs like The Witcher III and The Elder Scrolls V: Skyrim. In keeping with the convenient and player-friendly quest systems of modern RPGs, we decided to implement a quest log system into the project. Current quests are displayed in a box in the top-right corner of the screen. In our game, a quest is initiated when the player reaches a particular branch of a non-player character (NPC)’s dialogue tree. All quests share a common structure:
● Name (text string)
● Type (Find [speak to a certain NPC], Hunt [defeat a certain enemy or enemies], Collect [obtain a certain item or items])
14
● Count (how many items to collect or enemies to defeat),
● Target NPC ID (who to speak to in order to complete the current Stage)
This structure was decided so that all quests could be easily constructed from the same base format, even if not all quests will use all the fields of the data structure.
In the current implementation, once a quest is initiated, a quest advances through its Stages by quest-specific triggers.
Dialogue System
A true RPG videogame has extensive dialogue between the player’s character and various NPCs throughout the game’s world. With our project aiming to modernize the classic RPG, having a dialogue system was an absolute must.
The first step towards creating a dialogue system was to create NPCs that the player’s character could interact with. This was accomplished by creating a base NPC blueprint for any kind of character that would be involved with dialogue. With the base NPC blueprint created, switch cases were implemented so that the dialogue system could determine exactly who the NPC was, what state they were in, and what their dialogue output should be. With that logic in place, a widget blueprint was created in order to create the display of the dialogue onto the game screen. Connecting the dialogue widget blueprint to the dialogue state system within the base NPC blueprint allowed the correct dialogue to always be updated and correctly added to the player’s screen. These systems working together allow our project to output the dynamic kind of dialogue that one would expect from an RPG videogame.
Character Progression
15
enough XP, their level state is updated and they are rewarded with the perk of dealing more damage to enemies in battle. Each successive level will continue to boost the player’s abilities so that they find combat and quests rewarding enough to seek out and complete.
Game Save / Load System
Nearly all modern games have some sort of system in place for a player to save the progress of their game and load it later so that they may continue playing from the spot they left off. While this feature seems so obvious and simple, it requires a lot of careful attention to detail behind the scenes to ensure that nothing is altered. For this project, a saving and loading system was developed to show how such a mechanic would function within a modernized take on a classic RPG.
When a player interacts with a save point object, all the relevant variables for the player, quest giver, enemies, items, shopkeeper, and NPC dialogue systems are archived through arrays. Once everything that is relevant to the player’s current game state is archived, the save system will begin to write all the data to a file within the game folder. Once the data is successfully written, the archive is flushed and the game resumes. Thanks to the capabilities of modern hardware and Unreal Engine 4, these actions take place fast enough to be imperceptible by the player.
Once the player returns to the game and wishes to load their save file, the system developed for this project will locate the game save file, read in the data, store everything in the correct variables of their respective blueprints, and update the level blueprint to load the correct game level. Once this is completed, the player will be able to continue playing their game from exactly where they last saved.
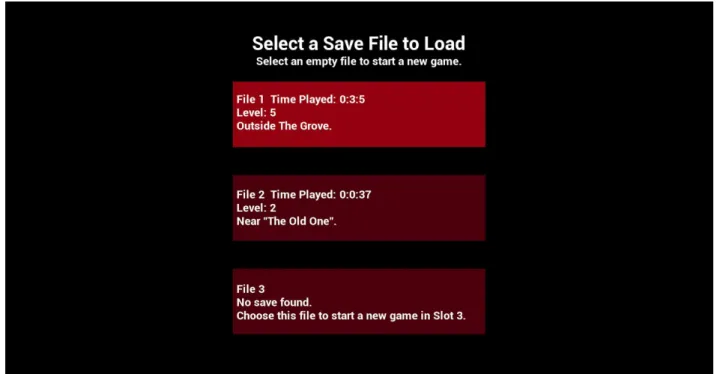
In our game, we allow the player to have three separate save files. The save selection screen is shown in Figure 7. We modeled this after the classic “file select menu” in games like The Legend of
Zelda. When the player selects “Play” from the main menu, they are presented with the three save
16
Figure 7. File Select Menu
Map Switching System
For a game to switch between one map to another, there must first exist a map switching system to carry out the transition. In this project, the “maps” that are switched between are that of the main menu and the game world level. While testing this system, there were several map switching events placed among the demo levels to ensure that map switching could occur between game levels and not just between the main menu and a game level. How our map switching system functions is similar to our game saving system, described in the previous section, but instead of saving all relevant variables to a SaveGame object, we save those variables to the GameInstance object, which persists between maps. When the new map loads, a fresh instance of the player’s character is made, but then it restores all its old data that was saved to the GameInstance. This preserves all of the player’s current statuses and information so that the player can now progress through the new map without losing the progress they made in the previous map. However, that progress is not
17
Battle Initiation
Enemy robots in this project operate under a sphere of detection. If a player is roaming the overworld and their character happens to intersect an enemies sphere, a battle will be initiated. Figure 8 shows various enemies and their detection spheres in the editor view. When in game, the red spheres shown in Figure 8 are not visible. Once a player initiates a battle, the current state of their heat bar will determine their position in the battle queue. Simultaneously, the level blueprint will fade out the ambient sound that is played in the overworld and fade in the battle music. As the camera transitions into battle view, temporary data structures are instantiated for the current combat session, such as the combat queue manager and the array of valid enemy targets. The
enemies and player change states in their animation state machines, and various UI elements are set to become hidden, such as the quest log, or visible, like the electricity (health) bars above each character. While in battle, the game switches from running on overworld mechanics to running on battle mechanics, so player inputs are processed differently.
18
Overworld Sound Effects
While we are not audio engineers, we found it necessary to apply some sound effects to our game in order to give the player expected and useful audio feedback. The first effects implemented were sounds when the player is walking or running. We stepped through the running and walking
animations and attached new events anytime a character’s foot was flat. With the events in place, we were able to open the blueprints for the animations and play an audio clip whenever one of these events were triggered. While the same footstep sound file is used for both running and walking, the pitch was altered between the two to adjust for the perceived difference in impact force between the actions. This allowed for similar albeit familiar sound effects depending on the current animation.
The remaining sound effects were far simpler to carry out as they all depended on an interaction of some kind. When the player toggles their flashpoint, a call to play a clicking sound effect is made. Within the player’s blueprint when an item is acquired and added to their inventory, a soft sound is played that simulates the sound of placing an object in a basket. Lastly, when the player uses a health potion, a bottle opening sound is played.
Item Acquisition Animation
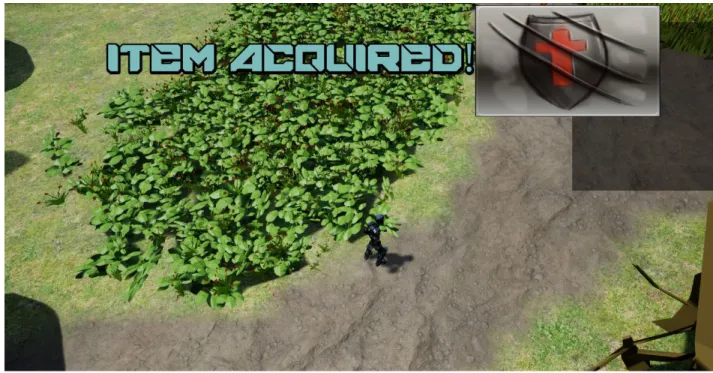
Visual feedback for interaction events within videogames is something that videogame players have come to depend upon. If there is an item purchased from a shop, acquired from a treasure chest, or located in an obscure hidden spot in the world, the player needs to be notified that something has happened. We created an item acquisition popup animation that plays whenever the player acquires an item of any kind. The animation was built entirely within Unreal Engine 4 using widget blueprint animations and designs. When the player interacts with an item that can be added to their inventory, the player character blueprint will call upon the item acquisition popup animation to be played. First, the popup is created off in the left corner of the screen and grows until it is centered with large font which is shown in Figure 9. The animation holds that position for a few seconds before
19
Figure 9: Item Acquisition popup message
Battle Mechanics
Radial Menu
Combat menu navigation needs to be quick and easy to pick up. We decided to implement a radial menu for our combat system like the ones used in other RPG games such as Mass Effect and South Park: The Stick of Truth. A radial menu provides the player with simplistic yet functional navigation and helps speed up combat choices while also making sure to not completely hide the battle that is occurring onscreen. Using the ideas from the aforementioned games, we devised a radial menu system that was built from the ground up in Unreal Engine 4. Making use of the powerful widget blueprint tools within Unreal Engine 4, we were able to design the aesthetics of the radial menu and integrate the system itself within the logic for the player’s combat systems.
Attack Options
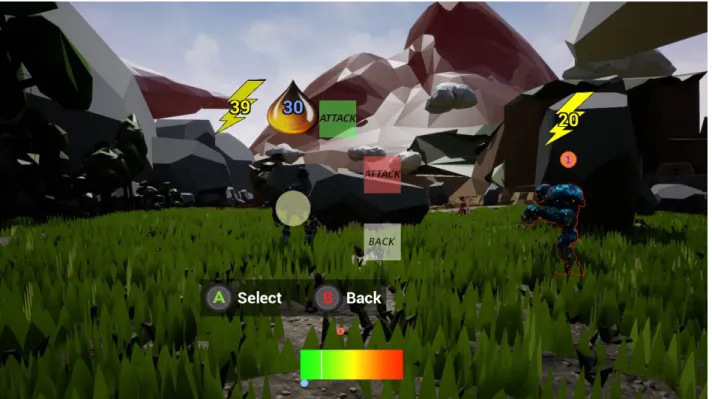
20
small amount of damage but adds an equally small amount of heat to the player. This attack is ideal for enemies with low amounts of health. The attack will finish off an enemy without negatively impacting the player’s heat. The heavy attack (red attack box) deals large amounts of damage to an enemy and causes the player to generate lots of heat. If the player needs to deal a substantial amount of damage to an enemy and can risk being placed at the end of the battle queue, then the heavy attack is the better option. Through these two options, the combat system has an element of choice while not being bogged down with unnecessarily complex options.
Figure 10: Battle gameplay showing the player choosing their attack
Attacking and Blocking Timing Event
A common practice in modern videogames is to make use of Quick Time Events (QTEs) in order to engage the player in some important action occurring onscreen. To continue the trend of
21
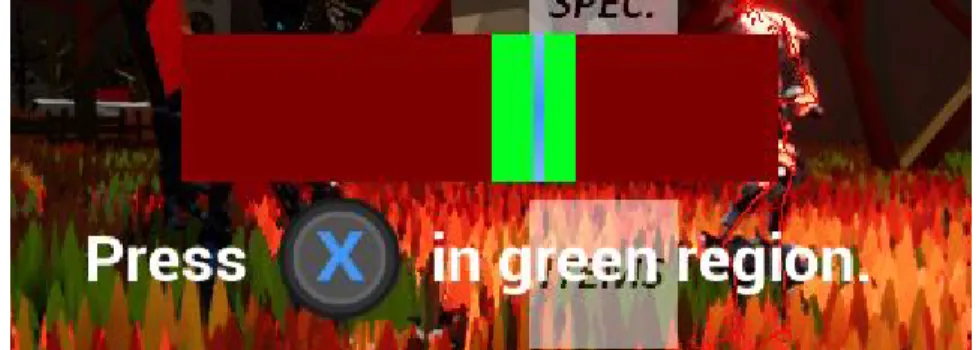
itself, the blocking QTEs add a damage reduction if the player successfully presses the “X” button when the blue line is within the green portion of the QTE bar which is shown in Figure 11. The blue line advances from the left to right of the QTE bar and expires once it reaches the end. If the player misses the block, they receive more damage. A similar QTE is applied to the attacking logic. If the player is successful with the QTE, then they are rewarded with a higher damage output to the enemy.
Figure 11: QTE Bar with the desired timing executed
Heat Bar Battle Queue
22
Figure 12: Heat bar battle queue showing two characters within the operable threshold
Battle Controls
Controls within the battle system are simple and intuitive. The left thumbstick is used for menu navigation while the face buttons and right bumper are used for actions pertaining to the combat system. Figure 13 shows the full button mapping.
Figure 13: Button mapping for player controls within the overworld
Attack Animations
23
these results in animations that can be controlled and played for any character so long as the skeletal mesh is compatible. These animations add a great amount of visual variety to the gameplay. When it came to our combat system, the animations within Unreal Engine 4 simply did not align with the look that we were going for. Instead of using fluid animations that would look out of place during combat, we decided to acquire some free animations from the Unity Game Engine Store and use them within our project.[11, 12]
While both engines can support 3D characters, the way that the animations integrate with the skeletal meshes can be quite different. This led to some painstakingly slow animation tweaking and editing for the Unity Store animations. The default animations would cause players to move around the screen unnaturally and gave off the appearance of being horribly broken which was due to an incompatibility with Unreal Engine 4. To remedy this, we had to go through the animations frame by frame and fix the portions that resulted in undesirable behavior. Once this was completed, we were able to have and implement the punch, kick, and idle stance animations that are seen in the battle system of the project.
Enemy Spawning
Some enemies placed in the world are spawned with friends next to them that are initially hidden. If a player encounters one of these enemies in the overworld, they will only see one character until the combat sequence is initiated. This is a game mechanic that is heavily used in classic RPGs to
eliminate the ability to fully assess a combat situation within in the overworld. By having the additional enemies hidden, the player is more likely to engage in combat since they are tricked into believing that the odds are in their favor.
24
set. Once the animation is completed, the additional enemies will appear just like standard enemies to the player and the combat sequence can begin.
Enemy Targeting
While in battle, the player is given the option to queue a move against whomever they wish. If there is an enemy that only has a small amount of health left but could deal massive damage, the player would want to prioritize that enemy before moving on to others. For our project, the player is given the ability to use the right bumper of the controller to cycle through the enemies that they are facing so that they can queue up a move against the proper choice. While cycling through the enemies, the actively selected enemy is given a red highlight through the use of the interaction system that is used for the shopkeeper, quest giver, treasure chests, etc. This red highlight allows the player to quickly register which enemy is selected so that no precious battle decision time is lost.
Battle Sound Effects
For a battle to fully engross the player, there must be audio to back up the visuals. When looking into battle sound effects, it seemed imperative for the sounds to match the intensity of what was being seen onscreen. Through the use of the GDC 2017 sound pack[5] and the program Audacity, we were able to locate quality sound effects that fit the robot combat action. Several metal impact sound effects were located and trimmed to fit melee combat. For every given combat impact, a random float is generated to adjust the pitch of the impact sound effect. From there, the sound’s audio is updated to play from the exact location of the melee attack animation. Together, these add variance to the melee actions so that each punch and kick sounds unique. When an enemy robot is defeated in combat, they explode into many different pieces. A combination of a minor explosion sound effect and a sound effect of metal debris hitting the ground were used to accompany this animation. Through all these sound effects, the battles are able to come to life.
Victory Screen
25
flies up and fades in from the bottom of the screen and briefly displays the funds and xp earned from the battle. The screen then empties the funds and xp earned into the total funds and LVL progress respectively through a fluid tallying animation on the numbers. Once the math is complete, the screen fades and shrinks into the player’s character. The screen and corresponding animations were built from scratch within a widget blueprint using Unreal Engine 4.
Figure 14: Victory screen adding up the rewards given to the player
Preliminary Level Design
Initial Environment Test Level
26
we were able to gain knowledge of how Unreal Engine 4 handles landscapes, foliage, and asset placement in a game level. From there, it was a quick transition to begin work on the large level that is present in the playable version of the project.
Figure 15: Environment Test level opened in the editor on the right along with the foliage tool opened on the left
Three Layer Texture for Landscapes
27
To have multiple textures applied to a single landscape within Unreal Engine 4, a new texture must be created with multiple unique layers. This texture must then be set as the default texture for the current landscape. Once that is set, the data for each layer must be built within a given game level in order to be used. Thankfully for us, there was a rather helpful tutorial that guided us through these steps.[10]
Environmental Asset Design Choices
As discussed in the Locating Assets section, it was our intent to use low polygon static meshes as assets. By using low polygon static meshes, the rocks, trees, grass, etc. begin to look robotic and match the robots that inhabit the world. On the other side, being able to add living environments made the project much more pleasing aesthetically and made it truly feel like a quality game world.
Lighting
Through the use of a skylight and a directional light to mimic the sun’s natural lighting, we were able to achieve a realistic looking lighting system. As can be seen in the environment test level shown in Figure 15, the world is brightly lit with shadows popping up in natural locations. Thanks to the use of the skylight, there is appropriate ambient lighting within the shadows. Without the skylight, the shadows would be completely black and would engulf anything that they covered. Although the lighting seems fairly simple, it still gave us a lot of trouble.
28
Final Level Design
Opening Tutorial Area
The level present in the final build of the project spawns the player onto a linear path that the player must follow. As seen in Figure 16, this path was designed with the purpose of forcing the player to get used to the overworld controls before they head out and roam the level. The linear nature of this area allowed for the placement of several NPCs that would spark interest from the player. From a talking NPC placed in a fork of the road to initial enemies blocking paths so that the player must enter combat, the character placement was designed so that each player flows through the level in an organic manner and is never stuck trying to figure out where anyone is located. Once the player has left the opening tutorial area, they have already encountered the majority of the essential game mechanics, allowing them to roam the open world with an understanding of how the game functions.
Figure 16: Opening tutorial area that takes the player along a linear path
Quest Giver Aesthetic
29
but notice the stark visual contrast of the quest giver from everything else on the map. This motivates the player to check the quest giver character out which in turn sparks the first quest.
Figure 17: Quest Giver standing amongst flowers and unique lighting in the tutorial area
With the knowledge of how the initial quest giver looks, the player will know that whenever they see a grouping of flowers or unique lighting, they are about to stumble upon another quest giver. Using this concept, the quest giver grove was created in the open world section as a new location for players to discover and acquire more quests. Figure 18 gives an aerial look at the quest giver grove and the contrasted visuals that it contains. Instead of bright lighting and grass, the player is
confronted with a blue and purple glow amongst fields of blue flowers. This area is completely in the shade through the use of a cloud placed above that allowed to create a mood that is separate from any other location on the map. With the cloud in place, several point lights and lanterns were
30
Figure 18: Quest Giver Grove entrance and overview
Foliage Density and Placement
Foliage can be found throughout the entire project level. While the render time for foliage is quite expensive, we decided that it was imperative to have a world that felt alive and inviting. Whether it be the brown grass of the tutorial area or the blue flowers of the quest giver grove, it was very important for us to have a level that had far more than simple landscape textures. What began as a simple goal of adding some grass and trees for color ended up with a fleshed out level containing more than 200,000 instances of foliage alone. We took the time to ensure that everything in the world made sense and looked correct in terms of foliage. The bridge in the tutorial area has sprouts of cattails growing around and underneath it and the shadowy and dark locations in the level contain groupings of mushrooms. By adding some attention to detail, a simple level was able to come alive and feel believable.
Backdrop Design and Reasoning
31
battles are seen from the side and can occur at any location depending on how the player
approaches an enemy, it is completely unknown to what extent of the world the player might see. To account for this, we decided to place stone walls and far off mountain ranges that fill in the backdrop from any angle so that the player is never staring off into empty space. Figure 19 shows a
particularly cloudy mountain range that is placed far in the background. When testing, it was found that all of the backdrops can indeed be seen through the various enemy placements within the open area of the level. Thankfully, due to the lighting systems available in Unreal Engine 4, we were able to render the mountains at a lower quality in an effort to increase system optimization. Since the mountain ranges are so far away, the player is completely unable to distinguish a difference in the lighting quality.
Figure 19: Level backdrop that can be seen by the player while in combat
Treasure Chests
32
typical task feel more interactive and enjoyable. The image seen in Figure 20 shows a discovered treasure chest that is placed among the outskirts of the tutorial area. It is not immediately apparent that the player can reach this area, so adding a reward for those that do was appropriate.
Figure 20: Hidden treasure chest illuminated by player
Static Mesh Based Gravel Road
Ground textures in videogames are excellent for adding some visual variety without costing too much in terms of game performance. Unfortunately, they end up getting to be repetitive over large maps as the player can grow familiar with the seam patterns as the textures repeat. We decided to change this up was by creating a new path material through the use of rock static meshes. By taking various rock static meshes and shrinking them down to pebble sizes, we were able to place these pebbles as foliage and paint paths like the one shown in Figure 21. While this technique opened up a large range of possibilities to create new looking paths on the ground, it did so at the cost of
33
render times were back to normal and the pebble path became just as usable as the other three textures that the landscape was comprised of.
Figure 21: Path created through the use of thousands of pebble static meshes
Open Battle Area and Level Boundaries
34
place right where they are initiated, the player is given the freedom to begin any battle within the open area from whatever angle they please. This allows the player to see differing backdrops should they choose to enter battles from varying angles.
Figure 22: Open battle area that player gains access to once they finish the tutorial area
If a player should choose to remain among the outskirt of the battle area, they will likely find
35
Conclusion
With this project, we have created a solid foundation for a classic-style role-playing videogame with modern touches. It features all the major components, including a combat system, dialogue and quest system, item collection, level progression, animations, sound effects, music, production-quality lighting, in-depth level design, and a modernized control scheme. The Blueprint scripting language used to develop this game makes it very simple to expand upon any of the features currently
36
References
[1] Adrian M. "Crash Test Robot Dummy." Unreal Engine Marketplace. Epic Games, 13 July 2015. Web. <https://www.unrealengine.com/marketplace/crash-test-robot-dummy>.
[2] Adrian M. "Enforcer Rig." Unreal Engine Marketplace. Epic Games, 05 Apr. 2016. Web. <https://www.unrealengine.com/marketplace/crash-test-robot-dummy>.
[3] Whitman and Olbert. "Olbert's Low Poly Forest." Unreal Engine Marketplace. Epic Games, 30 Aug. 2016. Web. <https://www.unrealengine.com/marketplace/olbert-s-low-poly-forest>.
[4] Synty Studios. "POLYGON Adventure Pack." Unreal Engine Marketplace. Epic Games, 07 Feb. 2017. Web. <https://www.unrealengine.com/marketplace/polygon-adventure-pack>. [5] Various. “Game Audio GDC Bundle.” Sonniss. Sonniss, 2017. Wev.
<http://www.sonniss.com/gameaudiogdc2017/>.
[6] Oneirophile. “Insects in the Field.” Freesound.org. Freesound, 01 Aug. 2012. Web. <https://www.freesound.org/people/Oneirophile/sounds/162166/>.
[7] Matthew Pablo. “Wasteland Showdown [Battle Music].” OpenGameArt.org. OpenGameArt, 03 Nov. 2012. Web. <https://opengameart.org/content/wasteland-showdown-battle-music>. [8] Wes Bunn. "Switching between multiple cameras within the Character." UE4 Answer Hub. Epic
Games, 17 May 2014. Web.
< https://answers.unrealengine.com/questions/45130/switching-between-multiple-characters-within-the-c.html>.
[9] n4. “Gears and Wrench.” OpenGameArt.org. OpenGameArt, 22 Jan. 2012. Web. <https://opengameart.org/content/gears-and-wrench>.
[10] Thomas Haskell. “Texturing a Landscape in UE4 (Unreal Engine 4).” YouTube.com. YouTube, 26 Mar. 2014. Web. <https://www.youtube.com/watch?v=tsXVP0fykBM&t=332s>.
[11] Yushan Yang. “The Woman Warrior.” Unity 3D Asset Store. Unity, 24 Apr. 2015. Web. <https://www.assetstore.unity3d.com/en/#!/content/33230>.
[12] Quad-Arrow. “HQ Fighting Animation FREE.” Unity 3D Asset Store. Unity, 3 Apr. 2015. Web. <https://www.assetstore.unity3d.com/en/#!/content/33478>.
37
[14] Rodrigo Villani. “UE4 Tutorial 101 - Occlusion Outlines.” YouTube.com. YouTube, 24 Feb. 2017. Web. <https://www.youtube.com/watch?v=rL7VUeZzRyQ>.