Intel
®
Data Plane Development Kit
(Intel
®
DPDK) vSwitch
Getting Started Guide
Legal Lines and Disclaimers
INFORMATION IN THIS DOCUMENT IS PROVIDED IN CONNECTION WITH INTEL PRODUCTS. NO LICENSE, EXPRESS OR IMPLIED, BY ESTOPPEL OR OTHERWISE, TO ANY INTELLECTUAL PROPERTY RIGHTS IS GRANTED BY THIS DOCUMENT. EXCEPT AS PROVIDED IN INTEL'S TERMS AND CONDITIONS OF SALE FOR SUCH PRODUCTS, INTEL ASSUMES NO LIABILITY WHATSOEVER AND INTEL DISCLAIMS ANY EXPRESS OR IMPLIED WARRANTY, RELATING TO SALE AND/OR USE OF INTEL PRODUCTS INCLUDING LIABILITY OR WARRANTIES RELATING TO FITNESS FOR A PARTICULAR PURPOSE,
MERCHANTABILITY, OR INFRINGEMENT OF ANY PATENT, COPYRIGHT OR OTHER INTELLECTUAL PROPERTY RIGHT.
A "Mission Critical Application" is any application in which failure of the Intel Product could result, directly or indirectly, in personal injury or death. SHOULD YOU PURCHASE OR USE INTEL'S PRODUCTS FOR ANY SUCH MISSION CRITICAL APPLICATION, YOU SHALL INDEMNIFY AND HOLD INTEL AND ITS SUBSIDIARIES, SUBCONTRACTORS AND AFFILIATES, AND THE DIRECTORS, OFFICERS, AND EMPLOYEES OF EACH, HARMLESS AGAINST ALL CLAIMS COSTS, DAMAGES, AND EXPENSES AND REASONABLE ATTORNEYS' FEES ARISING OUT OF, DIRECTLY OR INDIRECTLY, ANY CLAIM OF PRODUCT LIABILITY, PERSONAL INJURY, OR DEATH ARISING IN ANY WAY OUT OF SUCH MISSION CRITICAL APPLICATION, WHETHER OR NOT INTEL OR ITS SUBCONTRACTOR WAS NEGLIGENT IN THE DESIGN, MANUFACTURE, OR WARNING OF THE INTEL PRODUCT OR ANY OF ITS PARTS.
Intel may make changes to specifications and product descriptions at any time, without notice. Designers must not rely on the absence or characteristics of any features or instructions marked "reserved" or "undefined". Intel reserves these for future definition and shall have no responsibility whatsoever for conflicts or incompatibilities arising from future changes to them. The information here is subject to change without notice. Do not finalize a design with this information.
The products described in this document may contain design defects or errors known as errata which may cause the product to deviate from published specifications. Current characterized errata are available on request.
Contact your local Intel sales office or your distributor to obtain the latest specifications and before placing your product order.
Copies of documents which have an order number and are referenced in this document, or other Intel literature, may be obtained by calling 1-800-548-4725, or go to: http://www.intel.com/design/literature.htm
Intel® Hyper-Threading Technology (Intel® HT Technology): Available on select Intel® Core™ processors. Requires an Intel® HT
Technology-enabled system. Consult your PC manufacturer. Performance will vary depending on the specific hardware and software used. For more information including details on which processors support HT Technology, visit http://www.intel.com/info/hyperthreading.
Intel® Virtualization Technology (Intel® VT) requires a computer system with an enabled Intel® processor, BIOS, and virtual machine monitor (VMM).
Functionality, performance or other benefits will vary depending on hardware and software configurations. Software applications may not be compatible with all operating systems. Consult your PC manufacturer. For more information, visit http://www.intel.com/go/virtualization
Any software source code reprinted in this document is furnished for informational purposes only and may only be used or copied and no license, express or implied, by estoppel or otherwise, to any of the reprinted source code is granted by this document.
Intel processor numbers are not a measure of performance. Processor numbers differentiate features within each processor family, not across different processor families. Go to: http://www.intel.com/products/processor_number/
Intel, Atom, the Intel logo, the Intel Inside logo, and Xeon are trademarks of Intel Corporation in the U.S. and/or other countries. *Other names and brands may be claimed as the property of others.
Revision History—Intel® DPDK vSwitch
Revision History
Date Revision Description
March 2013 0.1.0 Initial version
April 2013 0.2.0 Updated with sections for IVSHM and 12-Tuple support
May 2013 0.3.0 Removed vswitchd instructions and changed ovs_dpdk parameters June 2013 0.4.0 Updated to reflect directory naming changes and merge of QEMU June 2013 0.5.0 Updated to add details of KNI configuration
June 2013 0.6.0 Updated to add Wind River* Linux* details and update method of mapping hugepages in the guest for IVSHM June 2013 0.7.0 Document restructuring and rework
July 2013 0.8.0 Updated to add changes for flow manipulation code
July 2013 0.9.0 Updates to flow manipulation sections and correction of errata August 2013 0.9.1 Fixed broken links and added additional sample test setups October 2013 1.0 Minor corrections and conversion to FrameMaker
October 2013 1.0.1 Minor updates related to 802.1Q VLAN packet support November 2013 001
New public document number assigned with new revision number
Minor updates related to multiple actions and strip VLAN, mod VLAN, and drop action support
Significant rewrite of Wind River* Linux* section
December 2013 002 Minor updates related to ovs-testsuite, OFTest and Intel® DPDK v1.5 support
January 2014 003 Significant updates related to Open vSwitch 2.0, Intel
® DPDK v1.6 support, the
new Intel® DPDK v1.6 IVSHM feature support, improved support for various
Intel® DPDK vSwitch—Contents
Contents
1.0 Introduction ... 7
1.1 Description of Release ... 7
1.2 Terminology... 7
2.0 Release Notes and Known Bugs ... 8
2.1 Supported Operating Systems ... 8
2.2 Supported Processors... 8
2.3 Intel® DPDK vSwitch ... 8
2.4 Intel® DPDK vSwitch Sample Guest Application...10
2.5 Open vSwitch...10
2.6 Open vSwitch Commands ...10
2.7 Open vSwitch Testsuite ...10
2.8 OFTest ...11 2.9 QEMU...11 2.10 ovs-vswitchd...11 2.11 ovs-vsctl ...11 2.12 ovs-ofctl ...11 2.13 ovs-dpctl ...11 3.0 System Requirements ...12 3.1 Required Libraries...12 3.2 Download Intel® DPDK ...12
4.0 Compiling Intel® DPDK vSwitch from Source ...14
4.1 Compile the Intel® DPDK ...14
4.2 Compile Open vSwitch...14
4.3 Compile QEMU ...15
5.0 Compiling and Running Sample Applications ...16
5.1 VirtIO...16
5.1.1 Host Setup ...16
5.1.1.1 Configure Kernel Boot Parameters ...16
5.1.1.2 Build Source Code ...16
5.1.1.3 Setup Intel® DPDK ...16
5.1.1.4 Add Ports to the vSwitch ...16
5.1.1.5 Start Intel® DPDK vSwitch (ovs_dpdk) ...17
5.1.1.6 Start QEMU ...17
5.1.1.7 Program the Switch’s Flow Tables ...17
5.1.2 Guest Setup...18
5.1.2.1 Ensure VirtIO Ethernet Device Is Present...18
5.1.2.2 Configure VM Network Interfaces...18
5.2 IVSHM Setup ...18
5.2.1 Host Setup ...18
5.2.1.1 Configure Kernel Boot Parameters ...18
5.2.1.2 Build Source Code ...19
5.2.1.3 Set Up the Intel® DPDK...19
5.2.1.4 Add Ports to the vSwitch ...19
5.2.1.5 Start Intel® DPDK vSwitch (ovs_dpdk) ...19
5.2.1.6 Program the Switch’s Flow Tables ...20
5.2.1.7 Copy Required Files to a Temporary Location ...20
5.2.1.8 Start QEMU ...21
5.2.2 Guest Configuration ...21
5.2.2.1 Enable Hugepages...21
5.2.2.2 Copy Required Files from Host ...21
Contents—Intel® DPDK vSwitch
5.2.2.4 Compile and Run ovs_client Sample Application ... 22
5.2.3 Optimizing Performance ... 22
5.2.3.1 Sample Setup for 8-core System (16 Logical Cores if Intel® Hyper-Threading Technology Enabled) ... 22
5.3 Intel® DPDK KNI Setup ... 23
5.3.1 Host Configuration... 23
5.3.2 Guest Configuration... 23
5.3.2.1 Insert the rte_kni Module... 23
5.3.2.2 Compile and Run kni_client Sample Application... 24
5.4 Sample Test Setup (Physical Port-Physical Port) ... 24
5.4.1 Test Setup ... 24
5.4.2 Add a Flow Entry ... 25
5.5 Sample Test Setup (Physical Port to VM to Physical Port via IVSHMEM)... 25
5.5.1 Test Setup ... 25
5.5.2 Add a Flow Entry ... 25
5.6 Sample Test Setup (VM to VM via VirtIO) ... 26
5.6.1 Test Setup ... 26
5.6.1.1 Configure VM Network Interfaces ... 26
6.0 Wind River* Linux* 5.0.1 with Wind River* Linux* Open Virtualization Profile... 28
6.1 Building the Host and Guest... 28
6.1.1 Getting Ready to Build ... 28
6.1.1.1 Set up the Custom Variables and Create the Build Directories. ... 28
6.1.1.2 Set Up the Build Environment:... 28
6.1.2 Wind River* Linux* Host Build ... 29
6.1.3 Wind River* Linux* Guest Build... 29
7.0 Intel® DPDK vSwitch Command Line Parameters ... 31
8.0 Switch Manipulation Using ovs-vsctl... 32
8.1 ovs-vsctl ... 32 8.2 Supported Commands... 32 8.2.1 add-br ... 32 8.2.2 del-br ... 32 8.2.3 add-port ... 33 8.2.4 del-port ... 33
9.0 Dynamic Flow Manipulation Using ovs-ofctl ... 34
9.1 ovs-ofctl ... 34
9.2 Supported Commands... 34
9.2.1 add-flow ... 35
9.2.2 del-flows ... 35
9.2.3 dump-flows ... 35
9.3 Supported Flow Strings ... 36
9.4 Configuring Intel® DPDK vSwitch Flow Tables Using ovs-ofctl ... 36
10.0 Dynamic Flow Manipulation Using ovs-dpctl ... 38
10.1 ovs-dpctl... 38 10.2 Supported Options ... 38 10.3 Supported Commands... 39 10.3.1 add-flow ... 39 10.3.2 del-flow ... 39 10.3.3 del-flows ... 39 10.3.4 mod-flow ... 40 10.3.5 get-flow ... 40 10.3.6 dump-flows ... 40 10.4 Supported Arguments ... 41
Intel® DPDK vSwitch—Contents
11.0 Testing Intel® DPDK vSwitch with OFTest ...42
11.1 Get OFtest ...42
11.2 Configure Intel® DPDK vSwitch for OFTest...42
11.2.1 Add Switch Ports ...42
11.2.2 Start Intel® DPDK vSwitch (ovs_dpdk)...42
11.2.3 Configure the Switch ...43
11.3 Run OFTest...43
12.0 Testing Intel® DPDK vSwitch with ovs-testsuite...50
12.1 Setup...50
12.2 Running Tests ...50
12.2.1 Running Tests via Make ...50
12.3 Running Tests via the testsuite Script ...51
13.0 Intel® DPDK vSwitch Port Numbers...52
Tables
1 Terms ... 72 Affinitizing the Host Cores...23
3 Flow Strings Supported with ovs-ofctl...36
4 Arguments Supported with ovs-dpctl...39
5 Arguments Required with ovs-dpctl...41
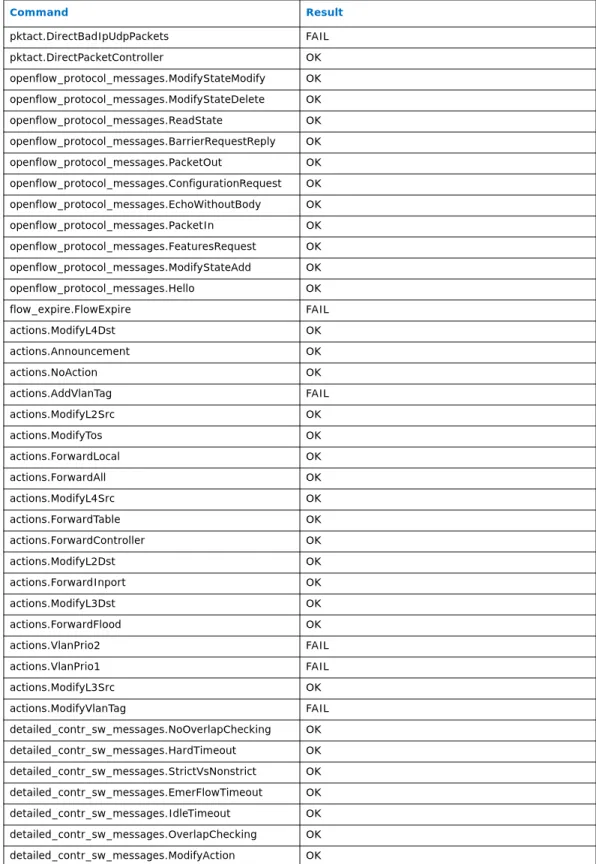
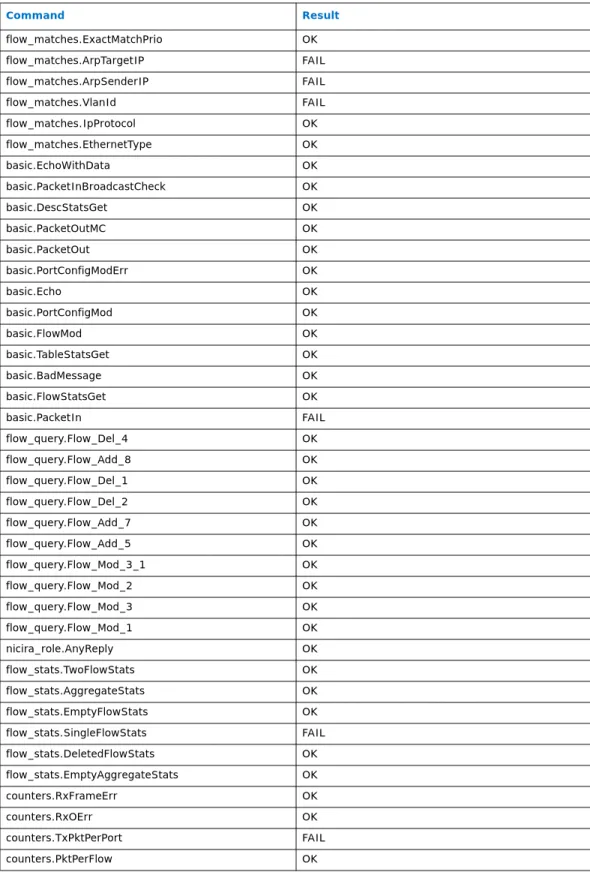
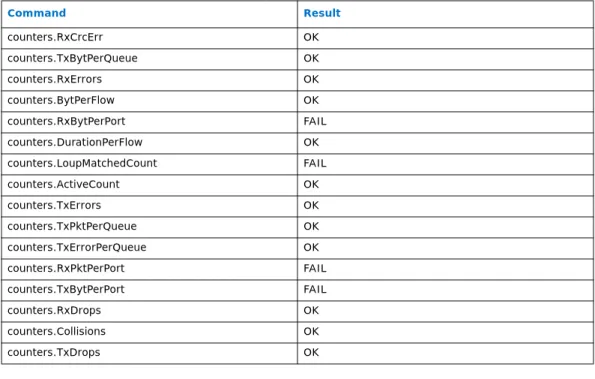
6 List of Expected Results for OFTest ...44
Introduction—Intel® DPDK vSwitch
1.0
Introduction
This document contains detailed instructions for building and running the Intel® Data Plane Development Kit (Intel® DPDK) vSwitch software. It describes how to compile and run Intel® DPDK vSwitch, QEMU, and guest applications in a Linux* environment.
1.1
Description of Release
This guide covers modified Open vSwitch and QEMU packages that enable the use of Intel® DPDK to demonstrate performance, and it is to be used as a reference
architecture. This release ports Intel® DPDK vSwitch to Intel® DPDK 1.6.0, and it adds Open vSwitch 2.0 and new Intel® DPDK 1.6.0 IVSHM feature support. Additionally, it incorporates a number of bug fixes and significant performance improvements. Refer to the NEWS file included in the release package for additional details.
Caution: Please note that the software in this release is under various open source licenses and, as such, is provided “as is” and without warranty. Intel is not liable for any damages arising from the use of this software.
1.2
Terminology
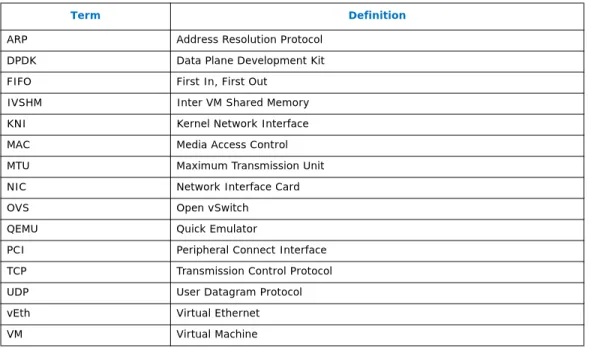
Definitions of terms used in this document are listed in Table 1.
§ §
Table 1. Terms
Term Definition
ARP Address Resolution Protocol
DPDK Data Plane Development Kit
FIFO First In, First Out
IVSHM Inter VM Shared Memory
KNI Kernel Network Interface
MAC Media Access Control
MTU Maximum Transmission Unit
NIC Network Interface Card
OVS Open vSwitch
QEMU Quick Emulator
PCI Peripheral Connect Interface TCP Transmission Control Protocol
UDP User Datagram Protocol
vEth Virtual Ethernet
Intel® DPDK vSwitch—Release Notes and Known Bugs
2.0
Release Notes and Known Bugs
2.1
Supported Operating Systems
This release has been validated against the following operating systems. • Host OS
— Wind River* Linux* 5.0.1.0_standard – Kernel 3.4.34
— Fedora* 16 – Kernel 3.6.7-4 • Guest OS
— Fedora* 16 – Kernel 3.6.7-4
2.2
Supported Processors
This release has been validated on the Intel® Xeon® Processor E5 Family and the Intel® Atom™ Processor C2000 Family.
2.3
Intel
®DPDK vSwitch
• This release supports Intel® DPDK v1.6.0 only. Intel® DPDK v1.5.2 is no longer supported.
• QEMU is added as an Intel® DPDK secondary process — attempting to run a secondary process before a primary process will result in a segfault. This behavior is standard for Intel® DPDK.
• Intel® Virtualization Technology for Directed I/O (Intel® VT-d) should be disabled in the BIOS settings, unless PCI passthrough is required, in which case the following options should be added to the kernel boot parameters:
intel_iommu=on iommu=pt
• Memory corruption is possible if the cores specified using the –c option overlap between processes.
• When starting the VMs, the following warning may appear:
(ASLR) is enabled in the kernel. This may cause issues with mapping memory into secondary processes.
Although in most cases this warning is harmless, to suppress it, run the following command:
# echo 0 > /proc/sys/kernel/randomize_va_space
• Only one instance of the kni_client application should be started in a guest;
however, to create multiple KNI devices in a single VM, use the –p parameter, a
bitmask that specifies the KNI queues to initialize and connect to, to specify the KNI devices to be created.
For example, to initialize KNI queues 0 and 1 in the VM, the –p value is 3 (see KNI
section for further details):
Release Notes and Known Bugs—Intel® DPDK vSwitch
• In Intel® DPDK vSwitch, packet data is copied before it is injected into VirtIO, which may introduce a higher packet drop rate with larger packet sizes. In general, throughput speeds for VirtIO are similar to standard QEMU, if slightly lower; currently, ways to improve the performance with a different design are being investigated. KNI is offered as a backwards-compatible alternative to VirtIO (that is, it supports non-Intel® DPDK userspace applications in the guest), and offers significantly better performance compared to VirtIO. Intel recommends this option when high throughput is required in a non-Intel® DPDK application use case. • This release has not been tested or validated for use with Virtual Functions,
although it should theoretically work with Intel® DPDK 1.6.0.
• If testing performance with TCP, variances in performance may be observed; this variation is due to the protocol’s congestion-control mechanisms. UDP produces more reliable and repeatable results, and it is the preferred protocol for
performance testing.
• On start-up, Intel® DPDK vSwitch may issue an error:
EAL: memzone_reserve_aligned_thread_unsafe(): memzone <RG_MP_log_history> already exists
RING: Cannot reserve memory
When an Intel® DPDK process starts, it attempts to reserve memory for various rings through a call to rte_memzone_reserve; in the case of a Intel® DPDK
primary process, the operation should succeed, but for a secondary process, it is expected to fail, as the memory has already been reserved by the primary process. The particular ring specified in the error message - RG_MP_log_history - does
not affect operation of the secondary process, so this error may be disregarded. • On start-up, ovs_dpdk may complain that no ports are available (when using an
Intel® DPDK-supported NIC): Total ports: 0
EAL: Error - exiting with code: 1
Cause: Cannot allocate memory for port tx_q details
These error messages indicate that Intel® DPDK initialization failed because it did not detect any recognized physical ports. One possible cause is that the NIC is still driven by the default ixgbe driver. To resolve this issue, run DPDK/tools/ pci_unbind.py before starting ovs-dpdk. (This process lets the Intel® DPDK
poll mode driver take over the NIC.)
For example, pci_unbind.py -b igb_uio <PCI ID of NIC port> binds the
NIC to the Intel® DPDK igb_uio driver.
• As ovs_dpdk requires modification to achieve compatibility with 82571EB-based
dual-port cards, modify openvswitch/datapath/dpdk/init.c, updating the
value of tx_rings in the init_port function from num_clients to 1, and
recompile.
• Passing a VLAN packet with VLAN ID 0, but a priority greater than 0 (A priority tagged packet) is not currently supported, and passing this type of packet will render the switch unresponsive.
• Introducing traffic into the switch, prior to starting the vSwitch daemon, may cause undesired behavior. This issue is being investigated and will be resolved in a future release.
Intel® DPDK vSwitch—Release Notes and Known Bugs
2.4
Intel
®DPDK vSwitch Sample Guest Application
In the current IVSHM implementation, multiple Intel® DPDK objects (memory zones, rings, and memory pools) can be shared between different guests. The host application determines what to share with each guest. The guest applications are not Intel® DPDK secondary processes anymore, and so they can create their own Intel® DPDK objects as well.
2.5
Open vSwitch
Open vSwitch builds with a number of warnings (of type deprecated declaration), originating from the original Open Source Open vSwitch v2.0 release package.
2.6
Open vSwitch Commands
Only a subset of the OpenFlow actions implemented in the original Open Source Open vSwitch application are currently supported by Intel® DPDK vSwitch. Currently, these are the following:
• output • drop • set ethernet • set IPv4 • set TCP • set UDP • VLAN actions — strip_vlan — mod_vlan_vid — mod_vlan_pcp
Intel® DPDK vSwitch supports action sets.
Note: strip_vlan should be used in conjunction with the output action. If this step is not
done, the packet will be dropped after applying the action. This behavior is standard for OVS.
2.7
Open vSwitch Testsuite
Open vSwitch contains a number of unit tests that collectively form the OVS “testsuite.” While the majority of these tests currently pass without issue, a small number do fail. The common cause of failure for these tests is a discrepancy in the command line arguments required by many of the utilities in standard Open vSwitch and their equivalents in Intel® DPDK vSwitch. In addition, test three (3) causes the testsuite to hang and should be skipped. These issues will be resolved in a future release.
Many of the tests also fail due to differences in the required parameters for utilities such as ovs-dpctl (that is, Intel® DPDK vSwitch’s version of these utilities require
EAL parameters). As a result, these tests should be used as guidelines only.
In addition to the standard unit tests, Intel® DPDK vSwitch extends the testsuite with a number of “Intel® DPDK vSwitch”-specific unit tests. These tests require root privileges to run, due to the use of hugepages by the Intel® DPDK library. These tests are currently the only tests guaranteed to pass.
Release Notes and Known Bugs—Intel® DPDK vSwitch
2.8
OFTest
Adding a route when using virtual Ethernet devices has been known to cause system instability. The root cause of this issue is currently being investigated.
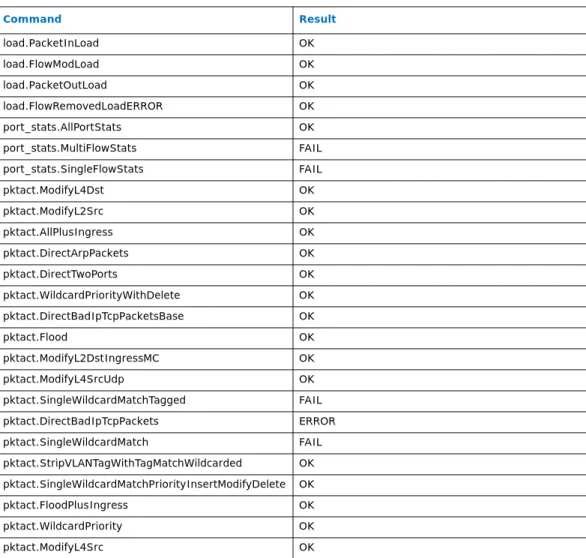
A number of OFTest tests currently fail. In most cases, this failure is due to missing functionality in either standard Open vSwitch or Intel® DPDK vSwitch. These issues will be resolved as additional functionality is added. A full list containing the current status of the tests is given in Section 11.3.
Note: OFTest support has been validated against Scapy v2.2.
2.9
QEMU
The IVSHM model has been validated only on QEMU v1.4.0 and above. This limitation is due to a known bug in earlier versions (such as v1.1), which prevents mapping of hugepages of size > 256 MB. Further modifications were added to allow multiple IVSHM files to be passed into the command line.
2.10
ovs-vswitchd
Not all functionality that is supported by Open vSwitch is supported by the Intel® DPDK vSwitch.
2.11
ovs-vsctl
Not all functionality that is supported by Open vSwitch is supported by the Intel® DPDK vSwitch.
2.12
ovs-ofctl
• Not all functionality that is supported by Open vSwitch is supported by the Intel® DPDK vSwitch.
• The only OpenFlow actions currently supported are those detailed in Section 2.6.
2.13
ovs-dpctl
• Not all functionality that is supported by Open vSwitch is supported by the Intel® DPDK vSwitch.
• The only OpenFlow actions currently supported are those detailed in Section 2.6.
Intel® DPDK vSwitch—System Requirements
3.0
System Requirements
This section describes how to build and run Intel® DPDK vSwitch, Open vSwitch, QEMU, and sample Intel® DPDK guest applications.
3.1
Required Libraries
The following libraries are needed to compile the various components within the release: • gcc • kernel-dev • kernel-devel • coreutils • make • nasm • glibc-devel.i686 • libc6-dev-i386 • glibc-devel.x64_86 • glibc-devel
• kernel-devel-3.3.4-5.fc17.x86_64 (matching kernel) • autoconf • automate • autom4te • automake • zlib-devel • glib2-devel.x86_64 • libtool
3.2
Download Intel
®DPDK
To download the Intel® DPDK release package DPDK.L.1.6.0-18.zip:
• Existing customers can download the release package from the Intel Business Portal website: http://www.intel.com/ibl.
— Under Information Desk/Design Kits, select the Embedded category, under Platforms and Solutions.
— Under Development Kits, select Intel Data Plane Development Kit (Intel
DPDK), then select Embedded Software: Intel Data Plane Development Kit - Technical.
System Requirements—Intel® DPDK vSwitch
— Download Intel® Data Plane Development Kit (Intel® DPDK) - Release 1.6.0
(L1.6.0-18) - Code (Zip File)and Intel® Data Plane Development Kit (Intel®
DPDK) - Release 1.6.0 - Documentation.
• Otherwise, please register on the Intel® Embedded website, and request design assistance for your project.
Intel® DPDK vSwitch—Compiling Intel® DPDK vSwitch from Source
4.0
Compiling Intel
®
DPDK vSwitch from Source
4.1
Compile the Intel
®DPDK
Create a folder to hold the source for each component of Intel® DPDK vSwitch. Expand the Intel® DPDK release package within this folder:
mkdir ovs_dpdk cd ovs_dpdk
tar –xzvf <dpdk_release_pkg_name>.tar.gz
Modify the Intel® DPDK buildsystem so that libraries are position independent: --- a/mk/target/generic/rte.vars.mk
+++ b/mk/target/generic/rte.vars.mk
@@ -105,7 +105,7 @@ ifeq ($(KERNELRELEASE),) # merge all CFLAGS
CFLAGS := $(CPU_CFLAGS) $(EXECENV_CFLAGS) $(TOOLCHAIN_CFLAGS) $(MACHINE_CFLAGS) -CFLAGS += $(TARGET_CFLAGS)
+CFLAGS += $(TARGET_CFLAGS) -fPIC # merge all LDFLAGS
To enable the new Intel® DPDK 1.6.0 IVSHMEM feature, Intel® DPDK has to be compiled using the Intel® DPDK IVSHMEM target. This requirement may vary, depending on where the system is built. Please refer to sections two and three of the
Intel® Data Plane Development Kit (Intel® DPDK) - Getting Started Guide (Document
Number: 326002) for instructions on performing this step.
4.2
Compile Open vSwitch
Once the Intel® DPDK is built, expand the Intel® DPDK vSwitch package within the same folder as before:
tar –xzvf <ovs_release_pkg_name>.tar.gz Compile Open vSwitch as follows:
cd openvswitch ./boot.sh
./configure RTE_SDK=/path/to/dpdk --disable-ssl make
At this point it is recommended that unit tests are run to ensure correct installation — refer to Section 12.0 for details.
Note: A number of these tests will fail. See Section 2.7 for further information.
Note: Open vSwitch builds with a number of warnings (of type deprecated declaration)
Compiling Intel® DPDK vSwitch from Source—Intel® DPDK vSwitch
Note: It may be necessary to create a number of directories to ensure correct operation of
the vswitch daemon. This step will be necessary if this is your first time using Intel® DPDK vSwitch, or if these folders had been previously deleted:
mkdir –p /usr/local/etc/openvswitch mkdir –p /usr/local/var/run/openvswitch
4.3
Compile QEMU
Once Open vSwitch is built, perform the following steps to build QEMU: cd qemu
./configure --enable-kvm –-dpdkdir=/path/to/dpdk –-target-list=x86_64-softmmu make
Intel® DPDK vSwitch—Compiling and Running Sample Applications
5.0
Compiling and Running Sample Applications
5.1
VirtIO
This section contains instructions on how to compile and run a sample application that demonstrates performance of an Intel® DPDK-accelerated version of VirtIO for IO virtualization.
5.1.1
Host Setup
5.1.1.1 Configure Kernel Boot Parameters
Enable hugepage usage within kernel boot options. Multiple 1 GB and 2 MB hugepage sizes are supported; however, standard Intel® DPDK vSwitch configuration requires a single 1 GB hugepage per instance of the vSwitch:
default_hugepagesz=1G hugepagesz=1G hugepages=1
Note: As of release 0.9, it is possible to configure multiple hugepages. For example, using 4
pages of 1 GB size
default_hugepagesz=1G hugepagesz=1G hugepages=4 5.1.1.2 Build Source Code
Compile Intel® DPDK, Open vSwitch, and QEMU as described in Section 4.0.
5.1.1.3 Setup Intel®DPDK
Once compilation of the above packages is complete, mount the Intel® DPDK hugepage:
mount –t hugetlbfs nodev /dev/hugepages
Ensure the hugetlbfs mount point is mounted correctly by running the mount
command.
mount | grep hugepages
The output of this command should be:
nodev on /dev/hugepages type hugetlbfs (rw, realtime) 5.1.1.4 Add Ports to the vSwitch
Add flow ports to the switch for any VirtIO and/or physical devices required, using
ovs-vsctl. See Section 9.4 for details on how to add ports to the switch and
Compiling and Running Sample Applications—Intel® DPDK vSwitch
5.1.1.5 Start Intel® DPDK vSwitch (ovs_dpdk)
Start the ovs_dpdk application. For example:
sudo ./openvswitch/datapath/dpdk/build/ovs_dpdk -c 0xf -n 4 --proc-type=primary -- -p 0x03 -k 2 -n 4 stats=1 vswitchd=0 client_switching_core=1
--config="(0,0,2),(1,0,3)"
Note: Intel® DPDK does not automatically bind the igb_uio driver to supported NICs. To
manually bind a NIC to the Intel® DPDK driver, use the pci_unbind.py script in $RTE_SDK/tools/. Consult the Intel® Data Plane Development Kit (Intel® DPDK)
-Release 1.6.0 - Documentation for details.
Note: Select --base-virtaddr value to a valid virtual address on your system. You can run
ovs_dpdk without using this option and copy the address from stdout output.
Consult the Intel® Data Plane Development Kit (Intel® DPDK) -Release 1.6.0 -
Documentation for details.
5.1.1.6 Start QEMU
Note: QEMU will fail if ovs_dpdk is not already running.
sudo ./qemu/x86_64-softmmu/qemu-system-x86_64 -c <core_mask> -n <num> --proc-type secondary -- -cpu host -boot c -hda <path_to_image> -m <mem> -netdev
dpdk,port=<port_num>,id=<device_id> -device
virtio-net-pci,netdev=<device_id>,mac=<device_mac> -smp <smp> --enable-kvm -name "<client_name>" -nographic -vnc :<vnc_num>
Sample command line:
sudo ./qemu/x86_64softmmu/qemusystemx86_64 c 0x30 n 4 proctype=secondary cpu host boot c hda <PATH_TO_IMAGE>.qcow2 m 512 netdev dpdk,port=1,id=me1 -device virtio-net-pci,netdev=me1,mac=00:00:00:00:00:01 -smp 2 --enable-kvm -name "Client 1"–nographic –vnc :1
Note: This command will start the guest image in persistent mode, that is, all changes made
in the guest remain present across reboots. Alternatively, the guest may be started in snapshot mode by passing the –snapshot flag on the command line:
sudo ./qemu/x86_64-softmmu/qemu-system-x86_64 -c <core_mask> -n <num> --proc-type secondary -- -snapshot -cpu host -boot c -hda <path_to_image> -m <mem> -netdev dpdk,port=<port_num>,id=<device_id> -device
virtio-net-pci,netdev=<device_id>,mac=<device_mac> -smp <smp> --enable-kvm -name "<client_name>" -nographic -vnc :<vnc_num>
5.1.1.7 Program the Switch’s Flow Tables
The switch’s flow table must be populated to allow traffic to flow to and from a VM, via the switch. See Section 9.0 and Section 10.0 for more information on programming flow tables, and Section 5.6 for an example of how to program the switch’s flow tables. Add flows to switch traffic appropriately:
• From ingress port to VirtIO port/ring used by VM (if using an external traffic generator)
• From VirtIO port to next target (Physical/VirtIO/KNI/IVSHM port) • Any additional entries required to complete the traffic flow path
Intel® DPDK vSwitch—Compiling and Running Sample Applications
5.1.2
Guest Setup
Note: The following configuration must be performed on each VirtIO client.
5.1.2.1 Ensure VirtIO Ethernet Device Is Present
After logging on to the client(s), list the PCI devices available and look for the entry listed as “Ethernet Controller.” This entry is the VirtIO device that has been mapped from the host:
lspci
The expected output should be:
00:03.0 Ethernet Controller: Red Hat, Inc Virtio network device 5.1.2.2 Configure VM Network Interfaces
Note: To pass packets correctly between VMs, the flow table must be configured correctly.
Note: A static ARP entry may be required depending on how the flow table has been
configured.
The device can be configured like a standard Ethernet device. Sample command line:
ifconfig eth0 up
ifconfig eth0.700 2.2.2.1/24 up arp -s 2.2.2.2 00:00:00:00:00:02
5.2
IVSHM Setup
Intel® DPDK vSwitch supports the mapping of host-created Intel® DPDK objects directly into guest userspace, eliminating performance penalties presented by QEMU I/O emulation. This section contains instructions on how to compile and run a sample application that demonstrates performance of Intel® DPDK vSwitch with IVSHM integration. It also describes the additional configuration required for both host and client systems to use IVSHM.
Note: IVSHM modifications require QEMU v1.4.0 or above. Use of the IVSHM model and older
versions of QEMU has not been validated.
5.2.1
Host Setup
5.2.1.1 Configure Kernel Boot Parameters
Enable hugepage usage within kernel boot options. Multiple 1 GB and 2 MB hugepage sizes are supported; however, standard Intel® DPDK vSwitch configuration requires a single 1 GB hugepage per instance of the vSwitch:
default_hugepagesz=1G hugepagesz=1G hugepages=1
Note: As of release 0.9, it is possible to configure multiple hugepages. For example, using 4
pages of 1 GB size
Compiling and Running Sample Applications—Intel® DPDK vSwitch
5.2.1.2 Build Source Code
Compile Intel® DPDK, Open vSwitch, and QEMU as described in Section 4.0. 5.2.1.3 Set Up the Intel® DPDK
Once compilation of the above packages is complete, insert the Intel® DPDK kernel module and mount the hugepage(s). The hugepage(s) will be mapped to the guests. modprobe uio
insmod $RTE_SDK/$RTE_TARGET/kmod/igb_uio mount –t hugetlbfs nodev /dev/hugepages
Ensure the hugetlbfs mount point is mounted correctly by running the mount
command.
mount | grep hugepages
The output of this command should be:
nodev on /dev/hugepages type hugetlbfs (rw,realtime) 5.2.1.4 Add Ports to the vSwitch
Add flow ports to the switch for the IVSHM devices (and other devices) you wish to use, using ovs-vsctl. See Section 8.0 for details on how to add ports to the switch and
Section 13.0 for details on the valid values for IVSHM ports.
5.2.1.5 Start Intel® DPDK vSwitch (ovs_dpdk)
Start the ovs_dpdk application.
Note: Intel® DPDK does not automatically bind the igb_uio driver to supported NICs. To
manually bind a NIC to the Intel® DPDK driver, use the pci_unbind.py script in $RTE_SDK/tools/. Consult the Intel® Data Plane Development Kit (Intel® DPDK)
-Release 1.6.0 - Documentation for details.
sudo ./openvswitch/datapath/dpdk/build/ovs_dpdk -c <core_mask> -n 4
proctype=primary basevirtaddr=<virt_addr> p <port_mask> n <number_of_clients> -k 2 stats=<stats update interval> vswitchd=<core_mas-k>
--client_switching_core=<core_mask> --config="<port_config>” Sample command line:
sudo ./openvswitch/datapath/dpdk/build/ovs_dpdk -c 0xF -n 4 proc-type=primary base-virtaddr=0x2aaa2aa00000 -p 0x3 -n 3 –k 2 stats=1 vswitchd=0
--client_switching_core=1 --config=”(0,0,2),(1,0,3)”
Note: Client 0 represents the vswitchd interface, and is always counted toward the
number_of_clients present, that is, to support two VMs, a value of 3 should be used as the number_of_clients parameter.
Note: --base-virtaddr parameter must be set to a valid virtual address on the host.
Intel® DPDK processes will use this address as a base point to do the hugepages mapping. Consult the Intel® Data Plane Development Kit (Intel® DPDK) -Release 1.6.0 - Documentation for details. To get a valid virtual address to be used, simply execute
ovs_dpdk without this parameter and copy the address from the output: EAL: Virtual area found at 0x2aaa40000000 (size = 0x40000000)
Intel® DPDK vSwitch—Compiling and Running Sample Applications
To tell QEMU where to look for Intel® DPDK objects that the host app wants to share with a given guest, the ovs_dpdk application will print qemu’s --device ivshmem
parameter value to stdout. This will have to be passed in to QEMU’s command line as
shown in Section 5.2.1.8.
The ovs_dpdk application will also store these command lines into temporary files
under /tmp directory for automation purposes. Each line contains the information for qemu to map all the Intel® DPDK objects the ovs_dpdk application is trying to share
with a given VM. Only one of these command lines must be used per VM. There will be one per each client selected in number_of_clients parameter and another one for
all the Intel® DPDK KNI clients in case -k parameter is used. Consult the Intel® Data
Plane Development Kit (Intel® DPDK) -Release 1.6.0 - Documentation for details on
IVSHM.
Sample command line to support two VMs:
sudo ./openvswitch/datapath/dpdk/build/ovs_dpdk -c 0xF -n 4 proc-type=primary base-virtaddr=0x2aaa2aa00000 -p 0x3 -n 3 stats=1 vswitchd=0
--client_switching_core=1 --config=”(0,0,2),(1,0,3)”
ovs_dpdk application will create two temporary files under /tmp: # ls /tmp/.ivshmem_qemu_cmdline_*
/tmp/.ivshmem_qemu_cmdline_client_1 /tmp/.ivshmem_qemu_cmdline_client_2 The content of these files must be used within the two qemu processes. See
Section 5.2.1.8 for more information on how to run qemu. The ovs_client
applications running on each VM will see only those Intel® DPDK objects specifically shared by ovs_dpdk. See Section 5.2.2.4 for more information on how to run ovs_client sample application.
Note: Intel® DPDK processes using Intel® DPDK 1.6.0 IVSHM feature and running on the
host, like ovs_dpdk, will show a new message that can be ignored: EAL: Searching for IVSHMEM devices...
EAL: No IVSHMEM configuration found!
Consult the Intel® Data Plane Development Kit (Intel® DPDK) -Release 1.6.0 - Documentation for details on IVSHM.
5.2.1.6 Program the Switch’s Flow Tables
The switch’s flow table must be populated to allow traffic to flow to and from a VM, via the switch and IVSHM rings. See Section 9.0 and Section 10.0 for more information on programming flow tables, and see Section 5.5 for an example of how to program the switch’s flow tables.
Add flows to switch traffic appropriately:
• From ingress port to IVSHM port/ring used by VM
• From IVSHM port to next target (Physical/Virtio/KNI/IVSHM port) • Any additional entries required to complete the datapath
Note: The ID of the IVSHM port is the same as the client_id passed to the ovs_client
application described in Section 5.2.2.4, and it should be a value from 1 to 15.
5.2.1.7 Copy Required Files to a Temporary Location
Both ovs_client source code — located within the guest subfolder of the Intel®
DPDK vSwitch source package — and Intel® DPDK source code must be copied to each guest required. The simplest way to do this step is by copying the required files to a
Compiling and Running Sample Applications—Intel® DPDK vSwitch
directory on the host and mounting this directory as a drive on the guest. Once the guest is started, the files can be copied from the mounted drive to a local directory. This method has been validated using qcow2 images.
mkdir /tmp/share mkdir /tmp/share/DPDK chmod 777 /tmp/share
cp –a /path/to/ovs_client/* /tmp/share cp –a /path/to/DPDK/* /tmp/share/DPDK 5.2.1.8 Start QEMU
Start QEMU on the host:
./qemu/x86_64-softmmu/qemu-system-x86_64 –c <coremask> -n 4 --proc-type=secondary -- –cpu host –smp 2 –hda <path_to_guest_image> -m 4096 –boot menu=on –vnc
:<vnc_session_id> --enable-kvm -device ivshmem,size=2048M,shm=fd:/dev/hugepages/ rtemap_0:0x0:0x40000000:/dev/zero:0x0:0x3fffc000:/var/run/
.dpdk_ivshmem_metadata_ovs_config_1:0x0:0x4000 –drive file=fat:/tmp/share The -device ivshmem argument will be provided by ovs_dpdk application. See
Section 5.2.1.5 for more information on how to run ovs_dpdk application.
Note: This step will start the guest image in persistent mode, that is, all changes made in the
guest remain present across reboots. The guest may alternatively be started in snapshot mode by passing the –snapshot flag on the command line, and appending ,-snapshot=off to the –drive parameter:
./qemu/x86_64-softmmu/qemu-system-x86_64 –c <coremask> -n 4 --proc-type=secondary -- -snapshot –cpu host –smp 2 –hda <path_to_guest_image> -m 4096 –boot menu=on –vnc :<vnc_session_id> --enable-kvm -device ivshmem,size=2048M,shm=fd:/dev/hugepages/ rtemap_0:0x0:0x40000000:/dev/zero:0x0:0x3fffc000:/var/run/
.dpdk_ivshmem_metadata_ovs_config_1:0x0:0x4000 –drive file=fat:/tmp/ share,snapshot=off
5.2.2
Guest Configuration
Note: The following configuration must be performed on each IVSHM client.
5.2.2.1 Enable Hugepages
Start the guest OS with the following added kernel options. This step ensures that hugepages are enabled in the guest thus allowing for correct operation of the
ovs_client application:
default_hugepagesz=2M hugepagesz=2M hugepages=1024
Alternatively, use the runtime method to enable huge pages (no reboot required): echo 1024 > /sys/kernel/mm/hugepages/hugepages-2048kB/nr_hugepages
More information can be found within the Intel® DPDK documentation.
5.2.2.2 Copy Required Files from Host
In the guest, mount the temporary folder, which was created in the host, and copy the required files:
mkdir –p /mnt/ovs_client mkdir –p /root/ovs_client
Intel® DPDK vSwitch—Compiling and Running Sample Applications
5.2.2.3 Compile Intel® DPDK cd /root/ovs_client/DPDK
export RTE_SDK=/root/ovs_client/DPDK
export RTE_TARGET=x86_64-ivshmem-linuxapp-gcc make install T=x86_64-ivshmem-linuxapp-gcc
5.2.2.4 Compile and Run ovs_client Sample Application cd /root/ovs_client
make
./build/ovs_client –c <core_mask> -n 4 -- -n <client_id>
ovs_client now runs as an Intel® DPDK primary process, which means it can create
its own Intel® DPDK objects. Thanks to the Intel® DPDK 1.6.0 IVSHM feature, the
ovs_client process will see only those Intel® DPDK objects shared by ovs_dpdk.
5.2.3
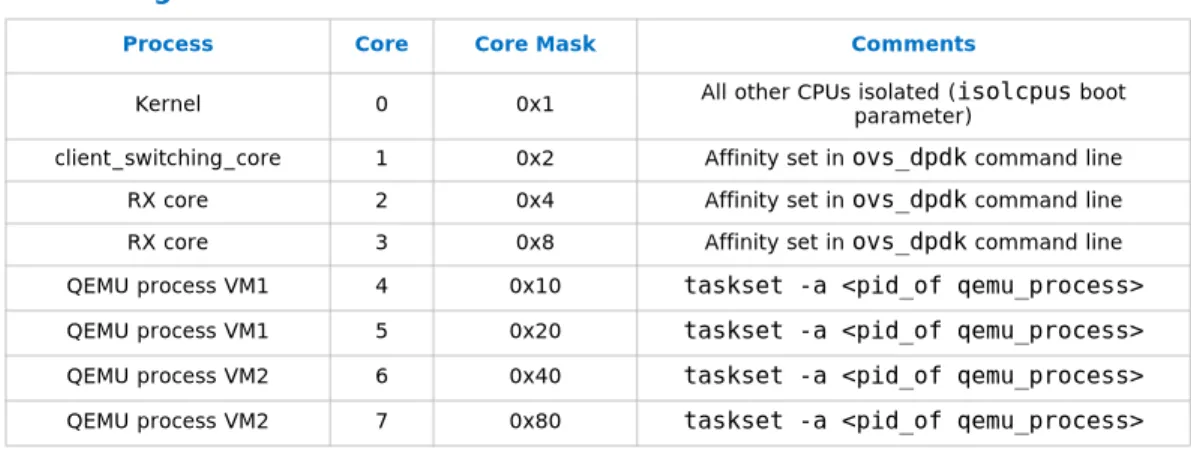
Optimizing Performance
To maximize throughput, assign individual cores to each of the various processes involved in the test setup (either using the taskset command, or the core mask
passed to the ovs_client and ovs_dpdk applications). Additionally, on the host, all
available cores, with the exception of core 0, should be isolated from the kernel scheduler.
5.2.3.1 Sample Setup for 8-core System (16 Logical Cores if Intel® Hyper-Threading Technology Enabled)
5.2.3.1.1 Isolate Cores
In the host, edit /boot/grub2/grub.cfg (or /etc/default/grub, if applicable),
specifically this line: GRUBCMDLINELINUX="..." Include the following: isolcpus=1,2,...,n
Note: n should be the max number of logical cores available (if Intel® Hyper-Threading
Technology is enabled). Always leave core 0 for the operating system. Update the grub configuration file.
grub2-mkconfig -o /boot/grub2/grub.cfg
Reboot the system, then set up the application as described above but with two differences.
First, for ovs_dpdk, substitute in this command:
sudo ovs_dpdk -c 0x0F -n 4 proc-type=primary -n 3 -p 0x3 –k 2 stats=1 --vswitchd=0 –client_switching_core=1 --config="(0,0,2),(1,0,3)"
Then for ovs_client, substitute in this command: ovs_client -c 0x1 -n 4 -- -n 1
ovs_client -c 0x1 -n 4 -- -n 2
Compiling and Running Sample Applications—Intel® DPDK vSwitch
Note: For all Intel® DPDK-enabled applications, the core mask option (-c) must be set so
that no two processes have overlapping core masks.
5.3
Intel
®DPDK KNI Setup
When created in a guest, KNI devices enable non-Intel® DPDK applications running in the VM to use the Intel® DPDK shared objects using the IVSHM model.
This section contains instructions on how to compile and run a sample application that, when run in the guest, allows the user to create an Intel® DPDK KNI device, which will attach to queues in the host ovs_dpdk application. It also describes the additional
configuration required for both host and client systems to use KNI.
Note: This release supports only the KNI implementation contained within Intel® DPDK 1.6.0.
5.3.1
Host Configuration
Follow the host configuration steps provided in Section 5.2.1.
Note: When programming the Switch’s flow table, the IVSHM port value should be replaced
with a KNI FIFO value (in the range 32-47; that is, 32 = KNI FIFO 0, 33 = KNI FIFO 1, and so on).
Note: When copying the required guest files to a temporary location, the kni folder — also
located in the guest subfolder of the Intel® DPDK vSwitch package — should be copied rather than the ovs_client folder.
5.3.2
Guest Configuration
Follow the guest configuration steps, as described in Section 5.2.2, up until the “Compile Intel® DPDK” step.
Note: When copying the required files from the host, the kni folder should be copied rather
than the ovs_client folder. Other than the folder name, the process is the same. 5.3.2.1 Insert the rte_kni Module
A small number of modifications to the standard Intel® DPDK driver are required to support KNI devices in the guest. These changes have been included as a patch. Apply the rte_kni_module_1_6 patch before compiling Intel® DPDK and inserting the KNI
module.
Table 2. Affinitizing the Host Cores
Process Core Core Mask Comments
Kernel 0 0x1 All other CPUs isolated (isolcpus boot parameter) client_switching_core 1 0x2 Affinity set in ovs_dpdk command line RX core 2 0x4 Affinity set in ovs_dpdk command line RX core 3 0x8 Affinity set in ovs_dpdk command line QEMU process VM1 4 0x10 taskset -a <pid_of qemu_process> QEMU process VM1 5 0x20 taskset -a <pid_of qemu_process> QEMU process VM2 6 0x40 taskset -a <pid_of qemu_process> QEMU process VM2 7 0x80 taskset -a <pid_of qemu_process>
Intel® DPDK vSwitch—Compiling and Running Sample Applications export RTE_SDK=/root/kni/DPDK export RTE_TARGET=x86_64-ivshmem-linuxapp-gcc cd /root/kni/DPDK patch -N -p1 < rte_kni_module_1_6.patch make uninstall
make install T=x86_64-ivshmem-linuxapp-gcc
insmod ./x86_64-ivshmem-linuxapp-gcc/kmod/rte_kni.ko
Note: Ensure the Intel® DPDK KNI patch has been applied and the kernel module has been
built correctly by running the dmesg command: dmesg
The output of this command should be similar to:
[ 2734.408833] KNI: ######## DPDK kni module loading ######## [ 2734.409226] KNI: loopback disabled
[ 2734.409239] KNI: IVSHMEM metadata found
[ 2734.409240] KNI: ######## DPDK kni module loaded ########
It is important to see the "IVSHMEM metadata found" message in the kernel log. If "IVSHMEM metadata NOT found" message is seen instead or if no IVSHMEM message is printed at all, uninstall all targets, re-apply the patch, and re-install again. An attempt to bring up a virtual interface without the IVSHMEM metadata being found will lead to a kernel panic error on the guest.
5.3.2.2 Compile and Run kni_client Sample Application
Copy the kni_client folder to a directory on the VM, then compile and run it. When
the application is running, bring up the KNI device. cd /root/kni/kni_client
make
./build/kni_client -c 0x1 -n 4 -- -p <kni_portmask> &
ifconfig vEthX up #where X is the number of a given KNI device, as configured in the portmask
Note: kni_portmask above is similar to the ovs_dpdk portmask. Refer to Section 7.0 for
details. However, the kni_portmask should be entered in decimal format only (that is,
no prepending 0x).
5.4
Sample Test Setup (Physical Port-Physical Port)
To forward packets along the various datapaths supported by ovs_dpdk (physical port
to physical port, physical port to VM, VM to physical port, VM to VM), the switch’s flow table must be programmed, either directly using ovs-dpctl, or indirectly using ovs-ofctl. This section describes how to program the flow table to forward a specific flow
from one physical port to another physical port via the switch (Phy Port -> Switch ->
Phy Port), using ovs-dpctl.
5.4.1
Test Setup
Perform the initial setup, as described in the section of the relevant I/O method, and
Section 10.0.
Note: This test assumes that ingress traffic is received on Physical Port 0, either via a traffic
Compiling and Running Sample Applications—Intel® DPDK vSwitch
5.4.2
Add a Flow Entry
sudo ./ovs-dpctl -c 1 --proc-type=secondary -- -s add-flow dpdk@dp
"in_port(16),eth(src=00:00:00:00:00:11,dst=00:00:00:00:00:22),eth_type(0x0800),ipv 4(src=1.1.1.1,dst=1.1.1.2,proto=1,tos=0,ttl=64,frag=no)" "17"
This command adds an entry in the switch’s flow table that sends packets received on physical port 0 with source MAC address 00:00:00:00:00:11, destination MAC address 00:00:00:00:00:22, Ethertype 0x800 (IPv4), source IP address 1.1.1.1, destination IP address 1.1.1.2, protocol type ICMP, Type Of Service 0 and Time To Live 64, to physical port 1.
When matching traffic is received on physical port 0, it should be switched to the correct physical port. Enable statistics for ovs_dpdk (specify non-zero value for – stats parameter) to observe traffic passing through the various interfaces. This step
can also be useful for debugging.
Note: When using dpctl, the flow must be specified exactly (that is, all 13 match fields must
be specified). If a match field is not specified, ovs_dpdk will assume that it is zero.
If bidirectional testing is required, another flow entry may be added to switch packets received on physical port 1 to physical port 0:
sudo ./ovs-dpctl -c 1 --proc-type=secondary -- -s add-flow dpdk@dp
"in_port(17),eth(src=00:00:00:00:00:22,dst=00:00:00:00:00:11),eth_type(0x0800),ipv 4(src=1.1.1.2,dst=1.1.1.1,proto=1,tos=0,ttl=64,frag=no)" "16"
Note: When using dpctl, the ovs-vswitchd application should not be running. This
requirement only applies when modifying flows.
5.5
Sample Test Setup (Physical Port to VM to Physical Port
via IVSHMEM)
This section describes how to program the flow table to forward a specific flow from one physical port to a VM and back out to another physical port via the switch (Phy Port
-> Switch --> VM --> Switch --> Phy Port), using ovs-dpctl ( ./utilities/ovs-dpctl).
5.5.1
Test Setup
Perform the initial setup, as described in the IVSHM section.
This test assumes that ingress traffic is received on Physical Port 0, either via a traffic generator or otherwise, and that the VM/ovs_client app uses IVSHM ring 1.
5.5.2
Add a Flow Entry
sudo ./ovs-ofctl -c 1 --proc-type=secondary -- -s add-flow br0
in_port=16,dl_type=0x0800,nw_src=1.1.1.1,nw_dst=2.2.2.1,idle_timeout=0,action=outp ut:1
This command adds an entry in the switch’s flow table that sends packets received on physical port 0 with Ethertype 0x800 (IPv4), source IP address 1.1.1.1, and destination IP address 2.2.2.1, to the VM.
When matching traffic is received on physical port 0, it should be switched to the VM. Enable statistics for ovs_dpdk (specify non-zero value for –stats parameter) to
observe traffic passing through the various interfaces. This step can also be useful for debugging.
Intel® DPDK vSwitch—Compiling and Running Sample Applications
To allow traffic from ovs_client running on the VM to pass traffic out, another flow
entry may be added to switch packets received from VM to physical port 1: sudo ./ovs-dpctl -c 1 --proc-type=secondary -- -s add-flow dpdk@dp
"in_port(1),eth(src=00:00:00:00:00:11,dst=00:00:00:00:00:22),eth_type(0x0800),ipv4 (src=1.1.1.1,dst=2.2.2.1,proto=1,tos=0,ttl=64,frag=no)" "16"
Note: It is also possible to replicate this step using dpctl. As always, when using dpctl, the
ovs-vswitchd application should not be running.
5.6
Sample Test Setup (VM to VM via VirtIO)
This section describes how to program the flow table to forward a specific flow between VM to VM via the switch (VM -> Switch -> VM), using ovs-ofctl.
5.6.1
Test Setup
Perform the initial setup, as described in the VirtIO section, Section 5.1, and
Section 10.0, Dynamic Flow Manipulation Using ovs-ofctl.
This test assumes that traffic originates from VM0 and that VMs 0 and 1 use VirtIO devices/rings 1 and 2, respectively. Add a Flow Entry:
sudo ./utilities/ovs-ofctl add-flow br0
in_port=1,dl_type=0x0800,nw_src=2.2.2.1,nw_dst=2.2.2.2,idle_timeout=0,action=outpu t:2
This command adds an entry in the switch’s flow table that sends packets sent by VM 0, with any source and destination MAC address, Ethertype 0x800 (IPv4), source IP address 2.2.2.1, destination IP address 2.2.2.1, to VM 1.
When matching traffic is received by the switch from VM 0, it should be switched to the correct VM port. Enable statistics for ovs_dpdk (specify non-zero value for –stats
parameter) to observe traffic passing through the various interfaces. This process can also be useful for debugging.
Note: When using ofctl, the flow will match wildcard fields, which are not configured by the
user. If a match field is not specified, ovs_dpdk will assume that it is wildcarded.
To allow traffic from ovs_client running on the VM to pass traffic out, another flow
entry may be added to switch packets received from VM 1 to physical port 1: sudo ./utilities/ovs-ofctl add-flow br0
in_port=2,dl_type=0x0800,nw_src=2.2.2.2,nw_dst=2.2.2.1,idle_timeout=0,action=outpu t:16
5.6.1.1 Configure VM Network Interfaces
Note: To pass packets correctly between VMs, the flow table must be configured correctly.
Note: A static ARP entry may not be required, depending on how the flow table has been
configured.
Compiling and Running Sample Applications—Intel® DPDK vSwitch
Sample command line: ifconfig eth0 up
ifconfig eth0.700 2.2.2.1/24 up arp -s 2.2.2.2 00:00:00:00:00:02
Intel® DPDK vSwitch—Wind River* Linux* 5.0.1 with Wind River* Linux* Open Virtualization Profile
6.0
Wind River* Linux* 5.0.1 with Wind River* Linux*
Open Virtualization Profile
This section provides the steps for using Wind River* Linux* Host and Wind River* Linux* Guest with Intel® DPDK vSwitch. For additional information, please refer to:
• Wind River Linux 5.0.1 User's Guide
• Wind River Linux 5.0.1 Open Virtualization Profile: Virtual Node User's Guide
6.1
Building the Host and Guest
The following subsections show the basic configuration steps required to build the Wind River* Linux* Host and Guest for an Intel® Xeon® processor-based platform. Once complete, a kernel and rootfs will be available for both host and guest deployment on the target system.
6.1.1
Getting Ready to Build
6.1.1.1 Set up the Custom Variables and Create the Build Directories.
The host and guest build steps will reference the following environment variables. • PROD_BASE - is the directory where Wind River* Linux *is installed. Typically
something like /opt/Windriver.
• WIND_BASE - is the base Linux* directory in the Wind River* Linux* product installation.
• HOST_BUILD_DIR - is the directory in which you will build the Wind River* Linux* host.
• GUEST_BUILD_DIR - is the directory in which you will build the Wind River*
Linux*
guest.
$ export PROD_BASE=/opt/Windriver $ export HOST_BUILD_DIR=~/build/host $ export GUEST_BUILD_DIR=~/build/guest $ mkdir -p $HOST_BUILD_DIR $ mkdir -p $GUEST_BUILD_DIR6.1.1.2 Set Up the Build Environment:
This step will set up the $WIND_BASE environment variable along with others to enable
building the host and guest.
Wind River* Linux* 5.0.1 with Wind River* Linux* Open Virtualization Profile—Intel® DPDK vSwitch
6.1.2
Wind River* Linux* Host Build
The following steps provide the framework for building the host. Configure the host build with the following options:
$ cd $HOST_BUILD_DIR $ $WIND_BASE/wrlinux/configure \ --enable-board=intel-xeon-core \ --enable-kernel=preempt-rt --enable-rootfs=ovp-kvm \ --enable-addons=wr-ovp \ --with-layer=wr-intel-support \ --with-template=feature/openvswitch,feature/rt-tune \ --enable-reconfig \ --enable-parallel-pkgbuilds=8 --enable-jobs=8
Note: --enable-parallel-pkgbuilds=8 and --enable-jobs=8 can be tuned based on
the processing power of the build platform. (See $GUEST_BUILD_DIR/local.conf.)
Extract and patch the kernel source for kernel configuration: $ make -C build linux-windriver.config
Launch the menu-based tool for guest kernel configuration. Here you will add the appropriate kernel options for your hardware.
$ make -C build linux-windriver.menuconfig Regenerate the kernel configuration:
$ make -C build linux-windriver.rebuild Build a new file system:
$make
6.1.3
Wind River* Linux* Guest Build
The
following
steps
provide
the
framework
for
building
the
guest.
Configure the guest build:$ cd $GUEST_BUILD_DIR $ $WIND_BASE/wrlinux/configure \ --enable-board=x86-64-kvm-guest \ --enable-kernel=preempt-rt \ --enable-rootfs=ovp-guest+kvm \ --enable-addons=wr-ovp \ --enable-reconfig \ --enable-parallel-pkgbuilds=8 \ --enable-jobs=8
Note: --enable-parallel-pkgbuilds=8 and --enable-jobs=8 can be tuned based on
the processing power of the build platform. (See $GUEST_BUILD_DIR/local.conf.).
Extract and patch the kernel source for kernel configuration: $ make -C build linux-windriver.config
Intel® DPDK vSwitch—Wind River* Linux* 5.0.1 with Wind River* Linux* Open Virtualization Profile
Launch the menu-based tool for kernel configuration Here you will add guest kernel options. Turn on these options CONFIG_PREEMPT_NONE=y and
CONFIG_BLK_DEV_PIIX=y through the kernel configuration menu. $ make -C build linux-windriver.menuconfig
Regenerate the kernel configuration to add the appropriate kernel options for the hardware.
$ make -C build linux-windriver.rebuild Build a new file system:
$ make
Intel® DPDK vSwitch Command Line Parameters—Intel® DPDK vSwitch
7.0
Intel
®
DPDK vSwitch Command Line Parameters
This section explains the various command-line parameters passed to the Intel® DPDK vSwitch application.
Sample command line:
sudo ./datapath/dpdk/build/ovs_dpdk -c 0x0F -n 4 --proc-type=primary base-virtaddr=0x2aaa2aa00000 -p 0x03 -n 4 –k 2 stats=1 vswitchd=0 --client_switching_core=1 --config="(0,0,2),(1,0,3)"
Note: The initial parameters, before the separating double-dash ("--"), are Intel®
DPDK-specific options, details of which can be found in the Intel® DPDK Getting Started Guide.
The Intel® DPDK vSwitch application-specific options are detailed below:
• --stats: If zero, statistics are not displayed. If nonzero, it represents the interval
in seconds at which statistics are updated onscreen
• --client_switching_core: CPU ID of the core on which the main switching
loop will run
• -n NUM: The number of supported clients
• -p PORTMASK: - Hexadecimal bitmask representing the ports to be configured,
where each bit represents a port ID, that is, for a portmask of 0x3, ports 0 and 1
are configured
• -k KNIPORTMASK: Number of KNI devices to configure
• -v NUM: Number of virtual Ethernet devices to configure
Note: This parameter is optional, and it is typically used only when running OFTest. The
maximum number of virtual devices currently supported is eight (8).
• --vswitchd: CPU ID of the core used to display statistics and communicate with
the vswitch daemon
• --config (port,queue,lcore)[,(port,queue,lcore]: Each port/queue/
core group specifies the CPU ID of the core that will handle ingress traffic for the specified queue on the specified port
Intel® DPDK vSwitch—Switch Manipulation Using ovs-vsctl
8.0
Switch Manipulation Using ovs-vsctl
8.1
ovs-vsctl
Intel® DPDK vSwitch supports dynamic switch manipulation, using the ovs-vsctl command. A subset of the command’s operations has been implemented, as described later in this section. An example of ovs-vsctl usage is described in Section 9.4. ovs-vsctl syntax is generally in the format:
ovs-vsctl COMMAND BRIDGE [PORT] – [OPTIONS] Where:
• COMMAND: One of the supported commands described in Section 8.2
• BRIDGE: The bridge name, for example, br0
• PORT: The port name, for example, ovs_dpdk_16
• OPTIONS: The options for the switch. Currently, one of the following: — set Bridge datapath_type=TYPE
— set Interface type=TYPE
• TYPE: The bridge type, for example, dpdk
Note: The --no-wait option should be used in cases where the daemon is not running.
8.2
Supported Commands
8.2.1
add-br
Create new bridge named BRIDGE: add-br BRIDGE
Example:
# sudo ./ovs-vsctl add-br br0 -- set Bridge br0 datapath_type=dpdk
8.2.2
del-br
Delete bridge named BRIDGE: del-br BRIDGE
Example:
Switch Manipulation Using ovs-vsctl—Intel® DPDK vSwitch
8.2.3
add-port
Add new PORT to BRIDGE: add-port BRIDGE PORT Example:
# sudo ./ovs-vsctl add-port br0 ovs_dpdk_16 --set Interface ovs_dpdk_16 type=dpdk ofport_request=16
Note: The ofport_request parameter forces the vswitchd to request the given port
number in the datapath. This step ensures you are given the correct port number corresponding to the port type.
8.2.4
del-port
Delete PORT from BRIDGE: del-port BRIDGE PORT Example:
# sudo ./ovs-vsctl del-port br0 ovs_dpdk_16
Intel® DPDK vSwitch—Dynamic Flow Manipulation Using ovs-ofctl
9.0
Dynamic Flow Manipulation Using ovs-ofctl
9.1
ovs-ofctl
Intel® DPDK vSwitch supports dynamic flow manipulation, using the ovs-ofctl command. A subset of the command’s operations has been implemented, as described later in this section.
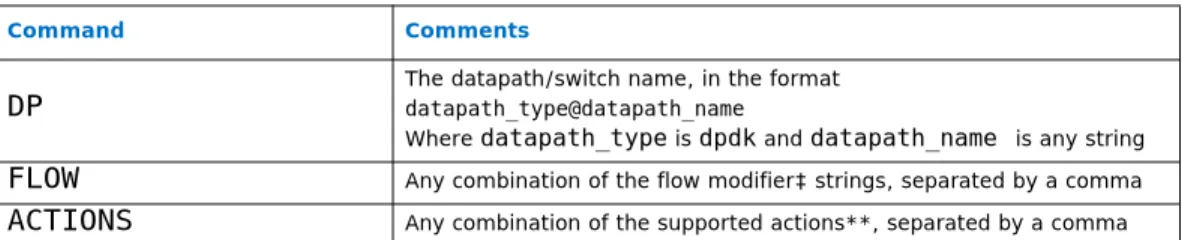
ovs-ofctl syntax is generally in the format: ovs-ofctl COMMAND SWITCH FLOW
Where:
• SWITCH: The switch name, for example, br0
• COMMAND: One of the supported commands described in Section 9.2
• FLOW: A comma-separated list of the strings described in Section 9.3
Note: Matching on VLAN header fields (dl_vlan, dl_vlan_pcp) is supported; however,
this process has been validated for the phy-phy case only.
Note: A timeout value may also be specified for a flow. When this value expires, an entry is
deleted from the vswitch daemon’s flow table: idle_timeout=timeout
Note: A flow may only specify a value for an L3 field if it also specifies a particular L2
protocol. Similarly, a flow may only specify an L4 field if it also specifies particular L2 and L3 protocol types.
9.2
Supported Commands
Dynamic Flow Manipulation Using ovs-ofctl—Intel® DPDK vSwitch
9.2.1
add-flow
Add a flow described by FLOW to SWITCH: add-flow SWITCH FLOW
Note: add-flow requires an additional FLOW parameter: action=ACTION. Currently, the
only supported actions are those listed in Section 2.6. For example, if using the
OUTPUT action to output to <PORT>: action=output:<PORT>
Example:
# ovs-ofctl add-flow br0 dl_type=0x0800,nw_src=10.0.124.4,nw_dst=10.0.124.1, idle_timeout=0,action=output:16
Note: Multiple actions can be specified in the action field.
9.2.2
del-flows
Delete matching FLOWs from SWITCH. If FLOW is not set, all flows are deleted. del-flows SWITCH [FLOW]
Example:
# ovs-ofctl del-flows br0
9.2.3
dump-flows
Print matching FLOWs. If FLOW is not set, prints all flows. dump-flows SWITCH [FLOW]
Example:
Intel® DPDK vSwitch—Dynamic Flow Manipulation Using ovs-ofctl
9.3
Supported Flow Strings
The following flow strings are currently supported:
9.4
Configuring Intel
®DPDK vSwitch Flow Tables Using
ovs-ofctl
To use ofctl, the vSwitch daemon must be configured correctly.
Create the Open vSwitch database: cd openvswitch
sudo ./ovsdb/ovsdb-tool create /usr/local/etc/openvswitch/conf.db vswitchd/ vswitch.ovsschema
Start the Open vSwitch database server: sudo ./ovsdb/ovsdb-server
remote=punix:/usr/local/var/run/openvswitch/db.sock --remote=db:Open_vSwitch,Open_vSwitch,manager_options & Configure the database:
sudo ./utilities/ovs-vsctl --no-wait add-br br0 -- set Bridge br0 datapath_type=dpdk
Then add ports you want to use:
sudo ./utilities/ovs-vsctl --no-wait add-port br0 ovs_dpdk_16 -- set Interface ovs_dpdk_16 type=dpdk ofport_request=16
sudo ./utilities/ovs-vsctl --no-wait add-port br0 ovs_dpdk_17 -- set Interface ovs_dpdk_17 type=dpdk ofport_request=17
Note: In the example above, 16 and 17 refer to the port number index used in ovs_dpdk.
Ports 1-15 refer to VirtIO/IVSHM rings. Ports 16-31 refer to physical ports. Ports 32-47 refer to KNI FIFOs. Additional ports are required in the case of VirtIO/IVSHM/KNI.
Table 3. Flow Strings Supported with ovs-ofctl
Command Comments
in_port=port Datapath in port
dl_src=XX:XX:XX:XX:XX:XX Source MAC dl_dst=XX:XX:XX:XX:XX:XX Destination MAC dl_type=ethertype Ethernet protocol type
dl_vlan=vlan VLAN ID
dl_vlan_pcp=priority VLAN Priority Code Point
nw_src=ip Source IP
nw_dst=ip Destination IP
nw_proto=proto IP protocol type
nw_tos=tos IP ToS
nw_ttl=ttl Time to Live
tp_src=port UDP or TCP source port tp_dst=port UDP or TCP destination port
Dynamic Flow Manipulation Using ovs-ofctl—Intel® DPDK vSwitch
You can see your configuration by typing the following: sudo ./utilities/ovs-vsctl show
Start ovs_dpdk, as previously detailed. For example,
sudo ./datapath/dpdk/build/ovs_dpdk -c 0xf -n 4 -p 0xc -n 2 –k 2 stats=1 --vswitchd=0 --client_switching_core=1 --config="(0,0,2),(1,0,3)"
Start the Open vSwitch daemon.
sudo ./vswitchd/ovs-vswitchd -c 0x100 --proc-type=secondary
Note: Before running the vSwitch daemon, ensure that the ovs_dpdk process has completed
initialization.
Configure flow table entries using ofctl.
Note: By default, the daemon has a special flow entry implementing L2 learning, and every
bridge has a default internal port with the same name as the bridge. Therefore, the daemon will add an output action on this default port causing a segmentation fault. To prevent this fault, you must first delete this flow table entry.
sudo ./utilities/ovs-ofctl del-flows br0 Then configure the flow you want to use: sudo ./utilities/ovs-ofctl add-flow br0 <FLOW>,idle_timeout=0,action=<ACTION> Where:
• <ACTION>: specifies the action(s) to apply to the port, that is, one or more of the
actions listed in Section 2.6.
• <FLOW>: describes the flow match fields for the flow table entry. If a match field is
not specified, then it as assumed to be a wildcard. The following fields are
matched: in_port, dl_src, dl_dst, dl_type, dl_vlan, dl_vlan_pcp, nw_src, nw_dst, nw_proto, nw_tos, nw_ttl, tp_src, tp_dst. Refer to
the ovs-ofctl man page for more details.
For example, the following command will send packets with ethertype 0x800, source IP address 10.0.124.4, and destination IP address 10.0.124.1 to physical port 0.
sudo ./utilities/ovs-ofctl add-flow br0
dl_type=0x0800,nw_src=10.0.124.4,nw_dst=10.0.124.1,idle_timeout=0,action=output:16