(
■ ■ ■ ■ ■ ■ ■
■ ■ ■ ■ ■ ■ ■
■ ■ ■ ■ ■ ■ ■
■ ■ ■ ■ ■ ■ ■
■ ■ ■ ■ ■ ■ ■
■ ■ ■ ■ ■ ■ ■
■ ■ ■ ■ ■ ■ ■
■ ■ ■ ■ ■ ■ ■
■ ■ ■ ■ ■ ■ ■
■ ■ ■ ■ ■ ■ ■
■ ■ ■ ■ ■ ■ ■
■ ■ ■ ■ ■ ■ ■
■ ■ ■ ■ ■ ■ ■
■ ■ ■ ■ ■ ■ ■
Server MT2200
N e t w o r k O p e r a t i n g
S y s t e m C o n f i g u r a t i o n
G u i d e
Copyright © 1997,1998 Packard Bell NEC, Inc. Trademarks
Adaptec is a registered trademark of Adaptec, Inc. DigiBoard is a registered trademark of Digi International. Mylex is a trademark of Mylex Corporation.
MS-DOS is a registered trademark of Microsoft Corporation. Novell and NetWare are registered trademarks of Novell, Inc. Windows NT is a trademark of Microsoft Corporation. All other trademarks belong to their respective owners.
Printed in the United States of America.
Contents
Chapter 1 Introduction
Chapter 2 Installing Windows NT v4.0
Chapter 3 Installing and Configuring Novell NetWare v3.12 Chapter 4 Installing and Configuring Novell NetWare v4.11 Chapter 5 Installing and Configuring SCO UNIX 5.04
C h a p t e r 1
Introduction
Contents
About This Guide ... 1
Document Conventions ... 1
How This Guide Is Organized ... 2
Using ExpressBuilder to Create Diskettes ... 3
1-1
Introduction
About This Guide
This configuration guide contains supplemental instructions needed to install and configure your SERVER Windows NT v4.0, Novell NetWare v3.12, Novell NetWare v4.11, and Santa Cruz Operation (SCO) OpenServer Release 5.04 Network Operating Systems. This document is intended to complement the more detailed procedural documents available from the vendor of the network operating system. This document is not intended as the central source of installation and configuration information for your system.
For additional information, it is important to read the READ ME files and related documentation provided by the vendor of the network operating system.
Document Conventions
The notational conventions listed below are used throughout this manual.
Italic Used for user command input, file names and keywords.
Bold Used for system prompts and command definitions.
1-2
Introduction
How This Guide Is Organized
Chapter 1 Introduction — This chapter contains
general information about this guide and instructions on how to create diskettes from the EXPRESSBU IL DER CD-ROM.
Chapter 2 Installing Windows NT v4.0 — This
chapter contains supplemental information for installing the Windows NT v4.0 Network Operating System.
Chapter 3 Installing and Configuring Novell NetWare v3.12 — This chapter contains supplemental
information for installing and configuring the Novell NetWare v3.12 Network Operating System.
Chapter 4 Installing and Configuring Novell NetWare v4.11 — This chapter contains supplemental
information for installing and configuring the Novell NetWare v4.11 Network Operating System.
Chapter 5 Installing and Configuring SCO UNIX 5.04 — This chapter contains supplemental information
for installing and configuring the Santa Cruz Operation (SCO) Network Operating System OpenServer Release 5.04.
Chapter 6 Release Notes — This chapter contains
information on product restrictions as well as a description of known problems and workarounds.
1-3
Introduction
Using ExpressBuilder to Create Diskettes
The EXPRESSBU IL DER (abbreviated EB within the following procedures) CD-ROM is an easy installation tool with various functions. With it you can create various utility diskettes such as SCU, SMC Superdisk for PCI, System Utility, Mylex RAID Configuration, or Adaptec Drivers. You can also run various utilities such as SCU, Mylex RAID Configuration, or System BIOS FLASH.
The EXPRESSBU IL DER CD-ROM can be used to create various driver and utility diskettes. To create a diskette:
Note: Refer to your specific Operating System in this
guide to determine the diskettes required for the installation and configuration of your particular Operating System.
1. Power on your system.
2. Insert the EB CD-ROM in your CD-ROM drive. 3. After booting, you will be asked about loading an
alternate keyboard mapping. Enter the number corresponding to your choice (e.g., United States, French, etc.) and press RETURN.
4. The EB startup screen is displayed. Within the startup screen there are three choices:
Continue: The program will go through the
installation checklist to verify your server is ready for installation of the operating system. Main: The program will go directly to the main
menu screen, skipping the installation checklist. Exit: Exits the program.
Using left () and right () arrows, highlight Main and press RETURN.
1-4
Introduction
5. The Main Menu screen is displayed. Within the Main Menu screen there are four choices:
Run Utility: The program will display the Run
Utility sub-menu.
Create Diskette: The program will display the
Create Diskette sub-menu.
Help: Offers help for the Main Menu screen.
Exit: Exits the program.
Using left () and right () arrows, highlight
Create Diskette and press RETURN.
Note: Press the escape key to exit a sub-menu.
7. The Create Diskette sub-menu is displayed. Within the Create Diskette sub-menu there are several choices:
SCU: The program allows you to create a SCU
diskette.
SMC Superdisk for PCI: The program allows you
to create a SMC Superdisk for PCI diskette. This diskette will be needed if you have certain SMC PCI LAN boards.
SMC Superdisk for SMC9432: The program
allows you to create a SMC Superdisk for
EtherPower II 10/100 diskette. This diskette will be needed if you have certain SMC EtherPower II 10/100 LAN boards.
Utility Diskette: The program allows you to
create a utility diskette. This diskette contains utilities that may be specific to different server types. See your system User’s Guide for a detailed description.
System BIOS Diskette: The program allows you
to create a system BIOS diskette.
Mylex : The program will display the Mylex sub-menu. This sub-menu allows you to create diskettes that are used to install and configure a Mylex DAC960 RAID subsystem.
1-5
Introduction
Adaptec Drivers : The program will displaythe Adaptec Drivers sub-menu. This sub-menu allows you to create diskettes that are used to install and configure drivers for your Adaptec SCSI disk subsystem.
Using up () and down () arrows, highlight your choice and press RETURN.
9. Locate a blank formatted diskette you want to use. When the following message is displayed, insert the blank diskette and press any key:
Please insert a blank formatted 1.44 MB diskette in the diskette drive, then press a key to continue, or Escape key to abort.
10. The following message is the displayed:
Diskette being created, please wait 11. When the following message is displayed, press any
key:
Diskette created successfully Press a key to continue
The diskette in drive A: can now be used.
12. The Create Diskette sub-menu is displayed again. At this point you can either:
Create another diskette: select the diskette type and return to step 9.
Exit: Press the escape key to return to the Main Menu. Once at the Main Menu you can either run a utility or exit the program.
1-6
Introduction
Where to Go From Here
Where you go to continue your installation depends on how your system was shipped:
■ If you are installing the Windows NT v4.0 Network Operating System, go to Chapter 2.
■ If you are installing or configuring the Novell NetWare v3.12 Network Operating System, go to Chapter 3.
■ If you are installing or configuring the Novell NetWare v4.11 Network Operating System, go to Chapter 4.
■ If you are installing or configuring the Santa Cruz Operation (SCO) Network Operating System OpenServer Release 5.04, go to Chapter 5.
C h a p t e r 2
Installing Windows NT 4.0
Contents
Installing Windows NT 4.0 ... 1
Checking BIOS Setup ... 1
Required Diskettes ... 1
Disk Subsystem Driver Installation ... 2
AIC7880/AIC7860 Disk Controller Driver Installation ... 2
During Windows NT Installation ... 3
After Windows NT Installation ... 4
Disk Array Controller Driver and Monitor Utility Installation ... 6
During Windows NT Installation ... 7
After Windows NT Installation ... 8
Driver Installation For the PC8e 8-Port DigiBoard Card ... 9
Installing LAN Adapter Drivers ... 9
Driver Installation for the SMC8416BTA LAN Adapter ... 10
Installation While Installing Windows NT ... 11
Installation for a Running Windows NT System... 11
Driver Installation for the SMC8432BTA and SMC9332BDT LAN Adapters ... 12
Installation While Installing Windows NT ... 13
Installation for a Running Windows NT System... 14
Driver Installation for the SMC9432TX LAN Adapter ... 15
Installation While Installing Windows NT ... 15
Installation for a Running Windows NT System... 16
2-1
Installing Windows NT 4.0
Installing Windows NT 4.0
Note: The information in this chapter supplements
Microsoft Windows NT Release 4.0 installation
procedures. Read this entire chapter before starting the installation process.
Checking BIOS Setup
This server requires a MP Spec Version setting of v1.4 when using the Microsoft Windows NT Operating System. Run the BIOS Setup Utility and check the MP Spec Version setting located within the Advanced Menu Group. If necessary change the MP Spec Version setting to v1.4.
Refer to the Configuring Your System chapter of your System User’s Guide for information on running the BIOS Setup Utility.
Required Diskettes
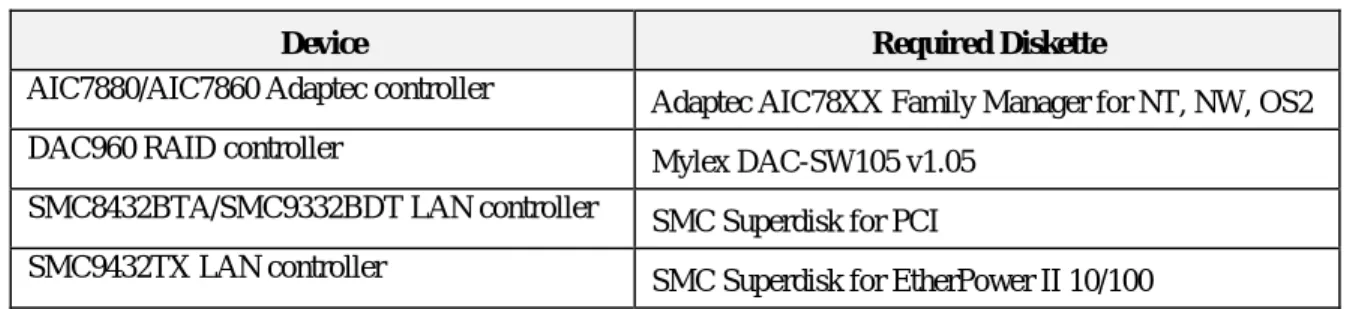
Depending upon the configuration of your system, you may be required to use newer drivers than the ones supplied on the Windows NT 4.0 distribution media. You will need newer drivers if any of the devices listed Table 2-1 are installed on your system. Use the
EXPRESSBU IL DER CD-ROM to create the required diskettes, see Using ExpressBuilder to Create Diskettes in Chapter 1.
Table 2-1. Devices and Required Diskettes
Device Required Diskette
AIC7880/AIC7860 Adaptec controller Adaptec AIC78XX Family Manager for NT, NW, OS2 DAC960 RAID controller Mylex DAC-SW105 v1.05
SMC8432BTA/SMC9332BDT LAN controller SMC Superdisk for PCI
2-2
Installing Windows NT 4.0
Disk Subsystem Driver Installation
A disk subsystem driver must be installed during the initial phase of the installation. The driver installation process depends upon the disk controller in your
system.
If your system is configured to use the on-board SCSI controller (AIC7880 or AIC7860) or the AHA2940UW SCSI host adapter card, read the AIC7880/AIC7860
Disk Controller Driver Installation section of this
chapter.
If your system is configured to use the optional
DAC960PDU Disk Array Controller, read the Disk Array
Controller Driver and Monitor Utility Installation
section of this chapter.
If your system is configured to use a controller other than the controllers described above, follow the vendor’s installation procedures or those found in the Microsoft Windows NT installation procedures and skip sections “AIC7880/AIC7860 Disk Controller Driver Installation” and “Disk Array Controller Driver and Monitor Utility Installation” of this chapter.
AIC7880/AIC7860 Disk Controller Driver Installation
If your system is configured to use the onboard SCSI controller (AIC7880 or AIC7860) then Windows NT is installed using the Windows NT driver on the Adaptec 7800 Family Manager Set v1.30 diskette, which is labeled Adaptec 78XX Drivers NW, NT, OS2 v1.30. Use the EXPRESSBU IL DER CD-ROM to create this diskette. The Adaptec 7800 Family Manager Set v1.30 driver can be installed whether you are installing Windows NT from a bootable CD-ROM, the setup diskettes, or from MS-DOS.
The Adaptec 7800 Family Manager Set v1.30 driver can also be installed by replacing the standard Windows NT driver after installing Windows NT. This procedure may be required if you apply any Windows NT service packs, since the service pack may install an older driver.
2-3
Installing Windows NT 4.0
After applying a service pack, verify the version of the Adaptec 7800 driver. The driver, aic78xx.sys, is located in the system32\drivers folder of the folder in which you installed Windows NT (i.e.C:\winnt\system32\drivers). To verify the version of your driver, use Windows NT explorer to examine the properties of aic78xx.sys. The properties for aic78xx.sys on the Adaptec 7800 Family Manager Set v1.30 are: ■ File version: v1.30
■ Description: Adaptec 7800 Family SCSI Miniport The following sections contain the installation
procedures for installing the Adaptec 7800 Family Manager Set v1.30 driver during a Windows NT installation or when replacing the standard Windows NT driver after a Windows NT installation.
D u r i n g W i n d o w s N T I n s t a l l a t i o n
Use this procedure to install the Adaptec 7800 Family Manager Set v1.30 driver while installing Windows NT. 1. Start the installation of Windows NT using your
preferred method.
2. While the message “Setup is inspecting your
computer’s hardware configuration” is displayed on the screen, press the F6 key.
3. When the message “Setup could not determine the type of one or more mass storage devices installed in your system, or you have chosen to manually specify an adapter” is displayed on the screen press S to “Specify Additional Device”.
4. When the list of mass storage devices is displayed, select “Other” from the end of the list.
5. When the message “Please insert the disk labeled Manufacturer-supplied hardware support disk into Drive A:” is displayed, insert the “Adaptec 78XX Drivers NW, NT, OS2 v1.30” diskette into drive A: and press ENTER.
2-4
Installing Windows NT 4.0
6. When the message “You have chosen to configure a SCSI adapter for use with Windows NT using a device support disk provided by an adapter manufacturer’ is displayed with “Adaptec AHA-2940/AIC-78xx (PCI) NT v3.5x” highlighted, press ENTER to select it.
7. When the message “Setup will load support for the following mass storage devices” appears listing the mass storage devices that you are installing, including Adaptec AHA-2940/AIC-78xx (PCI) NT
v3.5x, press ENTER to continue.
8. The Windows NT installation now continues in its regular manner, although you may be prompted to re-insert the “Adaptec 78XX Drivers NW, NT, OS2 v1.30” diskette again, depending on your original method of installing Windows NT.
A f t e r W i n d o w s N T I n s t a l l a t i o n
Use this procedure to install the Adaptec 7800 Family Manager Set v1.30 Driver after a Windows NT
Installation. This driver replaces the Standard Windows NT Driver.
1. Highlight “Control Panel” from “Settings” on the “Start” Menu.
2. Select the “SCSI Adapters” applet in Control Panel. 3. Select the “Drivers” tab.
4. Select “Add” on the “Drivers” tab.
5. Select “Have Disk” in the “Install Driver” dialog box. 6. In the “Install from Disk” dialog, when the message
“Insert the Manufacturer’s installation disk into the drive selected” appears, insert the “Adaptec 78XX Drivers NW, NT, OS2 v1.30” diskette into drive A:. 7. In the “Install From Disk” dialog box, click “Browse”.
2-5
Installing Windows NT 4.0
8. In the “Locate File” dialog box, double click the“Winnt” folder.
9. In the “Locate File” dialog box, double click 4_0 folder.
10. In the “Locate File” dialog box, when the “oemsetup.inf” file appears, click “Open”. 11. In the “Install From Disk” dialog box, when
“A:\WINNT\3_5” appears in the “Copy
manufacturer’s files from:” drop down list, click “OK”.
12. In the “Install Driver” dialog box, when “Adaptec AHA-2490/AIC-78xx (PCI) NT v3.5x” is highlighted, click OK.
13. In the “Windows NT Setup” dialog box, when the message “The driver(s) for this SCSI Adapter are already on the system. Do you want to use the currently installed driver(s) or install new one(s)” appears, click NEW.
14. In the Windows NT Setup dialog box, when the message “Please enter the full path to Adaptec’s installation files. These files are located in
\WINNT\3_5 on the Adaptec 7800 Family Manager Set diskette” appears, type A:\WINNT\4_0 in the data entry box and click Continue.
15. When the question “Do you want to restart your computer now?” appears, click Yes.
2-6
Installing Windows NT 4.0
Disk Array Controller Driver and Monitor Utility Installation
If the optional Disk Array Controller, offering data integrity and higher performance, is installed in the server, a driver (DAC960 NT SCSI), and monitor utility
Dacmon.exe, is required. Use the EXPRESSBU IL DER CD-ROM to create the diskette with the driver and monitor utility.
Prior to the installation of Windows NT, run the DAC Configuration Utility (DACCF) to create Drive Groups (packs) and System Drives. Initialize all system drives with DACCF.
The DAC960 NT SCSI driver can be installed from a diskette during the installation of Windows NT. The driver can be installed whether you are installing Windows NT from a bootable CD-ROM, the setup diskettes, or from MS-DOS.
The DAC960 NT SCSI driver can also be installed by replacing the standard Windows NT driver after installing Windows NT. This procedure may also be required if you apply any Windows NT service packs, since the service pack may install an older driver. After applying a service pack, verify the version of the DAC960 NT SCSI driver. The driver dac960nt.sys is located in the system32\drivers folder of the folder that you installed Windows NT (i.e.
C:\winnt\system32\drivers). To verify the version of your driver, use Windows NT explorer to examine the properties of dac960nt.sys. The properties for
dac960nt.sys on the Mylex DAC-SW105 v1.05 diskette
are as follows:
■ File version: 4.03k
■ Description: DAC960 SCSI Controller Driver The following sections contain the installation
procedures for installing the DAC960 NT SCSI driver during a Windows NT installation and when replacing the standard Windows NT driver after a Windows NT installation.
2-7
Installing Windows NT 4.0
D u r i n g W i n d o w s N T I n s t a l l a t i o n
Use this procedure to install the DAC960 NT SCSI driver while installing Windows NT.
1. Start the installation of Windows NT using your preferred method.
2. While the message “Setup is inspecting your
computer’s hardware configuration” is displayed on the screen, press F6.
3. When the message “Setup could not determine the type of one or more mass storage devices installed in your system, or you have chosen to manually specify an adapter” is displayed on the screen press S to “Specify Additional Device”.
4. When the list of mass storage devices is displayed, select “Other” from the end of the list.
5. When the message, “Please insert the disk labeled Manufacturer-supplied hardware support disk into Drive A:”, appears, insert the “Mylex DAC-SW105 v1.05” diskette into drive A: and press ENTER. 6. When the message “You have chosen to configure a
SCSI adapter for use with Windows NT using a device support disk provided by an adapter manufacturer” appears with “DAC960 NT SCSI Driver” highlighted, press ENTER to select it. 7. When the message “Setup will load support for the
following mass storage devices” appears, listing the mass storage devices you are installing, including “DAC960 NT SCSI Driver” appears, press ENTER to continue.
8. The Windows NT installation may now proceed. However, you may be prompted to re-insert the “Mylex DAC-SW105 v1.05” diskette again, depending on your original method of installing Windows NT.
2-8
Installing Windows NT 4.0
A f t e r W i n d o w s N T I n s t a l l a t i o n
Use this procedure to install the DAC960 NT SCSI Driver after a Windows NT Installation. This driver replaces the Standard Windows NT Driver.
1. Select “Control Panel” from “Settings” on the Start Menu.
2. Select the “SCSI Adapters” applet in Control Panel. 3. Select the “Drivers” tab.
4. On the “Drivers” tab, select Add.
5. In the “Install Driver” dialog box, select “Have Disk”. 6. In the “Install From Disk” dialog, when the message
“Insert the Manufacturer’s installation disk into the drive selected” appears, insert the “Mylex DAC-SW105 v1.05” into drive A:
7. In the “Install From Disk” dialog box, click “Browse”. 8. In the “Locate File” dialog box, double click 3_5
folder.
9. In the “Locate File” dialog box, when the
oemsetup.inf file appears, click “Open”.
10. In the “Install From Disk” dialog box, when “A:\NT” appears in the “Copy manufacturer’s files from:” drop down list, click “OK”.
11. In the “Install Driver” dialog box, when “Mylex DAC960 Disk Array Adapter” is highlighted, click “OK”.
12. In the Windows NT Setup dialog box, when the message “The driver(s) for this SCSI Adapter are already on the system. Do you want to use the currently installed driver(s) or install new one(s).” appears, click “NEW”.
2-9
Installing Windows NT 4.0
13. In the “Windows NT Setup” dialog box, when themessage “Please enter the full path to the OEM SCSI adapter files” appears, type A:\NT in the data entry box and click “Continue”.
14. When the question “Do you want to restart your computer now?” appears, click “Yes”.
To install the monitor utility, follow the instructions in Chapter 3 of the DAC Software Kit Installation Guide
User Manual Version 3.0.
After completing the installation of Windows NT, ensure your STARTUP window includes Dacmon.exe.
Dacmon.exe a monitor program for the Disk Array
Controller, which alerts the user if a disk drive within the array has failed.
Driver Installation For the PC8e 8-Port DigiBoard Card
The DigiBoard card driver can be installed during the graphics portion of the Windows NT installation or later after you complete the Windows NT installation.During or after Windows NT installation, this driver is installed by first selecting “Add Adapter” in the
“Network” setting of the Program Manager Control Panel. Then select the “DigiBoard PC8e” driver from the pull-down menu list.
Installing LAN Adapter Drivers
The following sections include special driver
installation instructions for LAN adapters used in your system.
2-10
Installing Windows NT 4.0
Driver Installation for the SMC8416BTA LAN Adapter
If an optional SMC8416BTA LAN Adapter is installed the SMC NDIS 3 Driver for EtherCard Family LAN Adapters driver supplied on the Windows NT 4.0 distribution media must be used.
If the SMC8416 driver is being installed during the installation of Windows NT, go to “Installation While Installing Windows NT” in this chapter.
If the SMC8416 driver is being installed on a server that already has Windows NT installed, go to
“Installation for a Running Windows NT System” in this chapter. This procedure may be required if you apply any Windows NT service packs, since the service pack may install an older driver.
After applying a service pack, verify the version of the SMC NDIS 3 Driver for EtherCard Family LAN
Adapters driver. The driver, smc8000.sys, is located in the system32\drivers folder of the folder in which you installed Windows NT (i.e.
C:\winnt\system32\drivers).
To verify the version of your driver, use Windows NT explorer to examine the properties of smc8000.sys. The properties for smc8000.sys on the Windows NT 4.0 CD-ROM are:
■ File version: v3.02
■ Description: SMC NDIS 3 Driver for EtherCard Family LAN Adapters Installation While Installing Windows NT.
2-11
Installing Windows NT 4.0
I n s t a l l a t i o n W h i l e I n s t a l l i n g W i n d o w s N T
The SMC8416 adapter driver is installed during the setup phase of Windows NT installation. To do this, complete the text phase of the installation and reboot the system. When the system comes up, it will be
running the setup phase of the Windows NT installation procedure. The system will issue a series of screen prompts beginning with “Installer’s Name and Company Name.” Answer system prompts until the “Network Adapter Card Detection” screen appears. When this screen appears, complete the following steps to install the SMC8416 driver files.
1. Click “Start Search”.
2. The adapter will be identified as follows: SMC8416 EtherEZ
3. Click “Next”.
4. When the SMC8416 adapter card setup screen is displayed, select the appropriate values for “IRQ Level”, “I/O Base”, and “Memory Address.” 5. Continue installation of Windows NT.
I n s t a l l a t i o n f o r a R u n n i n g W i n d o w s N T S y s t e m
1. Make sure that the Windows NT 4.0 CD-ROM is mounted in the CD-ROM driver.
2. Click on “Start”, “Settings”, and then “Control Panel”.
3. In “Control Panel”, double-click on the “Network” applet.
4. In the “Network” dialog box, select the “Adapters” tab.
5. Select add.
6. In the “Select Network Adapter” dialog box, scroll down the list until “SMC 8416 EtherEZ” appears. Highlight “SMC 8416 EtherEZ” and click “OK”.
2-12
Installing Windows NT 4.0
7. When the “Windows NT Setup” dialog box appears, make sure the Windows NT 4.0 CD-ROM is in the CD-ROM drive and click “Continue”. When the SMC8416 adapter card setup screen displays, select the appropriate values for “IRQ Level”, “I/O Base”, and “Memory Address”.
8. If TCP/IP is to be used, supply the IP address information.
9. Close and restart the system.
Driver Installation for the SMC8432BTA and SMC9332BDT LAN
Adapters
If an optional SMC8432BTA or SMC9332BDT LAN Adapter is installed, the SMC NDIS 3.1 SMCPWR miniport driver supplied on the SMC Superdisk for PCI must be used. Use the EXPRESSBU IL DER CD-ROM to create this diskette.
If the SMC8432/9332 driver is being installed during the installation of Windows NT, go to “Installation While Installing Windows NT” in this chapter. If the SMC8432/9332 driver is being installed on a server that already has Windows NT installed, go to “Installation for a Running Windows NT System” in this chapter. This procedure may also be required if you apply any Windows NT service packs, since the service pack may install an older driver. After applying a service pack, verify the version of the SMC NDIS 3.1 SMCPWR miniport driver. The driver, smcpwrn.sys, is located in the system32\drivers folder of the folder in which you installed Windows NT (i.e.
C:\winnt\system32\drivers).
To verify the version of your driver, use Windows NT explorer to examine the properties of smcpwrn.sys. The properties for smcpwrn.sys on the SMC Superdisk version 2.8 are:
■ File version: v4.02
■ Description: SMC NDIS 3.1 SMCPWR miniport driver
2-13
Installing Windows NT 4.0
I n s t a l l a t i o n W h i l e I n s t a l l i n g W i n d o w s N T
The SMC8432/SMC9332 adapter driver is installed during the setup phase of Windows NT installation. To do this, complete the text phase of the installation and reboot the system. When the system comes up, it will be running the setup phase of the Windows NT installation procedure. The system will issue a series of screen prompts beginning with “Installer’s Name and Company Name.” Answer system prompts until the “Network Adapter Card Detection” screen appears. When this screen appears, complete the following steps to install the SMC8432/SMC9332 driver files.
1. Do not click “Start Search”. Click “Select from list”. 2. In the “Select Network Adapter” dialog box, click
“Have Disk”.
3. When the “Insert Disk” dialog box appears, insert the SMC Superdisk into Drive A: and click “OK”.
4. When the Select OEM Option dialog box appears, select the appropriate software for your LAN adapter.
Select “SMC8432 EtherPower with ROM Socket” if you are installing the SMC8432BTA LAN adapter. Select “SMC9332BDT/9334BDT EtherPower 10/100” if you are installing the SMC9322BDT.
5. When the SMC8432 PCI adapter card setup screen is displayed, select “Autodetect” for the cable type. Select either 100bps or 10bps for the cable type, if installing the SMC9332BDT LAN card. Do not select “Autodetect” when installing the SMC9332BDT LAN card.
2-14
Installing Windows NT 4.0
I n s t a l l a t i o n f o r a R u n n i n g W i n d o w s N T S y s t e m
1. Click on “Start”, “Settings”,and then “Control Panel”. 2. In “Control Panel”, double-click on the “Network”
applet.
3. In the “Network” dialog box, select the “Adapters” tab.
4. Select “add”.
5. In the “Select Network Adapter” dialog box, click “Have Disk”.
6. When the “Insert Disk” dialog box appears, insert the SMC Superdisk into Drive A: and click “OK”.
7. When the “Select OEM Option” dialog box appears, select the appropriate software for your LAN adapter.
Select “SMC8432 EtherPower with ROM Socket” if you are installing the SMC8432BTA LAN adapter. Select “SMC9332BDT/9334BDT EtherPower 10/100” if you are installing the SMC9322BDT.
8. When the SMC8432 PCI adapter card setup screen is displayed, select “Autodetect” for the cable type. Select either 100bps or 10bps for the cable type, if installing the SMC9332BDT LAN card. Do not select “Autodetect” when installing the SMC9332BDT LAN card.
9. If TCP/IP is to be used, supply the IP address information.
2-15
Installing Windows NT 4.0
Driver Installation for the SMC9432TX LAN Adapter
If an optional SMC9432TX LAN Adapter is installed, the SMC NDIS 3 driver for SMC EtherFast 10/100 supplied on the SMC Superdisk for EtherPower II
10/100 must be used. Use the EXPRESSBU IL DER CD-ROM to create this diskette.
If the SMC9432TX driver is being installed during the installation of Windows NT, go to “Installation While Installing Windows NT” in this chapter.
If the SMC9432TX driver is being installed on a server that already has Windows NT installed, go to
“Installation for a Running Windows NT System” in this chapter. This procedure may also be required if you apply any Windows NT service packs, since the service pack may install an older driver.
I n s t a l l a t i o n W h i l e I n s t a l l i n g W i n d o w s N T
The SMC9432TX adapter driver is installed during the setup phase of Windows NT installation. To do this, complete the text phase of the installation and reboot the system. When the system comes up, it will be
running the setup phase of the Windows NT installation procedure. The system will issue a series of screen prompts beginning with “Installer’s Name and Company Name.” Answer system prompts until the “Network Adapter Card Detection” screen appears. When this screen appears, complete the following steps to install the SMC9432TX driver files.
1. Do not click “Start Search”. Click “Select from list”. 2. In the “Select Network Adapter” dialog box, click
“Have Disk”.
3. When the “Insert Disk” dialog box appears, insert the SMC Superdisk version for SMC9432TX into Drive A: and click “OK”.
4. When the Select OEM Option dialog box appears, select the appropriate software for your LAN
2-16
Installing Windows NT 4.0
5. When the SMC9432TX PCI adapter card setup screen is displayed, select “AutoNegotiate” for the cable type.
6. Continue the installation of Windows NT.
I n s t a l l a t i o n f o r a R u n n i n g W i n d o w s N T S y s t e m
1. Click on “Start”, “Settings”, and then “Control Panel”.
2. In “Control Panel”, double-click on the “Network” applet.
3. In the “Network” dialog box, select the “Adapters” tab.
4. Select “add”.
5. In the “Select Network Adapter” dialog box, click “Have Disk”.
6. When the “Insert Disk” dialog box appears, insert the SMC Superdisk for SMC9432TX into Drive A: and click “OK”.
7. When the “Select OEM Option” dialog box appears, select the appropriate software for your LAN adapter.
Select “SMC9432TX EtherPower II 10/100”.
8. When the SMC9432TX PCI adapter card setup screen is displayed, select “AutoNegotiate” for the cable type.
9. If TCP/IP is to be used, supply the IP address information.
10. Close and restart the system.
Where to Go From Here
C h a p t e r 3
Installing and Configuring Novell
NetWare v3.12
Contents
Overview ... 1 Required Diskettes ... 1 Installation Assumptions ... 1 DOS Partition ... 2 Reconfiguring the DOS Partition ... 2 Configuring Drivers for the IDE CD-ROM ... 3 Configuring Drivers For the Standard Onboard SCSI Disk Controllers (AIC7860 and AIC7880) ... 5 Configuring Drivers For the Disk Array Controller (DAC960) .. 6 Running EZSTART for LAN Adapters ... 6 Running EZSTART for SMC8416BTA LAN Adapters ... 7 Running EZSTART for SMC8432BTA and SMC9332BDT LAN Adapters ... 8 Running EZSTART for SMC9432TX LAN Adapter ... 9 Configuration Checklist ... 10 Installing the Novell NetWare v3.12 Network Operating System 14 Loading LAN Drivers... 17 Loading SMC8416BTA LAN Drivers ... 18 Loading SMC8432BTA, SMC9332BDT, and SMC9432TX LAN Drivers ... 18 Creating Startup.ncf ... 20 Creating Autoexec.ncf ... 21 Configuring Additional Disks ... 23 Configuring Additional Volumes ... 23 Registering Users ... 23 Downing the Server ... 23 Backing Up the Server ... 24 Where To Go From Here ... 24
3-1
Installing and Configuring Novell NetWare v3.12
Overview
This chapter contains instructions for installing and configuring the Novell NetWare v3.12 Network
Operating System on your server system. For additional Novell NetWare information, it is important to read the NetWare "README" files and related documentation provided by Novell.
Required Diskettes
Depending upon the configuration of your system, you may be required to use newer drivers than the ones supplied on the NetWare distribution media. You will need newer drivers if any of the devices listed Table 3-1 are installed on your system. Use the EXPRESSBU IL DER CD-ROM to create the required diskettes, see Using
ExpressBuilder to Create Diskettes in Chapter 1.
Table 3-1. Devices and Required Diskettes
Device Required Diskette
AIC7880/AIC7860 Adaptec controller Adaptec AIC78XX Family Manager for NT, NW, OS2 DAC960 RAID controller Mylex DAC-SW105 v1.05
SMC8432BTA/SMC9332BDT LAN controller SMC Superdisk for PCI
SMC9432TX LAN controller SMC Superdisk for EtherPower II 10/100
Installation Assumptions
The installation and configuration instructions in this chapter assume the following:
■ You will be installing (not updating) the Novell NetWare v3.12 Network Operating System from CD-ROM media.
■ You will be starting NetWare from an MS-DOS® partition, not a DOS diskette.
3-2
Installing and Configuring Novell NetWare v3.12
DOS Partition
The MS-DOS partition on your system hard disk drive is configured to ensure you have sufficient space for the Novell NetWare v3.12 Network Operating System and applications. (See the NetWare Installation and
Upgrade manual for disk space requirements.)
If your system does not include a Disk Array Controller (DAC960), your primary boot disk drive is formatted with a single 50MB MS-DOS partition and MS-DOS is preinstalled on this drive.
If you have a Disk Array Controller (DAC960)
preinstalled on your system, it was preconfigured at the factory. The primary boot drive is formatted with a single 50MB MS-DOS partition and MS-DOS is preinstalled on this drive.
If you want to reconfigure the size of the DOS partition, perform the steps in the following subsections.
Otherwise, go to the Running EZSTART for LAN
Adapters subsection in this chapter.
Reconfiguring the DOS Partition
If you want to reconfigure the size of the DOS partition:
Notice: When reconfiguring the DOS partition all data
on non-removable disk drive C: will be lost!
1. Boot your system from the DOS partition and execute some DOS commands (CHKDSK, for example) to verify that your system was not damaged during shipment and that the keyboard and monitor are properly installed and working.
2. Create a bootable DOS diskette by inserting a blank diskette and entering:
3-3
Installing and Configuring Novell NetWare v3.12
3. Copy the fdisk command to the bootable diskette byentering:
copy c:\dos\fdisk.exe a:
4. Follow step 4a or 4b, as appropriate.
a. If your system does not include a Disk Array Controller (DAC960), boot the system from the bootable diskette created in Steps 2 and 3. Use the DOS fdisk command to create a small active DOS partition on Drive C: If you do not intend to use the DOS partition, a minimum size of 10MB is recommended.
b. If your system does include a Disk Array
Controller (DAC960), ensure that it is properly configured. Refer to the MYLEX DAC960PDU
Disk Array Controller User Manual and the
MYLEX Disk Array Controller Software Kit User’s Manual for additional information on this option
card. After you have configured the Disk Array Controller, boot the system from the bootable diskette created in Steps 2 and 3. Use the DOS fdisk command to create a small active DOS partition on Drive C: If you do not intend to use the DOS partition, a minimum size of 10 MB is recommended.
5. Install DOS (version 6.0 or greater) in the DOS partition.
Configuring Drivers for the IDE CD-ROM
Follow the instructions below to configure the device driver “NEC_IDE.SYS”.
1. Insert the Utilities Diskette into Drive A.
2. Select drive C: by typing CD\ and press ENTER. 3. Create a directory named IDE on drive C: by typing
md ide and press ENTER.
4. Change the working drive to Drive A: by typing A: and press ENTER.
3-4
Installing and Configuring Novell NetWare v3.12
5. Change the working directory to IDE by typing cd
IDE and press ENTER.
6. Copy file NEC_IDE.SYS to the C:\IDE subdirectory. Example: Copy NEC_IDE.SYS C:\IDE
Press ENTER.
7. Select drive C: by typing C: and press ENTER. 8. Type edit config.sys and press ENTER.
Add the following line after the Buffers statement.
device=c:\ide\nec_ide.sys /d:necide01
Save and close the file.
9. Type edit autoexec.bat and press ENTER.
Add the following line to the top of autoexec.bat.
C:\dos\mscdex.exe /D:necide01
3-5
Installing and Configuring Novell NetWare v3.12
Configuring Drivers For the Standard Onboard SCSI Disk
Controllers (AIC7860 and AIC7880)
Follow the instructions below to configure the drivers for the standard onboard SCSI disk controller.
1. Insert the diskette labeled “ADAPTEC EZ-SCSI for DOS/WINDOWS” into Drive A. Type:
A:
Press ENTER. Type: install
Press ENTER.
Follow the screen prompts.
2. Edit the c:\config.sys file and make sure it includes the following commands (The device command
assumes that the contents of the driver diskette were copied to a directory named c:\scsi.)
lastdrive=Z files=50 buffers=50
device=c:\scsi\aspi8dos.sys /D device=c:\scsi\aspicd.sys /D:aspicd0
Ensure the following commands are not in the
c:\config.sys file:
device=c:\dos\setver.exe device=c:\dos\himem.sys dos=high
3. Edit the c:\autoexec.bat file and ensure the following command is not in your c:\autoexec.bat file:
3-6
Installing and Configuring Novell NetWare v3.12
4. Create a directory named c:\diskdrv by entering the following command:
mkdir c:\diskdrv
5. Copy all the files from the \netware\v3_1x directory on the diskette labeled 7800 Family Manager Set
v1.30 to the directory created in Step 4.
Configuring Drivers For the Disk Array Controller (DAC960)
If your system includes the Disk Array Controller (DAC960), follow the instructions under “Configuring Drivers for the Standard Onboard SCSI Disk Contollers (AIC7860 and AIC7880) “ earlier in this chapter and then follow the instruction below.
1. Copy all files from the \NW_3X directory on the diskette labeled RAID NOS Driver NT, NetWare,
OS/2 to the c:\diskdrv directory.
Running EZSTART for LAN Adapters
If you have LAN adapter(s) installed in your system, go to the appropriate subsection for your LAN adapter and run EZSTART. Otherwise, go to the Configuration
3-7
Installing and Configuring Novell NetWare v3.12
Running EZSTART for SMC8416BTA LAN Adapters
Note: Skip this subsection if you do not have an
SMC8416BTA LAN Adapter installed in your server. 1. Insert the diskette labeled “SMC Super Disk for
8X16" into Drive A.
2. Change your working drive to Drive A by entering A: and press ENTER.
3. Type ezstart and press ENTER.
4. If you have more than one SMC Ethernet Adapters installed in your server, the Ethernet Adapter Selection menu displays. Ezstart will ask you to select one of the adapters. Select one of the SMC8416BTA LAN adapters and press ENTER. 5. Ezstart displays the current configuration of the
adapter. Note the I/O base address as it will be needed later during the installation. Tab down to "Custom" installation and press ENTER.
6. Using the down arrow key, select
"Drivers/Documents" and press ENTER.
7. Using the down arrow key, select "Novell" and press ENTER.
8. Using the down arrow key, select "Novell NetWare 386 v3.12 Server" and press ENTER.
9. Change the Destination Directory to C:\SMC8416. 10. Tab to "Copy Files" and press ENTER. Driver files
are copied from the source driver diskette to the destination directory.
11. The "Installation Notes" information box is displayed. Press ENTER.
12. Tab to and press ENTER on "Exit" to exit ezstart and return to the A: prompt.
3-8
Installing and Configuring Novell NetWare v3.12
Running EZSTART for SMC8432BTA and SMC9332BDT LAN
Adapters
Note: Skip this subsection if you do not have a
SMC8432BTA or SMC9332BDT LAN Adapter installed in your server.
Note: See your System User’s Guide to determine which
PCI physical slot the adapters should be installed in.
Note: Use SMC Superdisk 8432/9332 v2.8 that is
supplied with your system and ignore the SMC Superdisk that is included in the SMC LAN Adapter Kit.
1. Insert the diskette labeled “SMC SuperDisk for PCI” into Drive A.
2. Change your working drive to Drive A by entering A: and press ENTER.
3. Type ezstart and press ENTER.
4. If you have more than one SMC Ethernet Adapters installed in your server, the Ethernet Adapter Selection menu displays. Ezstart will ask you to select one of the adapters. Select one of the
SMC8432BTA/SMC9332BDT LAN adapters and press ENTER.
5. Ezstart displays the current configuration of the
adapter. Tab down to "Custom" installation and press ENTER.
6. Using the down arrow key, select
"Drivers/Documents" and press ENTER.
7. Using the down arrow key, select "Novell" and press ENTER .
8. Using the down arrow key, select "Novell NetWare 386 v3.12 Server" and press ENTER.
3-9
Installing and Configuring Novell NetWare v3.12
10. Tab to "Copy Files" and press ENTER. Driver filesare copied from the source driver diskette to the destination directory.
11. The "Installation Notes" information box is displayed. Press ENTER.
12. Tab to "Exit" and press ENTER to exit ezstart and return to the A: prompt.
Running EZSTART for SMC9432TX LAN Adapter
Note: See your System User’s Guide to determine which
PCI physical slot the adapters should be installed in. 1. Insert the diskette labeled “SMC SuperDisk for
EtherPower II 10/100” into Drive A.
2. Change your working drive to Drive A by entering A: and press ENTER.
3. Type ezstart and press ENTER.
4. If you have more than one SMC Ethernet Adapter installed in your server, the Ethernet Adapter Selection menu displays. Ezstart will ask you to select one of the adapters. Select one of the SMC LAN adapters and press ENTER.
5. Ezstart displays the current configuration of the
adapter. Tab down to "Custom" installation and press ENTER.
6. Using the down arrow key, select
"Drivers/Documents" and press ENTER.
7. Using the down arrow key, select "Novell" and press ENTER .
8. Using the down arrow key, select "Novell NetWare 386 v3.12 Server" and press ENTER.
3-10
Installing and Configuring Novell NetWare v3.12
10. Tab to "Copy Files" and press ENTER. Driver files are copied from the source driver diskette to the destination directory.
11. The "Installation Notes" information box is displayed. Press ENTER.
12. Tab to "Exit" and press ENTER to exit ezstart and return to the A: prompt.
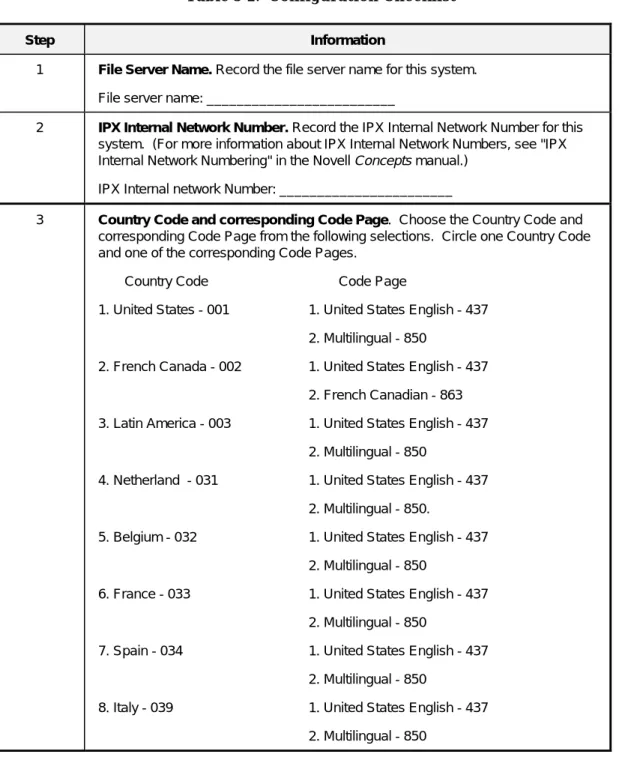
Configuration Checklist
Certain configuration information must be available before loading the Novell NetWare v3.12 Network Operating System. Table 3-2 is a checklist that helps you identify the information you need. You may need to ask your Network Administrator for some of the
3-11
Installing and Configuring Novell NetWare v3.12
Table 3-2. Configuration Checklist
Step Information
1 File Server Name. Record the file server name for this system.
File server name: _________________________
2 IPX Internal Network Number. Record the IPX Internal Network Number for this
system. (For more information about IPX Internal Network Numbers, see "IPX Internal Network Numbering" in the Novell Concepts manual.)
IPX Internal network Number: _______________________
3 Country Code and corresponding Code Page. Choose the Country Code and
corresponding Code Page from the following selections. Circle one Country Code and one of the corresponding Code Pages.
Country Code Code Page
1. United States - 001 1. United States English - 437
2. Multilingual - 850
2. French Canada - 002 1. United States English - 437
2. French Canadian - 863
3. Latin America - 003 1. United States English - 437
2. Multilingual - 850
4. Netherland - 031 1. United States English - 437
2. Multilingual - 850.
5. Belgium - 032 1. United States English - 437
2. Multilingual - 850
6. France - 033 1. United States English - 437
2. Multilingual - 850
7. Spain - 034 1. United States English - 437
2. Multilingual - 850
8. Italy - 039 1. United States English - 437
3-12
Installing and Configuring Novell NetWare v3.12
Table 3-2. Configuration Checklist (Continued)Step Information
3 (Cont.) 9. Switzerland - 041 1. United States English - 437
2. Multilingual - 850
A. United Kingdom - 044 1. United States English - 437
2. Multilingual - 850
B. Denmark - 045 1. Multilingual - 850
2. Nordic - 865
C. Sweden - 046 1. United States English - 437
2. Multilingual - 850
D. Norway - 047 1. Multilingual - 850
2. Nordic - 865
E. Germany - 049 1. United States English - 437
2. Multilingual - 850
F. International English - 061 1. United States English - 437
G. Portugal - 351 1. Multilingual - 850
2. Portuguese - 860
H. Finland - 358 1. United States English - 437
2. Multilingual - 850
4 Keyboard Mapping. Choose your keyboard mapping from the following
selections. (Circle one selection):
1. France
2. Germany
3. Italy
4. Spain
5. United States
3-13
Installing and Configuring Novell NetWare v3.12
Table 3-2. Configuration Checklist (Continued)Step Information
5 LAN Adapter. Choose which type of LAN adapter is installed in the LAN adapter
slot. Circle one selection.
1. SMC8416BTA
2. SMC8432BTA
3. SMC9332BDT
4. SMC9432TX
5. No adapter to configure.
6 IPX Network Number. Record the IPX Network Number associated with the LAN
adapter in slot one. (For more information about IPX Network Numbers, see "Network Numbering" in the Novell Concepts manual.)
IPX Number: _________________________
3-14
Installing and Configuring Novell NetWare v3.12
Installing the Novell NetWare v3.12 Network Operating
System
1. Insert the NetWare 3.12 CD-ROM into your CD-ROM drive.
2. Remove the diskette from Drive A: and reboot the system.
3. Change your working drive to the drive letter that points to the CD-ROM drive. (The steps to follow assume the CD-ROM drive is associated with Drive R). Type R: and press ENTER.
4. Type: cd R:\netware.312\english and press ENTER. 5. Type: install and press ENTER.
6. After reading the Ethernet message, press any key to continue.
7. Highlight "Install new NetWare v3.12" from the "Select an Installation option" menu and press ENTER.
8. Highlight "Retain Current Disk Partitions" and press ENTER.
9. Name the File Server. (See Table 3-2.)
Give the file server a unique name using up to 298 alphanumeric characters, hyphens, and underscores (spaces are not allowed).
10. Assign an IPX internal network number.
An internal network number is generated randomly. Accept this or enter your own by using the DELETE key to erase each unwanted digit and then typing in your own. The number must be unique and it must be a hexadecimal number one to eight digits long (0 and ffffffff are not allowed). For more information on internal network numbers, see IPX internal network
3-15
Installing and Configuring Novell NetWare v3.12
11. Insert your SYSTEM-1 disk into Drive A: whenprompted to load license diskette.
12. Press ENTER to begin copying the server boot files to the hard disk. Once the files are copied, the language screen appears.
13. Select your Country Code, Code Page, and Keyboard Mapping setting (see Table 3-2) and press the F10 key.
14. Select a filename format. (DOS filename format is recommended.)
15. You are asked if you want to specify startup commands. Select "NO".
16. Select "YES" or "NO", as appropriate, to add server.exe to your autoexec.bat file. The server is now started and should be displaying the server name with a colon following it.
17. If you are using the Disk Array Controller (DAC960), type load c:\diskdrv\dac960 and press ENTER. 18. If you are using the standard onboard disk controller,
type load c:\diskdrv\aic7870, and press ENTER. At the prompt to select a default slot number, press ENTER. Note the slot number as it is needed later in this installation.
19. Type load install and press ENTER.
20. Highlight "Disk Options" from the "Installations Options" menu and press ENTER.
21. Highlight "Partition Tables" from the "Disk Options" menu and press ENTER.
22. If you have more than one logical disk attached to your system, highlight device #0 and press ENTER. 23. Highlight "Create Netware Partition" from the
"Partition Options" menu and press ENTER. 24. Change partition size, if desired (optional).
3-16
Installing and Configuring Novell NetWare v3.12
25. Press the ESCAPE key and select YES to create the partition.
26. Press the ESCAPE key to return to the available "Disk Options" menu.
27. Press the ESCAPE key to go to the "Installation Options" menu.
28. Highlight "Volume Options and press ENTER." 29. Press the INSERT key while in the "Volumes" menu. 30. Enter size of volume in the Segment Size field and
press ENTER. If unsure of size, use 100MB (26000 4K blocks =101 MB).
31. Press the ESCAPE key and select "YES" on the "Create Volume" menu.
32. Highlight SYS on the "Volumes" menu and press ENTER.
33. Highlight the "Status" field using the down arrow and press the ENTER key to open the "Volume Status" menu.
34. Highlight "Mount Volume" and press ENTER. 35. Press the ESCAPE key twice. The "Installation
Options" menu displays.
36. Highlight "System Options" and press ENTER. 37. Highlight "Copy System and Public Files" and press
ENTER.
3-17
Installing and Configuring Novell NetWare v3.12
39. Backspace over a:\ and type R:\netware.312\englishand press the ENTER key. (This step assumes that R: has been assigned to your CD-ROM drive in the autoexec.bat file). A window displays a listing of the files that are copied.
40. When you see a window that says “file upload complete, press escape to continue” is displayed, press the ESCAPE key until you see the "Exit Install" menu.
41. Highlight “YES” and press the ENTER key.
Loading LAN Drivers
If you do not have any LAN drivers to install, go to the subsection entitled Creating Startup.ncf. Otherwise load the LAN drivers for each LAN adapter you have installed in your server.
If you do not plan to use this server on a network that uses ETHERNET_802.2 framing (the default for
Netware version 3.12), see the Load LAN Drivers and
Frame Types chapter in the NetWare Installation and
3-18
Installing and Configuring Novell NetWare v3.12
Loading SMC8416BTA LAN Drivers
1. From the Server_Name: prompt, type: load c:\smc8416\msm31x
load c:\smc8416\ETHERTSM 2. Type:
load c:\smc8416\smc8000 port=nnn frame=ETHERNET_802.2 Bind ipx to smc8000 [port=nnn] net=xxxxxxxx
(Where nnn is the base I/O address that you noted while running the EZStart Utility). xxxxxxxx is the IPX network number for the LAN segment to which your LAN card is attached. See Network Numbering in the Novell Concepts manual for additional
information on network numbers.)
3. Repeat step 2 for each additional SMC8416BTA LAN card installed.
Loading SMC8432BTA, SMC9332BDT, and SMC9432TX LAN
Drivers
Note: The following procedure must be run before
loading the driver. The supplied LSWAP.EXE file (copied to C:\SMCPCI under the “Running EZStart” subsection) must be executed in DOS before loading the NetWare v3.12 Operating System.
Note: In order for LSWAP.EXE to work correctly, the
operating system and Loader.EXE must reside in a NWSERVER subdirectory on your drive.
1. Down the Novell Operating System and return to the MS-DOS C:\prompt.
3-19
Installing and Configuring Novell NetWare v3.12
2. Enter and perform the following instructions:MOVE \SERVER.312 \NWSERVER
COPY C:\SMCPCI\LOADER.EXE \NWSERVER C:\SMCPCI\LSWAP.EXE
The SERVER.EXE file will be updated and a backup copy of SERVER.EXE will be created and named
SERVER.OLD.
3. Restart the NetWare Operating System. 4. From the Server_Name: prompt, type:
load c:\smcPCI\msm31x load c:\smcPCI\ETHERTSM 5. Type:
load C:\smcPCI\smcpwr slot=nn frame=ETHERNET_802.2 name=E82nn
Bind ipx to E82nn net=xxxxxxxx
(Where nn is the “slot” number for your server
starting with slot 1. Slot 1 is the server’s top PCI slot and slot 2 is the next slot down, etc.; xxxxxxxx is the IPX network number for the LAN segment to which your LAN card is attached. See Network Numbering in the Novell Concepts manual for additional
information on network numbers.
6. Repeat Step 5 for each additional SMC8432BTA, SMC9332BDT, and SMC9432TX LAN card installed.
3-20
Installing and Configuring Novell NetWare v3.12
Creating Startup.ncf
1. Ensure you are at the Server_Name: prompt, and type load install and press ENTER.
2. Highlight "System Options" from the "Installation Options" menu and press ENTER.
3. Highlight "Create STARTUP.NCF" and press ENTER. 4. Accept the default path by pressing ENTER.
5. There should be only one entry for each disk controller. Change the entry from:
load AIC7870.dsk to
load C:\diskdrv\AIC7870 slot = nn instr=1
Change the slot number to the same number as you noted in Step 18 of the Installing the Novell NetWare v3.12 Network Operating System section of this chapter.
6. If your system includes the Disk Array Controller (DAC960) card, change the entry from:
load DAC960 port=xxxx int=B to:
load c:\diskdrv\DAC960
3-21
Installing and Configuring Novell NetWare v3.12
Creating Autoexec.ncf
1. Ensure you are in the System Options menu. If not, type load install from the Server_Name: prompt. Highlight "System Options" and press ENTER. 2. Highlight "Create AUTOEXEC.NCF" and press
ENTER. An autoexec.ncf file will be created and will be displayed for you to edit.
3. Edit the file if necessary. Be sure the full path name is included in the Load command for the LAN drivers and that all the prerequisite modules are loaded. For example :
load c:\SMC8416\MSM31X load c:\SMC8416\ETHERTSM load c:\SMC8416\SMC8000....
or
load c:\SMCPCI\MSM31X load c:\SMCPCI\ETHERTSM load c:\SMCPCI\SMCPWR....
If you are using the DAC960 Disk Array Controller, edit the file by adding the following:
load c:\diskdrv\aspidac3 load c:\diskdrv\dacmon
Dacmon is a monitor program for the Disk Array Controller, which will alert the user if a drive within the array has failed.
3-22
Installing and Configuring Novell NetWare v3.12
4. If you have more than 16MB of memory installed in your server system, add the following line after “IPX internal net...”:
Register memory 1000000 x where x is:
Memory Size x
24MB 800000
32MB 1000000
40MB 1800000
48MB 2000000
56MB 2800000
64MB 3000000
... ...
5. Press the ESCAPE key twice and select "YES" in the "Exit Install" menu.
3-23
Installing and Configuring Novell NetWare v3.12
Configuring Additional Disks
If you have additional disks, partition them now. See
Create NetWare Disk Partition Tables in the Install
Fileserver Software chapter of the Novell Installation and Upgrade manual.
Configuring Additional Volumes
If your sys: volume did not use all of the disk or if you have additional disk drives installed, you should now create the additional volumes.
1. Type load install and press ENTER.
2. Select "Volume Options" and use the INSERT key while in the "Volumes" menu to define the additional volumes.
Registering Users
You should now register your users on the server. 1. From a client, login to the server as SUPERVISOR. 2. Use sys:\public\syscon to register your users. 3. Be sure to add a password for the SUPERVISOR
user.
Downing the Server
You should now “down” the server and return to DOS. You can do this by typing the following command from the Server_name: prompt:
Down Exit
3-24
Installing and Configuring Novell NetWare v3.12
Backing Up the Server
You should now use SBACKUP or some other backup facility to backup your server. You should restart the server before backing up. See the section "Notes on Tape Backup" in Chapter 5 for more information.
Where To Go From Here
You have finished the installation and configuration of the Novell NetWare v3.12 Network Operating System. Go to Chapter 6 and read the Release Notes.
C h a p t e r 4
Installing and Configuring Novell
NetWare v4.11
Contents
Overview ... 1 Required Diskettes ... 1 Installation Assumptions ... 1 DOS Partition ... 2 Reconfiguring the DOS Partition ... 2 Configuring Drivers for the IDE CD-ROM ... 3 Configuring Drivers For the Standard Onboard SCSI Disk Controllers (AIC7860 and AIC7880) ... 5 Configuring Drivers For the Disk Array Controller (DAC960) .. 6 Running EZSTART for LAN Adapters ... 6 Running EZSTART for SMC8416BTA LAN Adapters ... 7 Running EZSTART for SMC8432BTA and SMC9332BDT LAN Adapters ... 8 Running EZSTART for SMC9432TX LAN Adapter ... 9 Configuration Checklist ... 10 Installing the Novell NetWare v4.11 Network Operating System 14 Configuring SMC8432BTA and SMC9332BDT LAN Cards .... 18 Configuring an SMC8416BTA LAN Card ... 19 Configuring SMC9432TX LAN Card ... 20 Completing the Installation ... 21 Customizing the Installation ... 23 Downing the Server ... 24 Backing Up the Server ... 24 Where To Go From Here ... 25
4-1
Installing and Configuring Novell NetWare v4.11
Overview
This chapter contains instructions for installing and configuring the Novell NetWare v4.11 Network Operating System on your system.
For additional Novell NetWare information, it is important to read the NetWare “READ ME” files and related documentation provided by Novell.
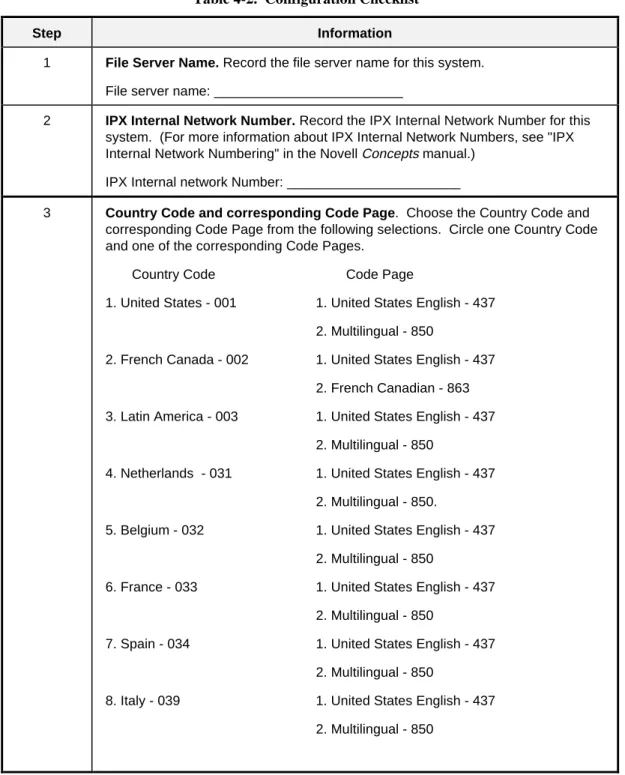
Required Diskettes
Depending upon the configuration of your system, you may be required to use newer drivers than the ones supplied on the NetWare distribution media. You will need newer drivers if any of the devices listed Table 4-1 are installed on your system. Use the EXPRESSBU IL DER CD-ROM to create the required diskettes, see Using
ExpressBuilder to Create Diskettes in Chapter 1.
Table 4-1. Devices and Required Diskettes
Device Required Diskette
AIC7880/AIC7860 Adaptec controller Adaptec AIC78XX Family Manager for NT, NW, OS2 DAC960 RAID controller Mylex DAC-SW105 v1.05
SMC8432BTA/SMC9332BDT LAN controller SMC Superdisk for PCI
SMC9432TX LAN controller SMC Superdisk for EtherPower II 10/100
Installation Assumptions
The installation and configuration instructions in this chapter assume the following:
■ You will be installing (not updating) the Novell NetWare 4.11 Network Operating System from the CD-ROM media.
■ You will be starting NetWare from an MS-DOS® partition, not a DOS diskette.
4-2
Installing and Configuring Novell NetWare v4.11
DOS Partition
The MS-DOS partition on your system hard disk drive is configured to ensure you have sufficient space for the Novell NetWare v3.12 Network Operating System and applications. (See the NetWare Installation and
Upgrade manual for disk space requirements.)
If your system does not include a Disk Array Controller (DAC960), your primary boot disk drive is formatted with a single 50MB MS-DOS partition and MS-DOS is preinstalled on this drive.
If you have a Disk Array Controller (DAC960)
preinstalled on your system, it was preconfigured at the factory. The primary boot drive is formatted with a single 50MB MS-DOS partition and MS-DOS is preinstalled on this drive.
If you want to reconfigure the size of the DOS partition, perform the steps in the following subsections.
Otherwise, go to the Running EZSTART for LAN
Adapters subsection in this chapter.
Reconfiguring the DOS Partition
If you want to reconfigure the size of the DOS partition perform the following procedure:
Notice: When reconfiguring the DOS partition all data
on non-removable disk drive C: will be lost!
1. Boot your system from the DOS partition and execute some DOS commands (CHKDSK, for example) to verify that your system was not damaged during shipment and that the keyboard and monitor are properly installed and working.
2. Create a bootable DOS diskette by inserting a blank diskette and entering:
4-3
Installing and Configuring Novell NetWare v4.11
3. Copy the fdisk command to the bootable diskette byentering:
copy c:\DOS\fdisk.exe a:
4. Follow step 4a or 4b, as appropriate.
a. If your system does not include a Disk Array Controller (DAC960), boot the system from the bootable diskette created in Steps 2 and 3. Use the DOS fdisk command to create a small active DOS partition on Drive C: If you do not intend to use the DOS partition, a minimum size of 20MB is recommended.
b. If your system does include a Disk Array
Controller (DAC960), ensure that it is configured. Refer to the MYLEX DAC960PDU Disk Array
Controller User Manual and the MYLEX Disk Array Controller Software Kit User’s Manual for
additional information on this option card. After you have configured the Disk Array Controller, boot the system from the bootable diskette created in Steps 2 and 3. Use the DOS fdisk command to create a small active DOS partition on Drive C: If you do not intend to use the DOS partition, a minimum size of 20 MB is
recommended.
5. Install DOS (version 6.0 or greater) in the DOS partition.
Configuring Drivers for the IDE CD-ROM
Follow the instructions below to configure the device driver “NEC_IDE.SYS”.
1. Insert the Utilities Diskette into Drive A.
2. Select drive C: by typing CD\ and press ENTER. 3. Create a directory named IDE on drive C: by typing
md ide and press ENTER.
4. Change the working drive to Drive A: by typing A: and press ENTER.