6565 Kilgour Place, Dublin, OH 43017-3395
www.oclc.org
Take Actions on Bibliographic Records
Last updated: April 2012
Date Section title Description of changes
April 2006 1. Actions: edit mode; 2. Actions: keystrokes; 4. Set holdings; 12. Actions: display mode
Revised to reflect changed and added functionality for maintaining local holdings records.
November 2006 1. Actions: edit mode; 2. Actions: keystrokes; 12. Actions: display mode
Documented new function Display Find in a Library that displays Find In a Library screen of the WorldCat.org service. Use the screen to locate WorldCat libraries that hold the item. You can also access supplemental materials such as cover art and user reviews via this screen.
8. Replace master records
Revised to reflect expanded capabilities for users with Full level authorizations to upgrade records to control headings or (using Connexion client) to add non-Latin script.
July 2008 8. Replace master records
1. Actions edit mode; 4. Set holdings; 12. Actions display mode
Revised to reflect changes implemented with the 2008 MARC update.
Updated to clarify meaning of upper- or lowercase letters in library symbols in basic holdings lists.
April 2012 1. Actions: edit mode; 2 Actions: keystrokes; 6. Print records 12. Actions: display mode
Revised to remove “and DDC” from the Control All Headings command. The command no longer includes DDC numbers. Connexion does not control DDC numbers.
© 2012 OCLC Online Computer Library Center, Inc. 6565 Kilgour Place
Dublin, OH 43017-3395 USA
The following OCLC product, service and business names are trademarks or service marks of OCLC, Inc.: CatExpress, Connexion, DDC, Dewey, Dewey Decimal Classification, OCLC, WorldCat, WorldCat Resource Sharing and “The world’s libraries. Connected.” In addition, the WorldCat symbol and OCLC symbol are service marks of OCLC. Third-party product and service names are trade-marks or service trade-marks of their respective owners.
1 Bibliographic record actions: edit modes
Edit modes and edit views, 5
Actions available in edit mode, 5
Record actions summary, 18
2 Bibliographic record actions: keystrokes
Command shortcuts: permanent keystrokes for actions, 23
Table of command shortcuts, 23
Customizable keystrokes for actions (<Ctrl><Shift> keystrokes), 25
Change the action assigned to a keystroke, 26
Keystrokes and default actions, 27
3 Validate bibliographic or authority record
About validation, 28
Validate record, 28
Automatic validation on final actions, 29
Specify validation levels for selected actions, 30
Errors detected, 31
Automatic data correction, 31
4 Set holdings for bibliographic record
Why set holdings for a bibliographic record?, 32
Set holdings (Update Holdings): copy cataloging, 32
Add new bibliographic record to WorldCat, 32
Delete Holdings, 33
Display Holdings, 34
Holdings lists, 34
Identify libraries by OCLC symbol, 34
5 Produce and Alternate Produce
Why use Produce or Alternate Produce actions?, 35
When Produce and Alternate Produce are available, 35
How to use Produce, 35
How to use Alternate Produce, 37
Cards produced for Produce actions and options, 40
OCLC Catalog Cards, 40
6 Print bibliographic or authority record
Why print a record?, 41
Print a bibliographic or authority record, 41
7 Create labels
About printing labels in Connexion, 43
Prepare to print labels with the OCLC Cataloging Label Program, 43
Labels for one record, 44
Create label file for multiple flagged records, 45
Download label files, 47
Import label file to Label Program, 48
Tip: Override browser-supplied file type and name for label file, 49
Manage label files, 49
Label formats, 50
Fields selected for labels, 51
Label Program documentation, 51
Cataloging Service User Guide, 51
8 Replace master bibliographic record
Record replace capabilities, 52
Types of modifications, 52
Replace your own record, 53
Replace master records containing controlled headings, 53
Replace master record (procedure), 54
Release lock on master record, 55
Upgrade records, 55
9 Maintain URLs in bibliographic records
When you can correct or add a URL, 58
Correct or add a URL: basic steps, 58
Record fields that may contain URLs, 58
10 Report error in bibliographic or authority record
Errors to report, 60
Report an error via e-mail, 60
11 Procedures for cataloging agents
Cataloging Agent authorizations, 61
Use field 951, 61
Process records, 62
Replace newly added records to correct errors, 63
Offline products, 63
Billing and credits, 64
Reports, 64
12 Bibliographic record actions: display mode
Display mode and display views, 65
Actions available in display mode, 65
Record actions summary, 70
1
Bibliographic record actions: edit modes
Edit modes and edit views
Edit mode.
You are in edit mode (copy cataloging mode) when you use the
Edit Record
action to begin editing the record. The master record is not locked
in WorldCat.
Master edit mode.
You are in master edit mode when you use the
Lock
Master Record
action to begin editing a record. The master record is locked in
WorldCat.
MARC edit views.
MARC Template or MARC Text Area
Dublin Core edit views.
DC Template or DC Text Area
Display view in edit mode.
While in master edit or local edit mode, you can
switch to a display view of the record via the
Display Record
action. You
remain in your original edit mode. From the display view, some editing actions
are not available. To resume editing the record, use the
Back to Editing
action.
Display mode.
You are in display mode
when you have not begun editing a
record
. Display mode is in effect when you click the
Display
button for a record
in a search results list. The record appears in a display view for the current
format (MARC or Dublin Core).
Switch to display mode from edit mode.
You switch from edit mode to
display mode when you save a record or take the Cancel Changes action.
Actions available inedit mode
Action How To
Display record On the Edit list, click Display Record.
The record appears in a display view for the current format (MARC or Dublin Core).
Reformat record On the Edit list, click Reformat Record.
MARC. Reformatting arranges fields in (approximate) ascending tag number order; same order used in standard WorldCat record displays.
Dublin Core. Elements are arranged so that Title and Description appear first.
Validate record On the Edit list, click Validate Record or press <Alt><K>, <V>. For a valid record, the system redisplays the record.
If the record contains invalid data, the system displays 1 or more error messages that identify the problem(s). Messages appear directly above the fields/elements to which they refer (template edit views) or above the text area (text area edit views).
The Validate Record action applies OCLC WorldCat validation rules.
Print Record 1. On the Action list click Print Record. Or
Press <F12>.
Control All Headings (authority control for all
controllable headings)
On the Edit list, click Control All Headings.
The system displays a message explaining the limitations of the Control All function. Click OK to clear the message and continue
The system attempts to apply authority control to all controllable headings in the record (personal/corporate names or subject headings).
Note: Control All works only for headings that exactly match a heading in the Authority File. You must control other headings individually using the Control option in the functions list for the heading field.
Report Error Report an error in a record by sending an e-mail message to OCLC quality control staff.
1. View the bibliographic record for which you want to report an error.
2. On the Action list click Report Error or press <Alt><K> and then <7> (or press <Alt><J> and then < 7>).
3. In the Report Error dialog box, complete the required fields at the top of the window: OCLC Symbol, User Name, and E-Mail.
4. In the large text box, type a description of the problem. 5. (Optional) To request a copy of the e-mail message
containing the error report, select the check box labeled
Send a copy of the e-mail message to me. 6. Click Report Error to send the error report. Submit for
Review
1. Prepare the record you want to submit for review. 2. On the Action list, click Submit for Review or press
<Alt><K><>> (right angle bracket).
3. In the popup window, check the displayed list of reviewer institutions and edit the list if necessary.
Or
Type a list of OCLC symbols, separated by semicolons.
Note: You can enter symbols in lowercase or uppercase. The system converts symbols to uppercase before validating them.
4. Click OK to submit the record for review.
Or click Cancel if you do not want to submit the record now.
Results
When you click OK, the system:
Validates OCLC symbols you supplied. If any symbol is
invalid, the system does not submit the record. An error message identifies the invalid symbol(s). You must retry submitting the record. When prompted, correct all invalid symbols and then click OK.
Sets the record’s Review status to Submitted for Review. For a locked master record, retains any lock on the record in
WorldCat or the Authority File.
Automatically saves the record to the bibliographic save file
or the authority save file.
Displays the submitted record (display mode).
Displays messages confirming that the record has been
submitted and that the record has been saved.
Shows the record’s save file number.
Recall Submitted Record
1. Retrieve the record you want to recall.
2. On the Action list, click Recall Submitted Record or press <Alt><K><<> (left angle bracket).
3. Click OK to recall the record.
Or click Cancel if you do not want to recall the record now.
Results
When you click OK, the system:
Removes the Review status Submitted from the record. For a locked master record, retains any lock on the record in
WorldCat or the Authority File.
Automatically resaves the record to the bibliographic save
file or the authority save file.
Displays the record (display mode).
Displays messages confirming that the record has been
recalled and that the record has been saved.
Shows the record’s save file number.
Save record Save a new or existing record or resave a saved record
On the Action list, click Save Record.
Assign a workflow status appropriate for the record’s position in your cataloging workflow. If desired, enter a note or identifier in the My Status text box.
Click Yes to add the record to the save file.
The system saves the record and displays the save file number for the record.
Or click No to cancel saving the record.
Locked master record. When you save a locked master record, the system places a long-term (14-day) lock on the master record in the Resource Catalog and in WorldCat. Other users can retrieve a copy, but cannot change the master record. Resave record. When you resave a record, the system resets the records age in the save file to 0 days.
Delete record from save file (saved records only)
On the Action list, click Delete Save File Record.
Then click Yes or Yes, Wait for response to confirm the action. Or click No to cancel deleting the record.
The system deletes the record from the bibliographic save file. Derive New
Record (Derive a new record from an existing record or a workform)
1. On the Edit list click Derive New Record or press <Alt><K> and then <D> (or <Alt><J> and then <D>).
2. When the system asks whether you want to transfer fixed-field values to the new record,
— Click Yes to transfer all fixed-field values except the OCLC control number, Rec Stat, Entered, and Replaced.
Rec Stat is set to Q (New). Both Entered and Replaced
are set to the current date,
— Click No to transfer only default fixed-field values for the format, as indicated by the value in the Type element. — Click Cancel to cancel deriving a new record.
Results
The system displays the content of the new record.
Variable fields transfer based on your settings for the Derive Record Fields option (Cataloging Options screen).
NEW appears in place of an OCLC control number.
Cancel changes to record
On the Edit list, click Cancel Changes.
The system asks you to confirm that you want to discard changes you made while editing the record.
Click Yes to cancel edits.
Or click No to keep your changes and continue editing the record.
Results
Existing record. The system redisplays the record from WorldCat, in display mode. Any locks on the record are released.
New record (saved). The system redisplays the record from the bibliographic save file.
New record (unsaved). The system deletes the record and returns you to the Create Record screen.
Unedit Record On the Edit list, click Unedit Record.
The system redisplays the record as originally retrieved from WorldCat (for an unsaved record) or as last saved (if the record is in the save file).
The record remains in the edit mode you were using. Any locks are retained.
Release Record Lock
Master edit mode only.
On the Action list, click Release Record Lock.
Results
The master record is unlocked in WorldCat.
Changes you made while the record was locked are retained
in your working copy.
You switch to local edit mode.
Replace master record
On the Action list, click Replace Record or Replace and Update Holdings.
The system prompts you to confirm that you want to replace the master record.
Click Yes to continue and replace the master record.
Results
Connexion validates the record. If the system reports
validation errors, correct them and retry replacing the record.
When the record is valid, Connexion replaces it in WorldCat
and sets your holdings if you took the Replace and Update Holdings action.
The system notifies you that the record has been replaced.
The master record is unlocked.
Your copy of the record is displayed in local edit mode. Local
data fields you added to the record are retained in your copy. To cancel replacing the record, click No. If you cancel, the system redisplays the record for further editing.
Update Holdings (link your library’s OCLC symbol to the record)
On the Action list, click Update Holdings. The system asks you to confirm the action.
Click OK to set holdings. Or click Cancel to cancel the action.
Results
Validation: existing records. By default, Connexion does
not validate bibliographic records automatically when you update holdings. You can request basic or full validation. For records that fail validation, you must correct errors and then retry the Update Holdings action.
Validation: new records. Connexion validates the record
before adding it to WorldCat. If the system reports validation errors, correct them and retry adding the record.
When the record is valid, Connexion sets your holdings; your
institution's OCLC symbol is associated with the record. For a new record, the system adds the record to WorldCat and assigns an OCLC control number.
Your copy of the record is displayed in local edit mode. Local
data fields you added to the record are retained in your copy.
Note: You can also set holdings when you replace a record. Use Replace Record or Replace and Update Holdings as appropriate.
Produce and Update Holdings
MARC view only
(Not available for locked master record
Local edit mode only (not available for locked master record).
MARC Template edit view only.
On the Action list, click Produce and Update Holdings. The system asks you to confirm the action.
Click OK to continue. Or click Cancel to cancel the produce action.
Results
Validation: existing records. By default, Connexion does
not validate bibliographic records automatically when you update holdings and produce offline products. You can request basic or full validation. For records that fail
validation, you must correct errors and then retry the action.
Validation: new records. Connexion validates the record
before adding it to WorldCat. If the system reports validation errors, correct them and retry adding the record.
For a new record, adds the record to WorldCat and assigns
an OCLC control number.
Sets holdings for your library.
Adds your library’s institution symbol to field 040. Sends appropriate information to create offline products
including catalog cards, accessions lists, and records in an electronic file or on magnetic tape. Delivery of products depends on the your profile.
Creates an archive record that reflects any changes you
made while editing the record.
Redisplays the record in local edit mode. A confirmation
message appears at the top of the record. Local data fields you added to the record are retained in your copy.
In the record, sets the Produce action status to C
(Completed).
Alternate Produce and Update
MARC view only
(Not available for locked master record
Local edit mode only (not available for locked master record).
MARC Template edit view only.
On the Action list, click Alternate Produce and Update. The system displays the Alternate Produce Options dialog box. Specify the alternate produce options you want to apply:
In the Extra Cards text box, type the number of extra cards
for the receiving catalogs for the first holding library listed in field 049, subfield $a. Enter a number from 1 to 255.
Select the Ad Produce check box to order cards for the
receiving catalogs for the first holding library listed in field 049, subfield $a of the record.
Select the All Produce check box to order cards for the
receiving catalogs for all holding libraries listed in field 049, subfield $a of the record.
Click Produce to continue. Or click Cancel to cancel the alternate produce action.
Results
Validation: existing records. By default, Connexion does
not validate bibliographic records automatically when you update holdings and produce offline products. You can request basic or full validation. For records that fail
validation, you must correct errors and then retry the action.
Validation: new records. Connexion validates the record
before adding it to WorldCat. If the system reports validation errors, correct them and retry adding the record.
For a new record, adds the record to WorldCat and assigns
an OCLC control number.
Sets holdings for your library.
Adds your library’s institution symbol to field 040. Sends appropriate information to create offline products
including catalog cards, accessions lists, and records in an electronic file or on magnetic tape. Delivery of products depends on the your profile.
Sends information to the catalog card production system to
generate the cards specified using alternate produce options.
Creates an archive record that reflects any changes you
made while editing the record.
Redisplays the record in local edit mode. A confirmation
message appears at the top of the record. Local data fields you added to the record are retained in your copy.
In the record, sets the Produce action status to C
(Completed).
Create Local Holdings
1. On the Action list click Create Local Holdings or press <Alt><K> and then <+>(plus sign) (or <Alt><J> and then <+>).
2. In the local holdings workform, enter content to describe your holdings for the item. Edit the Summary field to reflect any changes in your institution’s overall holdings for the item. Apply local holdings constant data if appropriate.
3. In the new local holdings record, on the Action list click Add Record or press <Alt><K> and then <N> (or <Alt><J> and then <N>).
Results
Connexion validates the record. If the system reports
validation errors, correct them and then try again to add the record.
When the record is valid, Connexion links it to the
bibliographic record.
When you add your first LHR to a bibliographic record,
Connexion sets your institution-level holdings, if not already set.
The added record reappears in display mode.
Delete Holdings On the Action list, click Delete Holdings.
The system asks you to confirm that you want to delete holdings.
Click OK to delete holdings. Or click Cancel to cancel the action.
Local holdings records. If you have local holdings records attached to the record, the system asks you to confirm that you want to delete local holdings. Click Yes to delete LHRs and your holdings symbol or click No to return to the record.
When you confirm that you want to delete holdings (and/or LHRs), the system displays a confirmation message.
Your institution's OCLC symbol is no longer linked to the record.
Note: The Delete Holdings action is available only if your library's OCLC symbol is attached to the record.
Delete All Local Holdings
1. Open the bibliographic record from which you want to delete all local holdings records and remove your institution’s symbol.
2. On the Action list click Delete All Local Holdings or press <Alt><K> and then <-> (hyphen) (or <Alt><J> and then <->). 3. Above the record, Connexion asks you to confirm whether
you want to delete all your LHRs and whether you also want to remove your institution’s holdings symbol.
4. Confirm or cancel the action:
—Delete all LHRs and holdings symbol. Select the
Remove your institution’s symbol from bibliographic record check box and then click Delete Local Holdings. —Delete LHRs, retain your institution’s symbol. Clear
(uncheck) the Remove your institution’s symbol from bibliographic record check box and then click Delete Local Holdings.
—Cancel deleting all LHRs. Click Cancel if you decide to keep your existing LHRs and retain your holdings symbol attached to the bibliographic record.
Results
Delete all LHRs and symbol. Connexion deletes the LHRs
and your institution’s symbol from the record. A confirmation message states that your holdings were deleted and gives the number of LHRs deleted.
Delete LHRs, retain symbol. Connexion deletes the LHRs
and displays a confirmation message that gives the number of LHRs deleted.
Display Holdings 1. On the View list click Display Holdings or press <Alt><K> and then <H> (or <Alt><J> and then <H>).
2. In the Display Holdings box (above the record header), click
Display Holdings or press <Enter> to view the Default Holdings.
Or
Open the list and select the type of holdings display you want: All Holdings or Regional Holdings or State Holdings.
3. Then click Display Holdings or press <Enter>.
The Holdings Display window lists the holdings you requested. When finished viewing holdings, click Close Window.
Note: The Holdings Display window closes automatically when you choose another command or navigate to another screen.
Print holdings list (Internet Explorer only).
1. Right-click in the Holdings Display window. 2. On the popup menu click Print.
3. In the Print dialog box, click OK or press <Enter>.
Identify listed institutions
Show institution name (Holdings Display window)
In the locations listing, move the mouse pointer over an
institution symbol to display the name of the institution.
Library symbols in lists. In holdings lists, letters in institution symbols appear in uppercase or lowercase. An uppercase symbol indicates that the institution participates in the WorldCat Resource Sharing service as a lender of library materials. A lowercase symbol indicates that the institution does not lend materials via WCRS. Users creating a loan request in WCRS can include uppercase symbols in the list of potential lenders. Display Local
Holdings
1. On the View list, click Display Local Holdings or press
<Alt><K><\> (backslash) (or <Alt><J> and then <\>). 2. In the Local holdings type list, select the display to view:
For Institution Holdings or Group Holdings, type the institution or group symbol in the text box. Or select State Holdings, Region Holdings, Default Holdings, or All Holdings.
3. Click Display Local Holdings.
Results
The Holdings Display window lists summary local holdings for an institution or group, or for institutions in the category you selected (state, region, default, all).
In the Holdings Display window, under Local Holdings Information, click the link to the holdings summary for the institution you want.
Edit Local Holdings
Note: Available only if your institution has one or more LHRs linked to the bibliographic record.
On the Action list, click Edit Local Holdings or press
<Alt><K><_> (underscore) (or <Alt><J> and then <_>).
Display Find in a Library
On the View list, click Display Find in a Library or press <Alt><K> and then <8> (or <Alt><J> and then <8>).
Result: Connexion displays the Find in a Library® service at WorldCat.org in a new window. Use the screen to locate WorldCat libraries that hold the work described in the current record and to link directly to library OPACs. You can also access cover art, information on alternative formats (large print, audiobooks, etc.), user reviews and other evaluative content. Apply CD By
Name
1. Retrieve the bibliographic record to which you want to apply a constant data record. The record must be in edit mode. 2. On the Edit list, click Apply CD By Name or press <Alt><K>
and then <5> (or <Alt><J> and then <5>). An entry opens above the record header.
3. Specify fields to apply. In the entry area, select the option button for Whole Record or Variable Fields Only or Fixed Field Only.
4. In the Specific CD Name text box, type the name of the constant data record you want to apply.
5. Click Apply CD or press <Enter>. Apply CD From
List
1. Retrieve the bibliographic record to which you want to apply a constant data record. The record must be in edit mode. 2. On the Edit list, click Apply CD From List or press <Alt><K>
and then <6> (or <Alt><J> and then <6>).
3. Specify fields to apply. In the Select Constant Data window, select the option button for Whole Record or Variable Fields Only or Fixed Field Only.
4. In the list of constant data records, click the hyperlinked name of the constant data record you want to apply. Apply Default
CD
On the Edit list, click Apply Default CD or press <Alt><K> and then <C>.
The system merges your default constant data with the record you are editing.
MARC only: fields applied. Depending on the option you selected within the default constant data, the system adds the entire record, the fixed fields only, or the variable fields only. To change the setting for this option, edit your default constant data. On the Cataloging tab, under Show Options, click Default CD. Your default constant data appears in edit mode.
Derive New Constant Data Record
1. On the Edit list click Derive New Constant Data Record or press <Alt><K> and then <4> (or <Alt><J> and then <4>). 2. When the system asks whether you want to transfer
fixed-field values to the new CD record,
— Click Yes to transfer all fixed-field values except Entered
and Replaced. (Note: Both Entered and Replaced are set to the current date.).
— Click No to transfer only default fixed-field values for the format, as indicated by the value in the Type element. — Click Cancel to cancel deriving a new CD record.
Results
The system displays the content of the new constant data record.
Variable fields transfer based on your settings for the Derive Record Fields option (Cataloging Options screen).
Complete new CD record
1. Edit the new CD record to add or revise content. 2. On the Action list click Save Constant Data Record.
3. In the dialog box, enter a name for the constant data record. Use a name that indicates the content or purpose of the constant data.
4. Then click OK to add the record to your institution’s constant data database.
Export record On the Action list click Export Record in MARC or Export
Record DC HTML or Export Record DC RDF. Or
MARC. Press <Alt><K> and then <E>. DC HTML. Press <Alt><K> and then <*>. DC RDF. Press <Alt><K> and then <(>.
Results
Validation. By default, Connexion does not validate
bibliographic records before exporting them. For single-record exports, you can request basic or full validation. For records that fail validation, you must correct errors and then retry exporting.
For export to a file (default), the system adds the record to a
file on the Connexion server. Exported records are appended to the same file until you download the file.
For TCP/IP export (direct to local system), the system
exports the record immediately.
The system changes the record's Export status to C
(Completed) or F (Failed).
Mark For Export 1. Before or after saving a record you plan to export, on the Action list click Mark for Export or press <Alt><K> and then <J>. The record’s Export status changes to R (Ready).
Note: You can have the system save a record automatically when you use Mark for Export. On the Export Options screen, set the Mark for Export and Save Record option to
On (default is Off)
2. When ready to export a group of saved records, search the save file for records with the Export status Ready.
3. Flag the records and then take the Export Flagged Records
action.
View Label in Label Program
MARC view only
(Not available for locked master record
Requires that you install the OCLC Cataloging Label Program (version 1.22 or later) on your workstation.
1. Retrieve the bibliographic record for which you want to print labels.
2. Edit the record as you wish. For example: add or modify a call number, add an input stamp in the 049 field, or edit text in author (1xx) or title (245 $a) fields.
3. On the View list, click View Label in Label Program or press <Alt><K> and then <Y>.
Results
The system extracts data from the record and downloads the
text to your workstation.
The OCLC Cataloging Label Program starts automatically (if
it is not already running).
The Label Program displays the label set using the label
format you specified in Connexion Cataloging Options.
In the record, the system sets the Label action status to C
(Completed).
Mark For Label 1. Before or after saving a record for which you plan to create labels, on the Action list click Mark for Label or press <Alt><K> and then <3>. The record’s Label status changes to R (Ready).
Note: You can have the system save a record automatically when you use Mark for Label. On the Cataloging Options screen, set the Mark for Label and Save Record option to
On (default is Off)
2. When ready to create labels for a group of saved records, search the save file for records with the Label status Ready. 3. Flag the records and then take the Create Labels for
Flagged Records action. Lock Master
Authority Record for name heading
Controlled name heading fields only
MARC only
Not available in Dublin Core template view.
Move to the name heading field for which you want to edit the linked master authority record.
In the Functions list click Lock Master Authority.
The system retrieves and locks the master authority record for the name heading. The record appears in a new browser window, in master edit mode, using your default edit view for authority records (MARC or MARC Text Area).
Edit Authority Record for name heading
Controlled name heading fields only
MARC only
Not available in Dublin Core template view.
Move to the name heading field for which you want to locally edit the linked authority record.
In the Functions list click Edit Authority Record.
The system retrieves the authority record for the name heading. The record appears in a new browser window, in local edit mode, using your default edit view for authority records (MARC or MARC Text Area).
Derive New Authority Record from record for name heading
Controlled name heading fields only
MARC only
Not available in Dublin Core template view.
Move to the controlled name heading field you want to use to create a new name authority record by cloning.
In the Functions list click Derive New Authority. The Derive Authority function
Retrieves the linked record from the Authority File. Transfers selected content and/or supplies default fields/
values to produce a new record based on the cloned record.
Presents the resulting record in local edit mode.
Inserts 1(: in the OCLC: field in place of an OCLC authority record number (ARN).
The resulting workform appears a new browser window in local edit mode, using your default edit view for authority records (MARC or MARC Text Area).
Generate Authority Record for name heading
Uncontrolled or controlled name heading fields
MARC only
Not available in Dublin Core template view.
Move to the name heading field you want to use to generate a new name authority record.
Headings you can use
100, 110, 111, 130, 240, 440, 600, 610, 611, 630, 651 700, 710, 711, 730 800, 810, 811, 830
In the Functions list click Generate Authority. The Generate Authority function
Extracts appropriate elements from the selected field and
supplies new tags and subfields or removes them as needed.
Rearranges and adds the data from the bibliographic record
to a name authority workform in the following order: — Fixed field
— 040 with default MARC Organization Code (NUC symbol) — 022 (if any)
— 1xx — 4xx (if any) — 642-646 (if any) — 670
Supplies 1(: in the OCLC: field in place of an OCLC authority record number (ARN).
The resulting workform appears a new browser window in local edit mode, using your default edit view for authority records (MARC or MARC Text Area).
Flag record On the Action list, click Flag Record.
The record remains flagged during the current session or until you unflag it.
Note: You cannot flag a record retrieved from WorldCat. You can save the record and flag it in the save file.
Note: You cannot flag a new record (not yet added to WorldCat, no OCLC control number).
Unflag record On the Action list, click Unflag Record.
Record actions summary
The following table defines record actions and indicates the mode(s) in which
each action is available for a user with the required authorization level.
Availability of some actions depends on whether or not the record is in the
bibliographic save file. Other actions are not available for a new record (without
an OCLC control number).
The hierarchy of authorizations from least to most record actions included is as
follows:
— Search
— Limited
— Full
— Authorizations for those who participate in special projects or services, such
as NACO (Name Authority Cooperative), Enhance, or CONSER
(Cooperative Online Serials) program.
Action What it does
Minimum Auth Level Locked Master Record ? Edit Mode? Display Mode? Update Holdings (add new record)
Add a new record to WorldCat and add your library's OCLC symbol.
Full Yes No No
Derive New Constant Data Record
Add a copy of the record to your institution’s constant data database.
Limited No No Yes
Apply CD By Name
Apply a specific
constant data record by typing the CD name.
Limited Yes Yes No
Apply CD From List
Retrieve and apply a stored constant data record to the
bibliographic record you are editing.
Choose to apply the whole CD record, fixed field only, or variable fields only.
Limited Yes Yes No
Apply Default CD
Insert content from your default constant data.
Limited Yes Yes No
Back to Editing
In edit mode, return from a display view of the record to an edit view (appears in the display view only).
Cancel Changes
Existing record. The system redisplays the record from WorldCat, in display mode. Any locks on the record are released.
New record (saved).
The system redisplays the record from the bibliographic save file.
New record
(unsaved). The system deletes the record and returns you to the Create Record screen.
Limited Yes Yes No
Control All Headings
Add authority control for all controllable fields in the record.
Limited Yes Yes No
Create Local Holdings
Link a new local holdings record to the bibliographic record.
Full No Yes No
Delete Holdings (if library has holdings)
Remove your library's OCLC symbol from the record.
Full No Yes No
Delete All Local Holdings
Remove any LHRs your library has linked to the record. Option to delete your OCLC symbol from the record.
Full No Yes No
Delete Save File Record (saved record only)
Remove record from the bibliographic save file.
Limited Yes Yes No
Derive New Record
Create a new record based on the current record.
Limited No Yes Yes
Display Holdings
View a list of libraries whose OCLC symbols are attached to the record.
Search Yes Yes Yes
Display Local Holdings
View a list of libraries that have local holdings records attached to the record.
Search Yes Yes Yes
Action What it does
Minimum Auth Level Locked Master Record ? Edit Mode? Display Mode?
Display Record
View record as presented when first retrieved.
Search Yes Yes No
Edit Local Holdings
Edit local holdings record(s) your library has attached to the record.
Full No Yes No
Edit Record (saved records only)
Begin editing a saved record (in master edit mode if the record is locked, in local edit mode if unlocked)
Limited Yes Yes Yes
Edit Record Modify a working copy of the record without affecting the master record.
Limited Yes No Yes
Export Record in [MARC, DC, etc.] (existing record only)
Store the record in a file on the Connexion server (default) or export directly to your local system via TCP/ IP.
Search Yes Yes Yes
Lock Master Record
Lock and modify the master copy of the record.
Limited No Yes Yes
Mark for Export
Indicate a record is ready to export.
Limited Yes Yes No
Mark for Label
Indicate a record is ready for use to create labels.
No Yes No
Reformat Record
Refresh the edit view to reorder fields.
Limited Yes Yes No
Release Record Lock
Unlock a locked master record.
Retain changes made while editing.
Switch to local edit mode.
Limited Yes No No
Replace Record (existing record only)
Overwrite the master record with your modified working copy. (Only for specific records and purposes, as defined by your authorization.)
Full Yes No No
Action What it does
Minimum Auth Level Locked Master Record ? Edit Mode? Display Mode?
Replace and Update Holdings (existing record only)
Replace the master record and add your library's OCLC symbol. (Only for specific records and purposes, as defined by your authorization.)
Full Yes No No
Report Error Report an error in the record by via e-mail.
Limited Yes Yes Yes
Save Record Place the record in the bibliographic save file. Or resave the record in the save file; restart save file aging for the record.
Limited Yes Yes No
Submit for Review
Submit a record for review by colleagues at other institutions.
Limited Yes Yes Yes
Recall Submitted Record
Remove Review status from a submitted record; the record is no longer available for review.
Limited Yes Yes Yes
Flag Record Mark the record to set it aside for further use during the current session.
Search Yes Yes Yes
Unedit Record
The system redisplays the record as originally retrieved from WorldCat (for an unsaved record) or as last saved (if the record is in the save file).
The record remains in the edit mode you were using.
Any locks are retained.
Limited Yes Yes No
UnFlag Record
Remove a flag from the record.
Search Yes Yes Yes
Update Holdings
Add your library's OCLC symbol to the record.
Full No Yes No
Action What it does
Minimum Auth Level Locked Master Record ? Edit Mode? Display Mode?
Validate Record
Check the content and format of the record using OCLC WorldCat validation rules.
Limited Yes Yes No
View Label in Label
Program (Requires Label
Program 1.22 or later installed on workstation)
Display a label set for the current record in the OCLC Cataloging Label Program.
Limited No Yes Yes
Action What it does
Minimum Auth Level
Locked Master Record ?
Edit Mode?
Display Mode?
2
Bibliographic record actions: keystrokes
Command shortcuts: permanent keystrokes for actions
Connexion browser provides permanently assigned keystrokes for actions you
can take on a bibliographic or authority record.
The Command Shortcuts list includes a keystroke for every command that
appears on the Edit, Action, and View lists.
Use these keystrokes instead of
— Selecting a command from the Edit, Action, or View list.
— Using a customizable shortcut for the command. Note: Customizable
keystrokes work in both IE and Netscape but are limited in number. For
information on using these keystrokes, see the sections
Change the action
assigned to a keystroke
and
Keystrokes and default actions
.
Command Shortcuts are available with supported versions of Internet Explorer
only.
Table of command shortcuts
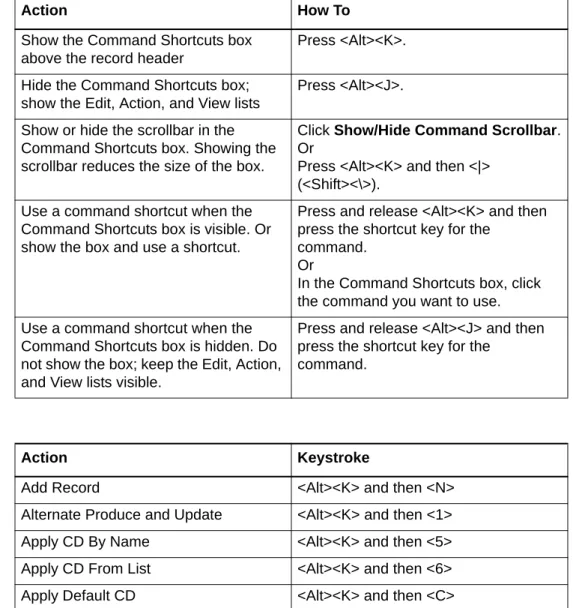
Action How To
Show the Command Shortcuts box above the record header
Press <Alt><K>.
Hide the Command Shortcuts box; show the Edit, Action, and View lists
Press <Alt><J>.
Show or hide the scrollbar in the Command Shortcuts box. Showing the scrollbar reduces the size of the box.
Click Show/Hide Command Scrollbar. Or
Press <Alt><K> and then <|> (<Shift><\>).
Use a command shortcut when the Command Shortcuts box is visible. Or show the box and use a shortcut.
Press and release <Alt><K> and then press the shortcut key for the
command. Or
In the Command Shortcuts box, click the command you want to use. Use a command shortcut when the
Command Shortcuts box is hidden. Do not show the box; keep the Edit, Action, and View lists visible.
Press and release <Alt><J> and then press the shortcut key for the
command.
Action Keystroke
Add Record <Alt><K> and then <N> Alternate Produce and Update <Alt><K> and then <1> Apply CD By Name <Alt><K> and then <5> Apply CD From List <Alt><K> and then <6> Apply Default CD <Alt><K> and then <C> Back to Editing <Alt><K> and then <L>
Cancel Changes <Alt><K> and then <2> Control All Headings <Alt><K> and then <K>
Create Local Holdings <Alt><K> and then <+> (plus sign) DC HTML Preview <Alt><K> and then <%> (<Shift><5>) DC RDF Preview <Alt><K> and then <^> (<Shift><6>) DC Template <Alt><K> and then <$> (<Shift><3>) DC Text Area <Alt><K> and then <&> (<Shift><7>) Delete Constant Data Record <Alt><K> and then <X>
Delete All Local Holdings <Alt><K> and then <-> (hyphen) Delete Holdings <Alt><K> and then <9>
Delete Local Holdings <Alt><K> and then <X> Delete Save File Record <Alt><K> and then <X> Derive New Constant Data Record <Alt><K> and then <4> Derive New Record <Alt><K> and then <D> Display Constant Data Record <Alt><K> and then <T> Display Find in a Library <Alt><K> and then <8>
Display Local Holdings <Alt><K> and then <\> (backslash) Display Holdings <Alt><K> and then <H>
Display Record <Alt><K> and then <T> Edit Constant Data record <Alt><K> and then <L>
Edit Local Holdings <Alt><K> and then <_> (underscore) Edit Record <Alt><K> and then <L>
Export Record in DC HTML <Alt><K> and then <*> (<Shift><8>) Export Record in DC RDF <Alt><K> and then <(> (<Shift><9>) Export Record in MARC <Alt><K> and then <E>
Flag Record <Alt><K> and then <F> Lock Master Record <Alt><K> and then <M> MARC Template <Alt><K> and then <[> MARC Text Area <Alt><K> and then <]> Mark For Export <Alt><K> and then <J> Mark For Label <Alt><K> and then <3> Print Record <Alt><K> and then <I> Produce and Update Holdings <Alt><K> and then <P>
Recall Submitted Record <Alt><K> and then <<> (left angle bracket)
Reformat Record <Alt><K> and then <R> Release Record Lock <Alt><K> and then <W>
Customizable
keystrokes for actions (<Ctrl><Shift>
keystrokes)
Connexion browser provides a limited set of customizable keystrokes that work
in supported versions of Internet Explorer and Netscape.
Keystrokes apply only to bibliographic records and authority records. The
keystrokes are not available for other records (such as pathfinders or) or when
using other Connexion services (for example, Express, WebDewey, Digital
Archive).
Replace and Update Holdings <Alt><K> and then <N> Replace Record <Alt><K> and then <A> Report Error <Alt><K> and then <7> Save Constant Data Record <Alt><K> and then <S> Save Record <Alt><K> and then <S> Set as Default Constant Data <Alt><K> and then <G> Show Command Lists (when Command
Shortcuts box is visible)
<Alt><J> Or
<Alt><K> and then <B>
Show/Hide Command Scrollbar <Alt><K> and then <|> (<Shift><\>) Show Command Shortcuts (when Edit,
Action, and View lists are visible)
<Alt><K>
Show/Hide Functions List <Alt><Y> Or
<Alt><K> and then <=> Show/Hide Quick Search <Alt><Q>
or
<Alt><K> and then <Q>
Submit for Review <Alt><K> and then <>> (right angle bracket)
Unedit Record <Alt><K> and then <Z> Unflag Record <Alt><K> and then <F> Update Holdings <Alt><K> and then <U> Validate Record <Alt><K> and then <V> View Label in Label Program <Alt><K> and then <Y> View Group Summary <Alt><K> and then <G>
The keyboard shortcut for an action works only if
— The action is supported in the current mode (master edit, local edit, or
display).
And
— You are authorized to take the action.
The Action, Edit, and View lists (above the record view) show available actions
for your current mode and authorization level.
Sometimes a keystroke does not work because the record view is not the active
frame (screen area). If a keystroke should work (the action is available and you
are authorized) but does not, click the mouse once within the record to make it
the active frame. Then repeat the keystroke.
Why customize keystrokes?
Many users find that they work more efficiently, especially while editing, if they
avoid switching between the keyboard and the mouse.
Customizing the default keystrokes lets you assign your most-used actions to
the keys you find most convenient.
Change the actionassigned to a keystroke
You may find that the actions assigned to keystrokes are not your most-used
actions. You can assign other actions that better fit your workflow.
Deactivate a keystroke.
You can select the [No Action] option for any
keystroke to make that keystroke inactive in Connexion. Select this option to
prevent conflicts with keystrokes used by other software that is active while you
use Connexion.
Action
1 On the General tab, under Admin Options, click Preferences. 2 At the Preferences screen, click General Options.
3 On the General Options screen, click Keystroke Shortcut Options. The Keystroke Shortcut Options screen appears.
4 To change the action assigned to a keystroke,
Find the key combination you want to use in the list of default keystrokes. Open the list of available actions.
Keystrokes and default actions
5 Review the modified key assignments.
Make sure you have not assigned the same action to more than one key combination.
6 Save changes as default or use for current session only.
Click Save My Default or Save for Session.
Action
Action Keystroke
Replace Record <Ctrl><Shift><A> Apply Default CD <Ctrl><Shift><C> Derive New Record <Ctrl><Shift><D> Export Record in MARC <Ctrl><Shift><E> Flag Record <Ctrl><Shift><F> Set as Default Constant Data <Ctrl><Shift><G> Display Holdings <Ctrl><Shift><H> Control All Headings <Ctrl><Shift><K> Edit Record <Ctrl><Shift><L> Lock Master Record <Ctrl><Shift><M> Produce and Update Holdings <Ctrl><Shift><P> Release Record Lock <Ctrl><Shift><Q> Reformat Record <Ctrl><Shift><R> Save Record <Ctrl><Shift><S> Update Holdings <Ctrl><Shift><U> Validate Record <Ctrl><Shift><V> Delete Save File Record <Ctrl><Shift><X> Unedit Record <Ctrl><Shift><Z>
3
Validate bibliographic or authority record
About validation
Validation is a system function that checks the quality of bibliographic and
authority records and prevents records with errors from being added to or
replaced in WorldCat or the Authority File.
Validation on command.
Validate a record as a separate step while creating
or modifying a bibliographic or authority record. Use the
Validate Record
command (Edit list) to identify errors in the structure or data before taking a final
action.
Automatic validation.
When you take a final action, the system automatically
validates the record before completing the action you request. If validation
detects errors, you must correct them and then try again to take the final action.
Note: Constant data.
You cannot validate a constant data record. Connexion
does no automatic validation of constant data records.
Validate record
Action Result
1 If not in Edit mode, on the Edit list click
Edit Record or press <Alt><K> and then <L>.
2 On the Edit list click Validate Record
or press <Alt><K> and then <V>.
Connexion validates the entire record. If the record contains invalid elements (for example, tags, indicators or subfield codes) or invalid data (for example, fixed-field codes), Connexion displays error messages that identify the problem(s). Messages appear directly above the fields/elements to which they refer (template edit views). Messages appear above the text area in text area edit views. Messages about fixed-length fields (Leader, 008 or 006) appear between the Format list and the field elements.
3 Correct the error(s) and then retry validation.
Automatic validation on final actions
The following table shows the extent of automatic validation performed for each
type of final action.
Final action Validation performed Bibliographic record
Update Holdings Produce and Update Holdings
Alternate Produce and Update
Default setting: By default, Connexion does not validate the record when you take these actions on an existing bibliographic record.
Note: When you update holdings, even with validation level set to No, the system verifies that the following fields are present and, for some, checks for valid data: Leader, 001, 005, 008, 040 $c, 049 and 245 $a or 245 $k. If any required field is missing, or in some cases contains invalid data, you receive an error message.
Validation level set: If you select Basic or Full
validation for actions that set holdings, Connexion does the specified level of validation.
Add new record to WorldCat
(Update Holdings, Produce and Update Holdings, Alternate Produce and Update)
For new records, Connexion always does full validation.
Replace Record Validates edited fields only. Replace and Update
Holdings
Validates edited fields only for the Replace action. Applies the user-specified validation level for the Update Holdings action.
Export Record Default setting. By default, Connexion does not validate exported records.
Validation level set: If you select Basic or Full validation for single-record exports, Connexion does the specified level of validation.
Delete Holdings Does not validate the record.
Note: For Delete Holdings, although Connexion does no validation, the system verifies that the following fields are present and, for some, checks for valid data: Leader, 001, 005, 008, 040 $c, 049 and 245 $a or 245 $k. If any required field is missing, or in some cases contains invalid data, you receive an error message.
Authority record
Add Record Validates the entire record. Replace Record Validates edited fields only. Export Record in
MARC
Default setting. By default, Connexion does not validate exported authority records.
Validation level set: If you select Basic or Full validation for single-record exports, Connexion does the specified level of validation.
Note: Check for duplicate 1xx headings when you add or replace a name
authority record.
As part of automatic validation for new or replaced name
authority records, the system compares the established heading (1xx field) in the
new/modified record with 1xx headings in all name authority records. The system
also compares the 1xx heading in the new/modified record with 4xx
cross-references present in the same record or any other record(s).
If a normalized heading in the 100, 110, 111, or 130 field of the new/modified
name authority record matches another 1xx heading or a 4xx cross-reference, the
new/modified record fails validation and the system displays the following
message:
This main entry exists in another authority record:
LCCN=[LCCN] ARN=[ARN]
To resolve the error, you must modify one of the records to differentiate them.
Currently, the system does
not
compare 4xx headings in new/modified records to
1xx headings in existing name authority records.
Specify validation levels for selected actions
Note:
You can also set the validation level for exporting on the Export Option
screen under
Validate Exported Bibliographic and Authority Records
. If you
change the setting on either screen, it changes automatically on the other screen.
Note:
When you select Basic or Full validation, each record must pass validation
(in addition to the default Structure check) before Connexion completes the
update or export action. If a record fails validation, you must correct the errors
identified and then retry the update or export.
Action
1 On the Cataloging Options screen, locate the Validation Levels setting. 2 Set Holdings
Select the level of validation to apply when you set holdings on a record.
Structure (Default). Minimum validation. Verifies that indicators, if present, are a single character, that BLvl and Type codes are correct, and that the following fields are present (for some, also checks validity of data): Leader, 001, 005, 008, 040 $c, 049, and 245 $a or 245
$k- Basic. Checks the validity of elements, length, repeatability, type of data or codes, and other aspects of MARC record structure.
Full. Verifies record structure (as for basic validation) and also checks relationships between elements.
Default setting: Structure.
Note: When you add a record to WorldCat or replace a master record, Connexion always performs full validation.
Errors detected
Validation verifies the following in records:
Valid fixed-field values, tags, indicators, and subfields as defined in
OCLC-MARC Records and Bibliographic Formats and Standards.
Valid combinations of fixed-field values, tags, indicators, and subfields.
Repeatability and nonrepeatability of tags and subfields.
Valid number of characters in fields and records. The number of characters in a
field cannot exceed 9,999. The number of characters in a record cannot exceed
99,999.
Note: Record size.
Size limits applied by Connexion validation are defined by
MARC21 standards. For offline products such as catalog cards and accessions
lists, and for OCLC MARC Subscription records, record size is restricted to 50
variable fields and 4096 characters. Individual variable fields are limited to 4096
characters. Records used for these services may be truncated.
Valid characters defined in OCLC-MARC Records.
Valid structure in some non-textual variable fields, for example, 006, 010, 020,
022, 030, and 040.
Automatic datacorrection
To speed your cataloging process, Connexion corrects minor errors when you
validate a record as a separate step (take the Validate Record action) or when the
system validates the record automatically when you take the Update Holdings,
Produce and Update Holdings, Alternate Produce and Update or Replace Record
action. Connexion corrects the following errors:
If you enter fixed field values in the wrong case (upper- vs. lowercase) the
system automatically changes them to the correct case (bibliographic records
only).
If the last character (check digit) in the ISBN or ISSN is a lowercase
x
, the
system automatically changes it to uppercase (bibliographic records and
authority records).
If you enter
dlc
in lowercase in $a of field 040, the system automatically
changes it to uppercase (bibliographic records only).
3 Export Bibliographic Record
Select the level of validation to apply when you export a single bibliographic record.
None No validation for exported records.
Basic Checks the validity of elements, length, repeatability, type of data or
codes, and other aspects of MARC record structure.
Full Verifies record structure (as for basic validation) and also checks
relationships between elements.
Default setting: None.
4 Click Save My Default or Save for Session.
4
Set holdings for bibliographic record
Why set holdings for a bibliographic record?
Maintain your holdings in WorldCat and your archive records at OCLC.
Associate the record with your library; for example, because you have added
the record to a local catalog or incorporated it into a pathfinder.
Note:
You can also set holdings when you add a new record or replace a
record. Use
Update Holdings
or
Replace and Update Holdings
as
appropriate.
Set holdings (Update Holdings): copy cataloging
Add new bibliographic record to WorldCat
Action
1 1. On the Action list click Update Holdings or press <Alt><K> and then <U>. 2. Click OK to confirm that you want to set holdings.
Or
Click Cancel to cancel the action.
Result
By default, Connexion does not validate the record when you take the
Update Holdings, Produce and Update Holdings, or Alternate Produce and Update action on an existing bibliographic record. If you select Basic or Full validation for actions that set holdings, Connexion does the specified level of validation.
If the record contains invalid data, the system returns you to edit mode. Validation messages inserted in the record highlight errors. Correct the errors and then retry updating holdings.
The system displays a confirmation message.
Your institution's OCLC symbol is associated with the record.
Note: Saved record deleted after Update If you retrieved the record from the bibliographic save file, the system deletes the record from the save file after a successful Update Holdings transaction. Resave the record if you need to keep it in the save file for further processing.
Action
1 Retrieve the record you want to add from the bibliographic save file. Or
Complete editing on an unsaved new record. 2 View the full record.
3 If appropriate, apply constant data to the new record.
On the Edit list click Apply Default CD or press <Alt><K> and then <C> to apply your default constant data.
Or
On the Edit list click Apply CD By Name (or press <Alt><K> and then <5>) or Apply CD From List (or press <Alt><K> and then <6>) to apply a specific constant data record.
Delete Holdings
The first time you use a record for cataloging, Connexion links your OCLC symbol
to the bibliographic record. Your OCLC symbol appears in holdings messages in
records and in locations displays retrieved via Display Holdings. Delete Holdings
unlinks your OCLC symbol from a record. Use this action when you no longer hold
the item or if you inadvertently linked your OCLC symbol to the wrong record.
The Delete Holdings action is available only if your library's OCLC symbol is
attached to the record.
If you know that you need to delete all your local holdings records for an item, and
also remove your institution’s symbol, you can complete both tasks by taking the
Delete All Local Holdings
action.
4 Prevent duplicate records
Search WorldCat again immediately before adding the new record verify
that no other user has created a record for the resource since you began working on your record.
5 Add the new record to WorldCat.
If you find no existing record, on the Action list click Update Holdings or
press <Alt><K> and then <U> (or <Alt><J> and then <U>).
Result
Connexion validates the full record automatically when you add a new
record to WorldCat.
If the record contains invalid data, the system returns you to edit mode.
Validation messages inserted in the record highlight errors. Correct the errors and then retry adding the record.
When the record is valid, Connexion adds it to WorldCat, sets your holdings,
and assigns an OCLC control number.
Your copy of the record is displayed in local edit mode. Local data fields you
added to the record are retained in your copy.
Note: Saved record deleted after add If you retrieved the new record from
the bibliographic save file, the system deletes the record from the save file after adding it to WorldCat. Resave the record if you need to keep it in the save file for further processing.
Action
Action
1 On the Action list click Delete Holdings or press <Alt><K> and then <9> (or <Alt><J> and then <9>).
The system asks you to confirm that you want to delete holdings.
Click OK to remove your holdings. Or click Cancel to cancel the action.
2 Local Holdings Records.
If you have local holdings records attached to the record, the system asks
you to confirm that you want to delete LHRs. Click Yes to delete LHRs and holdings or click No to return to the record.
Result
When you confirm that you want to delete holdings (and/or LHRs), the
system displays a confirmation message.