750W DIRTY WATER
SUBMERSIBLE PUMP
MODEL: PDW-750
INSTRUCTION MANUAL
0212
WARNING!
Read all safety warnings and all instructions. Failure to follow
the warnings and instructions may result in electric shock, fire and/or serious
injury. Save all warnings and instructions for future reference.
INTRODUCTION
Congratulations on purchasing the Commercial Electric 750W Dirty Water
Submersible Pump. We aim to provide quality products at an affordable price.
Before using, it is most important that you read and follow the instructions in
this manual, even if you feel you are quite familiar with this type of product.
This product has been designed for numerous water transfer applications.
These include draining flooded laundries, bathrooms, basements or garages,
emptying rainwater tanks, pools and spas, emptying garden ponds and
transferring water for domestic irrigation. This product is not suitable for use
with drinking (potable) water.
SPECIFICATIONS
Input Voltage: 230-240V ~ 50Hz
Input Power: 750W
Max. Immersion Depth: 7m
Max. Head: 7.5m
Max. Flow Rate: 16,500 litres/hour
Max. Particle Size: 35mm
Min. Water Depth: 70mm
Max. Water Temp: 35°C
Hose Sizes: 25, 32mm inside diameter
Tap Adaptor Size: 25mm (1'')
Power Cable Length: 10m
IP Rating: IPX8
Weight: 5.4kg
KNOW YOUR PRODUCT
9
2 8
1. Handle 2. Pump Housing 3. Universal Adaptor 4. L-Shape Connector 5. Suction Base 6. Float Switch 7. Vent Valve
8. Float Switch Adjustor 9. Float Switch Cable 10. Power Cable
3 1 10
TABLE OF CONTENTS
INTRODUCTION……….………
SPECIFICATIONS ……….………..…………...
KNOW YOUR PRODUCT ……….
ELECTRICAL SAFETY………
GENERAL SAFETY INSTRUCTIONS………..
ADDITIONAL SAFETY INSTRUCTIONS FOR PUMPS…………..…………..
SUGGESTED APPLICATIONS……….………
PACK CONTENTS………
FITTINGS AND TOOLS REQUIRED FOR INSTALLATION………
PREPARATION……….
SET-UP & INSTALLATION……….
OPERATION……….
HINTS WHEN USING THE PUMP………
MAINTENANCE ………..………
SPARE PARTS……….
TROUBLESHOOTING………..…………..
DESCRIPTION OF SYMBOLS……….………….
WARRANTY……….
1
1
1
3
3
5
6
6
6
7
9
10
11
11
11
12
14
15
ELECTRICAL SAFETY
WARNING! When using mains-powered equipment, basic safety precautions, including the following, should always be followed to reduce risk of fire, electric shock, personal injury and material damage.
Read and understand the manual prior to operating this tool.
Save these instructions and other documents supplied with this tool for future reference.
The electric motor has been designed for 230V and 240V only. Always check that the power supply corresponds to the voltage on the rating plate.
Note:The supply of 230V and 240V on Commercial Electric tools are interchangeable for Australia and New Zealand.
This tool is earthed in accordance with AS/NZS 60335-2-41
If the power outlet is external, ensure that it is weather proof. If the supply cord is damaged, it must be replaced by an electrician or a power tool repairer to avoid a hazard.
The water pump has a built-in thermal protection overload switch. The water pump stops if an overload occurs. The motor restarts automatically after it has cooled down.
Using an extension lead
Always use an approved extension lead suitable for the power input of this product. Before use, inspect the extension lead for signs of damage, wear and ageing. Replace the extension lead if damaged or defective.
When using an extension lead on a reel, always unwind the lead completely. Use of an extension lead not suitable for the power input of this product or which is damaged or defective may result in a risk of fire and electric shock.
GENERAL SAFETY INSTRUCTIONS
SAVE THESE INSTRUCTIONS 1) WORK AREA
a) Keep work area clean and well lit. Cluttered and dark areas invite accidents.
b) Do not operate pumps in explosive atmospheres, such as in the presence of flammable liquids, gases, or dust. Pumps create sparks which may ignite the dust or fumes.
c) Keep children and bystanders away while operating a pump. Distractions can cause you to lose control.
2) ELECTRICAL SAFETY
a) Pump plugs must match the outlet. Never modify the plug in any way. Do not use any adapter plugs with earthed (grounded) pumps. Unmodified plugs and matching outlets will reduce risk of electric shock.
b) Avoid body contact with earthed or grounded surfaces such as pipes, radiators, ranges and refrigerators. There is an increased risk of electric shock if your body is earthed or grounded.
GENERAL SAFETY INSTRUCTIONS (cont.)
c) Do not abuse the cord. Never use the cord for carrying, pulling or unplugging the pump. Keep cord away from heat, oil, sharp edges or moving parts. Damaged or entangled cords increase the risk of electric shock.
e) When operating a pump outdoors, use an extension cord suitable for outdoor use. Use of a cord suitable for outdoor use reduces the risk of electric shock.
3) PERSONAL SAFETY
a) Stay alert, watch what you are doing and use common sense when operating a pump. Do not use a pump while you are tired or under the influence of drugs, alcohol or medication. A moment of inattention while operating pumps may result in serious personal injury.
b) Avoid accidental starting. Ensure the switch is in the off position before plugging in. Carrying pumps with your finger on the switch or plugging in pumps that have the switch on invites accidents.
c) Remove any adjusting key or wrench before turning the pump on.A wrench or a key left attached to a rotating part of the pump may result in personal injury.
d) Dress properly. Do not wear loose clothing or jewellery. Keep your hair, clothing and gloves away from moving parts. Loose clothes, jewellery or long hair can be caught in moving parts.
4) PUMP USE AND CARE
a) Disconnect the plug from the power source before making any adjustments, changing accessories, or storing pumps. Such preventive safety measures reduce the risk of starting the pump accidentally.
b) Maintain pumps. Check for misalignment or binding of moving parts, breakage of parts and any other condition that may affect the pumps operation. If damaged, have the pump repaired before use. Many accidents are caused by poorly maintained pumps.
c) Use the pump, accessories and tool bits etc., in accordance with these instructions and in the manner intended for the particular type of pump, taking into account the working conditions and the work to be performed.Use of the pump for operations different from intended could result in a hazardous situation.
5) SERVICE
a) Have your pump serviced by a qualified repair person using only identical replacement parts.
This will ensure that the safety of the pump is maintained.
b) If the supply cord is damaged, it must be replaced by the manufacturer, its service agent or similarly qualified persons in order to avoid a hazard.
ADDITIONAL SAFETY INSTRUCTIONS FOR PUMPS
CAUTION: If operating a pump in a swimming pool or spa, use a residual current device (RCD) protected supply.
WARNING! This product is intended for pumping water in a Home Domestic application. Do not use it for corrosive, abrasive, explosive or dangerous liquids. Fluids other than water will damage the water pump and/or create a fire hazard.
WARNING! This product is not suitable for use with drinking (potable) water.
This appliance is not intended for use by person (including children) with reduced physical, sensory or mental capabilities, or lack of experience and knowledge, unless they have been given supervision or instruction concerning use of the appliance by a person responsible for their safety.
Children should be supervised to ensure that they do not play with the appliance.
• Ensure the water pump is disconnected from mains power when installing.
• Do not install or operate the water pump in an explosive environment or near flammable material. • Do not operate the water pump without liquid.
• Do not run the water pump dry.
WARNING! The water pump together with associated pipework operate under pressure. Do not disconnect water pump or pipework until internal pressure has been released. Failure to do this could result in personal injury and damage to property.
• Avoid inserting hands into the inlets/outlets of the water pump while it is connected to mains power. • Before using the water pump, always inspect it visually. Do not use the pump if it is cracked
and/or damaged. If the water pump is damaged, contact Commercial Electric customer service. • The water pump has a built-in thermal protection overload switch. The water pump stops if an
overload occurs. The motor restarts automatically after it has cooled down. The pump must not be used when people are in the water.
Never work or perform maintenance on the pump without first making sure it has been disconnected from the mains power.
Pollution of the liquid could occur due to leakage of lubricants.
IMPORTANT:Avoid inserting hands into the mouth of the pump if it is connected to the mains. The electrical connection must always be made in a dry area. Make sure that electrical connections are protected from inundations.
Protect the plug and the power cable from heat, oil or sharp edges. If damaged, The power cable must be replaced by a qualified electrician.
!!
!!
!!
SUGGESTED APPLICATIONS
Draining flooded laundries, bathrooms, basements or garages.
Emptying rainwater tanks, pools and spas. Transferring water for domestic irrigation.
Emptying garden ponds and water features.
PACK CONTENTS
1 x Dirty water submersible pump (PDW-750) 1 x Universal adaptor 1 x L-shape connector (2 O-rings fitted) 1 x Instruction manual
FITTINGS AND TOOLS REQUIRED FOR INSTALLATION
Included
1 x L-shape connector (2 O-rings fitted) 1 x Universal adaptor
Not Included
Suitable hose/tube/piping Tap adaptor (optional)
Hose clamp (optional) Hack saw (optional)
!!
!!
PREPARATION
WARNING! This product is intended for pumping water in a home domestic application. Do not use it for corrosive, abrasive, explosive or dangerous liquids. Fluids other than water will damage the water pump and/or create a fire hazard.
WARNING! Disconnect the plug from the mains power prior to making any adjustments or installation.
Your pump requires no assembly before use other than the connection of a suitable outlet hose (not supplied).
• After removing the pump from its carton, check that the pump has not been damaged. • Unpack the contents.
NOTE: Use the handle (1) when lifting or moving the pump. Never hang the pump by the power cable (10) (Fig. 1).
The pump can be used in either permanent applications or temporary applications. In either application, the installation guidelines must be followed.
• Ensure the distance from the lowest to the highest point that you wish to distribute the water does not exceed 7.5m (Fig. 2). • Ensure that the pump is not
submerged deeper than 7m (Fig. 2).
• Ensure that the container is large enough (40 x 40 x 50cm) to allow the float switch (6) to move freely and function effectively (Fig. 2).
• Ensure the pump is placed on a flat and level surface and there are no obstructions to the suction base (5).
Float
Discharge point
Max. head: 7.5m Max.
immersion depth: 7m Water level
Pump
Water container
Power cable: 10m Fig. 2
Fig. 1
PREPARATION (cont.)
Preparing the Universal Adaptor
The universal adaptor (3) is designed to fit various sizes of pipes and fittings.
Prepare the universal adaptor (3) as required for the accessory, see options A, B & C below. The universal adaptor (3) allows a range of different diameter hose/tube to be fitted (Fig. 3).
A) To fit a 25mm (1’’) tap adaptor (temporary application only)
Cut the universal adaptor (3) using a hack saw (not included) (Fig. 4). It is now ready to be fitted with a 25mm (1’’) tap adaptor and flexible tubing (not included) (Fig. 5).
B) To fit a 25mm (1’’) rigid pipe or flexible tubing (temporary or permanent application)
No cutting of the universal adaptor (3) is required (Fig. 6). It is now ready to be fitted with a 25mm (1’’) rigid pipe or flexible tubing (not included) (Fig. 7).
C) To fit a 32mm (11/4’’) rigid pipe or flexible tubing
(temporary or permanent application)
Cut the universal adaptor (3) using a hack saw (not included) (Fig. 8). It is now ready to be fitted with a 32mm (11/4’’) rigid pipe or flexible tubing (not included) (Fig. 9).
NOTE:To use the pump in permanent installations with rigid pipes, install a non-return valve to avoid the fluid being re-circulated once the pump has stopped.
NOTE:After temporary applications, the pump should be cleaned with clean water after each use, see "Maintenance" section for more information.
Fig. 3 25mm hose/tube
25mm tap adaptor 32mm hose/tube
Fig. 4 Fig. 5
Fig. 6 Fig. 7
SET-UP & INSTALLATION
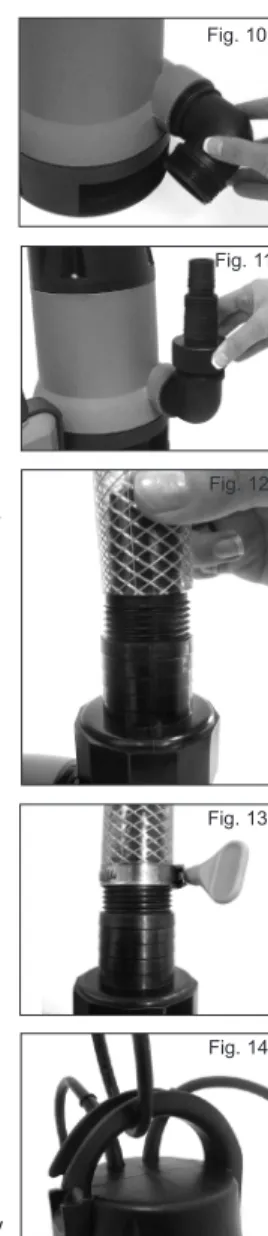
1. Screw the L-shape connector (4) into the pump housing (2) by rotating in a clockwise direction (Fig. 10).
NOTE: Make sure the L-shape connector (4) is firmly tightened so that the O-ring is compressed between the pump housing (2) and the L-shape connector (4). This ensures no leakage will occur at this point.
2. Screw the prepared universal adaptor (3) clockwise onto the L-shape connector (4) (hose/tube/tap adaptor should not be connected at this stage) (Fig. 11).
NOTE:Make sure the universal adaptor (3) is firmly tightened so that the O-ring of the L shaped connector (4) is compressed between the universal adaptor (3) and the L shaped connector (4). This ensures no water or air leakage will occur at this point.
3. Securely attach the hose/tube/tap adaptor (not included) to the universal adaptor (3) (Fig. 12) (see the section "Preparing the Universal Adaptor").
NOTE:Due to the high water pressure generated by the pump it is recommended to use a hose clamp (not included) when fitting a flexible hose or tube (available from your local Bunnings Warehouse). This secures the hose or tube and further prevents it from becoming removed from the universal adaptor (3) during operation (Fig. 13).
NOTE: Before submerging the pump in water, unwrap the power cable (10) and ensure the plug is clear of any damp locations.
4. To immerse the pump in deep water, use a rope (not included) and secure it to the handle (1) (Fig. 14). Set the pump in the desired position within the work area/tank.
NOTE: The vent valve (7) is used to allow air to escape from the pump body when submerging the pump so no priming is required.
Fig. 11
Fig. 12
Fig. 14 Fig. 13 Fig. 10
SET-UP & INSTALLATION (cont.)
NOTE:The pump has a pre-set float switch (6). To change the setting, reduce or increase the length of the float switch cable (9) by inserting it in the float switch adjuster (8) (Fig. 15 & 16).
When the float switch cable (9) is able to move freely (float switch adjustor (8) is not in use), the pump will function down to a water depth of 150mm. Restricting the length of the float switch cable (9) using the float switch adjustor (8), results in the pump ceasing operation at higher water depths.
The length of the float switch cable (9) between the float switch adjustor (8) and the float switch (6) must be at least 100mm in order for the float switch (6) to activate and de-activate.
5.When the float switch (6) is adjusted as you require, use the rope (not included) to immerse the pump back into the body of water.
OPERATION
1. When the float switch (6) is 30° higher than horizontal (start up level) or above the handle (1), the pump will turn ‘on’ and operate (water depth of 530mm) (Fig. 17).
ATTENTION:The pump runs as soon as the float switch (6) reaches the start-up level.
2. When the float switch (6) is 30° lower than the horizontal or below the handle (1), the pump will turn ‘off’ and will not operate (water depth of approximately 150mm) (Fig. 18). You can alternatively, manually turn the pump off at the mains power.
ATTENTION:If you wish to use the pump down to the minimum water depth of 70mm, the float switch (6) will need to be operated manually. The pump can be manually turned “on” by lifting the float switch (6) to the required level.
CAUTION:You must observe the pump at all times when operating manually.
NOTE:If you manually turn the pump off, be aware of the location of your
hose or tube (not included). If it is at a lower point than the pump, the water will continue to ‘siphon’ out, unless a non-return valve (not included) is used in the hose or tube and turned off.
Turning On and Off
1. Insert the plug into the mains power socket (Fig. 19). Avoid using extension cords as this can lead to a voltage drop which may cause power loss and overheating.
2. Switch on the mains power to commence operation.
3. To cease operation, turn off the mains power. The pump will also stop operation automatically once the float switch (6) reaches the minimum water depth (150mm).
Fig. 19 Fig. 17
Fig. 18 Fig. 15
HINTS WHEN USING THE PUMP
• The maximum pumping rate only occurs when using the largest diameter hose or tube possible, if smaller diameter hoses or tubes are used, the rate will reduce relative to the size of the
hose/tube. Try to use discharge pipes which have a larger diameter than the discharge outlet.
• Running the pump with no water flowing through leads to increased wear and is not recommended. The pump must be immediately unplugged as soon as water stops flowing through.
The pump will automatically switch off in the event of overheating due to the built-in thermal overload protector. After cooling down, the motor automatically switches on again.
• When disconnecting the pump from the mains power supply, do not pull by the power cable (10). Using 3 fingers around the 3 pin power plug, gently pull and disconnect from the mains power.
MAINTENANCE
In ordinary conditions, the pump does not require any maintenance.
Make sure the pump is disconnected from electric power supply before performing maintenance procedures.
Cleaning the Pump Housing
Use a moist cloth to wipe down the pump housing (2). Allow to dry thoroughly before storing in a dry location that is protected from bad weather conditions.
Cleaning the Suction Base
Gently hose down with low pressured water. Allow to dry thoroughly before storing.
Power Cable
For all submersible pumps, a H07RN-F cable is required to be fitted. Contact Commercial Electric customer service for replacement cable.
SPARE PARTS
Limited spare parts are available subject to availability. Please contact your local Bunnings Special Orders Desk to order the required spare parts.
Most common spare parts listed below
Spare Part Part No.
O-ring SPPDW750-19 O-ring SPPDW750-23 Impellor SPPDW750-25 O-ring SPPDW750-31
L-Shape connector SPPDW750-34
TROUBLESHOOTING
Problem Possible Cause Solution
The pump does not
start, or pump water Pump is not connected to themains power supply Check that the pump is connected tothe mains power supply Float switch has not been
activated, water level too low Manually raise the position of thefloat switch
Incorrect assembly leads to air and water leakage in the discharge lines
Ensure the discharge lines are the correct length and all assembly instructions are adhered to The thermal overload protection
is activated Wait for the motor to cool and it willautomatically start operation The motor is damaged Contact Commercial Electric customer
service The pump does not
supply water when the motor is running
The suction base is
obstructed/blocked Clean the suction base of anyforeign matter and debris Air lock in the hose/tube and/or
pump (air bubbles) Perform several start-ups in order toremove all the air or lift and tilt the pump slightly while the pump is running Discharge hose/tube
(not included) is kinked or damaged
Un-kink the discharge hose/tube. Or replace hose/tube
The pump flow rate
is reduced The suction base is partiallyobstructed/blocked Clean the suction base of anyforeign matter and debris The hose/tube is obstructed Remove the obstructions
Pump will not turn off, even though the water level is low
The float switch is stuck in the
“on” position Ensure that the float switch is free tooperate normally. Contact Commercial Electric customer service if the problem still occurs Hose/tube does not
stay on the universal adaptor when water is travelling through
The hose/tube is slightly wider than the dimension of the universal adaptor
An adhesive can be used insidethe hose/tube to prevent this or teflon tape can be fixed around the universal adaptor or a hose clamp can be used (Fig. 13)
Air leak in the suction line or
joints Check the suction line connectionsfor air leaks and tighten or fix where found
TROUBLESHOOTING (cont.)
Problem Possible Cause Solution
The pump operates
intermittently The suction base isobstructed/blocked Clean the suction base of anyforeign matter and debris Incorrect voltage is being used Ensure the pump is connected into
230-240V power supply The fluid contains particles
thicker than 35mm Ensure the pump is not being usedwith particles thicker than 35mm. The motor is faulty or damaged Contact Commercial Electric
customer service The temperature of the fluid is
too high Ensure that maximum permissiblewater temperature (35°C) is not exceeded
DESCRIPTION OF SYMBOLS
V Volts Hz Hertz
~ Alternating current W Watts
/min Revolutions or
reciprocation per minute
Hp Horse power ˚C Degrees Celsius
p/hr Per hour kPa Pressure rating (kilopascals)
bar Pressure rating L Litres
F Insulation class PVC Polyvinyl chloride
n
o No load speedRegulator compliance mark
Warning Read instruction manual
IPX8 Ingress protection from water
CARING FOR THE ENVIRONMENT
Power tools that are no longer usable should not be disposed of with household waste but in an environmentally friendly way. Please recycle where facilities exist. Check with your local council authority for recycling advice.
Recycling packaging reduces the need for landfill and raw materials. Reuse of recycled material decreases pollution in the environment. Please recycle packaging where facilities exist. Check with your local council authority for recycling advice.
2 YEAR REPLACEMENT WARRANTY
Your product is guaranteed for a period of 24 months from the original date of purchase
and is intended for DIY (Do It Yourself) use only. If a product is defective it will be replaced in accordance with the terms of this warranty. Warranty excludes consumable parts, for example: o-rings, bearing, seals, gaskets, universal adaptors, L-shaped connectors.
WARNING
The following actions will result in the warranty being void.
Professional, Industrial or high frequency use.
If the tool has been operated on a supply voltage other than that specified on the tool. If the tool shows signs of damage or defects caused by or resulting from abuse, accidents or alterations.
Failure to perform maintenance as set out within the instruction manual. If the tool is disassembled or tampered with in any way.
Commercial Electric
Australia/New Zealand (Head Office)
1-23 Letcon Drive, Bangholme, Victoria, Australia 3175 •
• • • •
WARRANTY
YOUR WARRANTY FORM SHOULD BE RETAINED BY YOU AT ALL TIMES. IN ORDER TO MAKE A CLAIM UNDER THIS WARRANTY YOU MUST RETURN THE PRODUCT TO YOUR NEAREST BUNNINGS WAREHOUSE WITH YOUR BUNNINGS REGISTER RECEIPT.
PRIOR TO RETURNING YOUR PRODUCT FOR WARRANTY PLEASE TELEPHONE OUR CUSTOMER SERVICE HELPLINE:
TO ENSURE A SPEEDY RESPONSE PLEASE HAVE THE MODEL NUMBER AND DATE OF PURCHASE AVAILABLE. A CUSTOMER SERVICE REPRESENTATIVE WILL TAKE YOUR CALL AND ANSWER ANY QUESTIONS YOU MAY HAVE RELATING TO THE WARRANTY POLICY
OR PROCEDURE.
The benefits provided under this warranty are in addition to other rights and remedies which are available to you at law.
Our goods come with guarantees that cannot be excluded at law. You are entitled to a replacement or refund for a major failure and for compensation for any other reasonably foreseeable loss or damage. You are also entitled to have the goods repaired or replaced if the goods fail to be of acceptable quality and the failure does not amount to a major failure. Generally you will be responsible for all costs associated with a claim under this warranty, however, where you have suffered any additional direct loss as a result of a defective product you may be able to claim such expenses by contacting our customer service helpline above.