Intuity™ AUDIX
®
Basic
Administration Guide
Comcode 108344821
585-313-701
Issue 1
Toll fraud is the unauthorized use of your telecommunications sys-tem by an unauthorized party, for example, persons other than your company’s employees, agents, subcontractors, or persons working on your company’s behalf. Note that there may be a risk of toll fraud associated with your telecommunications system and, if toll fraud occurs, it can result in substantial additional charges for your tele-communications services.
You and your system manager are responsible for the security of your system, such as programming and configuring your equipment to prevent unauthorized use. The system manager is also responsible for reading all installation, instruction, and system administration documents provided with this product in order to fully understand the features that can introduce risk of toll fraud and the steps that can be taken to reduce that risk. Lucent Technologies does not war-rant that this product is immune from or will prevent unauthorized use of common-carrier telecommunication services or facilities accessed through or connected to it. Lucent Technologies will not be responsible for any charges that result from such unauthorized use.
Lucent Corporate Security
Whether or not immediate support is required, all toll fraud inci-dents involving Lucent products or services should be reported to Lucent Corporate Security at 1 800 821-8235. In addition to record-ing the incident, Lucent Corporate Security is available for consulta-tion on security issues, investigaconsulta-tion support, referral to law enforcement agencies, and educational programs.
Lucent Technologies Fraud Intervention
If you suspect that you are being victimized by toll fraud and you need technical support or assistance, call the Lucent Technologies National Customer Care Center Toll Fraud Intervention Hotline at 1 800 643-2353.
Federal Communications Commission Statement
Part 15: Class A Statement. This equipment has been tested and
found to comply with the limits for a Class A digital device, pursu-ant to Part 15 of the FCC Rules. These limits are designed to pro-vide reasonable protection against harmful interference when the equipment is operated in a commercial environment. This equip-ment generates, uses, and can radiate radio-frequency energy and, if not installed and used in accordance with the instruction manual, may cause harmful interference to radio communications. Operation of this equipment in a residential area is likely to cause harmful interference in which case the user will be required to correct the interference at his own expense.
Part 68: Network Registration Number. This equipment is
regis-tered with the FCC in accordance with Part 68 of the FCC Rules. It
This digital apparatus does not exceed the Class A limits for radio noise emissions set out in the radio interference regulations of the Canadian Department of Communications.
Le Présent Appareil Nomérique n’émet pas de bruits radioélec-triques dépassant les limites applicables aux appareils numériques de la class A préscrites dans le reglement sur le brouillage radioélec-trique édicté par le ministére des Communications du Canada.
Trademarks
See the section titled “About This Book.”
Ordering Information
Call: Lucent Technologies Publications Center
Voice 1 800 457-1235 International Voice 317 322-6791 Fax 1 800 457-1764 International Fax 317 322-6699
Write: Lucent Technologies Publications Center 2855 N. Franklin Road
Indianapolis, IN 46219
Order: Document No. 585-313-701 Comcode Comcode 108344821 Issue 1, December 1998
You can be placed on a standing order list for this and other docu-ments you may need. Standing order will enable you to automati-cally receive updated versions of individual documents or document sets, billed to account information that you provide. For more infor-mation on standing orders, or to be put on a list to receive future issues of this document, contact the Lucent Technologies Publica-tions Center.
Warranty
Lucent Technologies provides a limited warranty on this product. Refer to the “Limited Use Software License Agreement” card pro-vided with your package.
European Union Declaration of Conformity
Lucent Technologies Business Communications Systems declares that the equipment specified in this document conforms to the refer-enced European Union (EU) Directives and Harmonized Standards listed below:
EMC Directive 89/336/EEC Low-Voltage Directive 73/23/EEC
The “CE” mark affixed to the equipment means that it conforms to the above directives.
Comments
Contents
Welcome
. . . vInformation You’ll Find in This Book . . . v
Conventions Used in This Book . . . .vi
Typography . . . .vi
Terminology . . . vii
Admonishments . . . vii
Notes . . . .viii
Tips. . . .viii
Trademarks . . . .viii
Releases That This Book Covers . . . .viii
Telling Us What You Think . . . .ix
Viewing This Book on the World Wide Web . . . .ix
Ordering More Copies . . . x
Getting More Help . . . x
Chapter 1
Getting Started
How to Log In to the System . . . .1-2
Navigation Keys . . . 1-5
Function Keys. . . 1-6
Alternate Function Keys . . . 1-6
Standard Function Keys . . . 1-6
Types of Fields . . . 1-9
Display-Only Fields . . . 1-9
Data-Entry Fields . . . 1-9
How to Change the Date and Time . . . 1-10
Saving Screen Changes . . . 1-13
Chapter 2
Managing Mailboxes
How to Add a User . . . 2-2
How to Remove a User from the System . . . 2-23
How to Check for Messages in an Old Mailbox. . . 2-23
How to Erase Messages in an Old Mailbox . . . 2-24
How to Remove a User. . . 2-25
How to Change User Information . . . 2-26
Chapter 3
Administering the System
How to Maintain the System . . . 3-2
How to Send a Broadcast Message . . . 3-4
How to Set Up a Broadcast Mailbox . . . 3-5
How to Create a Broadcast Message . . . 3-10
Chapter 4
Exploring Advanced Features
Comparing Bulletin Boards and Automated Attendants . . . .4-2
How a Bulletin Board is Unique . . . .4-2
How an Automated Attendant is Unique . . . .4-2
Bulletin Boards vs. Automated Attendants . . . .4-3
How to Create a Bulletin Board Message. . . .4-4
How to Set Up a Bulletin Board . . . .4-4
How to Record a Bulletin Board Message . . . .4-9
How an Automated Attendant Works. . . .4-9
Designs for an Automated Attendant . . . .4-10
Features for an Automated Attendant . . . .4-11
Modes of Operation . . . .4-14
Primary Mode . . . .4-14
Secondary Mode . . . .4-15
Operational Schedules . . . .4-15
Business Operational Schedule . . . .4-15
Holiday Operational Schedule . . . .4-15
Alternate Operational Schedule . . . .4-15
Routing Table . . . .4-16
MERLIN LEGEND Schedule. . . .4-16
Procedures for Setting Up an Automated Attendant . . . .4-16
Chapter 5
Producing Maintenance Reports
How to Produce an Activity Log Report . . . .5-2
How to Set Activity Log Options. . . .5-2
How to Produce a System Status Report. . . 5-12
How to Run a System Status Report. . . 5-12
How to Interpret a System Status Report . . . 5-13
How to Run a Feature Daily Traffic Report . . . 5-19
How to Run a Load Daily Traffic Report . . . 5-28
Chapter 6
Enhancing System Security
Guidelines for Creating Passwords . . . 6-2
How to Change the sa Password . . . 6-3
How to Change the vm Password . . . 6-4
How to Set Administrator Password Aging . . . 6-6
How to Change a User’s Password . . . 6-9
How to Unlock a User’s Mailbox . . . 6-10
Glossary
. . . .GL-1Welcome
This book provides step-by-step instructions for basic administrative tasks for your Intuity AUDIX system.
The procedures in this book are written to help administrators at all levels of experience. If you are a new administrator, this book guides you through the most frequently performed tasks. If you are a more experienced administrator, this book provides you with procedures that you can use as guidelines.
Information You’ll Find in This Book
This book is divided into six chapters.
Chapter 1, “Getting Started,” explains how to log in and log out of the system, how to navigate screens, how to change the date and time, and how to save screen changes.
shut down and restart the system.
Chapter 4, “Exploring Special Features,” compares an automated attendant and a bulletin board, explains how to set up a bulletin board, and presents an overview of how to set up an automated attendant.
Chapter 5, “Producing Maintenance Reports,” explains how to produce and interpret reports such as an Activity Log report, a System Status report, a Feature Daily Traffic report, and a Load Daily Traffic report.
Chapter 6, “Enhancing System Security,” provides guidelines for creating passwords, and explains how to change the administrator’s sa and vm passwords, how to set administrator password aging, how to change user passwords, and how to unlock mailboxes.
Conventions Used in This Book
This section explains the conventions that are used in this book.
Typography
n Commands are shown in their abbreviated version in all cases.
Tip: If you have trouble remembering the parts of a command, press F6 (Choices) and the system
n Commands and text you type in or enter are printed in bold type, for example, add subscriber.
n
shown in capital letters, followed by the function of that key in parentheses, for example, F3 (Save).
n Numbers, letters, and symbols on a telephone keypad are shown enclosed in square boxes, for example, .
Terminology
n The word “enter” means to type a value and then press ENTER. For example, an instruction to type the letter “y” and press ENTER is shown as follows:
Enter y to continue.
n The word “type” means to press the key or sequence of keys indicated. For example, an instruction to type the letter “y” is shown as follows:
Type y to continue.
Admonishments
!
CAUTION:This admonishment calls attention to a situation that could result in harm to software, possible loss of data, or possible service interruptions.
!
SECURITY ALERT:This admonishment calls attention to a situation that could result in unauthorized use of a customer’s
telecommunications system.
the main text or deserves emphasis.
Tips
Tip:This tip calls attention to information that you may find helpful.
Trademarks
n Intuity, AUDIX, DEFINITY, and MERLIN LEGEND are registered trademarks of Lucent Technologies.
n Acrobat is a registered trademark of Adobe Systems Incorporated.
Releases That This Book Covers
The Intuity AUDIX Basic Instruction Book is suitable for use with any Intuity AUDIX Release 4 or Release 5 system.
Because this book is applicable to several releases, some of the screens you will use will not be exactly the same as those shown in this book. However, the information will generally be similar.
Let us know what you like or don’t like about this book and how it meets your needs. Your reactions are valuable to us. Although we can’t promise that we’ll be able to respond personally to all your feedback, we will read each response we receive.
Viewing This Book on the World Wide Web
If you have access to the Internet, you can view and download the latest version of the Intuity AUDIX Basic Instruction Book. To view the book, you must have a copy of Acrobat Reader. To view the latest version:
1. Access the Customer Self-Service Center web site at http://www.lucent.com/enterprise/selfservice.
2. Click Information Resources.
3. Click ELMO.
Write to: Lucent Technologies
OMD Technical Publications Room 3E-385
6200 E. Broad Street Columbus, OH 43213-1569 USA
Fax to: Intuity documentation team 614-868-4988
version of this book.
Ordering More Copies
Getting More Help
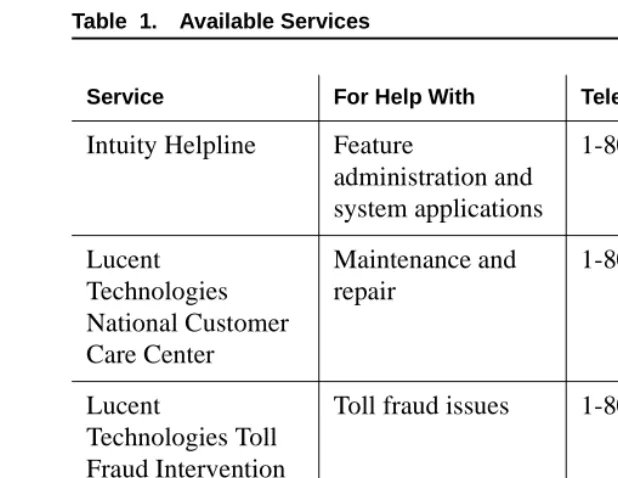
If you need additional help, Table 1 shows what services are available.
Note: You may need to purchase an extended service agreement to use some of these services. See your Lucent Technologies representative for more information. Call: Lucent Technologies Publications Center
Voice: 1-800-457-1235 Fax: 1-800-457-1764
International Voice: 317-322-6416 International Fax: 317-322-6699
Write: Lucent Technologies Publications Center 2855 N. Franklin Road
Indianapolis, IN 46219
Order: Document No. 585-313-701
Table 2 lists the telephone numbers for Lucent Technologies International Centers of Excellence. These centers can provide help with feature administration, system applications, maintenance, repair, and toll fraud issues for international locations.
Intuity Helpline Feature
administration and system applications
1-800-242-2121
Lucent Technologies National Customer Care Center
Maintenance and repair
1-800-242-2121
Lucent
Technologies Toll Fraud Intervention
Toll fraud issues 1-800-242-2121
Lucent Technologies Corporate Security
Security issues 1-888-267-7732
Table 2. Lucent Technologies International Centers of Excellence
Location Telephone Number
Australia 612-9352-9151
Bahrain 973-218-266
Budapest 361-345-4334
Caribbean/Latin America 3030-8043778
France 332-4153-4382
Hong Kong 852-2506-5352
Japan 813-5798-8800
Russia 709-5974-0133
Singapore 65-872-868
United Kingdom 44-1252-774-889
United States 303-804-3777
Getting Started
This chapter contains information to help you start working on your system. The following procedures show you how to:
n Log in to the system
n Log out of the system
n Navigate screens
n Change the date and time
To log in to the system:
1. Turn on your monitor.
2. Enter your administrator’s login at the login: prompt.
n If you are the system administrator, enter sa
n If you are the voice messaging administrator, enter vm
3. Enter your administrator’s password at the password:
prompt.
4. Enter at386 at the terminal type: prompt.
The system displays one of the following:
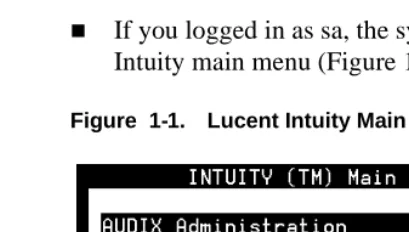
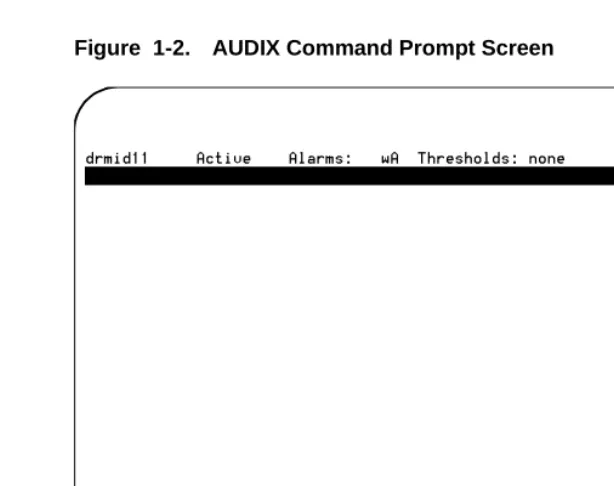
n If you logged in as sa, the system displays the Lucent Intuity main menu (Figure 1-1).
n If you logged in as vm, the system displays the AUDIX Command Prompt screen (Figure 1-2).
You have now logged in to the system.
How to Log Out of the System
You must log out of the system the same way in which you logged in:
n If you logged in as sa, you must log out as sa.
1. Enter exit at the enter command: prompton the AUDIX Command Prompt screen.
The system displays the Lucent Intuity main menu (Figure 1-1).
2. Press F6 (Cancel).
The system displays the login: prompt.
You have now logged out of the system as sa.
How to Log Out as vm
To log out as vm:
1. Enter exitat the enter command: prompt on the AUDIX Command Prompt screen.
The system displays the login: prompt.
You have now logged out of the system as vm.
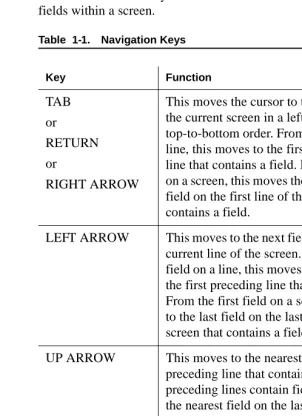
How to Navigate Screens
To navigate the different screens, use the keys on your keyboard. There are two types of keys:
fields within a screen.
Table 1-1. Navigation Keys
Key Function
TAB
or
RETURN
or
RIGHT ARROW
This moves the cursor to the next field on the current screen in a left-to-right,
top-to-bottom order. From the last field on a line, this moves to the first field on the next line that contains a field. From the last field on a screen, this moves the cursor to the first field on the first line of the same screen that contains a field.
LEFT ARROW This moves to the next field to the left on the current line of the screen. From the first field on a line, this moves to the last field on the first preceding line that contains a field. From the first field on a screen, this moves to the last field on the last line of the same screen that contains a field.
UP ARROW This moves to the nearest field on the first preceding line that contains a field. If no preceding lines contain fields, this moves to the nearest field on the last line of the current screen that contains a field.
DOWN ARROW This moves to the nearest field on the next line that contains a field. If no lines below the current one contain fields, this moves to the nearest field on the first line of the current screen that contains a field.
Function Keys
There are two types of function keys.
Alternate Function Keys
Some function keys perform actions that are unique to a particular screen.
Note: To obtain the alternate function of each key, you need to turn the toggle switch on. To activate the toggle switch, enter toggle function-keys at the enter command:
prompt.
Standard Function Keys
Most function keys perform standard actions regardless of the screen you are viewing.
Table 1-2 describes the purpose of each standard function key. There is also a description of each function key at the bottom of each screen. BACKSPACE This deletes the last changes entered into the
field and moves the cursor backwards one position.
HOME This moves the cursor to the beginning of the first field on the screen.
END This moves the cursor to the end of the current field.
F1 (Cancel) This stops the current activity and returns the cursor to the command line. When the cursor is in the command line, F1(Cancel) erases the entire contents of the command line. On a help screen, F1(Cancel) returns to the screen on which the help was requested.
F2 (Refresh) This redraws or updates the screen.
F3 (Enter) This submits the information entered on a screen for the action specified on the command line. When the cursor is on the command line, F3 (Enter) requests execution of the command.
Note: RETURN has the same effect as F3 (Enter) when the cursor is on the command line. On a screen, RETURN moves the cursor forward from one field to the next.
F4 (Clearfld) This clears an entire field on a screen or a single keyword from the command line. For example, if the command line contains the command list cos and you press F4 (Clearfld), the command line changes to list.
F5 (Help) When the cursor is on the command line, pressing this key is identical to typing the help command. That is, it displays a screen explaining all the types of help available in the Intuity AUDIX system. When the cursor is on a screen, this key requests help for the entire screen.
F6 (Choices) When the cursor is on the command line, this key requests a menu of valid entries for command line keywords. Once this menu is displayed, use the UP ARROW or DOWN ARROW key to select an item from the menu.
Pressing F6 (Choices) or RETURN selects the highlighted item from the menu. When the cursor is on a screen, this key requests help for the particular field where the cursor appears. The field help menu provides an explanation of the field and a list of valid values or actions for the field. When a field menu is displayed, pressing F6 (Choices) or RETURN selects the highlighted item from the menu.
F7 (Nextpage) This moves forward through multiple-page administration screens, reports, or help screens.
There are two types of fields on AUDIX Administration screens.
Display-Only Fields
Some AUDIX Administration screens have display-only fields. You cannot enter data into display-only fields.
Data-Entry Fields
Some AUDIX Administration screens have data-entry fields into which you enter values, such as user extension numbers, machine names, or class of service names.
Data-entry fields have various characteristics or responses, depending on the nature of the field. The following is a short description of some of those characteristics or responses.
n Position of cursor. When a screen is activated, the cursor is initially positioned at the beginning of the first data-entry field.
n Character limitations. The length of a data-entry field corresponds to the maximum number of characters that are allowed for that field.
n Obtaining field information. To obtain more information on a particular field, for example, what information is required, position the cursor in a data-entry field and press F6 (Choices).
n Missing information. If you try to save information entered on a screen without entering all of the required information, the system displays a help message noting the missing information.
n Clearing field contents. When you type a character into the first position of a field, the system replaces the previous contents of the field with the new characters that are entered into the field.
How to Change the Date and Time
To change the date and time:
1. Start at the Lucent Intuity main menu (Figure 1-1), and select:
Customer Services/Administration System Management
UNIX Management
UNIX Date and Time
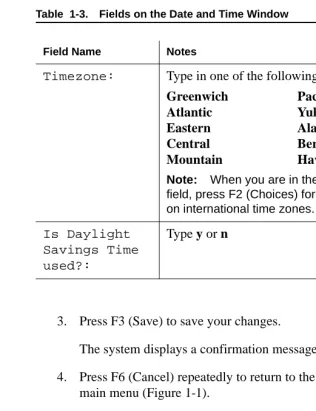
2. Use the TAB key to move among the fields and change as necessary. Table 1-3 describes the fields on this screen.
Table 1-3. Fields on the Date and Time Window
Field Name Notes
Date: Month: Type the first three letters of the current month and press the TAB key.
Day: Type a numeric value from 1 to 31 for the current date and press the TAB key.
Year: Type the 4-digit number of the current year and press the TAB key.
Time: Hour: Type a number from 0 to 12 for the current hour and press the TAB key.
Minute: Type a number from 00 to 59 for the current minute and press the TAB key.
AM/PM: Type a for a.m. or p for p.m. and press the TAB key.
3. Press F3 (Save) to save your changes.
The system displays a confirmation message.
4. Press F6 (Cancel) repeatedly to return to the Lucent Intuity main menu (Figure 1-1).
Note: Changes made to the timezone field do not take effect until you shut down and restart the Lucent Intuity system. To shut down and restart the system, see ‘‘How to Shut Down the System’’ and ‘‘How to Restart the System’’ in Chapter 3, “Administering the System.”
Timezone: Type in one of the following time zones:
Greenwich Pacific
Atlantic Yukon
Eastern Alaska
Central Bering
Mountain Hawaii
Note: When you are in the Timeszone:
field, press F2 (Choices) for more options on international time zones.
Is Daylight Savings Time used?:
Type y or n
Managing Mailboxes
This chapter contains information to help you manage your mailboxes. The following procedures show you how to:
n Add a user
n Remove a user
To add a user:
1. Start from the Lucent Intuity main menu (Figure 1-1), and select:
AUDIX Administration
2. At the enter command: prompt, enter
ad su name/extension where name is the name of the user
and extension is the telephone extension of the user you want to add to the system.
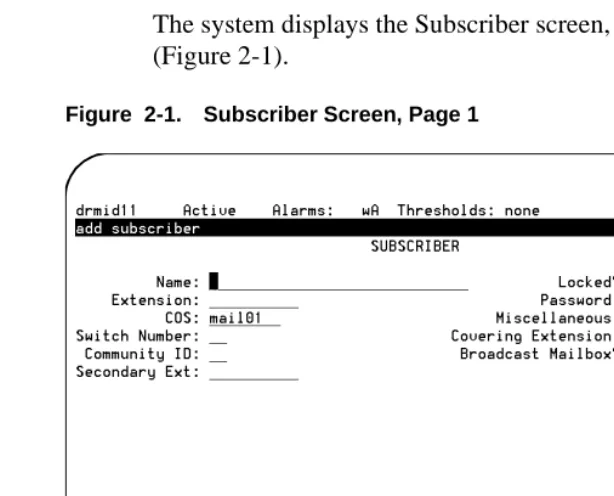
The system displays the Subscriber screen, Page 1 (Figure 2-1).
:
5. Complete the fields on this screen using the information provided in Table 2-1.
If... then go to Step because...
the default information for the user is
acceptable
8 you have now entered a new user.
you need to have information other than the default information for the user,
5 you need to enter personalized information for the user.
Table 2-1. Fields on the Subscriber Screen, Page 1
Field Name Valid Input Notes
Name: A unique name consisting of from 1 to 29 alphabetic characters
Enter a name that is unique. We recommend that you enter the last name first, then a comma, then the first name, for example,
Doe, Jane
Tip: To avoid the confusion of identical names, add a middle initial, for example,
Doe, Jane, L
Locked? n = no Skip over this field by pressing the TAB key.
Extension: A 3-digit to 10-digit telephone extension
Enter the user’s
telephone extension. The extension must be within the range of numbers assigned to your system.
Tip: At the enter command: prompt, enter cha
mach for a list of available
extensions on your system.
Password: n A number from
1 to 15 digits
n Blank (default)
Enter the password that the user must have to log in to his or her AUDIX mailbox. If you do not enter a password or if you enter a password that is shorter than the required length as specified on the System-Parameters Features screen, the user must change the
password the first time he or she logs in.
COS: n A unique name
consisting of from 1 to 8 alphanumeric characters
n An integer from 0 to 11
n class01 (default)
Enter the name or number of the class of service (COS) that is to be assigned to the user.
Tip: Enter the command list cos for a list of all current COS
names and numbers.
Miscel-laneous:
A unique name consisting of from 1 to 11 alphanumeric characters
Enter additional information about the user that may be helpful to you. This field is for your convenience only and is not used by the AUDIX system.
Switch Number:
n An integer from
0 to 20
n Blank (default)
Enter the number of the switch on which the user’s extension is administered. A 0 (zero) in this field means that the user has an AUDIX mailbox, but does not have an extension on the switch. Mailboxes for shared extensions should also have a 0 (zero) in this field. A blank indicates that the host switch number should be used.
Covering Extension:
n A 3-digit to
10-digit telephone extension
n Blank (default)
Enter the number of the default destination for the Transfer Out of AUDIX feature. If you leave this field blank, the system uses the default covering extension as specified on Page 2 of the System-Parameters Features screen. The extension must be within the range of numbers assigned to your system.
Community ID:
n A number from
1 to 15
n Blank (default)
Enter the community ID to be assigned to the user. If you leave this field blank, the system uses the default
community ID from the Machine screen for the local machine.
Broadcast Mailbox?
n= no Press the TAB key to move over this field. When adding a user, this field always displays an
n.
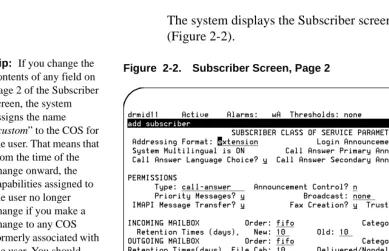
6. Press F7 (Next page).
The system displays the Subscriber screen, Page 2 (Figure 2-2).
Tip: If you change the contents of any field on Page 2 of the Subscriber screen, the system assigns the name “custom” to the COS for the user. That means that from the time of the change onward, the capabilities assigned to the user no longer change if you make a change to any COS formerly associated with the user. You should only make changes to this page if you want a user to have a unique profile. Custom profile pages must be updated individually.
Secondary Ext:
A 3-digit to 10-digit telephone extension
Enter the number of the user’s secondary fax extension. This
extension must have the same number of digits as the primary extension.
(5 of 5)
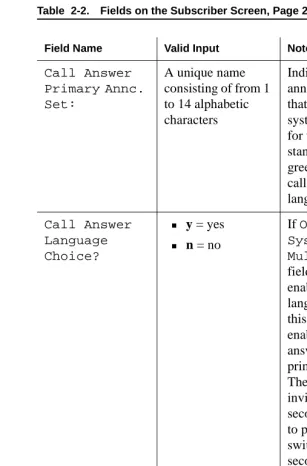
Field Name Valid Input Notes
Addressing Format:
n extension
n name
Indicates the default method of
addressing AUDIX messages for a user with this COS.
Login
Announcement Set:
A unique name consisting of from 1 to 14 alphabetic characters
Indicates the announcement set that the user hears after she or he logs in. If the
Multilingual feature is turned off, this field must either be blank or contain the word System.
Tip: To see a list of the announcement sets that are installed on your system, enter list annc-sets
Tip: To see which announcement set is assigned to the system set, enter dis sys fea
System Multilingual
Call Answer Primary Annc. Set:
A unique name consisting of from 1 to 14 alphabetic characters
Indicates the announcement set that is to be used for system prompts and for the personal or standard system greeting until the caller switches languages.
Call Answer Language Choice?
n y = yes
n n = no
If ON appears in the System
Multilingual field, enter y to enable Call Answer language choice. If this feature is enabled, a call is answered in the primary language. The caller is then invited in the secondary language to press to switch to the secondary language. If ON does not appear in the System Multilingual field, enter n
(2 of 15)
Call Answer Secondary Annc. Set:
A unique name consisting of from 1 to 14 alphabetic characters
Indicates the announcement set that is to be used for system prompts and for the personal or standard system greeting until the caller switches languages.
PERMISSIONS, Type: n call-answer n none n auto-attendant n bulletin-board Enter either: n call-answer Callers have both call answer and mailbox capabilities.
n none
Callers have a mailbox, but no call answer capability.
The two other types of permission are:
n auto-attendant
The mailbox is an automated attendant.
n bulletin-board
The mailbox is an information-only recorded announcement. Announcement Control?
n y = yes
n n = no
Permits a user to record system announcements such as user names and networked system machine names. We recommend that you enter n
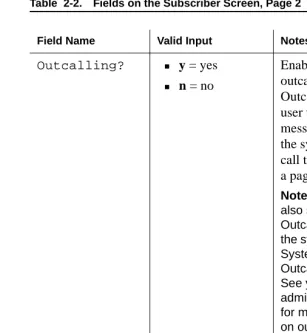
Outcalling? n y = yes
n n = no
Enables or disables outcalling.
Outcalling alerts a user to new
messages by having the system place a call to the user or to a pager.
Note: You must also set up the Outcalling feature for the system using the System Parameters Outcalling screen. See your
administration guide for more information on outcalling.
Priority Messages?
n y = yes
n n = no
Permits a user to send priority mail messages to other AUDIX users.
Broadcast: n voice
n login
n both
n none
Indicates the types of broadcast messages that a user can create:
n voice
Broadcast voice and fax message permission only
n login
Login
announcement permission only
n both
Broadcast voice, fax message, and login
announcement permissions
n none
No broadcast message or login announcement permissions
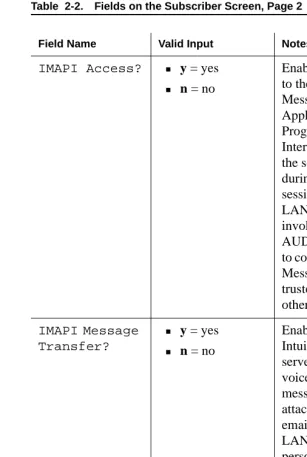
IMAPI Access? n y = yes
n n = no
Enables client access to the Lucent Intuity Messaging
Applications Programming Interface (IMAPI) of the server (perhaps during a LAN session). An IMAPI LAN session is invoked when the AUDIX server needs to communicate with Message Manager, a trusted server, and other systems.
IMAPI Message Transfer?
n y = yes
n n = no
Fax Creation? n y = yes
n n = no
Enables fax message creation for the user.
Trusted Server Access?
n y = yes
n n = no
Permits a trusted server to add messages to and delete messages from this user’s mailbox. Set this field to y if you have Internet Messaging.
INCOMING MAILBOX, Order:
n fifo = first in,
first out (default)
n lifo = last in,
first out
Indicates the order for retrieving incoming mailbox messages for this user.
Category Order:
The following three letters in any order:
n n= new
n u= unopened
n o= old
Indicates the order for scanning the incoming categories for messages for a user.
n n (new)
Neither the header nor the message body has been read.
n u (unopened)
The header has been read, but not the message body.
n o (old)
The header and the message body have been read.
Note: The order
oun encourages
users to keep messages stored to a minimum by forcing them to scan through old
messages first.
Retention Times, (New Old
Unopened):
A number from 0 to 999
Indicates the number of days that new, old, or unopened
messages are retained in this user’s incoming mailbox. The retention time clock is not reset to zero when a message is moved between the old, unopened, and new categories. For example, if the retention time is 10 days for all three categories, a
message is removed after 10 days (not 30 days) regardless of whether or when it is moved from one category to another.
OUTGOING MAILBOX, Order:
n fifo = first in,
first out (default)
n lifo = last in,
first out
Indicates the order for retaining outgoing mailbox messages for this user.
Category Order:
The following letters in any order:
n f = file cabinet
n u = undelivered
n n =
nondeliverable
n d = delivered
n a = accessed
Indicates the order for scanning the outgoing categories for messages for a user.
n f (file cabinet)
Saved copies of created
messages
n u (undelivered)
Messages awaiting delivery n n (nondeliverable) Unsuccessful message deliveries
n d (delivered)
Notifications of delivered messages
n a (accessed)
Notifications of delivered and accessed messages
Retention Times (File Cab and Delivered/ Nondeliver- able):
A number from 0 to 3999
Enter the number of days that file cabinet messages, delivered messages, or nondeliverable messages are retained in this user’s outgoing mailbox. Voice Mail Message (Seconds), Maximum Length:
n A number from
0 to 1200
n 300 (default)
Enter the maximum duration of voice, fax, and text mail messages that this user can create. If this user is enabled for fax, expand this parameter to 1200 seconds. Voice Mail Message (Seconds), Minimum Needed:
n A number from 0 to 1200
n 32 (default)
Enter the minimum mailbox space needed to create voice, fax, or text messages. If less than the minimum number of seconds remain in the user’s mailbox, a message tells the user that she or he cannot create a new message or reply to an incoming message.
Call Answer Message (Seconds), Maximum Length:
n A number from
0 to 1200
n 120 (default)
Enter the maximum duration of
call-answer messages that this user can receive. If your system has fax messaging, expand this parameter to 1200 seconds. Call Answer Message (Seconds), Minimum Needed:
n A number from
0 to 1200
n 8 (default)
Enter the minimum mailbox space that must be available for a caller to be able to leave this user a call-answer message. If less than the minimum number of seconds remain in a user’s mailbox, a caller hears the “full mailbox” greeting.
End of Message Warning Time (Seconds):
n 0 (zero)
n A number from 15 to 60
Enter the number of seconds that a warning messaging plays to indicate the remaining available recording time. The system plays the warning message this number of seconds before the maximum recording time is reached. If you enter a 0 (zero), no end-of-message warning is played. If you leave this field blank, the system uses the value on the System-Parameters Features screen. Otherwise, this value overrides the value on the System-Parameters Features screen. Maximum Mailing Lists:
n A number from 0 to 999
n 25 (default)
Enter the maximum number of mailing lists that this user can create.
8. Press F3 (Enter) to save the information.
The cursor returns to the command line, and the system displays the following message:
Total Entries in all Lists:
A number from 0 to 9999
Enter the maximum total number of mailing list entries that this user can create.
Mailbox Size (Seconds), Maximum:
n A number from
0 to 32767 (just over 9 hours)
n 1200 (20 minutes, default)
Enter the maximum number of seconds of mailbox space for this user. If this user is enabled for fax, expand this
parameter to at least 4800 seconds.
Minimum Guarantee:
n A number from
0 to 9999
n 0 (zero, default)
Enter the number of seconds of mailbox space that is guaranteed for this user.
Tip: We recommend that no space be guaranteed because some users may never need the reserved space.
You have now added a user.
How to Remove a User from the System
Before removing a user from the system, you may want to make sure that there are no messages in that user’s mailbox. Unless you or the user erases leftover messages, they can stay in the system.
How to Check for Messages in an Old Mailbox
There are two ways to see if there are leftover messages in an old mailbox. The first way is to run an Activity Log report for the user whose mailbox you want to check. The second way is to check the message waiting indicator as described in following table:
How to Erase Messages in an Old Mailbox
To erase messages in an old mailbox:
1. Start at the Lucent Intuity main menu (Figure 1-1), and select:
AUDIX Administration
2. At the enter command: prompt, enter
change subextension where extension is the extension
number of the user.
3. Change the user’s default password. lit leftover messages
in the user’s mailbox
go into the user’s mailbox to erase leftover messages. Perform the “How to Erase Messages in an Old Mailbox,” procedure in this chapter before removing this user from the system.
not lit no leftover messages in the user’s mailbox
1. Start from the Lucent Intuity main menu (Figure 1-1), and select:
AUDIX Administration
2. At the enter command: prompt, enterre suextension
where extension is the extension of the user you want to remove from the system.
The system displays the Subscriber Screen, Page 1 (Figure 2-1).
3. Confirm that this is the user you want to remove.
4. Press F3 (Enter) to remove the user.
If this subscriber has new messages, a warning appears.
5. Press ENTER again to remove this user.
The cursor returns to the command line, and the system displays the following message:
Command Successfully Completed
6. Enter exit or another administrative command at the enter command: prompt.
You may want to change user information because a user:
n Requests it
n Needs a different extension
n Has changed his or her name
Tip: The system automatically updates name changes on mailing lists. For example, if Jane L. Doe is on one or more mailing lists and the administrator changes her name to Jane L. Smith, all lists in the system that contain the name Jane L. Doe are updated automatically to reflect the change.
To change user information:
1. Start from the Lucent Intuity main menu (Figure 1-1), and select:
AUDIX Administration
2. At the enter command: prompt, enterch subextension
where extension is the telephone extension of the user whose information you want to change.
The system displays the Subscriber screen, Page 1 (Figure 2-1).
3. Type over any existing information with new information.
4. Press F7 (Nextpage) to move to the Subscriber screen, Page 2 (Figure 2-2).
5. Type over any existing information with new information.
6. Press F3 (Enter) to save the information.
The cursor returns to the command line, and the system displays the following message:
Administering the System
This chapter contains information to help you administer your system. The following procedures show you how to:
n Maintain the system
n Send a broadcast message
n Change class of service options
n Run an attended backup
n Shut down the system
Table 3-1 lists ongoing maintenance tasks for the Intuity AUDIX system. Perform these tasks on a regular basis to help keep the system operating properly
Table 3-1. Ongoing Maintenance Tasks
Task Purpose Procedure
Update the UNIX system clock.
To compensate for the 3-second monthly time loss.
See ‘‘How to Change the Date and Time’’ in Chapter 1, “Getting Started.”
Run traffic reports. Display AUDIX traffic information to help you troubleshoot and improve system efficiency.
See ‘‘How to Run a Load Daily Traffic Report’’ or ‘‘How to Run a Feature Daily Traffic Report’’ in Chapter 5, “Producing Maintenance Reports.”
See your administration guide for more information on other types of reports.
Administer and check the Activity Log.
Investigate user activity to help to resolve reported problems.
See ‘‘How to Produce an Activity Log Report’’ in Chapter 5, “Producing Maintenance Reports.”
Check the Alarm Log.
Display active or resolved Lucent Intuity system alarms.
See your administration guide for more information on alarm reports. Check the Administrator’s Log. Display and investigate alarms that you can resolve.
See your administration guide for more information on the Administrator’s Log.
How to Send a Broadcast Message
A broadcast message is a message that you can send to all subscribers on your system at the same time. These messages are useful for emergency announcements or other important announcements.
Back up data. n Store backup
system data immediately after a large number of changes or if the automated backup does not run.
n Store voice data
that the automated backup may not store.
See ‘‘How to Run an Attended
Backup’’ in Chapter 3, “Administering the System.”
Tip: In the most recent releases of Intuity AUDIX, full backups are attempted every night. It is only necessary to perform an attended backup if your system’s data does not fit on one tape or cartridge.
Change the backup media.
Preserve the most recent backup of your system data.
Rotate your backup media daily so that you do not back up one night’s data over the previous night’s data.
The following procedures show you how to:
n Set up a broadcast mailbox
n Create a broadcast message
How to Set Up a Broadcast Mailbox
To set up a broadcast mailbox:
1. Start at the Lucent Intuity main menu (Figure 1-1), and select:
AUDIX Administration
2. At the enter command: prompt, enter add sub
3. Complete the fields on this screen using the information provided in Table 3-2.
Table 3-2. Fields on the Subscriber Screen, Page 1
Field Name Valid Input Notes
Name: A unique name
consisting of from 1 to 29 alphabetic characters
Enter a name that is unique for this broadcast mailbox.
4. Press F7 (Nextpage).
The system displays the Subscriber screen, Page 2 (Figure 3-2).
Extension: A 3-digit to 10-digit telephone extension
Enter an extension that is not
administered on the switch.
COS: n A unique name
consisting of from 1 to 8 alphanumeric characters
n An integer from 0 to 11
Enter the name or number of the COS that is to be
assigned to this broadcast mailbox.
Tip: To see a list of all current COS names and numbers, enter list cos Switch
Number:
0 (zero) A 0 (zero) means that the broadcast mailbox has a voice messaging mailbox, but does not have an extension on the switch.
Broadcast Mailbox?
y = yes A y identifies this
as the broadcast mailbox.
5. Complete the fields on this screen using the information provided in Table 3-3.
Table 3-3. Subscriber Screen, Page 2
Field Valid Input Notes
Permissions, Type:
None —
Permissions, Broadcast:
None —
6. Press F3 (Enter) to save the information.
The cursor returns to the command line, and the system displays the following message:
Command Successfully Completed
7. Enter exit or another administrative command at the enter command: prompt.
You have now set up a broadcast mailbox. Incoming Mailbox, Retention Times: (New, Old, Unopened)
A number from 0 to 3999
Enter the maximum number of days for which you want a particular message to remain available in the system. Enter the same number of days for New, Old, and Unopened.
Mailbox Size (Seconds), Maximum:
n A number from
0 to 32767 seconds (just over 9 hours)
n 1200 seconds
(20 minutes, default)
Enter the maximum number of seconds of mailbox space that is allowed for each broadcast message.
Note: In order to send a broadcast message, the sender must be given permission to do so. Change the permission for this feature on the second page of the Subscriber screen by entering both or voice in the Broadcast field.
1. Log in to your mailbox using a touchtone telephone.
2. Press at the main menu.
3. Record your message at the tone.
4. Press to approve the message.
5. Press to mark the message as broadcast.
6. (OPTIONAL) You have three optional delivery choices:
n To make the message a private one, press .
n To schedule delivery, press .
n To file a copy, press .
Tip: A broadcast message cannot also be a priority message.
7. (OPTIONAL) Press to select from the following additional options:
n To turn on message notification, press .
n To change message expiration from the 2-day default, press and do the following:
a. Enter the numbers for the month and day of expiration. For example, enter 1008 for October 8; enter 913 for
1
# #
8
1
3
4
*
61
8. Press to approve your message.
You have now sent a broadcast message.
How to Change Class of Service Options
A Class of Service (COS) is a set of messaging capabilities you define and assign to users.
Tip: Use the Class of Service screen to define each COS. Use the Subscriber screen to assign a COS to a user.
To change Class of Service options:
1. Start at the Lucent Intuity main menu (Figure 1-1), and select:
AUDIX Administration
2. At the enter command: prompt, enter one of the following. Base your decision on whether you want to identify the COS by number or by name.
n ch coscos-numberwhere cos-number is a unique COS number from 0 to 11.
n ch cos cos-name where cos-name is a unique COS name
you want to administer.
The system displays the Class of Service screen, Page 1 (Figure 3-3).
Name: n A unique name
consisting of from 1 to 8 alphanumeric characters
n Class00 through class11 (defaults)
Enter the name of the COS.
Tip: A descriptive name might be more helpful to you than a number. For example, enter 2_lang to indicate a COS that uses multiple languages, or enter email to indicate that this COS is for users who have special permission to access an email server.
COS Number: Display only This field shows the number for this COS.
Modified? Display only This field shows an n
until such time as you modify any fields on the screen. Once you save any changes, this field changes to a
y.
Addressing Format:
n extension
n name
Enter extension or
name to indicate the
default way a user with this COS is to address AUDIX messages.
Login
Announcement Set:
n A unique name
consisting of from 1 to 14 alphabetic character
n System (default)
Enter the name of announcement set that the system uses when a user logs in. If the Multilingual feature is turned off, this field must either be blank or contain the word System.
Tip: To see a listing of the announcement sets that are installed on your system, enter list annc
sets
Tip: To see which announcement set is assigned to the system set, enter dis sys fea
System Multilingual
Display only This field shows whether the
Multilingual feature is on or off.
Call Answer Language Choice?
n y = yes
n n = no
If ON appears in the System
Multilingual field, enter y to enable Call Answer language choice. If this feature is enabled, a call is answered in the primary language. The caller is then invited in the secondary language to press to change to the secondary language. If OFF appears in the System
Multilingual field, enter n
Call Answer Primary Annc. Set:
A unique name consisting of from 1 to 14 alphabetic characters
Enter the name of the announcement set for system prompts and for the personal or standard system greeting until the caller switches languages.
(3 of 10)
Call Answer Secondary Annc. Set:
A unique name consisting of from 1 to 14 alphabetic characters
Enter the name of the announcement set for system prompts and for the personal or standard system greeting after the caller switches languages. PERMISSIONS, Type: n call-answer n none n auto-attendant n bulletin-board n call-answer
Callers have both call answer and mailbox capabilities.
n none
Callers have a mailbox, but no call answer capability.
n auto-attendant
The mailbox is an automated attendant.
n bulletin-board
The mailbox is recorded for an information-only announcement.
Announcement Control?
n y = yes
n n = no
This field permits a user to record system announcements such as user names and networked system machine names.
Outcalling? n y = yes
n n = no
This field enables or disables outcalling. Outcalling alerts a user to new messages by having the system place a call to that user.
Note: You must also set up the Outcalling feature. See your
administration guide for more information on outcalling.
Priority Messages?
n y = yes
n n = no
Permits a user to send priority mail
messages to other AUDIX users.
Broadcast: n voice
n login
n both
n none
Indicates the types of broadcast messages that a user can create:
n voice
Broadcast voice and fax message permission
n login
Login
announcement permission only
n both
Broadcast voice, fax message, and login
announcement permissions
n none
No broadcast message or login announcement permissions
IMAPI Access? n y = yes
n n = no
Permits the Lucent Intuity Messaging Applications Programming Interface (IMAPI) client access to the server (during a LAN session). An IMAPI LAN session is invoked when the AUDIX server needs to communicate with Message Manager, Internet Messaging, the Enhanced List Application (ELA), a trusted server, or other systems.
IMAPI Message Transfer?
n y = yes
n n = no
Enables the Intuity AUDIX server to transfer voice, fax messages, file attachments, and email files over the LAN to a client’s personal computer. Entering y allows users to store their AUDIX messages on their personal computers.
Note: If you are using Message Manager or Internet Messaging, enter y in both the IMAPI Access? and
IMAPI Message Transfer? fields. If you are not using Message Manager, Internet Messaging, or ELA, enter n in both of these fields.
Fax Creation? n y = yes
n n = no
Enables fax for this COS. Enter n if you do not want users to create fax messages or if fax was not purchased for your system.
Note: Administra-tion of the fax opAdministra-tion involves much more than setting the COS. If you purchase the Fax Messaging feature, any user can receive a fax. This field only determines whether a user can create a fax
message. See your administration guide for more information on fax creation.
4. Press F7 (Nextpage).
The system displays the Class of Service screen, Page 2 (Figure 3-4).
Trusted Server Access?
n y = yes
n n = no
Permits a trusted server to add messages to, and delete messages from, the mailbox of a user who is
assigned to this COS.
Note: If this field is set to y, the IMAPI Access? andIMAPI Message
Transfer? fields must also be set to y
5. Complete the fields on this screen using the information provided in Table 3-5.
Table 3-5. Fields on the Class of Service Screen, Page 2
Field Name Valid Input Notes
Incoming Mailbox, Order:
n fifo = first in,
first out (default)
n lifo = last in,
first out
Indicates the order for retrieving incoming mailbox messages for a user.
Category Order:
The following three letters in any order:
n n = new
n u = unopened
n o = old
Indicates the order for scanning the incoming mailbox message categories for a user.
n n (new)
Neither the header nor the message body has been read.
n u (unopened)
The header has been read, but not the message body.
n o (old)
The header and the message body have both been read.
Note: The order oun encourages users to keep messages stored to a minimum by forcing them to scan through old messages first.
Retention Times (New, Old, and Unopened):
n A number from
0 to 999
n 10 (default)
Indicates the number of days that messages are retained in the incoming mailbox for a user. After the specified period, the system deletes the messages. The retention time clock is not reset to zero when a message is moved between the old, unopened, and new categories. For example, if the retention time is 10 days for all three
categories, a message is removed after 10 days (not 30 days) regardless of whether or when it is moved from one category to another.
Outgoing Mailbox, Order:
n fifo = first in,
first out (default)
n lifo = last in,
first out
Indicates the order for retrieving messages from the outgoing mailbox for a user.
Category Order:
The following letters in any order:
n f = file cabinet
n u = undelivered
n n =
nondeliverable
n d = delivered
n a = accessed
Indicates the order for scanning the outgoing mailbox message categories for a user.
n f (file cabinet)
Saved copies of created messages
n u (undelivered)
Messages awaiting delivery
n n (nondeliverable)
Unsuccessful message deliveries
n d (delivered)
Notifications of delivered messages
n a (accessed)
Notifications of delivered and accessed messages Retention Times (File Cab and Delivered/ Nondeliver - able):
n A number from
0 to 999
n 5 (default)
Indicates the number of days that file cabinet messages, delivered messages, or
Voice Mail Message (Seconds), Maximum Length:
n A number from
0 to 1200
n 300 (default)
Indicates the maximum duration (in seconds) of voice messages or fax mail messages that a user can create. If fax is purchased for this COS, set this parameter to 1200. Voice Main Message (Seconds), Minimum Needed:
n A number from
0 to 1200
n 32 (default)
Indicates the minimum mailbox space that is needed to create voice messages or fax mail messages. If less than the minimum number of seconds remain in the user’s mailbox, a message tells the user that she or he cannot create a new message or reply to an incoming message. Call Answer Message (Seconds), Maximum Length:
n A number from 0 to 1200
n 120 (default)
Indicates the maximum duration of call answer messages that a user can receive. If the COS for this user is enabled for fax, expand this parameter to 1200 seconds.
Call Answer Message (Seconds), Minimum Needed:
n A number from
0 to 1200
n 8 (default)
Indicates the minimum mailbox space that is needed to leave a call answer message for a user. If less than the minimum number of seconds remain in a user’s mailbox, a caller hears the “full mailbox” greeting. End of Message Warning Time (Seconds):
n 0 (zero)
n A number from
15 to 60
Enter the number of seconds that a warning message plays to indicate the remaining available recording time. The system plays the warning message this number of seconds before the maximum recording time is reached. If you enter 0 (zero), no
Maximum Mailing Lists:
n A number from
0 to 999
n 25 (default)
Indicates the maximum total number of mailing lists that a user can create.
Total Entries in all Lists
n A number from
0 to 9999
n 250 (default)
Indicates the total number of entries among all mailing lists that the user has created. For example, suppose a user has a COS with 25 as the total entries in all lists. The user has two lists, the first of which has 20 entries. The second list can then only have five entries.
Mailbox Size
(Seconds), Maximum:
n A number from
0 to 32,767
Tip: 32, 767 seconds converts to just over 9 hours.
n 1200 (default)
Indicates the maximum number of seconds of mailbox space for a user. If the COS for this user is enabled for fax, expand this parameter to at least 4,800 seconds.
Minimum Guarantee:
n A number from 0 to 9999
n 0 (default)
Indicates the number of seconds of mailbox space that is guaranteed for a user.
Tip: We recommend that no space be guaranteed because some users may never need the reserved space.
Command Successfully Completed
7. Enter exit or another administrative command at the enter command: prompt.
You have now changed Class of Service options.
How to Run an Attended Backup
To run an attended backup:
1. Start at the Lucent Intuity main menu (Figure 1-1), and select:
Customer Services/Administration Backup/Restore
Backup
2. Enter y in the fields to be backed up. Table 3-6 describes each field. You can manually back up any combination of the following data types at any time.
Table 3-6. Fields on the Backup Window
Field Name Notes
System Data System data is automatically backed up nightly through the unattended backup command. In addition to the unattended backup, you should also back up the system data manually whenever you make
extensive changes to the user profiles, or if you also want to back up names, greetings, and messages.
AUDIX
Announcements
Announcements are the prompts and phrases that the user of the Intuity AUDIX voice messaging system hears. This data type does not require a backup unless you have customized announcements in the system. If customized announcements are not being used, a backup of announcements already exists on the original factory tape.
3. Enter n in all of the other fields.
4. Press F3 (Save).
The system displays a message similar to the following: AUDIX Names The Intuity AUDIX names data type
contains voiced subscriber names.
Whenever you record additional subscriber names, you should perform an attended backup of this file system.
Greetings and Messages
Intuity AUDIX voice messaging greetings and messages include each subscriber’s primary voice greeting, multiple personal greetings, automated attendant menus, bulletin board messages, and messages. Intuity AUDIX voice messages are all of the call answer and voice mail messages that subscribers send and receive every day.
release and
configuration of your system. Therefore, the message you see may be different than the one shown here.
please wait
the backup will need approximately:
x yyy MB cartridge tape(s)
Verify whole backup tape(s) will double the amount of backup time.
Do you really want to verify tape(s)?
(Strike y or n)
5. Make sure that there are enough backup media to accommodate the backup.
Tip: The Lucent Intuity system verifies a backup media by reading back the entire set of data it has just written on the media. Verifying the backup media increases the total time for backup from 1.5 hours to 3 hours. Verification is not necessary to ensure a good backup.
6. If you want to verify the backup media, press y. If you do not want to verify the backup media, press n
The system displays the following message:
please insert a tape into the tape drive to back up tape 1
press <Enter> when tape is inserted
press <Esc> key to terminate the backup
7. Insert the first cartridge into the backup drive.
8. Press F3 (Enter) when the drive is idle.
use. If the light is not blinking, the tape drive is idle. The light on the 525-MB tape drive is on when there is a tape in the drive. If the light is not on, the tape drive is empty.
10. When the backup is complete, the system displays the following message.
backup process has been completed successfully
press any key to continue
11. Press F3 (Enter).
12. Press F6 (Cancel) repeatedly to return to the Lucent Intuity main menu (Figure 1-1).
You have now performed an attended backup of the system. another backup media is
necessary
1. remove the current backup media
2. label the backup media with the current date and type of backup data
3. insert the new media
4. continue with Step 10.
another backup media is not necessary
To shut down the system:
1. Make sure that there is no diskette in the disk drive.
2. Start at the Lucent Intuity main menu (Figure 1-1), and select:
Customer Services/Administration System Management
System Control
Stop Voice System
The system displays the Wait Time window (Figure 3-6).
3. Enter a number between 60 and 600 to designate how long the system will wait for calls in progress to finish before stopping the voice system.
The Voice System is now stopping.
Initiating request to clear all calls in the next X seconds.
Orderly idling of system succeeded.
The AUDIX module is being stopped. Please wait.
AUDIX module stopped.
After the Voice System has completely stopped, select the ‘Start Voice’ System choice from the System Control menu to restart the Voice System.
Tip: When the voice system is stopped, the user cannot access Intuity AUDIX administration screens. AUDIX Administration still appears as an option on the Lucent Intuity Main menu, but the user cannot select this option. To view the Intuity AUDIX administration screen, the user must restart the voice system. See ‘‘How to Restart the Voice System’’ later in this section for that procedure.
5. Press F3 (Save) to save the information.
6. From the System Control menu, select:
Shutdown System
The system displays the Wait Time window (Figure 3-7).
7. Enter a number between 0 and 60 to designate how long the system will wait for users to log out before shutting down.
Shutdown started.
When the system is completely shut down, the system displays the following message:
The system is down.
Press Ctrl-Alt-Del to reboot your computer.
You have now shut down the system.
How to Restart the System
You can restart your system one of two ways:
n You can do a warm restart, which is performed while the computer is on.
n You can do a cold restart, which is performed after the computer has been turned off and then on again.
How to Perform a Warm Restart
To perform a warm restart:
1. Make sure there is no diskette in the disk drive.
2. Press CONTROL+ALT+DELETE.
Console Login:
You have now performed a warm restart.
How to Perform a Cold Restart
To perform a cold restart:
1. Make sure that there is no diskette in the disk drive.
2. Turn off the power by pressing the power button.
3. Wait 30 seconds to allow the drives to