AT&T
999-510-137Issue 1, July 1990MERLIN MAIL
™VOICE MESSAGING SYSTEM
Installation and
Implementation Guide
for MERLIN
®II
©1990 AT&T
Issue 1 All Rights Reserved
July, 1990 Printed in USA
NOTICE
The information in this document is subject to change without notice. AT&T assumes no responsibility for any errors that may appear in this document.
MERLIN is a registered trademark of AT&T. MERLIN MAIL is a trademark of AT&T.
Phillips is a registered trademark of the Phillips Screw Company.
FCC Notification and Repair Information
This equipment is registered with the Federal
Communications Commission (FCC) in accordance with Part 68 of its rules. In compliance with those rules, you are advised of the following:
MEANS OF CONNECTION: Connection to the
telephone network shall be through a standard network interface jack USOC RJ11C. These USOCs must be ordered from your Telephone Company.
This equipment may not be used with party lines or coin telephone lines.
NOTIFICATION TO THE TELEPHONE COMPANIES:
Before connecting this equipment, you or your equipment supplier must notify your local telephone company’s business office of the following:
The telephone numbers you will be using with this equipment.
The appropriate registration number and ringer
equivalence number (REN) which can be found on the back or bottom of the control unit.
●
●
You must also notify your local telephone company if and when this equipment is permanently disconnected from the line(s).
Repair Instructions: If you experience trouble because your equipment is malfunctioning, the FCC requires that the equipment not be used and that it be disconnected from the network until the problem has been corrected. Repairs to this equipment can only be made by the manufacturers, their authorized agents, or by others who may be authorized by the FCC. [In the event repairs are needed on this equipment, please contact the
Rights of the Local Telephone Company: If this equipment causes harm to the telephone network, the local telephone company may discontinue your service
temporarily. If possible, they will notify you in advance. But if advance notice is not practical, you will be notified as soon as possible. You will also be informed of your right to file a complaint with the FCC.
Your local telephone company may make changes in its facilities, equipment, operations, or procedures that affect the proper functioning of this equipment. If they do, you will be notified in advance to give you an opportunity to maintain uninterrupted telephone service.
INTERFERENCE INFORMATION NOTICE:
FCC Rules require that you be notified of the following:
●
●
●
This equipment generates, uses, and can radiate radio frequency energy and, if not installed and used in accordance with the instructions in this manual and the MERLIN MAIL System Installation and
Implementation Guide, may cause interference to radio
comnunications.
This equipment has been tested and found to comply with the limits for a Class A computing device
pursuant to Subpart J of Part 15 of FCC Rules, which are designed to provide reasonable protection against such interference when the equipment is operated in a commercial environment.
Contents
Chapter 1: Installation
Installing the MERLIN MAIL System 1-1
Hardware Requirements 1-2
Installing the MERLIN MAIL System Unit 1-4 Performing the Installation Acceptance Tests 1-7 Upgrading to a Four-Port Configuration 1-7
Chapter 2: Required Settings
Required Settings 2-1
Conventions 2-1
Hints and Shortcuts 2-2
Configuring the MERLIN II R3 System 2-3 Setting the MERLIN MAIL System Parameters 2-7
Chapter 3: System Greetings
Automated Attendant Greetings 3-1
Recording the Day and Night Greeting 3-1
Recording a Call Answer Greeting 3-3
Recording a Voice Mail Greeting 3-4
Chapter 4: Call Handling
Call Handling Methods 4-1
Selecting Immediate Call Handling 4-1 Selecting Delayed Call Handling 4-6
Selecting Fax Call Handling 4-10
Chapter 5: Automated Attendant Service
5-1 5-1 5-2 5-4 5-6
6-1 6-1 6-3 6-4
7-1 7-1 7-2 7-3
7-4 7-4 7-7
8-1 Providing Automated Attendant Service
Changing the Touch-Tone Gate Setting Creating Announcements
Creating Submenus Creating the Main Menu
Chapter 6: Call Answer Service
Providing Call Answer Service
Providing Button Coverage Providing Group Coverage Personal Coverage
Chapter 7: Post-lmplementation Steps
Programming Helpful Features
Programming Auto Dial Buttons
Programming a Delete Message Button Programming a Return Message Button
Performing Acceptance Tests
Checking the Automated Attendant Service Checking the Call Answer Service
Chapter 8: Troubleshooting
Troubleshooting
Glossary
List of Figures
Figure
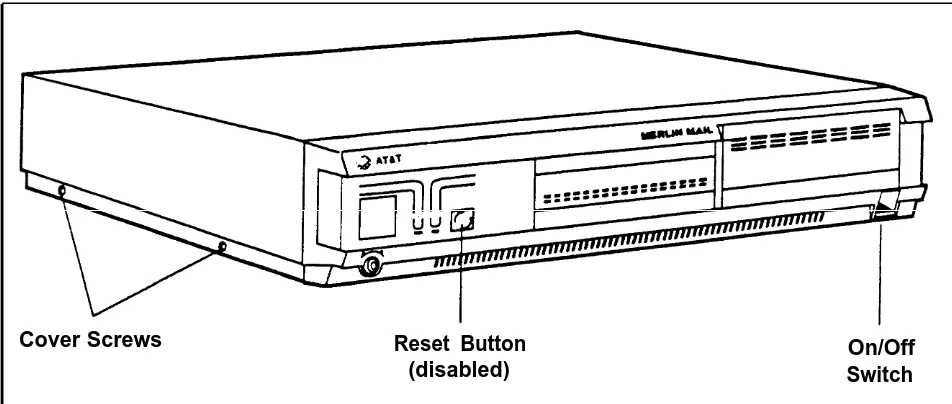
1-1 The MERLIN MAIL system (front view)
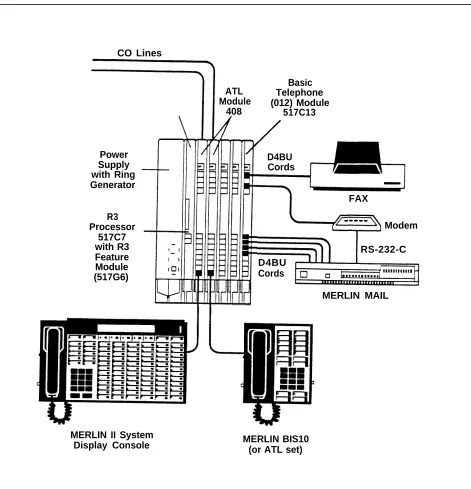
1-2 The MERLIN MAIL system basic configuration 1-3 The MERLIN MAIL system (back view)
1-4 The MERLIN MAIL system modem
Page
Chapter 1: Installation
Installing the MERLIN MAIL System 1-1
Hardware Requirements 1-2
Environmental Considerations 1-4
Installing the MERLIN MAIL System Unit
Performing the Installation Acceptance Tests
1-4
1-7
Upgrading to a Four-Port Configuration 1-7
Installing the MERLIN MAIL System
The MERLIN MAIL™ system is available in two-port and four-port configurations. Each voice processing card has two ports that connect to a Basic Telephone (012) Module and appear as single line sets to the MERLIN® II R3 system.
Cover Screws Reset Button On/Off
(disabled) Switch
FIGURE 1-1 The MERLIN MAIL system (front view).
Hardware Requirements
The following equipment is required to install the MERLIN MAIL system:
Processor
Must be a 517C7 module. If it is a 517B7, upgrade it to a 517C7 module.
Feature Module
Must be a 517G6 Release 3 Feature Module.
●
●
●
●
Basic Telephone (012) Module
The 012 module used for connecting the
MERLIN MAIL system ports to the MERLIN II R3 system must be model 517C13.
Ring Generator
If the 012 module is in the basic carrier, the power supply module in it must contain the ring generator module. If the 012 module is in the expansion carrier, then the ring generator must be in the expansion
carrrier’s power supply module.
CO Lines
Power Supply with Ring Generator
FAX
R3 Processor
517C7 with R3 Feature Module (517G6)
RS-232-C D4BU
Cords
MERLIN MAIL
MERLIN II System Display Console
Basic
ATL Telephone
Module (012) Module
408 517C13
D4BU Cords
Modem
MERLIN BIS10 (or ATL set)
ENVIRONMENTAL Place the MERLIN MAIL system unit on a sturdy flat CONSIDERATIONS surface, such as a desk or table, or sidemount it with the
vent side up for proper ventilation. The location must meet the following conditions:
●
●
1
2
3
4
Dry, dustfree area (relative humidity < 90%), no potential exposure to water or liquids (avoid areas around drinking fountains, coffeemakers, etc.). Temperature range: 40 °F to 104 °F.
Installing the MERLIN MAIL System Unit
To install the MERLIN MAIL system unit, follow the instructions below:
Using a Phillips® head screwdriver, loosen the four screws located on the right and left sides of the MERLIN MAIL system unit.
WARNING: The MERLIN MAIL system unit must
be unplugged before removing the cover.
Hazardous voltage inside. Risk of electric shock. Remove the cover.
Remove the two spacers that hold the voice processing cards in place during shipment, then replace the cover. Connect two or four line cords into the appropriate ports.
NOTE: Line cords must connect to ports 1 and 2 in
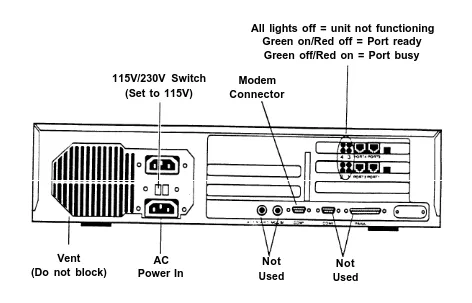
All lights off = unit not functioning Green on/Red off = Port ready
Green off/Red on = Port busy
115V/230V Switch Modem (Set to 115V) Connector
Vent (Do not block)
AC Not Not
Power In Used Used
FIGURE 1-3 The MERLIN MAIL system (back view).
5
6
7
8
Plug in the MERLIN MAIL system unit.
Power on the unit. (The on/off switch located on the front of the unit on the lower right.)
Connect the other end of the line cords into station jacks on the Basic Telephone (012) Module.
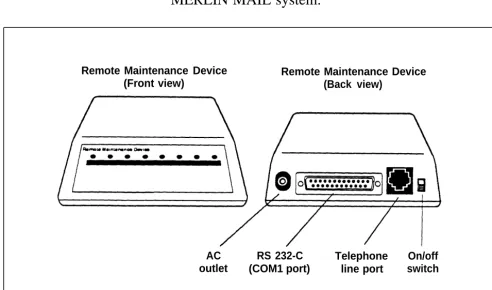
The modem (Remote Maintenance Device) comes preset from the factory. Confirm that the switches, located on the bottom of the modem, are set as follows:
1 on 6 on
2 off 7 off
3 off 8 on
4 on 9 off
NOTE: If you reset the switches, you must turn off the modem and turn it back on before the new settings go into effect.
9
10
11
Using the cable provided, connect the RS-232-C port of the modem to the modem (COM1) port on the MERLIN MAIL system.
Remote Maintenance Device (Front view)
Remote Maintenance Device (Back view)
AC RS 232-C Telephone On/off outlet (COM1 port) line port switch
FIGURE 1-4 The MERLIN MAIL system modem.
Using a modular line cord, connect the modem’s telephone line port to a station jack on the
Basic Telephone (012) Module.
Performing the Installation Acceptance Tests
After you connect the MERLIN MAIL system unit to the MERLIN II R3 system, perform the following tests:
Place a call to each MERLIN MAIL system port. The prerecorded greetings should play for each port.
1
2
● ● ●
1
2
Place a call to the port where the modem is connected. You should hear the modem tone.
Upgrading to a Four-Port Configuration
INSTALLING THE VOICE PROCESSING CARD
Customers with two-port configurations may want to upgrade to a four-port configuration for the following reasons:
To add more lines.
To add more subscribers. To add another service.
To upgrade the MERLIN MAIL system from a two-port to a four-port configuration, follow the procedure below:
Turn off the MERLIN MAIL system unit. (The on/off switch is located on the front of the unit on the
lower right.)
Unplug the power cord before removing the cover.
WARNING: Make sure the MERLIN MAIL system
Using a Phillips head screwdriver, loosen the four screws located on the right and left sides of the MERLIN MAIL system unit.
3
4
5
6
7
8
9
10
11
12
13
Remove the cover.
Remove the second slot bracket.
Verify that the following switch settings are set on the voice processing card being installed:
Card 1
1 on 5 on
2 off 6 on
3 on 7 on
4 off 8 on
Card 2
1 off 5 on
2 off 6 on
3 on 7 off
4 off 8 off Install the voice processing card. Replace the slot bracket.
Replace the cover. Replace the screws.
Plug in the MERLIN MAIL system unit. Power on the MERLIN MAIL system unit. Perform the Installation Acceptance Tests.
Chapter 2: Required Settings
Required Settings
Conventions
Hints and Shortcuts
Configuring the MERLIN II R3 System
Programming Speed Dial Access Buttons Setting Modem for No Ring
Assigning Ports to AA/VMS
Assigning AA/VMS Ports to the Exclusion List Selecting CO Dial Tone
Labeling the AA/VMS Ports
Setting the MERLIN MAIL System Parameters
Creating Mailboxes
Setting the Date and Time Selecting Services
Permitting Transfers from Call Answer Ports Assigning the System Administrator Position Assigning the System Operator Position Assigning a General Mailbox Owner
Specifying Maximum Digits in an Extension Setting the Weekly Business Schedule
2-1
2-1
2-2
2-3 2-3 2-4 2-5 2-6 2-6 2-7
Required Settings
The administration procedures in this section are required to ensure proper communication between the MERLIN II R3 system and the MERLIN MAIL system.
Conventions
The following conventions are used throughout this guide: [ MERMAIL ] means dial the MERLIN MAIL system
extension number.
[ Ext. ] means dial the appropriate extension number.
[ # ] means press the pound button. (This is frequently
used as a termination character, so that the
MERLIN MAIL system knows when you have entered an entire extension number or password.)
[ Mailbox ] means dial the Mailbox number (which is usually
the same as the extension number) of a subscriber. [ * ] means press the star button.
The prompts provided by the MERLIN MAIL system are shown in this manner:
Hints and Shortcuts
These hints and shortcuts can save you time when you are administering the MERLIN MAIL system:
●
● ●
●
●
●
proceeding to the next step.
Dialing [ * ] [ # ] returns you to the previous menu.
Dialing [ * ] [ 7 ] returns you to the System
Administration Menu.
You do not have to wait for a prompt before
[ * ] [ * ] [ 9 ] exits immediately from the
MERLIN MAIL system. So does hanging up, except it takes a little longer.
These templates are provided to help you with the following administration procedures:
>
>
>
>
>
>
Adding Mailboxes.
Recording Announcements. Changing Greetings.
Changing the Main Menu. Changing Submenus. Changing the Schedule.
Configuring the MERLIN II R3 System
Perform the following MERLIN II R3 system
administration from the MERLIN II R3 System Display Console.
PROGRAMMING SPEED DIAL ACCESS BUTTONS
For more efficient access to the MERLIN MAIL system features, program a button for Speed Dial Access on all subscribers’ phones so that they do not have to dial the pound sign (#) twice when using Voice Mail. You can program the phones individually or use Centralized Programming as shown below.
1
2
3
4
5
6
7 8
9
10
At the MERLIN II R3 System Display Console, enter administration mode by sliding the T/P switch to P. Press [ Conference ] twice.
The Administration Menu appears.
From the Administration Menu, press [ More ],
[ More ], [ Cntr-Prg ].
Press the Auto Intercom button of the station being programmed.
The green light goes on.
Press [ Enter ].
Press an available programmable button.
NOTE: To save programmable buttons, assign Speed
Dial Access to virtual buttons (#01 through #24 for 10-button sets; #01 through #12 for 22-button sets). If you program an available button on a phone, mark it with an "X" to indicate that it should not be used.
[ * ] [ 2 ] [ 0 ] followed by any telephone number.
Press the button to confirm the selection. Repeat steps 4 through 8 for each phone.
SETTING MODEM FOR NO RING
Use Centralized Programming to set the lines assigned to the modem port to no ring.
1
2
3
4
5
6
7
8
9
At the MERLIN II R3 System Display Console, enter administration mode by sliding the T/P switch to P. Press [ Conference ] twice.
The Administration Menu appears.
From the Administration Menu, press [ More ],
[ More ], [ Cntr-Prg ].
Press [ Enter ].
Press the Auto Intercom button for the modem port.
The green light goes on.
Press [ Enter ].
Press the line button to be programmed. [ * ] [ 3 ] [ 4 ] [ 5 ] for no ring on all lines.
The red lights next to all line buttons go off.
Press [ Conference ] to continue administration or leave
ASSIGNING PORTS TO AA/VMS
Determine the ports on the MERLIN II R3 system which are to be assigned to the MERLIN MAIL system. Assign the appropriate ports (two or four) to AA/VMS.
1
2
3
4
5
6
At the MERLIN II R3 System Display Console, enter administration mode by sliding the T/P switch to P. Press [ Conference ] twice.
The Administration Menu appears.
[ More ], [ AA/VMS ].
From the Administration Menu, press [ Stations ].
From the Stations Menu, press [ More ], [ More ],
Press the Auto Intercom buttons of the ports you are assigning for the MERLIN MAIL system.
Green light on = port assigned to AA/VMS Green light off = port not assigned to AA/VMS
Press [ Conference ] to continue administration or leave
ASSIGNING AA/VMS The AA/VMS ports must be assigned to the exclusion list PORTS TO THE if the MERLIN II R3 system is set up for Night Service EXCLUSION LIST with Outward Restriction. Follow the procedure below to
administer the AA/VMS ports to the exclusion list. At the MERLIN II R3 System Display Console, enter administration mode by sliding the T/P switch to P. Press [ Conference ] twice.
The Administration Menu appears.
From the Administration Menu, press [ More ], [ Night ].
From the Night Menu, press [ Exclude ].
Press the Auto Intercom buttons of the MERLIN MAIL system ports.
Green light on = outward restricted
Green light off = excluded from outward restriction
1
2
3
4
5
6
1
2
3
4
5
6
Press [ Conference ] to continue administration or leave
administration mode by sliding the T/P switch to the center position.
SELECTING CO
DIAL TONE Follow this procedure to change the MERLIN II R3system from intercom to CO (Central Office) dial tone.
At the MERLIN II R3 System Display Console, enter administration mode by sliding the T/P switch to P. Press [ Conference ] twice.
The Administration Menu appears.
From the Administration Menu, press [ More ], [ Options ].
From the Options Menu, press [ More ], [ More ],
[ More ], [ ICMdial ].
Press [ Externl ].
Press [ Conference ] to continue administration or leave
LABELING THE AA/VMS PORTS
Follow the procedure below to label the MERLIN MAIL system ports so that display phones can easily identify calls from the MERLIN MAIL system.
1
2
3
4
5
6
7
8
9
10
At the MERLIN II R3 System Display Console, enter administration mode by sliding the T/P switch to P. Press [ Conference ] twice.
The Administration Menu appears.
From the Administration Menu, press [ More ],
[ More ], [ Label ].
From the Label Menu, press [ Stations ].
Press the Auto Intercom button for an AA/VMS port.
The green light goes on.
Press [ Enter ].
Enter the label, "MERMAIL."
Press [ Next ] and repeat steps 5 and 7 until labels are
entered for each port. Press [ Enter ].
Press [ Conference ] to continue administration or leave
administration mode by sliding the T/P switch to the center position.
Setting the MERLIN MAIL System Parameters
CREATING MAlLBOXES
CAUTION: Using single line sets to perform
administration while on site may cause you to activate or deactivate MERLIN II R3 system features
inadvertently. It is strongly recommended that only ATL phones be used when administering the MERLIN MAIL system locally. This is not a problem when administering the MERLIN MAIL system remotely.
The factory setting for the System Administrator’s extension is 9997 and the password is 1234. To prevent unauthorized administration of the MERLIN MAIL system, these factory settings should be changed. (See "Assigning the System Administrator Position.")
Follow Form A: Voice Mail Assignment to create up to 100 Mailboxes (due to traffic limitations a maximum of 40 Mailboxes is recommended). Follow the procedure below to create Mailboxes for each subscriber.
1
2
3
4
5
6
7
8
[ MERMAIL ] (the MERLIN MAIL system extension).
The MERLIN MAIL system greeting plays.
[ * ] [ 7 ] to enter Voice Mail.
The Voice Mail greeting plays.
System Administrator’s [ Ext. ] followed by [ # ].
System Administrator’s [ Password ] followed by [ # ].
The Voice Mail Activity Menu plays.
[ 9 ] to administer the MERLIN MAIL system.
The System Administration Menu plays.
[ 4 ] for Mailbox Administration.
The Mailbox Administration Menu plays.
[ 4 ] to create a Mailbox.
Enter the [ Ext. ] of the person being assigned the
Mailbox, followed by [ # ].
9 10 11 > > 12 13
Enter the Class of Service (COS) assigned to this Mailbox.
Class of Service (COS) Key Class Mins Transfer Type
1 5 Unsupervised 2 10 Unsupervised 3 15 Unsupervised 4 5 Supervised 5 10 Supervised 6 15 Supervised 7 15 No Transfer
Using the "Letter Key," enter the first ten letters of the subscriber’s last name followed by [ # ].
Letter Key
21
A = N = 6 2
22
B = O = 6 3 23
C = P = 7 1 31
D = Q = 7 4
32
E = R = 7 2 33
F = S = 7 3
41
G = T = 8 1
42
H = U = 8 2
43
I = V = 8 3 51
J = W = 9 1 52
K = X = 9 2
53
L = Y = 9 3
61
M = Z = 9 4
The letters entered are confirmed.
Choose the appropriate option:
[ 9 ] for Yes to approve the name.
[ 6 ] for No to disapprove the name. Go to step 10.
When prompted, record the subscriber’s name.
The Message Recording Menu plays.
SETTING THE DATE AND TIME
14
15
>
>
>
[ 2 ] [ 3 ] to rewind and play back the name.
[ 2 ] [ 1 ] to rerecord the name.
[ * ] [ D ] to delete the name.
Record the name again. [ * ] [ # ] to approve the name.
The Mailbox Administration Menu plays.
Repeat steps 8 through 14 for each subscriber.
Synchronize the time and date set on the MERLIN MAIL system with the MERLIN II R3 system. Use two digits for month (01 through 12), day (01 through 31), year
(00 through 99), hour (01 through 23) and minutes (00 through 59).
1
2
3
4
5
6
7
8
9
[ MERMAIL ] (the MERLIN MAIL system extension).
The MERLIN MAIL system greeting plays.
[ * ] [ 7 ] to enter Voice Mail.
The Voice Mail greeting plays.
System Administrator's [ Ext. ] followed by [ # ].
System Administrator's [ Password ] followed by [ # ].
The Voice Mail Activity Menu plays.
[ 9 ] to administer the MERLIN MAIL system.
The System Administration Menu plays.
[ 2 ] to administer the Schedule.
[ 1 ] to enter the current date and time.
The current setting plays.
Enter the month (mm), day (dd), and year (yy). Enter the hour (hh) and minutes (mm).
NOTE: If prompted, [ 1 ] for a.m. or [ 2 ] for p.m.
SELECTING Follow Form B: System Parameters to specify the
SERVICES MERLIN MAIL system port assignments for
Automated Attendant Service and Call Answer Service. 1
2
3
4
5
6
7
8
[ MERMAIL ] (the MERLIN MAIL system extension).
The MERLIN MAIL system greeting plays.
[ * ] [ 7 ] to enter Voice Mail.
The Voice Mail greeting plays.
System Administrator’s [ Ext. ] followed by [ # ].
System Administrator’s [ Password ] followed by [ # ].
The Voice Mail Activity Menu plays.
[ 9 ] to administer the MERLIN MAIL system.
The System Administration Menu plays.
[ 1 ] to administer System Parameters.
The System Parameters Menu plays.
[ 2 ] for Port Allocation.
The current configuration is confirmed.
Choose the appropriate option:
[ 1 ] all ports assigned for Automated Attendant
Service (factory setting).
[ 2 ] all ports assigned for Call Answer Service.
[ 3 ] for split assignment—both Services
(four port only).
Ports 1 and 2 for Automated Attendant Service.
Ports 3 and 4 for Call Answer Service.
>
>
>
>
PERMITTING If Call Answer Service is being used, you can permit TRANSFERS FROM callers to dial 0 for assistance or enter another extension CALL ANSWER number after they are connected to a Call Answer port. PORTS Refer to Form B: System Parameters to see if transfers are
permitted from Call Answer ports (the factory setting disallows transfers).
NOTE: Transfers are not permitted when Button
Coverage is selected as the Call Answer Coverage Scheme.
1
2
3
4
[ MERMAIL ] (the MERLIN MAIL system extension).
The MERLIN MAIL system greeting plays.
[ * ] [ 7 ] to enter Voice Mail.
The Voice Mail greeting plays.
System Administrator’s [ Ext. ] followed by [ # ].
System Administrator’s [ Password ] followed by [ # ].
The Voice Mail Activity Menu plays.
5
6
7
8
[ 9 ] to administer the MERLIN MAIL system.
The System Administration Menu plays.
[ 1 ] to administer System Parameters.
The System Parameters Menu plays.
[ 9 ] to administer Transfers from a Call Answer Port.
Choose the appropriate option:
[ 9 ] for Yes to permit transfers from a
Call Answer port.
[ 6 ] for No to disallow transfers from a
Call Answer port.
>
ASSIGNING THE Follow Form B: System Parameters to identify the
SYSTEM extension of the System Administrator. The factory
ADMINISTRATOR setting for this Mailbox is 9997, with password 1234. POSITION If the customer is not using this setting, you must
create a Mailbox for the new extension before you change the assignment.
NOTE: If the System Administrator changes the
password and forgets it, or a new System
Administrator does not know the password set by his or her predecessor, only NSAC/NTSC
personnel can reset the password to 1234 after obtaining proper authorization from the customer. 1
2
3
4
5
6
7
8
[ MERMAIL ] (the MERLIN MAIL system extension).
The MERLIN MAIL system greeting plays.
[ * ] [ 7 ] to enter Voice Mail.
The Voice Mail greeting plays.
System Administrator’s [ Ext. ] followed by [ # ].
System Administrator’s [ Password ] followed by [ # ].
The Voice Mail Activity Menu plays.
[ 9 ] to administer the MERLIN MAIL system.
The System Administration Menu plays.
[ 1 ] to administer System Parameters.
The System Parameter Menu plays.
[ 7 ] to reassign the System Administrator position.
The current extension plays.
System Administrator’s [ Ext. ] followed by [ # ].
ASSIGNING THE Follow Form B: System Parameters to identify the
SYSTEM OPERATOR extension of the System Operator. Use the factory setting POSITION 760 unless it has been reassigned through flexible
numbering. If the dial plan already use 760, assign an extension that is not in the dial plan so that calls
transferred from the MERLIN MAIL system appear on a line button and not on the System Operator’s intercom button. Follow the procedure below to reassign the System Operator position.
NOTE: Extension 760 should not be assigned a Mailbox.
1
2
3
4
5
6
7
8
[ MERMAIL ] (the MERLIN MAIL system extension).
The MERLIN MAIL system greeting plays.
[ * ] [ 7 ] to enter Voice Mail.
The Voice Mail greeting plays.
System Administrator’s [ Ext. ] followed by [ # ].
System Administrator’s [ Password ] followed by [ # ].
The Voice Mail Activity Menu plays.
[ 9 ] to administer the MERLIN MAIL system.
The System Administration Menu plays.
[ 1 ] to administer System Parameters.
The System Parameter Menu plays.
[ 5 ] to administer the System Operator position.
The current extension plays.
System Operator’s [ Ext. ] followed by [ # ].
ASSIGNING A Follow Form B: System Parameters to identify the GENERAL MAILBOX extension of the General Mailbox Owner (usually the
OWNER System Operator performs this function). The factory
setting for this Mailbox is station 10, and the Mailbox number is 9999, with password 1234.
NOTE: To change the password of the General Mailbox,
log in to the Voice Mail Service as extension 9999, then see "Changing Your Password" in the
MERLIN MAIL System Quick Reference Card to
assign a new password.
To assign this Mailbox to a station other than 10, follow the instructions below:
1
2
3
4
5
6
7
[ MERMAIL ] (the MERLIN MAIL system extension).
The MERLIN MAIL system greeting plays.
[ * ] [ 7 ] to enter Voice Mail.
The Voice Mail greeting plays.
System Administrator’s [ Ext. ] followed by [ # ].
System Administrator’s [ Password ] followed by [ # ].
The Voice Mail Activity Menu plays.
[ 9 ] to administer the MERLIN MAIL system.
The System Administration Menu plays.
[ 6 ] to administer the General Mailbox.
The current extension plays.
General Mailbox Owner’s [ Ext. ] followed by [ # ].
SPECIFYING Follow Form B: System Parameters to specify the MAXIMUM DIGITS IN maximum number of digits in an extension
AN EXTENSION (2 is the factory setting). When this number is set, the
MERLIN MAIL system recognizes when a caller has completed dialing so calls can be processed quickly. 1
2
3
4
5
6
7
8
[ MERMAIL ] (the MERLIN MAIL system extension).
The MERLIN MAIL system greeting plays.
[ * ] [ 7 ] to enter Voice Mail.
The Voice Mail greeting plays.
System Administrator’s [ Ext. ] followed by [ # ].
System Administrator’s [ Password ] followed by [ # ].
The Voice Mail Activity Menu plays.
[ 9 ] to administer the MERLIN MAIL system.
The System Administration Menu plays.
[ 1 ] to administer System Parameters.
The System Parameters Menu plays.
[ 8 ] to specify the maximum length of an extension.
The current setting plays.
Enter the number of digits (2 through 4).
SETTING THE The factory setting for business hours is 8:00 a.m. to WEEKLY BUSINESS 5:00 p.m., Monday through Friday. When using
SCHEDULE Automated Attendant for After Hours Call Handling only,
set all the days to closed. Follow Form B: System
Parameters to identify the hours the company is open for
business and when it is closed.
[ MERMAIL ] (the MERLIN MAIL system extension).
The MERLIN MAIL system greeting plays.
[ * ] [ 7 ] to enter Voice Mail.
The Voice Mail greeting plays.
System Administrator’s [ Ext. ] followed by [ # ].
1
2
3
4
5
6
7
System Administrator’s [ Password ] followed by [ # ].
The Voice Mail Activity Menu plays.
[ 9 ] to administer the MERLIN MAIL system.
The System Administration Menu plays.
[ 2 ] for administering the Schedule.
The Schedule Menu plays.
Select the day you want to program. If you are
programming the same hours for several days, use [ 9 ]
to set the same schedule for all days, then change it for the one or two days that aren’t on the same schedule.
>
>
>
>
>
>
>
>
>
[ 1 ] for Sunday.
[ 2 ] for Monday.
[ 3 ] for Tuesday.
[ 4 ] for Wednesday.
[ 5 ] for Thursday.
[ 6 ] for Friday.
[ 7 ] for Saturday.
[ 9 ] for all days.
[ # ] for next day. (Use when changing days in
sequential order.)
Specify if the business is opened or closed: [ 1 ] for open. Go to step 10.
>
> [ 2 ] for closed. To change another day,
go to step 8.
The prompt says, "The business will be closed."
Enter the opening time (hhmm).
NOTE: If prompted, [ 1 ] for a.m. or [ 2 ] for p.m.
Enter the closing time (hhmm). 8
9
10
11
12
NOTE: If prompted, [ 1 ] for a.m. or [ 2 ] for p.m.
If the closing time is earlier than the opening time, you must reenter the closing time. To change another day, go to step 8, or [ * ] [ # ] to
Chapter 3: System Greetings
Automated Attendant Greetings 3-1
Recording the Day and Night Greeting 3-1
Recording a Call Answer Greeting 3-3
Automated Attendant Greetings
If applicable, use the procedures that follow to record the Day Greeting that plays when the company is open and, the Night Greeting that plays when the company is closed. If Form D: Automated Attendant Setting indicates that the Touch-Tone Gate is on, the greeting must ask callers to dial [ 1 ] before the Main Menu plays. (Calls from rotary
phones are transferred to the System Operator, General Mailbox, or are disconnected depending on the
Dial 0/Timeout Option.)
Recording the Day and Night Greeting
Follow Form C: System Greetings to record the Day and/or Night Greeting.
1
2
3
4
5
6
7
[ MERMAIL ] (the MERLIN MAIL system extension).
The MERLIN MAIL system greeting plays.
[ * ] [ 7 ] to enter Voice Mail
The Voice Mail greeting plays.
System Administrator’s [ Ext. ] followed by [ # ].
System Administrator’s [ Password ] followed by [ # ].
The Voice Mail Activity Menu plays.
[ 9 ] to administer the MERLIN MAIL system.
The System Administration Menu plays.
[ 7 ] for System Greeting.
The System Greeting Menu plays.
[ 3 ] for the Automated Attendant Greeting.
8
9
10
11
12
13
Choose the appropriate option: [ 1 ] for the Day Greeting.
[ 2 ] or the Night Greeting.
[ 1 ] to record the greeting.
Record the greeting (up to ten seconds). [ 1 ] after recording the greeting.
Select one of the following options or go to step 13:
>
>
>
>
>
[ 2 ] [ 1 ] to rerecord the greeting.
[ 2 ] [ 3 ] to rewind and play back the greeting.
[ * ] [ D ] to delete the greeting.
Recording a Call Answer Greeting
Follow Form C: System Greetings to record the Call Answer Greeting.
1
2
3
4
5
6
7
8
9
10
11
12
[ MERMAIL ] (the MERLIN MAIL system extension).
The MERLIN MAIL system greeting plays.
[ * ] [ 7 ] to enter Voice Mail.
The Voice Mail greeting plays.
System Administrator’s [ Ext. ] followed by [ # ].
System Administrator’s [ Password ] followed by [ # ].
The Voice Mail Activity Menu plays.
[ 9 ] to administer the MERLIN MAIL system.
The System Administration Menu plays.
[ 7 ] for System Greeting.
The System Greeting Menu plays.
[ 2 ] for Call Answer Greeting.
The Call Answer Greeting Menu plays.
[ 1 ] to record a greeting.
The prompt says, "Record at the tone."
Record the greeting (up to two minutes). [ 1 ] after recording the greeting.
Select an option or go to step 12:
>
>
>
[ 2 ] [ 3 ] to rewind and play back the greeting.
[ 2 ] [ 1 ] to rerecord the greeting.
[ * ] [ D ] to delete the greeting.
Recording a Voice Mail Greeting
Follow Form C: System Greetings to record a Voice Mail Greeting.
1
2
3
4
5
6
7
8
9
10
11
12
[ MERMAIL ] (the MERLIN MAIL system extension).
The MERLIN MAIL system greeting plays.
[ * ] [ 7 ] to enter Voice Mail.
The Voice Mail greeting plays.
System Administrator’s [ Ext. ] followed by [ # ].
System Administrator’s [ Password ] followed by [ # ].
The Voice Mail Activity Menu plays.
[ 9 ] to administer the MERLIN MAIL system.
The System Administration Menu plays.
[ 7 ] for System Greeting.
The System Greeting Menu plays.
[ 1 ] for Voice Mail.
The Voice Mail Greeting Menu plays.
[ 1 ] to record the greeting.
Record the greeting (up to two minutes).
The prompt says, "Record at the tone."
[ 1 ] after recording the greeting.
Choose an option or go to step 12:
>
>
>
[ 2 ] [ 1 ] to rerecord the greeting.
[ 2 ] [ 3 ] to rewind and play back the greeting.
[ * ] [ D ] to delete the greeting and use the
current greeting.
Chapter 4: Call Handling
Call Handling Methods 4-1
Selecting Immediate Call Handling 4-1
Creating Call Distribution Groups (CDG) 4-1 Setting Delayed Ring for Operator 4-2 Setting Lines to No Ring for AA Ports 4-3 Setting No Ring for Other Stations 4-4
Setting Immediate Answer 4-5
Selecting Delayed Call Handling
Creating Call Distribution Groups (CDG) Setting Immediate Ring for Operator Setting No Ring for AA Ports
Setting No Ring for Other Stations Setting Delayed Answer
Selecting Fax Call Handling
Assigning Fax Stations to CDG Identifying Fax Stations
4-6 4-6 4-7 4-7 4-8 4-9
4-10 4-10 4-10
Selecting After Hours Call Handling 4-11
Accepting Fax Calls Only 4-11
Call Handling Methods
The Automated Attendant (AA) Service can answer calls immediately (primary) or after a delay (secondary). In addition, it can direct fax calls automatically to fax machines and route after-hours calls to the appropriate person, department, or announcement.
Refer to "Selecting Immediate Call Handling" if the Automated Attendant Service will answer calls
immediately. Skip to "Selecting Delayed Call Handling" if the Automated Attendant Service is acting as a backup to a primary call handler.
Selecting Immediate Call Handling
If a company wants some or all of its lines answered immediately by the Automated Attendant Service, use the procedures below to select Immediate Call Handling.
CREATING CALL DISTRIBUTION GROUPS (CDG)
Follow Form D: Automated Attendant Settings to assign the AA ports to a Call Distribution Group.
1
2
3
4
5
6
At the MERLIN II R3 System Display Console, enter administration mode by sliding the T/P switch to P. Press [ Conference ] twice.
The Administration Menu appears.
From the Administration Menu, press [ Stations ].
From the Stations Menu, press [ More ], [ GrpCall ].
Dial the CDG number (870 through 875), then press [ Enter ].
Press the Auto Intercom button of the AA ports.
Press the line or line pool buttons associated with AA.
Green light on = line assigned to CDG Green light off = line not assigned to CDG
Press [ Conference ] to continue administration or to
leave administration mode slide the T/P switch to the center position.
SETTING DELAYED RING FOR
OPERATOR
Use Centralized Programming to set the lines assigned to the Automated Attendant Service for delayed ring at the System Operator’s position.
7
8
1
2
3
4
5
6
7
8
At the MERLIN II R3 System Display Console, enter administration mode by sliding the T/P switch to P. Press [ Conference ] twice.
The Administration Menu appears.
From the Administration Menu, press [ More ],
[ More ], [ Cntr-Prg ].
Press the Auto Intercom button of the station to be programmed.
Press [ Enter ].
Press the line or line pool button. Choose the appropriate option:
>
>
[ * ] [ 3 ] [ 6 ] for delayed ring on the line or line pool
that is also assigned to the Automated Attendant Service.
The red light next to the line button flashes.
[ * ] [ 3 ] [ 4 ] [ 6 ] for delayed ring on all lines if all
the lines appearing on this station are also assigned to the Automated Attendant Service.
The red lights next to all line buttons flash.
Press [ Conference ] to continue administration or to
SETTING LINES Use Centralized Programming to set lines answered by the TO NO RING FOR Automated Attendant Service to no ring at the AA ports. AA PORTS
1
2
3
[ More ], [ Cntr-Prg ].
4
5
6
7
8
9
10
At the MERLIN II R3 System Display Console, enter administration mode by sliding the T/P switch to P. Press [ Conference ] twice.
The Administration Menu appears.
From the Administration Menu, press [ More ],
Press [ Enter ].
Press the Auto Intercom button for an AA port.
The green light goes on.
Press [ Enter ].
Press a line button to be programmed.
[ * ] [ 3 ] [ 4 ] [ 5 ] for no ring on all lines assigned to
the AA port.
The red lights next to all line buttons go off.
Repeat this procedure for each Automated Attendant port.
Press [ Conference ] to continue administration or to
SETTING NO RING FOR
OTHER STATIONS
If the lines covered by the Automated Attendant Service appear at any other station, use Centralized Programming to set them for no ring.
1
2
3
4
5
6
7
8
9
At the MERLIN II R3 System Display Console, enter administration mode by sliding the T/P switch to P. Press [ Conference ] twice.
The Administration Menu appears.
From the Administration Menu, press [ More ],
[ More ], [ Cntr-Prg ].
Press the Auto Intercom button of the station to be programmed.
Press [ Enter ].
Press the line or line pool button. Choose the appropriate option:
[ * ] [ 3 ] [ 5 ] for no ring on a line or line pool
answered by the Automated Attendant Service.
The red light next to the line button goes off.
[ * ] [ 3 ] [ 4 ] [ 5 ] for no ring on all lines if all lines
that appear on this station are answered by the Automated Attendant Service.
The red lights next to all line buttons go off.
Repeat this procedure for each station.
Press [ Conference ] to continue administration or to
leave administration slide the T/P switch to the center position.
>
SETTING IMMEDIATE Follow the procedure only if you are changing Automated
ANSWER Attendant Service from delayed answer to immediate
answer. If you are performing the initial installation, do
not use this procedure since immediate answer is the
factory setting.
NOTE: Since this selection sets all ports to immediate
1
2
3
4
5
6
7
8
answer, you must reset the Call Answer ports if they should be set for delayed answer.
[ MERMAIL ] (the MERLIN MAIL system extension).
The MERLIN MAIL system greeting plays.
[ * ] [ 7 ] to enter Voice Mail.
The Voice Mail greeting plays.
System Administrator’s [ Ext. ] followed by [ # ].
System Administrator’s [ Password ] followed by [ # ].
Your name plays, followed by the Voice Mail Activity Menu.
[ 9 ] to administer the MERLIN MAIL system.
The System Administration Menu plays.
[ 1 ] to administer System Parameters.
The System Parameter Menu plays.
[ 3 ] for Immediate Answer.
[ 4 ] for Immediate Answer on all ports.
Selecting Delayed Call Handling
CREATING CALL DISTRIBUTION GROUPS (CDG)
With Delayed Call Handling, the Automated Attendant Service acts as a backup to the primary call handler, usually a receptionist, when he or she does not answer calls within four rings.
Follow Form D: Automated Attendant Settings to assign the AA ports to a Call Distribution Group.
1
2
3
4
5
6
7
8
At the MERLIN II R3 System Display Console, enter administration mode by sliding the T/P switch to P. Press [ Conference ] twice.
The Administration Menu appears.
From the Administration Menu, press [ Stations ].
From the Stations Menu, press [ More ], [ GrpCall ].
Dial the CDG number (870 through 875), then press [ Enter ].
Press the Auto Intercom button for each of the AA ports.
Green light on = port assigned to CDG Green light off = port not assigned to CDG
Press each line button assigned to the Automated Attendant Service.
Green light on = line in CDG Green light off = line not in CDG
Press [ Conference ] to continue administration or
SETTING IMMEDIATE At the System Operator’s phone, program the lines RING FOR covered by the Automated Attendant Service for
OPERATOR immediate ring.
Press a line or line pool button. Choose the appropriate option:
>
>
[ * ] [ 3 ] [ 7 ] for immediate ring on one line or
line pool.
The red light next to the line button goes on steady.
[ * ] [ 3 ] [ 4 ] [ 7 ] for immediate ring on all lines
if all lines are covered by the Automated Attendant Service.
The red lights next to the line buttons go on steady.
SETTING NO RING For the lines answered by the AA ports, use Centralized FOR AA PORTS Programming to set them for no ring.
1
2
1
2
3
4
5
6
7
At the MERLIN II R3 System Display Console, enter administration mode by sliding the T/P switch to P. Press [ Conference ] twice.
The Administration Menu appears
From the Administration Menu, press [ More ],
[ More ], [ Cntr-Prg ].
Press the Auto Intercom button of the AA port. Press [ Enter ].
Press the line or line pool button.
[ * ] [ 3 ] [ 4 ] [ 5 ] for no ring on all lines answered by the
Automated Attendant Service.
Repeat this procedure for each AA port.
Press [ Conference ] to continue administration or to leave
administration slide the T/P switch to the center position.
SETTING NO RING FOR OTHER
STATIONS
If the lines covered by the Automated Attendant Service also appear at any other station, use Centralized
Programming to set them for no ring. 8
9
1
2
3
4
5
6
7
8
9
At the MERLIN II R3 System Display Console, enter administration mode by sliding the T/P switch to P. Press [ Conference ] twice.
The Administration Menu appears.
From the Administration Menu, press [ More ],
[ More ], [ Cntr-Prg ].
Press the Auto Intercom button of the station to be programmed.
Press [ Enter ].
Press the line or line pool button. Choose the appropriate option:
>
>
[ * ] [ 3 ] [ 5 ] for no ring on each line or line pool
that is answered by the Automated Attendant Service.
The red light next to the line button goes off.
[ * ] [ 3 ] [ 4 ] [ 5 ] for no ring on all lines if all lines
assigned to this station are answered by the Automated Attendant Service.
The red lights next to all line buttons go off.
Repeat this procedure for each station.
Press [ Conference ] to continue administration or
SETTING DELAYED Follow Form D: Automated Attendant Settings to set the ANSWER Automated Attendant Service for delayed call handling.
[ MERMAIL ] (the MERLIN MAIL system extension).
The MERLIN MAIL system greeting plays.
[ * ] [ 7 ] to enter Voice Mail.
The Voice Mail greeting plays.
1
2
3
4
5
6
7
8
System Administrator’s [ Ext. ] followed by [ # ].
System Administrator’s [ Password ] followed by [ # ].
Your name plays, followed by the Voice Mail Activity Menu.
[ 9 ] to administer the MERLIN MAIL system.
The System Administration Menu plays.
[ 1 ] to administer System Parameters.
The System Parameter Menu plays.
[ 3 ] for Delayed Answer.
[ 2 ] for Delayed Answer on AA ports only.
Selecting Fax Call Handling
If requested on Form D: Automated Attendant Settings, administer the MERLIN MAIL system to distinguish fax calls from regular voice calls in order to transfer fax calls immediately to a fax machine. Fax Call Handling can be combined only with Immediate Call Handling.
NOTE: When Fax Call Handling is selected, the
Touch-Tone Gate is automatically activated.
ASSIGNING FAX Perform this procedure to assign fax machines to a CDG STATIONS TO CDG only if the customer has more than one fax machine.
1
2
3
4
5
6
7
1
2
At the MERLIN II R3 System Display Console, enter administration mode by sliding the T/P switch to P. Press [ Conference ] twice.
The Administration Menu appears.
From the Administration Menu, press [ Stations ].
From the Stations Menu, press [ More ], [ GrpCall ].
Enter the CDG number (870 through 875), then press [ Enter ].
Press the Auto Intercom button of each fax station.
Green light on = station is in CDG Green light off = station is not in CDG
Press [ Conference ] to continue administration or
to leave administration slide the T/P switch to the center position.
IDENTIFYING FAX Specify the fax extension where the Automated Attendant STATIONS Service will transfer fax calls.
[ MERMAIL ] (the MERLIN MAIL system extension).
The MERLIN MAIL system greeting plays.
[ * ] [ 7 ] to enter Voice Mail.
3
4
5
6
7
8
System Administrator’s [ Ext. ] followed by [ # ].
System Administrator’s [ Password ] followed by [ # ].
The Voice Mail Activity Menu plays.
[ 9 ] to administer the MERLIN MAIL system.
The System Administration Menu plays.
[ 1 ] to administer System Parameters.
The System Parameter Menu plays.
[ 4 ] to administer the fax extension.
The current fax extension plays.
Enter the fax extension or CDG number followed by [ # ].
NOTE: To deactivate fax call handling, enter [ 0 ]
instead of an extension or CDG number.
The new fax extension is confirmed.
Selecting After Hours Call Handling
There are several options available to use the Automated Attendant Service after hours. Two of the options, fax calls only and Night Service Only, require additional MERLIN II R3 system administration as shown below.
ACCEPTING FAX CALLS ONLY
With this arrangement, only fax calls are accepted when the business is closed. Assign the AA ports to all Night Service groups. Follow Form C: System Greetings to record the Night Greeting and follow Form F: Automated
Attendant Night Main Menu to delete Selector Codes 1
Assigning AA Ports Follow this procedure to add the AA ports to all Night to Night Service Service Groups.
Groups
At the MERLIN II R3 System Display Console, enter administration mode by sliding the T/P switch to P. Press [ Conference ] twice.
The Administration Menu appears.
1
2
3
4
5
6
7
8
9
From the Administration Menu, press [ More ], [ Night ].
From the Night Menu, press [ Group ].
Dial the attendant’s intercom number. Press [ Enter ].
Green lights flash at all attendant positions.
NOTE: If there is more than one attendant, assign the
AA ports to all Night Service groups.
Press the Auto Intercom buttons for all the AA ports.
Green light on = port assigned to Night Service group Green light off = port not assigned to Night Service group
To administer other groups, press [ Group ] and repeat
steps 6 and 7.
Press [ Conference ] to continue administration or leave
administration mode by sliding the T/P switch to the center position.
Selecting Night Service with Time Set
Follow the procedure below only if Night Service is invoked by the MERLIN II R3 system through Night Service with Time Set. Be sure the MERLIN II R3 system clock is set for the current time and date.
NOTE: Night Service can also be invoked manually by
1
2
3
4
5
6
7
8
9
10
11
12
13
14
15
At the MERLIN II R3 System Display Console, enter administration mode by sliding the T/P switch to P. Press [ Conference ] twice.
The Administration Menu appears.
From the Administration Menu, press [ More ], [ Night ].
From Night Menu, press [ More ], [ Start ].
Dial "on" day number (0 through 6, Sunday=0). Dial "on" time (24-hour time).
Press [ Enter ].
Press [ Stop ].
Dial "off" day number (0 through 6, Sunday=6). Dial "off" time (24-hour time).
Press [ Enter ].
Repeat steps 8 through 13 for each day.
To turn Night Service on or off, from the Night Menu press [ More ], [ DayofWk ].
Perform the appropriate action:
>
>
To turn on timer-controlled Night Service, dial the current day number (0 through 6, Sunday=0) followed by [ Enter ].
To turn off timer-controlled Night Service, [ 9 ], then [ Enter ].
Press [ Conference ] to continue administration or
SELECTING NIGHT
SERVICE ONLY In this case, Automated Attendant Service answers callsonly after business hours. Follow Form C: System Greetings to record the Night Greeting and create the
Night Main Menu using Form F: Automated Attendant
Night Main Menu.
Assigning AA Ports Follow the procedures below to assign the AA ports to a to Night Service Night Service group.
Groups
At the MERLIN II R3 System Display Console, enter administration mode by sliding the T/P switch to P. 1
2
3
4
5
6
7
8
9
Press [ Conference ] twice.
The Administration Menu appears.
From the Administration Menu, press [ More ], [ Night ].
From the Night Menu, press [ Group ].
Dial the attendant’s intercom number. Press [ Enter ].
Green lights flash at all attendant positions.
NOTE: If there is more than one attendant, assign the
AA ports to all Night Service groups.
Press the Auto Intercom buttons for all the AA ports.
Green light on = port assigned to Night Service group Green light off = port not assigned to Night Service group
To administer other groups, press [ Group ] and repeat
steps 6 and 7.
Press [ Conference ] to continue administration or leave
Selecting Night Follow the procedure below only if Night Service is
Service with invoked by the MERLIN II R3 system through Night Time Set
NOTE:
Service with Time Set. Be sure the MERLIN II R3 system clock is set for the current time and date.
Night Service can also be invoked manually by programming a Night Service button at an attendant console.
1
2
3
4
5
6
7
8
9
10
11
12
13
At the MERLIN II R3 System Display Console, enter administration mode by sliding the T/P switch to P. Press [ Conference ] twice.
The Administration Menu appears.
From the Administration Menu, press [ More ], [ Night ].
From Night Menu, press [ More ], [ Start ].
Dial "on" day number (0 through 6, Sunday=0). Dial "on" time (24-hour time).
Press [ Enter ].
Press [ Stop ].
Dial "off" day number (0 through 6, Sunday=6). Dial "off" time (24-hour time).
Press [ Enter ].
Repeat steps 8 through 13 for each day.
14
15
Perform the appropriate action:
To turn on timer-controlled Night Service, dial the
>
>
current day number (0 through 6, Sunday=0) followed by [ Enter ].
To turn off timer-controlled Night Service, [ 9 ], then [ Enter ].
Press [ Conference ] to continue administration or
Chapter 5: Automated Attendant Service
Providing Automated Attendant Service 5-1
Changing the Touch-Tone Gate Setting 5-1
Creating Announcements 5-2
Creating Submenus 5-4
Providing Automated Attendant Service
Although it’s easier for planning purposes to write the Day and Night Main Menus before submenus and
announcements, when you administer the MERLIN MAIL system, create submenus and announcements first. To help you remember this, reorganize the Automated Attendant Forms as follows:
Form H: Automated Attendant Announcements
● ● ● ●
Form G: Automated Attendant Submenus
Form F: Automated Attendant Night Main Menu
Form E: Automated Attendant Day Main Menu
Changing the Touch-Tone Gate Setting
Follow Form D: Automated Attendant Settings to determine the Touch-Tone Gate setting. When the
Touch-Tone Gate is on, the greeting must instruct callers to press [ 1 ] before the Main Menu plays. If a caller does
not press [ 1 ], the call is transferred for assistance.
NOTE: The Touch-Tone Gate is automatically on when Fax Call Handling is selected and cannot be turned off.
When the Touch-Tone Gate is off, the greeting and the Main Menu play before rotary callers, who cannot use the MERLIN MAIL system, are transferred for assistance. To change the current setting of the Touch-Tone Gate, follow the procedure below.
1
2
[ MERMAIL ] (the MERLIN MAIL system extension).
The MERLIN MAIL system greeting plays.
[ * ] [ 7 ] to enter Voice Mail.
Your [ Ext. ] followed by [ # ].
Your [ Password ] followed by [ # ].
Your name plays, followed by the Voice Mail Activity Menu.
[ 9 ] to administer the MERLIN MAIL system.
The System Administration Menu plays.
[ 3 ] for Automated Attendant.
The Automated Attendant Administration Menu plays.
[ 5 ] for Touch-Tone Gate.
The current setting plays.
Choose the appropriate option:
>
>
[ 9 ] to turn on the Touch-Tone Gate.
[ 6 ] to turn off the Touch-Tone Gate.
Creating Announcements
Up to 99 announcements can be recorded to play to callers who choose the corresponding Selector Code from the Main Menu or a submenu. Follow Form H: Automated
Attendant Announcements to create an announcement.
Announcements must be created before you administer the Selector Code to transfer to the announcement.
[ MERMAIL ] (the MERLIN MAIL system extension).
The MERLIN MAIL system greeting plays.
[ * ] [ 7 ] to enter Voice Mail.
The Voice Mail greeting plays.
3
4
5
6
7
8
1
2
3
4
System Administrator’s [ Ext. ] followed by [ # ].
System Administrator’s [ Password ] followed by [ # ].
5
6
7
8
9
10
11
12
13
14
[ 9 ] to administer the MERLIN MAIL system.
The System Administration Menu plays.
[ 3 ] for Automated Attendant.
[ 4 ] to administer an announcement.
[ 7 ] to record an announcement.
Enter the announcement number (01 through 99) followed by [ # ].
You will be prompted to confirm the announcement number.
Choose the appropriate option:
> [ 9 ] for Yes to continue.
> [ 6 ] for No to cancel.
Record the announcement.
[ 1 ] after recording the announcement.
Choose an option or go to step 14:
> [ 2 ] [ 1 ] to rerecord the announcement.
> [ 2 ] [ 3 ] to rewind and play back the
announcement.
> [ * ] [ D ] to delete the announcement.
Creating Submenus
You can create up to 99 submenus, although more than two levels of menus can confuse callers. If you are creating more than one submenu, create the lowest level
submenu first. Follow Form G: Automated Attendant Submenus to specify the submenu number, the Selector
Codes, the type of transfer, and record the entire submenu script.
1
2
3
4
5
6
7
8
9
10
11
[ MERMAIL ] (the MERLIN MAIL system extension).
The MERLIN MAIL system greeting plays.
[ * ] [ 7 ] to enter Voice Mail.
The Voice Mail greeting plays.
System Administrator’s [ Ext. ] followed by [ # ].
System Administrator’s [ Password ] followed by [ # ].
The Voice Mail Activity Menu plays.
[ 9 ] to administer the MERLIN MAIL system.
The System Administration Menu plays.
[ 3 ] for Automated Attendant.
The Automated Attendant Menu plays.
[ 3 ] to administer the submenu.
The Menu Definition Options play.
[ 4 ] to create a submenu.
by [ # ].
Enter the submenu number (01 through 99) followed Enter the Selector Code ( [ 1 ] through [ 9 ]).
Enter the transfer type.
1 = Transfer to a specified extension 2 = Transfer to a submenu
Enter the extension, submenu, or announcement
number where calls will be transferred, followed by #.
The Selector Code, transfer type, and number are confirmed.
Repeat steps 10 and 12 for each Selector Code. When finished, go to step 14.
[ * ] [ # ] to approve.
The prompt asks you to record the submenu script, "Record at the tone."
Record the submenu script.
[ 1 ] after recording the submenu script.
The Message Recording Menu plays.
Choose an option or go to step 18:
>
>
>
[ 2 ] [ 1 ] to rerecord the submenu.
[ 2 ] [ 3 ] to rewind and play back the submenu.
[ * ] [ D ] to delete the submenu.
12
13
14
15
16
17
18 [ * ] [ # ] to approve the submenu.
Creating the Main Menu
Create the Day Main Menu following Form E: Automated
Attendant Day Main Menu, and/or the Night Main Menu
following Form F: Automated Attendant Night Main