Operating Instructions
Blu-ray Disc
TM
Player
Model No. DMP-BDT330
DMP-BDT230
Thank you for purchasing this product.
Please read these instructions carefully before using this product, and save this manual for future use. Unless otherwise indicated, illustrations in these operating instructions are of DMP-BDT330.
Firmware updates
Panasonic is constantly improving the unit’s firmware to ensure that our customers are enjoying the latest technology.
Panasonic recommends updating your firmware as soon as you are notified.
For details, refer to “Firmware updates” (>16) or
http://panasonic.jp/support/global/cs/ (This site is in English only.)
Unit
To reduce the risk of fire, electric shock or product damage, ≥Do not expose this unit to rain, moisture, dripping or splashing. ≥Do not place objects filled with liquids, such as vases, on this
unit.
≥Use only the recommended accessories. ≥Do not remove covers.
≥Do not repair this unit by yourself. Refer servicing to qualified service personnel.
≥Do not let metal objects fall inside this unit. ≥Do not place heavy items on this unit. AC mains lead
To reduce the risk of fire, electric shock or product damage, ≥Ensure that the power supply voltage corresponds to the
voltage printed on this unit.
≥Insert the mains plug fully into the socket outlet. ≥Do not pull, bend, or place heavy items on the lead. ≥Do not handle the plug with wet hands.
≥Hold onto the mains plug body when disconnecting the plug. ≥Do not use a damaged mains plug or socket outlet. The mains plug is the disconnecting device.
Install this unit so that the mains plug can be unplugged from the socket outlet immediately.
Unit
≥This unit utilizes a laser. Use of controls or adjustments or performance of procedures other than those specified herein may result in hazardous radiation exposure.
≥Do not place sources of naked flames, such as lighted candles, on this unit.
≥This unit may receive radio interference caused by mobile telephones during use. If such interference occurs, please increase separation between this unit and the mobile telephone.
Placement
Place this unit on an even surface.
To reduce the risk of fire, electric shock or product damage, ≥Do not install or place this unit in a bookcase, built-in cabinet or
in another confined space. Ensure this unit is well ventilated. ≥Do not obstruct this unit’s ventilation openings with newspapers,
tablecloths, curtains, and similar items.
≥Do not place the unit on amplifiers/receivers or equipment that may become hot. The heat can damage the unit.
≥Do not expose this unit to direct sunlight, high temperatures, high humidity, and excessive vibration.
Batteries
Mishandling of batteries can cause electrolyte leakage and may cause a fire.
≥Danger of explosion if battery is incorrectly replaced. Replace only with the type recommended by the manufacturer. ≥When disposing the batteries, please contact your local
authorities or dealer and ask for the correct method of disposal. ≥Do not mix old and new batteries or different types at the same
time.
≥Do not heat or expose to flame.
≥Do not leave the battery(ies) in a car exposed to direct sunlight for a long period of time with doors and windows closed. ≥Do not take apart or short circuit.
≥Do not recharge alkaline or manganese batteries. ≥Do not use batteries if the covering has been peeled off. Remove batteries if you do not intend to use the remote control for a long period of time. Store in a cool, dark place.
Precautions
WARNING
Small object
Keep the Memory Card out of reach of children to prevent swallowing.
CAUTION
[For[Australia[and[New[Zealand]
≥This unit is intended for use in moderate climates. [Except[Australia[and[New[Zealand]
≥This unit is intended for use in tropical climates.
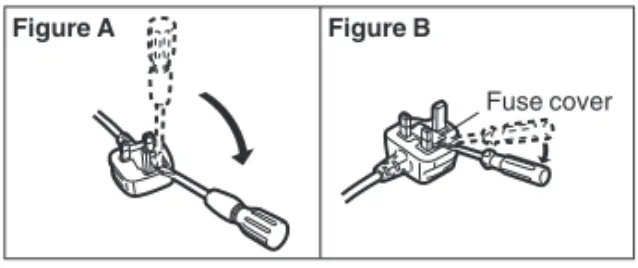
(For the AC mains plug of three pins) How to replace the fuse
The location of the fuse differ according to the type of AC mains plug (figures A and B). Confirm the AC mains plug fitted and follow the instructions below.
Illustrations may differ from actual AC mains plug. 1. Open the fuse cover with a screwdriver.
2. Replace the fuse and close or attach the fuse cover.
Fuse cover
Figure A Figure B
Figure A Fuse Figure B Fuse(5 ampere)
≥The operation history may be recorded in the memory of this unit.
Restriction on use of
unauthorized copied content
This unit adopts the following technology for copyright protection. Cinavia NoticeThis product uses Cinavia technology to limit the use of unauthorized copies of some commercially-produced film and videos and their soundtracks. When a prohibited use of an unauthorized copy is detected, a message will be displayed and playback or copying will be interrupted.
More information about Cinavia technology is provided at the Cinavia Online Consumer Information Center at http:// www.cinavia.com. To request additional information about Cinavia by mail, send a postcard with your mailing address to: Cinavia Consumer Information Center, P.O. Box 86851, San Diego, CA, 92138, USA.
Wireless LAN connection
The following limits are in place regarding the usage of this unit. You must be aware of these limits before using this unit. Panasonic will in no way be responsible for any incidental damage which may arise due to a failure to obey these limits, or to any condition of use or disuse of this unit.
≥Data transmitted and received over radio waves may be intercepted and monitored.
≥This unit contains delicate electronic components. Please use this unit in the manner in which it was intended and follow the following points:
– Do not expose this unit to high temperatures or direct sunlight.
– Do not bend, or subject this unit to strong impacts. – Keep this unit away from moisture.
– Do not disassemble or alter this unit in any way.
[For[Singapore]
Complies with IDA Standards DB01017
To dispose or transfer this unit
The unit may keep the user settings information in the unit. If you discard this unit either by disposal or transfer, then follow the procedure to return all the settings to the factory presets to delete the user settings. (>37, “To return all settings to the factory preset.”)Information on Disposal in other Countries outside the European Union
This symbol is only valid in the European Union.
If you wish to discard this product, please contact your local authorities or dealer and ask for the correct method of disposal.
Table of contents
Precautions . . . 2
Getting started
Accessories . . . 5
Unit and media care . . . 5
Playable media. . . 6
Control reference guide . . . 9
Connections and settings
Connecting to a TV . . . 11
Connecting to
an amplifier/receiver . . . 12
Connecting to the network . . . 14
Settings . . . 15
Reprogramming
the remote control . . . 17
Playback
Inserting or removing media . . . . 17
HOME menu . . . 18
Multi User Mode . . . 19
Playback . . . 20
VIERA Connect
(Enjoying Internet Service) . . . . 23
Home Network feature . . . 24
“HDMI CEC” . . . 27
USB Sharing . . . 27
Settings
Option menu . . . 28
Setup menu. . . 30
Reference
Troubleshooting guide . . . 37
Messages . . . 41
Specifications . . . 43
Limited Warranty (ONLY FOR
AUSTRALIA) . . . 47
G e tti n g started C onne c ti ons a nd s e tt ings P la yb ack S e tt ings Referen ce Getting started
Accessories
Check the supplied accessories before using this unit.
≥Do not use AC mains lead with other equipment.
∫
Using the remote control
Insert so the poles (i and j) match those in the remote control.
Point it at the remote control signal sensor on this unit. (>10)
Unit and media care
∫
Clean this unit with a soft, dry cloth
≥Never use alcohol, paint thinner or benzine toclean this unit.
≥Before using chemically treated cloth, carefully read the instructions that came with the cloth.
∫
This unit’s lens
∫
Clean discs
Wipe with a damp cloth and then wipe dry.
≥Handle discs by the edges to avoid inadvertent scratches or fingerprints on the disc.
≥Do not attach labels or stickers to discs.
≥Do not use disc cleaning sprays, benzine, thinner, static electricity prevention liquids or any other solvent.
≥Do not use the following discs:
– Discs with exposed adhesive from removed stickers or labels (rented discs, etc.). – Discs that are badly warped or cracked. – Irregularly shaped discs, such as heart
shapes. 1 Remote control
(N2QAYB000878)
2 Batteries for remote control 1 HDMI Cable
[For[Australia,[New[Zealand[and[India] 1 AC mains lead
[For[the[Middle[East[and[South[East[Asia] 2 AC mains lead*
* See page 11 for more information.
≥Product numbers provided in these operating instructions correct as of February 2013. These may be subject to change.
R6/LR6, AA
(Alkaline or manganese batteries)
Lens cleaner: RP-CL720AE
≥This lens cleaner may not be for sale depending on the region.
≥This lens cleaner is sold as specific for DIGA, but can be used on this unit as well.
∫
Disc and card handling precautions
≥Clean any dust, water, or foreign matter from the terminals on the rear side of the card.
Playable media
≥See pages 7 and 43 for more information on the types of content that can be played.
Device Media markings
Device types
Contents format
BD-Video Video
BD-RE Video, JPEG, MPO
BD-R Video, MKV, Xvid
DVD-Video Video
DVD-R
Video, AVCHD, MKV, Xvid, JPEG, MPO, AAC, FLAC, MP3, WAV, WMA DVD-R DL DVD-RW Video, AVCHD — +R/+RW/+R DL
Music CD Music [CD-DA]
— CD-RWCD-R
MKV, Xvid, JPEG, MPO, AAC, FLAC, MP3, Music [CD-DA], WAV, WMA
SD Memory Card (from 8 MB to 2 GB) SDHC Memory Card (from 4 GB to 32 GB)
SDXC Memory Card (48 GB, 64 GB) (Compatible with both mini and micro types)
AVCHD, AVCHD 3D, MP4, JPEG, MPO
— USB devices(up to 2 TB)
MKV, MP4, MPEG2, Xvid, JPEG, MPO, AAC, FLAC, MP3, WAV, WMA
BD
DVD
CD
SD
USB
G e tti n g started
∫
Discs that cannot be played by this
unit
Any other disc that is not specifically supported or previously described.
∫
Region management information
∫
Finalize
DVD-R/RW/R DL, +R/+RW/+R DL and CD-R/RW recorded by a recorder needs to be finalized by the recorder to play on this unit. Please refer to the recorder’s instructions.
∫
BD-Video
≥This unit supports high bit rate audio (Dolby® Digital Plus, Dolby® TrueHD, DTS-HD High Resolution Audio and DTS-HD Master Audio) adopted in BD-Video.
∫
Music CD
Operation and sound quality of CDs that do not conform to CD-DA specifications (copy control CDs, etc.) cannot be guaranteed.
≥DVD-RAM
≥Super Audio CD
≥Photo CD
≥DVD-Audio
≥Video CD and Super Video CD
≥HD DVD
BD-Video: [For[South[East[Asia] This unit can play BD-Video discs supporting the region code “A”.
[For[Australia,[New[Zealand[and[the[Middle[East] This unit can play
BD-Video discs supporting the region code “B”.
[For[India] This unit can play BD-Video discs supporting the region code “C”.
DVD-Video: [For]the]Middle]East] This unit can play DVD-Video discs supporting the region number “2” or “ALL”.
[For[South[East[Asia] This unit can play DVD-Video discs supporting the region number “3” or “ALL”.
[For[Australia[and[New[Zealand] This unit can play DVD-Video discs supporting the region number “4” or “ALL”.
[For[India] This unit can play DVD-Video discs supporting the region number “5” or Example: Example: Example:
2
ALL
3
5
2
Example:3
ALL
3
4
2
Example:4
ALL
3
4
2
Example:5
ALL
2
3
Example:≥[BDT230] If “Dolby D/Dolby D +/Dolby TrueHD” is set to “PCM” and “DTS Neo:6” is set to “Off”, the maximum possible number of Dolby® sound is 5.1ch PCM. (>31, 32)
∫
3D
≥3D videos and 3D still pictures can be played back when this unit is connected to a 3D compatible TV using a High Speed HDMI Cable.
≥2D video can be enjoyed as 3D virtually. (>29)
∫
SD card
≥miniSD Cards, microSD Cards, microSDHC Cards and microSDXC Cards can be used, but must be used with an adaptor card. These are usually supplied with such cards, or otherwise customer provided.
≥To protect the card’s contents,
move the record prevention tab (on the SD card) to “LOCK”.
≥This unit is compatible with SD Memory Cards that meet SD Card Specifications FAT12 and FAT16 formats, as well as SDHC Memory Cards in FAT32 format and SDXC Memory Cards in exFAT.
≥If the SD card is used with incompatible computers or devices, recorded contents may be erased due to the card being formatted etc.
≥Usable memory may be slightly less than the card capacity.
∫
USB device
≥This unit does not guarantee connection with all USB devices.
≥This unit does not support USB device charging.
≥FAT12, FAT16, FAT32, and NTFS file systems are supported.
≥This unit supports USB2.0 High Speed.
≥This unit can support an HDD formatted to FAT32 and NTFS.
Some types of HDD may require the use of its external power supply unit.
∫
BD-RE, BD-R
Discs recorded in DR mode using Panasonic Blu-ray Disc recorders may not play back the audio etc., correctly.
≥It may not be possible to play the above media in some cases due to the type of media, the condition of the recording, the recording method, and how the files were created.
≥The producers of the disc can control how discs are played, so you may not always be able to control play as described in these operating instructions. Read the disc’s instructions carefully.
G e tti n g started
Control reference guide
モヶュリヰチ ヤモワヤユロ 1 2 3 6 5 4 7 8 17 10 9 18 16 20 19 14 13 15 12
11 1 Turn the unit on and off
2 TV operation buttons
You can operate the Panasonic TV using the unit’s remote control. Some buttons may not work depending on the TV.
[ÍTV] : Turn the TV on and off [AV] : Change input
[i jVOL] : Adjust the volume
3 Select title numbers, etc./Enter numbers or characters
4 Cancel
5 Select audio (>20)
6 Basic playback control buttons (>20) 7 Show USB Sharing menu (>27) 8 Show Top menu (>21) 9 Show Option menu (>28)
10 Coloured buttons (red, green, yellow, blue) Used for various purposes depending on the display
11 Transmit the remote control signal 12 Open or close the disc tray (>17) 13 Show status messages (>21) 14 Show MiracastTM screen (>24) 15 Show the Home screen of the VIERA
Connect (>23) 16 Exit the menu screen 17 Show Pop-up menu (>21) 18 Show HOME menu (>18)
19 [3,4,2,1] : Move the highlight for selection
[OK] : Confirm the selection (;1) : Frame-by-frame (>20) 20 Return to previous screen
10 9 7 6 1 3 IR 5 4 2 SD CARD 11 8 [BDT330]
Pull to flip down the front panel. SD CARD 7 4 2 1 6 10 9 8 11
Pull to flip down the front panel.
[BDT230]
1 Disc tray (>17)
2 Remote control signal sensor Distance: Within approx. 7 m
Angle: Approx. 20e up and down, 30e left and right
3 [BDT330] Blue LED
It is possible to set the LED to turn on/off. (>36)
4 SD card slot (>17, 27)
5 [BDT330] V.OFF LED (Video off LED) It is possible to set the LED to turn on/off. (>36)
6 USB ports (>17, 27) 7 Display
8 Open or close the disc tray (>17) 9 Stop (>20)
10 Start play (>20)
11 Standby/on switch (Í/I) (>15)
Press to switch the unit from on to standby mode or vice versa. In standby mode, the unit is still consuming a small amount of power. Rear panel terminals (>11–14)
C onne c ti ons a nd s e tt ings
Connections and settings
Connecting to a TV
Connect the AC mains lead after making all connections.
≥Before making any connections, we recommend that you temporarily disconnect all the units from AC power.
≥Use the High Speed HDMI cables. Non-HDMI-compliant cables cannot be utilized.
It is recommended that you use Panasonic’s HDMI cable. When outputting 1080p signal, please use HDMI cables 5.0 meters or less.
≥This unit consumes a small amount of AC power (>43) even when turned off. For the purpose of power conservation, the unit can be disconnected if you will not be using it for extended period of time. G e tti n g started
The HDMI-compliant cable is supplied with this unit. [For]the]Middle]East]
Use the AC mains lead that matches the socket for the area you live in.
≥In Saudi Arabia, always use the 3-pin AC mains lead. [For[South[East[Asia]
AC mains lead with a label is for Thailand.
AC mains lead without a label is for areas other than Thailand.
HDMI IN HDMI cable (supplied)
[BDT330] Use HDMI AV OUT MAIN terminal.
[BDT230]
AC mains lead (supplied)
To a household mains socket
Connecting to an amplifier/receiver
≥Set “Digital Audio Output” (>31).
≥When using the TV or amplifier/receiver that does not have the indication of “(ARC)”
(non-ARC-compatible) on the HDMI terminal, the amplifier/receiver and TV must also be connected using an optical digital cable in order to enjoy the TV’s sound through the amplifier/receiver. Perform either one of the following connections in accordance with your amplifier/receiver input terminal.
HDMI AV OUT
HDMI IN (ARC) HDMI OUT (ARC) HDMI IN HDMI cable(supplied) HDMI cable
Amplifier/receiver
[BDT330] Use HDMI AV OUT MAIN terminal.
[BDT230]
≥When connecting to a non-3D compatible amplifier/receiver, connect this unit to a TV, then connect the TV and the amplifier/receiver. Please note, however, that the audio can only be up to 5.1ch.
HDMI AV OUT SUB
[BDT330]
You can enjoy richer sound by using the HDMI AV OUT SUB terminal.
≥Set “HDMI(SUB) Output Mode” to “V.OFF(Video Off)”. (>31)
– Audio is output in high resolution regardless of compatibility of the amplifier/receiver with 3D.
≥It is possible to play back 3D videos and 3D still pictures when the connected TV is 3D compatible, even if the amplifier/receiver is not 3D compatible.
≥The HDMI connection using HDMI AV OUT MAIN supports HDMI CEC (>27). The HDMI AV OUT SUB terminal is not compatible with the HDMI CEC.
HDMI IN HDMI IN
HDMI cable (supplied) HDMI cable
C onne c ti ons a nd s e tt ings
OPTICAL
≥Set “HDMI Audio Output” to “Off” (>31).
≥Set “Digital Audio Output” (>31).
OPTICAL IN [BDT330]
[BDT230]
Optical digital cable
Connecting to the network
The following services can be used when this unit is connected to broadband.
≥Firmware can be updated (>16)
≥You can enjoy BD-Live (>22)
≥You can access other devices (Home Network) (>24)
For details about connection method, refer to the instructions supplied with the connected equipment.
≥For up-to-date compatibility information on your wireless router, refer to http://panasonic.jp/support/global/cs/
(This site is in English only.)
≥Use category 5 or above straight LAN cables (STP) when connecting to peripheral devices.
≥Inserting any cable other than a LAN cable in the LAN port can damage the unit.
≥You can enjoy VIERA Connect (>23)
≥This unit supports Wi-Fi DirectTM and can make a wireless connection to wireless devices without router. You can use this function when enjoying Home Network feature, etc. Internet access is not available while connected via Wi-Fi DirectTM. (>25, 33)
Wireless LAN connection
This unit has built-in Wi-Fi® and can be connected to a wireless router.
Wireless router, etc. Internet
[BDT230] [BDT330]
≥The unit is not compatible with public wireless LAN services provided in airports, stations, cafes, etc.
≥See page 3 for the precautions for wireless LAN connection.
LAN cable connection
[BDT330]
[BDT230] Internet
LAN Cable
C onne c ti ons a nd s e tt ings
Settings
After connecting your new player for the first time and pressing [Í], the basic settings screen will appear.
Preparation
Turn on the TV and select the appropriate video input.
1
Press [Í].Setup screen appears.
2
Follow the on-screen instructions to continue with the settings.≥You can perform this setup anytime by selecting “Easy Settings” in the Setup menu. (>35)
After completing “Easy Settings”, you can perform “Easy Network Setting”.
Select “Wired” or “Wireless” and press [OK].
∫
“Wired” connection
Follow the on-screen instructions to establish your connection settings.
∫
“Wireless” connection
Before beginning wireless connection setup
≥Obtain your network name (SSID*1).
≥If your wireless connection is encrypted, please be sure that you know your encryption key.
Select “Search for wireless network” or “WPS (PUSH button)” and press [OK], then follow the on-screen instructions to continue with the settings.
WPS (PUSH button): If your wireless router supports WPS (PUSH button), you can easily perform the settings by pressing WPS button on it. WPS (Wi-Fi Protected SetupTM)
is a standard that facilitates settings relating to the connection and security of wireless LAN devices. 1 Press WPS button or corresponding button of
the wireless router until the lamp starts flashing.
≥For details, refer to the operating instruction of the wireless router.
2 Press [OK].
Search for wireless network:
≥When you select “Search for wireless network”, the available wireless networks will be displayed. Select your network name and press [OK].
– If your network name is not displayed, search again by pressing the red button on the remote control.
– Stealth SSID will not be displayed when you select “Search for wireless network”. Enter manually by using “Manual setting”. Press [HOME]
>press [OK] to select “Setup” >select “Player Settings” >select “Network” and press [OK] >select “Network Settings” and press [OK] >select “Wireless Settings” and press [OK] >select “Connection Setting” and press [OK] >select “Manual setting” and press [OK]
≥If your wireless network is encrypted, Encryption Key input screen will be displayed. Input the encryption key of your network.
Easy Settings
Easy Network Setting
Easy Network Setting
Wired Wireless
Select a connection mode.
OK RETURN
Wireless Settings
Select a connection method to wireless access point. Please refer to the operating instructions of your wireless access point about connection methods.
Search for wireless network WPS (PUSH button)
*2
≥Refer to the operating instructions of the hub or router. ≥You can perform this setup anytime by selecting “Easy
Network Setting” in the Setup menu. (>33)
≥You can redo these settings individually using “Network Settings”. (>33)
≥Do not use this unit to connect to any wireless network for which you do not have usage rights.
During automatic searches in a wireless network environment, wireless networks (SSID) for which you do not have usage rights may be displayed; however, using these networks may be regarded as illegal access. ≥After performing network settings on this unit, the settings
(encryption level, etc.) of the wireless router might change. When you have trouble getting online on your PC, perform the network settings on your PC in accordance with the settings of the wireless router.
≥Please be aware that connecting to a network without encryption may result in the content of the communication being illegitimately viewed by a third party, or the leaking of data such as personal or secret information.
*1SSID:
An SSID (Service Set IDentification) is a name used by wireless LAN to identify a particular network. Transmission is possible if the SSID matches for both devices.
*2The wireless router compatible with Wi-Fi Protected
SetupTM may have the mark.
Occasionally, Panasonic may release updated firmware for this unit that may add or improve the way a feature operates. These updates are available free of charge.
This unit is capable of checking the firmware automatically when connected to the Internet via a broadband connection.
When a new firmware version is available, the following message is displayed.
To update the firmware Press [HOME]
>press [OK] to select “Setup” >select “Player Settings” >select “System” and press [OK]
>select “Firmware Update” and press [OK] >select “Update Now” and press [OK] DO NOT DISCONNECT the unit from the AC power or perform any operation while the update takes place.
≥If downloading on this unit fails or this unit is not connected to the Internet, then you can download the latest firmware from the following website and burn it to a CD-R to update the firmware.
http://panasonic.jp/support/global/cs/ (This site is in English only.)
To show the firmware version on this unit. (>36, “Firmware Version Information”)
≥Downloading will require several minutes. It may take longer or may not work properly depending on the connection environment.
≥If you do not want to check for the latest firmware version, set “Automatic Update Check” to “Off”. (>36)
Firmware updates
After the firmware is installed, “FIN” will be displayed on the unit’s display. Unit will restart and the following screen will be displayed.
New firmware is available. Please update firmware in Setup.
The firmware has been updated. Current Version:x.xx
P la yb ack
Reprogramming the
remote control
If you have more than one Panasonic player/ recorder and the remote control operates both products at once, you will need to change the remote control code to prevent this occurrence. (>36, “Remote Control”)
Playback
Inserting or removing
media
Notes
≥When inserting a media item, ensure that it is facing the right way up.
≥If you connect a Panasonic product with a USB connection cable, the setup screen may be displayed on the connected equipment. For details, refer to the instructions for the connected equipment.
≥When you connect a USB HDD, use the right USB port (USB2).
CAUTION
Do not place objects in front of the unit. The disc tray may collide with objects when it is opened, and this may cause malfunction.
≥When removing the SD card, press the centre of the card and pull it straight out.
C onne c ti ons a nd s e tt ings IR SD CARD SD CARD USB1 USB2 USB1 USB2 [BDT330] [BDT230]
HOME menu
Major functions of this unit can be operated from the HOME menu.
Preparation
Turn on the TV and select the appropriate video input on the TV.
1
Press [Í] to turn on the unit.2
Press [OK] or [3,4,2,1] to select the item.≥If there are any other items, repeat this step.
To show the HOME menu Press [HOME].
≥Items to be displayed may vary with the media.
≥After network service introduction banner is shown, the HOME menu is displayed. – When connected to the network, the
banner content may be changed. – You can disable the “Start-up Banner”
(>36).
Music
Photos Setup
Network HOME
Blu-ray Disc Player
Register 1st user
Videos
Videos/Photos/Music
Disc Play back the contents. (>20)
≥When multiple contents are recorded, select the types of contents or the title.
≥“USB1” indicates the left USB port, while “USB2” indicates the right one. (>17) USB
SD Card
Network
Network Service
Displays the Home screen of VIERA Connect. (>23) Home Network DLNA Client (>25) Miracast (>24) Media Renderer (>26) Setup Player Settings (>30) USB Management (>22) USB Sharing (>27)
Wallpaper Changes the background
of HOME menu.
≥Where necessary, set “Mixed Data Disc Option” when using a disc with both data files (MP3, JPEG, MKV, etc.) and Video (BDAV and AVCHD). (>36)
P
la
yb
ack
Multi User Mode
Multi User Mode allows individuals to customize settings and switch to their saved settings easily. Up to 4 people can use the unit with their own settings.
The following settings can be personalized:
≥The user icon
≥The wallpaper of HOME menu
≥The audio and picture settings (>28, 30)
A The user name and icon currently selected
B Personalize a new user and switch between users with coloured buttons.
1
Press [HOME].2
Press the coloured button that indicates new user personalization.3
Select an item and change the settings according to the indications.The following items can be set.
4
Select “Confirm” and press [OK]. To change the personalized user information Select “Edit User Information” from Setup menu. (>36)Press the coloured buttons in the HOME menu to switch to the user corresponding to the button.
Music
Photos Setup
Network HOME
Blu-ray Disc Player
User 1 Register 2nd user User 1 A B Videos
Personalizing a new user
Input
Nickname Personalize a user name.
Select Icon
Personalize a user icon. Select from Illustrations The image can be selected from prepared illustrations.
Create from Photos You can select a photo in recording media as an icon. (>28, “Icon Registration”)
Select Wallpaper
Personalize a background of the HOME menu.
≥In addition to default wallpapers, you can select a photo in recording media as a wallpaper. (>28, “Wallpaper”)
Playback
1
Insert the media.Playback starts depending on the media.
2
Select the item to play and press [OK].Repeat this procedure if necessary.
≥DISCS CONTINUE TO ROTATE WHILE MENUS ARE DISPLAYED. Press [∫STOP] when you have finished playback to protect the unit’s motor, your TV screen and so on.
≥It is not possible to play back AVCHD and MPEG2 videos which have been dragged and dropped or copied and pasted to the media.
≥To save on electricity, this unit is turned off automatically if there is no button operation for about 30 minutes when not playing back (such as when paused or displaying the menu, displaying still pictures, etc.).
The following functions may not work depending on the media and contents.
Press [∫STOP].
The stopping point is memorized. Resume play function
Press [1PLAY] to restart from this point.
≥The point is cleared if the media is removed.
≥On BD-Video discs including BD-J, the resume play function does not work.
Press [;PAUSE].
≥Press [;PAUSE] again or [1PLAY] to restart play.
Search
While playing, press [SEARCH6] or [SEARCH5].
Slow motion
While paused, press [SEARCH5]. The speed increases up to 5 steps.
≥Music, MP3, etc.: The speed is fixed to a single step.
≥Press [1PLAY] to revert to normal playback speed.
While playing or paused, press [:] or [9].
Skip to the title, chapter or track.
While paused, press [1] (;1).
≥Press and hold to change in succession forward.
≥Press [1PLAY] to revert to normal playback speed.
Press [AUDIO].
You can change the audio channel number or soundtrack language, etc.
≥MKV/Xvid: Successive play is not possible.
Operations during playback
Stop
Pause
Search/Slow motion
Skip
Frame-by-frame
Changing audio
P
la
yb
ack
Select the item and press [OK].
While playing, press [STATUS].
The status messages give you information about what is currently being played. Each time you press [STATUS], the display information may change or will disappear from the screen.
≥Depending on media and contents, the display may change or may not appear.
e.g., BD-Video
A T: Title, C: Chapter, PL: Playlist
B Elapsed time in the title
C Current position
D Total time e.g., JPEG
Displaying menus and playback
information
Show top menu/pop-up menu
Press [TOP MENU] or [POP-UP MENU].
Show the status messages
Play BD-Video T1 C1 0:05.14 0:20.52 A C D B Date 11.12.2007 Size 500X375 Manufacturer Equipment
Enjoying 3D video and photos
PreparationConnect this unit to a 3D compatible TV. (>11, 12)
≥Perform the necessary preparations for the TV.
≥Play back following the instructions displayed on the screen.
≥3D Settings (>29, 32)
≥Please refrain from viewing 3D images if you do not feel well or are experiencing visual fatigue.
In the event that you experience dizziness, nausea, or other discomfort while viewing 3D images, discontinue use and rest your eyes.
≥3D video might not output the way it is set in “HDMI Video Format” and “24p(4K)/24p Output” [BDT330] / “24p Output” [BDT230] (>30).
≥When playing back 3D photos from “Photos” screen, select from the “3D” list. (Still pictures in “2D” are played back in 2D.)
If “2D” and “3D” indications are not displayed, press the red button on the remote control to switch the view of playback contents.
With “BD-Live” discs, you can enjoy bonus contents that use Internet access.
For this BD-Live function, connection of a USB device is necessary along with Internet connection.
≥When USB devices are connected to both USB ports, disconnect both of them first, and then connect only the one you want to use.
1
Perform network connection and settings. (>14, 15)2
Connect a USB device with 1 GB or more free space.≥The USB device is used as the local storage.
3
Insert the disc.∫
Deleting data on the USB device
Select “USB Management” in the HOME menu (>18), then select “BD-Video Data Erase” and press [OK].
≥The usable functions and the operating method may vary with each disc, please refer to the instructions on the disc and/or visit their website.
≥“BD-Live Internet Access” may need to be changed for certain discs (>34).
Play a slideshow of photos and adjust various settings during the playback.
1
Insert the media.2
Select “Photos”.3
Select an item and press the green button. The following items can be set.≥Still pictures displayed as “ ” cannot be played back with this unit.
Enjoying BD-Live
Slideshow
Start Slideshow
Start the slideshow.
You can display still pictures in the selected folder one by one at a constant interval. Interval Change the display interval. Transition
Effect
Select the effect when sliding pictures.
Repeat Play Set whether to repeat the slideshow.
P la yb ack
VIERA Connect
(Enjoying Internet
Service)
VIERA Connect allows you to access some specific websites supported by Panasonic, and enjoy Internet contents such as photos, videos, etc. from VIERA Connect Home screen.
* Images are for illustration purposes, contents may change without notice.
Preparation
≥Network connection (>14)
≥Network setting (>15)
1
Press [INTERNET].2
Select the item and press [OK]. To exit from VIERA Connect Press [HOME]. * MORE BACK XXXXXX XXXXXXXXXXXXXXX XXXXXXXXXXX XXXXXXXX XXXX XXXX XXXXXX, XXXX XXXXXXXX 39°C X XXXXX Market XXXXXXXXXXXXXXXXXXXX XXXXXVIERA Connect provides a variety of selected Internet services such as the following.
≥Online movie rental service
≥Video browsing service
Internet
≥When playing content in the media, VIERA Connect cannot be accessed by pressing [INTERNET]. ≥In the following cases, settings are possible using the
Setup menu items.
– When restricting the use of VIERA Connect (>34, “Network Service Lock”)
– When correcting the displayed time (>34, “Time Zone”, “Summer Time”)
≥If using slow Internet connection, the video may not be displayed correctly. A high speed Internet service with a speed of at least 6 Mbps is recommended.
≥Be sure to update the firmware when a firmware update notice is displayed on the screen. If the firmware is not updated, you may not be able to use VIERA Connect function properly. (>16)
≥VIERA Connect Home screen is subject to change without notice.
≥The services through VIERA Connect are operated by their respective service providers, and service may be discontinued either temporarily or permanently without notice. Therefore, Panasonic will make no warranty for the content or the continuity of the services.
≥Some features of websites or content of the service may not be available.
≥Some content may be inappropriate for some viewers. ≥Some content may only be available for specific countries
Home Network feature
Using Miracast
TMYou can enjoy the content you are viewing on a Miracast-compatible smartphone, etc. on the big screen of your TV.
≥Compatible with AndroidTM device, ver. 4.2 and above and Miracast certified.
For information on whether the smartphone, etc. supports Miracast, contact the
manufacturer of the device.
1
Press [MIRACAST].2
Operate the Miracast compatible device.≥On the device, enable Miracast and select this unit (DMP-BDT330 or DMP-BDT230) as the device to be connected.
For details, refer to the instructions supplied with the device.
To exit from Miracast Press [HOME].
P
la
yb
ack
You can share photos, videos and music stored in the DLNA Certified media server (PC with Windows 7 installed, smartphone, etc.) connected to your home network, and enjoy the contents with this player.
You can also enjoy viewing the video and photos recorded in Panasonic DLNA compatible recorders (DIGA).
Refer to our website about the sales area, etc. (>26)
≥About support format of DLNA (>44).
≥Before using the DLNA feature, be sure to configure the DLNA server on your Home Network.
Preparation
1 Perform network connection (>14) and network settings (>15) of this unit. 2 Perform Home Network settings of the
connected equipment.
When connected to other than DIGA,
3 Add the contents and folder to the libraries of the Windows Media® Player or the
smartphone, etc.
≥Playlist of Windows Media® Player can play back only the contents that are stored in the libraries.
When connected to DIGA, 3 Register this unit to your DIGA.
≥The list can be updated by pressing the red button on the remote control.
5
Select the equipment and press [OK].6
Select the item to play and press [OK].≥You may be able to use convenient functions depending on the content by pressing [OPTION].
≥Control Panel is displayed once the playback starts. Press [OK] if the Control Panel is not displayed, and press [RETURN] to hide the Control Panel.
To exit from Home Network Press [HOME].
Playing back contents on the
DLNA server
Player
Server
1
Press [HOME].2
Select “Network”.3
Select “Home Network”.4
Select “DLNA Client”.≥The connection method can be switched to Wi-Fi Direct by pressing the green button on the remote control.
EXIT
You can use a smartphone or tablet as the Digital Media Controller (DMC) to play back contents from DLNA server on the Renderer (this unit). Possible applications:
* DMC compatible software should be installed. Preparation
Perform steps 1 and 2. (>25)
3 Add the contents and folder to the libraries of the Windows Media® Player or the
smartphone, etc.
≥Playlist of Windows Media® Player can play back only the contents that are stored in the libraries.
4 Perform the “Remote Device Settings”. (>34)
≥You can register up to 16 devices.
1
Press [HOME].2
Select “Network”.4
Select “Media Renderer”.6
Operate the DMC compatible devices. To exit from Media Renderer screen Press [HOME].≥Depending on the contents and the connected equipment, playback may not be possible.
≥Items displayed in grey on the display cannot be played back by this unit.
≥This unit can be played back via connected equipment only when controlled using DMC.
Using the Digital Media Controller
* * * Renderer Server Controller Renderer Server i Controller
3
Select “Home Network”.5
Select “Home Network” or “Wi-Fi Direct” and press [OK], then follow theindications on the screen.
About DLNA and Media Renderer
For more details, refer to the following website and the operating instructions for each of the equipment. http://panasonic.jp/support/global/cs/ (This site is in English only.)
≥Wi-Fi Direct connection while using Home Network feature is only temporary, and the network connection method returns to the original setting when exiting.
≥Depending on the device or connection environment, the data transfer rate may decrease.
P
la
yb
ack
“HDMI CEC”
What is “HDMI CEC” (Consumer Electronics Control)?
“HDMI CEC” (Consumer Electronics Control) is a convenient function which links the operations of this unit and other “HDMI CEC” compatible device.
See the operating instructions for connected equipment for operational details.
Preparation
1 Set “HDMI CEC” to “On” (>35). (The default setting is “On”.)
2 Set the “HDMI CEC” operations on the connected equipment (e.g., TV). 3 Turn on all “HDMI CEC” compatible
equipment and select this unit’s input channel on the connected TV so that the “HDMI CEC” function works properly.
Repeat this procedure when the connections or settings are changed.
When play starts on the unit, the TV will automatically switch the input channel and the screen of this unit will be displayed.
Additionally when the TV is off, the TV will automatically turn on.
All connected equipment compatible with “HDMI CEC”, including this unit, automatically turns off when you switch the TV off.
≥This unit supports the “HDMI CEC” (Consumer Electronics Control) function. However, operation cannot be guaranteed on all HDMI CEC devices.
You can use this function by connecting the equipment with an HDMI cable*.
* [BDT330] Only when connecting via an HDMI AV OUT MAIN terminal on this unit.
Automatic input switching
Power on link
Power off link
USB Sharing
This function allows you to copy content between the following media.
Preparation
≥Insert the media. (>17)
1
Press [USB SHARING].2
Select the copy source (e.g., USB1) and press [OK].3
Select the folder or file to be copied and press the red button on the remote control.≥Press the red button on the remote control again to cancel.
4
Press [OK].5
Select the copy destination (e.g., USB2) and press [OK].6
Select “Yes” on the confirmation screen and press [OK].≥When the destination contains a folder or file with the same name, you can change the option for resolving the conflict by pressing [OPTION].
≥You cannot set the media formatted to NTFS as a copy destination.
≥Copying of files in all formats is not guaranteed. ≥Panasonic does not accept any responsibility for damages
directly or indirectly due to any type of problems that result in loss of copying content (data), and does not guarantee any content if copying does not work properly.
≥The recording and playback of content on this or any other device may require permission from the owner of the copyright or other such rights in that content. Panasonic has no authority to and does not grant you that permission and explicitly disclaims any right, ability or intention to obtain such permission on your behalf. It is your responsibility to ensure that your use of this or any other device complies with applicable copyright legislation in your country. Please refer to that legislation for more information on the relevant laws and regulations involved
USB1/
USB2
USB2/
USB1
SD card
Settings
Option menu
A variety of playback operations and settings can be performed from this menu.
Available options differ depending on the playing contents and the condition of the unit.
About Multi User Mode
: Settings of the items with this indication are saved by the respective users registered in the HOME menu.
Please refer to page 19 for details about user registration and switching.
1
Press [OPTION].≥When playing music, select “Playback Settings” and press [OK].
e.g., BD-Video
2
Select an item and change the settings. To exit the screenPress [OPTION].
Regarding Language : (>44)
∫Soundtrack
Show or change the soundtrack.
∫Audio channel
Select the audio channel number.
∫Subtitle
Change the subtitle settings.
∫Angle
Select the number of the angle.
∫Repeat Play
Select the item that you want to repeat.
≥The items displayed differ depending on the type of media.
≥Select “Off” to cancel.
∫Random
Select whether or not to play random.
∫Start Slideshow Start the slideshow.
∫Status
Show the status messages.
∫Rotate RIGHT
∫Rotate LEFT Rotate the still picture.
∫Wallpaper
Set the still picture to the wallpaper of HOME menu. (>18)
∫Icon Registration
Set the still picture as your user icon. (>19)
∫Video
The recording method of original video appears.
∫Primary Video
The recording method of original primary video appears.
∫Secondary Video
∫Top Menu Display Top Menu.
∫Pop-up Menu Display Pop-up Menu.
∫Menu Display Menu.
Operation Menu
Operation Menu Pop-up Menu Top Menu Secondary Video Primary Video Status Repeat Play Angle Subtitle Soundtrack Off 1MPEG-4 AVC – 1ENG Dolby TrueHD ...Video
Select on/off for images. The recording method of original video appears.
≥During search/slow motion or frame-by-frame, only the primary video is displayed. Soundtrack Select on/off for audio and the language.
S
e
tt
ings
∫Picture Mode
Select the picture quality mode during play.
≥If you select “User”, you can change settings in “Picture Adjustment”.
∫Picture Adjustment
Specific picture quality settings can be changed.
∫Progressive
Select the method of conversion for progressive output to suit the type of material being played.
∫24p
Movies and other material recorded on DVD-Video at 24p are output at 24p.
∫Reset to Default Picture Settings Return picture settings to the factory preset.
∫Dialogue Enhancer
The volume of the centre channel is raised to make dialog easier to hear.
Picture Settings
≥If the video is disrupted when “Auto” is selected, select either “Video” or “Film” depending on the material to be played back.
≥This works only in the following cases: –[BDT330] when “24p(4K)/24p Output” is set to
“24p(4K)” or “24p” (>30) and the disc recorded at a rate of 60 fields per second is played back.
–[BDT230] when “24p Output” is set to “On” (>30) and the disc recorded at a rate of 60 fields per second is played back.
≥This may not work with the PAL contents.
Sound Settings
≥This function is effective for multi-channel audio from the HDMI AV OUT terminal only when “Digital Audio Output” is set to “PCM” (>31).
3D Settings
∫Signal Format
Original Keep original picture format. Side by side 3D picture format comprising
of left and right screens. 2D to 3D Converts 2D pictures to 3D
effect.
∫Distance
Set the amount of depth perception.
∫Graphic Display Level
3D position for the Option menu or message screen, etc. can be adjusted during 3D playback.
Setup menu
Change the unit’s settings if necessary. The settings remain intact even if you switch the unit to standby.
Some items in the Setup menu are common to the Option menu. You can get the same effect with both menus.
About Multi User Mode
: Settings of the items with this indication are saved by the respective users registered in the HOME menu.
Please refer to page 19 for details about user registration and switching.
1
Press [HOME].2
Press [OK] to select “Setup”.3
Select “Player Settings”.4
Select an item and change the settings. To exit the screenPress [HOME].
∫Picture Mode (>29)
∫Picture Adjustment (>29)
∫HDMI Output
Press [OK] to show the following settings: ¾HDMI Video Format
The items supported by the connected devices are indicated on the screen as “¢”. When any item without “¢” is selected, the images may be distorted.
≥If “Automatic” is selected, the best suited output resolution to the connected TV is automatically selected.
≥To enjoy high-definition video up-converted to 1080p, you need to connect the unit directly to 1080p compatible HDTV (High Definition TV). If this unit is connected to an HDTV through other equipment, the other equipment must also be 1080p compatible.
¾24p Output [BDT230]
≥When playing DVD-Video, set to “On” and then set “24p” in “Picture Settings” (>29) to “On”.
≥When BD-Video/DVD-Video images other than 24p are played, images are output at 60p.
Picture
OK RETURN Player Settings System Ratings Network Language 3D Sound Picture HDMI Output Picture AdjustmentPicture Mode Normal
¾24p(4K)/24p Output [BDT330]
This setting is for selecting the output method for content recorded in 24p*1, such as movies. 24p(4K) Outputs signals by upconverting them to 4K*2. 24p Outputs in 24.
≥Connect the compatible TV for each (4K or 1080/24p) output to the HDMI AV OUT MAIN terminal of this unit.
≥“24p(4K)” works only when playing back in 2D.
≥When playing DVD-Video, set this setting to “24p(4K)” or “24p”, and then “24p” in “Picture Settings” (>29) to “On”.
≥When BD-Video/DVD-Video images other than 24p are played, images are output at 60p.
When this unit is connected to a TV supporting 1080/24p output, movies and other material recorded at 24p*1 are output at 24p.
*1A progressive image recorded at a rate of 24 frames per
second (motion-picture film). Many BD-Video movie contents are recorded in 24 frames/second in accordance with the film materials.
*2A high resolution image/display technology of
S
e
tt
ings
¾Deep Colour Output
This setting is for selecting whether to use Deep Colour output when a TV that supports Deep Colour is connected.
¾Contents Type Flag
Depending on the playback content, the TV will output adjusting to the optimal method when a TV that supports this function is connected.
∫Dialogue Enhancer (>29)
∫Dynamic Range Compression
You can listen at low volumes but still hear dialog clearly.
(Dolby Digital, Dolby Digital Plus and Dolby TrueHD only)
∫Digital Audio Output
Press [OK] to show the following settings: ¾Dolby D/Dolby D +/Dolby TrueHD ¾DTS/DTS-HD
Select the audio signal to output.
≥Select “PCM”, when the connected equipment cannot decode the respective audio format. This unit decodes the audio format and transmits to the connected equipment.
≥Not making the proper settings may result in noise.
¾BD-Video Secondary Audio
Select whether or not to mix the primary and secondary audio (including the button click sound).
If “Off” is selected, the unit outputs the primary audio only.
¾HDMI Colour Mode
This setting is for selecting colour-space conversion of the image signal.
¾HDMI(SUB) Output Mode [BDT330]
Set to output the video from the HDMI AV OUT SUB terminal or not.
Sound
≥“Automatic” is effective only when playing Dolby TrueHD.
¾HDMI Audio Output
This setting selects whether or not to output audio from HDMI.
≥Select “Off” when the TV is connected to this unit via HDMI AV OUT terminal, and this unit is also connected to other devices, such as an amplifier/receiver via an OPTICAL terminal.
∫Downmix
Select the downmix system of multi-channel to 2-channel sound.
≥Select “Surround encoded”, when the connected equipment supports the virtual surround function.
≥The downmix effect is not available when “Digital Audio Output” is set to “Bitstream”.
≥The audio will be output in “Stereo” in the following cases:
– AVCHD playback
– Playback of secondary audio (including the button click sound).
∫DTS Neo:6
2ch (2.1ch) audio is expanded to 7ch (7.1ch) before it is output.
∫PCM Down Conversion
Select how to output audio with a sampling frequency of 96 kHz for the PCM output from the OPTICAL.
≥If “On” is selected, the signals that are converted to 48 kHz are output.
≥If “Off” is selected, and the connected equipment does not support 96 kHz, the sound will not be output normally.
≥Signals are converted to 48 kHz despite the settings in the following cases:
– when the signals have a sampling frequency of 192 kHz
– when the disc has copy protection
– when “BD-Video Secondary Audio” is set to “On”
≥This function works when the following conditions are met:
– Audio is output from the HDMI AV OUT terminal.
– Audio recorded at 96 kHz or lower is output. – “Digital Audio Output” is set to “PCM” when
audio other than PCM is output.
3D
∫3D BD-Video Playback
Select the playback method of 3D compatible video software.
∫3D AVCHD Output
Select the output method of 3D AVCHD videos.
∫3D Playback Message
Set to display or hide the 3D viewing warning screen when playing back the 3D compatible video software.
S
e
tt
ings
∫Soundtrack Preference Choose the language for audio.
≥If “Original” is selected, the original language of each disc will be selected.
≥Enter a code (>44) when you select “Other
¢¢¢¢”.
∫Subtitle Preference
Choose the language for the subtitle.
≥If “Automatic” is selected and the language selected for “Soundtrack Preference” is not available, subtitles of that language will automatically appear if available on that disc.
≥Enter a code (>44) when you select “Other
¢¢¢¢”.
∫Menu Preference
Choose the language for the disc menus.
≥Enter a code (>44) when you select “Other
¢¢¢¢”.
∫Easy Network Setting (>15)
∫Network Settings
Perform network-related settings individually. Press [OK] to show the following settings:
¾LAN Connection Mode Select the LAN connection method.
¾Wireless Settings
This allows the wireless router and connection settings to be set. Current connection settings and connection state can be checked. Press [OK] to show the following settings:
Connection Setting
The wireless router connection wizard will be displayed.
Double Speed Mode Setting (2.4GHz) Set the connection speed for a 2.4 GHz wireless format.
≥If you connect using the “Double Speed Mode (40MHz)”, 2 channels use the same frequency band, and there is consequently a greater risk of reception interference. This can cause the connection speed to drop or become unstable.
¾IP Address / DNS Settings
This is for checking the state of the network connection and setting the IP address and DNS-related.
Press [OK] to show the respective setting. ¾Proxy Server Settings
This is for checking the state of connection with the Proxy server and performing settings. Press [OK] to show the respective setting.
Language
[Except[South[East[Asia]
∫Subtitle Text
Select a suitable item according to the language used for MKV/Xvid subtitles text.
≥This item is displayed only after playing back a file.
[For[South[East[Asia]
∫On-Screen Language
Choose the language for menus and on-screen messages.
Network
≥Select “Wireless Master” when you make a direct wireless connection between this unit and a Home Network device. Internet connection is not available when this item is selected.
¾Remote Device Settings (>26) Press [OK] to show the following settings:
Remote Device Operation Enable to operate by DMC.
≥If “On” is selected, “Quick Start” will be activated.
Device Name Entry
Set the name of this unit to be displayed on the connected equipment.
Registration Type
Remote Device List
Registering/deregistering of the displayed equipment can be performed when “Manual” in “Registration Type” is selected.
¾BD-Live Internet Access (>22)
You can restrict Internet access when BD-Live functions are used.
≥If “Limit” is selected, Internet access is permitted only for BD-Live contents which have content owner certificates.
The following items use the same password. Don’t forget your password.
∫DVD-Video Ratings
Set a ratings level to limit DVD-Video play.
∫BD-Video Ratings
Set an age limit of BD-Video play. ¾Network Service Settings (>23)
(VIERA Connect)
Press [OK] to show the following settings: Time Zone
Set the unit’s time to match your location.
≥Some VIERA Connect contents require the time zone to be set. Set the time zone if necessary.
Summer Time
Select “On” when using summer time. [Except[South[East[Asia]
¾Network Drive Connection
It is possible to access the shared folder of equipment not compatible with DLNA, such as the Windows XP operating system, and play back video, still pictures, and music on this unit. For the setting and operation method of connected equipment, refer to the following website.
http://panasonic.jp/support/global/cs/ (This site is in English only.)
Automatic
Allow connection to all the equipment accessing this unit.
Manual
Set the permission for individual equipment connections accessing this unit.
Ratings
∫Network Service Lock
S
e
tt
ings
∫Easy Settings
You can execute basic settings.
∫TV Settings
Press [OK] to show the following settings: ¾TV Aspect
Set to match the type of TV connected. When connected to a 4:3 aspect TV and playing 16:9 ratio image:
When connected to a 16:9 widescreen TV and playing 4:3 ratio image:
¾Screen Saver Function
This is to prevent image retention on the screen.
≥When this is set to “On”:
If a list of playback content is displayed and there is no operation for 10 minutes or more, the screen switches to HOME menu automatically.
≥While playing and pausing, etc., this function is not available.
¾On-Screen Messages
Choose whether to show status messages automatically.
¾HDMI CEC
≥Select “Off” when you do not want to use “HDMI CEC”.
System
4:3 Pan & Scan
The sides are cut off so the picture fills the screen.
When playing BD-Video, video is output as “4:3 Letterbox”.
4:3 Letterbox
Black bands appear at the top and bottom of the picture.
16:9
Video is displayed as a 4:3 ratio image in the centre of the screen. 16:9 full Video is displayed as a horizontally stretched 16:9 image. ¾TV System
Perform the setup so it matches the TV System of the connected TV.
Set to use “HDMI CEC” function when connected via HDMI cable to a device that supports “HDMI CEC”.
∫Unit Settings
Press [OK] to show the following settings: ¾Mixed Data Disc Option
Select the playback contents on discs with both data files and Video.
≥If “BDAV/AVCHD” is selected, data file cannot be played back.
¾Edit User Information
Change the user information registered in the HOME menu.
∫Quick Start
Speed of start-up from standby mode is increased.
≥When set to “On”, the internal control unit will be powered and the idle power consumption will increase so compared to when set to “Off”. (About the power consumption >43)
∫Remote Control
Change the remote control code if other Panasonic products react to this remote control.
∫Firmware Update (>16)
Press [OK] to show the following settings: ¾Automatic Update Check
When this equipment remains connected to the Internet, it will check for the latest firmware version when it is turned on and you can update it if necessary.
¾Update Now
You can update the firmware manually if a firmware update is available.
∫System Information
Press [OK] to show the following settings: ¾Software Licence
Information about the software used by this unit is displayed.
¾Firmware Version Information Display firmware version of this unit and wireless LAN module.
∫Default Settings
≥If “MP3/JPEG/MKV” is selected, the video menu function (except MKV/Xvid) cannot be played back.
¾Front Panel Display
Changes the brightness of the unit’s display.
≥If “Automatic” is selected, the display is set to bright and only dimmed during playback. ¾Blue LED [BDT330]
Set whether to light the blue LED in the centre of this unit when turned ON.
¾HDMI(SUB) V.OFF LED Control [BDT330]
Set to light the HDMI (SUB) V.OFF LED or not. (This will light when “HDMI(SUB) Output Mode” (>31) is set to “V.OFF(Video Off)”.)
∫Start-up Banner
Select whether to display the banner after turning on this unit. (>18)
This returns all values in the Setup menu and the Option menu to the default settings, except for some settings of network, ratings, remote control code, on-screen language [For[South[East[Asia], etc.