IBM Maximo Asset Management
Version 7 Release 5
Installation Guide
(WebLogic Server, Oracle, Active Directory)
Note
Before using this information and the product it supports, read the information in “Notices” on page 131.
This edition applies to version 7, release 5, modification 0 of IBM Maximo Asset Management and to all subsequent releases and modifications until otherwise indicated in new editions.
Contents
Chapter 1. Preparing for installation
. . 1
Software installation images . . . 1
Before you begin . . . 1
Programmatically verifying prerequisites . . . . 2
Checking port availability . . . 6
AIX and HP-UX tar command requirements . . . 7
AIX font requirements . . . 7
Checking for required libraries on Linux . . . . 7
Configuring the JRE in Linux . . . 8
Setting the ulimit . . . 8
Setting the swap size . . . 8
Setting shared memory . . . 9
Remote configuration enablement . . . 9
System password policy settings . . . 10
Backing up the Deployment Engine database . . 11
Specifying host name values . . . 11
Establishing a fully qualified host name on Windows systems . . . 11
Forcing the middleware installer to use alphanumeric hostnames . . . 12
Launchpad . . . 12
Starting the launchpad . . . 12
Chapter 2. Deploying automatically
reusing existing middleware . . . 15
Run the middleware installation program on existing middleware servers . . . 15
Manually configuring WebLogic Server . . . 16
Creating the MAXIMOSERVER domain . . . . 17
Configuring JMS options for integration framework . . . 17
Configuring JMS for the email listener in WebLogic Server. . . 19
Installation program overview . . . 21
Installing the product and automatically configuring middleware . . . 22
Creating a maxdemo database during installation 26 Post installation for Oracle WebLogic Server deployments . . . 26
Deploying ear files . . . 28
Setting the Oracle WebLogic Server host name. . . 29
Language deployment after database update deferral . . . 30
Manually deploying languages after database update deferral . . . 30
Chapter 3. Deploying manually reusing
existing middleware . . . 33
Maximo Asset Management installation with manual middleware configuration . . . 35
Manually configuring the database . . . 35
Manually configuring Oracle 11g . . . 35
Manually configuring Oracle 10g . . . 38
Manually configuring the directory server . . . 40
Manually configuring Microsoft Active Directory . . . 41
Manually configuring the J2EE server . . . . 44
Manually configuring WebLogic Server . . . 44
Installing the product and manually configuring middleware . . . 48
Creating a maxdemo database during installation . 53 Post installation for Oracle WebLogic Server deployments . . . 53
Deploying ear files . . . 55
Setting the Oracle WebLogic Server host name. . . 56
Language deployment after database update deferral . . . 57
Manually deploying languages after database update deferral . . . 57
Chapter 4. Silent installation . . . 59
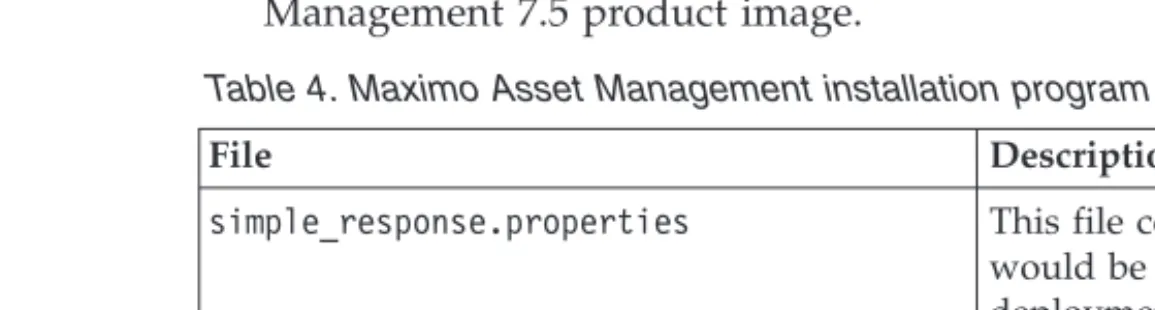
Installing Maximo Asset Management silently . . . 59
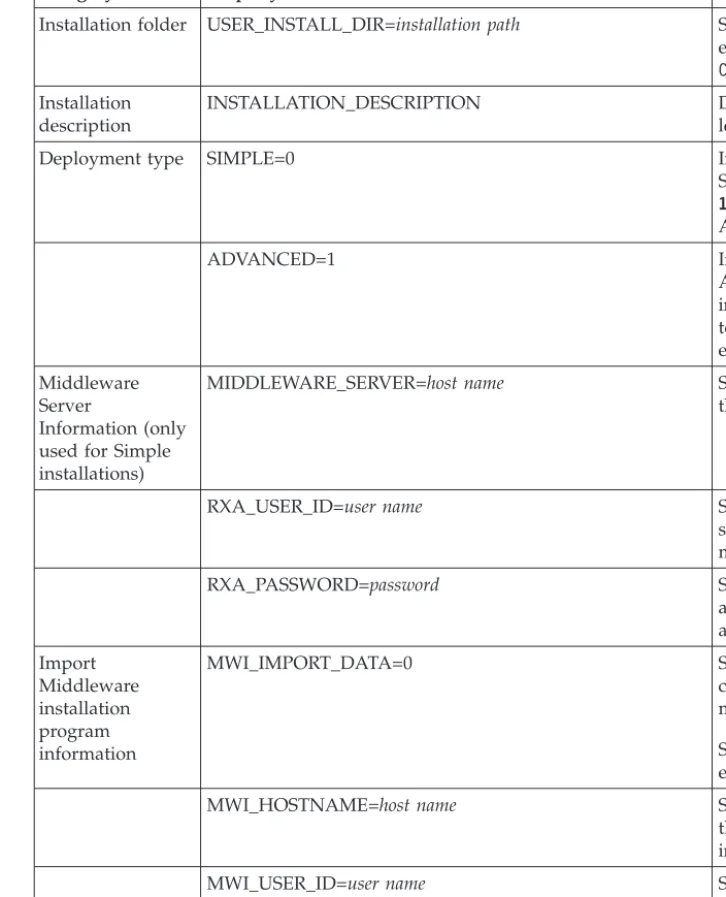
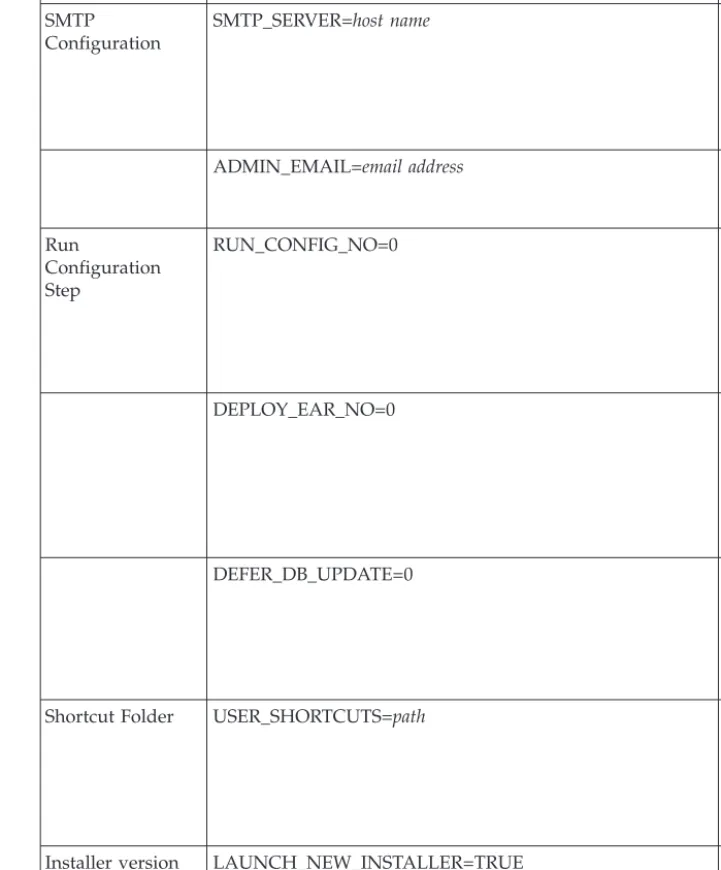
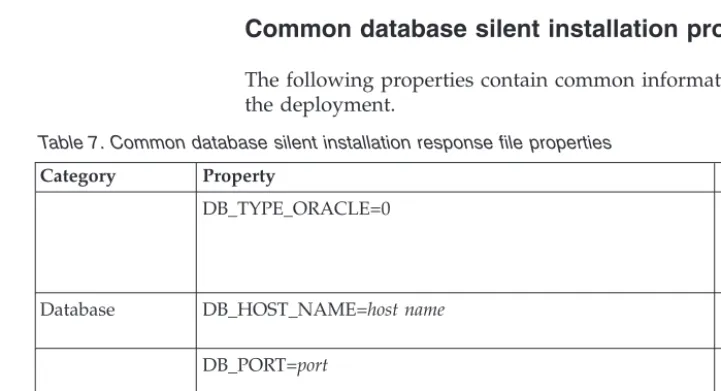
Silent installation properties . . . 61
Chapter 5. Programmatically verifying
that the installation was successful . . 79
Chapter 6. Verifying the installation
manually . . . 83
Chapter 7. Post installation tasks . . . 85
Accessing product documentation . . . 85
Initial data configuration . . . 85
Signing in using a default user ID . . . 85
Configuring SMTP . . . 86
Create currency codes . . . 86
Create item and company sets . . . 87
Create an organization. . . 87
Create a general ledger account component. . . 87
Applying changes to the database . . . 88
Create a general ledger account. . . 88
Update General Ledger Component Type Authorization . . . 89
Update Company-Related Accounts . . . 89
Create default insert site . . . 90
Create worktypes . . . 90
Signing out and signing in . . . 91
Synchronizing users and groups . . . 91
Create a maxdemo database after installation . . . 92
Understanding and configuring security . . . 93
Chapter 8. Uninstalling the product . . 95
Uninstalling an automatically configured deployment . . . 95
Running the product uninstallation program for automatically configured middleware. . . 96
Uninstalling a manually configured deployment . . 97
Running the product uninstall program for
manually configured middleware . . . 97
Database configuration recovery . . . 98
Restoring the Oracle database . . . 98
Uninstalling the product without the uninstallation program . . . 99
Uninstall program recovery tool . . . 100
Using the uninstallation program recovery tool. . . 100
Manual uninstallation . . . 101
Removing files from the system . . . 101
Chapter 9. Advanced installation
topics. . . 103
Configuring and managing Oracle WebLogic Server . . . 103
Starting Oracle WebLogic Server . . . 103
Stopping the Oracle WebLogic Server . . . . 103
Changing the middleware installation program configuration parameters . . . 104
Deploying EAR files . . . 104
Building EAR files. . . 105
Manually uninstalling applications from Oracle WebLogic Server . . . 105
Manually uninstalling applications from Oracle WebLogic Server . . . 105
Chapter 10. Backup and restoration
107
Backing up the administrative workstation . . . 107Restoring the administrative workstation . . . . 108
Installation properties . . . 108
Updating environment data . . . 114
Chapter 11. Troubleshooting . . . 117
Error when starting the middleware installation program . . . 117
Troubleshooting the middleware installer . . . . 117
Middleware installation program troubleshooting feature . . . 117
Encountering error ACUINI0044E . . . 118
Incorrect service pack requirement for AIX . . 118
Failure when system directories cannot be renamed . . . 119
Middleware setup script error codes. . . 120
Troubleshooting middleware uninstall . . . . 120
Troubleshooting the product installation program 121 General troubleshooting of the product installation program . . . 121
Common deployment failures . . . 125
Troubleshooting the product uninstallation program . . . 129
Error CTG00001 when performing an uninstall . . . 129
Notices . . . 131
Trademarks . . . 132
Chapter 1. Preparing for installation
These topics provide information about product media, preinstallation
considerations, overview of the installation procedure, and instructions on using the Maximo®Asset Management launchpad.
Use the planning information to familiarize yourself with the overall process of a Maximo Asset Management deployment before you use this information to conduct the installation.
Software installation images
You access the IBM®Maximo Asset Management product software from IBM Passport Advantage or from the product DVD if you requested a product DVD. The installation images that you download from Passport Advantage can comprise multiple downloadable files. Download all files in the package to a single directory and extract the files for execution.
For instructions and a full list of installation images, see the IBM Maximo Asset Management 7.5 Download Document (www.ibm.com/support/
docview.wss?uid=swg24029458).
Before you begin
A set of tasks must be completed before installing Maximo Asset Management. In some cases, to perform the steps, you must be logged in as a user with
administrator privileges on Windows. Some processes, such as anti-virus programs, can negatively affect Maximo Asset Management installation on the system. You must temporarily shut down any noncritical processes before running the Maximo Asset Management installation program.
Most tasks must be completed for middleware installed on UNIX systems, regardless of whether you intend to use the middleware installation program to install and configure Maximo Asset Management middleware. These tasks must be completed for any UNIX systems hosting middleware you intend to use with Maximo Asset Management.
Note: Make a copy of the image of the system, database, and application server on which you are planning to install the product.
Note: IBM publishes updates to the middleware installation program. Before using it, visit the IBM Support Portal http://www.ibm.com/support/entry/portal/ Overview/Software/Tivoli/Maximo_Asset_Management to see whether there is an updated copy of the installation program available for your use.
Ensure that you have adequate disk space for the future on the systems being used for the Maximo Asset Management deployment. Filling up the disk space on a Maximo Asset Management deployment system can cause problems with Maximo Asset Management operations.
Fully qualified host names provided to the installation programs must resolve between systems involved in the product deployment. Ensure all IP addresses
configured for systems targeted for the product deployment are reachable using the ping command from the administrative workstation.
“Checking port availability” on page 6
You need to ensure that certain ports are available before using the product installation programs.
“AIX and HP-UX tar command requirements” on page 7
Both the native UNIXtarcommand and the GNU version of thetar command are required by the middleware installation program. Because the native utility does not support long file names, ensure that GNUtar version 1.14 or higher is installed. GNUtar version 1.14 ensures that installation files can be extracted. “Checking for required libraries on Linux” on page 7
The Maximo Asset Management deployment requires certain Linux system libraries.
“Configuring the JRE in Linux” on page 8
In some cases, the middleware installation program fails on Red Hat Enterprise Linux 5 systems, or other systems with Security-Enhanced Linux (SELinux) enabled.
“Setting the ulimit” on page 8
This section details how to set the ulimit in Linux, which is used to define user system and process resource limits.
“Setting the swap size” on page 8
Maximo Asset Management can be a resource-intensive application. Configure and tune your system for maximum performance. This section details how to set the size of the swap space used in Linux systems.
“Setting shared memory” on page 9
This section details how to set a minimum shared memory value in Linux. “Remote configuration enablement” on page 9
The Maximo Asset Management installation program can automatically configure middleware. You must enable a remote access protocol for each system on which you intend to install the middleware.
“System password policy settings” on page 10
Be familiar with the password policies of systems you are using as part of a Maximo Asset Management deployment.
“Backing up the Deployment Engine database” on page 11
These instructions are for backing up the Deployment Engine database. Backups are used to restore the database to the state it was before installing. “Programmatically verifying prerequisites”
You can use the prerequisite verification utility to verify that installation program prerequisites are present on a system. Use this utility before starting the middleware and product installation programs.
Programmatically verifying prerequisites
You can use the prerequisite verification utility to verify that installation program prerequisites are present on a system. Use this utility before starting the
middleware and product installation programs.
About this task
The prerequisite verification utility checks the following items:
v Operating system requirements, including fix packs.
v Hardware requirements, including memory and hard disk space. v Port availability.
v Middleware requirements such as software packages, library files, directory
permissions, host names, and installation locations.
Note: This utility cannot be used to check Oracle WebLogic Server.
You can start the prerequisite verification utility from the product installation launchpad or from the command line. When started from the launchpad, the utility runs in interactive mode. When started from the command line, the prerequisite verification utility accepts various parameters. The prerequisite verification utility must be run on the system hosting the prerequisite being checked. You cannot use this utility to check prerequisites on a remote system.
Table 1. System verification parameters
Parameters Details
-component Specifies the type of component being verified. At least one component must be used with the prerequisite verification utility.
bsi
Use thebsiparameter to have the prerequisite verification utility check for prerequisites required by the product installation program. Run the prerequisite verification utility with thebsiparameter on the administrative workstation.
Syntax example:
tpae_req_check.bat -component bsi
If you do not use the-componentparameter, you are prompted to specify components when using the utility.
Multiple components can be specified as comma-separated values.
-input The prerequisite verification utility can accept a property file as input. The utility
verifies property values found in the file.
The default input property file istpae.properties, and is found on the
middleware installation media in theSystemRequirementsdirectory. There are also
several sample property files found in theSystemRequirements\
sample_property_files. These sample property files contain custom values
defined for particular operating systems. You can copy these property files to the system and modify them, or create your own, before running the prerequisite verification utility.
Syntax example:
tpae_req_check.bat -component dbserver -input path to the property file
If you do not use theinputparameter when you run the prerequisite verification
utility, the utility is run in interactive mode. You are prompted for individual values to be verified.
Table 1. System verification parameters (continued)
Parameters Details
-mode The prerequisite verification utility can be run in silent or interactive mode.
interactive
By default, the prerequisite verification utility is run in interactive mode. If you do not specify the-modeparameter, the utility defaults to running in
interactive mode. When started from the launchpad, the utility runs in interactive mode.
silent
If you use thesilentqualifier, you can also use theinputparameter and supply a property file. If an input file not provided, default property values are used. The output must also be directed to a file to view the results. Syntax example:
tpae_req_check.bat -component dbserver -mode silent
-input path to the property file > prereqresults.log
-lang Parameter used to specify the locale of the system being verified. Syntax example:
tpae_req_check.bat -component dbserver -lang en
Results are produced in the language of the locale specified. This is an optional parameter.
By default, the language set in the system locale is used. If the resource bundle is not found for the system locale, or, the system locale language is not supported, messages are displayed in English.
-trace Parameter used to specify trace output statements while the utility is running. None
Selecting this qualifier results in no trace information being generated while the utility is running.
Verbose
Selecting this qualifier results in detailed trace information being generated while the utility is running.
Normal
Selecting this qualifier results in default trace information being generated while the utility is running.
Syntax example:
tpae_req_check.bat -component dbserver -trace None
Procedure
1. Log on to the system you are checking for prerequisites with a user ID that has permission to run scripts on the system. Ensure that the middleware
installation media is mounted or otherwise available to the system.
2. Open a command-line window and change directory to theSystemRequirements
3. Run the prerequisite verification utility. Specify the component being checked and the property file to use.
tpae_req_check.bat -component dbserver
-input d:\SystemRequirements\tpae.properties
In this example, thetpae.propertiesfile is located in the same directory as the
tpae_req_check.batscript.
Results
After the prerequisite verification utility has completed successfully, results are printed to the screen.
CTGIN8117I : The Tivoli Pre-requisite Scanner has been launched.
CTGIN8118I : The Tivoli Pre-requisite Scanner exited with the return code IBM Prerequisite Scanner
Version : 1.0.34 Build : 20101109
OS Name : Microsoft Windows Server 2003, Enterprise Edition Service Pack 2 User Name: Administrator
Machine Info
Machine name : MYMACHINE Serial Number: KKKKKK0
OS Serial : 66666-666-6666666-66666 PAE [not defined] [version 07500000]:
Property Result Found Exp...
======== ====== ===== ===...
os.totalPhysicalMemory PASS 2.00GB 1.90GB
network.hasFQDN FAIL False True
Disk#1 (C:\ibm\tivoli\mwi\workspace) PASS 27.99GB 300MB
Disk#2 (C:\Temp\1) PASS 27.99GB 1000MB
Disk#3 (C:\Temp\1) PASS 27.99GB 250MB
network.availablePorts.db2 PASS 135,445,1025,2967,3389,5800,5900,139 50000 network.availablePorts.ctginst PASS 135,445,1025,2967,3389,5800,5900,139 50005
Disk#4 (C:\Program Files\IBM\SQLLIB) PASS 27.99GB 1.40GB
ALL COMPONENTS :
Property Result Found Exp...
======== ====== ===== ===...
C: PASS 27.99GB 2.91GB
Prereq Scanner Overall Result: FAIL prereq_checker.bat 1
These values can also be redirected to a file when starting the command from the command line.
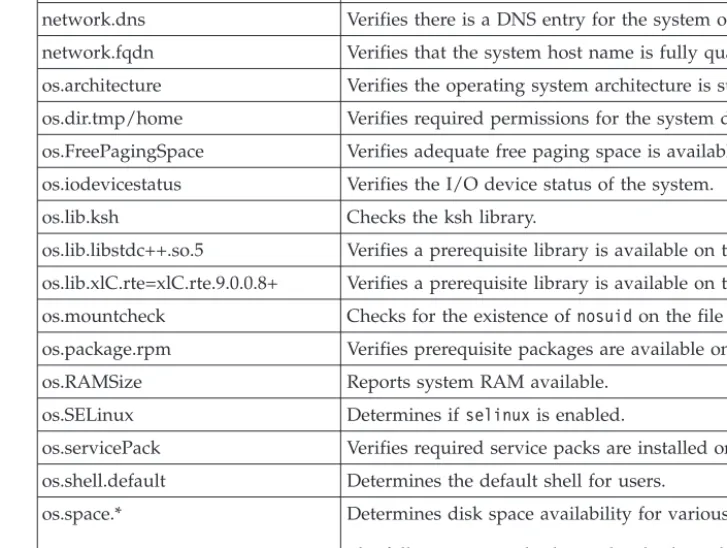
If any of the verification steps report a failure, resolve the issue and rerun the verification utility before installing Maximo Asset Management components. Table 2 contains a list of the properties checked. Use this information to analyze prerequisite verification utility results.
Table 2. Prerequisite verification utility properties
Property Description
CpuArchitecture Verifies the machine architecture is supported.
disk(rw permissions) Checks read/write permissions of required directories. network.availablePorts.* Verifies required ports are available.
Table 2. Prerequisite verification utility properties (continued)
Property Description
network.dns Verifies there is a DNS entry for the system on the DNS server. network.fqdn Verifies that the system host name is fully qualified.
os.architecture Verifies the operating system architecture is supported. os.dir.tmp/home Verifies required permissions for the system directories os.FreePagingSpace Verifies adequate free paging space is available on the system. os.iodevicestatus Verifies the I/O device status of the system.
os.lib.ksh Checks the ksh library.
os.lib.libstdc++.so.5 Verifies a prerequisite library is available on the system. os.lib.xlC.rte=xlC.rte.9.0.0.8+ Verifies a prerequisite library is available on the system. os.mountcheck Checks for the existence ofnosuidon the file system. os.package.rpm Verifies prerequisite packages are available on the system. os.RAMSize Reports system RAM available.
os.SELinux Determines ifselinuxis enabled.
os.servicePack Verifies required service packs are installed on the system. os.shell.default Determines the default shell for users.
os.space.* Determines disk space availability for various file systems.
The following example shows the check made for the middleware installation program workspace.
os.space.root=[dir:root=/root/ibm/tivoli/mwi/workspace,unit:MB]300
os.totalPhysicalMemory Reports physical RAM available to the operating system. os.ulimit Identifies user limits configured on the system.
os.Version Reports the operating system type and version.
Checking port availability
You need to ensure that certain ports are available before using the product installation programs.
About this task
You must check to see if ports are in use and accepting connections for the system you are using to host middleware.
Port 7001 must be made available for Oracle WebLogic Server.
If you intend to use these default port values, ensure that the port is not already assigned before you run installation programs.
You can either use the prerequisite verification utility to check for port availability, or you can check manually.
Procedure
1. Open the appropriate port checking utility on the host system. If present, check firewall rules for the system.
2. Check the availability of ports required by Maximo Asset Management. If you find that port already assigned, ensure that you choose another value when prompted by the middleware installation program.
“Programmatically verifying prerequisites” on page 2
You can use the prerequisite verification utility to verify that installation program prerequisites are present on a system. Use this utility before starting the middleware and product installation programs.
AIX and HP-UX tar command requirements
Both the native UNIXtar command and the GNU version of thetarcommand are required by the middleware installation program. Because the native utility does not support long file names, ensure that GNUtarversion 1.14 or higher is installed. GNUtarversion 1.14 ensures that installation files can be extracted. Verify that the system path variable contains both native UNIXtar and GNUtar
paths. The GNUtar path must be defined before the native UNIX tar path. For example, the nativetarutility is installed in/usr/binand the GNU tar utility is installed in/opt/freeware/bin/tar.
If you have set a symbolic link to overwrite the native UNIXtar command with the GNU tarcommand an error occurs.
http://www.ibm.com/systems/p/os/aix/linux/toolbox/download.html
AIX font requirements
AIX®requires specific fonts in order to produce reports.
About this task
When producing reports from AIX systems, TrueType fonts must be available on the system.
Procedure
1. Install TrueType fonts on the AIX system.
2. Ensure the fonts-path environment variable refers to the location of the fonts.
Checking for required libraries on Linux
The Maximo Asset Management deployment requires certain Linux system libraries.
Procedure
1. Locate thelibstdc++.so.5library in the /usr/lib/directory. If this library is not installed, the middleware installation program throws an error when running the middleware installation program in graphical mode. If you cannot locate this library on your system, locate the RPM package for your system that contains this library and install the package.
2. Ensure that you have thelibstdc++33-32bit-3.3.3-11.9.x86_64.rpmpackage installed before running the product installation program. SUSE Linux Enterprise Server 10 64-bit systems hosting manually configured middleware must host this package.
Configuring the JRE in Linux
In some cases, the middleware installation program fails on Red Hat Enterprise Linux 5 systems, or other systems with Security-Enhanced Linux (SELinux) enabled.
About this task
In one scenario, the middleware installation program fails with an error stating that the Java Runtime Environment (JRE) cannot be found. In another scenario, the middleware installation program fails stating that it cannot find the VM.
Complete the following steps to avoid these problems:
Procedure
1. Temporarily disable SELinux by using the setenforce 0command. 2. Run the middleware installation program.
3. Re-enable SELinux by using thesetenforce 1command.
4. Manually issue the chcon -R -t textrel_shlib_tinstall_home/jvm/jre> command.
Results
The middleware installation program is now able to locate the JRE. Alternatively, you can edit the /etc/selinux/configfile and setSELINUX to eitherpermissiveor
disabledfor a more permanent fix. This solution, however, affects the level of security for the entire system.
Setting the ulimit
This section details how to set the ulimit in Linux, which is used to define user system and process resource limits.
About this task
For Linux systems, you must set the ulimit for the system before using the middleware installation program.
If you set the ulimit in.profilefor root, the ulimit setting applies to all processes. To set the ulimit, complete the following steps:
Procedure
1. From a command line, type ulimit -f unlimited
2. From a command line, type ulimit -n 8192
Setting the swap size
Maximo Asset Management can be a resource-intensive application. Configure and tune your system for maximum performance. This section details how to set the size of the swap space used in Linux systems.
About this task
Typically, the swap size for Linux is set to twice the amount of physical RAM in the server. See the product documentation for your Linux distribution for more information.
Additional swap space can be made available to the system by:
Procedure
v increasing the size of the existing swap partition v creating a new, additional swap partition
v creating a swap file
Setting shared memory
This section details how to set a minimum shared memory value in Linux.
About this task
For Linux systems, you must set a minimum shared memory value for the system before using the middleware installer.
To set the minimum shared memory value, complete the following steps:
Procedure
1. From a command line, typesysctl kernel.shmmax and determine if the value is less than 268435456 bytes (256 Mb).
2. If you must increase the value, from a command line, type sysctl -w kernel.shmmax=268435456.
3. Update the value in/etc/sysctl.conf.
Remote configuration enablement
The Maximo Asset Management installation program can automatically configure middleware. You must enable a remote access protocol for each system on which you intend to install the middleware.
Use SSH for logging on to and configuring remote Linux and UNIX systems. Use Windows SMB for logging on to and configuring remote Windows systems. Windows SMB is a Windows protocol. The IBM JRE on the administrative workstation includes SSH.
Before you start the installation program, ensure that you can log on to any remote servers with the protocols that you intend to use. Use the credentials that you plan to supply to the installation program.
For remote Windows systems, ensure that the following requirements are met before installing the software:
v The user name that you provide to the installation program must exist as a local
account on the remote system. This user must be a member of the Windows Administrators group.
v The following Windows services must be started on the remote system before
you begin a remote installation and configuration: – winmgmt (Windows Management Instrumentation) – RemoteRegistry(Remote Registry)
– lanmanserver(Service)
v The SMB protocol must be enabled and configured to send NetBIOS over
TCP/IP, by choosing to use port 139. Alternatively, you can configure SMB to use TCP/IP as the transport protocol, without NetBIOS, by configuring it to use port 445.
v Ensure that any ports that you use for remote protocols are not blocked by
firewalls or security policies, including ports 137 and 139. Port 139 is used if SMB is configured to run on NetBIOS over TCP/IP. Port 445 is used if SMB is run directly on TCP/IP, without NetBIOS.
v To disable simple file sharing, start Windows Explorer. ClickTools>Folder Options, and clear the Use Simple File Sharingcheck box.
v The Windows administrative share (C$) and the interprocess communications
(IPC$) folder must be shared.
v For Microsoft Windows Server 2008 systems that support password-protected
sharing, disable password-protection. Shares must be shared for the Guest or Everyone accounts.
v For Windows systems that have User Account Control (UAC) enabled, it must
be disabled before software can be remotely installed and configured.
v If Cygwin is installed on the remote Windows system the SSH daemon (sshd)
must be uninstalled or disabled.
For remote Linux or UNIX systems, ensure that the following requirements are met before installing the software:
v For AIX systems, set the following SSH parameters located in the /etc/ssh/sshd_configfile:
– ClientAliveInterval 900 – ClientAliveCountMax 10
Stop the SSH daemon using thestopsrc -s sshdcommand and then restart it using thestartsrc -s sshd command.
v For AIX systems, set theTMOUTand TIMEOUTvariables in the user profile
script to 0. This setting prevents the user from idling out and being logged off the remote system during the installation.
v The user name that you provide to the installation program must exist as a
privileged account (for example, root) on the remote systems.
v Ensure that a current version of OpenSSH is installed and running. Do not use
OpenSSH 4.7.0.5302.
v For Oracle Solaris systems, the remote access protocols require the use of
internal shell scripts that must be run within the korn (ksh) shell. The methods need ksh, even if the user ID that you use to log on to the remote system is configured to use a different shell. Consequently, Oracle Solaris systems must have the ksh environment installed and properly configured.
v If you plan to remotely configure software on remote Linux or UNIX computers,
ensure that SSH is installed.
Remote configuration does not support accessing network drives on the local or remote system.
System password policy settings
Be familiar with the password policies of systems you are using as part of a Maximo Asset Management deployment.
Your organization might have password policy regulations enforced on systems on your network. Before deploying Maximo Asset Management, be sure that you are familiar with the password policies of systems used in the deployment, or you might experience errors during installation.
For example, Microsoft Windows Server 2008 systems have a stricter set of password requirements than previous versions configured by default. If you are not familiar with these stronger password requirements, you might experience an error during the installation of Maximo Asset Management. This error occurs when creating users on a Microsoft Windows Server 2008 system.
Password values that you provide during the Maximo Asset Management
installation must be compliant with the password policies set for the target system. Passwords are not validated against the password policies of target systems at the time you enter them on the installation program panels. If your passwords do not conform to the password policies of systems used to deploy the product, errors occur when the installation program attempts to create these passwords during the configuration step,
Backing up the Deployment Engine database
These instructions are for backing up the Deployment Engine database. Backups are used to restore the database to the state it was before installing.
Before you begin
Back up the Deployment Engine database of the system before and after applying any updates to an existing deployment. Use backups to recover from partial installation attempts.
About this task
To back up the Deployment Engine database, complete the following steps:
Procedure
1. Set up the environment using the following command: Windows
c:\install_home\ctg_DE\acsi\setenv.cmd
2. Run the command to back up the Deployment Engine registry: Windows
c:\install_home\ctg_DE\acsi\bin\backupdb.cmd backup file name
Use a meaningful name forbackup file nameto reflect the fact that it contains the state of the registry after your installation of Maximo Asset Management. For example,DEBackupAfterInstall.
Specifying host name values
Do not use localhost for host name values in the installation program. Specify the fully qualified host name or IP address of the system on which you are installing. For Linux or UNIX systems, if the hostname -fcommand does not return a fully qualified host name, consult the system documentation for assistance.
Establishing a fully qualified host name on Windows systems
Use this task to establish a fully qualified host name on Windows systems.About this task
To establish a fully qualified host name on Windows systems, complete the following steps.
Procedure
1. On the desktop, right-click My Computer. 2. Select Properties.
3. On the Computer Name tab, clickChange.
4. Enter a fully qualified host name in theComputer name field, and then click More.Alternatively, you can provide the IP address for the system.
5. In the DNS Suffix and NetBIOS Computer Name window, verify that the Primary DNS suffixfield displays a domain name, and then clickOK. 6. In the Computer Name Changes window, clickOK.
7. ClickApply and close the System Properties window.
Forcing the middleware installer to use alphanumeric hostnames
You can force the use of alphanumeric host name use within the middleware installation program by starting it from the command line and using theforceHostname=trueparameter.
Example
The following example shows a use of theforceHostname=trueparameter:
mwi-console -V forceHostname=true
What to do next
If you launched the middleware installation program from the command line using theforceHostname=trueparameter, then you are required to provide an
alphanumeric value in the Hostnamefield. An IP address results in an error message.
Launchpad
The IBM Maximo Asset Management launchpad serves as a centralized interface for launching a collection of installation programs and product information. The launchpad application assists you in choosing which product installation programs you must install and indicates the order in which they must be installed. Use the Maximo Asset Management launchpad to:
v start the middleware installation program. v start the prerequisite checker utility.
v start the Maximo Asset Management installation program.
v access the Maximo Asset Management information center, including information
used to plan the Maximo Asset Management installation and deployment. Just before starting the launchpad, ensure that you meet the middleware prerequisites. Ensure that you have the correct service pack levels for your environments and always use fully qualified domain names when entering values for the installation program.
Starting the launchpad
Before you begin
Launchpad generated messages are captured in a hidden log frame while the launchpad is running. To show the log frame on the bottom of the launchpad panels, hold the CTRL key while simultaneously clicking the banner frame of the launchpad. Messages that are generated while the launchpad is running are not automatically saved on the hard disk drive. You can manually save the messages from a session by clicking Saveat the bottom of the log frame and then specifying where you want to save the file.
About this task
To start the IBM Maximo Asset Management launchpad, complete the following steps:
Procedure
1. Log on to an account with system administration privileges on the computer where you want Maximo Asset Management components to be installed. 2. Start the launchpad from the root directory of the installation image:
v Windows: Start the launchpad by using the launchpad.exeprogram.
Chapter 2. Deploying automatically reusing existing
middleware
Use this information to use Maximo Asset Management installation programs and tools to automatically configure existing middleware within your enterprise during the Maximo Asset Management deployment process.
This information provides a high-level overview or road map of tasks you need to complete in order to deploy Maximo Asset Management automatically. You use middleware already established in your enterprise.
In this scenario, you use the middleware installation program and the Maximo Asset Management installation program to automatically configure existing middleware resources. Middleware configuration is performed automatically before deploying the product.
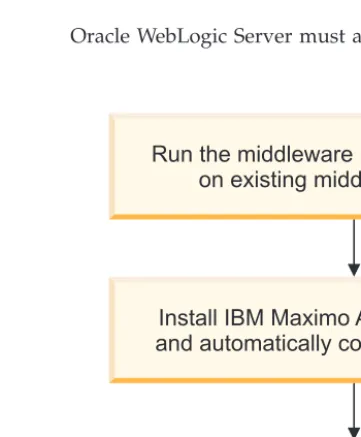
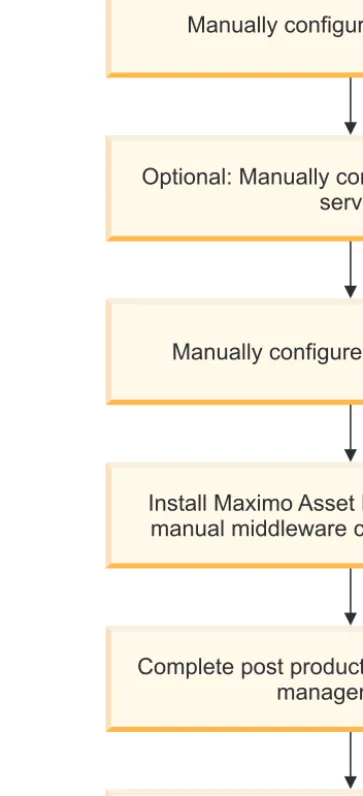
Oracle WebLogic Server must always be configured manually.
Run the middleware installation program on existing middleware
servers
If you intend to reuse existing middleware servers with Maximo Asset Management, they must be configured before you run the Maximo Asset Management installation program.
Run the middleware installation program
on existing middleware servers
Install IBM Maximo Asset Management
and automatically configure middleware
Verify the installation
Perform post-installation tasks
Figure 1. Deploying Maximo Asset Management reusing existing middleware
Details are provided for using the middleware installation program with Microsoft Active Directory.
You cannot use the middleware installation program to configure existing Oracle servers.
Oracle WebLogic Server cannot be configured using the middleware installation program.
Ensure that all of your middleware is at supported levels for Maximo Asset Management.
When you install and configure middleware in the middleware installation program and the Maximo Asset Management installation program, consider the following special characters restrictions:
Table 3. Middleware object naming conventions
Naming Convention Details
The middleware installation program The middleware installation program does not validate that your password is compliant with the operating system of the target host. Ensure that the password values you provide are valid for your environment. The middleware installation program does not allow the use of the '%' character on Windows and the use of the !, $, #, % characters on UNIX.
The middleware installation program does not check for accented characters in user name values. The use of accented characters can cause errors.
Manually configuring WebLogic Server
WebLogic Server can be used with Maximo Asset Management if it is manually configured.
About this task
You can use a WebLogic Server as your J2EE server. The Maximo Asset Management installation process prepares EAR files on the Maximo Asset Management administrative workstation. These files are then manually deployed to your WebLogic Server. The Maximo Asset Management installation program does not automatically configure a WebLogic Server environment It does not install or otherwise deploy Maximo Asset Management applications into a WebLogic Server server.
Manually configuring WebLogic Server consists of the following tasks:
Procedure
1. “Creating the MAXIMOSERVER domain” on page 17
2. “Configuring JMS options for integration framework” on page 17 3. “Configuring JMS for the email listener in WebLogic Server” on page 19
Creating the MAXIMOSERVER domain
This section details how to create the MAXIMOSERVER domain within WebLogic Server.
About this task
To create the MAXIMOSERVER domain within WebLogic Server, complete the following steps:
Procedure
1. Launch the Configuration wizard tool.
v For Windows systems, selectStart>Programs>BEA Products >Tools> Configuration Wizard.
v For UNIX systems, launch the Configuration wizard using the config.sh
command located in <WebLogic_Home>/weblogic10/common/bin.
2. From the welcome panel, selectCreate a new WebLogic Server domain, and then clickNext.
3. From the Select a Domain Source panel, selectGenerate a domain configured automatically to support the following products, and then clickNext. 4. From the Specify Domain Name and Location panel, name the domain
MAXIMOSERVER, and then clickNext
5. From the Configure Administrator Username and Password panel, enter an administrator user ID and password, and then clickNext.
6. From the Configure Server Start Mode and JDK panel, enter the following information, and then clickNext.
WebLogic Server Domain Startup Mode SelectProduction.
Selecting this option requires that you provide a user ID and password in order to deploy applications.
JDK Selection
Select a JDK with a version number 1.6.0 or greater from the supplied JDKs.
7. Proceed through the next few panels until you reach the Customize
Environment and Services Settings panel. From the Customize Environment and Services Settings panel, select the default optionNo, and then clickNext. 8. From the Create WebLogic Server Domain panel, change the Domain Name
value toMaximoServer, and then clickCreateto create the domain.
9. Once the domain has been created, ensure that theStart Admin Serveroption is cleared, and then clickDone to close the Configuration wizard. On UNIX systems, this option is not displayed.
Configuring JMS options for integration framework
This procedure provides details on steps to configure JMS queues.Before you begin
You need to be familiar with the Oracle WebLogic Server Administration Console to complete the following procedure. See your Oracle WebLogic Server
documentation on how to navigate through the Oracle WebLogic Server Administration Console.
Procedure
1. Launch Internet Explorer and open the MAXIMOSERVERAdministration Console by typing the following URL:
http://host_name:7001/console
2. Sign in by entering your user ID and password.
3. Create three persistent file stores with the following configuration parameters:
Option Description
File Store Name sqinstore,sqoutstore,cqinstore
File Store Target MAXIMOSERVER
File Store Directory C:\WebLogic, or another directory of your choice
File stores have better performance in general. However, you can choose to create database-based stores. To choose between file stores and database-based stores, consult your Oracle WebLogic Server documentation.
4. Create three JMS servers with the following configuration parameters:
Option Description
Properties Name sqinserver,sqoutserver,cqinserver
Server Target MAXIMOSERVER
Bytes Maximum 20% or below of the allotted JVM heap size
It is recommended that you configure the Bytes Maximum for the JMS servers to a value of 20% or below of the allotted JVM heap size to prevent the Oracle WebLogic Server from running out of memory.
5. Create a JMS system module named intjmsmodulewith MAXIMOSERVER as the target server.
6. Add a connection factory resource to the JMS module:
Option Description
Name intjmsconfact
JNDI Name jms/maximo/int/cf/intcf
Target MAXIMOSERVER
7. Add three queue resources to the JMS Module: a. Create the queue resource type.
b. Create a new subdeployment with the same name as the queue.
c. Assign thesubdeployment_nameserverserver target to the subdeployment.
Option Description
Queue 1 Name:sqinJNDI Name: jms/maximo/int/ queues/sqin
Queue 2 Name:sqoutJNDI Name:jms/maximo/int/queues/ sqout
Queue 3 Name:cqinJNDI Name:jms/maximo/int/queues/ cqin
Template None
8. Enable the JMS connection factory for integration framework: a. Select theintjmsconfactlink.
b. From theTransactionstab, check theXA Connection Factory Enabled check box.
9. Save and activate the changes.
What to do next
You need to stop and restart theMAXIMOSERVERapplication server for the update to take effect.
Configuring JMS for the email listener in WebLogic Server
You use the email listeners application to receive and process requests through email in the form of email messages.About this task
To configure JMS queues for the WebLogic Server, complete the following steps:
Procedure
1. Log in to the WebLogic Server administration console. 2. Create a persistent store.
a. In the Domain Structure panel, expandServicesand then clickPersistent Stores.
b. ClickNew and select the option to create a file store.
c. Enterlsnrstorefor the name of the file store andc:\wls10as the directory, and then clickFinish.
3. Create a JMS Server
a. In the Domain Structure panel, underServices>Messaging, clickJMS Servers, enter the following information, and then clickNext.
Name Enter a name for a new JMS server, for example,lsnrserver. Persistent Store
Selectlsnrstore.
b. For theTarget, select AdminServer, and then clickFinish. 4. Create a JMS System Module
a. In the Domain Structure panel, underServices>Messaging, clickJMS Modules, and then clickNew.
b. Enter a value for theNamefield, such aslsnrjmsmodule, and then click Next.
c. Select the option forAdminServer, and then clickNext.
d. Select the option forWould you like to add resources to the JMS system module?, and then clickFinish.
5. Add a connection factory to the JMS module.
a. From the Summary of Resources table of the lsnrjmsmodule module, click Newto add a resource.
b. Select theConnection Factoryoption, and then click Next.
c. From the Connection Factory Properties panel, enter the following information, and then clickNext.
Name Enter a name for the new connection factory. For example,
lsnrconnfact. JNDI Name
Enterjms/mro/lsnr/lsnrcf.
d. Ensure AdminServer is selected, and then clickFinish
6. Add a queue to the JMS module.
a. From the Summary of Resources table of the lsnrjmsmodule module, click Newto add a resource.
b. Select theQueueoption, and then clickNext.
c. From the JMS Destination Properties panel, enter the following information, and then clickNext.
Name Enter a name for the new queue. For example,lsnrqueue. JNDI Name
Enterjms/mro/lsnr/qin. Template
No template is necessary.
d. ClickCreate a new Subdeployment, select lsnrserver, and then click Finish.
7. Set the XA option for the connection factory.
a. Selectlsnrconnfact, and then select the Transactions tab.
b. Ensure that the XA Connection Factory Enabled option is selected, and then clickSave.
8. ClickActivate Changesto save and activate all changes.
9. To enable an email listener to use JMS queues, a Message Driven Bean is configured through a deployment descriptor file that is part of the installation. You configure the Message Driven Bean by removing comment lines from sections within the deployment descriptor files. Edit theejb-jar.xmland
weblogic-ejb-jar.xmlfiles.
a. Open theinstall_dir\applications\maximo\mboejb\ejbmodule\META-INF\ ejb-jar.xmlfile in an editor, uncomment the following sections, and then save the file:
Email Listener JMS is not deployed by default <message-driven id="MessageDriven_LSNRMessageBean"> <ejb-name>LSNRMessageBean</ejb-name> ejb-class>psdi.common.emailstner.LSNRMessageBean</ejb-class> transaction-type>Container</transaction-type> <message-destination-type>javax.jms.Queue</messagedestination-type> </message-driven>
Email Listener JMS is not deployed by default <container-transaction> <method> <ejb-name>LSNRMessageBean</ejb-name> <method-name>*</method-name> </method> <trans-attribute>Required</trans-attribute> </container-transaction>
b. Open the c:\ibm\smp\maximo\applications\maximo\mboejb\ejbmodule\META-INF\weblogic-ejb-jar.xmlfile in an editor, uncomment the following section, and then save the file:
Email Listener JMS is not deployed by default <weblogic-enterprise-bean> <ejb-name>LSNRMessageBean</ejb-name> <message-driven-descriptor> <destination-jndi-name>jms/mro/lsnr/qin</destination-jndiname> <connection-factory-jndi-name>jms/mro/lsnr/lsnrcf</ connection-factory-jndi-name> </message-driven-descriptor> <transaction-descriptor>
<trans-timeout-seconds>600</trans-timeout-seconds> </transaction-descriptor>
<jndi-name>LSNRMessageBean</jndi-name> </weblogic-enterprise-bean>
Installation program overview
The Maximo Asset Management installation program provides an interface for installing and deploying Maximo Asset Management, which includes the process automation engine and process managers.
The Maximo Asset Management installation program records choices you make about your Maximo Asset Management deployment. It records configuration parameters associated with those choices, and then installs and deploys Maximo Asset Management based upon the information you entered.
There are two installation paths available to you when you are installing Maximo Asset Management.
Simple
A simple deployment consists of installing Maximo Asset Management middleware on one system. You do not have the option of using existing middleware within your organization with Maximo Asset
Management. All middleware used with Maximo Asset Management must be installed on the system with the middleware installation program with default values. Maximo Asset Management is installed with default values provided by the middleware installation program and Maximo Asset Management installation program.
If you intend to override default values used by the simple deployment path, you must use the custom deployment path instead.
If you are deploying with Oracle WebLogic Server, you cannot choose this option.
Custom
A custom deployment typically involves deploying Maximo Asset
Management across several systems. Some of these systems might already host middleware products that you want to use with your Maximo Asset Management deployment. You can modify default installation values when you deploy with the custom installation path.
This deployment option does not require you to spread the Maximo Asset Management deployment across several systems. You can enter the name of the local host as the destination for all Maximo Asset Management components.
If you are deploying with Oracle WebLogic Server, you must choose this option.
The Maximo Asset Management installation program can automate the configuration of some middleware for use with Maximo Asset Management. The Maximo Asset Management installation program cannot automate the configuration of Oracle WebLogic Server.
If you choose not to have the Maximo Asset Management installation program automatically configure middleware, you must configure that piece of middleware manuallybeforethe installation of Maximo Asset Management.
Important: When you are entering LDAP values for Maximo Asset Management installation panel fields, be aware of the product-specific syntax rules for using special characters in an LDAP string. In most cases, special characters must be preceded by an escape character in order to make it readable by the directory server. Failing to escape special characters contained in an LDAP string used with Maximo Asset Management results in Maximo Asset Management errors.
Many directory server products consider a blank space as a special character that is part of the LDAP string. If you enter an LDAP string with an unescaped blank character at the end of a field value, you encounter Maximo Asset Management errors.
For more information about special character usage in LDAP strings, see the product documentation for your directory server.
Information that you enter for the Maximo Asset Management installation program is stored in themaximo.propertiesand install.propertiesfiles and the Maximo database. These values are populated into the panel fields of the Maximo Asset Management installation program on subsequent uses of the program. If you cancel the installation program, it recalls most values that you entered the next time you start it. Values excluded from being saved in this manner are the Maximo Asset Management installation directory and the shortcut option chosen during the installation. You can restore the default values in the Maximo Asset Management installation program by deleting <Maximo_Home>/applications/maximo/properties/ maximo.properties and<Maximo_Home>/etc/install.properties. If you cannot locate the maximo.propertiesfile in the<Maximo_Home>directory, look for it in the system temp file directory.
Installing the product and automatically configuring
middleware
To install Maximo Asset Management, you run the installation program from the launchpad. The installation procedure automatically configures middleware on multiple servers, using default values.
Before you begin
Ensure that you meet prerequisite conditions.
v Oracle WebLogic Server must have been manually configured for your
deployment.
v The database server, the directory server, and application server services must be
started and active.
v On the administrative workstation, temporarily shut down any noncritical
processes that can have a negative effect on the installation, such as antivirus software.
v Ensure that the Windows DEP setting does not prevent the launchpad from
running: SelectStart> Settings>Control Panel>System>Advanced> Performance>Settings>Data Execution Prevention. SelectTurn on DEP for essential Windows programs and services onlyand clickApply. You might be asked to reboot the server.
v For Linux and UNIX systems with middleware installed, the commandhostname
-fmust return a fully qualified host name. If necessary, consult the
documentation for your operating system. Alternatively, you can provide the IP address for the system.
v Enable a remote execution and access service on every system that has
middleware installed. Each remote system must support a remote access
protocol. It must also accept remote logins from a user name and password that were configured on the target server. Remote access protocols include SSH and Windows SMB. If the remote system is a Windows server, you must configure remote execution and access to use SMB.
About this task
The instructions are for a multiple server installation that uses default values.
Procedure
1. Log in on the administrative system.
2. Start the product installation program from the launchpad.
a. Start the launchpad. Browse to the root directory of the downloaded installation image, and run the following command:
Windows
launchpad.exe
b. In the launchpad navigation pane, clickInstall Product. c. Click Install Maximo Asset Management 7.5.
If the launchpad does not start the installation, you can start the product installation program directly. On the downloaded installation image, browse to\Install\mam\, and run one of the following commands:
Windows
v install.bat v install_win64.bat
3. Select a language for the installation and clickOK.
4. On the Choose Installation Folder panel, specify the path to the location where you want to install Maximo Asset Management.
You can specify a description for the installation. A description is useful for differentiating between multiple installations that are hosted on the same administrative workstation.
5. Review the information that is on the Verify Installation Location panel. The panel shows any previous installation information that was found based on the installation directory that you specified on the previous panel. After you advance past this panel, you cannot go back and change the installation directory for this installation.
If a more recent version of the installation program is found in the specified target directory, you are notified. The notification means that you are using an older version of the installation program. The version found on the
administrative workstation is newer and can contain important features and enhancements. To use the newer version of the installation program, select the option on the notification panel and clickNext. This action exits the current installation process and restarts the installation process with the newer installation program. If you do not select the option, you continue the installation with the older version of the installation program.
6. On the Package Summary panel, review the package deployment information. This panel lists version information for both new and existing packages on the system. Target package version information indicates the package version being currently deployed.
7. On the Choose Deployment panel, specify SimpleorCustomas the deployment type.
8. On the Import Middleware Configuration Information panel, you select Import middleware configuration information to have the product
installation program reuse the middleware installation program values. These values are used as default values for the same fields in the product
installation program.
The Workspace locationfield refers to the location of the topology file that contains the values that were specified for the middleware installation program. The file is located in the workspace that was defined during the middleware installation task. For example, C:\ibm\tivoli\mwi\workspacefor Windows or /root/ibm/tivoli/mwi/workspacefor UNIX.
If you selected the simple deployment, the middleware default information is not used.
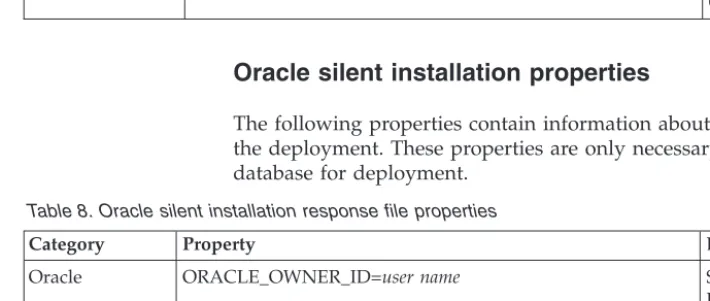
9. On the Database Type panel, specify the software to use for the Maximo database.
10. On the Database panel, specify configuration information for your database software.
For things such as the database user ID, the database name, the database instance for Maximo Asset Management, and the schema name, if the values do not exist when you specify them, they are created.
Database users and database instance names cannot contain spaces.
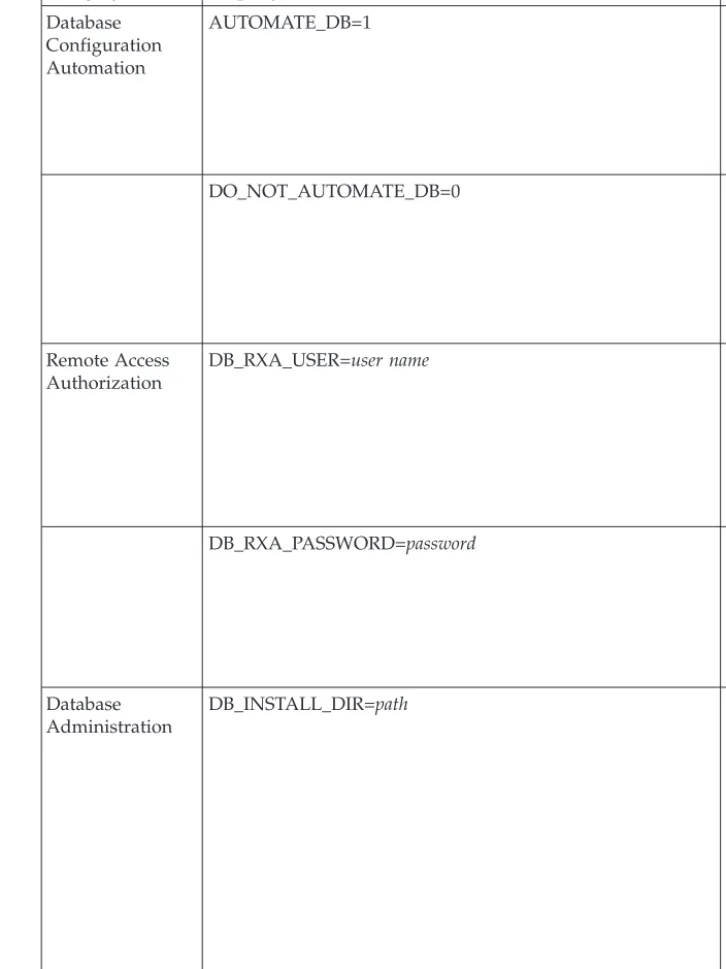
After you specify configuration information for your database software, the installation program validates the information with the database server. 11. On the Automate Database Configuration panel, you can specify that database
creation and configuration is to be automated.
If you do not select the option, you must configure the database manually. 12. On the Remote Access Authorization panel, specify authorization information
for the automatic database configuration feature. Specifying the values enables remote configuration.
13. On the Database Administration panel, specify configuration information about the database. The required information varies by database platform. 14. On the Database Tablespace panel, specify information about the table space
of the database.
When you click Next, the product installation program connects to the database server and validates the information that you specified.
15. When the database validation is complete, on the Application Server Type panel, specify the application server type for the product deployment. You must manually configure WebLogic Server and manually deploy application files.
16. On the Specify Maximo Users panel, enter Maximo database user information. Maximo administration user
The product administrator user ID that is used for initial configuration and adding users.
Maximo system registration user
The user ID that is used for the self-registration of users. Maximo system integration user
Custom user ID and password values are stored in the Maximo database. The default user IDs of maxadmin, maxreg, and maxintadm are also created as users in the Maximo database. Creation of the default user IDs is done for internal processing purposes. If you use Maximo database security for
authentication and authorization, the default user IDs can be used to log in to the application. If you regard this condition as a security risk, you can modify the passwords for the default user IDs. You modify passwords for the user IDs in the Users application.
17. On the SMTP Configuration panel, specify the SMTP configuration information that is used by workflows to communicate with workflow participants.
The administrator e-mail address is the e-mail address that is used to send messages. If you leave the fields blank, you must configure the SMTP parameters through the product interface as a post-installation task. 18. On the Base Language Selection panel, specify the base language for the
installation.
19. On the Additional Language Selection panel, you can optionally specify one or more additional languages that the installation is to support.
20. On the Run Configuration Step panel, specify how to perform the configuration step of the installation. If you do not select an option, the configuration step proceeds when you click Next.
Copy files now, but perform the installation configuration step later Select this option to copy files from the installation source to the administrative workstation. You must perform the configuration step at a later time to complete the deployment.
Select this option to create a maxdemo database during the installation of Maximo Asset Management and populate the database with sample data.
Important: Do not install another product before you complete the configuration step of the original installation. Installing another product before you run the configuration step for this installation overwrites the taskstore, which prevents the original installation from ever being deployed.
The configuration values that you specify are stored in the
install_home\maximo\applications\maximo\properties\
maximo.properties andinstall_home\etc\install.propertiesfiles. You run the configuration steps outside of the product installation program by using the taskrunner utility, in theinstall_home\scripts
directory. Run the taskrunner utility from the command line.
install_home\scripts\taskrunner [CONTINUE <STOPONERROR|NOSTOPONERROR>]
The taskrunner uses the configuration values that are stored in the
maximo.properties andinstall.propertiesfiles to configure Maximo Asset Management.
If you run taskrunner with theNOSTOPONERRORparameter, the taskrunner continues despite errors. If you run taskrunner with the
STOPONERROR parameter, the taskrunner stops when it encounters an error. If you usedSTOPONERROR, you can rectify the conditions that caused the error. You can then resume the installation where the last successfully completed task was recorded in the previous attempt by starting taskrunner with the CONTINUEparameter.
Defer the update of the Maximo database
Select this option if you want to manually run the database update task for the product deployment. This option can be used when there is a fix pack available that addresses known issues with the updatedb script. In this scenario, you choose the Defer the update of the Maximo database option, apply the fix pack, and then run the
updatedb -v1 command manually.
21. On the Choose Shortcut Folder panel, specify where you want Maximo Asset Management icons created.
If you select In the Start Menuand use Internet Explorer, add the Maximo Asset Management URL to the trusted sites web content zone. Disable the option that requires server verification for all sites in the zone.
Do not select In the Quick Launch Bar. The selection does not create a shortcut in the Quick Launch bar.
22. On the Input Summary panel, review the information that you provided for the product installation program.
If necessary, usePreviousto return to previous panels to change values. 23. On the Pre-Installation Summary panel, review the installation information,
then clickInstall.
The installation process begins. You can monitor the progress of the installation by viewing the messages that are shown.
24. On the Installation Completed panel, review any information presented, then click Done.
Creating a maxdemo database during installation
You can create a maxdemo database during a Maximo Asset Management installation and populate the database with sample data.
Procedure
1. On the Run Configuration Step panel of the installation wizard, selectCopy files now, but perform the installation configuration later.
2. When the installation finishes, exit the installation wizard.
3. Rename the C:\IBM\SMP\Maximo\tools\maximo\en\maximo.dbtypefile. 4. Copy theC:\IBM\SMP\Maximo\tools\maximo\en\maxdemo.dbtypefile to
C:\IBM\SMP\Maximo\tools\maximo\en\maximo.dbtype, whereenis the language folder and thedbtypeisora,sqs, ordb2.
5. Open a command window and browse to C:\IBM\SMP\scripts. 6. Run the following command: taskrunner.bat CONTINUE STOPONERROR
7. When the taskrunner process is complete, change the file names back to their original names. Do not restart the computer before you run the taskrunner command. The taskrunner utility does not create a persistent store of information and data can be lost.
Post installation for Oracle WebLogic Server deployments
There is a post installation step required for Oracle WebLogic Server deployments.
About this task
When using Oracle WebLogic Server as the application server for your Maximo Asset Management deployment, the installation program produces an EAR file.
When using Oracle WebLogic Server, you must modify the weblogic.xmlfile and rebuild themaximo.earfile before deploying it.
Procedure
1. Install the updated JDK 1.6 program.
a. Obtain the latest JDK program with a version number 1.6.0 SR7 or greater, from http://www.oracle.com/technetwork/java/index.html
b. Start the installation program. c. Accept the license agreement.
d. Change the installation destination path to your Oracle home folder, and clickOK, thenNext.
e. Accept any additional prompts to install the JDK program so that the installation process can complete successfully.
2. If you are using an Oracle database, copy theoraclethin.jarfile.
a. Copy theoraclethin.jarfile from the administrative workstation to the server where you installed Oracle WebLogic Server. Use any file transfer protocol that is available.
b. Theoraclethin.jarfile is in theinstall_home\maximo\applications\ maximo\libdirectory. The defaultinstall_homedirectory is
C:\IBM\SMP\Maximo\Applications\Maximo\lib. Copy theoraclethin.jarfile to the J2EE server and into thewls11g/server/lib directory. For example,
C:/Oracle/wls11g/server/lib.
3. Edit the domain configuration file for appropriate Java settings. a. Navigate toInstall_dir\user_projects\domains\mydomain\bin.
b. Right-click and edit (do not double-click)setDomainEnv.cmd(Windows) or
setDomainEnv.sh(UNIX).
c. Using your text editor, search for and replacejdk entries with entries that configure Oracle WebLogic Server to use the updated JDK program. Two instances must be replaced.
d. (Oracle only) Search forPRE_CLASSPATH. Set the parameter as follows:
set PRE_CLASSPATH=%WL_HOME%\server\lib\oraclethin.jar (Windows) PRE_CLASSPATH={WL_HOME}/server/lib/oraclethin.jar (UNIX)
Note: This step is required for connecting to Oracle databases from Oracle WebLogic Server.
e. Increase the Java Heap parameters by searching forMEM_ARGSand setting the parameter as follows:
set MEM_ARGS=-Xms512m -Xmx1024m -XX:MaxPermSize=512m (Windows) MEM_ARGS=-Xms512m -Xmx1024m -XX:MaxPermSize=512m (UNIX)
These parameters are case-sensitive. Ensure to include the minus (-) sign before each parameter and to include themafter each value.
f. Search for set JAVA_OPTIONS=%JAVA_OPTIONS% %JAVA_PROPERTIES%. Insert an option directly after this string, as follows:
-Dcom.sun.xml.namespace.QName.useCompatibleSerialVersionUID=1.0
The entry looks like this example when complete:
set JAVA_OPTIONS=%JAVA_OPTIONS% %JAVA_PROPERTIES%
-Dcom.sun.xml.namespace.QName.useCompatibleSerialVersionUID=1.0
-Dwlw.iterativeDev=%iterativeDevFlag% -Dwlw.testConsole=%testConsoleFlag% -Dwlw.logErrorsToConsole=%logErrorsToConsoleFlag%
g. Save and close thesetDomainEnv.cmdfile.