Visual Mutator 2.1 – User Manual
A1. Overview
Visual Mutator is a mutation testing tool and a Visual Studio extension that can be used to verify quality of a test suite in the active solution. It operates by executing the tests on automatically created original program copies (mutants), each containing one artificial fault. The test suite quality is based on a number of killed mutants - programs in which at least one test failed as a result of an artificial fault.
Features
• Mutating code after compilation – code in Common Intermediate Language;
• Creating first and second order mutants by using built-in and custom mutation operators; • Ability to view modified code fragments in C# and IL languages;
• Running NUnit and XUnit tests on generated mutants (runs also Unit tests but not on a single method (A3.1.2) );
• Interactive user interface: ability to view details about any mutant right after the start of the mutation testing process;
• Presenting results: the mutation score and information about passed and failed tests;
• Option to write detailed results to an XML file;
A2. Installation
The Visual Studio (Professional version or higher) version 2013 IDE or newer is required to install and use the Visual Mutator extension. In order to install Visual Mutator, execute the .vsix file and follow the instructions. The extension will be registered in Visual Studio after relaunching the IDE. If Visual Mutator was installed earlier, you must uninstall it before installing the new version.
To uninstall Visual Mutator from within Visual Studio, click menu item Tools -> Extensions and Updates, choose Visual Mutator from the list in the Extensions and Updates
window and click the Uninstall button.
A3. Getting started
Visual Mutator consists of a Visual Studio tool window that can be placed and resized anywhere in the parent environment. Its dimensions may be freely customized; the vertical layout is recommended however.
Tip:
If the Visual Mutator tool window is not visible, open it by selecting menu item: View -> Other Windows -> VisualMutator.
A3.1 Creating a mutation testing session
A mutation testing session, in the context of Visual Mutator, is a usage of the program by a user. It consists of creating and testing mutated program copies.
The Visual Studio solution should be built and up-to-date before creating a new mutation testing session.
Note:
It is strongly recommended to ensure that all the original program’s tests pass before starting a mutation testing session. If this is not the case, all mutants are going to be killed, leading to invalid and useless results.
There are 2 approaches to starting a session: the mutation scope can contain a whole codebase or in a single chosen method.
• The first approach is invoked by clicking the New Session. . . button. The scope can be further refined, however it should be noted, that starting the session on majority of the project code is most often a very time-consuming operation.
• If you do not need to measure the quality of the whole test suite at once, a more ad-hoc approach is recommended. A limited-scope mutation session can be started by right-clicking inside the body of a non-test method in the Visual Studio code editor and choosing the Mutate and test. . . action. This is a fast and recommended way to check the quality of the tests that call the selected method - the scope of mutation testing is automatically narrowed. In this usage of Visual Mutator Code Coverage Detection does not work.
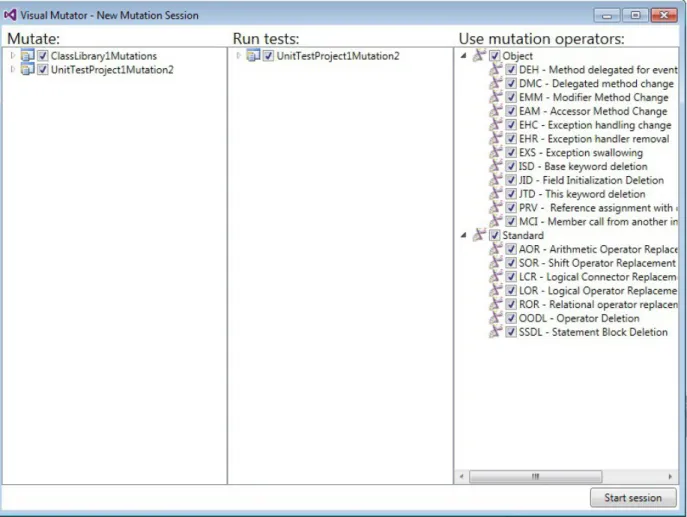
Regardless of the initial approach you choose, the mutation testing session creation window appears (fig. A.1):
Fig. A.1. Visual Mutator - session creation window
A3.1.1 Running the session on the whole codebase
The type tree on the left, labelled Mutate, presents types and methods detected in the solution’s assemblies. The checkboxes can be used to deselect any nodes in order to be excluded from the mutation process.
Note:
All types containing tests should be deselected in the left pane to avoid mutating them. Alternatively, Code Coverage Detection can be set on in Options view to do it automatically.
The middle pane Run tests presents the tests detected in the codebase. They are to be executed on every created mutant. By default, all tests are run; deselect any tests to turn off their execution (i.e. the test that are not related to the code selected in the left pane). In the right pane, available mutation operators can be deselected to exclude them from the mutant creation process.
1. In the left pane, deselect any code elements that are not desired to be mutated in the particular use case (for example the codebase that had been mutation-tested before, or a project that is to be mutated at a later time, due to its size);
2. In the left pane, deselect any code that is strictly test-related (unit tests, functional tests, test helper classes). Alternatively, Code Coverage Detection can do it automatically; 3. In the middle pane, deselect any tests that are not desired to be run (e.g. long running functional tests, or test that are unrelated to the code selected in the left
pane);
4. In the right pane, deselect any mutation operators that are not to be used (due to a large number of equivalent mutants generated, for example);
A3.1.2 Running the session on a single method
When the session creation window is shown as a result of using the Mutate and test. . .
action on a method, it makes more choices automatic and not involving the user: • In the left pane, only the specific method is selected;
• In the middle pane, only the tests invoking the method are selected. However, the selection may require further tuning;
Regardless of the approach, you can tune the selections to suite your needs. It is possible to manually tune the first approach to have its scope narrowed to the one similar to the second approach.
A3.2 Starting the session
Clicking on the Start session button closes the window and starts the session process. The session consists of the following steps:
1. Pre-check (testing unmodified assemblies); 2. Creating mutant list;
3. Instantiating and testing the mutants (possibly in parallel);
Current status of the session is visible in the upper-left corner of the Visual Mutator window.
The first step of a session is the pre-check, aiming to test unmodified assemblies. During the pre-check, the test cases are executed on the unmodified program to ensure that all pass. In case of a test failure, a warning window is displayed. After the pre-check, operators selected before are used to generate information about all mutants, grouped by location in the codebase.
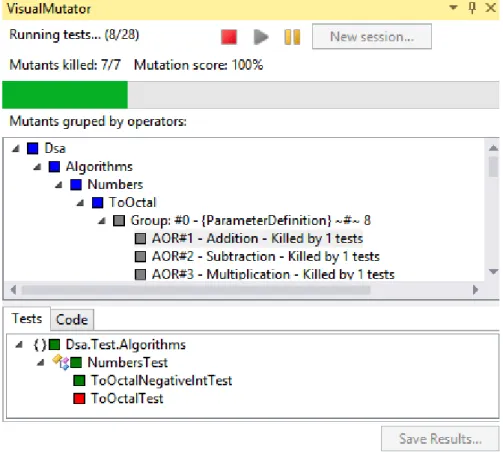
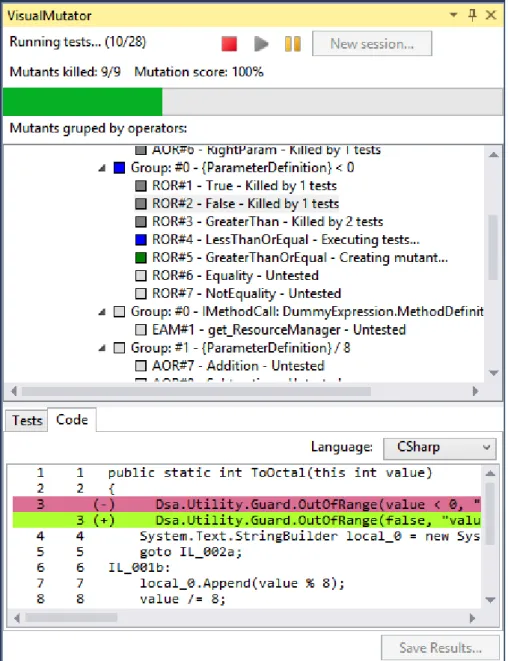
The next, main, step is testing of each mutant. For each mutant, all enabled test cases are executed. During and after this process, you can view the details of a selected mutant - the mutated code fragment and testing results (if the mutant has been already tested) - fig. A.2.
Fig. A.2. Visual Mutator - test tree view
Current overview of the running session is shown in the upper part of the Visual Mutator window:
• Number of mutants already tested in relation to all mutants;
• Number of mutants killed in relation to all mutants already tested and the mutation score resulted from this division;
• The progress bar of the whole process;
The testing process can be paused by clicking the yellow Pause button and then resumed by clicking the green (triangular) Resume button. It can be abandoned by clicking the red (rectangular) Stop button, which prematurely finishes the testing process.
The testing process can also be controlled by clicking on a mutant. Clicked mutant will be tested with the highest priority (while also displaying it’s source code).
The aggregated results of the whole session are available to save to XML after finishing the mutant testing phase.
Fig. A.3. Visual Mutator - mutated code view
Mutant results
Each mutant has a label consisting of: • Mutation operator identifier (e.g. ROR); • Mutant id (e.g. 5);
• Name of the result of the change (e.g. Subtraction);
• Current state (e.g. killed), also indicated by colour of the square icon; Possible mutant states are:
• Untested (light grey) – mutant is waiting to be tested;
• Creating (green) – mutant is being created or written to disk; • Testing (blue) – mutant is being tested;
• Killed (grey) – mutant was killed by one or more tests, or by a testing timeout; • Live (orange) – all tests passed on this mutant;
• Error (red) – an internal program error occurred while creating or testing the mutant. A message regarding the error can be displayed by right-clicking the mutant;
Clicking on a mutant updates the tabbed view in the lower section of the window: • Code tab - displays a decompiled code fragment (in C# or IL language) visualizing the change the mutant consists of (fig. A.1); Green and red colours indicate
• Tests tab - displays a tree containing the tests executed on the mutant, grouped by namespaces and classes. Green squares represent passed tests, red squares - failed ones. Right-clicking on a failed test gives an option to view a message describing the cause of the failure;
Marking mutants as equivalent
If a live mutant, based on its code presenting the change, is believed to be equivalent, it can be marked as such. To do this, right-click on it and choose the Mark as equivalent
context menu item. The equivalent mutant’s results are not counted towards the mutation score.
Saving aggregated results
After testing has been finished, detailed mutation testing session results can be saved to an XML file. Among the saved data, there are:
• Mutation score;
• Basic mutant information - outcome of mutant testing; • Various timing statistics;
Click the Save Results button in the lower section of the window to cause the results saving dialog to appear and select a valid path for a results file to be created or overwritten.
Options can be changed as well:
• Include detailed testing results - includes a results tree containing every test executed on every tested mutant (the name and outcome of each test);
• Include code difference for each mutant - includes C# decompiled code presenting the mutated code compared to the original program fragment;
Changing program options
Options window is available under the “Options” button in the upper section of the main program view. Possible options include:
Max number of mutants per operator - Sets the maximum number of mutants to be created by each mutation operator in one session.
Time after which timed-out mutant is killed - Factor responsible for how much time each mutant has to execute before it will be marked as killed due to time-out. Lowering this value will result in faster execution but lower accuracy of testing (due to the risk of marking a mutant as timed-out prematurely).
Mutation Order – possibility to choose between using First or Higher Order Mutation.
Use Code Coverage Detection - Sets if the program should use the Code Coverage Detection while generating a new session.
Enable mutant code cache - Enables or disables the mutant code cache. Enabling it causes every created mutant to be stored in memory (until a memory limit is reached), resulting in faster visualization of code.
Source files processing threads - Sets the number of background threads that prepare unmodified program copies to be mutated later.
Mutant processing threads - Sets the number of simultaneous mutant processing operations. Each such task acts as a consumer of one unmodified program copy: it
mutates the program and executes the tests.
Other params - For developer use only.
The command line interface
Besides the regular interaction with Visual Mutator in Visual Studio environment, the
command line access is also available. To use it, run the VisualMutator.Console.exe application file. The argument format is constructed as follows: –<argName> <value>
Possible arguments are:
• sourceAssemblies – The ’;’-separated paths to assemblies to be mutated;
• testAssemblies – The ’;’-separated list of assemblies’ names to include the tests from; • resultsXml – The path to store the xml result at;
• sourceThreads [optional, defaults to 2] – The number of original source processing threads;
• mutationThreads [optional, defaults to 3]– The number of mutant processing threads; • methodIdentifier [optional, defaults to the all code in all source assemblies] – An identifier of a single method to mutation test. Specifying this argument will create the session running in the context of a single method;
The command line interface is an optional way of interacting with Visual Mutator in an automatic way, when interactivity is not required.
The list of implemented Mutation Operators
Object Oriented Operators:ISD (ISK) – Super/Base Keyword Deletion
Operator deletes a call for base class method in overloading method belonging to inheritance method.
DMC – Delegated Method Change
Operator changes a method of processing delegation into another one with similar signature. DEH – Method Delegated for Event Handling Change
Operator changes a call adding or removing a method from error handling. EAM, EMM – Accessors, Modifier Method Change
Operators change a call for class property into call for another property of the same type. EHR - Exception Handler Removal
Operator removes catch block if there exists another catch or finally. EHC – Exception Handling Change
Operator changes body of a catch block into throwing caught exception. EXS – Exception Swallowing
Operator adds empty block catch(Exception e) so that no exception can leave current method. JTI, JTD – This Keyword Insertion, Deletion
Operators add or remove this keyword if there exists local variable with the same name. JID – Member Variable Initialization Deletion (Field Initialization Deletion)
Operator deletes initialisation of class's field with proper value. MCI – Member Call from Another Inherited Class
Operator changes calling of a method on object into calling the same method on another object. PRV - Reference Assignment with Other Compatible Type
Operator changes assigning certain object to references into assigning another compatible object.
Standard Operators:
AOR – Arithmetic Operator Replacement
Operator changes arithmetical operations (+, -, *, /, %) into another one from this group. LOR – Logical Operator Replacement
Operator changes logical operations (&, |, ˆ) into another one from this group. LCR – Logical Connector Replacement
Operator changes connector (,||) in logic expression into another one. ROR – Relational Operator Replacement
Operator changes each relational operator (>, <, <=, >=, ==, !=) into another one from the same group.
SOR – Shift Operator Replacement
Operator changes logical shift (», «) into opposite one. OODL – Operator Deletion
Operator creates two mutants from each operation such as +,-,>,<=,% etc. In one it removes operation and what is on its left side, in the other one it removes operation and what is on its right side (e.g. from y=a+b; there will be following mutants : y=a; and y=b;).
SSDL – Statement Block Deletion
Operator removes statements and assignments, but not declarations (e.g. from int y=15; there will be following mutant: int y;).