QAD Customer Relationship
Management
Overview
Installation
Post-Installation Configuration
Upgrade
Compilation with Progress 64 Bit
78-0818A QAD CRM 6.3B1 January 2010
without the prior written consent of QAD Inc. The information contained in this document is subject to change without notice.
QAD Inc. provides this material as is and makes no warranty of any kind, expressed or implied, including, but not limited to, the implied warranties of merchantability and fitness for a particular purpose. QAD Inc. shall not be liable for errors contained herein or for incidental or consequential damages (including lost profits) in connection with the furnishing, performance, or use of this material whether based on warranty, contract, or other legal theory.
QAD and MFG/PRO are registered trademarks of QAD Inc. The QAD logo is a trademark of QAD Inc.
Designations used by other companies to distinguish their products are often claimed as trademarks. In this document, the product names appear in initial capital or all capital letters. Contact the appropriate companies for more information regarding trademarks and
registration.
Copyright © 2010 by QAD Inc.
QAD Inc.
100 Innovation Place
Santa Barbara, California 93108 Phone (805) 684-6614
Fax (805) 684-1890 http://www.qad.com
About This Guide . . . 1
What Is in This Guide? . . . 2
Other QAD Documentation . . . 2
Online Help . . . 2
QAD Web Site . . . 3
Conventions . . . 3
Keyboard Command Summary . . . 3
Typographic . . . 4
Chapter 1
Overview . . . 7
Overview . . . 8
Installation . . . 10
Installing QAD CRM on a Network . . . 11
Installing QAD Remote Sales . . . 11
Configuration . . . 12
Integration . . . 12
Integration with QAD Enterprise Applications . . . 12
Integration with Microsoft Exchange Server . . . 13
Chapter 2
Installation . . . 15
Planning an Installation . . . 16
Security Plan . . . 16
Deployment . . . 17
File Server . . . 18
QAD CRM Clients . . . 18
QAD ERP Application Integration . . . 18
Exchange Server Integration . . . 19
Network, Disk, and Client Layout . . . 19
System Requirements . . . 19
General Requirements . . . 19
Database Server . . . 20
File Server . . . 21
QAD CRM Connected Clients . . . 21
QAD ERP Application Integration . . . 22
Microsoft Exchange Integration . . . 22
QAD Remote Sales . . . 22
Network . . . 23
Installing Progress Components . . . 24
Progress Components on the Database Server . . . 24
Progress Components on the File Server . . . 24
Setting Up the File Server . . . 25
Installing QAD CRM Program Files . . . 25
Setting Up the Database Server . . . 31
Setting Up Databases in a UNIX/Linux Server . . . 32
Setting Up Databases in a Windows Server . . . 35
Starting Databases in Multi-User Mode . . . 39
Configuring the File Server . . . 40
Configuring the services.txt File . . . 41
Configuring the Initialization File . . . 41
Mapping Network Drive and Permissions . . . 42
Configuring Parameters . . . 43
Integrating the System with QAD SE . . . 45
Prerequisites . . . 46
Configuring QAD CRM for Integration . . . 46
Configuring QAD Enterprise Applications for Integration . . . 50
Setting Up the AppServer Environment . . . 52
Configuring the QAD Enterprise Applications Environment for Sales Order Integration . . . 54
Integrating the System with QAD EE . . . 58
Prerequisites . . . 59
Configuring QAD CRM for Integration . . . 59
Configuring QAD Enterprise Applications for Integration . . . 64
Setting Up the AppServer Environment . . . 67
Configuring the QAD Enterprise Applications Environment for Sales Order Integration . . . 68
Configuring QXtend for Integration . . . 71
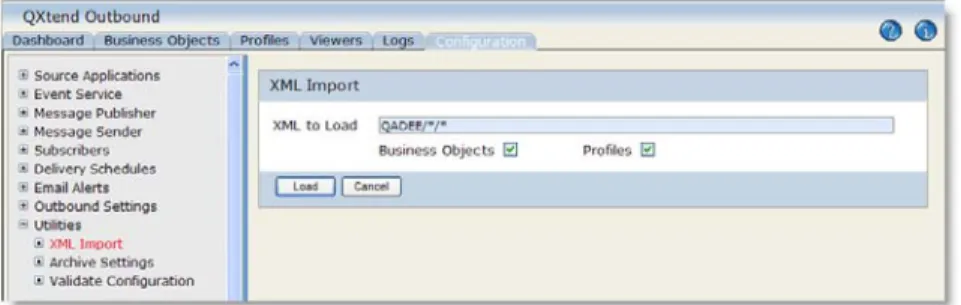
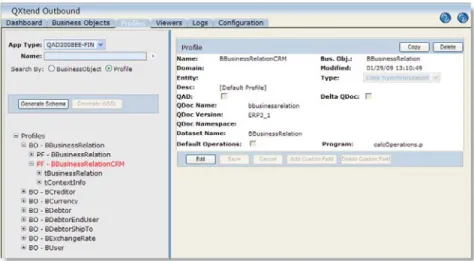
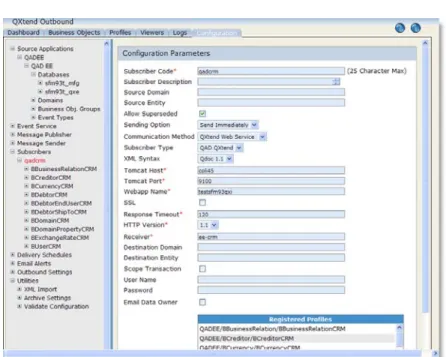
Configuring QXtend Outbound for Integration . . . 74
Configuring QXtend Inbound for Integration . . . 83
Setting Up Clients . . . 89
Prerequisites . . . 90
Installing and Configuring Progress on Client Computers . . . 90
Installing Clients . . . 92
Installing QAD Remote Sales . . . 96
Installing QAD Remote Sales . . . 96
Preparing QAD Remote Sales . . . 99
Chapter 3
Post-Installation Configuration. . . 101
Overview . . . 102
Mandatory Configuration Tasks . . . 102
Function Settings . . . 102
Configuring Mandatory Information . . . 104
Loading Language Files into QAD CRM . . . 107
Setting Up a New Language Record . . . 107
Loading Language File . . . 109
Configuring Function Information . . . 110
Chapter 4
Upgrade. . . 111
Upgrading QAD CRM 6.1.1 to 6.3B1 . . . 112
Installing QAD CRM 6.3B1 . . . 112
Converting the QAD CRM 6.1.1 Databases to the Supported Progress Version 113 Converting 6.1.1 Databases to 6.3B1 (Non-Unicode) . . . 113
Converting QAD CRM 6.3B1 Databases From Non-Unicode to Unicode 118
Performing Post-Upgrade Tasks . . . 121
Upgrading QAD CRM 6.3 to 6.3B1 . . . 122
Chapter 5
Compilation with Progress 64 Bit . . . 123
Compiling QAD ERP on the File Server . . . 124
Compiling QAD CRM on the Database Server . . . 128
What Is in This Guide? 2 Other QAD Documentation 2 Online Help 2
QAD Web Site 3 Conventions 3
What Is in This Guide?
This guide describes how to install QAD Customer Relationship Management (QAD CRM), a program designed to assist sales and marketing personnel in their business-generating efforts.
For information about system administration, see Administration Guide: QAD Customer Relationship Management.
For end-user information, see User Guide: QAD Customer Relationship Management.
Other QAD Documentation
QAD CRM can be integrated with your QAD ERP application to extend its capabilities. For information on QAD Enterprise Applications, see the following:
• For an overview of new features and software updates, see Release Bulletin.
• For software installation instructions, refer to the appropriate installation guide for your system.
• For conversion information, refer to Conversion Guide.
• For an overview of system features and instructions on navigating the user interface, see User Guide: Introduction.
• For detailed information on using system features, refer to the relevant user guide.
• For technical details, refer to Entity Diagrams and Database Definitions.
For a complete list of QAD documentation, visit the QAD Online Support Center at:
http://support.qad.com/
Online Help
QAD CRM has an extensive online help system. For details, refer to User Guide: QAD Customer Relationship Management.
QAD Web Site
QAD’s Web site provides a wide variety of information about the company and its products. You can access the Web site at:
http://www.qad.com
For users with a QAD Web account, product documentation is available for viewing or downloading from the QAD Online Support Center at:
http://support.qad.com/
You can register for a QAD Web account at the QAD Online Support Center. Your customer ID number is required. Access to certain areas is dependent on the type of agreement you have with QAD.
Most user documentation is available in two formats:
• Portable document format (PDF). PDF files can be downloaded from the QAD Web site to your computer. You can view them with the free Adobe Acrobat Reader.
• HTML. You can view user documentation through your Web browser. The documents include search tools for easily locating topics of interest.
Conventions
Keyboard Command Summary
The following table provides a summary of the keyboard commands. Shortcut Key Description Applicable To
F1 Displays Help file Application-wide
ALT + F2 Displays Session and Container Information dialog
Application-wide ALT + F3 Displays Translation on
Demand dialog
Application-wide
F7 Performs a spell check Editor
CTRL + F4 Displays lookup Application-wide Ctrl + F5 Displays Object Details dialog Application-wide
Typographic
This document uses the text or typographic conventions listed in the following table.
Delete Deletes record Browsers
Enter or double-click Performs default action Browsers Ctrl + F Search and cancel search Browsers
Ctrl + K Records count Browsers
Ctrl + T Performs sort Browsers
F5 Refreshes display Browsers
F8 Shows column Browsers
Shift + F10 Displays menu Browsers
Ctrl + S Saves record Viewers
Ctrl + R Undoes record Viewers
Ctrl + B Invokes create and modification details
Viewers
Ctrl + P Goes to previous record Browsers and viewers with navigation panels
Ctrl + N Goes to next record Browsers and viewers with navigation panels
Ctrl + Home Goes to first record Browsers and viewers with navigation panels
Ctrl + End Goes to last record Browsers and viewers with navigation panels
Ctrl + Left cursor Goes to previous page Wizards Ctrl + Right cursor Goes to next page Wizards
If you see: It means:
monospaced text A command or file name.
italicized monospaced text
A variable name for a value you enter as part of an operating system command; for example, YourCDROMDir.
indented command line
A long command that you enter as one line, although it appears in the text as two lines.
Note Alerts the reader to exceptions or special conditions. Shortcut Key Description Applicable To
Important Alerts the reader to critical information.
Warning Used in situations where you can overwrite or corrupt data, unless you follow the instructions.
Overview
This chapter provides an overview of QAD Customer Relationship Management (QAD CRM) and its enterprise-wide deployment. It discusses the following topics:
Overview 8 Installation 10 Configuration 12 Integration 12
Overview
QAD CRM is a comprehensive business-generating system that consists of several applications:
• QAD Sales Force Automation (QAD SFA). This is the core of the system that is designed to help you streamline sales efforts by managing your contacts, activities, business opportunities, product details, and so on.
• QAD Remote Sales. This is an optional stand-alone version of QAD CRM that lets remote sales personnel synchronize their data with the host database.
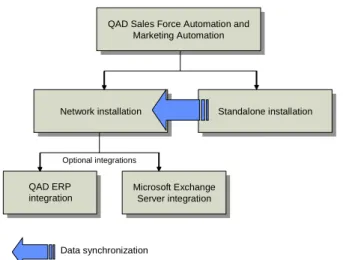
• QAD Marketing Automation. This optional application provides comprehensive campaign management features designed to streamline marketing efforts. All modules available in QAD Sales Force Automation are included in QAD Marketing Automation. Fig. 1.1
QAD CRM Functional Areas
QAD CRM applications can communicate with each other to share information. For example, sales and marketing departments can share details of customers, prospects, partners, and suppliers through the application they use. The system ensures organizational and departmental data security by selectively restricting user access to data.
The system can integrate and synchronize data with different versions of QAD EE and QAD SE, as well as Microsoft Exchange Server 2003. When remote users synchronize data in their personal database with the host databases, they indirectly synchronize data with the integrated system.
You can install QAD CRM across the enterprise network as a client/server application. QAD Remote Sales is installed on remote computers as a stand-alone application.
Fig. 1.2
Installation Overview
The system also integrates with other third-party applications—Microsoft Word 2003/2007, Microsoft Excel 2003/2007, Crystal Report XI, and Phone Dialer—to support various functions. For example, you can create business letters using Microsoft Word templates registered in the system. Microsoft Word is required if you want to use the mail merge feature to create letters to contacts, send marketing literature to your targeted audience, or print quotes. One specific report—installed base report— requires Microsoft Excel integration. Both Word and Excel are required
Network installation Network installation
QAD Sales Force Automation and Marketing Automation QAD Sales Force Automation and
Marketing Automation Standalone installation Standalone installation Microsoft Exchange Server integration Microsoft Exchange Server integration Data synchronization Optional integrations QAD ERP integration
for integration with Crystal reports, which lets you export reports to a number of standard Microsoft Office document formats supported by QAD CRM.
Fig. 1.3
Crystal Report Export
The architecture, features, and functionality of the system meet enterprise requirements of reliability, scalability, flexibility, and maintainability.
Installation
You can install QAD CRM across the enterprise network as a client/server application. QAD Remote Sales is installed on remote computers as a stand-alone application.
To install the system you should be familiar with the following technologies and products:
• Progress
• TCP/IP networking
• QAD CRM
• QAD EE/SE
• Microsoft Exchange Server 2003
• UNIX or Linux
Installing QAD CRM on a Network
1 Ensure that your hardware and software infrastructure meets the minimum requirement criteria for installation.
2 Plan the network installation.
3 Ensure that all required Progress components are installed.
4 Set up the system on the file and database servers:
a Install and configure program components on the file server.
b Set up the database server.
c Configure the servers to communicate with clients.
d Set up the system installation environment to integrate with QAD Enterprise Applications.
e Prepare the AppServer environment to support Microsoft Exchange Server 2003 integration and e-mail data synchronization.
5 Set up the clients:
a Edit various files on the server to specify the correct information based on the network architecture.
b Install Progress on client computers.
c Install the clients.
6 Start the database and file servers. Then start the client sessions that connect to them.
Installing QAD Remote Sales
1 From QAD CRM:a Create remote or regional nodes.
b Enable data synchronization.
2 On the remote computer(s):
a Ensure that the hardware and software configuration of remote computers meet the minimum requirement criteria for
installation.
b Install Progress Personal Database.
c Install QAD Remote Sales.
d Load the host node subset onto the Progress Personal Database.
e Enable data synchronization.
Configuration
You must configure QAD CRM according to the requirements of your company. Configuration tasks can be categorized as mandatory or functional.
• Mandatory tasks include setting up the system for enterprise-wide use by configuring business unit details, administrator profile, base currency, and so on. When you start the system after installation, you can configure it with mandatory information by using the
Configuration Wizard.
• Functional tasks include configuring user profiles, teams, menus, reports, templates, system settings, and so on by using the system setup modules.
Integration
You can integrate the system with your QAD ERP application and Microsoft Exchange Server 2003 to enhance its scope.
Integration with QAD Enterprise Applications
Various modules of your QAD ERP application can be integrated with QAD CRM through CIM, QXtend, database, and session triggers to provide efficient and fast online integration. QAD CRM supports integration with multiple domains of QAD ERP.
For integration purposes the databases must run in multi-user mode and must always be available. The file server that holds QAD ERP application programs must include certain QAD CRM programs. Similarly, the file server that holds QAD CRM programs must contain certain QAD ERP application programs.
After configuring the applications you can enable and configure the integration as required. You can then perform the initial data transfer between the integrated systems.
Integration with Microsoft Exchange Server
By integrating the system with Microsoft Exchange Server 2003 you can:
• Send e-mail messages from the system using the Microsoft Outlook client.
• Maintain references to e-mail messages stored in Microsoft Outlook in the system.
• Synchronize activity and contact details between the system and Microsoft Exchange Server 2003.
• Synchronize data sent using e-mail messages between the stand-alone version and network version of the system.
For the integration you must install QAD AdminService, which
communicates with Microsoft Exchange Server 2003 and its components for the integration. You must also install various components on QAD CRM File Server and QAD CRM client and register custom forms in Exchange organization library in order to enable integration with Exchange Server 2003.
Note QAD CRM’s integration with Microsoft Exchange is only certified and supported for Exchange implementations involving a single
Exchange domain. This limitation also applies to all previous releases of QAD CRM.
Installation
This chapter describes how to install QAD Customer Relationship Management (QAD CRM). It discusses the following topics:
Planning an Installation 16 System Requirements 19
Installing Progress Components 24 Setting Up the File Server 25 Setting Up the Database Server 31 Configuring the File Server 40
Integrating the System with QAD SE 45 Integrating the System with QAD EE 58 Setting Up Clients 89
Planning an Installation
This section describes topics you should understand before installing QAD CRM.
If you have experience installing QAD CRM from previous versions, numerous changes have occurred to the installation process.
A QAD CRM installation can be one of three types:
• A new installation.
• A Service Pack installation.
• An installation to support a conversion from an earlier QAD CRM version to the current release (upgrade).
This section only describes how to perform a new installation. To perform a new install, you must plan for the following:
1 An installation addressing:
• Test and production databases
• QAD ERP application integration (optional)
• Exchange Server integration (optional)
• QAD Remote Sales (optional)
2 QAD CRM database configuration, including any custom and other side databases.
3 The resulting network, disk, and client layouts.
Security Plan
A successful QAD CRM installation requires a complete security plan. During installation, full permissions are required for system and application tools that are used to load, edit or delete data. In addition, to install the system on a network, you require administrator privileges as installation programs create registry entries and may update some system files that require administrator rights.
In addition, to integrate Exchange Server, you need to create one user,
A security plan typically consists of:
1 Operating-system-level security for tools such as:
• Progress Editor
• Progress Data Administrator
• Progress Application Compiler
2 Operating-system login security.
3 Operating-system permissions and ownership set appropriately for:
• Database files
• Log files
• Application source and compiled source files
• Application startup and shutdown scripts
• Registry
Deployment
You can install QAD CRM on UNIX/Linux and Windows servers. QAD CRM has three components:
• Database server
• File server
• QAD CRM clients
Database Server
The database server consists of the QAD CRM databases. You build these databases as part of the installation. You first create empty databases, then use the empty databases as a template to build test, production, training, development and other databases. Clients connect to these databases directly or through a file server. QAD CRM stores information in the
File Server
The file server is the location of the QAD CRM encrypted code, compiled specifically for this machine. The resulting .r code is run by the
connected clients.
QAD CRM Clients
QAD CRM has two types of clients:
• Connected client. A client setup is required for connecting to the database server and Windows file server. Client setup copies system files to the client PC and creates necessary icons. The resulting client runs the source code on the file server and accesses the databases on the database server.
• QAD Remote Sales. This is an optional stand-alone version of QAD CRM that lets remote sales personnel use the system in an offline mode and synchronize data with the host database. A client setup is required to install QAD Remote Sales and perform data
synchronization.
QAD ERP Application Integration
You can integrate various modules of QAD Enterprise Applications with QAD CRM through QAD QXtend (in the case of QAD EE), CIM through Progress AppServer (sales order transfer), database and session triggers. For the integration, QAD Enterprise Applications and QAD CRM databases must run in multi-user mode and always be available. The file server that holds QAD ERP application programs must include certain QAD CRM programs. Similarly, the file server that holds QAD CRM programs must contain certain QAD ERP application programs. QAD recommends that you deploy:
• QAD CRM and QAD ERP application databases on the same database server.
Exchange Server Integration
You can integrate various modules of Microsoft Exchange Server 2003 (e-mails, appointments, tasks, and contacts) with QAD CRM. For integration you must install QAD AdminService. The QAD
AdminService is a Windows service that communicates with Microsoft Exchange Server 2003 and QAD CRM using Progress AppServer. QAD CRM runs QAD AdminService on the file server machine.
QAD recommends deployment of Progress AppServer on the database server.
Network, Disk, and Client Layout
The databases and program files can reside on the same Windows server. Using the same server enhances system performance. However, if there are many clients, you should use separate servers for resource sharing. The servers must be easily accessible by clients running on workstations across the network. They must have sufficient free hard disk space to accommodate operations performed by system users.
At a machine level, QAD recommends deployment of QAD CRM databases on a database server and software on a file server separate from the database server.
System Requirements
This section describes hardware and software requirements for deploying QAD CRM.
General Requirements
The system administrator must be an experienced Progress database administrator with experience managing Progress client processes. Before installing QAD CRM, Progress must be installed following the
instructions in the Progress installation guide. The Progress install for each platform may include UNIX kernel changes and patches.
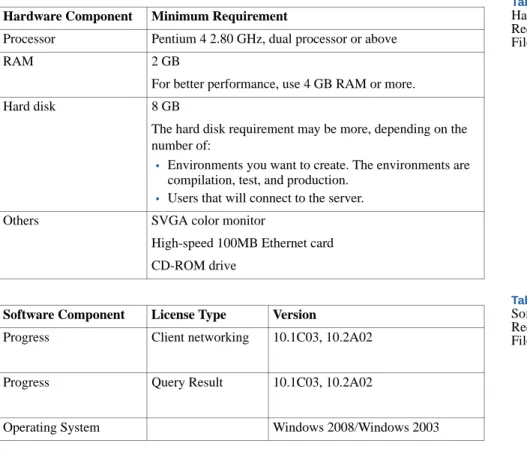
Database Server
The database server contains QAD CRM and Progress server software, as well as your production data. You should estimate the final size of your production database and the demands placed on different components of the database before starting an installation so that you can lay out your disks appropriately. Table 2.1 Hardware Requirements for Database Server Table 2.2 Software Requirements for Database Server
Hardware Component Minimum Requirement
Processor Pentium 4 2.80 GHz, dual processor or above
RAM 2 GB
For better performance, use 4 GB RAM or more.
Hard disk 8 GB
The hard disk requirement may be more, depending on the number of:
• Environments you want to create. The environments are compilation, test, and production.
• Users that will connect to the server.
Others SVGA color monitor
High-speed 100MB Ethernet card CD-ROM drive
Software Component License Type Version Progress Enterprise Database
Server
10.1C03, 10.2A02
Progress AppServer Enterprise 10.1C03, 10.2A02
Operating System UNIX/Linux/Windows
File Server
The file server requirements cover shared client requirements.
Table 2.3 Hardware Requirements for File Server Table 2.4 Software Requirements for File Server
QAD CRM Connected Clients
The requirements for connected client PCs assume that all shared files are on a file server and all databases on a database server.
Table 2.5
Hardware Requirements for Client
Hardware Component Minimum Requirement
Processor Pentium 4 2.80 GHz, dual processor or above
RAM 2 GB
For better performance, use 4 GB RAM or more.
Hard disk 8 GB
The hard disk requirement may be more, depending on the number of:
• Environments you want to create. The environments are compilation, test, and production.
• Users that will connect to the server.
Others SVGA color monitor
High-speed 100MB Ethernet card CD-ROM drive
Software Component License Type Version
Progress Client networking 10.1C03, 10.2A02
Progress Query Result 10.1C03, 10.2A02
Operating System Windows 2008/Windows 2003
Hardware Component Minimum Requirement Processor Pentium 4 3.00 GHz processor
RAM 1 GB
Table 2.6
Software Requirements for Client
QAD ERP Application Integration
Table 2.7
Requirements for QAD ERP Application Integration
Microsoft Exchange Integration
Table 2.8
Requirements for Microsoft Exchange Server 2003 Integration
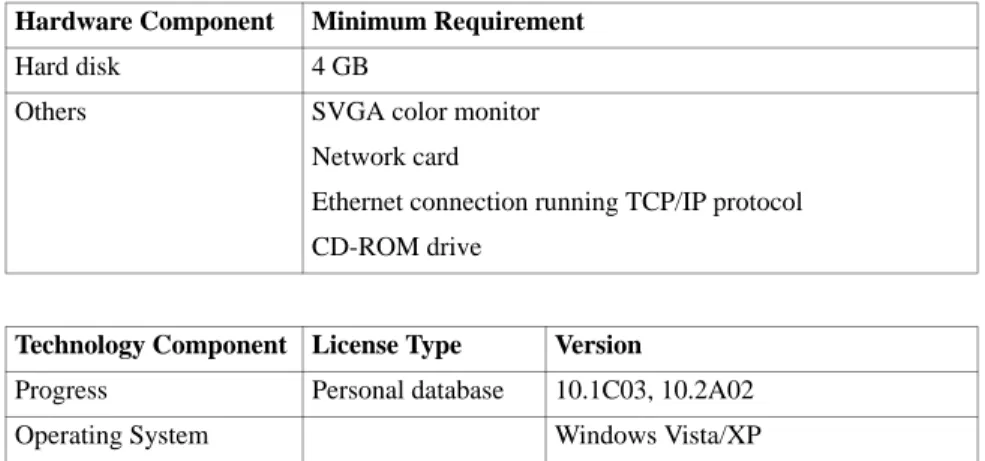
QAD Remote Sales
Table 2.9
Hardware Requirements for QAD Remote Sales
Hard disk 2 GB
Others SVGA color monitor
Network card
Ethernet connection running TCP/IP protocol Hardware Component Minimum Requirement
Software Component License Type Version
Operating System Windows 2003/XP/Vista/2008
Technology Component Server Client QAD ERP application QAD 2008 SE,
QAD 2008.1 SE, QAD 2009 SE, QAD 2009 EE, QAD 2009.1 EE
QAD 2008 SE, QAD 2008.1 SE, QAD 2009 SE, QAD 2009 EE, QAD 2009.1 EE
Technology Component License Type Version
QXtend 1.6.1, 1.6.2
Technology Component Server Client
Microsoft Microsoft Exchange
Server 2003
Microsoft Outlook 2003, Microsoft Outlook 2007
Hardware Component Minimum Requirement Processor Pentium 4 3.00 GHz processor
RAM 1 GB
Table 2.10
Software Requirements for QAD Remote Sales
Users can synchronize data in QAD Remote Sales with data in the host database using Progress AppServer. VPN access to office network is required. Table 2.11 Progress AppServer Synchronization Requirements Table 2.12 Microsoft Office Integration
MS Office needs to be installed on CRM remote nodes and connected CRM clients. If you want to run CRM directly from the file server, you need to install MS Office on the CRM file server as well. MS Word is used in CRM for sending letters, printing opportunity quotes, and so on; MS Excel is used to display CRM browser data in various modules and as an output channel for reporting purposes. MS Excel is also used by one specific report—Installed Base Report.
Network
Set up your network to support the Progress specifications. The minimum requirement is a 10 Megabit (Mb) Ethernet or faster network. For better maintenance and performance, QAD recommends the following:
• Install Progress Database and AppServer components on the database server.
Hard disk 4 GB
Others SVGA color monitor
Network card
Ethernet connection running TCP/IP protocol CD-ROM drive
Hardware Component Minimum Requirement
Technology Component License Type Version
Progress Personal database 10.1C03, 10.2A02
Operating System Windows Vista/XP
Method Technology Server QAD Remote Sales Client Progress AppServer Progress QAD CRM VPN Client
Technology Component License Type Version
• Install all Progress client components (Client Networking and Query result) on the file server.
• If you are integrating or planning to integrate with an QAD ERP application, use the same database server and Progress database and AppServer components used by QAD Enterprise Applications.
• 100 Megabit (Mb) Ethernet or faster network.
Installing Progress Components
The system requires various Progress components for deployment. If these components are not already installed, you must install them before system deployment.
Progress Components on the Database Server
The following Progress components must be on the database server:
• Progress Enterprise database server
• Progress AppServer
QAD recommends deployment of Progress AppServer on the database server.
Progress Components on the File Server
The following Progress components must be on the file server:
• Progress Client Networking, Progress Personal Database and Query Result. These licenses are shared by clients from a central location in the network. They can also be installed on individual workstations. Though installation on workstations is not recommended, it may be considered where the network traffic speed is slow. For increased efficiency, QAD recommends that you install the client networking and Query Result components in the QAD CRM file server.
• Progress Query/Result license. This license is required for the GDI module only (importing data from external sources into the system database).
Note For details on installing Progress components, refer to the Progress Software installation guides.
Setting Up the File Server
After planning the deployment and installing all Progress components, you can install the system from the installation CD. You can also download QAD CRM from QAD web site.
The first step is to set up the file server. The file server:
• Contains all program files
• Manages file sharing
• Manages system security
• Coordinates communication between workstations
Installing QAD CRM Program Files
Use the following steps to install QAD CRM components on the file server:
1 Insert the installation CD into the CD drive and run the setup program.
2 On the QAD CRM Setup Wizard Welcome screen, click Next. If QAD CRM 6.1 or CRM 6.2 is found on the system, a warning message asks you whether you want to continue with the installation. Click Yes to proceed or No to abort the setup.
Note QAD recommends that you uninstall any previous versions of QAD CRM prior to installing the latest release. However, this warning message only appears when CRM 6.1 or CRM 6.2 is installed on your computer.
3 Setup checks for supported versions of Progress on the computer.
• If no compatible Progress version (10.1C03, 10.2A02) is found, Setup displays an error message and aborts the installation.
• If both Progress 10.1C03 and Progress 10.2A02 are installed on the computer, Setup first checks for Progress 10.2 A02. If it cannot find that version, it checks for Progress 10.1C03.
4 Setup checks for Microsoft .NET Framework 1.1 on the system.
• If Microsoft .NET Framework 1.1 is already installed, skip to the next step.
• If Microsoft .NET Framework 1.1 is not found, Setup prompts you to install the component. Click Yes and run the Microsoft .NET Framework 1.1 Setup Wizard to install the component.
5 The Destination Location screen appears. Accept the default
installation directory and click Next. If you specify another directory other than the default location, you will see the following message:
6 In the Program Folder Name screen, specify the program folder name for QAD CRM and click Next.
7 In the QAD CRM Setup Confirmation screen, review the selected setup options. To change the options, click Back; click Install to start the installation process.
8 Setup may prompt you to copy some files to the Progress ADM2 directory and overwrite existing Progress files. Click Yes to continue. If you click No, a messages warns you that QAD CRM program files may not be successfully compiled later.
9 If the Crystal Distribution package is not installed on the computer, the Crystal Distribution Setup Wizard screen appears. Follow the on-screen instructions to complete the installation of this component.
a On the Crystal Distribution Setup Wizard Welcome screen, click Next.
b On the Select Installation Folder screen, click Next.
c On the Confirm Installation screen, click Next.
10 If QAD AdminService is not installed, the AdminService Setup Wizard screen appears. Follow the on-screen instructions to complete the installation of this component.
a On the QAD AdminService Setup Wizard Welcome screen, click Next.
b On the Select Installation Folder screen, click Next.
c On the Confirm Installation screen, click Next.
d Select English (United States) from the language list and then click OK. The Installation Log screen appears.
e Select the I would like to view the Installation Log file check box and then click Finish. The log file is opened in Microsoft
Windows Notepad.
f Check the log file for errors. Errors begin with two asterisks (**) in the log file. Contact QAD Support if errors are found.
11 When QAD CRM installation is complete, Setup creates the following QAD CRM shortcut icons in the QAD CRM program folder.
• QAD CRM Application Compiler: Compiles encrypted system programs.
• QAD CRM Help: Launches QAD CRM online help.
• QAD CRM Demo: Launches the QAD CRM demo environment. To log in to the demo environment, use the username demo and leave the password blank.
• QAD CRM Release Notes: Opens the CRM release notes.
• QAD CRM Upgrade Utility: Upgrades CRM to the most current build.
The installation process creates the following environments:
• QADCRMInstallDir\compile: the compilation environment for storing encrypted program files.
• QADCRMInstallDir\test: the testing environment for testing QAD CRM.
• QADCRMInstallDir\prod: the production environment for storing compiled program files used for enterprise-wide deployment.
Note It is useful to understand how files are organized in the installation directory for administration tasks, such as the system to integrate with QAD Enterprise Applications.
Testing the System
To test the installation on the file server:
1 Choose Start|All Programs|QAD CRM 6.3|QAD CRM Demo.
2 In the User ID field, type demo. Leave the Password field blank.
3 Test the system functionality.
If you encounter any errors, contact QAD Global Support Services.
Compiling Encrypted Files
Note If you are using Progress 10.2ASP2, see “Setting Up the Database Server” on page 31.
A full compile of the server code is required after installation. You are not required to compile if you are using Progress 10.2ASP2. Compiled programs (.r code) are shipped with the product. Setup copies the files to the installation folder as part of installation.
Compiling a source file creates an object file with the same name and a .r
extension.
Depending on your system, the Application Compiler can take as much as two hours. You must compile encrypted files in the following directories under QAD CRM installation directory:
• compile\dataexch • compile\lib • compile\progs • compile\report • compile\triggers • compile\system
To compile encrypted program files:
Non-Unicode Environment
1 If Progress OE Studio/ProVision Plus license is installed instead of Progress Client Networking, do the following:
a Right-click the Application Compiler shortcut icon and choose Properties.
b Click the Shortcut tab.
c In the Target field, remove -rx and click OK.
2 Choose Start|All Programs|QAD CRM 6.3|QAD CRM Application Compiler. The Application Compiler appears.
Fig. 2.1
Application Compiler
3 If the following directories do not appear, add them by clicking Add:
• dataexch • lib • progs • report • system • triggers
4 Clear the Look in Subdirectories check box.
5 Click Start Compile to start the compilation.
6 The application compiler generates a log file during compilation. Check the log file to ensure that there are no errors. Errors begin with two asterisk characters (**). Contact QAD support in case of any errors.
Note If you are unsure about the location of the log file, check Options|Compiler.
7 Once compilation completes, copy the .r programs from the
compile directory to the corresponding directories in
QADCRMInstallDir\prod.
Errors encountered during compilation display in an editor. Note any errors and contact QAD Support.
Unicode Environment
All steps are similar to those described in the procedure for a non-Unicode environment above, with just one modification.
Before starting the compilation for the Unicode environment, do the following:
1 You must change some parameter values defined in
qadsfamacompile.pf available in the
QADCRMInstallDir\compile folder.
Update or add the following entries in the qadsfamacompile.pf
file:
-cpinternal UTF-8 -cpstream UTF-8 -cpcoll ICU-UCA -cpcase Basic
2 For performing Unicode compilation, modify the
qadsfamacompile.pf file to connect to the Unicode databases in the QADCRMInstallDir\compile\db\demo\unicode folder; for example:
db\demo\unicode\bisgmenu -1 db\demo\unicode\bisgen -1 db\demo\unicode\dataexch -1
Setting Up the Database Server
QAD CRM is a multi-database application that requires a minimum of three databases connected concurrently to a single session. Each QAD CRM client session connects to, at minimum, a main database (bisgen), an administration database (bisgmenu) and a data synchronization database (dataexch). If you plan to integrate with a QAD ERP application, you need to connect to other databases.
Working QAD CRM databases are created in two stages. You first create empty databases, then use them as a template to build test, production, training, development and other databases.
To set up databases in a UNIX/Linux server, you must have experience creating databases and loading data definition files in Progress. You must also know how to modify system files such as service and startup scripts for databases.
Before creating the database, determine the following:
1 The directory where you want to create the QAD CRM databases, referred to as QADCRMInstallDirDatabaseServer/db
2 The Progress directory
3 The host name of the database server
Set the Progress DLC variable correctly and ensure that the $DLC\bin
directory is included in the PATH environment variable. DLC is the directory where Progress is installed, and bin is a subdirectory of DLC
Setting Up Databases in a UNIX/Linux Server
Creating Non-Unicode DatabasesTo create empty databases in a UNIX/Linux server:
1 Go to QADCRMInstallDirDatabaseServer/db.
2 Transfer all the data definition (.df) and structure (.st) files from
QADCRMInstallDir\compile\db\df to
QADCRMInstallDirDatabaseServer/db using an FTP or WinSCP program.
3 Enter the following:
prostrct create bisgen bisgen.st –blocksize 8192 prostrct create bisgmenu bisgmenu.st –blocksize 8192 prostrct create dataexch dataexch.st –blocksize 8192 procopy $DLC/empty8 bisgen
procopy $DLC/empty8 bisgmenu procopy $DLC/empty8 dataexch
4 Start the Progress data dictionary using the command:
_progres –p _admin.p
5 Connect bisgen, bisgmenu, and dataexch databases and load data definitions into it that define each table, field, and index in the database.
6 The database schema (.df file) consists of the sequences, tables, fields and indexes in the database. In this task, you load the schema into the empty bisgen, bisgmenu, and dataexch databases using data definition files bisgen.df, bisgmenu.df and dataexch.df. Load the data definition files using the Progress data dictionary tool.
7 The resulting empty databases are used to build all your main and support databases such as bisgenprod, bisgentest, and
bisgentrain. Create copies of the databases for backup and testing purposes.
Creating Unicode Databases
1 Go to QADCRMInstallDirDatabaseServer/db.
2 Transfer all the data definition (.df) and structure (.st) files from
QADCRMInstallDir\compile\db\df to
QADCRMInstallDirDatabaseServer/db using an FTP or WinSCP program.
3 Type the following:
prostrct create bisgen bisgen.st -blocksize 8192 prostrct create bisgmenu bisgmenu.st -blocksize 8192 prostrct create dataexch dataexch.st -blocksize 8192 procopy $DLC/prolong/utf/empty8 bisgen
procopy $DLC/prolong/utf/empty8 bisgmenu procopy $DLC/prolong/utf/empty8 dataexch 4 Load the ICU-UCA collation table.
a Start the Progress data dictionary using the following command:
_progres -p _admin.p
b Connect to the database you want to load the ICU-UCA collation table into by choosing Database|Connect from the menu.
c Choose Admin|Load Data and Definitions|Data Definitions (.df file). Locate the file icu-uca.df in $DLC/prolang/utf/ and load it into the database.
Ignore the following error and warning messages:
Error: Collation tables for database DBName have been changed. You must rebuild all the indexes in order to reconnect to this database. (2609)
Fig. 2.2
d Disconnect from the database by choosing Database|Disconnect from the menu.
Note Repeat steps b through d for each of the three CRM databases—bisgen, bisgmenu, and dataexch.
5 Rebuild indexes. Execute the following command to rebuild index for the new ICU-UCA collation:
proutil DBPath/bisgen -C idxbuild all -cpinternal UTF-8 proutil DBPath/bisgmenu -C idxbuild all -cpinternal UTF-8 proutil DBPath/dataexch -C idxbuild all -cpinternal UTF-8 6 Load your .df and .d files.
Connect to the bisgen, bisgmenu, and dataexch databases and load into them data definitions that define tables, fields, and indexes in the databases.
Note For the bisgen Unicode database, you should skip loading
bisgen.df and load bisgen_utf.df instead.
7 Use the Progress Data Dictionary tool to load the data definition files
bisgen.df, bisgmenu.df, and dataexch.df into the empty bisgen, bisgmenu, and dataexch databases.
8 Use the empty databases to build your main and support databases such as bisgenprod, bisgentest, and bisgentrain. Create copies of the databases for backup and testing purposes.
Note Whenever you use Progress tools such as Data Dictionary or Data Administration for setting up Unicode databases, make sure that the .pf
file used by the Progress session specifies the following parameters:
-cpinternal UTF-8 -cpstream UTF-8 -cpcoll ICU-UCA -cpcase Basic
9 Copy all databases from the
QADCRMInstallDir\compile\db\demo\unicode folder to the
QADCRMInstallDir\prod\db folder on the Windows server where CRM was installed from the CRM installation CD.
Setting Up Databases in a Windows Server
The QAD CRM installation uses or creates several directories. If you use the default directories and they do not exist at the time of installation, they are created automatically. This applies the ownership and appropriate permissions. However if you create or use the other directories outside installation, make sure that permissions are set properly.
Installation creates the following environments:
• QADCRMInstallDir\compile: the compilation environment for storing encrypted program files.
• QADCRMInstallDir\test: the test environment for testing QAD CRM.
• QADCRMInstallDir\prod: the production environment for storing compiled program files used for enterprise-wide deployment.
The above environments have a db folder. QAD recommends that you keep the databases on these folders. For example you can keep test databases on the QADCRMInstallDir\test\db folder.
Before creating the database, determine the following:
1 The directory where you want to create the QAD CRM databases
2 The Progress directory
3 The host name of the database server
Set the Progress DLC variable correctly and ensure that the %DLC%\bin
directory is included in the PATH environment variable. DLC is the directory where Progress is installed, and bin is a subdirectory of DLC
where the most often used Progress executables reside. To add DLC and PATH to user environment variables:
1 From the Desktop, choose Start|Settings|Control Panel.
2 Double-click the System icon and select the Advanced tab.
3 Click the Environment Variable button.
4 Click New under the User variables for <user name> listbox. The New User Variable dialog box appears.
5 In the Variable name field, type DLC.
6 In the Variable value field, type the Progress installation path. Then click OK.
7 Repeat Step 4 to create a PATH environment variable. In the Variable value field, type the following:
%DLC%\bin;%PATH%
When you have added the DLC and PATH environment variables, use the DOS command prompt to run all the Progress commands.
Creating Non-Unicode Databases
1 Using Windows Explorer, copy all the database structure (.st) and data definition (.df) files from
QADCRMInstallDir\compile\db\df to
QADCRMInstallDir\test\db
2 From the Desktop, choose Start|Run. The Run dialog box appears. Type cmd in the Open field. Then click OK.
3 Change to the QADCRMInstallDir\test\db folder.
4 Type the following:
prostrct create bisgen bisgen.st –blocksize 8192 prostrct create bisgmenu bisgmenu.st –blocksize 8192 prostrct create dataexch dataexch.st –blocksize 8192 procopy %DLC%/empty8 bisgen
procopy %DLC%/empty8 bisgmenu procopy %DLC%/empty8 dataexch
5 Start the Progress data dictionary using the command:
_progres –p _admin.p
6 Connect the bisgen, bisgmenu, and dataexch databases and load data definitions that define each table, field, and index in the
7 The database schema (.df file) consists of the sequences, tables, fields, and indexes in the database. You load the schema into the empty bisgen, bisgmenu, and dataexch databases using the data definition files bisgen.df, bisgmenu.df and dataexch.df. Load the data definition files using Progress data dictionary tool. The resulting empty databases are used to build all your main and support databases such as bisgenprod and bisgentrain. Create copies of the databases for backup and testing purposes.
8 For setting up your production CRM databases, do not use the
QADCRMInstallDir\prod\db folder. The databases in that folder are meant for remote nodes. Use a different folder for your production databases.
Creating Unicode Databases
To create Unicode databases on the Windows Server:
1 Copy all the database structure (.st) and data definition (.df) files from
QADCRMInstallDir\compile\db\df to
QADCRMInstallDir\test\db.
2 From the Windows Start menu, choose Run; then enter cmd and click OK to open the command window.
3 Change to the QADCRMInstallDir\test\db folder.
4 Enter the following:
prostrct create bisgen bisgen.st -blocksize 8192 prostrct create bisgmenu bisgmenu.st -blocksize 8192 prostrct create dataexch dataexch.st -blocksize 8192 procopy %DLC%\prolang\utf\empty8 bisgen
procopy %DLC%\prolang\utf\empty8 bisgmenu procopy %DLC%\prolang\utf\empty8 dataexch 5 Load the ICU-UCA collation table.
a Start the Progress data dictionary using the following command:
b Connect to the database you want to load ICU-UCA collation table into by choosing Database|Connect from the menu.
c Choose Admin|Load Data and Definitions|Data Definitions (.df file). Locate the file icu-uca.df in $DLC/prolang/utf/ and load it into the database.
Ignore the following error and warning messages:
Error: Collation tables for database DBName have been changed. You must rebuild all the indexes in order to reconnect to this database. (2609)
Fig. 2.3
Warning Message
d Disconnect from the database by choosing Database|Disconnect from the menu.
Note Repeat steps b through d for each of the three CRM databases—bisgen, bisgmenu, and dataexch.
6 Rebuild indexes. Execute the following command to rebuild indexes for the new ICU-UCA collation:
proutil DBPath/bisgen -C idxbuild all -cpinternal UTF-8 proutil DBPath/bisgmenu -C idxbuild all -cpinternal UTF-8 proutil DBPath/dataexch -C idxbuild all -cpinternal UTF-8 7 Load your .df and .d files.
Connect to the bisgen, bisgmenu, and dataexch databases and load into them data definitions that define tables, fields, and indexes in the databases.
Note For the bisgen Unicode database, you should skip loading
bisgen.df and load bisgen_utf.df instead.
8 Use the Progress Data Dictionary tool to load the data definition files
bisgen.df, bisgmenu.df, and dataexch.df into the empty bisgen, bisgmenu, and dataexch databases.
9 Use the empty databases to build your main and support databases such as bisgenprod, bisgentest, and bisgentrain. Create copies of the databases for backup and testing purposes.
Note Whenever you use Progress tools such as Data Dictionary or Data Administration for setting up Unicode databases, make sure that the .pf
file used by the Progress session specifies the following parameters:
-cpinternal UTF-8 -cpstream UTF-8 -cpcoll ICU-UCA -cpcase Basic
10 Copy all databases from the
QADCRMInstallDir\compile\db\demo\unicode folder to the
QADCRMInstallDir\prod\db folder on the Windows server where CRM was installed from the CRM installation CD.
Note For setting up your production CRM databases, do not use the
QADCRMInstallDir\prod\db folder. The databases in that folder are meant for remote nodes. Use a different folder for your production databases.
Starting Databases in Multi-User Mode
To enable clients to communicate with the databases, you need to start databases in multi-user mode.
1 On the database server machine, tailor your services file. All services names, host names, and port numbers must match in the services files of each client and each database server on the network. The location of the UNIX/Linux services file on the server is typically the /etc
directory. On Windows, it is located in
C:\windows\system32\drivers\etc.
Note The more users you expect to have, the more numbers you should leave open between port numbers.
2 Add the names of your database services to your services file. Add one for each main database and any other databases you plan to connect to. Limit the service name to 16 characters. You can use any unused port numbers.
3 The database service names and suggested port numbers are described below. If these port numbers conflict with your existing setup, you must specify appropriate numbers.
4 Start the databases in multi-user mode using one of the following:
• Progress Explorer (Windows only)
• Batch files
The installation technician is responsible for supplying and customizing the batch files.
If you plan to integrate with a QAD ERP application, QAD recommends that you use QAD ERP application startup and shutdown scripts.
5 Make sure that the databases are running properly. In case of errors, check Progress help and database startup parameters.
Configuring the File Server
To enable clients to communicate with the file and database server, you must configure various files in the file server. All services names, host names, and port numbers must match in the services files of each client and each database server on the network.
You do not have to modify the files in the workstations—the QAD Shared network installation program does this. However, you must configure various files on the file server.
Service Name Port #/Protocol Comment
bisgentest 2030/tcp # test bisgen bisgmenutest 2040/tcp # test bisgmenu dataexchtest 2050/tcp # test dataexch bisgenprod 2060/tcp # Production bisgen bisgmenuprod 2070/tcp # Production bisgmenu dataexchprod 2080/tcp # Production dataexch
Configuring the services.txt File
The services.txt file in the QAD CRM file server contains a list of database service names and their port number. The QAD CRM Shared network installation program uses this file to update the services file of client computers to start a multi-user session.
You must ensure that the database service names and port numbers in the
services.txt file match the services file of the database server that you have defined in the start databases in the multi-user mode section. To update the services.txt file:
1 Open the following file in an editor:
QADCRMInstallDir\test\netsetup\services.txt 2 Specify the correct service names and their port numbers.
3 Save and close the file.
4 Open the following file:
QADCRMInstallDir\prod\netsetup\services.txt 5 Repeat Steps 2 and 3.
Configuring the Initialization File
The system uses an initialization file to run QAD CRM from the server. To configure the initialization file:
1 Open the .ini file, typically qadsfamaclient.ini, in an editor such as Notepad. This file is located here:
QADCRMInstallDir\test\netsetup
2 Ensure that the DLC environment variable is set to NULL:
DLC= 3 Save the file.
4 Open the .ini file in the following location:
QADCRMInstallDir\prod\netsetup 5 Repeat Steps 2–4.
Mapping Network Drive and Permissions
You typically use the Progress and QAD CRM shared network
installation to install Progress and QAD CRM on client computers from a central location on the network. This utility updates client computers with the system files, icons, and registry entries required to launch Progress and QAD CRM.
To launch Progress and QAD CRM shared network installation utilities, you need to map two network drives to all client computers: one for Progress and one for QAD CRM.
For example if you have installed:
• Progress on C:\progress\dlc101c, you need to map
C:\progress to a logical drive. For example S:\.
• QAD CRM on C:\qadsfama, you need to map C:\qadsfama to a logical drive. For example R:\.
QAD recommends you map the drive by using the net logon script on the file server.
All QAD CRM users should have write permissions to the following folders: • QADCRMInstallDir\test • QADCRMInstallDir\test\document • QADCRMInstallDir\test\document\template • QADCRMInstallDir\test\log • QADCRMInstallDir\test\datain • QADCRMInstallDir\test\datain\save • QADCRMInstallDir\test\dataout\ • QADCRMInstallDir\test\dataout\save • QADCRMInstallDir\prod • QADCRMInstallDir\prod\document • QADCRMInstallDir\prod\document\template • QADCRMInstallDir\prod\datain • QADCRMInstallDir\prod\datain\save • QADCRMInstallDir\prod\dataout\ • QADCRMInstallDir\prod\dataout\save
Configuring Parameters
The servers and clients connect using scripts, which you must customize appropriately.
In the startup and shutdown scripts of any network environments, you must assign a name to the broker process using the service name startup parameter -S. Remote clients communicate with the broker using the same -S value as the startup or database parameter. The syntax is:
-S servicename port-number
Depending on your network type, you might have to specify additional addressing criteria in the scripts for remote clients.
Note The multi-user Progress database server process coordinates database requests from all clients using a single database. For the UNIX or Windows 2000/2003 database server that shares the Progress memory version, the broker process is the main database server. It manages shared resources and starts the server for remote clients.
The TCP protocol requires remote clients to explicitly address the database server computer. You must use the host name startup parameter
-H to specify the host address. The host address is the name assigned to the database server machine in the TCP/IP host file. The syntax is:
-H host-name
You must also ensure that the -S and -H values are correctly defined in the parameter file of QAD CRM. This file is used to connect clients to the database server.
To configure the parameter file:
1 For test databases, open the following file in an editor:
QADCRMInstallDir\test\netsetup\qadsfamatest.pf 2 Ensure that the file has correct entries. You must appropriately edit
the bold text in the following example of the file contents:
# qadsfamatest.pf #
# Use this parameter file when you are running QAD SFA and MA in # test mode.
# Refer to Progress Admin Manual for an explanation of these # parameters.
-db bisgentest -ld bisgen -H <IP address of database server> -S
<test bisgen service name> -N TCP -trig triggers
-db bisgmenutest -ld bisgmenu -H <IP address of database server>
-S <test bisgmenu service name> -N TCP -trig triggers
-db dataexchtest -ld dataexch -H <IP address of database server>
-S <test dataexch service name> -N TCP -trig triggers -Bt 10000
-mmax 65534 -L 50000 -yy 1950
-cpinternal iso8859-1 -cpstream ibm850 -inp 32000 -tok 4096 -T c:\temp -zn -tmpbsize 8 -s 128 -noincrwarn -h 8 -p progs\plog2000.r
3 Save the file.
4 For production databases, modify the qadsfamaprod.pf file located in QADCRMInstallDir\prod\netsetup.
Integrating the System with QAD SE
Note If you are using QAD Enterprise Edition, see “Integrating the System with QAD EE” on page 58.
The system uses a switch-based approach to integrate with a QAD ERP application. It lets you choose multiple QAD ERP Domains and QAD ERP application modules you want to integrate with QAD CRM. The following modules can be integrated:
• Product • Address • Sales Quote • Sales Order • Installed base • Call • Contract • Contract Quote • Multiple Currency • Users
QAD CRM uses database and session triggers to connect and update the databases of both systems, eliminating the need for manual intervention when transferring data between the two systems.
For integration, the databases of both systems:
• Must always be available.
• Must run in multi-user mode.
• Can share the same database server.
For integration you must configure the file servers of the QAD CRM and your QAD ERP application.
Prerequisites
Before integrating with QAD Enterprise Applications, verify that you have met the following prerequisites:
• System requirements for QAD ERP application integration. See “System Requirements” on page 19.
• Configured QAD CRM databases to use client/server connections.
• Your QAD ERP application is functioning properly.
• Your network is operating.
• QAD ERP application databases are in multi-user mode.
• You have access to QAD ERP application compiled programs (.r) and the xrc folder.
Configuring QAD CRM for Integration
Note If Progress installed on QAD ERP is 64 bit and Progress installed on QAD CRM is 32 bit, refer to “Compilation with Progress 64 Bit” on page 123 before you start configuring QAD CRM and QAD ERP. To configure the system file server for integration:
1 Check the primary language used in QAD Enterprise Applications, such as US for US-English or DU for Dutch.
2 Create a new directory called mfgsrv in the test and prod
directories and then create a language folder under mfgsrv. For example, in the case of US, create mfgsrv\us.
The name of the directory must match the primary language of your QAD ERP application.
As an example, US is assumed to be the detected language. In this case, the new directories are:
QADCRMInstallDir\test\mfgsrv\us
QADCRMInstallDir\prod\mfgsrv\us
3 Under the new directory, create the following directories:
• mfgsrv\triggers • mfgsrv\us\gp • mfgsrv\us\sq
• mfgsrv\us\fs • mfgsrv\us\mc • mfgsrv\us\px • mfgsrv\us\tx • mfgsrv\us\lg • mfgsrv\us\qq
4 Copy the files as described below.
5 If QAD QXtend is installed, create a new directory called qxo under
QADCRMInstallDir/mfgsrv in the test and prod directories and copy the files as described below.
6 If QAD QXtend is installed, modify the QAD CRM prod and test configuration settings (.ini) file to include path mfgsrv\qxo on top of all other paths from folder mfgsrv as shown below.
Copy all files from this directory in the installation directory
...to this directory in the test and prod directories of the QAD CRM installation directory
QADERPInstallDir mfgsrv (copy only .r files)
/triggers mfgsrv\triggers
/us mfgsrv\us (copy only the .r files)
/us/fs mfgsrv\us\fs /us/gp mfgsrv\us\gp /us/lg mfgsrv\us\lg /us/mc mfgsrv\us\mc /us/px mfgsrv\us\px /us/qq mfgsrv\us\qq /us/sq mfgsrv\us\sq /us/tx mfgsrv\us\tx
Copy all the files from this folder ...
To this folder in the QAD CRM test and prod installation directory
QxtendOutboundInstallDir mfgsrv\qxo (copy only .r files)
QxtendOutboundInstallDir/
triggers
mfgsrv\qxo\triggers (the complete trigger folder)
QxtendOutboundInstallDir/
config
mfgsrv\qxo\config (the complete config folder)
.,progs,system,dataexch,triggers,integration\mfgpro,report,lib, mfgsrv\qxo,mfgsrv\qxo\triggers,mfgsrv,mfgsrv\triggers,mfgsrv\us ,mfgsrv\us\sq,mfgsrv\us\tx
7 Rename the file:
QADCRMInstallDir\compile\system\psys0101.i
For example, you can rename the file to psys0101.i.org.
8 Copy psys0101.i from
QADCRMInstallDir\compile\integration\eb21 to the following folder:
QADCRMInstallDir\compile\system 9 Open the system parameter file .pf located at:
QADCRMInstallDir\prod\netsetup
QADCRMInstallDir\test\netsetup
10 Modify the parameter file to connect to all QAD ERP application
test and prod databases. Make sure that QAD ERP database qaddb is included as the first database to connect.
For QAD ERP application test databases, modify:
QADCRMInstallDir\test\netsetup\qadsfamatest.pf
For QAD ERP application prod databases, modify:
QADCRMInstallDir\prod\netsetup\qadsfamaprod.pf
Use the trigger option and specify the trigger location for QAD ERP application databases:
-trig triggers
If QXtend is installed, modify the parameter file to connect to the qxevents database of test and prod QAD ERP application. Use the trigger option and specify the trigger location for the qxevents database:
-trig triggers
11 Create a folder called xrc under QADCRMInstallDir\compile
and then copy all programs from QADERPInstallDir/xrc to:
QADCRMInstallDir\compile\xrc
12 Modify QADCRMInstallDir\compile\qadsfamacompile.pf to connect all QAD Enterprise Applications compilation databases.
13 If Progress OE Studio/ProVision Plus license is installed instead of Progress Client Networking, do the following:
a Right-click the Application Compiler shortcut icon and choose Properties.
b Click the Shortcut tab.
c In the Target field, remove -rx and click OK.
14 Choose Start|All Programs|QAD CRM 6.3|QAD CRM Application Compiler and compile all the programs in the following directories:
• QADCRMInstallDir\compile\integration\mfgpro • QADCRMInstallDir\compile\triggers • QADCRMInstallDir\compile\system • QADCRMInstallDir\compile\dataexch • QADCRMInstallDir\compile\progs • QADCRMInstallDir\compile\report • QADCRMInstallDir\compile\xrc\mfdpers.p
Note View the compiler log file to check for errors.
15 Copy the .r files from the directories listed in Step 17 to their corresponding directories in the QADCRMInstallDir\prod
directories.
16 Copy QADCRMInstallDir\compile\xrc\mfdpers.r to the following folders:
QADCRMInstallDir\test\mfgsrv\us
QADCRMInstallDir\prod\mfgsrv\us
17 Create the following directories in the QAD Enterprise Applications installation environment:
QADERPInstallDir/integration/test
QADERPInstallDir/integration/prod
18 Copy the .r files you copied in the prod directory in Step 17—except
mfdpers.r—to their corresponding directories in this location: