Important Notice
General Disclaimer
The contents of this document are subject to change without notice; therefore, the information presented herein shall not be construed as a commitment or warranty. Microsoft shall not be liable for any technical or editorial errors or omissions contained herein or for incidental or consequential damages resulting from the performance, furnishing, reliance on, or use of this material.
Patents
Certain software described in this document is protected by issued and pending U.S. and foreign patents. Microsoft, The SoftGrid Desktop, SoftGrid, SystemGuard, Virtual Application Services, Virtual Application Server, Application Management Lifecycle, Application Management for the Always-On Enterprise, and Take Control of Your Software are registered trademarks or trademarks of Microsoft Corporation. Other company, brand and product names are the property of their respective owners.
Copyright
The information contained in this document represents the current view of Microsoft Corporation on the issues discussed as of the date of publication. Because Microsoft must respond to changing market conditions, it should not be interpreted to be a commitment on the part of Microsoft, and Microsoft cannot guarantee the accuracy of any information presented after the date of publication.
This document is for informational purposes only. MICROSOFT MAKES NO WARRANTIES, EXPRESS, IMPLIED OR STATUTORY, AS TO THE INFORMATION IN THIS DOCUMENT.
Complying with all applicable copyright laws is the responsibility of the user. Without limiting the rights under copyright, no part of this document may be reproduced, stored in or introduced into a retrieval system, or transmitted in any form or by any means (electronic, mechanical, photocopying, recording, or otherwise), or for any purpose, without the express written permission of Microsoft Corporation. Microsoft may have patents, patent applications, trademarks, copyrights, or other intellectual property rights covering subject matter in this document. Except as expressly provided in any written license agreement from Microsoft, the furnishing of this document does not give you any license to these patents, trademarks, copyrights, or other intellectual property.
Copyright © 2008 Microsoft Corporation. All rights reserved.
Microsoft, MS-DOS, Windows, Windows Server, Windows Vista, Active Directory, SoftGrid, Windows 2000, Windows NT 4, Windows Server 2003, Windows XP, and SQL Server are either registered trademarks or trademarks of Microsoft Corporation in the United States and/or other countries.
IMPORTANT NOTICE ... 2
OVERVIEW OF MICROSOFT APPLICATION VIRTUALIZATION IN STANDALONE MODE ... 4
INTRODUCTION TO THE TRIAL GUIDE ... 4
TRIAL SYSTEM REQUIREMENTS ... 5
INSTALLING MICROSOFT APPLICATION VIRTUALIZATION FOR DESKTOPS ... 6
INSTALLING MICROSOFT APPLICATION VIRTUALIZATION SEQUENCER ... 8
SEQUENCING WORD VIEWER 2003 ... 10
INSTALLING WORD VIEWER 2003 ... 17
ACCESSING THE MICROSOFT SUPPORT KNOWLEDGE BASE ... 17
Overview of Microsoft Application Virtualization in Standalone Mode
Standalone mode is meant for those rarely connected users that need the power of virtualized applications, but do not have access to a streaming server. Typically, virtual applications are streamed from Microsoft Application Virtualization Servers to clients on demand, but this can limited by network and server availability. Standalone mode allows virtual application execution without streaming and is ideal for branch office and blank scenarios. Application distribution for standalone mode is also interoperable with Microsoft Systems Management Server/System Center Configuration Manger 2007 and third-party ESD systems. Virtual applications can also be distributed through unattended operation (script automation) from a centralized file server.Microsoft Application Virtualization in Standalone mode is ideal for environments where you need to deploy applications to Clients on workstations in small branch offices where server-class machines are not available to host Application Virtualization Servers or Streaming Servers. This allows administrators to maintain a consistent virtual application distribution practice between all offices. Application Virtualization Desktop Clients are installed on each local user computer and virtual applications can be deployed using the aforementioned methods. Once deployed, applications are pre-loaded into the client cache and run without the need for an application-streaming infrastructure.
This functionality is made possible through the addition of an option to create an .msi file to the Microsoft Application Virtualization Sequencer. The .msi automates the addition of the virtual application. The .msi contains metadata so an ESD system can recognize it and control the virtualized applications. Standalone mode only allows .msi-based updates of the virtual applications; streaming is not allowed while in standalone mode. Microsoft will be releasing a Group Policy administrative template (.adm) to manage the standalone client settings centrally through group policy with the final General Availability version of Microsoft Application Virtualization 4.5.
Introduction to the Trial Guide
This Trial Guide is designed to help you configure Microsoft® Application Virtualization for operation in Standalone mode. This guide outlines steps necessary to install the appropriate Microsoft Application Virtualization components for Standalone operation; including Microsoft Application Virtualization for Desktops and the Microsoft System Center Application Virtualization Sequencer. You will generate an MSI using the Microsoft System Center Application Virtualization Sequencer and then distribute it to clients with Microsoft Application Virtualization for Desktops installed.
To help this process flow as smoothly as possible, we recommend that you become familiar with the Microsoft Application Virtualization platform by reviewing the Microsoft Application Virtualization Version 4.5 Trial Guide.
Obtaining the Microsoft Application Virtualization platform
The latest beta version release is available for download from the Microsoft Connect Web site. If you are not already signed in with your Windows Live ID, click the Sign In button and sign in. If you have previously visited the Microsoft Connect site for the System Center Application Virtualization 4.5 Public Beta, in the left navigation bar, click My Participation, and then click Microsoft Application Virtualization. If you have not previously visited the Microsoft Connect site for the System Center Application Virtualization 4.5 Public Beta, click Available Connections, and then click Apply next to the System Center Application Virtualization 4.5 Public Beta listing. Then, in the left navigation bar, click Downloads, and locate the latest version of the release notes available for download.
Audience for This Guide
This guide was written for Microsoft Windows® system administrators. As an information technology (IT) professional, you should have sufficient knowledge and experience to accomplish the following tasks:
Set up operating systems and install applications.
Familiarity with Microsoft Application Virtualization.
System requirements are documented in the Trial System Requirements section of this guide.
Trial System Requirements
For this evaluation, you will need to set up a computer that will run the Application Virtualization Client for Desktops. You will also need a separate computer that will run the Microsoft System Center Application Virtualization Sequencer. Note that you can use virtual machines on a single physical computer to meet the system requirements of this trial.
In this trial, we assume that you using a test environment, completely separate from your production network. The purpose of this evaluation is for you to acquire basic experience with configuring the Microsoft Application Virtualization platform for Standalone operation. Also, only basic platform functionality will be covered in this guide, to simplify and focus on proof of concept. Microsoft Application Virtualization is covered in its entirety by Microsoft Training courses.
The following section lists the basic requirements for this trial evaluation.
Microsoft Application Virtualization for Desktops
Microsoft Windows XP Pro; or Windows Vista® Business, Enterprise, or Ultimate editions
Microsoft Application Virtualization Sequencer
The requirements for Microsoft Application Virtualization Sequencer are identical to those of Microsoft Application Virtualization Client for Desktops. A best practice is to create a real partition or drive labeled "Q:" on the sequencer computer.
Installing Microsoft Application Virtualization for Desktops
The section guides you through the step-by-step process of installing Microsoft Application Virtualization for Desktops on a Vista desktop.
Perform the following on the machine to be the Microsoft Application Virtualization client: 1. Run the setup executable for Microsoft Application Virtualization for Desktops.
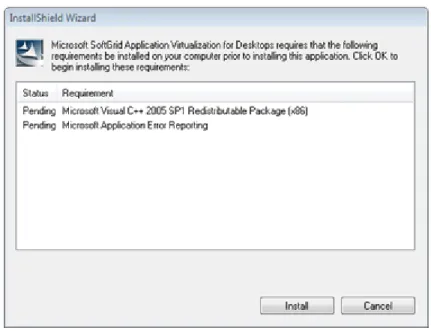
2. The setup wizard will scan for and prompt you to install Microsoft C++ and Microsoft Application Error Reporting (Figure 1).
Figure 1. Installation requirements 3. In the InstallShield Wizard dialog box, click Install.
4. On the Welcome page, click Next.
5. Read and accept the license agreement, and then click Next. 6. On the Microsoft Update Opt In page, click Next.
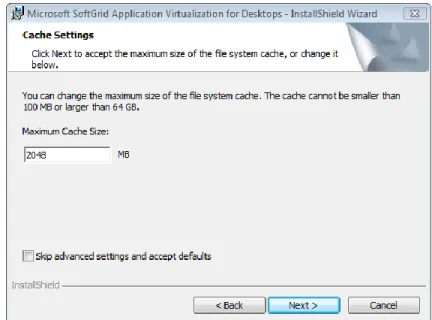
7. On the Destination Folder page, leave the default installation location, and then click Next. 8. On the Cache Settings page (Figure 2), leave the default data storage setting. Note that the cache
cannot be smaller than 100 MB or larger than 64 GB.
Figure 2. Cache Settings
10. On the SoftGrid Data Location page, leave the default values and click Next.
11. On the Runtime Package Policy Configuration page (Figure 3), in the Application Authorization section, clear the Require User authorization even when cached checkbox.
12. In the Application Authorization section, check the Allow streaming from file checkbox. 13. In the Automatically Load Application section, under When to Auto Load, clear the On Launch
and On Login checkboxes.
Figure 3. Runtime Package Policy Configuration 14. Click Next.
15. On the Desktop Configuration Server page, leave Setup a Desktop Configuration Server now unchecked and click Next.
16. On the SoftGrid Streaming Connection Security page, leave the default setting and click Next. 17. Click Install to begin the installation of Microsoft Application Virtualization Desktops.
18. When the installation is complete, click Finish.
Installing Microsoft Application Virtualization Sequencer
Microsoft Application Virtualization Sequencer packages the Microsoft Application Virtualization-enabled applications that are streamed to Microsoft Application Virtualization clients or deployed in Standalone operation.
Before You Install Microsoft Application Virtualization Sequencer
The sequencer computer must meet the same minimum requirements as Microsoft Application Virtualization for Desktops, but a fast workstation-class computer will significantly speed up the sequencing process. The workstation should be set up with one or more hard disk drives with ample disk space.
There are two main methods for setting up the sequencer computer: Option 1: Virtual Machine
Do a fresh install of a supported operating system to a virtual machine (VM). Do not use your "standard desktop image" or install any other applications on this image at this time. Then, follow the product-specific steps below.
Microsoft Virtual Server product: Add a second dynamically expanding virtual hard disk. Within the
virtual machine, set the drive letter to "Q." Enable Undo disks and commit the existing configuration. After each time you sequence an application, turn off the virtual machine and discard the undo disk to this VM to get back to a "clean" operating system.
VMware product: Edit the virtual machine settings and add an independent persistent virtual disk. Within
the virtual machine, set the drive letter to "Q." Create a snapshot of the VM. After each time you sequence an application, you will "revert" to this snapshot to get back to a "clean" operating system. Option 2: Local Image
Create at least two partitions on the hard disk. Make the first partition at least 4 GB in size for the operating system. The second partition should consume the remainder of the hard disk space, preferably more than 10 GB in total size. Set the drive letter to "Q" for the second partition. Do a fresh install of a supported operating system to the first partition. Do not use your "standard desktop image" or install any other applications on this image at this time. Using a utility like Symantec Ghost, store a disk image of the
first partition on the second partition. This method lets you rapidly restore the sequencing computer to a "clean" installation of your operating system, after each time you sequence an application.
Why a Q Drive?
Why sequence to a Q drive? The purpose is for the core application installation path to remain constant across all computers in the enterprise, which might not have constant system drives; for example, drive M for terminal servers and drive C for desktop computers. This is accomplished using a real drive or partition on the Microsoft Application Virtualization Sequencer computer and a virtual drive on Microsoft Application Virtualization clients. The virtual drive on Microsoft Application Virtualization clients is created by SystemGuard virtualization technology and not by a disk partitioning tool. The Q drive is the default drive letter and can be changed if needed in a production rollout. Microsoft has a method to handle applications that must be installed to a fixed drive; this is explained in Microsoft Training courses.
Installing Microsoft Application Virtualization Sequencer
Perform the following on the machine to be the Microsoft Application Virtualization Sequencer:
Important Do not install Microsoft Application Virtualization Sequencer on a computer that hosts Microsoft System Center Application Virtualization Management Server or Microsoft Application Virtualization for Desktops.
1. Run the setup executable for Microsoft Application Virtualization Sequencer. 2. The setup wizard will scan for and prompt to install Microsoft C++ (Figure 4).
Figure 4. Visual C++ installation 3. In the InstallShield Wizard dialog box, click Install.
4. On the Welcome page, click Next.
5. Read and accept the licensing agreement, and then click Next. 6. Accept the default installation path, and then click Next. 7. Click Install.
8. When the installation is complete, click Finish. Microsoft Application Virtualization Sequencer will start.
Sequencing Word Viewer 2003
This section walks through a simple sequencing process that will generate an MSI for distribution. We will use Word Viewer 2003 as a test case that can be easily and quickly deployed to clients.
Perform the following on the Microsoft Application Virtualization Sequencer:
1. Download Word Viewer 2003 and then copy the installer to a temporary directory on the Microsoft Application Virtualization Sequencer computer.
2. Open Windows Explorer, go to the Q:\ drive and create a folder named wdview.001.
3. Create a directory on the sequencer desktop called WordViewer2003. You will save the output of the sequencer to this directory.
4. Click Start | All Programs | Microsoft SoftGrid | Microsoft System Center Virtual Application Sequencer to open Microsoft Application Virtualization Sequencer (Figure 5).
Figure 5. Microsoft Application Virtualization Sequencer 5. Click File | New Package. The Package Configuration Wizard displays. 6. On the Welcome page, click Next.
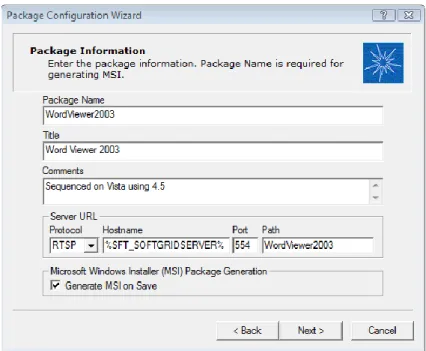
7. On the Package Information page (Figure 6), provide the following information: a. Package Name: WordViewer2003.
b. Title: Word Viewer 2003.
c. Comments: Use this field to record relevant information, such as the person who sequenced the application, specific configuration, etc.
d. Server URL: i. Protocol: RTSP
ii. Hostname: Leave the hostname default to the environment variable %SFT_SOFTGRIDSERVER%.
iii. Port: Leave the default value of 554. iv. Path: WordViewer2003.
Figure 6. Package Information page 8. Click Generate MSI on Save.
9. Click Next.
10. On the Operating Systems page (Figure 7), click the operating systems on which you intend to run this package, and use the right arrow to move the selected items to the right pane.
Figure 7. Operating Systems page 11. Click Finish. The Installation Wizard displays.
12. On the Welcome page, click Next.
13. On the Sequencing Parameters page, click Next.
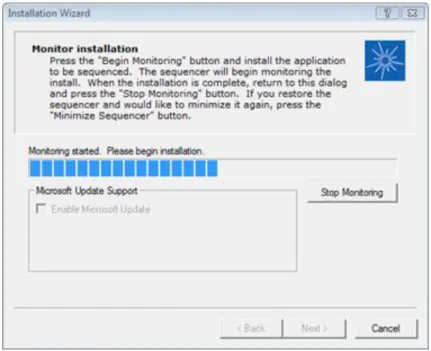
14. On the Monitor Installation page (Figure 8), click Begin Monitoring.
Figure 8. Monitor Installation page
16. Wait for the monitor to load the virtual environment and to display the status Monitoring started. Please begin installation (Figure 9).
Note: Occasionally, the sequencer will not stop the wuauserv service in a timely fashion. If this occurs, click OK to dismiss the dialog. Click Tools | Sequencing Wizards | Installation… to continue the package creation.
Figure 9. Monitoring started 17. From Windows Explorer, run the Word Viewer 2003 installer. 18. Accept the terms of the license agreement, and then click Next. 19. Click Browse, go to Q:\wdview.001, and then click OK.
Figure 10. Install Word Viewer to page 21. In the Success dialog box, click OK.
22. Switch to the Installation Wizard, and click Stop Monitoring.
23. Microsoft Application Virtualization Sequencer will scan the computer for changes. When monitoring is complete, click Next.
24. On the Additional Files to Map to the VFS page (Figure 11), click Finish.
25. On the Welcome to the Application Wizard page, click Next.
Note: If you had to manually start the Installation Wizard, you will have to do so with the Application Wizard as well.
26. On the Configure Applications page (Figure 12), click Applications.
Figure 12. Configure Applications page
27. In the details pane, click Microsoft Office 2003 component, and then click Remove. 28. Click OK.
29. In the details pane, click Microsoft Office Word Viewer 2003, and then click Edit.
30. In the Edit Application dialog box, set the following .osd file properties (Figure 13), and then click Save.
a. Name: Word Viewer b. Version: 2003
Figure 13. Edit Application dialog box 31. Click Save.
32. Under Applications, expand Word Viewer.
33. Click File Type Associations to view the FTAs the sequencer has recorded.
34. Click Shortcuts to view where the shortcuts for this application will be located on the Microsoft Application Virtualization client desktop.
35. When you are done viewing this information, click Next. 36. On the Launch Applications page (Figure 14), click Next.
37. On the Sequence Package page, when the sequencing is complete, click Finish.
38. Click File | Save, and then go to the folder WordViewer2003 that you created on the desktop and save your work as WordViewer2003.sprj.
39. Close Microsoft SoftGrid Sequencer.
40. Copy the WordViewer2003 folder to the client machine.
Installing Word Viewer 2003
Perform the following on the Microsoft Application Virtualization client: 1. From the WordViewer2003 folder, launch the WordViewer2003.msi.
2. In the Word Viewer 2003 wizard (Figure 15), on the Welcome page, click Next.
Figure 15. Word Viewer 2003 Wizard Welcome page 3. On the Installation Complete page, click Close.
4. Click Start | Programs | Word Viewer 2003. The application will launch an Open dialog box. 5. Click Cancel, and then close Word Viewer.
Accessing the Microsoft Support Knowledge Base
To access the Microsoft Support knowledge base and search for answers to the most frequently asked questions, go to Microsoft Support.
Contacting Microsoft Training
To register for training courses, to obtain course descriptions, and to get information about Microsoft certifications, go to Microsoft Training & Events.