PUBLIC
SAP Adaptive Server Enterprise 16.0 SP01
Document Version: 1.0 – 2015-02-25
Content
1 Conventions. . . .5
2 Installation Task Overview. . . .6
2.1 SAP ASE Software Download. . . 6
2.2 Installation Workflows. . . .6
3 SAP ASE Components. . . . 8
3.1 SAP ASE Editions. . . .8
Determining the Edition You Have. . . .9
3.2 SAP ASE Options. . . .9
3.3 Managing SAP ASE with SAP Control Center. . . .10
3.4 Client Components and Utilities. . . 11
4 Requirements. . . .13
4.1 Windows System Requirements. . . .13
4.2 SAP Java Runtime Environment Requirements. . . 14
4.3 System Requirements for Clients. . . .14
5 Planning Your SAP ASE Installation. . . . 15
5.1 SAP ASE Release Bulletin. . . 15
5.2 Obtaining a License. . . .15
Comparing License Deployment Models. . . .17
SySAM License Server. . . .18
Determining Host IDs. . . .18
Generating Licenses. . . 20
Knowing the Product License Type. . . .22
5.3 Installation Directory Contents and Layout. . . .24
5.4 Preparing to Install SAP ASE. . . .26
Managing Java in the Database During Installations and Upgrades. . . .27
6 Installing SAP ASE. . . .29
6.1 Installing SAP ASE in GUI Mode. . . .29
6.2 Installing SAP ASE in Console Mode. . . .33
6.3 Minimally Configuring an SAP ASE Server. . . .34
6.4 Installing SAP ASE Using a Response File. . . .39
Creating a Response File. . . 39
Installing in Silent Mode. . . 41
Command Line Options. . . .42
2
P U B L I C
© 2015 SAP SE or an SAP affiliate company. All rights reserved.
Installation Guide for Windows
6.5 Uninstalling SAP ASE. . . 43
Removing an Existing SAP ASE Server. . . .44
7 Starting and Stopping SAP Control Center. . . . 45
8 Postinstallation Tasks. . . . 47
8.1 Set Up sybase User in Windows. . . .47
8.2 Verifying That Servers are Running. . . 48
8.3 Verifying Your Connection to the Servers. . . .49
8.4 Test the Installation and Network Connections. . . .50
8.5 The System Administrator Account. . . 51
8.6 Installing Sample Databases. . . 51
Default Devices for Sample Databases. . . 52
Running the Database Scripts. . . .52
Installing the interpubs Database. . . 53
Installing the jpubs Database. . . 53
Maintaining Sample Databases. . . .54
9 SAP ASE Upgrades. . . .55
9.1 Considerations When Upgrading from SAP ASE 15.0.x or Earlier. . . .56
9.2 Considerations for Component Integration Services. . . 57
9.3 Preparing to Upgrade. . . .57
9.4 Changes in SAP ASE Directories. . . 58
9.5 Preupgrade Tasks. . . 60
Upgrade Stored Procedures. . . .62
Reserved Words. . . 62
Preparing the Database and Devices. . . .64
The sybprocsdev device. . . .65
9.6 Upgrade to SAP ASE 16.0 SP01. . . .69
Upgrading SAP ASE on Windows. . . 70
Testing the SAP ASE Upgrade. . . .71
Manually Upgrading SAP ASE. . . .71
Install and Upgrade an Existing Installation. . . .72
9.7 Upgrading in Silent Mode. . . .77
9.8 Postupgrade Tasks. . . .78
Running the instmsgs.ebf Script. . . .79
Restoring Functionality in SAP ASE After Upgrading. . . .80
Reenabling Auditing. . . .81
Restoring Permissions. . . .82
9.9 Migrate. . . .82
Migrating Data Using a Dump-and-Load Method. . . 83
Migrating Data Using bcp. . . .84
Installation Guide for Windows
Content
P U B L I C © 2015 SAP SE or an SAP affiliate company. All rights reserved. 3
9.10 SAP ASE Components and Related Products. . . 84
Upgrading Job Scheduler. . . .85
Upgrading High Availability and Cluster Support. . . .89
Upgrading Java in the Database. . . 90
Upgrading Backup Server. . . .91
Upgrading Databases Using Dump and Load. . . 91
How Compiled Objects Are Handled When Upgrading SAP ASE. . . .92
10 SAP ASE Downgrades. . . . 96
10.1 Downgrading from SAP ASE Version 16.0 SP01. . . .96
10.2 Dumping a 16.0 SP01 Database to Load Into an Older Version of SAP ASE 16.0. . . 98
10.3 Downgrading Job Scheduler. . . 99
10.4 Post-downgrade Tasks for SAP ASE. . . .100
11 Troubleshoot the Server. . . .101
11.1 Error Logs for Installation Utilities. . . .102
11.2 Error Logs for SAP ASE Servers. . . .102
11.3 Troubleshooting Common Installation Problems. . . .102
If the Installation Quits While You Are Configuring an SAP ASE Server. . . .103
11.4 Stopping a SAP ASE Server After a Failure. . . 104
11.5 If SAP ASE Fails the Preupgrade Eligibility Test. . . 104
11.6 When an Upgrade Fails. . . 105
If You Can Identify the Cause of the Upgrade Failure. . . .105
Restoring Databases After a Failed Upgrade. . . .106
Recovering from a Failed Upgrade. . . .106
If You Cannot Identify the Cause of an Upgrade Failure. . . 108
4
P U B L I C
© 2015 SAP SE or an SAP affiliate company. All rights reserved.
Installation Guide for Windows
1
Conventions
These style and syntax conventions are used in SAP Adaptive Server Enterprise (SAP ASE) documentation. ● In a sample window display, commands to be entered exactly as shown appear in:
this font
● In a sample window display, words that you should replace with the appropriate value for your installation are shown in:
<this font>
● In the regular text of this document, the names of files and directories appear in this font: /usr/u/ home_dir.
● The names of programs, utilities, procedures, and commands appear in this font: sqlupgrade.
● Commands for both the C shell and the Bourne shell are provided, when they differ. The initialization file for the C shell is called .cshrc. The initialization file for the Bourne shell is called .profile. If you are using a different shell, such as the Korn shell, refer to your shell-specific documentation for the correct command syntax.
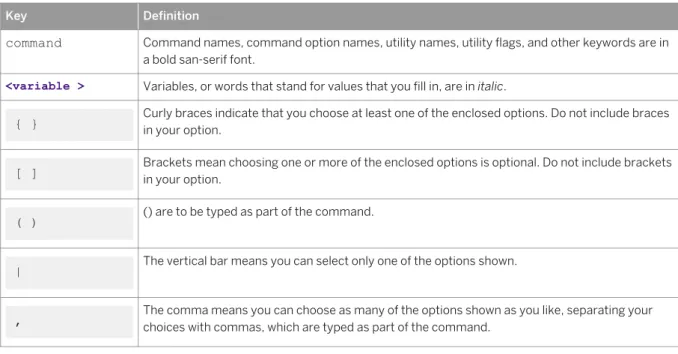
Table 1: SQL Syntax Conventions
Key Definition
command Command names, command option names, utility names, utility flags, and other keywords are in a bold san-serif font.
<variable > Variables, or words that stand for values that you fill in, are in italic.
{ } Curly braces indicate that you choose at least one of the enclosed options. Do not include braces in your option.
[ ] Brackets mean choosing one or more of the enclosed options is optional. Do not include brackets in your option.
( ) () are to be typed as part of the command.
| The vertical bar means you can select only one of the options shown.
, The comma means you can choose as many of the options shown as you like, separating your choices with commas, which are typed as part of the command.
Installation Guide for Windows
Conventions
P U B L I C © 2015 SAP SE or an SAP affiliate company. All rights reserved. 5
2
Installation Task Overview
To successfully install and configure SAP ASE, use the configuration guide along with this installation guide. The SAP ASE installation guide explains how to unload the SAP ASE software from the distribution media to your hard disk, and perform the minimal set of additional tasks so that you can start SAP ASE on your machine.
The configuration guide provides instructions for:
● Reconfiguring certain attributes of your existing SAP ASE, Backup Server™, and XP Server™ to meet your specific needs.
● Creating network connections. ● Configuring optional functionality.
● Performing operating system administrative tasks.
● Working with system administration issues that are relevant to SAP ASE running on UNIX platforms. This manual supplements the System Administration Guide and the Performance and Tuning Series.
2.1
SAP ASE Software Download
The SAP ASE installation and update packages are available on the SAP Software Download Center (https:// support.sap.com/software.html).
● Installation media for an SAP ASE:
SAP Software Download Center Installations and Upgrades A-Z Index Installations and Upgrades - A SAP ADAPTIVE SERVER ENTERPRISE SAP ASE 16.0 SP01 Installation
● Support Packages and Patches for SAP ASE: SAP Software Download Center Installations and
Upgrades A-Z Index Installations and Upgrades - A SAP ADAPTIVE SERVER ENTERPRISE SAP ASE 16.0 SP01 Support Packages and Patches SAP ASE Server 16.0 SP01
2.2 Installation Workflows
Workflows define a complete path for planning, installing, and upgrading.
Whether you plan to install or upgrade SAP ASE, identify the components and options to install or upgrade, and obtain a license.
6
P U B L I C
© 2015 SAP SE or an SAP affiliate company. All rights reserved.
Installation Guide for Windows
Installing SAP ASE for the First Time
1. Plan your installation and review system requirements. 2. Install SAP ASE.3. Perform postinstallation tasks.
Upgrading to a New Version of SAP ASE
1. Determine your upgrade eligibility, plan your installation, and review system requirements. 2. Run the preupgrade utility to prepare SAP ASE for upgrading.
3. Upgrade SAP ASE.
4. Perform postinstallation (postupgrade) tasks.
Uninstalling SAP ASE
See Uninstalling SAP ASE [page 43].Installation Guide for Windows
Installation Task Overview
P U B L I C © 2015 SAP SE or an SAP affiliate company. All rights reserved. 7
3
SAP ASE Components
SAP ASE is based on a client/server model, communicating with its clients over the network via the Tabular Data Stream™ (TDS) protocol. Each client process may execute on one machine and communicate with a database server on the same or a different machine.
SAP ASE runs as an application on top of an operating system. The hardware that the operating system runs on is completely transparent to SAP ASE, which sees only the operating system's user interfaces. To enhance performance on multiprocessor systems, configure multiple processes (engines).
SAP ASE is divided into a DBMS component and a kernel component. The kernel component uses the
operating system services for process creation and manipulation, device and file processing, and interprocess communication. The DBMS component manages SQL statement processing, accesses data in a database, and manages different types of server resources.
3.1
SAP ASE Editions
Analyze your system and scalability requirements to determine which edition of SAP ASE is appropriate for your enterprise.
● Enterprise edition – has no limit on scalability and supports all of the options that can be purchased or licensed separately.
● Small business edition – has limited scalability, and supports a limited set of the options that are purchased or licensed separately.
● Developer edition – has limited scalability and includes many of the options that are included in the enterprise edition.
See the SySAM Users Guide for information about unlocking editions and optional features.
The SAP ASE installer automatically installs a SySAM license server if you choose the full installation option or enter a served license when prompted for the SySAM license key. You can also install the license server using the installer's custom installation option. See the SySAM Users Guide to generate licenses.
8
P U B L I C
© 2015 SAP SE or an SAP affiliate company. All rights reserved.
Installation Guide for Windows
3.1.1
Determining the Edition You Have
If you already use SAP ASE, use the sp_lmconfig system procedure to identify the version.
Procedure
Enter:sp_lmconfig 'edition'
SAP ASE returns a value of EE, SE, or DE based on the edition that is currently running. See the Reference Manual for more information about sp_lmconfig.
3.2 SAP ASE Options
SAP offers various optional features for SAP ASE, such as data compression, partitions, and encrypted columns.
Option Description
Data compression Enables compression for regular and large object data, which uses less storage space for the same amount of data, reduces cache memory consumption, and improves performance due to lower I/O demands.
Security and directory services
Provides lightweight directory services and network-based authentication and encryption using SSL and Kerberos.
Partitions Enables semantic partitioning for table row data.
Encrypted columns Increases security parameters and allows for addition of datatypes.
Tivoli storage manager Enables the database to back up and restore operations to IBM Tivoli Storage Manager.
In-memory database Provides zero-disk-footprint in-memory database support that is fully integrated with SAP ASE for high-performance transactional applications. Provides
performance enhancements to disk-resident databases with relaxed durability properties.
High availability Supports the creation of a two-node hardware cluster with each node running SAP ASE. If one server fails, the other server automatically picks up its database operations and client connections.
SAP ASE editions and optional features are unlocked by SySAM licenses. See the SySAM Users Guide. To install any of these optional features to an existing SAP ASE installation, use the same steps as you used to install SAP ASE.
Installation Guide for Windows
SAP ASE Components
P U B L I C © 2015 SAP SE or an SAP affiliate company. All rights reserved. 9
3.3 Managing SAP ASE with SAP Control Center
SAP Control Center (SCC) provides a single, comprehensive, Web-administration console for real-time performance, status, and availability monitoring of large-scale SAP enterprise servers.
SAP Control Center combines a modular architecture, a rich-client administrative console, agents, common services, and tools for managing and controlling SAP products. It includes historical monitoring, threshold-based alerts and notifications, alert-threshold-based script execution, and intelligent tools for identifying performance and usage trends.
The SAP ASE installer installs these SAP Control Center components:
● Remote Command and Control Agent for SAP ASE – a remote command and control agent that runs on a managed server, and which is required to manage SAP ASE tasks within SCC.
● SNMP support for SAP ASE – Simple Network Management Protocol is a standard protocol used for network management. SNMP allows managers and agents to communicate: managers send requests to agents, and agents respond to queries from managers.
In addition, you must also install the SCC Management User Interface for SAP ASE in the custom installation option by selecting the SAP Control Center Management User Interface for SAP ASE feature. This feature provides the GUI that allows you to manage and monitor activities in SAP ASE using a Web browser. In some cases, you may want to use a central SCC server to manage multiple SAP ASE servers and other products rather than using the SCC server that is installed with each SAP ASE server. Deployment considerations include:
● Minimizing network latency – you see better performance if you install SCC near the monitored servers and near the workstations on which SCC Web clients are running.
● Unified SCC environment – installing SCC in a central location lets you manage and monitor your servers from a single SCC installation, which is especially useful in a replication environment.
● Administration and security – you can exercise differing levels of control in different parts of your enterprise, for example, by protecting the data in some servers more strictly than in others.
See Preinstallation Tasks in SAP Control Center Installation Guide for details on installation and deployment considerations.
In a production environment, we recommend that you install the SCC server on a machine other than the one you plan to run SAP ASE on.
See the following for detailed SCC information:
● SAP Control Center Release Bulletin – provides last-minute installation and upgrade information, as well as known problems.
● SAP Control Center Installation Guide – provides complete installation, configuration, and troubleshooting procedures.
● SAP Control Center for SAP Adaptive Server Enterprise – includes SAP ASE configuration procedures, user assistance, and troubleshooting information.
Related Information
Starting and Stopping SAP Control Center [page 45]
10
P U B L I C
© 2015 SAP SE or an SAP affiliate company. All rights reserved.
Installation Guide for Windows
SAP ASE Upgrades [page 55]
Installing SAP ASE in GUI Mode [page 29]
Minimally Configuring an SAP ASE Server [page 34]
3.4 Client Components and Utilities
There are several components that you can install onto a PC client to support the SAP ASE server, which are downloaded from the SAP Service Marketplace (SMP). The previous PC-Client installer is replaced in SAP ASE 16.0 SP01 by separately downloadable installers that provide many of the same components.
SDK for SAP ASE
The SAP Community Network provides both 32-bit and 64-bit SDK for SAP ASE images. Download the software development kit (SDK) that matches your version of Windows (32- or 64-bit).
Included in the SDK are:
Product Description
Open Client™ In addition to Open Client (Client Library, dblib), the following, which are all installed into the OCS-16_0 directory:
● ESQL/C
● ESQL/COBOL
● XA
● SAP ASE extension module for Python ● SAP ASE database driver for Perl ● SAP ASE extension module for PHP DataAccess Installed into the DataAccess64 directories:
● ODBC – a driver used that connects to SAP ASE from ODBC-based applications. ● ADO.NET – a provider used that connects to SAP ASE from .NET-based
applications. Java Runtime
Environment (JRE)
Installed into the shared directory, JRE is a runtime Java virtual machine used to execute Java-based programs, such as Interactive SQL, and which is shared by several other components.
Language Modules Installed into the locales directory. Provides system messages and date/time formats.
Character Sets Installed into the charsets directory. Provides character sets that are available for use with SAP ASE.
jConnect Installed into the jConnect-16_0 directory, jConnect provides a Java Database Connectivity (JDBC) driver for SAP ASE.
Installation Guide for Windows
SAP ASE Components
P U B L I C © 2015 SAP SE or an SAP affiliate company. All rights reserved. 11
Product Description
Interactive SQL Installed into the DBISQL-16_0 directory, Interactive SQL is a GUI tool that allows you to execute SQL statements, build scripts, and display data from SAP ASE.
jutils-3_0
utilities
A collection of SAP ASE utility programs that includes ribo, a tool to trace TDS traffic between a client program and SAP ASE.
For download and installation instructions, see 2093510
PowerDesigner Physical Modeler
The modeler is available in the ASE SAP 16.0 SP01 section of the SAP Service Marketplace, and is installed from its own image.
To install the modeler, download and extract the 16.0 SP01 file, then run setup.exe in your root directory.
SySAM Utilities
Access these utilities by searching for sysam 2.3 in the SAP Service Marketplace. See the SySAM 2 Users Guide.
MS-Cluster Server Admin Utility
Install this component from the SAP ASE Windows 64 image.
QP-Tune
Run this components from the SAP ASE server image directly.
Related Information
Installation Directory Contents and Layout [page 24]
12
P U B L I C
© 2015 SAP SE or an SAP affiliate company. All rights reserved.
Installation Guide for Windows
4 Requirements
Before installing SAP ASE version 16.0 SP01, install the latest patches and system requirements. Do not use a patch that is earlier than the version suggested for your operating system. Use the patch recommended by the operating system vendor, even if it supersedes the patch listed.
Identify the Windows Service Pack level from Control Panel System , or by running the winver
command.
4.1 Windows System Requirements
Verify that your system is up-to-date. Do not use a patch that is earlier than the version suggested for your operating system. Use the patch recommended by the operating system vendor, even if it supersedes the patch listed.
Table 2: Windows X64 System Requirements
Operating System Hardware Supported Protocols
Windows 2008 R2 Service Pack 1 ● Intel Xeon EM64T
● AMD Opteron
● TCP
● Named pipes (not supported for LDAP server connections) Windows 2012 R2
Windows X64 memory requirements are: ● Minimum RAM for SAP ASE – 127MB
● Minimum RAM per additional user, with default stack size, packet size, and user log cache size – 83KB ● Default user stack size – 73KB
The value of minimum RAM per additional user depends on the connection needs. See the System Administration Guide for information about configuring memory.
Use the following patches:
● Microsoft Visual C++ 2010 Service Pack 1 Redistributable Package and KB2565063 ● Microsoft Visual Studio 2010 Service Pack 1 and KB2565057
● (On Windows 7) Windows 6.1-KB917607-x64
Missing either of the above patches causes the installer to fail, and you see this message: Missing DLL MSVCR100.dll during Install.
Table 3: Windows Disk Space Requirements
Product Windows 64
SAP ASE typical installation 500MB
Installation Guide for Windows
Requirements
P U B L I C © 2015 SAP SE or an SAP affiliate company. All rights reserved. 13
Product Windows 64 Default databases created during installation, with SAP ASE using a 4K page
size
306MB
Total 656MB
Note
To use ODBC, OLE DB, or ADO.NET drivers, you must install Microsoft .NET Framework 2.0 Service Pack 1, or the installer displays errors, and the drivers do not function. Confirm that .NET Framework 2.0 Service Pack 1 is listed as a currently installed program in Control Panel Add or Remove Programs .
4.2 SAP Java Runtime Environment Requirements
Ensure that you have the required operating system patches for the SAP Java Runtime Environment (JRE) version 7.1.
For JRE requirements, see 1367498 . Log in with your SAP support account to view the SAP note.
4.3 System Requirements for Clients
Check the system requirements for the machine on which you plan to install the client applications and utilities.
Type Requirement
Product Programs and utilities installed onto the PC client
Hardware X86 or X64 system running Xeon or AMD 1.5 GHz or faster
Operating system Windows Server 2012, Windows 2008 R2 SP1, Windows 2008 x86, Windows 8, Windows 7 SP1
Suggested minimum RAM 512MB
Note
If you are using ODBC or ADO.NET drivers, make sure that Microsoft .NET Framework 2.0 Service Pack 1 is installed on your Windows machine. To confirm that it is installed, select Control Panel Add or Remove Programs and verify that .NET Framework appears in the list of currently installed programs.
14
P U B L I C
© 2015 SAP SE or an SAP affiliate company. All rights reserved.
Installation Guide for Windows
5
Planning Your SAP ASE Installation
Before you install or upgrade, prepare your environment.
Procedure
● Identify the components and options to install or upgrade. ● Obtain a license.
Note
If you are using a served license, you must install the SySAM license server version 2.3 or later. ● Make sure your system meets all requirements for your installation scenario and planned use.
5.1
SAP ASE Release Bulletin
The release bulletin contains last-minute information about installing and upgrading SAP ASE software. The latest release bulletins are available at the SAP ASE Help Portal at http://help.sap.com/adaptive-server-enterprise.
5.2 Obtaining a License
Before installing your product, choose a SySAM license model, and obtain license files from the SAP Service Marketplace (SMP) at http://service.sap.com/licensekeys
Context
Note
If you purchased your product from Sybase or an authorized Sybase reseller and have not been migrated to SAP Service Marketplace (SMP), go to the Sybase Product Download Center (SPDC) at https://
sybase.subscribenet.com to generate license keys.
Installation Guide for Windows
Planning Your SAP ASE Installation
P U B L I C © 2015 SAP SE or an SAP affiliate company. All rights reserved. 15
Procedure
1. Choose a SySAM license model. License Model Description
Unserved license model Licenses are obtained directly from the license file. If you are using an unserved license, save the license file to the machine on which you install the product.
Served license model A license server manages the allocation of licenses among multiple machines.
Note
The SAP ASE installer automatically installs a SySAM license server if you choose the full installation option or enter a served license when prompted for the SySAM license key. You can also install the license server using the installer's custom installation option. See the SySAM Users Guide to generate licenses.
2. For the served license model, decide whether to use an existing or new license server.
The license server and your product installation need not share the same machine, operating system, or architecture.
Note
There can be only one instance of a SySAM license server running on a given machine. To set up a SySAM 2 license server on a machine that is already running a SySAM 1.0 license server, follow the migration instructions in the SySAM Users Guide. A migrated license server can serve licenses for both SySAM 1.0 and SySAM 2-enabled products.
3. Get your host IDs.
When you generate licenses, you must specify the host ID of the machine where the licenses will be deployed.
○ For unserved licenses – the host ID of the machine where the product will run. If you are running a product with per-CPU or per-chip licensing that supports SySAM sub-capacity and want to run the product in a virtualized environment, see SySAM Sub-capacity Licensing in the SySAM Users Guide. ○ For served licenses – the host ID of the machine where the license server will run.
4. Before installing your product, obtain license files from SMP or from SPDC using the access information in your welcome e-mail message.
Note
If you purchased your software from a reseller, rather than an e-mail message you may receive a Web key certificate that contains the location of the SPDC Web key login page at https://
sybase.subscribenet.com/webkey and the activation key to use for the login name.
If you plan to use sub-capacity licensing, see the SySAM Users Guide for information on how to configure using the sysamcap utility.
Use sp_lmconfig to configure and show license management-related information in SAP ASE. See
sp_lmconfig in Reference Manual: Procedures.
16
P U B L I C
© 2015 SAP SE or an SAP affiliate company. All rights reserved.
Installation Guide for Windows
5.2.1
Comparing License Deployment Models
Learn about license deployment models.Table 4: Differences Between Unserved and Served Licenses
Unserved Licenses Served Licenses
Licenses can be used only on the machine for which the li cense was generated.
Licenses can be distributed from a network license server to products running on any network machine.
Generate licenses at SMP or SPDC for each machine that will run the product:
1. Specify the host ID of the machine where the product will run.
2. Generate a license for that machine. 3. Save the license to the specified machine.
4. Repeat steps 1 – 3 for each machine where the product will run.
Generate licenses at SMP or SPDC for products running on multiple machines:
1. Specify the host ID of the license server. 2. Specify the number of required licenses.
3. Save the licenses to the license server host machine.
No license administration is required. However, when new li censes are required for product updates, you must update and deploy each license for each machine where the prod uct update will run.
The license server requires administration. When new li censes are required for product updates, SMP or SPDC lets you update all licenses for a specific license server in a sin gle step.
No license reporting or asset management capabilities are available.
Allows license monitoring and reporting of license use, ca pacity planning, and asset management.
Installed locally and always available. Requires a functioning license server and network. If the li cense server or network fails, you must fix the problem or install an alternate license server before the product grace period expires.
If a machine where the product is running fails, you must re generate all of its licenses and deploy those licenses to the replacement machines.
If a machine where the product is running fails, you can move the product to a new machine, and it will acquire li censes from the running license server.
If the license server host machine fails, use the Manage Li cense Hosts functionality at SMP or SPDC to move its li censes to a new network license server host.
License files are distributed across each machine running a product, and therefore they are difficult to manage and con trol.
License files are centrally located and managed.
Unserved Standalone Seat (SS) licenses do not allow prod uct use via Remote Desktop Connection or other terminal services clients.
Products can be used via Remote Desktop Connection or other Terminal Services clients, irrespective of the type of li cense in use.
Installation Guide for Windows
Planning Your SAP ASE Installation
P U B L I C © 2015 SAP SE or an SAP affiliate company. All rights reserved. 17
5.2.2 SySAM License Server
If you choose to use the served licensed model, make sure you have installed the required SySAM license server version.
The license server is a lightweight application that serves licenses to products running on any operating system.
A license server can run on a low-end machine or a machine with spare cycles. For example, a license server running on a Solaris UltraSparc-60 serving 100 different licenses to 200 product instances, used 50MB of memory, 5 minutes of CPU time per week, and 100MB of disk space per year.
SAP ASE 16.0 SP01 requires SySAM 2.3 or later. To determine the current license server version, use the
sysam version command.
Note
This command is not available in SySAM version 2.0 and earlier.
Download the latest SySAM version from http://service.sap.com/patches . SAP ASE 16.0 SP01 and SySAM 2.3 use FlexNet Publisher version 11.11.
To check the version of FlexNet Publisher used by your license server, examine the license server log or execute the lmgrd -v command.
The license server installer is available in the <ASE_installer>\sysam_setup directory.
Note
You cannot start the license server until there is at least one served license saved to the licenses
directory on the license server host machine.
5.2.3 Determining Host IDs
When you generate licenses at SMP, you must specify the host ID of the machine where the licenses will be deployed.
Context
● For unserved licenses, specify the host ID of the machine where the product will run. If you are running a product with per-CPU or per-CHIP licensing that supports SySAM sub-capacity, and you want to run the product in a virtualized environment, see SySAM Sub-capacity Licensing in the SySAM Users Guide for information about determining the host ID for unserved licenses.
● For served licenses, specify the host ID of the machine where the license server will run.
SMP remembers the host information so that you can select the same license server when generating additional licenses.
18
P U B L I C
© 2015 SAP SE or an SAP affiliate company. All rights reserved.
Installation Guide for Windows
To determine the host ID of the machine, run the lmutil utility from a terminal window or the Windows command prompt. For example:
lmutil lmhostid
Note
You can download the lmutil utility from either:
● The SAP ASE installer image, under the sysam_utilities directory; or,
● The Flexera Software Web site at http://www.globes.com/support/fnp_utilities_download.htm . You can also determine the host ID using native operating system commands. See the Frequently Asked Questions topic "What is my Host ID?" at https://websmp208.sap-ag.de/~sapidb/
011000358700001006652011E (requires login) .
5.2.3.1
Determining Host IDs for Machines with Multiple
Network Adapters
On some platforms, the host ID is derived from the network adapter address.
Context
If the machine where your product is installed or where the license server is hosted has multiple network adapters, running lmutil lmhostid returns one host ID for each network adapter, and returns output similar to this:
The FLEXlm host ID of this machine is ""0013023c8251 0015c507ea90"" Only use ONE from the list of hostids.
It is important that you:
● Choose only one host ID to enter during license generation. ● Use the value associated with the primary wired Ethernet adapter. ● Do not use values associated with internal loopback or virtual adapters.
If you cannot determine the host ID using the lmutil lmhostid output, use the native operating system commands to get additional details.
Installation Guide for Windows
Planning Your SAP ASE Installation
P U B L I C © 2015 SAP SE or an SAP affiliate company. All rights reserved. 19
5.2.3.2 Using Alternate Host IDs on Windows
If your Windows machine does not have a network adapter, SySAM allows you to use an alternate host ID based on the hard disk serial number.
Procedure
1. At a Windows command prompt on the machine where you will deploy your license, enter:
lmutil lmhostid -vsn
This returns output similar to:
The FLEXlm host ID of this machine is "DISK_SERIAL_NUM=70ba7a9d"
2. Use the complete output (DISK_SERIAL_NUM=70ba7a9d) for the host ID value requested during license generation.
5.2.4 Generating Licenses
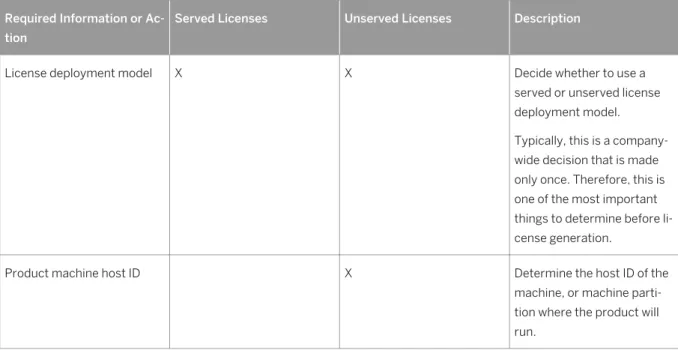
Before you generate licenses, gather the necessary information and complete these tasks. Table 5: Information Needed Before Generating Licenses
Required Information or Ac tion
Served Licenses Unserved Licenses Description
License deployment model X X Decide whether to use a
served or unserved license deployment model. Typically, this is a company-wide decision that is made only once. Therefore, this is one of the most important things to determine before li cense generation.
Product machine host ID X Determine the host ID of the
machine, or machine parti tion where the product will run.
20
P U B L I C
© 2015 SAP SE or an SAP affiliate company. All rights reserved.
Installation Guide for Windows
Required Information or Ac tion
Served Licenses Unserved Licenses Description
License server – download and install
X Download and install the Sy
SAM license server before you generate the product’s licenses, and before you in stall the product.
License server host ID X Determine the host ID of the
machine where the license server will run.
License server host name X Determine the host name of
the machine where the li cense server will run. License server TCP/IP port
numbers
X Determine the two port num
bers on which the license server will listen for license requests.
5.2.4.1
Generating License Keys at SMP
Use SMP to generate license keys.
Procedure
1. Go to the SAP Marketplace main page at http://service.sap.com/licensekeys . 2. Log in using your SMP credentials.
3. Select SAP Support Portal.
4. Select Keys & Requests License Keys .
5. Follow the instructions in the "How to generate license keys for SAP Sybase products" presentation available under the "Documentation and Helpful Resources" quick access link.
Installation Guide for Windows
Planning Your SAP ASE Installation
P U B L I C © 2015 SAP SE or an SAP affiliate company. All rights reserved. 21
5.2.5 Knowing the Product License Type
SAP sells products under different license types, which entitle the customer to different rights of use. For example, whether a product is entitled to be used in production, or standby, or development and test environments.
The license type determines the quantity of licenses required; dictating, for example, whether a license is required for each machine; or for each CPU, or CPU chip; or per terabyte of storage.
For example, a product purchased under the CPU License (CP) type requires one license per CPU on the machine, partition, or resource set where it will run. The same product purchased under the Server License (SR) type requires a single license for the machine, partition, or resource set.
Your account can have the same product licensed under multiple license types. Make sure you select the correct license type when you generate your SySAM license file.
When you generate licenses, each license type is presented on the License Information screen in bold font. For example:
License Type: CPU License (CP)
5.2.5.1
Optional Feature Licenses
Some SAP ASE applications are offered as base products with optional features that require a separate license.
Customers can mix license types. For example, customers can order SAP ASE under the Server License (SR) license type and order an optional feature (for example, High Availability or Enhanced Full Text Search) under the CPU License (CP) type.
Optional features are licensed only with the base product of the same product edition. For example, if you order SAP ASE, you cannot use a Small Business Edition optional feature license with the Enterprise Edition base product. In addition, the entitled use of the license types must be compatible; for example, both types should allow use in a production environment.
5.2.5.2 SySAM Licensing Checkout
If SAP ASE is licensed using a per-processor license type, it checks out a license quantity equal to the number of processors, or, if insufficient licenses are available, allows a 30-day grace period.
If the number of processors is dynamically increased while running and the software cannot check out additional licenses, the software permits a 30-day grace period. If sufficient licenses are not made available within the grace period, the software shuts down. Decreasing the number of processors that the software can use while it is running does not reduce the required license quantity. You must restart the SAP ASE server on the correct number of processors.
See the SySAM Users Guide.
22
P U B L I C
© 2015 SAP SE or an SAP affiliate company. All rights reserved.
Installation Guide for Windows
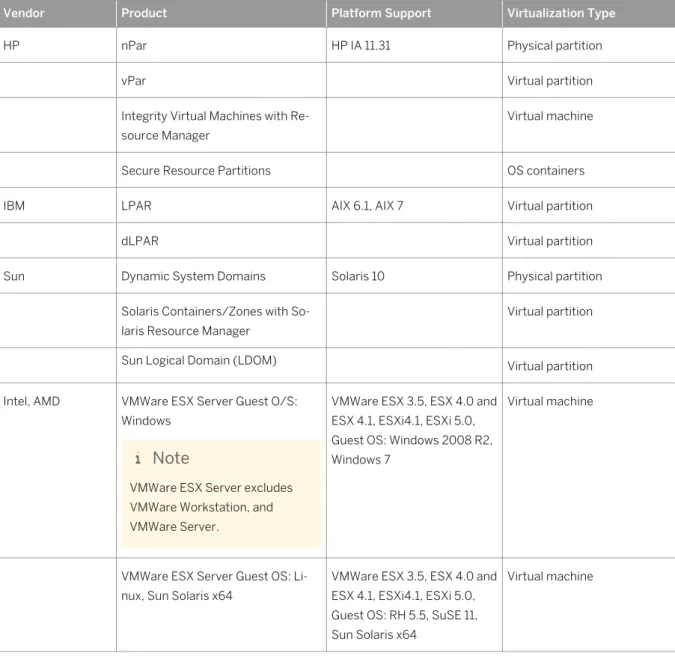
5.2.5.3 Sub-capacity Licensing
Sub-capacity licensing allows you to license a subset of the CPUs available on a physical machine using the SySAM sub-capacity license functionality.
Platform support
Table 6: SySAM Virtualization Sub-Capacity Compatibility
Vendor Product Platform Support Virtualization Type
HP nPar HP IA 11.31 Physical partition
vPar Virtual partition
Integrity Virtual Machines with Re source Manager
Virtual machine
Secure Resource Partitions OS containers
IBM LPAR AIX 6.1, AIX 7 Virtual partition
dLPAR Virtual partition
Sun Dynamic System Domains Solaris 10 Physical partition
Solaris Containers/Zones with So laris Resource Manager
Virtual partition
Sun Logical Domain (LDOM) Virtual partition
Intel, AMD VMWare ESX Server Guest O/S: Windows
Note
VMWare ESX Server excludes VMWare Workstation, and VMWare Server.
VMWare ESX 3.5, ESX 4.0 and ESX 4.1, ESXi4.1, ESXi 5.0, Guest OS: Windows 2008 R2, Windows 7
Virtual machine
VMWare ESX Server Guest OS: Li nux, Sun Solaris x64
VMWare ESX 3.5, ESX 4.0 and ESX 4.1, ESXi4.1, ESXi 5.0, Guest OS: RH 5.5, SuSE 11, Sun Solaris x64
Virtual machine
Installation Guide for Windows
Planning Your SAP ASE Installation
P U B L I C © 2015 SAP SE or an SAP affiliate company. All rights reserved. 23
Vendor Product Platform Support Virtualization Type Xen, KVM, DomainU: Windows
Note
Xen excludes Sun Solaris x64.
Windows 2008 R2, Windows 7 Virtual machine
Xen, KVM, DomainU: Linux RH 5.5, SuSe 11 Virtual machine
Hyper-V Windows 2008 R2 Virtual machine
Enabling SAP ASE Sub-Capacity Licensing
If you purchased your product from Sybase or an authorized reseller, you must have a sub-capacity licensing agreement with SAP or Sybase before you can enable sub-capacity licensing.
Note
Keep your license server up-to-date.Although the installation media includes a copy of the most recent SySAM license server, we recommend that you periodically check for updates at https://support.sap.com/ patches .
When using SySAM sub-capacity licensing, set the SYBASE_SAM_CAPACITY environment variable before installing, or copy in the license key after installation.
5.3 Installation Directory Contents and Layout
SAP ASE includes server components that are installed into specific directories.Product Description
SAP ASE Installed into the ASE-16_0 directory. ● SAP ASE – the database server.
● Backup Server – an application based on SAP Open Server that manages all database backup (dump) and restore (load) operations.
● XP Server – an Open Server application that manages and executes extended stored procedures (ESPs) from within SAP ASE.
● Job Scheduler – provides a job scheduler for SAP ASE. Job Scheduler components are located in ASE-16_0\jobscheduler\.
Connectivity Installed into the OCS-16_0 directory:
24
P U B L I C
© 2015 SAP SE or an SAP affiliate company. All rights reserved.
Installation Guide for Windows
Product Description
● Open Client™ (<Client Library>, <dblib>)
● ESQL/C
● ESQL/COBOL
● XA
Installed into the DataAccess and DataAccess64 directories:
● ODBC (Windows, Solaris SPARC, Solaris x64, Linux Power, HP-UX Itanium, IBM AIX) – a driver used to connect to SAP ASE from ODBC-based applications.
● ADO.NET (Windows only) – a provider used to connect to SAP ASE from .NET based applications.
Shared Directory The Shared directory contains components and libraries that are shared by several other components. In earlier versions, this directory was named Shared-1_0.
● Java Runtime Environment (JRE) – is a runtime Java virtual machine used to execute Java-based programs, such as SAP Control Center. SAP ASE includes the JRE. In typical installations, by default, the JRE is fully installed. In custom installations, if you select a component for installation that requires the JRE, the JRE is also automatically selected. It is located in the Shared\SAPJRE-7_0 * directory. SAP Control
Center
SAP Control Center logs and utilities – files related to the Web-based tool for monitoring the status and availability of SAP ASE servers. They are installed into the %SYBASE% \SCC-3_3 directory.
Language
Modules Installed into the locales directory. Provides system messages and date/time formats. Character Sets Installed into the charsets directory. Provides character sets that are available for use
with SAP ASE. Collation
Sequences
Installed into the collate directory. Provides the collation sequences that are available for use with SAP ASE.
Sybase Software Asset
Management (SySAM)
Installed into the SYSAM-2_0 directory. Provides asset management of SAP ASE servers and optional features.
Web Services Installed into the WS-16_0 directory. An optional product that provides access to SAP ASE using HTTP/SOAP and WSDL.
Interactive SQL Interactive SQL is a GUI tool that allows you to execute SQL statements, build scripts, and display data from SAP ASE. It is installed into the DBISQL-16_0 directory.
jutils-3_0
Utilities
A collection of SAP ASE utility programs including ribo, a tool to trace TDS traffic between a client program and SAP ASE.
SAP jConnect for JDBC
Installed into the jConnect-16_0 directory. Provides a Java Database Connectivity (JDBC) driver for SAP ASE.
OData Server Installed into the ODATA-16_0 directory, OData (Open Data Protocol) enables data services over RESTful HTTP, allowing you to perform operations through URIs (Universal Resource Identifiers) to access and modify information.
Installation Guide for Windows
Planning Your SAP ASE Installation
P U B L I C © 2015 SAP SE or an SAP affiliate company. All rights reserved. 25
Note
We strongly recommend that you install the ECDA DirectConnect option or MainframeConnect DirectConnect for z/OS, including DirectConnect Manager, into its own directory.
Related Information
Client Components and Utilities [page 11]
5.4 Preparing to Install SAP ASE
Before you start the installer, prepare your system.Procedure
1. Back up your current system.
2. Verify that you have Winrar or Winzip installed on your machine so the installer can decompress files during the installation process.
3. Ensure that the account used to start the server has read and write permissions for the directory in which you are installing the server. You may need to create nonadministrative logins to install the server into personal directories.
4. Review the SySAM licensing procedures, and plan your server configuration using the configuration guide for your platform.
5. For consistency and security, create an account with administrative privileges. This user account could be "sybase" or any other user name. Use this account to perform all installation and device-creation tasks. This user must have permission privileges from the top (or root) of the disk partition or operating system directory, down to the specific physical device or operating system file. Maintain consistent ownership and privileges for all files and directories. A single user—the system administrator with read, write, and execute permissions—should perform all installation, upgrade, and setup tasks.
If you are installing SAP ASE on more than one computer, create the "sybase" user account on each machine.
The user should be a member of the Windows system-defined “Administrators” group so that the installation process can create the entries in the service control manager for all the processes. 6. Log in to the machine as “sybase.”
7. If you have enabled the Java in the database feature, create the sybpcidb database and disable the feature during the installation.
8. Decide where to install SAP ASE:
26
P U B L I C
© 2015 SAP SE or an SAP affiliate company. All rights reserved.
Installation Guide for Windows
○ Make sure there is sufficient disk space and temporary directory space available. ○ Ensure there are no spaces in the path name of the directory.
9. Decide whether you want licensing events to trigger e-mail alerts, and the severity of the events that generate e-mail messages.
If you choose to have e-mail notifications for license events, know your: ○ SMTP server host name
○ Port number for an SMTP server
Note
If SAP assigns any port numbers to you for use with SAP ASE, exclude these numbers from any port-scanning software you run. SAP ASE attempts to service each scan as a login attempt, which may lead to poor performance.
○ E-mail return address ○ Recipients of the notifications
○ Severity level of an event that triggers mail. Your choices are: ○ None
○ Informational ○ Warning ○ Error
Related Information
Preupgrade Tasks [page 60] Reenabling Auditing [page 81]Managing Java in the Database During Installations and Upgrades [page 27]
5.4.1
Managing Java in the Database During Installations
and Upgrades
If you have enabled Java in the database, create the sybpcidb database before installing or upgrading to SAP ASE version 16.0 SP01.
Procedure
1. Create the sybpcidb database, which stores configuration information for the pluggable component interface (PCI) and all pluggable component adapter (PCA) components. This database is used by the
installpcidb script. For example:
1> disk init
2> name = "sybpcidb_dev",
Installation Guide for Windows
Planning Your SAP ASE Installation
P U B L I C © 2015 SAP SE or an SAP affiliate company. All rights reserved. 27
3> physname = "${SYBASE}/data/sybpcidb_dev.dat", 4> size = "48M"
5> go
1> create database sybpcidb on sybpcidb_dev = 48 2> go
The device and database sizes depend on the SAP ASE server page size. The minimum and default size requirements for sybpcidb are:
○ 2KB page size server – 48MB
○ (Default) 4KB page size server – 96MB ○ 8KB page size server – 192MB
○ 16KB page size server – 384MB 2. Disable Java in the database:
1> sp_configure 'enable java', 0 2> go
3. Reenable the feature after you have successfully installed or upgraded to SAP ASE 16.0 SP01:
1> sp_configure 'enable java', 1 2> go
Related Information
Preupgrade Tasks [page 60] Reenabling Auditing [page 81]Preparing to Install SAP ASE [page 26]
28
P U B L I C
© 2015 SAP SE or an SAP affiliate company. All rights reserved.
Installation Guide for Windows
6
Installing SAP ASE
Install SAP ASE using your chosen method.
Prerequisites
Complete installation planning tasks.
Procedure
1. Choose an installation method: ○ GUI wizard (recommended) ○ Console mode
○ Response file
2. Follow the instructions for your chosen method. 3. Perform postinstallation steps.
6.1 Installing SAP ASE in GUI Mode
Use GUI mode to install SAP ASE and related products.Prerequisites
Shut down all programs before running the installer.
Context
The installer creates the target directory (if it does not yet exist) and installs the selected components into that directory.
Installation Guide for Windows
Installing SAP ASE
P U B L I C © 2015 SAP SE or an SAP affiliate company. All rights reserved. 29
Note
Version 16.0 included new major versions of SAP ASE and many supporting components. Installing version 16.0 and higher into the same directory with existing products should not impact the existing products. Install SAP ASE version 16.0 into the existing Sybase/SAP directory.
SAP ASE version 15.5 and later uses InstallAnywhere for its installation, while versions earlier than 15.5 and other products use InstallShield Multiplatform. Do not use both installers to install products into the same directory, as this creates files to be installed incorrectly and overwritten without warning.
At the end of the installation, verify that the product has installed correctly. You may also need to perform additional configuration procedures.
Procedure
1. Insert the installation media in the appropriate drive, or download and extract the SAP ASE installation image from the SAP Service Marketplace (SMP).
2. Launch the setup program.
If the installer does not launch automatically, double-click setup.exe or go to Start Run and enter the following, where <x> is your CD or DVD drive:
<x>:\setup.exe
If there is not enough disk space in the temporary disk space directory, set the environment variable TMP to <directory_name> before running the installer again, where <directory_name> is where the installation program writes the temporary installation files. When specifying the <directory_name>, include its full path.
Note
You cannot run the installer from a Universal Naming Convention (UNC) path (such as \\<host> \<share_name>). Map a network share to a drive instead.
3. If you are prompted with a language selection list, specify the appropriate language. 4. On the Introduction screen, click Next.
5. Accept the default directory or enter a new path to specify where to install SAP ASE, then click Next.
Note
Do not use the following when specifying the installation path: ○ Double-byte characters
○ Single- or double-quote characters
The installer does not recognize these, and displays an error.
If you see Choose Update Installation, this means that there is an older version of SAP ASE in the directory you specified for the installation, and you need to perform an upgrade rather than a new installation.
30
P U B L I C
© 2015 SAP SE or an SAP affiliate company. All rights reserved.
Installation Guide for Windows
6. Select the type of installation: Option Description
Typical (Default) Recommended for most users, this option installs a default set of components, including the SAP Control Center Remote Command and Control Agent plug-in. This option does not install the SySAM license server.
Full Installs every SAP ASE component, including all the supported language modules, as well as the SCC Agent plug-in and Management UI.
Customize Lets you select the components to install. Some components are automatically installed if they are required to run your selected components.
7. Select the software license type for the SAP ASE suite: ○ Install licensed copy of SAP ASE Suite
○ Install Free Developer Edition of SAP ASE Suite ○ Evaluate SAP ASE Suite
An evaluation is valid for 30 days from the installation date.
8. Choose the most appropriate region, read the license terms, then click I agree. Click Next. 9. If you have a licensed copy of SAP ASE Suite:
1. Specify the license type:
○ Enter a license file. If it is a served license key, you are prompted to set up the license server. ○ Use an existing license server.
○ Proceed without specifying license information for the duration of 30 days from the installation date.
2. Specify the product edition: ○ Enterprise Edition ○ Small Business Edition ○ Developer Edition
○ Unknown – select this if you are unsure about the license type.
Note
Choosing Unknown prevents you from being able to select Optimize SAP ASE later in the installation process.
Depending on the edition, you can also select the license type under which the product is licensed. 3. Configure your server to send e-mail notifications about license management events that require
attention:
○ SMTP server host name ○ SMTP server port number ○ E-mail return address ○ Recipient e-mail addresses
○ Message severity that triggers e-mail messages
10. In the preinstallation summary, verify the installation type and that you have enough disk space for the installation. Click Next.
The installation status window displays the result of the installation process. 11. In the Configure New Servers window, configure:
Installation Guide for Windows
Installing SAP ASE
P U B L I C © 2015 SAP SE or an SAP affiliate company. All rights reserved. 31
○ SAP ASE ○ Backup Server ○ XP Server ○ Job Scheduler ○ SAP Control Center
Note
When you connect to a server that you create during installation, log in using the -X option:
isql -S<server> -U<user> -P<pwd> -I interfaces –X
12. If you select to configure an SAP ASE, you see:
1. The Configure with Different User Account window, which allows you to enable a different user for the SAP ASE you are installing. If you click Yes to enable a different user for the SAP ASE you are
installing, enter:
○ The name of the account ○ The password of the account
The SAP ASE, Backup Server, and XP Server Windows Service accounts are then configured under the account name you specify.
If you keep the default, No, the fields are disabled. 2. The User Configuration Data Directory window.
Note
The default directory is the installation directory. If you specified a different directory, make sure you or the account specified in the Configure with Different User Account window has write permission to it.
SAP ASE creates these files during installation to place in the data directory: ○ The interfaces file.
○ RUN_server file – in the ASE-16_0\install subdirectory.
○ Configuration utilities log files – in the ASE-16_0\init\logs subdirectory. ○ SAP ASE configuration file (.cfg) – in the ASE-16_0 subdirectory.
○ SAP ASE shared memory file (.krg) – in the ASE-16_0 subdirectory. ○ SAP ASE SySAM properties file – in the ASE-16_0\sysam subdirectory.
○ Job Scheduler template .ini files – in the ASE-16_0\jobscheduler\Templates subdirectory. Database device files and server error log files are also created in the data directory you specify, but you can move them after the installation is finished.
Next Steps
Configure some basic settings for SAP ASE, Backup Server, Job Scheduler self-management, Web Services, and the SAP Control Center.
32
P U B L I C
© 2015 SAP SE or an SAP affiliate company. All rights reserved.
Installation Guide for Windows
Related Information
Minimally Configuring an SAP ASE Server [page 34] SAP ASE Upgrades [page 55]
Managing SAP ASE with SAP Control Center [page 10]
6.2 Installing SAP ASE in Console Mode
Choose command line installation if you prefer a nonwindowing interface, or if you are developing custom installation scripts.
Prerequisites
Launch the installer in console mode. If the installer launches automatically, click Cancel to cancel the GUI installation, then launch the setup program from a terminal or console.
Context
The steps for installing components in an interactive text mode are the same as those described for installing in GUI mode, except you use the following command to execute the installer from the command line, and you enter text to select installation options:
setupConsole.exe -i console
Procedure
1. To display Western European fonts such as French, English, and Italian on Windows:
1. Run chcp 1252 to change the code page to 1252, which is the code page that Java uses to display Western European fonts for Windows.
2. Open the properties of cmd.exe and set Font to Lucida Console. 2. At the command line, start the installation program:
setupConsole.exe -i console
If setupConsole.exe -i console hangs on Windows 2008 or Windows 7, perform either of these workarounds:
○ From Start All Programs Accessories , right-click Command Prompt and select Run as administrator, then enter setupConsole.exe -i console.
Installation Guide for Windows
Installing SAP ASE
P U B L I C © 2015 SAP SE or an SAP affiliate company. All rights reserved. 33
○ From the Command Prompt window, issue setupConsole.exe -i console, then press and hold the Ctrl key until you see the output.
3. Follow the remaining prompts to install SAP ASE, then specify the basic settings for your installation. The flow of the installation is identical to a GUI installation, except output is written to a terminal window and responses are entered using the keyboard.
6.3 Minimally Configuring an SAP ASE Server
Use GUI mode to minimally configure an SAP ASE server and related products for use.Prerequisites
The Configure screen shows a list of everything you can minimally configure. By default, all products are selected. Unselect any products you do not want to configure now. If you are configuring in console mode, enter the corresponding number:
● Configure New SAP ASE
○ Configure New Backup Server – see the System Administration Guide
○ Configure New XP Server – see the Transact-SQL Users Guide
○ Configure Job Scheduler – see the Job Scheduler Users Guide
○ Enable Self Management
○ Configure SAP Control Center – see SAP Control Center Installation Guide
● Configure SAP Control Center – see SAP Control Center Installation Guide
When finished, click Next in the GUI wizard, or enter 0 in console mode. You are now ready to begin configuring the SAP ASE server.
Procedure
1. Set the Configure New SAP ASE option:
Option Description
SAP ASE Name Default is the machine name.
System Administrator's Password
Enter your password. Confirm System
Administrator's Password
Enter your password.
Port Number Default is 5000.
Error Log Name and location of the error log file. Defaults to servername.log.
34
P U B L I C
© 2015 SAP SE or an SAP affiliate company. All rights reserved.
Installation Guide for Windows
Option Description
Application Type ○ (Default) MIXED – both OLTP and DSS.
○ OLTP – online transaction processing generally consists of smaller, less complex transactions.
○ DSS – decision-support systems generally have less update activity with large complex queries.
Page Size ○ 2KB
○ (Default) 4KB – if you plan to load database dumps from an SAP ASE with a page size that is not 4KB, enter the page size that matches the database dump.
○ 8KB ○ 16KB
Language Default: us-english. In typical installations, only us-english is available. Default Character Set Default is cp850.
Default Sort Order Default is bin_cp850. Optimize SAP ASE Server
Configuration
Specify Yes if you want to optimize the configuration for your system. The default is No.
Available Physical Memory for SAP ASE Server
Appears when you select Yes for Optimize SAP ASE Configuration. The numeric value is either 2816MB or 80 percent of available RAM, whichever is smaller.
Note
If you specify a value that is larger than the available resource for allocation to the server, the optimize configuration may fail, causing the server to not start.
Available CPU for SAP ASE Appears when you select Yes for Optimize SAP ASE Configuration. The value is 80 percent of the physical CPU, with a default minimum of 1. Create Sample Databases Select this option for the installer to install sample databases.
2. After customizing your SAP ASE configuration, click Next to record the input fields. You see Enter the custom configuration values:
Configuration Value
Master Device Name, including location, of the master device. Master Device Size (MB) The minimum sizes are:
○ 2KB page size – 29MB ○ 4KB page size – 45MB ○ 8KB page size – 89MB ○ 16KB page size – 177MB The default sizes are:
Installation Guide for Windows
Installing SAP ASE
P U B L I C © 2015 SAP SE or an SAP affiliate company. All rights reserved. 35
Configuration Value
○ 2KB page size – 36MB ○ 4KB page size – 52MB ○ 8KB page size – 104MB ○ 16KB page size – 208MB
master Database Size (MB)
The minimum and default sizes are: ○ 2KB page size – 18MB
○ 4KB page size – 26MB ○ 8KB page size – 52MB ○ 16KB page size – 104MB System Procedure Device The complete file path name. System Procedure Device
Size (MB) and System Procedure Database Size (MB)
The minimum for both is 184; the default for both is 196MB.
System Device The complete file path name.
System Device Size (MB) and System Database Size (MB)
The default options for both are: ○ 2KB page size server – 3MB
○ (Default) 4KB page size server – 6MB ○ 8KB page size server – 12MB
○ 16KB page size server – 24MB
Tempdb Device The full path of the device.
Tempdb Device Size (MB) and Tempdb Database Size (MB)
The default for both is 100MB for all page sizes.
Enable PCI in SAP ASE Enable the pluggable component interface. The PCI is a generic interface internal to SAP ASE that is installed by default when you install or upgrade SAP ASE. See Java in Adaptive Server Enterprise.
PCI Device Appears when you select Enable PCI. The default is
sybpcidbdev_data.dat in %SYBASE%\data. PCI Device Size (MB) and
PCI Database Size (MB)
Appears when you select Enable PCI. The PCI device and PCI database size are the same:
○ 2KB page size server – 48MB
○ (Default) 4KB page size server – 96MB ○ 8KB page size server – 192MB
○ 16KB page size server – 384MB
After customizing your SAP ASE configuration, click Next to record the input fields. 3. Set the Configure New Backup Server option:
Configuration Value
Backup Server Name The default is <machinename>_BS.
36
P U B L I C
© 2015 SAP SE or an SAP affiliate company. All rights reserved.
Installation Guide for Windows
Configuration Value
Port Number The port number of the Backup Server. The default is 5001. Error Log The full path to the error log file.
Allow Hosts Comma-separated lists of hosts that are allowed to connect to this Backup Server. When null, only the dataserver running on the same host as the Backup Server can access this Backup Server. The default value is null.
4. Set the Configure New XP Server option: Configuration Value
XP Server Name The XP Server name is set automatically, in the form of <machinename>_XP. Port Number The port number of the XP Server. The default is 5002.
Error Log The full path to the error log file. 5. Set the Configure Job Scheduler option:
Configuration Value
Job Scheduler Agent name The default is <<ASE Server Name>>_JSAGENT.
Port number The default is 4900.
Management device The full path to the device.
Management device size, in MB The default is 76. Management database size, in MB The default is 76. Click Next.
6. Set the Configure Self Management option to create a scheduled job to run update statistics on any table in any SAP ASE database:
○ Self-management user name – default is "sa". Entering a new user name creates it in SAP ASE. ○ Self-management password.
7. Set the SAP Control Center – Configure Self Discovery Service Adapter option: ○ Configure UDP Adapter
○ Configure JINI Adapter – if you select this option, enter: ○ JINI host name – default is localhost.
○ JINI port number – default is 4160.
○ JINI heartbeat period, in seconds – default is 900.
Note
If you do not select an adapter, you see a message similar to: You must choose at least one adapter to configure.
8. If you installed the SAP Control Center Management User Interface for SAP ASE, set the SCC Configure HTTP Ports option.
Accept the default options, or specify other, unused ports, ensuring that the port numbers do not conflict with those used by other applications or services on your system:
○ HTTP port – choose an integer between 1025 and 65535.
Installation Guide for Windows
Installing SAP ASE
P U B L I C © 2015 SAP SE or an SAP affiliate company. All rights reserved. 37