Application Bulletin
4 1 7 0 1 2 3
Using StrataLink for CTI Connections
This bulletin provides important general information on StrataLink and how it operates. For specific instructions on using StrataLink with a given software application, see the Application Notes for that software.
Many Microsoft® Windows®-based Computer Telephony software products either do not have
a TAPI compliant version of their product, or need the additional capabilities of a “middleware” software to use their software with the Strata DK.
StrataLink is a “middleware” application that provides the multiple line and translation functions for non-TAPI software applications. StrataLink provides the flexibility to interface multiple applications and to be able to define the actions desired for each button on the connected phone.
StrataLink works with Toshiba’s TAPI Service Provider (TSPI) v2.26 or higher. Both the TAPI Service Provider and the StrataLink application are included on the TAPI installation disks. Either TSPI, StrataLink, or both can be installed. The installation program selects the appropriate TAPI Service Provider for the PC’s operating system.
StrataLink Operation
StrataLink communicates with software applications using Microsoft Windows Open System Architecture capabilities for Dynamic Data Exchange (DDE). The specific messages are defined as Actions in StrataLink. StrataLink contains a number of Actions for popular applications. The user can select from this list or define new Actions for an application. StrataLink also accepts DDE Execute commands. These commands enable dialing calls, answering calls, holding calls, blind transfer of calls, and hanging up. Many of these commands can be directed to specific telephone buttons or the TSPI can choose the button. When using this interface for dialing, StrataLink also provides for button preferences to be used for intercom, local, or long distance calls. It can include prefix digits prior to dialing the number and automatically insert a “1,” if required for long distance calling.
Incoming calls are based upon events from the TAPI Service Provider. These events (Call Ringing, Call Connected, Call Hold, Call Cleared) are used in the Triggering Rules that define what Actions are needed and when. Filters can be used to qualify when an action should be taken.
P
re
lim
in
ary
a
n
d
Co
n
fi
d
en
ti
al
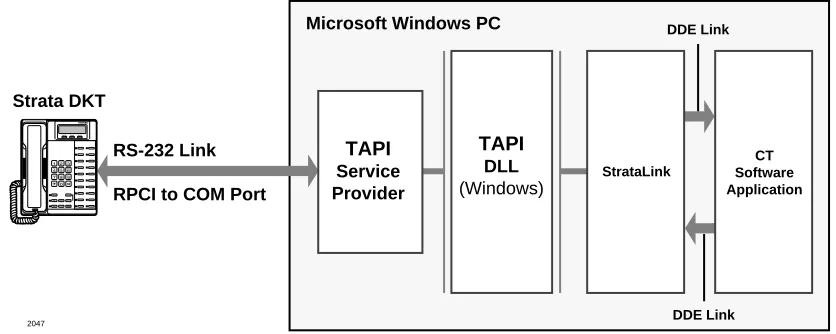
Figure 1 shows how StrataLink is used with Windows applications to provide telephone services with your desktop PC.
Figure 1 Computer Telephony Connection Using Toshiba’s StrataLink
StrataLink has three basic functions. It:
♦ Accepts events from the telephone, applies filtering rules and conditions, and causes actions to take place in the application
♦ Provides for outbound calling and call control from the application
♦ Provides tools for testing the interface and debugging or monitoring the call events
Incoming Call Events
Using Windows TAPI, StrataLink accepts the Strata DK commands and provides a selection of Actions based upon call events (Triggers). Each Trigger can have one or more conditions applied to control how, when, or if the Action should be performed. Each Action has a set of parameters that can customize the application for the user. A list of Trigger events can be created for the desired Action.
Provides Outbound Calling and Call Control
The Computer Telephony Software creates events for controlling the telephone. The events are controlled using DDE exchanges originating from the application and received by StrataLink. In some programs, the application software must be configured for this operation.
Tests, Debugs, and Monitors
StrataLink provides several important testing and debugging functions. These tools enable the installer to verify whether the link is functional. The installer can also use the TAPI link to view the details of the information being passed. These tools reduce the guesswork in the troubleshooting and operation verification.
2047
Microsoft Windows PC
DDE Link DDE Link
TAPI
Service Provider
TAPI
DLL (Windows)
StrataLink
CT Software Application
Strata DKT
RS-232 Link
P
re
lim
in
ary
a
n
d
Co
n
fi
d
en
ti
al
Starting StrataLink
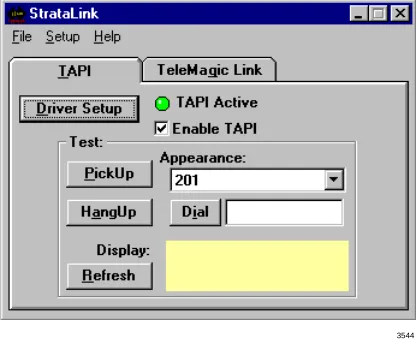
The Main Screen for StrataLink is shown in Figure 2. This screen provides access to the main menu, driver setup, the ability to enable/disable the TAPI link, and a testing interface with the telephone. Most Setup items are located under Setup item from the Main Menu.
Figure 2 StrataLink Main Screen
➤
To install and set up StrataLink1. Load the software by inserting Disk 1 in the floppy disk drive, and from Windows, selecting Run… and entering A:\Setup.exe.
2. Follow the instructions for installation.
3. Start StrataLink, enable TAPI and wait for the green light which indicates that a communication link with the TAPI Service Provider was successful.
4. Press Driver Setup to configure the driver if not previously done as part of the installation. The Driver Setup selects the COM port, system type, and key definitions for the connected phone. Be sure to assign meaningful labels for the keys on the phone as these will be used for creating the Triggering Rules.
5. Test the link with the phone using the Test section. Select the button to place a call, enter a number to dial and press Dial.
6. Once the link has been established with the phone, go to Setup to establish the Preferences, add or edit any new Actions.
Note Actions can be tested using the Add/Edit Action and Show Test Params button. 7. Create Trigger Rules using the events expected from the phone and the desired action. 8. Make several test calls to verify all the pieces are working and the installation is complete.
Preferences
Most application programs when attempting to dial using a DDE command are not able to specify the line appearance for the call. A line appearance must be specified and can be different for different types of calls. These types of calls are:
♦ Intercom Calls – dialing numbers with less than five digits.
♦ Local Calls – calls that match the local area code specified or calls with only seven digits.
P
re
lim
in
ary
a
n
d
Co
n
fi
d
en
ti
al
♦ Long Distance Calls – any call with 10 or more digits (also indicate if a “1” needs to be
added when missing).
When an Intercom or [PDN] button is used to initiate calls, a prefix code is required to select an outside line. Local and Long Distance calls have provisions for prefix digits to be dialed prior to the number received from the software application.
Applications using DDE messages generally will dial the area code of the telephone number even if it is a local call. By assigning a Local Area Code, StrataLink detects these calls, strips off the Area Code of the telephone number, and dials using the “Local” appearance.
For example, if your Local Area Code is “714” and the application attempts to dial “714-515-1234,” the program converts the number to “515-1234” before dialing.
It may be convenient to record a person’s extension number as part of the telephone number. When dialed the 10 digit number is sent along with the extension number. As long as the number is stored using any letter, such as “x,” all digits following will not be dialed, e.g. “714-515-1234 x205” will be dialed as ““714-515-1234”.
Some databases may not include a “1” as part of the dialed number. StrataLink can optionally insert this missing digit by using the option “Add 1+ if Missing”. For example, if the
application attempts to dial a long distance call like “612-555-1234” (and your Local Area Code is “714”), this option converts the number to “1-612-555-1234” before dialing.
Incoming calls with Caller ID need to have the telephone number in a specific format for the lookup function to work. Caller ID and ANI numbers are received from the telephone network as 10 digits. Many databases store the numbers in a more readable format using punctuation formats by inserting hyphens, parenthesis, and spaces.
StrataLink provides a method for defining the format to present this number to the software application. Any character other than “x” will be included as part of the number, where “x” will be replaced with the number received as part of Caller ID.
For example, if the international number plan is needed for the number, then a code for &H of “1+(xxx) xxx-xxxx” will be entered. When a number “6125551234” is received, it will be presented as “1+(612) 555-1234”.
Figure 3 Preferences Dialog Box
P
re
lim
in
ary
a
n
d
Co
n
fi
d
en
ti
al
DDE Commands
StrataLink accepts a number of DDE commands for controlling calls. StrataLink, wherever necessary, offers more than one format for each command. The commands supported include Dial, Answer, Hangup, Transfer, and Hold/Unhold.
Dial
Dial a telephone number on the specified line appearance. If the line appearance is not specified, the lowest button appearance (Intercom, Local, or Long
Distance) is used.
[Dial, “Phone Number”, <appearance>]
...or [DialNumber (“Button Name”, “Outside Phone Number”)]
Answer
Answer a Ringing Call on the specified line appearance. If the line appearance is not specified, the lowest appearance is used.
[Answer, <appearance>]
...or [AnswerCall ( )]
Hangup
Hangup on a active call.
[Hangup]
...or [DropCall ( )]
Hold To hold the active call. [Hold]
Unhold
Retrieving a call from Hold. If the “appearance” isn’t specified, the lowest button number with a holding line is answered.
[UnHold, <appearance>]
Transfer
Blind transfer a call to the designated number
[Xfr, "Ext Number"]
…or Transfer, "Ext Number"]
Quit Terminates the OA Client program. [Quit]
P
re
lim
in
ary
a
n
d
Co
n
fi
d
en
ti
al
Telephone System Events
Trigger Rules and Conditions
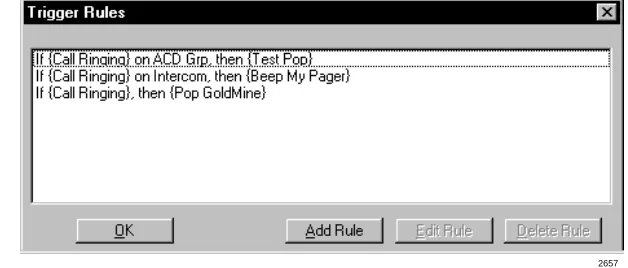
The Trigger Rules are established by the installer or user so that specific Actions can be performed when an event occurs. The Triggering event can be any number of things (e.g., Call Ringing, Call Connected, Call Holding, or Call Cleared). See Figure 4.
Figure 4 Trigger Rules
The existing Trigger Rules can be displayed, edited, deleted or new rules can be added. Multiple rules can be created and active at the same time.
Each rule uses the names assigned in the TAPI Service Provider to determine their application to a given event. Buttons with the same name use the same rule written for that name. For example, creating a Triggering Rule for “Call Ringing” on a [PDN] with multiple appearances can be written to apply only to the PDN name, such as “3351.”
Specific [PDNs] can be labeled for “Call Ringing,” while other appearances may require a screen pop whenever a call is connected. These other appearances could have the rule “Call Connected” using <any> button. This prevents screen pops for calls which are directly ringing a particular telephone button, while providing screen pops when a call is answered on another button on the phone.
Add/Change a Trigger Rule
When adding or changing a rule, Filters and Conditions fields display on the Add/Change Trigger Rule screen:
Figure 5 Add/Change Trigger Rule
2657
P
re
lim
in
ary
a
n
d
Co
n
fi
d
en
ti
al
Filters
When the triggering event occurs, it may need to pass specific filters or conditions before the Action is performed. The Filters are shown in Figure 5 and described below:
♦ Caller ID – required/not required. If there is no Caller ID associated with a call, you may
not want to have an Action performed. The most common example is “Screen Pop” where you may select “any Number” to not perform the action until a Caller ID number has been received. To trigger an event anytime a call rings, regardless of whether Caller ID is present, you need select “none Required.”
♦ Trigger Delay – a short delay, expressed in tenths of a second, that will occur prior to the
action. The delay is needed to allow the Caller ID or other information to be received prior to performing the action.
♦ Appearance – the Trigger can be used on any line or a specific line. If the same Trigger
applies to some lines but not to others, the rule must be entered for each line to which the rule applies. Buttons having the same name need only one rule, e.g., two buttons labeled 205 would have the same action whenever either ring when a Trigger Rule for Call Ringing is created for appearance 205.
Conditions
Conditions (i.e., Phone State, shown in Figure 5) include performing the action “if not talking” or “if trunk number is available.” You may not want to have an Action performed while you are talking on a call. Again, a common example is to screen pop only “If Not Talking”. This prevents an Action from occurring until you are finished with the call or placed it on hold.
Actions and Parameters
Actions are set up by the installer to perform a specific function (e.g., Screen Pop Goldmine, Pop Telemagic, or Beep My Pager). These Actions can then be used as part of a Trigger Rule and performed when a specific event occurs. The existing Actions can be displayed (Figure 6), edited, deleted or new Actions added.
Figure 6 Add/Change Actions
Important! Deleting or adding Actions without instructions from Toshiba or knowledge of your program’s DDE commands is not recommended. Toshiba supports editing actions that are based on Application Notes.
P
re
lim
in
ary
a
n
d
Co
n
fi
d
en
ti
al
Add/Edit Action
When adding or editing an Action, the following fields are displayed (see Figure 7 and the following text):
Figure 7 Add/Edit Actions
Important! Changes to these items without specific instructions in the program’s Application Notes is not supported by Toshiba.
Action Name – Every event Action has a “Name” that you should set to describe the result the
action, such as “Beep My Pager.” This name is used in the Trigger Rules.
Type – Select the Action to be performed from the pull-down menu. Each Action has one or
more parameters that must be provided by the user/installer. These parameters often contain “tokens” that enable the inclusion of real-time information (e.g., Caller Phone Number, Date, Time, etc.). The choices are as follows:
♦ DDE Execute – Sends a specific DDE command to the program you specify. This Action
is very flexible and can be used to communicate with many different types of programs for a variety of purposes (e.g., Screen Pop). DDE Execute String parameters include:
♦ App Name – Used to set the DDE name of the application to receive the DDE event.
♦ App Topic – Used to set the DDE “Topic” for the application to receive the DDE
event.
♦ DDE Execute String – This is the command executed by the application receiving
this DDE event. Typically this command includes token(s) so that real-time information is included in the command string.
♦ Show/Hide Test Params Button – When you set up an Action, it is always a good idea to
make sure the Action works correctly. The Show Test Params button exposes a set of parameters (e.g., Calling Phone Number and Calling Name) that can be changed for verifying the action defined.
➤ To execute the command, press the Do Test button.
P
re
lim
in
ary
a
n
d
Co
n
fi
d
en
ti
al
Some parameters contain token(s) that enable the inclusion of real-time information (like the Caller Phone Number, Date, Time, etc.). The Tokens are described in Table 1.
Table 1 Tokens
Note The format is defined using the Preferences dialog box.
TeleMagic Link
The TeleMagic program (from Telemagic, Inc.) communicates with StrataLink via a special link called TeleMagic. The TeleMagic Link appears automatically each time StrataLink is accessed and provides a means to set up and monitor communication between the two programs.
Important! For this link to operate, the TeleMagic program must be loaded and operational.
If you select Auto Activate Link (see Figure 8), StrataLink automatically attempts to establish the TeleMagic link periodically (every 30 seconds or so) until the connection is made. Once the link is established, the Link Active light changes from Red to Green, dialing and Screen-Pop can function. For Screen-Screen-Pop to work, the appropriate Trigger Rules must be set up.
Token Function
&P Caller Phone Number: Unformatted
&H Caller Phone Number: Formatted 714-555-12341
&I Caller Phone Number: Formatted (714)555-12341
&N Caller Name
&L Elapsed Time of Call (Seconds)
&C TAPI Call ID
&R Trunk (CO Line) Number
&E Called Phone Number (DNIS)
&F Called Name (DNIS Tag)
&A Phone Button Number
&B Phone Button Name
&D Date: MM:DD:YY
P
re
lim
in
ary
a
n
d
Co
n
fi
d
en
ti
al
Figure 8 Telemagic Link
Pop TeleMagic
This instruction sends a “Pop” or “LookUp” command to TeleMagic with the configuration you specify. This is used to Screen-Pop the TeleMagic contact manager when a call rings in. Pop TeleMagic parameters are:
♦ Index Level – Tells TeleMagic the level on which to perform the search (e.g., 1, 2, 3, etc.).
Leaving this parameter blank causes the search to occur on the level in present use.
♦ Index Name – Selects the TeleMagic index to be used for the search. For Screen Pop this
is typically “TelePhone #”, but since the Indexes within TeleMagic are programmable, this could be set to any appropriate index. The TeleMagic Link must be operational before you can make this selection.
♦ Search String – This should be set to whatever string should be searched for using the
above two parameters. For Screen Pop, this is typically the Calling Phone number which would be the token &P.
Testing TSPI Link
The TAPI dialog box provides a method for verifying the TAPI Driver is setup and
operational. To check the driver, select an appearance (e.g., Intercom) and click on each of the Pickup, Dial, and Hangup keys individually. To complete the test, you should repeat this procedure for each line appearance.
To access the setup screen for the Toshiba TAPI Service Provider, click on the Driver Setup button. The Configure Keys section of the screen should be programmed properly as they will be interrogated and used as the Appearances by StrataLink. Whenever you make configuration changes to the TAPI Service Provider, it is recommended that you exit and restart StrataLink.
P
re
lim
in
ary
a
n
d
Co
n
fi
d
en
ti
al
The Display section on the screen is the display found on the phone. This information is not normally shown and can be activated by pressing Alt+O.
Figure 9 StrataLink Main Screen
Show Events
♦ Show Events menu item– opens a Debug Events screen which shows real-time events as they occur. The Display option enables you to choose which event you will monitor.
Figure 10 Debug Events ScreenTelephone System Events
♦ Show Calls menu item – displays the Active Call Queue window, which can be kept open while other activities and functions are performed
3544
3541