Software for Calculating Anthropometry
Version 1.02, Y2K Compliant29 June 1999
Developed by Kevin M. Sullivan, PhD, and Jonathan Gorstein, PhD For the
Division of Nutrition and Physical Activity
National Center for Chronic Disease Prevention and Health Promotion Centers for Disease Control and Prevention
USA and the
Department of Nutrition for Health and Development World Health Organization
Geneva, Switzerland
Distribution Conditions
Nonwarranty. ANTHRO is provided "as is" and without any warranty expressed or implied. The user assumes all risk of the use of ANTHRO. ANTHRO may not run on your particular hardware/software configuration. We bear no responsibility for any mishap or economic loss resulting from the use of this software.
Copyright Conditions. You may make and distribute copies of ANTHRO provided that there is no material gain involved.
Use at your own risk. All risk of any kind due to the use of ANTHRO is with you, the user. You are responsible for all mishaps, even if the program proves to be defective.
Other Information
dBASE III Plus is a trademark of Ashton Tate, Clipper is a trademark of Nantucket, Inc., MS-DOS and Windows are registered trademark of Microsoft Corporation,, and SAS is a trademark of the SAS Institute, Inc.
This program uses the Superfunction Library for some of its routines.
For further information concerning ANTHRO, please contact: Division of Nutrition and Physical Activity
National Center for Chronic Disease Prevention and Health Promotion Centers for Disease Control and Prevention
4770 Buford Highway, MS K25 Atlanta, GA 30341 www.cdc.gov/nccdphp/dnpa/
or
Department of Nutrition for Health and Development World Health Organization
1211 Geneva 27 Switzerland
www.who.int/nutgrowthdb
Acknowledgments
We would like to thank the many individuals who have assisted in testing this software and who have provided valuable suggestions. Particular thanks go to Norman Staehling, MS, and Eddas Bennett, MPH, CDC, for their assistance in the development and verification of the accuracy of the dBase anthropometric subroutine, and to Byron Breedlove, CDC, for editorial assistance with the ANTHRO documentation. Thanks Alberto Pradilla, MD (formerly of WHO), Frederick Trowbridge, MD (formerly of CDC), and Ronald Fichtner, PhD (CDC) for their encouragement and support of this endeavor for the development of Anthro; and to Laurence Grummer-Strawn, PhD (CDC), Monika Blössner, MS (WHO), Mercedes de Onis, MD (WHO), and Sandy Jewell, MS (CDC) for their input into the update of the Y2K compliant version of ANTHRO.
Table of Contents
What is ANTHRO? . . . . 1
ANTHRO Software and Hardware Requirements. . . 1
ANTHRO Files . . . 1
A General Reminder on Backing Up Files . . . . 1
Getting started . . . 1
Backing Anthro Up Disk . . . 1
Before You Start ANTHRO . . . 2
Copying ANTHRO to a Hard Disk . . . 3
Starting ANTHRO from a Hard Disk . . . 3
How to Use This Handbook . . . 4
Notation . . . 4
Outputting ANTHRO Results. . . 5
Limitations of NCHS/CDC/WHO Reference . . . 6
Setup . . . . 6
Main Menu . . . 10
Process dBase File . . . 10
1. Process new file . . . 10
2. Reprocess file . . . 14 3. Edit template . . . 15 Standard Analysis . . . 16 4. Prevalence/Age . . . 16 5. Z-score . . . 21 6. Centiles . . . 22 Other . . . . 23 7. Browse . . . 23 8. Edit . . . 24 9. Import file . . . 24 10. Export file . . . 27 11. Anthropometric Calculator . . . 28 12. DOS shell . . . 30 13. Setup . . . 30
14. Description of Edit Flags . . . 30
99. Exit . . . 33
Other Software for Anthropometric Calculations . . . . . 33
Other Information on the Development, Use, and Interpretation of Data . 33 Trouble Shooting . . . 34
History of ANTHRO . . . 35
What is ANTHRO?
The ANTHRO software package was developed for calculating the WHO/CDC anthropometric indices with dBase files on IBM-compatible microcomputers. The indices can be calculated in a batch processing or calculator mode. ANTHRO also has the ability to perform some standard data analyses. Data can be imported from or exported from or to either fixed-column or comma-delimited files.
ANTHRO Software and Hardware Requirements
ANTHRO is written in dBASE III Plus and compiled using Clipper (Summer '87 version). The compiled program file is a "stand alone" executable file. Thus, to use ANTHRO, you do not need to have dBASE or Clipper. You do need PC/MS-DOS Version 2.1 or greater or Windows 3.x/95/98/NT/2000. For those not running Windows, you need to assure that there is a CONFIG.SYS file containing certain information. See the "Before You Start" section for details concerning the CONFIG.SYS file. ANTHRO operates on IBM compatible microcomputers with at least 640K of Random Access Memory (RAM).
ANTHRO Files
The files ANTHRO needs to run correctly, which can fit on a single 3.5 inch disk, are below:
* ANTHRO.EXE DOS executable program
* ANTHTEMP.TDB File for storing user-specific information * ANTHCALC.TDB File for storing user-specific information * NUT.DBF Example dBase file
* SETUP.TDB File for storing user-specific information * SNIPPER.COM File for printing screens in DOS
A General Reminder on Backing Up Files
The concept of backup files is not specific to ANTHRO. It is important to back up working files on a regular basis. The method used to back up files depends on the specific hardware and software configuration that you are using (such as tape backup, floppy disk backup, etc.). Because of the large number of hardware and software configurations available for backing up information, we cannot provide a complete discussion here. Consult your DOS or Windows documentation regarding how to backup and restore files.
Getting Started
Backing up ANTHRO disk
We recommend you make a backup of the ANTHRO disk in case you lose or damage the original disk. You will need to have a blank or formatted high-density floppy disk. For the instructions below we assume that you will back up the ANTHRO disk from drive A.
In DOS:
1. Put the ANTHRO disk in drive A and type the following:
diskcopy a:*.* a: <ENTER>
2. You will be instructed to insert the "source" disk (which in this case is the original ANTHRO disk) in Drive A and to press the enter to continue:
<ENTER>
3. After a minute or so, you will be instructed to remove the original disk and insert the "target" disk (that is, the blank or formatted disk) into the drive and to press the enter key.
<ENTER>
4. Label the backup disk. Store the original ANTHRO disk in a safe place.
In Windows:
You could use Windows Explorer to copy the files.
Before you start ANTHRO (DOS-users only)
For those not using Windows, to use ANTHRO you will need to make sure that you have a file called CONFIG.SYS in the root directory of the hard disk, or, if you turn on the computer with a floppy disk in drive A, on the "boot" disk. The contents of this file must contain the following statements:
FILES=20 BUFFERS=8
If you already have a CONFIG.SYS file, those statements should be added to the file if they are not already present. The number of files and buffers listed above (20 and 8, respectively) are a
minimum number. For your particular computer system configuration, you may specify more
files or buffers, but not fewer. If you already have a CONFIG.SYS file that does not have the appropriate FILES and BUFFERS statement, edit the CONFIG.SYS file and make the appropriate changes. Please consult your DOS manual for further information concerning CONFIG.SYS files and how to edit them.
How can you tell if you have a CONFIG.SYS file? Turn on your computer, and make sure you are in the root directory (assuming you have a hard disk) by entering:
CD/ <ENTER>
Next, type:
If you have a CONFIG.SYS file, you will be shown the size (in kilobytes) and date of the file. To see the contents of the CONFIG.SYS file, type:
TYPE CONFIG.SYS <ENTER>
If you do not have a CONFIG.SYS file, a message will be displayed on the screen saying "File not found." You will need to create one and place the two commands listed previously above in the file. Consult your DOS manual for further details.
Copying ANTHRO to a hard disk
In DOS or from within a DOS window in Windows:
Follow these steps to copy ANTHRO onto a hard disk. For this example, we are assuming the floppy disk drive is drive A: and the hard disk drive is drive C:.
1. Use the DOS MD command to make a directory for ANTHRO as follows:
md\ANTHRO <ENTER>
2. Now move to the ANTHRO directory by typing:
cd\ANTHRO <ENTER>
3. Place the ANTHRO disk in drive A. To copy the files from the floppy to the hard disk, type:
COPY A:*.* c:\ANTHRO <ENTER>
To return to the root directory from the ANTHRO directory, type:
cd\ <ENTER>
For Windows users:
You could use the Windows Explorer program to create a new folder on Drive C: called “ANTHRO” and then copy all of the files from the floppy disk to the folder.
Starting ANTHRO from a hard disk
In DOS or from within a DOS window in Windows:
After you have installed the ANTHRO programs onto your hard disk, to start ANTHRO, after you have turned on the computer, type:
This will move you to the ANTHRO subdirectory. To start ANTHRO, enter “ANTHRO” at the DOS prompt.
From Windows 95/98/NT/2000:
From Windows Explorer, you can open the ANTHRO folder and then click on ANTHRO.EXE.
How To Use This Handbook
To become proficient in the use of ANTHRO, we recommend that you follow the examples in this documentation. Step-by-step examples are provided for each of the ANTHRO modules so that you can follow along on a computer. Some users will need to use only certain ANTHRO modules.
Also, to exit a module, at most requests for input, entering a '^' (by pressing the shift and the number 6 key located above the regular keys) will return you to the previous menu.
Notation
The following notation will be used in this handbook:
<drive>: refers to the disk drive where a program or data file can be found. For those with a
hard disk, this will usually be:
C:
For those using ANTHRO with floppy disks, this may be:
A: or B:
depending on where the program or data files are located.
<any key> means to press any key <backspace> refers to the backspace key <Esc> refers to the Escape key
<Prt Scr> refers to the Print Screen key
<ENTER> refers to the Return or Enter key. This means to press this key once. DOS is the abbreviation for Disk Operating System
[ ] When you see brackets in the handbook, you should type the contents within the bracket. For
For the anthropometric indices, we will use the following abbreviations:
Indices Z-scores Percentiles Percent of Median
Weight-for-Height (W/H) WHZ WHP WHM
Height-for-Age (H/A) HAZ HAP HAM
Weight-for-Age (W/A) WAZ WAP WAM
The terms standard deviation score (SD) and Z-score will be used interchangeably, as will centile and percentile.
Outputting ANTHRO Results
In DOS:
If you have a printer attached to your computer, you can press the <Prt Scr> key to print the screen information. A utility included with ANTHRO allows you to copy screen information to either a printer or disk file. The program, called SNIPPER, is a memory resident program that takes up about 4K of RAM. To use this program, before getting into ANTHRO, move to the ANTHRO subdirectory and enter:
SNIPPER <ENTER>
A message will appear at the top of the screen, which will look like this:
SNIPPER 1.2 (c) 1987 Ziff Communications Co. PC Magazine _ Tom Kihlken
Hotkey is ALT-0
This utility will be especially useful in the Standard Analysis module. To use SNIPPER, when you get to a screen that you want to print or save to a file, simultaneously press the <ALT> and 0 (zero) keys. A nonblinking block cursor will appear at the top of the screen. You need to identify the part of the screen to print/save. Use the cursors to move the block to where you would like to begin and press the <ENTER> key. Use the cursor keys to reverse video the area of the screen of interest. Once you are finished, press the <ENTER> key again. A menu will appear in the upper left corner of the screen. The primary options are to send the identified area on the screen to the printer or a file. If you want to send it to a file, you will be requested to provide a file name (the default name is SCREEN.CUT).
In Windows:
To print a screen in ANTHRO from within Windows, it is recommended that you first copy the screen to a Window’s program, such as Word or WordPerfect, and then print from that program. To do this, first make sure you have ANTHRO in Window’s full screen mode (toggle between the window and full screen mode by pressing <Ctrl><Enter>). Then, press <Shift><PrtScr> to copy the screen. Open the Window’s program you will print from, and select Edit -> Paste in that program. The ANTHRO screen image should be pasted into the Windows program. Then print from that program.
Limitations of CDC/WHO Reference
The WHO/CDC International Growth Reference is for the calculation of weight-for-height (W/H), height-for-age (H/A) and weight-for-age (W/A). H/A and W/A indices can be calculated for individuals up to 18 years of age. W/H indices are calculated for male children through 138 months of age and less than 145 cm, and female children through 120 months of age and less than 137 cm. For children less than two years of age, recumbent length measurements are assumed. For children two years of age and older a standing height is assumed. W/H will not be calculated for children less than 49 cm (but the program will calculate H/A).
Setup
One of the first things you will probably want to do is customize ANTHRO for your particular use. There are a number of settings that you can modify. These settings can be found in the SETUP module. To get to the SETUP menu, start ANTHRO and at the main menu select option [13] ("Setup"). The Setup menu will appear. Each of the Setup menu items are discussed below.
Global Configuration: These are settings that affect two or more modules within ANTHRO.
1. Language. You can select ANTHRO to run in English (option 1), French (option 2), or
Spanish (option 3). After making your selection you will be returned to the Setup menu.
2. Date Format. The user can select one of five different date formats: American
(mm/dd/yyyy), ANSI (yyyy.mm.dd), British (dd/mm/yyyy), Italian (dd-mm-yyyy), and German (dd.mm.yyyy), which are options 1-5, respectively. Select the date option that best meets your needs. The date format selected will be used in certain screens where the current date is shown, and also in the Anthropometric Calculator, Browse, and Edit modules.
3. Screen Colors. You can select one of several different screen colors. The different screen
color options are shown by background color and the foreground colors in low intensity and high intensity. For those using monochrome screens, color option '1' would probably be the most suitable.
4. Path. You can select the path for ANTHRO to search for dBase files (i.e., files with the
.DBF extension). For instance, if you set the path to drive 'A:', when calling up a dBase file, ANTHRO will search the drive/path where ANTHRO is located and also the additional drive/path you have entered in the Setup menu. Please note that in the modules where a listing of the dBase files is provided, only the dBase files on the same drive/path as ANTHRO are shown.
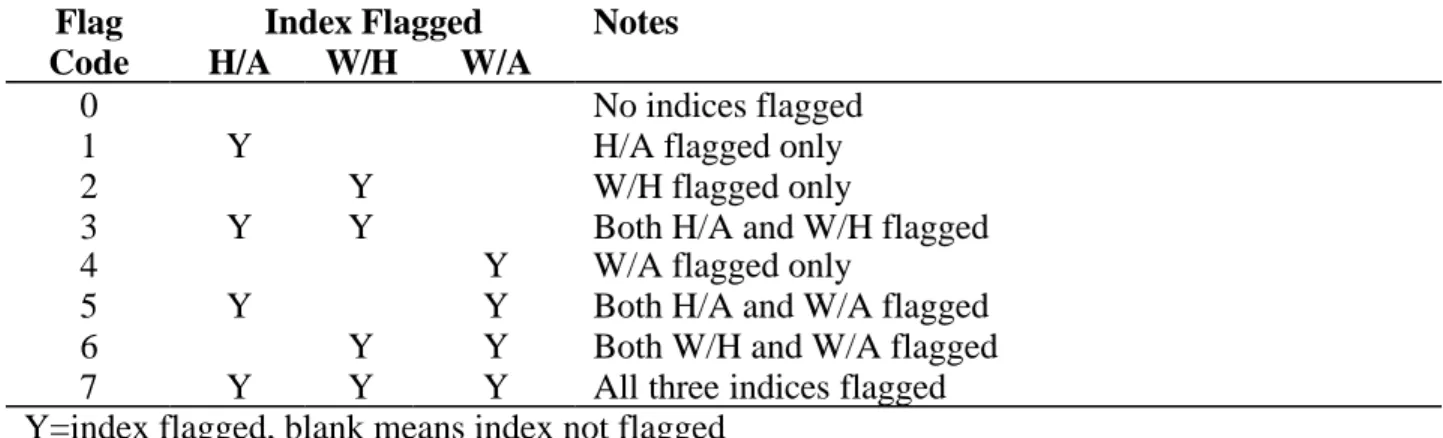
5. Edit flag criteria. ANTHRO has an edit flag mechanism to identify records where the data
are either incorrect, incomplete, or have extremely low or high weights, heights, or both. Selecting option [5] from the Setup menu will bring up a screen depicting the edit flag criteria. You can select the upper and lower Z-score limits for H/A (HAZ), W/H (WHZ), and W/A
(WAZ). In addition, there are three other flag criteria that are described in more detail in subsequent sections.
The default settings for flagging records based on extreme Z-score values are -6 and +6 for HAZ and WAZ, and -4 and +6 for WHZ. For instance, if a child's record has a WHZ of -6.2, this would be outside the minimum Z-score value for WHZ and the record would be flagged. The flag indicates that the data are either incorrect or, in this example, the child may be extremely "wasted" or "thin."
In most situations you should not need to change the default Z-score limits, although in some extreme situations you may want to select some other limits.
The other three optional flags (all relating to Z-scores) are
HAZ and WAZ > 3.09 or
HAZ and WAZ < -3.09
If age is entered incorrectly (e.g. 1 month of age rather than 10 months of age), this error would result in both HAZ and WAZ having moderately to extreme Z-scores in the same direction. The default setting for this flag is [N]o, i.e., records will not be flagged if they meet these criteria.
WHZ and WAZ > 3.09 or
WHZ and WAZ < -3.09
If weight is entered incorrectly (e.g., 3.4 kgs entered rather than 4.3 kgs), both WHZ and WAZ could have moderate to extreme Z-scores in the same direction. The default setting for this flag is [N]o.
HAZ >3.09 and WHZ <-3.09 or
HAZ <-3.09 and WHZ >3.09
Finally, if height is entered incorrectly, this would effect the HAZ and WHZ measures. For example, if height was entered as 66 cms rather than 56 cms, this error would make HAZ higher and WHZ lower than they should actually be. The default setting is [Y]es, i.e., and records meeting the just stated criterion will be flagged.
The default settings mentioned above are the same as those in the software packages Epi Info Versions 5 and 6 (Dean et al., 1995), and CASP (CDC Anthropometric Software Package). In a more recent publication (Report of a WHO Expert Committee, 1995), two recommendations on exclusion criteria, based on Z-scores, were provided. One, called the flexible exclusion range, is where the mean Z-score is first calculated for a population, and then the extremes are +4 SD units from the mean. Another criteria called the fixed exclusion range was considered suitable when the observed mean Z-score is above –1.5: HAZ < -5 and > +3; WHZ < -4 and >+5; and WAZ <-5 and >+5.
Edit flags are determined in the processing of dBase files and in using the Anthropometric Calculator. They also are used in the Standard Analysis section where flagged records are
excluded from analyses. For more information on edit flags, please see the Description of Edit Flags section on page 28.
Batch Configuration: There are three Setup options that are specific to the dBase file
batch/processing modules.
6. Skip U.S. Measurements: When processing a dBase file to have the anthropometric
calculations performed, you are requested to provide the dBase field numbers for weight and height information. Weight can be provided in metric units (kilograms), U.S. units (pounds, quarter pounds, or ounces), or both. Height information can be provided in metric units (centimeters), U.S. units (feet, inches, or 1/8th inches), or both. If you using exclusively metric measurements for weight and height, you can skip the U.S. measurements by having this option set to [Y], i.e., to skip the requests for the field numbers of the U.S. measurements. This option is also briefly discussed in the Processing dBase files section.
7. Fast Mode Processing: In processing dBase files, you can choose two modes, fast or slow.
If you select the slow process mode, as each record is processed, the record number, sex, age, weight (in kgs), height (in cms), anthropometry data, and edit flag (if any) are shown on the screen. In the fast mode, only the record number is displayed on the screen. In general, the fast mode processing is only about 5% faster than the slow mode.
8. Decimal places implied: Usually when using dBase files, numeric fields include the decimal
place. However, occasionally the decimal place is not included, for example, if a child's weight is 3.1 kgs, it may have been entered as 31. If the data have been entered without the decimal place, you must tell ANTHRO this for the program to compute the anthropometry correctly. If age in months, weight in kilograms, or height in centimeters is in the database without decimal places, answer [Y]es to the question "Decimal places implied?". (To determine whether or not your data has decimal places, use the Browse feature in ANTHRO (described on page 16) to look at your data. If in the Browse feature the decimal place is in the field, then you do not need to worry about specifying the number of decimals. If there are no decimal places, then there is a need to specify decimal places.
When this question is set to [Y]es, when processing a file, you will be prompted for the necessary number of decimal places for age in months, weight in kilograms, and height in centimeters. (This version of ANTHRO does not allow for the input of decimal places for any other variables. If you have a need for this option with other variables, please notify either CDC or WHO.) For example, when you are prompted for the field number for weight in kilograms, the next prompt will be for the number of decimal places. The number of decimal places can be zero (which means not to imply any decimal places) to five decimal places (i.e., 345321 would be interpreted as 3.45321).
Anthropometric Calculator Configuration: This section refers to setup options that are
specific to the Anthropometric Calculator module. This module is where age, sex, weight, and height values are entered and the anthropometric indices are presented in an interactive manner. The Anthropometric Calculator module is discussed in detail on page 16. In general, you can customize the Calculator module for your own particular application. You can select the use of dates, age in years, age in months, and the units of weight and height. For each option, [Y]es means to present the option to the screen, and [N]o means to not request the information on the screen.
10. Age in years? By default, age in years is presented as missing (999.99).
11. Age in months? By default, presented as missing (999.99). When both age in years and months are presented, values in these fields are added together to determine age, e.g., one year and six months would be converted to 18 months.
12. Weight in kilograms?
13. Weight in pounds?
14. Weight in ounces? Only displayed if weight in pounds is present. Pounds and ounces are added together to determine weight.
15. Weight in quarter pounds? Only displayed if pounds is present. Pounds and quarter pounds are added together. Please note that you have the option of either ounces or quarter pounds, but not both.
16. Height in centimeters?
17. Height in feet?
18. Height in inches?
19. Height in eighth inches? Only presented if height in inches is present.
The U.S. height measurements are added together to determine height.
If two dates and age in either year, months, or both are present, the calculated age from the two dates is used. If weight in metric and U.S. is present, the metric measurements will be used. Similarly, if height is present in metric and U.S., the metric will be used.
Main Menu
This section describes each of the options on the main menu and provides an example in several of the options.
Process dBase File
Options 1, 2, and 3 from the Main Menu are for batch processing of dBase files. In general, you have a dBase file that includes information on sex, age (or birth date and date of measurements), weight, and height for a number of children, and you want to have the anthropometric indices (H/A, W/H, and W/A) calculated. Age, weight, and height measurements must be in numeric fields, dates in date fields, and sex in either a numeric or character field. If you do not have a dBase file, you will need to import the file and create a dBase file before you can process it (see the Import section on page 24 for more information).
1. Process dBase file
In this section a step-by-step example is followed by a more detailed discussion of processing dBase files.
Example of Process new file
This example assumes that the "Skip U.S. measurements" from the Setup menu is set to [Y]es. Select option 1 from the Main Menu ("Process new file").
1 <ENTER>
We will use the example database provided with ANTHRO called NUT. When the prompt says "Enter dBase file name ..." enter:
NUT <ENTER>
There are six fields in NUT: SEX, HT_CM, WT_KG, DBIRTH, DSURVEY, and AREA. Also notice the number in front of each field. This is the field number. The letter after the field name is the type of field (N=Numeric, C=Character, or D=Date). You are first requested to enter the field number for the Date of Birth, which is field number 4, DBIRTH. Enter:
4 <ENTER>
For date of visit/measurement:
5 <ENTER>
There are no fields for age in years or age in months, so enter a zero (which means the database does not have these fields, the default setting) by pressing the enter key once for age in years then once again for age in months:
<ENTER> <ENTER>
Next the field number for sex is requested, which is field number 1:
1 <ENTER>
Sex is a character field and is coded as M=male and F=female, so at the next prompt enter:
C <ENTER>
For weight in kilograms:
3 <ENTER>
and height in centimeters:
2 <ENTER>
Next the Field Descriptions, Field Names, and sex coding scheme selected are presented. If you made a mistake entering the field numbers, when asked if the information is correct, say [N]o by entering:
N <ENTER>
You are then able to make the appropriate changes. If the information is correct, the default answer is [Y]es, so just press the enter key:
<ENTER>
The next screen displays the anthropometry-related fields by whether or not they are (or should be) included in the database and by their default names. For this example, we will want to change one of the default settings. Therefore enter:
N <ENTER>
The fields in screen will become reverse video (dark letters on a lighter colored background). Press the <ENTER> key several times to move the cursor to where AGE_COMP is located (at the bottom of the list). Where it says [N] (do you want to include this in the database) we want to change this to a [Y]:
Y <ENTER>
Then press the <ENTER> key one more time. and you will again be prompted as to whether the information is correct. The default answer is [Y]es, so press the <ENTER> key:
<ENTER>
ANTHRO will check the dBase file NUT to see if it already contains the anthropometry-related fields. Because in this example it does not, these field names will be presented to the screen with a message stating that they are not in the database. You are then asked if you would like to
create a new database that contains all the information from NUT plus the added fields. The default answer is [Y]es, so press the Enter key:
<ENTER>
Enter the new dBase file name, which we will call NUT1:
NUT1 <ENTER>
A new database is created with all of the original information from NUT plus the added fields for the anthropometry calculations. The anthropometry calculations are then performed. When all of the 100 records from the database are processed, you will be asked whether you want to save the template. (Templates are described in the next two sections on page 14.) For this example enter the default selection of [N]o:
<ENTER>
You should now be back at the Main Menu.
More Detailed Discussion of Processing New Files
Getting dBase file name. First you will be requested to enter name of the dBase file that you
want to process. A listing of the dBase files located in the same directory as ANTHRO is provided, and you select the dBase file. You can also include a drive or path name if the dBase file is located elsewhere.
Getting field numbers. After the dBase file is identified, the fields from that database are
presented on the screen. In the upper left-hand corner of the screen is the dBase file name. For each field, the field number, field name, and field type (N=numeric, C=character, and D=date) are presented. If there are more than 80 fields in the dBase file, the first screen will show the first 80 fields, and a second screen will show the rest of the fields. You will be requested to input the field numbers to identify the fields that contain information on date of birth, age, etc. To see the field numbers for field numbers 80 or greater, you enter an 'N' to see the Next screen of fields.
First you are requested to enter the field number for Date of Birth (DOB). If you have DOB in the dBase file, enter the field number; if not, enter a zero (the default value). (Any time you wish to exit the Process New File, enter a [^].) The field that contains DOB information must be a date field.
Next, the field number for Date of Visit (DOV) is requested. Again, if there is a field for DOV in the dBase file, enter the field number, otherwise enter a zero. The field numbers for DOB and DOV cannot be the same, and the field that contains the DOV information must be a date field.
Other information requested is age in years, age in months, sex, weight, and height. If DOB and DOV are in the database as well as age in years and months, the calculated age from the dates is used for the anthropometric calculations. If one or both of the date fields are empty, the age in years, months, or both, is used. If both age in years and months are in the database, they are added together to determine a child's age. Note that the fields for age, weight, and height must be numeric fields.
If in the Setup Menu you answered yes to option 8 ("Decimal places implied?") and you have identified a field in the database as containing age in months, the next prompt will ask for the number of decimal places. If the age in months field already includes a decimal place or no decimal place is needed, enter a 0 (zero). If a decimal place is implied, enter the number of decimal places (from 1 to 5). For example, an age in months of 101 with one decimal place will be interpreted as 10.1 months. If you are unsure as to whether a decimal place is needed, you can view the dBase file using the Browse feature in ANTHRO (the Browse feature is described on page 23).
There must be a field that contains information on the sex of the child. This field can be either numeric or character. If numeric, sex must be coded a 1=males and 2=females. If a character field, you will be requested to enter the coding scheme for sex: [N]umeric if sex is coded as 1=males and 2=females, or [C]haracter if sex is coded as M or m for males and F or f for females. If you are unsure of the coding scheme for sex, use the Browse feature (see page 23) to view the database to determine the coding scheme.
If the option for skipping U.S. measurements is in the Setup menu is [Y]es, you will be asked for the field number that contains the information on weight in kilograms and then the field number for height in centimeters. If option 8 from the Setup Menu (Decimal places
implied?) is set to [N]o, the program assumes that if there is a fraction of a kilogram, centimeter,
age in years, or age in months, there will be a decimal place in the field. However, if option 8 is set to [Y]es, after you identify the field number for weight in kilograms, the next prompt will as for the number of decimal places. Enter a [0] (zero) if the decimal place is included or if no decimal place is needed. If a decimal place is implied, enter a 1 to 5 for the number of decimal places. For example, a child's weight in the database is listed as 31 and you inform the program that one decimal place is implied, ANTHRO will interpret the weight as 3.1 kgs. If you are unsure of whether or not a decimal place is included, use the Browse feature. The height in centimeters, age in years, and age in months decimal placement works the same as weight in kilograms.
If the option to skip U.S. measurements is [N]o, you will also be prompted for the field number for pounds. If you provide the field number for pounds, next you will be prompted for the field numbers for quarter pounds and ounces. You will also be prompted for the field numbers for height in feet, height in inches, and if a field number for height in inches is provided, height in eighth inches.
If both metric and U.S. data are present, the metric data will be used for the anthropometric calculation. If the metric fields are empty or zero, then the U.S. measurements are used. With the U.S. measurements, the units are added together and converted to metric for the anthropometric calculations. For instance, height in feet, inches, and eighth inches are added together and then converted to metric. ANTHRO does not change any of the original values in the dBase file for the dates, age, sex, weight, or height fields.
If height information is not present, W/A indices will be calculated. If age is unknown, W/H indices are calculated, and if weight is unknown, H/A indices are calculated.
After all of the field number information is collected, you are presented with a screen that shows the Field Descriptions, Field Names, and the coding scheme for sex. You are asked whether this information is correct. If it is not, answer [N]o and you will be given the opportunity to change any of the field numbers. Otherwise, you will move to the next screen.
Added Fields and Names. Next you are given the opportunity to select which fields you want in
the database and the names of these fields. Default field selections and names are provided. If these are all right, answer [Y]es and you will go to the next screen. If these defaults are not correct, answer [N]o and you can make the appropriate changes. If you want to change the field names, the field name must conform to the dBase field naming convention: the first character
must be a letter; the following characters can be either a letter, number, or an underscore [_]; blanks are not allowed within the name (but they may be at the end of the name).
The default added field names use the following naming convention: H/A, W/H, and W/A with a Z for Z-score, P for percentile, and M for percent of median. Other fields are FLAG for edit flags, BMI for body mass index (weight in kgs/height in meters squared), and AGE_COMP for computed age. We strongly recommend that you always keep the FLAG field because it identifies anthropometric indices that may be incorrect and also because the FLAG field must be in the database in order to use the Standard Analyses module in ANTHRO.
Check for Fields. On the basis of the fields selected from the previous section, the current dBase
file is checked to see if the added anthropometric indice field names already exist in the file. If the field names already exist, the dBase file processing will begin. If the fields do not exist, the fields that are not in the dBase file are displayed on the screen, and you are given the opportunity to provide a name of a new dBase file that will contain all the information from the original dBase file plus the added anthropometry fields. The new dBase file name must be different from the original dBase file. You can specify a drive/path in the new file name. If the file name already exists, you can choose to overwrite the file or provide a new file name. In addition, there is a check to make sure enough free disk space exits for the new file.
File Processing. There are two file processing modes, fast and slow. These modes can be
selected from the Setup menu, option [7]. If the slow mode processing is selected, the record number, age, sex, weight in kgs, height in cms, flag message (if any), and anthropometry data are shown for each record. If the fast mode processing is selected, only the record number is presented. The fast mode processing is about 5% faster than the slow mode.
Saving Template. After processing the file, you can save the information on the dBase file name,
field numbers, etc. to a template. Use of the templates is discussed further in the next two sections. You are then returned to the main menu.
A Note about Edit Flags. One of the fields ANTHRO adds and uses is called FLAG (or
whatever name you change this to). This field is used to identify anthropometry indices where there is a strong likelihood that some of the data are incorrect or missing data in the record. The limits for the flags are determined in the Setup menu. This FLAG field must be in the dBase file if you plan to use the Standard Analysis module of ANTHRO. For additional information on edit flags, please refer to pages 7 (“Setup” section) and 30.
2. Reprocess file
If you are routinely going to process a particular dBase file, you may want to save the file name, field numbers, and added field selections and names to a template. To do so, the first time you process the dBase file, follow the instructions for option 1 "Process new file" from the Main Menu. After all of the records have been processed, you are asked whether you would like to save the information to a template. Answer [Y]es. You are then asked to enter a name for the template. The next time you want to process the same dBase file, select option 2 "Reprocess file" from the Main Menu. You are then shown the names of the templates and a horizontal menu is at the bottom of the screen with the following options: Select (to select a template),
Delete (delete a template), and Main menu (to return to the main menu). To reprocess a file,
press the <ENTER> key to Select a template, then enter the template number. The screens will flash through the file name, field names, etc., and process the file. When you are done, there will be a message stating that the processing is complete and instructing you to press any key to return to the Main Menu.
A Note about the Template Options
The horizontal menu at the bottom of the Template screen has three choices: Select, Delete, and Main menu. To select a template, use the Select option. You are then prompted to select one of the templates; enter the template number you want to select. You can delete templates by selecting the Delete option. You then enter the number of the template you wish to delete. Up to 40 templates can be saved. To return to the main menu, select the Main menu option.
3. Edit template
Editing templates is a useful option for processing several dBase files that, for example, differ only by dBase file name but the field numbers for age, sex, etc., are the same. Select option 3 from the main menu. The available templates are displayed, and you have the option to select one of them. The only difference between Edit template and Reprocess template is that in Edit template you have the option to change the dBase file name, field numbers, etc.
Additional Notes and Hints on Processing dBase files
If from all of your dBase file processing, you want to save only certain anthropometry fields (e.g., WHZ, HAZ and FLAG), process the file using option 1 from the Main Menu ("Process new file"), determine which anthropometric fields you want to save and their names, then save these options as a template. Any time you wish to process a different dBase file (with different field numbers for age, sex, etc.), select option 3 from the Main Menu (Edit template), and change the field numbers accordingly. The anthropometric fields saved and their names will be the same as those specified in the template.
If within each record more than one weight and height measurement exists (i.e., longitudinal data), each weight and height measurement can be processed. For example, the child's DOB and sex will remain the same, but the DOV, weight, and height will differ for each visit. You can rename the anthropometric indices to reflect the different weight and height measurement visits. For example, the first visit would the first date of visit to the clinic (e.g., field name DOV1) and the weight and height measurements (e.g., field names WT1 and HT1). Name the anthropometric indice fields HAZ1, WHZ1, etc., and for the second visit (DOV2, WT2, HT2) name the anthropometric indices HAZ2, WHZ2, etc.
Standard Analysis
Introduction
Once you have a dBase file that contains anthropometric information, you can execute several standard procedures for analyzing and presenting the data. These follow recommendations that have been promoted by the WHO and several expert groups which allow for the description of population anthropometry status. In addition, these procedures allow for the identification of groups at "increased risk" by different demographic and socioeconomic parameters, including age, sex and other variables.
These standard analyses may be useful for trend assessments within a geographic area, as well as for comparing different populations. The various programs provide the ability to cross-tabulate data to present prevalences and distributions of the three anthropometric indices. In each of these, the user can use default settings or select certain variables and intervals for stratification, i.e. age, sex, geographic location, bottle- or breast-fed, etc.
These procedures can be executed with any dBase file. Data in fixed-column or comma-delimited format can be converted to a .DBF file (see the section on Import, page 24).
The different operations have been designed to send output (in tabular form) to the screen, but these can be printed (see Outputting ANTHRO information on page 5). The three Standard Analyses provided are prevalence of low anthropometry by age, Z-score distribution, and centile distribution. These procedures provide only an initial descriptive analysis of data. Another software package, Epi Info, can be utilized to perform more sophisticated analysis of data is listed on page 33.
4. Prevalence/Age
A widely used method of expressing anthropometric information is as prevalences of children who are considered "at risk" of growth faltering. Prevalences, or the proportion of a population falling below a designated cut-off point for the different indices, are useful for identifying groups at increased risk by comparing their prevalence with the prevalence for the international reference population or with the prevalence within other groups.
In ANTHRO, prevalences can be presented either by using centiles, standard deviations/Z-score, or percent-of-median values; different cut-off points can be used for each. For example, with SD scores, the cut-off point generally used is below -2 standard deviations from the NCHS reference median, or for percentiles, the third or fifth centile of the same reference.
To describe the process of calculating prevalences, we will go through the sample data file provided with the original program disk that was analyzed in an earlier section on processing dBase files, called NUT1.DBF.
Note
For purposes of simplifying the directions, we will assume that the file, NUT1.DBF is located on the hard disk C:, which is the active drive being used, with the various program files and .TDB files. However, if the file were to be on a separate drive, i.e., floppy disk, you would need to indicate the disk drive before the file name (for example A:NUT1 if it was on the A: drive, as well as the subdirectory if applicable). Here, as in all cases throughout the program, you NEED
NOT provide an extension with the file name, as it assumes that it is in a dBase format, and in turn has the extension, .DBF.
Steps
Get into the ANTHRO2 program as described in an earlier section (see the section on Starting ANTHRO from a Hard Disk, page 3) and press the <ENTER> key to invoke the Main Menu. Notice that on the Main Menu the three options (4,5, and 6) for Standard Analysis are located on the left. To initiate the process for Prevalence/Age, type:
4 <ENTER>
At the bottom of the screen notice that the program requests the name of the file with which you will be working. All of the databases in the active subdirectory, including the number of records, date of last update and the file size, are listed. As mentioned previously we will start by using the sample file, NUT1.DBF which should appear in this listing (along with NUT.DBF, the original file to which the anthropometric indices were added). At the bottom of the screen, type:
NUT1 <ENTER>
The screen will clear. The next parameter the program needs to know is the mode for which you will be presenting prevalence data, either centiles (C), SD scores (Z), or percent-of-median (P).
For this exercise, we will use SD scores, so type:
Z <ENTER>
You next have to provide the cut-off point for which the prevalences will be calculated. The prevalences are below the cut-off points, not including the cut-off value itself. Thus, for the cut-off -2 SD, prevalences are for values <=-2.01 SD, and do not include -2.00 SD.
These are the default settings and corresponding possible range of cutoff values for each of the modes:
Unit of Measure Default Range Indice
SD/Z Score -2 -6, +6 HAZ, WHZ, WAZ
Centiles 3rd 0-100 HAP, WHP, WAP
Percent-of-Median 80 40-150 WAM
90 40-150 HAM
85 40-150 WHM
______________________________________________________________________________
To select the default setting, press the <ENTER> key, or you can change the cut-off point by typing in a new value and pressing <ENTER>.
For this example, we will change the cut-off point to < -2.5 S.D., so type
The next screen will present the 17 fields that are in the database file and their corresponding (field) numbers, names, and types. Notice that beyond the first six fields which made up the original datafile (sex, ht, wt, dbirth, dsurvey, and area), are 11 other fields which have been added as a result of the processing. These include the nine anthropometric indices, a field for FLAG, and AGE_COMP which contains the ages in months that were computed from the birth and survey dates.
From these fields, you will be asked to identify the different variables to be used in the analysis, beginning with the edit flag and then the fields containing the anthropometric values. You should indicate the number for each corresponding field. If you used the default field names of the different variables and included them in the database, the program automatically searches for these names; when the default names are present, the field number will be already listed in the prompt.
The analysis will use indices that are not flagged to eliminate potential errors in the data set. This edit flag field is essential and needs to be included in the database. If the Edit Flag Parameters are changed in the Setup program, any file which was processed before the change was made will contain the previous edit flag limits, and these limits will be reflected in all analyses of that file.
At the bottom of the screen, you are asked to specify the field number for FLAG. If the name was not changed when adding it to the data file, as in this example, the corresponding field number 16 will appear; accept it by pressing the <ENTER> key.
<ENTER>
Next, depending upon whether you will be presenting SD scores, centiles, or percent-of-median values, the fields containing the anthropometric indices need to be identified. For SD scores, you need to identify the three fields for SD (i.e., Z-score) values; WHZ, HAZ, and WAZ. In a similar way, for centiles, only fields presenting centile information (HAP, WAP, and WHP) need to be identified.
Because for this example we have decided to use SD scores, the first field that needs to be identified is for the variable HAZ. You will notice that in the highlighted box at the bottom of the screen the number [7] will appear. Look to the list of fields above, and confirm that field number [7] is HAZ. Again, because the number is already there, you can simply press <ENTER>. If, on the other hand you had a different name you would have to enter the appropriate number and then <ENTER>.
<ENTER>
Following this, you need to repeat the process for WHZ, field number [13], which again will be identified by its field name and number. To confirm this:
<ENTER>
In a similar way, confirm WAZ, field number [10]:
In this example, all three indices were available because they had been included in the data set, but this might not always be the case. The analysis will continue for any combination of indices, or for that matter, any single indice if other(s) are not in the data file or requested. For example, if height information is not available in the database, then the analysis of weight-for-age can be performed.
The program will next request you to identify the field that contains the age information. Distinct patterns of growth faltering occur at different ages, and the tabulation of age-specific data is important to identify groups (ages) that might be expressing different growth potential than others. In this program, age can be in units of days, months, or years, but not combination of these (e.g., age in whole years in one field, and the remaining months in another).
For the present example, the age-in-months was calculated from the birth and survey dates, and this information was stored in the field AGE_COMP, field number [17]. This field number should appear in the highlighted box at the bottom of the screen. Confirm this with
<ENTER>
Once a field that contains the age information is identified, the program needs to know in what units the age is expressed. The default setting for age is [M]onths. Because the field AGE_COMP contains calculated ages in months and meets the default criterion, confirm your choice of the default setting by pressing
<ENTER>
If, on the other hand, data for ages are in different units, you should specify the correct units (e.g., days or years).
Once the field containing ages has been identified, along with the type of units in which ages are presented, you are next requested to state whether the data are to be stratified by Sex. If so, the crosstabulations will be performed twice, one time for each sex, and appropriate tables are presented.
For this example, we will stratify by sex, so change the response to the question to:
Y <ENTER>
The list of fields will appear on the screen again, and you are asked to identify the field in which contains the information on Sex. Again, because we have a field with the default name
sex, the program has placed the field number [1] in the box. Confirm this with: <ENTER>
This is a character field which is coded with "M" for males and "F" for females, so we need to respond to the next question concerning the coding scheme for sex with:
C <ENTER>
After you have stated whether (or not) you would like to stratify by Sex, you indicate which age group categorization should be used for the prevalence tabulations.
The next screen shows three preset age categorizations, and there is a fourth option that allows you to specify your own age categories.
Note that two conventions dealing with age that are utilized throughout of the analytical procedures. First, ages are always expressed in months. Second, for age ranges, the minimum value is inclusive, in that it includes the expressed value, whereas the maximum value is
exclusive. For example, the age interval 0 - 12 months will include all children whose ages are
between 0.00 months and 11.99 MONTHS, but will not include children with ages of 12.00.
One of three different age groupings can be selected. Presenting the results by age may highlight growth patterns, especially for younger children who are especially vulnerable to a number of conditions that may affect growth. For each age categorizations, summary information for all ages are presented at the bottom of the table.
To select one of the preset age categorizations, you need only fill the corresponding number in the box at the top of the screen and press <ENTER>. In addition, if the preset age groupings do not meet your needs, you can choose your own intervals, which is discussed in further detail in the next section.
User-Specified Age Groups:
To demonstrate how this option functions, select [D] in response to the question "For which age group would you like to present prevalences?"
D <ENTER>
1. You will be asked to indicate the number of age categories you would like to create. The smallest number of categories is 1 and the largest number the program will allow is 10 different age categories.
For the present exercise, we will define [5] Categories, so in the box, type:
5 <ENTER>
2. Next, a new screen will appear with the place to indicate the minimum and maximum values for each of the age categories. To remind you of the conventions mentioned previously, mathematical signs are included on the screen with the values for the ranges. For this example, we will define age into five 12-month age intervals. The first group will be the youngest children with ages from zero months up to 12 months of age. On the screen, for the minimum value of level 1, enter:
0 <ENTER>
The cursor will move to the right, to the maximum field for the first level. Here, type:
12 <ENTER>
This first level will now accept all records of children between the ages of 0.00-11.99 months.
You will notice that the cursor has moved down to the second level, minimum value. For the next entries, type:
MINIMUM MAXIMUM Level 2 12 <ENTER> 24 <ENTER> Level 3 24 <ENTER> 36 <ENTER> Level 4 36 <ENTER> 48 <ENTER> Level 5 48 <ENTER> 60 <ENTER>
After you press the <ENTER> key after the maximum value for the last age category, the screen will clear, and the table for the cross tabulation will appear. Notice that the age groups you have just defined have been displayed at the left side of the table. The record numbers in the data set being processed are displayed in the upper right corner.
When the tabulation is finished (for all one hundred records in the example database), the respective prevalences for each indice and age group will be displayed. The aggregate total for all age groups is displayed at the bottom of the table. Note the "Press any key" message at the bottom of the screen. By pressing any key you will be returned to the main menu.
5. Z Scores
This option displays the distribution of the population by Z-score values. This distribution can be presented either for the entire data set or for any combination of age, sex and, a user-specified variables.
The operations for the Z-score distribution is similar to those for Prevalence/Age. You need to:
a. Identify a dBase file to analyze.
b. Provide field numbers for the necessary fields. For the Z-score distribution these fields are: Edit Flag, HAZ, WHZ, and WAZ.
c. State whether or not to stratify the analyses by age, sex, or a third variable.
i. To stratify by age, you must provide the number of age categories and the minimum and maximum values for each category. You also must provide the field number for age and its units of measurement (days, months, or years).
ii. To stratify by sex, you must provide the field number, and if sex is in a character field, the coding scheme (“C” for M/F, “N” for 1/2).
iii. To stratify by an additional variable, you must provide the field number, the number of categories, and the category values.
d. The dBase file name and date, and when applicable, selected stratified information (e.g., age, sex) appear at the top of the screen. After the analysis is completed, the number and percentage of children by each Z-score category, for each of the indices, is presented. The distribution of the reference population is also provided.
e. Press any key and the next screen provides the mean, standard deviation, standard error, minimum, and maximum Z-score values for the three indices. Also, the minimum and maximum Z-score values are displayed at the bottom of the screen. (For more information on the minimum and maximum allowable Z-score values, see the Setup section on page 7.)
6. Centiles
In this module the distribution of individuals is presented by centile groupings. Similar to the steps for calculating the Z-score distribution, you need to:
a. Identify a dBase file to analyze.
b. Provide field numbers for the necessary fields. For the centile distribution these fields are: Edit Flag, HAP, WHP, and WAP.
c. State whether or not to stratify the analyses by age, sex, or a third variable.
i. To stratify by age, you must provide the number of age categories and the minimum and maximum values for each category. You also must provide the field number for age and its units of measurement (days, months, or years).
ii. To stratify by sex, you must provide the field number, and if sex is in a character field, the coding scheme (C for M/F, N for 1/2).
iii. To stratify by an additional variable, you must provide the field number, the number of categories, and the category values.
d. The dBase file name and date, and when applicable, selected stratified information (e.g., age, sex) appear at the top of the screen. After the analysis is completed, the number and percentage of children by each centile category, for each of the indices, is presented. The distribution of the reference population is also provided.
e. Press any key and the next screen provides the median, minimum, and maximum centile values for the three indices.
OTHER
7. Browse
The Browse feature provided in ANTHRO is very similar to this feature in dBase. Select option 7 from the Main menu, and then you will be asked to provide a dBase file name. After you have entered a dBase file name, the records from the dBase file will be displayed. The upper part of the screen provides a menu with information on cursor movement, editing records, deleting information, and other miscellaneous instructions. There are some differences from the dBase Browse feature, but reviewing the menu at the top of the ANTHRO Browse screen will familiarize you with the differences. If you are not familiar with dBase Browse feature, review the following description of Browse.
General information. Browse is for reviewing dBase records and making editing changes. In
the upper right hand corner is the dBase file number, and in the upper left hand corner is the record number. The dBase file is presented by listing the field names from left to right, and the record information is presented below the field names. In databases with many fields, only the fields that can fit on the screen are shown, although you also view other fields.
Cursor movement. Pressing the right cursor key will move the reverse video area one field to the
right. The left cursor key moves the reverse video area one field to the left (if you are at the first field, nothing will happen if you press the left cursor key). To move several fields to the right, press the control key and the right cursor (called "pan" in the menu). The menu in Browse represents the control key with a "^". The control key and left cursor key move you several fields to the left (unless you are at the first field in which case pressing these keys will have no effect). To edit a field, move the cursor to the field and press the [F3] key. You can then change the contents of the field. While you are editing a field, use of the cursor keys moves you around within the field and not to other fields.
Pressing the down cursor key moves the reverse video area down one record, and pressing the up cursor key moves the reverse video area up one record (if you are at the first record, it will have no effect). If you want to jump many records to move down the file, press the <PAGE DOWN> key; this key will move you down 12 records. You can also jump up 12 records by pressing the <PAGE UP> key. Another way to move or "jump" to a different record is to press the [F2] key, which prompts for a record number to "jump" to. To move to the top of a database, simultaneously press the <CONTROL> (depicted as "^" on the screen) and <PAGE UP> keys. To go to the bottom or last record of the database, simultaneously press the <CONTROL> and <PAGE DOWN> keys.
Deletion. To delete a record, move the reverse video to the record you wish to delete, and then
press the control key and 'U'. This step does not remove the record from the database, but marks the record for deletion (similar to the way dBase deletes records). To actually remove a record, you need to use the Pack command within dBase (please refer to a dBase manual for more information). You can also delete the contents of a field by moving the reverse video area to the field you wish to delete, then press the control key and [Y].
Editing. You can edit a field. Move the reverse video area to the field you want to edit, then
press the [F3] key. You can delete the contents of the field by pressing '^Y'. Enter the changes from the keyboard. (You can also move within the field with the left and right cursor keys and use the <Delete> key to delete characters.) Once you have made your changes, press <ESC> to exit the edit mode.
Other information: To leave the Browse mode, press the escape key. You cannot append (i.e.,
add) records to the data base in the Browse mode.
8. Edit
The Edit feature in ANTHRO is similar to the one in dBase and has many of the same features as Browse. The Browse and Edit modes differ in the way records are presented on the screen. In the Edit mode, only one record is on the screen and the fields are presented vertically direction; in the Browse mode the records are presented horizontally. If there are more fields in a dBase record than can fit on one screen, you can use the <Page Down> key or press the <ENTER> key many times to see the next screen of fields. Another difference between Browse and Edit is that you can edit any field in Edit without pressing the [F3] key. Records cannot be appended (i.e., added) to the database in the Edit mode.
9. Import
ANTHRO was developed primarily for use with dBase files. However, the Import utility allows you to import a fixed-column or comma-delimited ASCII file into a dBase file. Note that the majority of database, statistics, and spreadsheet programs have the ability to read and write dBase files. If you have entered your data into a software package that does not use the dBase file structure or cannot "export" or "output" the data into a dBase file, the software package will most likely be able output the data into a fixed-column or comma-delimited ASCII file format. The definition for these terms is as follows:
ASCII -- ASCII is an acronym for American Standard Code for Information Interchange. This
is standard format for transferring data between microcomputers. Software programs on microcomputers that can create fixed column or comma-delimited files use the ASCII format.
Fixed-Column -- In dBase terminology, a fixed column file is a System Data Format (SDF).
Here is an example of a fixed column file is shown below:
M100.514.01978010719820403 F 76.5 8.01980010219820403 M 84.0 1980030719820403
In the above example the following fields are listed:
Sex -- in column 1 (coded as "M" or "F") Height in cms -- columns 2-6
Weight in kgs -- columns 7-10
Date of birth -- columns 11-18 (in year, month, day format)
Date of measurement -- columns 19-26 (in year, month, day format)
It is important to note the column orientation: sex is always in the first column, height is always in columns 2-6, etc.
Comma-delimited -- A file where fields are separated by commas and character fields are
enclosed in quotes. This is called a Printer File (PRN) in Lotus 123. An example of a comma-delimited file, which uses the same data as in our example of a fixed-column file, follows:
"M",100.5,14.0,19780107,19820403 "F",76.5,8.0,19800102,19820403 "M",84.0,,19800307,19820403
What must you know before importing the data? First you need to know if the data are in a fixed format or a comma-delimited format. Then you need the following information for each field:
Field name Field type Field Width
Number of Decimal Places
Each of these pieces of information is described next:
Field name -- A name for the field of 10 or fewer characters.
Field type -- The three most frequent types of dBase field are character, numeric, and date. Character fields -- can contain letters, numbers, or other symbols and are usually used with
fields such as name, address, city, etc.
Numeric fields -- must contain a numeric value, usually for fields such as age, height,
weight, etc. In dBase (and ANTHRO), a blank numeric field is given the value of zero, therefore it is important to have a missing variable code, such as 9, 99, etc.
Date fields -- contains a date, such as a child's birthdate. The format of the date must be
YYYYMMDD, where YYYY is the year, e.g., 1989; MM is the month; and DD is the day. This is the standard format for ASCII dates.
Field width -- The maximum number of characters or numbers needed for the field defines its
width. For example, for a field that contains the city, you might want 20 characters. With numeric fields, provide the width for the largest number. If there is a decimal place in the number, you need to include it in the count for width. For example, with height in centimeters, you would probably want a width of 5 for three digits to the left of the decimal place, the decimal place, and one digit to the right of the decimal place. For age in months (without decimal places), you would probably want a width of 3.
Decimal places -- This information is only used with numeric fields and the user provides the
number of decimal places. If there are no decimals, then there would be zero decimal places.
You are ready to import a file after you have provided and checked the information for each field just discussed.
Use the Export option to create a file to import. For this example, we will export a fixed-column file. From the main menu in ANTHRO, select option [10], Export. From the Export menu, select option [1] for fixed column. You will then be prompted to provide a dBase file name to export. For this example, export the file NUT.
Next, you are asked to name the exported file, which we will call "TEST". By default, the file "TEST" will have the extension ".TXT". The next screen asks how you would like to have the header information, i.e., information on the field name, type, etc. Select option [1] to send the information to the screen. The information should look like this:
1 SEX C 1 0 2 HT_CM N 5 1 3 WT_KG N 4 1 4 DBIRTH D 8 0 5 DSURVEY D 8 0 6 AREA C 1 0
At this point you have a fixed-column file called "TEST.TXT" and header information for the file. (For more detailed information on Exporting a file, see the Export section on page 27.) Select option [9] from the Export menu to return to the main menu.
From the main menu select option [9], Import File. The first menu in Import File asks the file type to import. For this example, enter [1] for fixed-column. You are provided three choices: to Create a new data structure, Modify an existing structure, or Return to previous menu. For example, to create a new data structure, enter a name for the new dBase file. For this example call the new file "TEST". Do not provide an extension because by default the file will be given a ".DBF" extension. You will then be asked whether you want to copy a data structure from an existing dBase file. For this example, select the [N]o option.
At this point the screen will change. On the left side of the screen will be a window where information on the fields is located and instructions in a window on the right. The instructions show how to add/insert, edit, and delete a field.
Enter option [A] to insert or add a field. Notice that the right side of the screen changes to allow for entering the field name, type, width, and decimal places. From the example, enter the appropriate data for the first field. Enter "SEX" for field name, "C" for field type (because it is a character field), and "1" for the field width. You cannot enter a value for decimal places in a character field. Once you have the data entered correctly, press the <F10> key to save the information. Notice that the right side of the screen has the instructions within it again and the information you entered is now on the left side of the screen.
Continuing with the example, press the [A] key to insert the next field and enter the following information:
HT_CM N 5 1
Press the <F10> key to save the results, which will appear on the left side of the screen. You may notice that you cannot see the previous field information for sex on the left side of the screen. Press the <up arrow> key and you will be able to see both fields.