PRODUCT DOCUMENTATION
Greenplum
®
Database
Version 4.2
Getting Started
Rev: A01
© 2014 GoPivotal, Inc.
Copyright © 2014 GoPivotal, Inc. All rights reserved.
GoPivotal, Inc. believes the information in this publication is accurate as of its publication date. The information is subject to change without notice.
THE INFORMATION IN THIS PUBLICATION IS PROVIDED "AS IS." GOPIVOTAL, INC. ("Pivotal") MAKES NO REPRESENTATIONS OR WARRANTIES OF ANY KIND WITH RESPECT TO THE INFORMATION IN THIS
PUBLICATION, AND SPECIFICALLY DISCLAIMS IMPLIED WARRANTIES OF MERCHANTABILITY OR FITNESS FOR A PARTICULAR PURPOSE.
Use, copying, and distribution of any Pivotal software described in this publication requires an applicable software license.
All trademarks used herein are the property of Pivotal or their respective owners.
Table of Contents iii Greenplum Database Getting Started Guide — Contents
Greenplum Database Getting Started Guide 4.2 - Contents
Preface... v
About This Guide... v
About the Greenplum Database Documentation Set...vi
Document Conventions...vi
Text Conventions...vi
Command Syntax Conventions... vii
Getting Support... viii
Product and licensing information... viii
Technical support... viii
Chapter 1: Introduction to Greenplum Database... 1
Greenplum Database Overall Architecture... 1
Shared Nothing vs. Shared Disk Architectures... 2
Greenplum Database MPP Features... 3
Single-Node Greenplum Database Configuration... 3
Find Out More... 4
Chapter 2: Installing a Single-Node Greenplum Database Instance... 5
Add the Greenplum Database Administrative User Account... 5
Install the Greenplum Database Software... 6
Prepare the Data Directory Locations... 7
Configure Greenplum Database Environment Variables... 7
Initialize Greenplum Database... 8
Set the MASTER_DATA_DIRECTORY Environment Variable... 9
Find Out More... 9
Chapter 3: Getting Started with Greenplum Database...10
Sample data...10
Start and stop Greenplum Database...11
About Greenplum instances, databases, and templates...11
Connect to a database with psql...12
Entering commands in psql...12
Set up authentication...13
Set up roles...14
Create a new database...15
Grant database privileges to users...16
Create a schema and set search path...17
Create tables...18
About the distribution policy...18
Execute the CREATE TABLE script in psql...18
Load data into tables...19
Load data with the INSERT statement...20
Load data with the COPY statement...20
Load data with gpdist...21
Loading Data with gpload...22
Create and load fact tables...24
Data loading summary...24
Table of Contents iv Greenplum Database Getting Started Guide — Contents
VACUUM and ANALYZE...25
Analyze the tables...26
View explain plans...26
Indexes and performance...28
Row vs. column orientation...30
Check for even data distribution on segments...33
About partitioning...34
Chapter 4: Introduction to Greenplum In-Database Analytics 36 Run PostgreSQL built-in aggregates...36
Install MADlib...37
Download and install MADlib...38
Install the MADlib library into a database...38
Run MADlib ANOVA...39
Perform linear regression...42
Learn more about MADlib...43
About Pivotal GPText...43
Learn more about GPText...43
Appendix A: Operating System Configuration
...45Linux...45
Supported Operating System Versions 45
OS Configuration 45
Mac OS X...45Supported Operating System Versions 45
Appendix B: PSQL Cheat Sheet...47
About This Guide v Greenplum Database Getting Started Guide — Preface
Preface
This guide describes tasks you complete to install and run your Greenplum Database system, and learn about the main features of the system.
• About This Guide
• Document Conventions
• Getting Support
About This Guide
This guide provides information and instructions for installing, initializing, and running a Greenplum Database system.
This guide assumes knowledge of Linux/Unix system administration, database management systems, database administration, and structured query language (SQL). This guide contains the following chapters and appendices:
• Chapter 1, “Introduction to Greenplum Database” — Information about the Greenplum Database system architecture and components.
• Chapter 2, “Installing a Single-Node Greenplum Database Instance” — Instructions for installing and intializing a single-node Greenplum Database instance.
• Chapter 3, “Getting Started with Greenplum Database” — An introduction to Greenplum Database in a hands-on tutorial format.
• Chapter 4, “Introduction to Greenplum In-Database Analytics” — An introduction to using the MADlib in-database analytics library in Greenplum Database and an introduction to Pivotal GPText.
• Appendix A, “Operating System Configuration” — Detailed configuration parameters for supported operating systems.
• Appendix B, “PSQL Cheat Sheet” — A quick reference for the Greenplum Database interactive command line program psql.
About the Greenplum Database Documentation Set vi Greenplum Database Getting Started Guide — Preface
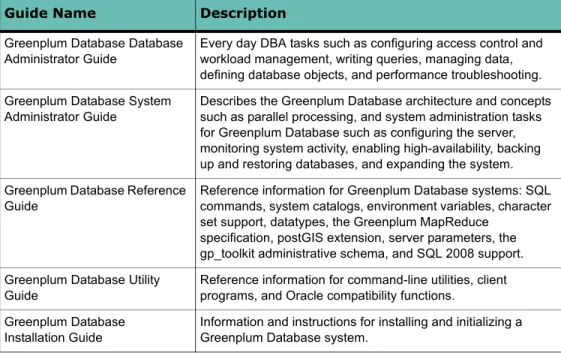
About the Greenplum Database Documentation Set
The Greenplum Database documentation set consists of the following guides.Table 1 Greenplum Database documentation set
Guide Name Description
Greenplum Database Database Administrator Guide
Every day DBA tasks such as configuring access control and workload management, writing queries, managing data, defining database objects, and performance troubleshooting. Greenplum Database System
Administrator Guide
Describes the Greenplum Database architecture and concepts such as parallel processing, and system administration tasks for Greenplum Database such as configuring the server, monitoring system activity, enabling high-availability, backing up and restoring databases, and expanding the system. Greenplum Database Reference
Guide
Reference information for Greenplum Database systems: SQL commands, system catalogs, environment variables, character set support, datatypes, the Greenplum MapReduce
specification, postGIS extension, server parameters, the gp_toolkit administrative schema, and SQL 2008 support. Greenplum Database Utility
Guide
Reference information for command-line utilities, client programs, and Oracle compatibility functions.
Greenplum Database Installation Guide
Information and instructions for installing and initializing a Greenplum Database system.
Document Conventions
Pivotal documentation adheres to the following conventions to help you identify certain types of information.
• Text Conventions
• Command Syntax Conventions Text Conventions
Table 2 Text Conventions
Text Convention Usage Examples
bold Button, menu, tab, page, and field names in GUI applications
Click Cancel to exit the page without saving your changes.
italics New terms where they are defined
Database objects, such as schema, table, or column names
The master instance is the postgres
process that accepts client connections.
Catalog information for Greenplum Database resides in the pg_catalog
Document Conventions vii Greenplum Database Getting Started Guide — Preface
Command Syntax Conventions
monospace File names and path names
Programs and executables Command names and syntax Parameter names
Edit the postgresql.conf file.
Use gpstart to start Greenplum
Database.
monospace italics Variable information within file
paths and file names
Variable information within command syntax
/home/gpadmin/config_file COPY tablename FROM 'filename'
monospace bold Used to call attention to a particular
part of a command, parameter, or code snippet.
Change the host name, port, and database name in the JDBC connection URL:
jdbc:postgresql://host:5432/m ydb
UPPERCASE Environment variables
SQL commands Keyboard keys
Make sure that the Java bin directory
is in your $PATH.
SELECT * FROM my_table;
Press CTRL+C to quit.
Table 2 Text Conventions
Text Convention Usage Examples
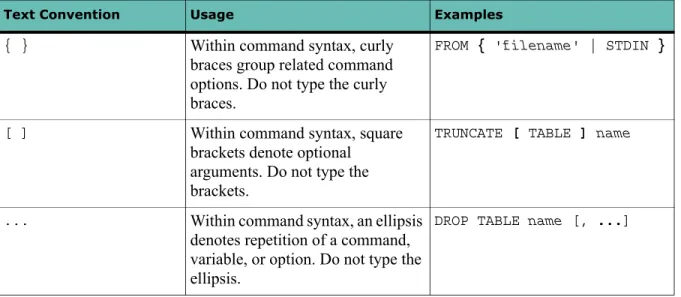
Table 3 Command Syntax Conventions
Text Convention Usage Examples
{ } Within command syntax, curly
braces group related command options. Do not type the curly braces.
FROM { 'filename' | STDIN }
[ ] Within command syntax, square
brackets denote optional arguments. Do not type the brackets.
TRUNCATE [ TABLE ] name
... Within command syntax, an ellipsis
denotes repetition of a command, variable, or option. Do not type the ellipsis.
Getting Support viii Greenplum Database Getting Started Guide — Preface
Getting Support
Pivotal support, product, and licensing information can be obtained as follows. Product and licensing information
For product-specific documentation, release notes, or software updates, go to the Pivotal Web site at www.gopivotal.com.
Technical support
For technical support, go to EMC Online Support. On the Support page, you will see several options, including one for making a service request. Note that to open a service request, you must have a valid support agreement. Please contact your EMC sales representative for details about obtaining a valid support agreement or with questions about your account.
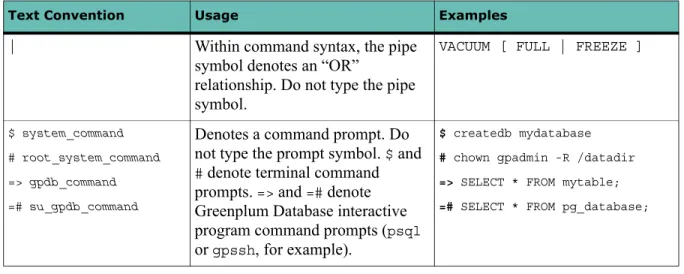
| Within command syntax, the pipe
symbol denotes an “OR”
relationship. Do not type the pipe symbol.
VACUUM [ FULL | FREEZE ]
$ system_command
# root_system_command
=> gpdb_command
=# su_gpdb_command
Denotes a command prompt. Do not type the prompt symbol. $ and # denote terminal command
prompts. => and =# denote
Greenplum Database interactive program command prompts (psql
or gpssh, for example).
$ createdb mydatabase
# chown gpadmin -R /datadir
=> SELECT * FROM mytable;
=# SELECT * FROM pg_database;
Table 3 Command Syntax Conventions
1 Greenplum Database Getting Started Guide — Chapter 1: Introduction to Greenplum Database
1.
Introduction to Greenplum Database
Greenplum Database is a massively parallel processing (MPP) database server based on PostgreSQL open-source technology. An MPP system is a cluster with two or more PostgreSQL database instances cooperating to accomplish a task, each instance with its own memory and storage. Greenplum Database uses this high-performance system architecture to distribute the load of multi-terabyte data warehouses, and can use all of the system’s resources in parallel to process a query.
Greenplum Database Overall Architecture
Greenplum Database is essentially several Pivotal-enhanced PostgreSQL database instances acting together as one cohesive database management system (DBMS). Each Greenplum Database has a master instance and two or more segment instances. Database users interact with the master as they would a regular PostgreSQL DBMS. The following illustration shows a Greenplum Database instance with a master instance and eight segment instances.
The master in this illustration is deployed on a dedicated host. A host is a computer— either physical or virtual—with an operating system, memory, disk storage, CPU, and one or more network interfaces.
The master, or master instance, is the Greenplum Database server that client programs interact with. The master listens for client connections on a unique port on the master host, port 5432 by default.
2 Greenplum Database Getting Started Guide — Chapter 1: Introduction to Greenplum Database
The eight segments shown in the illustration are deployed on four segment hosts. Each segment host is a separate computer with its own operating system, memory, CPU, storage, and network interfaces. Like the master host, a segment host may be a standalone computer or a virtual machine.
The segment hosts in this example each host two segments, or segment instances. A segment is a database server instance managing a portion of the data on disk storage that has been allocated to it. Each segment instance listens on a unique port on the segment host. Deploying multiple segments on a host ensures the host’s resources are fully utililized. A multi-core host with multiple segments can be expected to
accomplish more work than a multi-core host with a single segment.
The master instance coordinates the entire Greenplum Database instance, distributing requests to the segments and combining the results returned from the segments. The master and segment hosts communicate over the interconnect, a standard gigabit Ethernet using an enhanced User Datagram Protocol (UDP) that is faster than TCP and more reliable than standard UDP.
High availability can be achieved by mirroring the master and each segment instance on separate hosts, and providing a redundant interconnect. This ensures that a standby is available for any component that fails.
Shared Nothing vs. Shared Disk Architectures
The Greenplum Database architecture is called a shared nothing architecture because each segment independently manages a portion of the database with its own CPU, memory, and disk. In contrast, a distributed DBMS system with a shared disk (or
shared everything) architecture has multiple database server instances managing a single database instance on a shared collection of disks. The shared disk and shared nothing architectures have different advantages and disadvantages.
In a shared disk system, all data is local to each database server. There is no need to send data over the network to another server to process queries that join tables. However, the network disk storage solution and the software that coordinates disk sharing between servers can limit the amount of data and the number of database servers that can be added to the database cluster. Expensive server and NAS hardware are needed to increase capacity and maintain acceptable query response times. The primary advantages of the Greenplum shared nothing architecture are greater scalability, lower cost, and faster query execution. Commodity PCs and disks can be added to increase capacity at little expense, so it is possible to add large numbers of CPUs to the database instance at a very low cost-per-CPU. Each segment manages a discrete portion of the data, so there is no need to coordinate shared disk access between servers.
Performance on the shared nothing architecture can suffer when data is unevenly distributed among the segments or is distributed in a way that requires sending large volumes of data between segments to execute queries. Therefore, a shared nothing architecture like Greenplum Database requires up-front planning to ensure that all of the segments participate fully and their resources are used effectively.
3 Greenplum Database Getting Started Guide — Chapter 1: Introduction to Greenplum Database
Greenplum Database MPP Features
Pivotal has modified and supplemented the internals of PostgreSQL to support the parallel structure of Greenplum Database. For example, the system catalog, query planner, optimizer, query executor, and transaction manager components have been modified and enhanced to execute queries simultaneously across all of the parallel segments. Adding more segments to a Greenplum instance, therefore, can increase data capacity and query response.
Greenplum Database also includes features designed to optimize PostgreSQL for business intelligence (BI) workloads. For example, Greenplum Database has added parallel data loading (external tables), resource management, and query optimizations, which are not found in standard PostgreSQL.
Storage enhancements in Greenplum Database include column-oriented tables, append-only (or append-optimized) tables, and data partitioning. These features allow faster data loading and data management, optimized and compressed disk storage, and fast, targeted disk reads, all keys to agile processing of very large analytics datasets and data warehouses.
Single-Node Greenplum Database Configuration
The smallest multi-segment Greenplum Database configuration is a single-node system, which runs as several distinct processes on a single host computer. There is a
master instance and one or more segment instances, typically one segment per CPU core. The single-node configuration is easily installed and can be used on a
development workstation or to evaluate the Greenplum Database software. It lacks high availability features, such as mirroring, but is otherwise a complete Greenplum Database instance running on a single host.
The next section of this guide provides instructions for installing a single-node Greenplum Database instance with a master and two segments. The resulting installation can then be used with the exercises to explore Greenplum Database features.
4 Greenplum Database Getting Started Guide — Chapter 1: Introduction to Greenplum Database
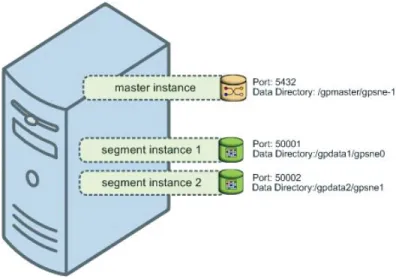
The following illustration shows a single-node Greenplum Database instance.
Figure 1.1 Single-Node Greenplum Database Configuration
The master is the entry point to the Greenplum Database system. It is the database instance where clients connect and submit SQL statements. The master coordinates the work of the other database instances in the system, the segments.
The segments handle data processing and storage. Each segment contains a portion of the data. When a user issues a query on the master, the master distributes the work to the two segments. A query process is created on each segment to handle the request. When the segments return individual results, the master combines them and presents the final result to the user.
Setting up a production Greenplum Database instance includes planning for capacity, networking, security, and high availability. These topics are beyond the scope of this guide. Please refer to Greenplum Database Installation Guide for help installing a production system.
Find Out More
Learn more about Greenplum Database system architecture in Greenplum Database System Admnistrator Guide.
5 Greenplum Database Getting Started Guide — Chapter 2: Installing a Single-Node Greenplum Database Instance
2.
Installing a Single-Node Greenplum
Database Instance
This chapter provides instructions for installing a single-node Greenplum Database instance on a Red Hat Enterprise Linux (or CentOS) computer, or on a Mac OS X computer. The instance will have one master and two segments. See Greenplum Database Installation Guide for comprehensive instructions on installing a multi-node production Greenplum Database system.
Here is a list of steps to install and configure the Greenplum Database instance:
1. Configure your operating system following instructions in Appendix A, “Operating System Configuration”
2. “Add the Greenplum Database Administrative User Account” on page 5
3. “Install the Greenplum Database Software” on page 6
4. “Prepare the Data Directory Locations” on page 7
5. “Configure Greenplum Database Environment Variables” on page 7
6. “Initialize Greenplum Database” on page 8
7. “Set the MASTER_DATA_DIRECTORY Environment Variable” on page 9 Add the Greenplum Database Administrative User Account You cannot run the Greenplum Database server as root.
For a production system, Pivotal recommends that you:
• designate a user account that will own the Greenplum Database installation
• always start and administer Greenplum Database as this user
Note: Greenplum Database is not supported for production use on Mac OS X. For evaluation or development on Mac OS X, it is acceptable to install a single-node Greenplum Database instance using your own user account. When this
documentation references the gpadmin user, you can substitute your own Mac OS X
user name.
On Linux, you can create a dedicated user account to run Greenplum Database,
gpadmin, by convention. To add this new user, enter the following commands as root:
# useradd gpadmin # passwd gpadmin
New password: password
6 Greenplum Database Getting Started Guide — Chapter 2: Installing a Single-Node Greenplum Database Instance
The user must have permission to access services and directories that are needed to install and run Greenplum Database. For example, the user needs access to the Greenplum Database installation directory, directories where data is to be stored, and to services such as the Java virtual machine (JVM).
(Optional) If your environment has multiple administrative users or if you will be running multiple Greenplum Database systems on the same machine, you might want to designate a group of users to own your Greenplum Database installation. For the purposes of this documentation, we will use the group name of gpadmin as well. To
add a new group, for example, run the following commands as root: # groupadd gpadmin
# usermod -g gpadmin gp_user1 # usermod -g gpadmin gp_user2
Install the Greenplum Database Software
1. Download or copy the Greenplum Database installer file to the system on which you want to install Greenplum Database. Installer files are available at
http://www.gopivotal.com/products/pivotal-greenplum-database.
2. Unzip the installer file. For example:
# unzip greenplum-db-4.2.x.x-PLATFORM.zip
3. As the root user, run the installer using bash. For example: # /bin/bash greenplum-db-4.2.x.x-PLATFORM.bin
4. The installer prompts you to accept the Greenplum Database license agreement. Type yes to accept the license agreement.
5. The installer prompts you to provide an installation path. Press ENTER to accept
the default install path (/usr/local/greenplum-db-4.2.x.x), or enter an
absolute path to an installation location. You must have write permissions to the location you specify.
6. The installer installs the Greenplum Database software and creates a
greenplum-db symbolic link one directory level above your version-specific
Greenplum Database installation directory. The symbolic link is used to facilitate patch maintenance and upgrades between versions. The installed location is referred to as $GPHOME.
7. Change the ownership of your Greenplum Database installation so that it is owned by the gpadmin user or group. For example, run the following commands as root:
# chown -R gpadmin /usr/local/greenplum-db-4.2.x.x # chgrp -R gpadmin /usr/local/greenplum-db-4.2.x.x
7 Greenplum Database Getting Started Guide — Chapter 2: Installing a Single-Node Greenplum Database Instance
Prepare the Data Directory Locations
Each Greenplum Database master and segment has a designated storage area on disk that is called the data directory location. This is the file system location where the database data is stored. In a single-node Greenplum Database, you initialize a
Greenplum Database master instance and two or more segment instances on the same system, each requiring a data directory location. These directories should have sufficient disk space for your data and be owned by the gpadmin user.
Remember that the data directories of the segment instances are where the user data resides, so they must have enough disk space to accommodate your expected data capacity. For the master instance, only system catalog tables and system metadata are stored in the master data directory.
To create the data directory locations:
1. Create or choose a directory that will serve as your master data storage area. For example, run the following commands as root:
# mkdir /gpmaster
# chown gpadmin /gpmaster # chgrp gpadmin /gpmaster
2. Create or choose the directories that will serve as your segment storage areas. For this two-segment, single-node example system, run the following commands as
root:
$ mkdir /gpdata1
$ chown gpadmin /gpdata1 $ chgrp gpadmin /gpdata1
$ mkdir /gpdata2
$ chown gpadmin /gpdata2 $ chgrp gpadmin /gpdata2
Configure Greenplum Database Environment Variables
A greenplum_path.sh file is provided in your $GPHOME directory with environment
variable settings for Greenplum Database. You can source this in the gpadmin user’s
startup shell profile (such as .bashrc), or in /etc/profile if you want to set the
environment variables for all users.
For example, you could add a line similar to the following to your chosen profile files:
source /usr/local/greenplum-db/greenplum_path.sh
After editing the chosen profile file, source it as the correct user to make the changes active. For example:
$ source ~/.bashrc
or
8 Greenplum Database Getting Started Guide — Chapter 2: Installing a Single-Node Greenplum Database Instance
Note: The .bashrc file should not produce any output. If you wish to have a message
display to users upon logging in, use the .profile file.
Initialize Greenplum Database
The Greenplum gpinitsystem utility initializes the Greenplum Database system. For
a single-node Greenplum Database system, you are initializing a master and two (or more) segment instances on the same system.
After the Greenplum Database system is initialized and started, you can then create and manage databases by connecting to the Greenplum master database process.
To initialize Greenplum Database: 1. Log in to the system as the gpadmin user:
su - gpadmin
2. Copy the hostlist_singlenode and gpinitsystem_singlenode example
files from your Greenplum Database installation to the current directory:
cp $GPHOME/docs/cli_help/gpconfigs/*_singlenode .
3. Make the hostlist_singlenode and gpinitsystem_singlenode files
writable so that you can edit them:
chmod +w *_singlenode
4. Edit the gpinitsystem_singlenode file and enter your configuration settings.
There are informative comments within the file to help you make your changes. At minimum, you must set the MASTER_HOSTNAME parameter to the name of your
system, or 127.0.0.1.
Here is an example of the default parameters in this file:
ARRAY_NAME="GPDB SINGLENODE"
MACHINE_LIST_FILE=./hostlist_singlenode SEG_PREFIX=gpsne
PORT_BASE=40000
declare -a DATA_DIRECTORY=(/gpdata1 /gpdata2) MASTER_HOSTNAME=127.0.0.1
MASTER_DIRECTORY=/gpmaster MASTER_PORT=5432
5. Edit the hostlist_singlenode file and replace the first line with the name of
your system or 127.0.0.1.
6. Run the gpssh-exkeys utility to exchange ssh keys for the local host: $ gpssh-exkeys -h 127.0.0.1
7. Run the following command to initialize Greenplum Database:
9 Greenplum Database Getting Started Guide — Chapter 2: Installing a Single-Node Greenplum Database Instance
The utility verifies your setup information and makes sure that the data directories specified in the gpinitsystem_singlenode configuration file are accessible. If
all of the verification checks are successful, the utility prompts you to confirm your Greenplum Database configuration before creating the system. For example:
=> Continue with Greenplum creation? y
8. The utility begins setup and the initialization of the master instance and each segment instance in the system. This process can take several minutes (depending on the number of segments to initialize).
At the end of a successful setup, the utility starts your Greenplum Database system. You should see:
=> Greenplum Database instance successfully created.
Note: For a single-node Greenplum Database instance, you can disregard the warning messages about the use of ‘127.0.0.1’ or ‘localhost’. These warnings only apply to a multi-node Greenplum Database system.
Set the MASTER_DATA_DIRECTORY Environment Variable The Greenplum Database management utilities require that you set the
MASTER_DATA_DIRECTORY environment variable. This variable points to the directory
created by the gpinitsystem utility in the master data directory location.
For example, add a line similar to the following to the gpadmin user’s profile file
(such as .bashrc):
MASTER_DATA_DIRECTORY=/gpmaster/gpsne-1 export MASTER_DATA_DIRECTORY
After editing the chosen profile file, source it as the correct user to make the changes active. For example:
$ source ~/.bashrc
Find Out More
Learn more about installing and configuring Greenplum Database in Greenplum Database System Administrators Guide.
Sample data 10 Greenplum Database Getting Started Guide — Chapter 3: Getting Started with Greenplum Database
3.
Getting Started with Greenplum Database
This chapter provides an introduction to basic Greenplum Database operations and introduces the features that make Greenplum Database the best choice for big data analytics.
Sample data
To introduce Greenplum Database, we use a public data set, the Airline On-Time Statistics and Delay Causes data set, published by the United States Department of Transportation at http://www.transstats.bts.gov/.
The On-Time Performance dataset records flights by date, airline, originating airport, destination airport, and many other flight details. Data is available for flights since 1987. The exercises in this guide use data for about a million flights in 2009 and 2010. The FAA uses the data to calculate statistics such as the percent of flights that depart or arrive on time by origin, destination, and airline.
You will create a tutorial database, define the schema and tables to hold the data,
and load the data from external files. Then you install the MADlib in-database analytics library and run a few analyses to answer questions such as these:
• Are performances differences between an airline’s flights originating from
different airports significant?
• Are performance differences between different airlines originating from the same
airport significant?
• Do delayed flights over longer distances make up time so they can arrive closer to
the scheduled arrival time?
You can download a ZIP file containing the sample data and queries from
http://gpdb.docs.gopivotal.com/gs/faa-samples-A01.zip and unzip the file into your home directory. The file extracts to a directory which contains SQL scripts and data files used in the exercises.
The tutorial database will contain a fact table and several dimension tables. The
fact table holds historical flight records for a few months in 2009 and 2010. You will create two versions of the fact table, a row-oriented version (otp_r) and a
column-oriented version (otp_c). You will load the dimension tables from
CSV-formatted text files. For the fact table, you will use an Extract, Load, Transform (ELT) process to load data.
You are encouraged to review the SQL scripts in the faa directory as you work
through this introduction. You can run most of the exercises by entering the commands yourself or by executing a script in the faa directory.
Start and stop Greenplum Database 11 Greenplum Database Getting Started Guide — Chapter 3: Getting Started with Greenplum Database
Start and stop Greenplum Database
The Greenplum Database installation includes utility commands to shut down the system gracefully, start it up, and view the current status. The commands are in the
bin subdirectory in the Greenplum installation, that is, $GPHOME/bin. When your
environment has been set up by sourcing $GPHOME/greenplum_path.sh in your
shell, the commands are on your path.
Execute these commands as the user running Greenplum Database, for example
gpadmin.
You can get online help for any Greenplum command by running it with the --help
option.
To check the current status of the Greenplum Database instance: 1. Run the gpstate command:
$ gpstate
The command displays the status of the master and segment processes. If the Greenplum system is not running, the command displays an error message.
To shut down the Greenplum Database instance: 1. Run the gpstop command:
$ gpstop
Displays parameters for the master and segment processes that are to be stopped.
2. Enter y when prompted to stop the Greenplum instance.
To start the Greenplum Database instance: 1. Run the gpstart command:
$ gpstart
The command displays parameters for the master and segment processes that are to be started.
2. Enter y when prompted to continue starting up the instance.
Find Out More
Learn more about managing Greenplum Database in the Greenplum Database Database Administrator Guide. See Greenplum Database Utility Guide for information about the included utilities.
About Greenplum instances, databases, and templates
A Greenplum Database system is called an instance. It is possible to have more than one instance installed; the environment variables set by the$GPHOME/greenplum_path.sh file point to the current instance and ensure that the
Connect to a database with psql 12 Greenplum Database Getting Started Guide — Chapter 3: Getting Started with Greenplum Database
An instance can manage multiple databases. A database typically contains all of the data and objects needed for one or more related applications. A client can connect to only one database at a time; it is not possible to query across databases.
When newly installed, a Greenplum Database instance has three databases:
• The template1 database is the default template used to create new databases. If
you have objects that should exist in every database managed by your Greenplum Database instance, you can create them in the template1 database.
• The postgres and template0 databases are used internally and should not be
modified or dropped. If you have modified the template1 database you can use
the template0 database to create a new database without your modifications.
Connect to a database with psql
The psql command is an interactive, command-line client used to access a
Greenplum database.
By default, psql attempts to connect to the Greenplum instance on the current host
(localhost) at port 5432, with the database user and database name the same as your
current login name. For example, if you are logged in as gpadmin, entering psql at a
shell prompt with no options attempts to connect to the gpadmin database with the gpadmin role. Since there is no gpadmin database by default, you must at least
specify the database name on the psql command line.
The default database name and other connection parameters can be overridden on the command line or by setting environment variables. The essential connection
parameters are the name of the host, the port number where the master is listening, the database user name (role), and the database name.
To connect to a database with default connection parameters:
$ psql template1
To specify connection parameters on the command line:
$ psql -h localhost -p 5432 -U gpadmin template1
To set connection parameters in the environment:
$ export PGPORT=5432 $ export PGHOST=localhost $ export PGDATABASE=template1 $ psql
Entering commands in psql
When you successfully connect to a database, psql displays a prompt, the database
name followed by =#. For example: $ psql template1
psql (8.2.15)
Set up authentication 13 Greenplum Database Getting Started Guide — Chapter 3: Getting Started with Greenplum Database
template1=#
SQL statements can be quite long, so you can enter them on multiple lines. On continuation lines, the psql prompt changes to the database name followed by -#.
Terminate a SQL statement with a semicolon. psql saves your input in a query buffer
until it sees the semicolon, and only then does it execute the statement.
In addition to SQL statements, you can enter psqlmeta-commands, which begin with
a backslash (\). Here are some common psql meta-commands: • Enter \g instead of a semicolon to terminate a SQL statement • Enter \e to edit the buffer in an external editor (vi by default) • Enter \p to display the contents of the query buffer
• Enter \r to reset the query buffer, abandoning what you have entered • Enter \l to list databases
• Enter \d to list tables, views, and sequences • Enter \q to exit psql
• Enter \h to display help for SQL statements • Enter \? to display help for psql
You can get help for an SQL statement even after you have started entering the text of the statement. The \h meta-command and everything up to the end of the line is
omitted from the query buffer.
There are many more useful psql meta-commands. You will encounter some of them
in later exercises. See Appendix B, “PSQL Cheat Sheet” for a complete list of psql
commands. See Greenplum Database Utility Guide for the complete psql reference
documentation.
Set up authentication
Following a fresh installation, Greenplum Database authentication is set up to accept database connections only from the gpadmin user on the master host. To allow other
users to connect, and to allow connections from other hosts on the network, you must configure Greenplum Database authentication on the master host. Note that the segments are automatically configured to accept connections from the master only. Greenplum Database supports several authentication schemes, including passwords, LDAP, Kerberos, Radius, client certificates, PAM, and SSPI. In this exercise, we set up password authentication using MD5-encrypted passwords. The passwords are encrypted and saved in a system table in the database. See Greenplum Database Database Administration Guide for information about setting up other authentication methods.
You configure authentication in the $MASTER_DATA_DIRECTORY/pg_hba.conf file.
Lines that begin with a # character are comments and describe the file’s syntax and the
Set up roles 14 Greenplum Database Getting Started Guide — Chapter 3: Getting Started with Greenplum Database
Each non-comment line is an entry that will be compared to incoming connection requests. The first line that matches a request determines the method of authentication, so the order of the lines is important. The entries allow you to specify different authentication methods depending on the type of connection, the target database, and the database role (user or group) of the requester.
The type of connection can be local(for a local Unix socket connection), host (for
an unencrypted TCP/IP connection), or hostssl (for an SSL-encrypted TCP/IP
connection). If the connection type is host or hostssl, the entry contains a CIDR
mask that determines which network hosts the entry applies to.
In the following exercise, you set up authentication to allow any user who is a member of the users group to connect to the tutorial database by supplying a password.
SSL is required for connections from other hosts.
1. While logged in as gpadmin, edit the $MASTER_DATA_DIRECTORY/pg_hba.conf
file:
$ vi $MASTER_DATA_DIRECTORY/pg_hba.conf
2. At the end of the file, add the following entries.
local tutorial +users md5 local tutorial +users 127.0.0.1/32 md5 hostssl tutorial +users samenet md5
3. Save your changes and restart Greenplum Database. In the next section, you create user roles and the users group.
See the Database Administration Guide for a complete description of the syntax and permitted values for these entries or read the comments in the pg_hba.conf file.
Set up roles
Greenplum Database manages database access using roles. Initially, there is one superuser role—the role associated with the OS user who initialized the database instance, usually gpadmin. This user owns all of the Greenplum Database files and
OS processes, so it is important to reserve the gpadmin role for system tasks only.
A role can be a user or a group. A user role can log in to a database; that is, it has the
LOGINattribute. A user or group role can become a member of a group.
Permissions can be granted to users or groups. Initially, of course, only the gpadmin
role is able to create roles. You can add roles with the createuser utility command, CREATE ROLE SQL command, or the CREATE USER SQL command. The CREATE USER command is the same as the CREATE ROLE command except that it automatically
assigns the role the LOGIN attribute.
Create a user with the createuser utility command 1. Log in to the master host as the gpadmin user.
2. Enter the createuser command and reply to the prompts: $ createuser -P user1
Create a new database 15 Greenplum Database Getting Started Guide — Chapter 3: Getting Started with Greenplum Database
Enter password for new role: Enter it again:
Shall the new role be a superuser? (y/n) n
Shall the new role be allowed to create databases? (y/n) y Shall the new role be allowed to create more new roles? (y/n) n
The next example is the equivalent of this one, but using the CREATE USER SQL
command in psql.
Create a user with the CREATE USER command
1. Connect to the template1 database as gpadmin: $ psql template1
2. Create a user with the name user2:
=# CREATE USER user2 WITH PASSWORD 'changeme' NOSUPERUSER;
3. Display a list of roles:
# \du
List of roles
Role name | Attributes | Member of gpadmin | Superuser, Create role, Create DB |
user1 | Create DB | user2 | Create DB |
Create a users group and add the users to it
1. While connected to the template1 database as gpadmin enter the following SQL
commands:
=# CREATE ROLE users;
=# GRANT users TO user1, user2;
2. Display the list of roles again:
=# \du
List of roles
Role name | Attributes | Member of gpadmin | Superuser, Create role, Create DB |
user1 | Create DB | {users} user2 | Create DB | {users} users | Cannot login |
Create a new database
Create a new database with the CREATE DATABASE SQL command in psql or the createdb utility command in a terminal. The new database is a copy of the template1 database, unless you specify a different template.
Grant database privileges to users 16 Greenplum Database Getting Started Guide — Chapter 3: Getting Started with Greenplum Database
To use the CREATE DATABASE command, you must be connected to a database. With a
newly installed Greenplum Database system, you can connect to the template1
database to create your first user database. The createdb utility, entered at a shell
prompt, is a wrapper around the CREATE DATABASE command.
In this exercise you will drop the tutorial database if it exists and then create it new
with the createdb utility.
1. Enter these commands to drop the tutorial database if it exists: $ dropdb tutorial
2. Enter the createdb command to create the tutorial database, with the defaults: $ createdb tutorial
3. Verify that the database was created using the psql -l command: $ psql -l
List of databases
Name | Owner | Encoding | Access privileges postgres | gpadmin | UTF8 |
template0 | gpadmin | UTF8 | =c/gpadmin
: gpadmin=CTc/gpadmin template1 | gpadmin | UTF8 | =c/gpadmin
: gpadmin=CTc/gpadmin tutorial | gpadmin | UTF8 |
(4 rows)
4. Connect to the tutorial database as user1, entering the password you created
for user1 when prompted: $ psql -U user1 tutorial Password for user user1: psql (8.2.15)
Type "help" for help. => \q
Grant database privileges to users
In a production database, you should grant users the minimum permissions required to do their work. For example, a user may need SELECT permissions on a table to view
data, but not UPDATE, INSERT, or DELETE to modify the data.
To complete the exercises in this guide, the database users will require permissions to create and manipulate objects in the tutorial database.
1. Connect to the tutorial database as gpadmin. $ psql -U gpadmin tutorial
2. Grant user1 and user2 all privileges on the tutorial database. =# GRANT ALL PRIVILEGES ON DATABASE tutorial TO user1, user2;
Create a schema and set search path 17 Greenplum Database Getting Started Guide — Chapter 3: Getting Started with Greenplum Database
Create a schema and set search path
A database schema is a named container for a set of database objects, including tables, data types, and functions. A database can have multiple schemas. Objects within the schema are referenced by prefixing the object name with the schema name, separated with a period. For example, the person table in the employee schema is written employee.person.
The schema provides a namespace for the objects it contains. If the database is used for multiple applications, each with its own schema, the same table name can be used in each schema—employee.person is a different table than customer.person.
Both tables could be accessed in the same query as long as they are qualified with the schema name.
The database contains a schema search path, which is a list of schemas to search for objects names that are not qualified with a schema name. The first schema in the search path is also the schema where new objects are created when no schema is specified. The default search path is "$user",public, so by default, each object you
create belongs to a schema associated with your login name.
In this exercise, you create an faa schema and set the search path so that it is the
default schema.
1. Change to the directory containing the FAA data and scripts:
$ cd ~/faa
Like the OS shell, psql has a current working directory (CWD), which is initially
the same as your OS shell CWD when you invoke psql. You can change the psql
CWD using the \cd command. Changing to the faa directory allows you to
reference the data files and SQL scripts without having to specify the path.
2. Connect to the tutorial database with psql: $ psql -U user1 tutorial
3. Create the faa schema:
=# DROP SCHEMA IF EXISTS faa CASCADE; =# CREATE SCHEMA faa;
4. Add the faa schema to the search path:
=# SET SEARCH_PATH TO faa, public, pg_catalog, gp_toolkit;
5. View the search path:
=# SHOW search_path;
The search path you set above is not persistent; you have to set it each time you connect to the database. You can associate a search path with the user role by using the
ALTER ROLE command: =# ALTER ROLE user1
Create tables 18 Greenplum Database Getting Started Guide — Chapter 3: Getting Started with Greenplum Database
Then each time you connect to the database with that role, the search path is restored. Learn more about working with database schemas in Greenplum Database DBA Guide.
Create tables
The CREATE TABLE SQL statement creates a table in the database.
About the distribution policy
The definition of a table includes the distribution policy for the data, which has great bearing on system performance. The goals for the distribution policy are to:
• distribute the volume of data and query execution work evenly among the segments, and to
• enable segments to accomplish the most expensive query processing steps locally. The distribution policy determines how data is distributed among the segments. Defining an effective distribution policy requires an understanding of the data’s characteristics, the kinds of queries that will be run once the data is loaded into the database, and what distribution strategies best utilize the parallel execution capacity of the segments.
Use the DISTRIBUTED clause of the CREATE TABLE statement to define the
distribution policy for a table. Ideally, each segment will store an equal volume of data and perform an equal share of work when processing queries. There are two kinds of distribution policies:
• DISTRIBUTED BY (column, ...) defines a distribution key from one or more
columns. A hash function applied to the distribution key determines which segment stores the row. Rows that have the same distribution key are stored on the same segment. If the distribution keys are unique, the hash function ensures the data is distributed evenly. The default distribution policy is a hash on the primary key of the table, or the first column if no primary key is specified.
• DISTRIBUTED RANDOMLY distributes rows in round-robin fashion among the
segments.
When different tables are joined on the same columns that comprise the distribution key, the join can be accomplished at the segments, which is much faster than joining rows across segments. The random distribution policy makes this impossible, so it is best practice to define a distribution key that will optimize joins.
Learn more about table distribution policies in Greenplum Database DBA Guide. Execute the CREATE TABLE script in psql
The CREATE TABLE statements for the faa database are in the
faa/create_dim_tables.sql script. Open the script in a text editor to see the text
of the commands that will be executed when you run the script. The psql\i command executes a script.
Load data into tables 19 Greenplum Database Getting Started Guide — Chapter 3: Getting Started with Greenplum Database
1. Execute the faa/create_dim_tables.sql script: =# \i create_dim_tables.sql CREATE TABLE CREATE TABLE CREATE TABLE CREATE TABLE CREATE TABLE CREATE TABLE
2. List the tables that were created, using the psql\dt command. =# \dt
List of relations
Schema | Name | Type | Owner | Storage faa | d_airlines | table | gpadmin | heap faa | d_airports | table | gpadmin | heap faa | d_cancellation_codes | table | gpadmin | heap faa | d_delay_groups | table | gpadmin | heap faa | d_distance_groups | table | gpadmin | heap faa | d_wac | table | gpadmin | heap (6 rows)
Load data into tables
Loading external data into Greenplum Database tables can be accomplished in different ways. We will use three methods to load the FAA data:
• The simplest data loading method is the SQL INSERT statement. You can execute INSERT statements directly with psql or another interactive client, run a script
containing INSERT statements, or run a client application with a database
connection. This is the least efficient method for loading large volumes of data and should be used only for small amounts of data.
• You can use the COPY command to load the data into a table when the data is in
external text files. The COPY command syntax allows you to define the format of
the text file so the data can be parsed into rows and columns. This is faster than
INSERT statements but, like INSERT statements, it is not a parallel process.
The SQL COPY command requires that external files be accessible to the host
where the master process is running. On a multi-node Greenplum Database system, the data files may be on a file system that is not accessible to the master process. In this case, you can use the psql \copy meta-command, which streams
the data to the server over the psql connection. The scripts in this tutorial use the \copy meta-command.
• You can use a pair of Greenplum utilities, gpfdist and gpload, to load external
data into tables at high data transfer rates. This method takes advantage of the Greenplum Database MPP architecture and is recommended for large data loads. In the following exercises, you load data into the tutorial database using each of
Load data into tables 20 Greenplum Database Getting Started Guide — Chapter 3: Getting Started with Greenplum Database
Load data with the INSERT statement
The faa.d_cancellation_codes table is a simple two-column look-up table, easily
loaded with an INSERT statement.
1. Use the \dpsql meta-command to describe the faa.d_cancellation_codes
table:
=# \d d_cancellation_codes
Table "faa.d_cancellation_codes" Column | Type | Modifiers cancel_code | text |
cancel_desc | text |
Distributed by: (cancel_code)
2. Load the data into the table with a multirow INSERT statement: =# INSERT INTO faa.d_cancellation_codes
VALUES ('A', 'Carrier'), ('B', 'Weather'), ('C', 'NAS'), ('D', 'Security'), ('', 'none');
Alternatively, use the \i meta-command to execute the insert_into_cancellation_codes.sql script.
3. Display the data:
=# SELECT * FROM faa.d_cancellation_codes ORDER BY cancel_code; cancel_code | cancel_desc | none A | Carrier B | Weather C | NAS D | Security (5 rows)
Load data with the COPY statement
The COPY statement moves data between the file system and database tables. Data for
five of the FAA tables is in the following CSV-formatted text files:
1. In a text editor, review the .csv data files. • L_AIRLINE_ID.csv
• L_AIRPORTS.csv
• L_DISTANCE_GROUP_250.csv • L_ONTIME_DELAY_GROUPS.csv • L_WORLD_AREA_CODES.csv
Load data into tables 21 Greenplum Database Getting Started Guide — Chapter 3: Getting Started with Greenplum Database
Notice that the first line of each file contains the column names and that the last line of the file contains the characters “\.”, which signals the end of the input
data.
2. In a text editor, review the following scripts:
• copy_into_airlines.sql • copy_into_airports.sql • copy_into_delay_groups.sql • copy_into_distance_groups.sql • copy_into_wac.sql
The HEADER keyword prevents the \copy command from interpreting the column
names as data.
3. Run the scripts:
=# \i copy_into_airlines.sql =# \i copy_into_airports.sql =# \i copy_into_delay_groups.sql =# \i copy_into_distance_groups.sql =# \i copy_into_wac.sql
Load data with gpdist
For the FAA fact table, we will use an ETL (Extract, Transform, Load) process to load data from the source gzip files into a loading table, and then insert the data into a query and reporting table. For the best load speed, use the gpfdist Greenplum utility
to distribute the rows to the segments.
In a production system, gpfdist runs on the servers where the data is located. With a
single-node Greenplum Database instance, there is only one host, and you run gpdist
on it. Starting gpfdist is like starting a file server; there is no data movement until a
request is made on the process.
Note: This exercise loads data using the Greenplum Database external table feature to move data from external data files into the database. Moving data between the database and external tables is a security consideration, so only superusers are permitted to use the feature. Therefore, you will run this exercise as the gpadmin
database user.
1. Start a new terminal and execute gpfdist. Use the –d switch to set the “home”
directory used to search for files in the faa directory. Use the –p switch to set the
port and background the process.
$ gpfdist -d $HOME/faa -p 8081 > gpfdist.log 2>&1 & [1] 5231
2. Check that gpfdist is running with the ps command: $ ps -A | grep gpfdist
5231 ttys001 0:00.00 gpfdist -d /home/gpadmin/faa -p 8081 5257 ttys001 0:00.00 grep gpfdist
3. View the contents of the gpfdist log. $ cat gpfdist.log
Load data into tables 22 Greenplum Database Getting Started Guide — Chapter 3: Getting Started with Greenplum Database
Disregard any warning about the bind function failing.
4. In another terminal, start a psql session as gpadmin and execute the create_load_tables.sql script.
=# \i create_load_tables.sql
This script creates two tables: the faa_otp_load table, into which gpdist will
load the data, and the faa_load_errors table, where load errors will be logged.
(The faa_load_errors table may already exist. Ignore the error message.) The faa_otp_load table is structured to match the format of the input data from the
FAA Web site.
5. Create an external table definition with the same structure as the faa_otp_load
table.
=# \i create_ext_table.sql
CREATE EXTERNAL TABLE faa.ext_load_otp
psql:./create_ext_table.sql:5: NOTICE: HEADER means that each one of the data files has a header row.
CREATE EXTERNAL TABLE
This is a pure metadata operation. No data has moved from the data files on the host to the database yet. The external table definition references files in the faa
directory that match the pattern otp*.gz. There are two matching files, one
containing data for December 2009, the other for January 2010.
6. Move data from the external table to the faa_otp_load table. =# INSERT INTO faa.faa_otp_load
SELECT * FROM faa.ext_load_otp;
NOTICE: Found 26526 data formatting errors (26526 or more input rows). Rejected related input data.
INSERT 0 1024552
Greenplum moves data from the gzip files into the load table in the database. In a production environment, you could have many gpfdist processes running, one
on each host or several on one host, each on a separate port number.
7. Examine the errors briefly. (The \x onpsql meta-command changes the display
of the results to one line per column, which is easier to read for some result sets.)
=# \x on
Expanded display is on.
=# SELECT DISTINCT relname, errmsg, count(*) FROM faa.faa_load_errors
GROUP BY 1,2;
-[ RECORD 1 ]---relname | ext_load_otp
errmsg | invalid input syntax for integer: "", column deptime count | 55614
The problem is that, for some flights, the CSV file contains an empty string ("") in the deptime column where an integer is expected.
Loading Data with gpload
Greenplum provides a wrapper program for gpfdist called gpload that does much
Load data into tables 23 Greenplum Database Getting Started Guide — Chapter 3: Getting Started with Greenplum Database
In this exercise, you reload the faa_otp_load table using the gpload utility.
1. Since gpload executes gpfdist, you must first kill the gpfdist process you
started in the previous exercise.
$ ps -A | grep gpfdist
5012 ttys000 0:00.00 grep gpfdist
2498 ttys001 0:03.38 gpfdist -d /Users/gpadmin/faa -p 8081
Your process id will not be the same, so kill the appropriate one with the kill
command, or just use the simpler killall command: $ killall gpfdist
2. Edit and customize the gpload.yaml input file. Be sure to set the correct path to
the faa directory. Notice the TRUNCATE: true preload instruction ensures that
the data loaded in the previous exercise will be removed before the load in this exercise starts.
$ vi gpload.yaml
---VERSION: 1.0.0.1
# describe the Greenplum database parameters DATABASE: tutorial
USER: gpadmin HOST: localhost PORT: 5432
# describe the location of the source files
# in this example, the database master lives on the same host as the source files
GPLOAD: INPUT: - SOURCE: LOCAL_HOSTNAME: - gp-single-host PORT: 8081 FILE: - /home/gpadmin/faa/otp*.gz - FORMAT: csv - QUOTE: '"' - ERROR_LIMIT: 50000 - ERROR_TABLE: faa.faa_load_errors OUTPUT: - TABLE: faa.faa_otp_load - MODE: INSERT PRELOAD: - TRUNCATE: true
3. Execute gpload with the gpload.yaml input file. (Include the -v flag if you
want to see details of the loading process.)
$ gpload -f gpload.yaml -l gpload.log
2014-01-27 15:05:24|INFO|gpload session started 2014-01-27 15:05:24
2014-01-27 15:05:24|INFO|started gpfdist -p 8081 -P 8082 -f "/home/gpadmin/faa/otp*.gz" -t 30
Load data into tables 24 Greenplum Database Getting Started Guide — Chapter 3: Getting Started with Greenplum Database
2014-01-27 15:05:58|WARN|26528 bad rows
2014-01-27 15:05:58|INFO|running time: 34.55 seconds 2014-01-27 15:05:59|INFO|rows Inserted = 1024552 2014-01-27 15:05:59|INFO|rows Updated = 0
2014-01-27 15:05:59|INFO|data formatting errors = 0 2014-01-27 15:05:59|INFO|gpload succeeded with warnings
Create and load fact tables
The final step of the ELT process is to move data from the load table to the fact table. For the FAA example, you create two fact tables. The faa.otp_r table is a
row-oriented table, which will be loaded with data from the faa.faa_otp_load
table. The faa.otp_c table has the same structure as the faa.otp_r table, but is
column-oriented and partitioned. You will load it with data from the faa.otp_r table.
The two tables will contain identical data and allow you to experiment with a column-oriented and partioned table in addition to a traditional row-oriented table.
1. Create the faa.otp_r and faa.otp_c tables by executing the create_fact_tables.sql script.
=# \i create_fact_tables.sql
Review the create_fact_tables.sql script and note that some columns are
excluded from the fact table and the data types of some columns are cast to a different datatype. The MADlib routines usually require float8 values, so the numeric columns are cast to float8 as part of the transform step.
2. Load the data from the faa_otp_load table into the faa.otp_r table using the
SQL INSERT FROM statement. Load the faa.otp_c table from the faa.otp_r
table. Both of these loads can be accomplished by running the
load_into_fact_table.sql script. =# \i load_into_fact_table.sql
Data loading summary
The ability to load billions of rows quickly into the Greenplum database is one of its key features. Using “Extract, Load and Transform” (ELT) allows load processes to make use of the massive parallelism of the Greenplum system by staging the data (perhaps just the use of external tables) and then applying data transformations within Greenplum Database. Set-based operations can be done in parallel, maximizing performance.
With other loading mechanisms such as COPY, data is loaded through the master in a
single process. This does not take advantage of the parallel processing power of the Greenplum segments. External tables provide a means of leveraging the parallel processing power of the segments for data loading. Also, unlike other loading mechanisms, you can access multiple data sources with one SELECT of an external
table.
External tables make static data available inside the database. External tables can be defined with file:// or gpfdist:// protocols. gpfdist is a file server program
that loads files in parallel. Since the data is static, external tables can be rescanned during a query execution.
Queries and performance tuning 25 Greenplum Database Getting Started Guide — Chapter 3: Getting Started with Greenplum Database
External Web tables allow http:// protocol or an EXECUTE clause to execute an
operating system command or script. That data is assumed to be dynamic—query plans involving Web tables do not allow rescanning because the data could change during query execution. Execution plans may be slower, as data must be materialized (I/O) if it cannot fit in memory.
The script or process to populate a table with external Web tables may be executed on every segment host. It is possible, therefore, to have duplication of data. This is something to be aware of and check for when using Web tables, particularly with SQL extract calls to another database.
Queries and performance tuning
This section introduces some of the basic principles of query and performance tuning in a Greenplum database.
Some items to consider in performance tuning:
• VACUUM and ANALYZE • Explain plans
• Indexing
• Column or row orientation • Set based vs. row based • Distribution and partitioning
VACUUM and ANALYZE
Greenplum uses Multiversion Concurrency Control (MVCC) to guarantee isolation, one of the ACID properties of relational databases. MVCC enables multiple users of the database to obtain consistent results for a query, even if the data is changing as the query is being executed. There can be multiple versions of rows in the database, but a query sees a snapshot of the database at a single point in time, containing only the versions of rows that were valid at that point in time. When a row is updated or deleted and no active transactions continue to reference it, it can be removed. The VACUUM
command removes older versions that are no longer needed, leaving free space that can be reused.
In a Greenplum database, normal OLTP operations do not create the need for vacuuming out old rows, but loading data while tables are in use may. It is a best practice to VACUUM a table after a load. If the table is partitioned, and only a single
partition is being altered, then a VACUUM on that partition may suffice.
The VACUUM FULL command behaves much differently than VACUUM, and its use is not
recommended in Greenplum databases. It can be expensive in CPU and I/O, cause bloat in indexes, and lock data for long periods of time.
The ANALYZE command generates statistics about the distribution of data in a table. In
particular it stores histograms about the values in each of the columns. The query optimizer depends on these statistics to select the best plan for executing a query. For example, the optimizer can use distribution data to decide on join orders. One of the
Queries and performance tuning 26 Greenplum Database Getting Started Guide — Chapter 3: Getting Started with Greenplum Database
optimizer’s goals in a join is to minimize the volume of data that must be analyzed and potententially moved between segments by using the statistics to choose the smallest result set to work with first.
Analyze the tables
After a load you should analyze the tables, using the ANALYZE command. This gathers
statistics on the data distribution, which the optimizer uses to choose an explain plan. Unanalyzed tables lead to less than optimal explain plans and less than optimal query performance.
1. Run the ANALYZE command on each of the tables: => ANALYZE faa.d_airports; ANALYZE => ANALYZE faa.d_airlines; ANALYZE => ANALYZE faa.d_wac; ANALYZE => ANALYZE faa.d_cancellation_codes; ANALYZE => ANALYZE faa.faa_otp_load; ANALYZE => ANALYZE faa.otp_r; ANALYZE => ANALYZE faa.otp_c; ANALYZE
View explain plans
An explain plan explains the method the optimizer has chosen to produce a result set. Depending on the query, there can be a variety of methods to produce a result set. The optimizer calculates the cost for each method and chooses the one with the lowest cost. In large queries, cost is generally measured by the amount of I/O to be performed.
An explain plan does not do any actual query processing work. Explain plans use statistics generated by the ANALYZE command, so plans generated before and after
running ANALYZE can be quite different. This is especially true for queries with
multiple joins, because the order of the joins can have a tremendous impact on performance.
In the following exercise, you will generate some small tables that you can query and view some explain plans.
Note: In the results in this section, long lines are reformatted for easier reading.
1. Enable timing so that you can see the effects of different performance tuning measures.
=> \timing on
Queries and performance tuning 27 Greenplum Database Getting Started Guide — Chapter 3: Getting Started with Greenplum Database
=> \i create_sample_table.sql
DROP TABLE
Time: 18.777 ms SET
Time: 0.800 ms
psql:create_sample_table.sql:3: NOTICE: CREATE TABLE will create implicit sequence "sample_id_seq" for serial column "sample.id" CREATE TABLE Time: 12.718 ms INSERT 0 1000000 Time: 32776.929 ms UPDATE 1000000 Time: 1411.764 ms UPDATE 50000 Time: 680.276 ms UPDATE 1000000 Time: 1748.169 ms
The script has created the sample table, inserted one million rows, and some data.
3. Request the explain plan for the COUNT() aggregate.
=> EXPLAIN SELECT COUNT(*) FROM sample WHERE id > 100;
QUERY PLAN Aggregate (cost=16367.17..16367.18 rows=1 width=8)
-> Gather Motion 2:1 (slice1; segments: 2) (cost=16367.11..16367.15 rows=1 width=8)
-> Aggregate (cost=16367.11..16367.12 rows=1 width=8) -> Seq Scan on sample (cost=0.00..13863.80 rows=500662 width=0) Filter: id > 100
(5 rows)
Time: 2.459 ms
Query plans are read from bottom to top. In this example, there are four steps. First there is a sequential scan on each segment server to access the rows. Then there is an aggregation on each segment server to produce a count of the number of rows from that segment. Then there is a gathering of the count value to a single location. Finally, the counts from each segment are aggregated to produce the final result.
The cost number on each step has a start and stop value. For the sequential scan, this begins at time zero and goes until 13863.80. This is a fictional number created by the optimizer—it is not a number of seconds or I/O operations.
The cost numbers are cumulative, so the cost for the second operation includes the cost for the first operation. Notice that nearly all the time to process this query is in the sequential scan.
4. The EXPLAIN ANALYZE command actually runs the query (without returning the
result set). The cost numbers reflect the actual timings. It also produces some memory and I/O statistics.