Cover
SINAMICS V: Positioning the V20 in
STEP 7-Micro/Win with the S7-200
PLC over the USS protocol
SINAMICS V20 (3AC400V 1.5kW Unfiltered),
SIMATIC S7-224XP
Application Description August 2012
C o pyr ight Si em ens AG Error! Unknown d o cument property na me. A ll rig h ts re se rved SIN AM IC S_V 20_c on ne ct to _S 7-200 vi a U SS .doc Error! Unk n o w n doc ume n t prop erty na me.
Siemens Industry Online Support
This article is taken from the Siemens Industry Online Support. The following link takes you directly to the download page of this document:
http://support.automation.siemens.com/WW/view/en/<Item-ID>
Caution
The functions and solutions described in this article confine themselves to the realization of the automation task predominantly. Please take into account furthermore that corresponding protective measures have to be taken up in the context of Industrial Security when connecting your equipment to other parts of the plant, the enterprise network or the Internet. Further information can be found under the Item-ID 50203404.
http://support.automation.siemens.com/WW/view/en/50203404
You can also actively use our Technical Forum from the Siemens Industry Online Support regarding this subject. Add your questions, suggestions and problems and discuss them together in our strong forum community:
C o pyr ight Si em ens AG Error! Unknown d o cument property na me. A ll rig h ts re se rved
s
Task
1
2
Automation solution
3
Functional mechanisms
Commissioning
4
SIMATIC, SINAMICS
5
Operation
SINAMICS V: Positioning the V20
in STEP 7-Micro/WIN with the
Literature
6
S7-200 PLC over the USS protocol
7
History
Warranty and liability C o pyr ight Si em ens AG Error! Unknown d o cument property na me. A ll rig h ts re se rved
Warranty and liability
Note The Application Examples are not binding and do not claim to be complete
regarding the circuits shown, equipping and any eventuality. The Application Examples do not represent customer-specific solutions. They are only intended to provide support for typical applications. You are responsible for ensuring that the described products are used correctly. These application examples do not relieve you of the responsibility to use safe practices in application, installation, operation and maintenance. When using these Application Examples, you recognize that we cannot be made liable for any damage/claims beyond the liability clause
described. We reserve the right to make changes to these Application Examples at any time without prior notice.
If there are any deviations between the recommendations provided in these application examples and other Siemens publications – e.g. Catalogs – the contents of the other documents have priority.
We do not accept any liability for the information contained in this document. Any claims against us – based on whatever legal reason – resulting from the use of the examples, information, programs, engineering and performance data etc., described in this Application Example shall be excluded. Such an exclusion shall not apply in the case of mandatory liability, e.g. under the German Product Liability Act (“Produkthaftungsgesetz”), in case of intent, gross negligence, or injury of life, body or health, guarantee for the quality of a product, fraudulent concealment of a deficiency or breach of a condition which goes to the root of the contract (“wesentliche Vertragspflichten”). The damages for a breach of a substantial contractual obligation are, however, limited to the foreseeable damage, typical for the type of contract, except in the event of intent or gross negligence or injury to life, body or health. The above provisions do not imply a change of the burden of proof to your detriment.
Any form of duplication or distribution of these Application Examples or excerpts hereof is prohibited without the expressed consent of Siemens Industry Sector.
Table of contents C opyr ight Si em ens AG Error! Unknown d o cument property na me. A ll rig h ts re se rved
Error! Unknown docu
ment property nam
e
.
Table of contents
Warranty and liability... 4
Table of contents ... 5
1 Task... 6
1.1 Overview of the automation task... 6
1.2 Sequence control ... 7
2 Automation solution... 8
2.1 Hardware and software components used... 8
2.2 Setup ... 9
3 Functional mechanisms... 11
3.1 USS protocol ... 11
3.2 Communication program... 12
3.2.1 Initialize interface... 12
3.2.2 USS control block... 13
4 Commissioning... 16
4.1 Installing and wiring the hardware... 16
4.2 Downloading the SIMATIC program ... 17
4.3 V20 commissioning ... 22
4.3.1 Introduction to the built-in BOP ... 22
4.3.2 Inverter parameters setting ... 24
5 Operation... 28 5.1 Jog reverse... 28 5.2 Jog forward... 29 5.3 Auto mode ... 30 6 Related literature ... 31 7 History... 32
1 Task 1.1 Overview of the automation task
C o pyr ight Si em ens AG Error! Unknown d o cument property na me. A ll rig h ts re se rved
1 Task
Communication between an inverter and a PLC is often required in a diversity of general motion control applications. Taking reciprocating motions for example, communication between a controller (S7-200)and a frequency inverter (SINAMICS V20) takes place with the aid of the USS protocol.
1.1
Overview of the automation task
In the application, the inverter controls a motor. The motor controls a toothed belt through a gearbox. A mechanical arm in the toothed belt reciprocates horizontally at a speed set point within the specified range.
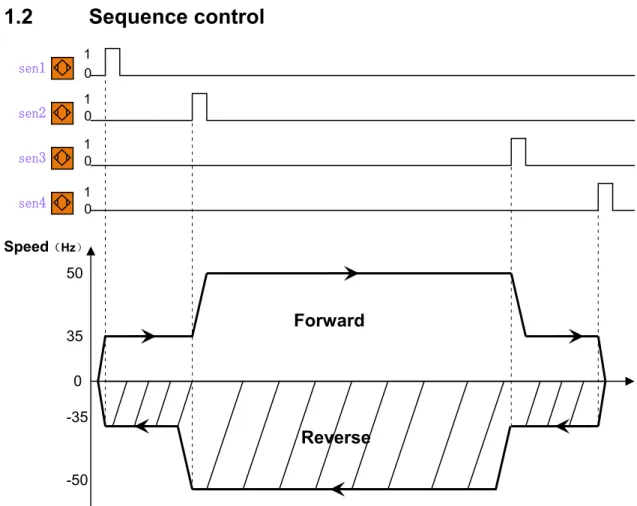
1 Task 1.2 Sequence control C o pyr ight Si em ens AG Error! Unknown d o cument property na me. A ll rig h ts re se rved
1.2 Sequence
control
Forward
Reverse
Speed(Hz) 0 35 -35 50 -50 0 1 0 1 0 1 1 0 sen4 sen3 sen2 sen1Figure 1-1 --- Description of movement
Motion control requirements:
Switch off the Jog/Auto mode button. Switch on the Jog reverse or Jog forward button and the motor can run at 30Hz.
Switch on the Jog/Auto mode button, the toothed belt reciprocates between the positions of sen1and sen4 automatically.
To improve the stability of the system, there are two deceleration signals sen2 and sen3, the motor speed within the positions of sen2 and sen3 is not less than 50Hz, and the speed is changed to 35Hz in other positions.
If the drive displays a fault code, the fault light will light. And press the reset button can reset fault light.
Control mode:
The sensor signals are read into the PLC via digital input modules and the frequency converter is activated accordingly by the PLC.
PLC deals with these digital inputs and issues commands to the inverter.
Note
These sensors used in the application example are inductive BERO proximity switches, which will not cause mechanical wear. Working principle: When the permeable material approaches the switch sensing surface, the magnetic field is subject to decay, causing the change of the output signal of the switch.
2 Automation solution 2.1 Hardware and software components used
C o pyr ight Si em ens AG Error! Unknown d o cument property na me. A ll rig h ts re se rved
2 Automation
solution
2.1
Hardware and software components used
Hardware components
No. Component Order number Quantity
1 SIMATIC S7-200 CPU 224XP 6ES7214-2BD23-0XB0 1 2 SINAMICS V20 1.5Kw without filter; FSA1* 6SL3210-5BE21-5UV0 1
3 Transformer(380V/220V)2* 1 4 Motor 1.1kW 1LA7083-4AA60 1 5 Sensor3* 3RG40-13-0AG01 4 3RV1021-1JA10 1 6 Circuit breaker 2RV1021-1JA10 1 JOG/AUTO switch button 3SB3602-2KA11 1 Jog forward/Jog reverse button 3SB3610-2EA11 1
Reset button 3SB3602-0AA31 1
7
Fault light 3SB3644-6BA20 1
PC/PPI cable(COM connection) 6ES7901-3CB30-0XA0 8
USB/PPI cable(COM connection 6ES7901-3DB30-0XA0 1
9 RS-485 Terminator 6SL3255-0VC00-0HA0 1
1* The SINAMICS V20 order number information given in the table indicates that the mains supply voltage for the inverter is 3AC 380V and the inverter is an unfiltered variant. Some variants of SINAMICS V20 inverters also support the mains supply of 1AC 220V. Select the desired models according to your specific requirements. For more information about order numbers, access the following Web site:
http://support.automation.siemens.com/CN/view/en/62072319
2* The PLC order number information indicates that the CPU requires a 1AC 220 mains power supply. Select this transformer since in China, the mains supply voltage used in factories are usually 3AC 380V.
3* These sensors are inductive BERO proximity switches, rated operating distance is 5mm, dimension is M18*54mm, rated current is 200mA, rated voltage is DC15-34V, protection class is IP67, digital output NO, PNP type.
Software components
User can order these CDs that contain the following software tools:
No. Component Order number Quantity
1 STEP7 Micro/WIN V4.0 SP6 6ES7810-2CC03-0YX0 1 2 S7-200 Instruction Library 6ES7830-2BC00-0YX0 1
Note
Most of the hardware components shown in the table are commercially available in the global market. If unavailable in your country (or region), find an appropriate substitute at your own discretion.
The table lists key hardware components required for this
project. Other accessories such as cables and wires, supports, terminal strips, and so on can be purchased separately.
2 Automation solution 2.2 Setup C o pyr ight Si em ens AG Error! Unknown d o cument property na me. A ll rig h ts re se rved
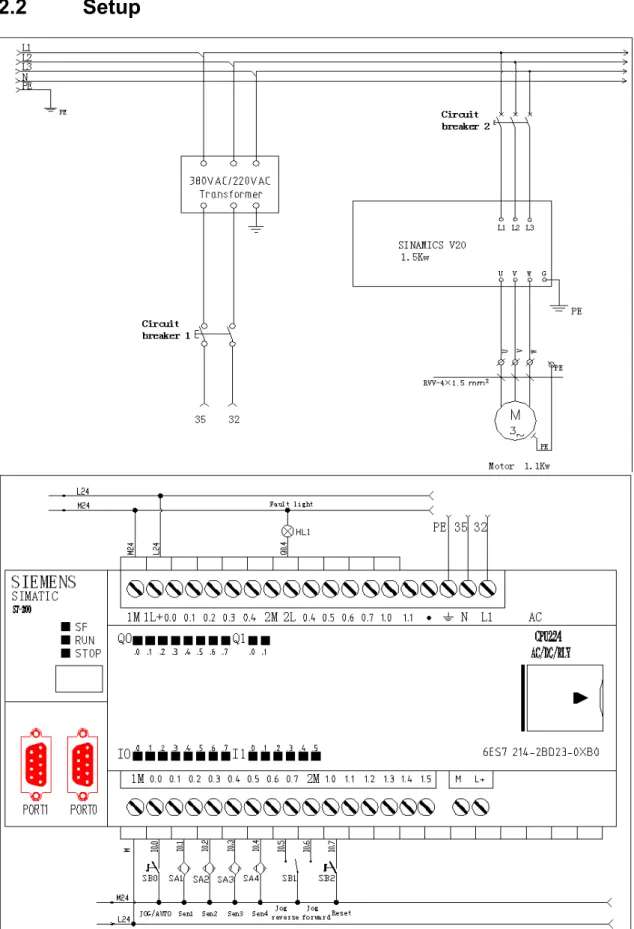
2.2 Setup
2 Automation solution 2.2 Setup C o pyr ight Si em ens AG Error! Unknown d o cument property na me. A ll rig h ts re se rved
Note This system connection diagram is applicable only to users in China.
The mains power for L1, L2, L3 is 3AC 380V. The ordering information table for hardware components shows that this project uses the 3AC 380V mains supply for the SINAMICS V20. The power supply voltage for the SINAMICS S7-200 CPU 224XP is 1AC 220. To be on the safe side, Siemens recommends that you install a transformer to convert the 3AC 380V voltage to the 1AC 220V voltage in order to supply the correct voltage for the PLC.
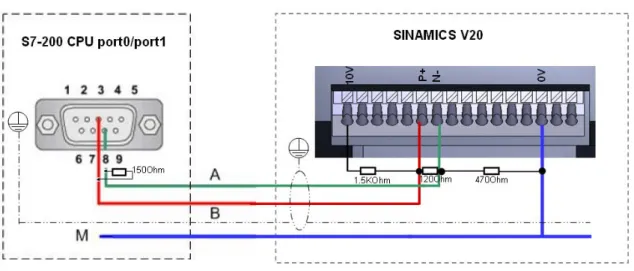
Figure 2-2 Bus connections
Note The SINAMICS V20 supports communication with Siemens PLC over USS on
RS485. You can parameterize whether the RS485 interface shall apply USS protocol. USS is the default bus setting. A screened twisted pair cable is recommended for the RS485 communication.
Make sure that you terminate the bus correctly by fitting a 120 R bus termination resistor between the bus terminals (P+, N-) of the device at one end of the bus and a termination network between the bus terminals of the device at the other end of the bus. The termination network should be a 1.5 k resistor from 10 V to P+, 120 R from P+ to N- and 470 R from N- to 0 V. A suitable termination network is available from your Siemens dealer.
3 Functional mechanisms 3.1 USS protocol C o pyr ight Si em ens AG Error! Unknown d o cument property na me. A ll rig h ts re se rved
3 Functional
mechanisms
3.1 USS
protocol
The USS protocol was developed in order to exchange process data between a master and one or more slave stations on an RS485 bus. Each bus station is identified by a unique bus address. The STEP7-Micro/WIN Instruction Libraries provide subroutines, interrupt routines, and
instructions to support the USS protocol.
The USS protocol is an interrupt driven application. In the worst case, the receive message interrupt routine requires up to 2.5 ms to execute. During this time, all other interrupt events are queued for service after the receive message interrupt routine has been executed. If your application cannot tolerate this worst case delay, then you may want to consider other solutions for controlling drives.
Initializing the USS protocol dedicates a S7-200 SMART CPU port for USS communications. You use the USS_INIT instruction to select either USS or PPI for port 0 or port 1. (USS refers to the USS protocol for Siemens drives.) When a port is set to use the USS protocol for
communicating with drives, you cannot use the port for any other purpose, including communicating with an HMI. The second communications port allows STEP 7-Micro/WIN SMART to monitor the control program while USS protocol is running.
The USS instructions affect all of the SM locations that are associated with Freeport communication on the assigned port.
The USS subroutines and interrupt routines are stored in your program. The USS instructions increase the amount of memory required for your program by up to 3050 bytes. Depending on the specific USS instructions used, the support routines for these instructions can increase the overhead for the control program by at least 2150 bytes and up to 3050 bytes.
The variables for the USS instructions require a 400-byte block of V memory. The starting address for this block is assigned by the user and is reserved for USS variables.
Some of the USS instructions also require a 16-byte communications buffer. As a parameter for the instruction, you provide a starting address in V memory for this buffer. It is recommended that a unique buffer be assigned for each instance of USS instructions.
When performing calculations, the USS instructions use accumulators AC0 to AC3. You can also use the accumulators in your program; however, the values in the accumulators will be changed by the USS instructions.
The USS instructions cannot be used in an interrupt routine.
Note To change the operation of a port back to PPI so that you can communicate with STEP 7-Micro/WIN, use another USS_INIT instruction to reassign the port to PPI operation.
You can also set the mode switch on the S7-200 to STOP mode. This resets the parameters for the port. Be aware that stopping the communication to the drives also stops the drives.
3 Functional mechanisms 3.2 Communication program C o pyr ight Si em ens AG Error! Unknown d o cument property na me. A ll rig h ts re se rved
3.2 Communication
program
3.2.1 Initialize interfaceBefore sending a command from the controller to a slave, make sure that you activate the initialization of the interface of the S7-200 controller. This is achieved using the USS_INIT block, which among other things fixed the baud rate (see Figure 3-1).
Figure 3-1
Input/Output Date Type Value
EN BOOL Initialization is required after every time the communication state is changed. The EN channel should be pulsed to activate this initialization.
Mode BYTE Choose communication protocol by using following USS input value.
1: Select USS protocol for port 0. And start using this protocol.
0: Select PPI protocol for port 0. And stop using USS protocol.
Baud DWORD Baud rate:1200,2400,4800,9600, 19200
Active DWORD Active drive address
Done BOOL After execute USS_INIT instruction Done=1. Error BYTE If something is wrong with executing
instructions, an error code is displayed.
Table 3-1 Function block definition
An RS485 bus transmission uses the USS protocol via a 2-wire connection between a master (e.g. CPU 224XP) and up to 32 slaves (e.g. SINAMICS V20) It is necessary here to identify each slave via a unique address between 0 and 31.
3 Functional mechanisms 3.2 Communication program C o pyr ight Si em ens AG Error! Unknown d o cument property na me. A ll rig h ts re se rved
3.2.2 USS control block
The inputs of the USS_CTRL function block are used to control the inverter and set the desired speed. The inverter status signals are provided by the outputs of the USS_CTRL block.
The USS_CTRL (port 0) or USS_CTRL_P1 (port 1) instruction is used to control an ACTIVE Micro Master drive. The USS_CTRL instruction places the selected commands in a
communication buffer, which is then sent to the addressed drive (DRIVE parameter), if that drive has been selected in the ACTIVE parameter of the USS_INIT instruction.
Only one USS_CTRL instruction should be assigned to each drive.
Figure 3-2
The EN bit must be on to enable the USS_CTRL instruction. This instruction should always be enabled.
RUN (RUN/STOP) indicates whether the drive is ON (1) or OFF (0). When the RUN bit is on, the Micro Master drive receives a command to start running at the specified speed and direction. In order for the drive to run, the following must be true:
DRIVE must be selected as ACTIVE in USS_INIT.
OFF2 and OFF3 must be set to 0.
FAULT and INHIBIT outputs must be 0.
When RUN is off, a command is sent to the Micro Master drive to ramp the speed down until the motor comes to a stop. The OFF2 bit is used to allow the Micro Master drive to coast to a stop. The OFF3 bit is used to command the Micro Master drive to stop quickly.
3 Functional mechanisms 3.2 Communication program C o pyr ight Si em ens AG Error! Unknown d o cument property na me. A ll rig h ts re se rved
The F_ACK (Fault Acknowledge) bit is used to acknowledge a fault in the drive. The drive clears the fault (Fault) when F_ACK goes from 0 to 1.
The DIR (direction) bit indicates in which direction the drive should move.
The Drive (drive address) input is the address of the Micro Master drive to which the USS_CTRL command is to be sent. Valid addresses: 0 to 31
The Type (drive type) input selects the type of drive. For a Micro Master 3 (or earlier) drive, set Type to 0. For a Micro Master 4 drive, set Type to 1.
Speed_SP (speed setpoint) is drive speed as a percentage of full speed. Negative values of Speed_SP cause the drive to reverse its direction of rotation. Range: -200.0% to 200.0%.
The inputs of speed: The speed setpoint is a percentage of the full speed, and the full speed can be set with P2000. Furthermore, the value of P2000<= P1082.
a. P2000 represents the reference frequency for frequency values which are displayed and transferred as a percentage or a hexadecimal value.
b. P1082 represents the maximum frequency. Set maximum motor frequency at which motor runs irrespective of the frequency setpoint. The value set here is valid for both clockwise and anticlockwise rotations.
Detail of speed signal:
a. Hexadecimal 4000H means 100 %==> P2000 b. Real 100.0 means 100% ==> P2000
Figure 3-3
For example, the speed_set register is VD0, and we set P2000=50Hz
3 Functional mechanisms 3.2 Communication program C o pyr ight Si em ens AG Error! Unknown d o cument property na me. A ll rig h ts re se rved
Fault indicates the state of the fault bit (0 - no fault, 1 - fault). The drive displays the fault code. (Refer to the manual for your drive). To clear the Fault bit, correct the cause of the fault and turn on the F_ACK bit.
Inhibit indicates the state of the inhibit bit on the drive (0 - not inhibited, 1 - inhibited). To clear the inhibit bit, the Fault bit must be off, and the RUN, OFF2, and OFF3 inputs must also be off.
D_Dir indicates the drive's direction of rotation.
Run_EN (RUN enable) indicates whether the drive is running (1) or stopped (0).
Speed is drive speed as a percentage of full speed. Range: -200.0% to 200.0%
Status is the raw value of the status word returned by the drive.
Error is an error byte that contains the result of the latest communication request to the drive. The Iinstructions, topic defines the error conditions that could result from executing the instruction.
The Resp_R (response received) bit acknowledges a response from the drive. All the Active drives are polled for the latest drive status information. Each time the S7-200 receives a response from the drive, the Resp_R bit is turned on for one scan and all the following values are updated
Input/Output Date Type Value
EN BOOL Generally activated.
RUN BOOL Indicate the state of drive, activated (1) or forbidden(0). OFF2 BOOL Allow V20 tapper off.
OFF3 BOOL Allow V20 fleetly stop. F _ACK BOOL Reset V20 failure.
DIR BOOL V20 turning direction 0:Anticlockwise 1:Clockwise
Drive BYTE V20 address 0-31
Type BYTE Select the type of drive. For V20 drive, set Type to 1. Speed_SP REAL
Drive speed as a percentage of full speed.
REAL:-200~~200/-200~~200%, if negative value,V20 reverse
Resp_R BOOL Poll V20,when scan=1,update following value. Error BYTE Wrong word. Look for: Error of executing USS instruction. Status WORD V20 return to state value.
Speed REAL V20 actually speeds as a percentage of full speed. Range:-200.0% to 200.0%. Run_EN BOOL V20 run state 1:run;0:stop
D_DIR BOOL V20 turning direction 0:anticlockwise ;1:clockwise Inhibit BOOL State of V20 forbidden position 0:start; 1:forbidden Fault BOOL Indicate state of fault. Refer to V20 error list to confirm error
Table3-2 Function block definition
Note To clear forbidden positions, make sure you clear the active faults RUN, OFF2,
4 Commissioning 4.1 Installing and wiring the hardware
C o pyr ight Si em ens AG Error! Unknown d o cument property na me. A ll rig h ts re se rved
4 Commissioning
4.1
Installing and wiring the hardware
The USS protocol allows only one master which does not require an assigned address.
Figure 4-1 Configuring S7-200 with Micro/WIN Project
Note It is assumed here that the necessary software has been installed on your
computer and that you are familiar with handing the software.
Furthermore it is assumed, that STEP7 Micro/WIN has been installed on the standard Windows PC for operator control.
CAUTION Please make sure that the reader clearly realizes
Please carefully read all safety and warning notices given in the operating instructions on the frequency converter and all warning labels attached to the device before doing any installation and commissioning procedures. Please maintain warning labels in a legible condition and do not remove them from the device.
4 Commissioning 4.2 Downloading the SIMATIC program
C o pyr ight Si em ens AG Error! Unknown d o cument property na me. A ll rig h ts re se rved
4.2
Downloading the SIMATIC program
This chapter describes the steps for the installation of the example code.
We offer you examples with test code test parameters as a download. The software examples support you during the first steps and tests with your STEP7-Micro/WIN. The enable quick testing of hardware and software interfaces between the products described in the tool.
No. Action Remarks
1. Start STEP7-Micro/WIN.
4 Commissioning 4.2 Downloading the SIMATIC program
C o pyr ight Si em ens AG Error! Unknown d o cument property na me. A ll rig h ts re se rved
No. Action Remarks
3. Call up “PLC”. Click “PLC” and select the right “PLC Type”. (All types of S7-200 are available.)
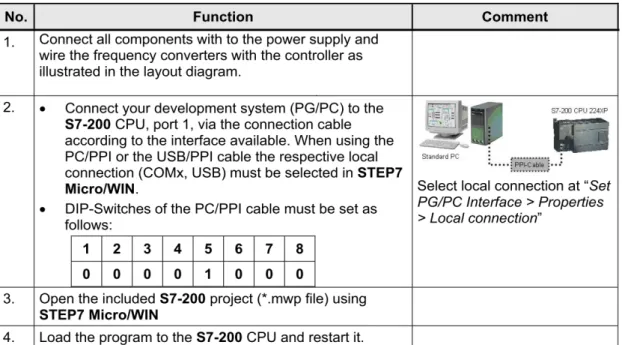
4. Double click “Communications > Set PG/PC Interface...” to open the settings of the online interface.
4 Commissioning 4.2 Downloading the SIMATIC program
C o pyr ight Si em ens AG Error! Unknown d o cument property na me. A ll rig h ts re se rved
No. Action Remarks
5. Select “PC/PPI cable (PPI)” in connection with the selected network card
6. Call up the “Properties”. Click “PPI” and choose “Multiple master networks”.
4 Commissioning 4.2 Downloading the SIMATIC program
C o pyr ight Si em ens AG Error! Unknown d o cument property na me. A ll rig h ts re se rved
No. Action Remarks
7. Click on “Local Connection”. If you use “USB/PPI Multi-Master Cable”, choose “USB”.
If you use “RS232/PPI Multi-Master Cable”, choose COM”.
Then click “OK”.
8. Double click “Communications > Communication ports”.
Set the appropriate values, especial the “Baud Rate”. Then click “OK”.
4 Commissioning 4.2 Downloading the SIMATIC program
C o pyr ight Si em ens AG Error! Unknown d o cument property na me. A ll rig h ts re se rved
No. Action Remarks
9. Double click “Communications > Communications”. If you click “Double-Click to Refresh”, the type of PLC used will appear. Click “OK”.
10. To download the program, click “ “and select “Download”.
4 Commissioning 4.3 V20 commissioning C o pyr ight Si em ens AG Error! Unknown d o cument property na me. A ll rig h ts re se rved
4.3 V20
commissioning
4 Commissioning 4.3 V20 commissioning C o pyr ight Si em ens AG Error! Unknown d o cument property na me. A ll rig h ts re se rved
4 Commissioning 4.3 V20 commissioning C o pyr ight Si em ens AG Error! Unknown d o cument property na me. A ll rig h ts re se rved
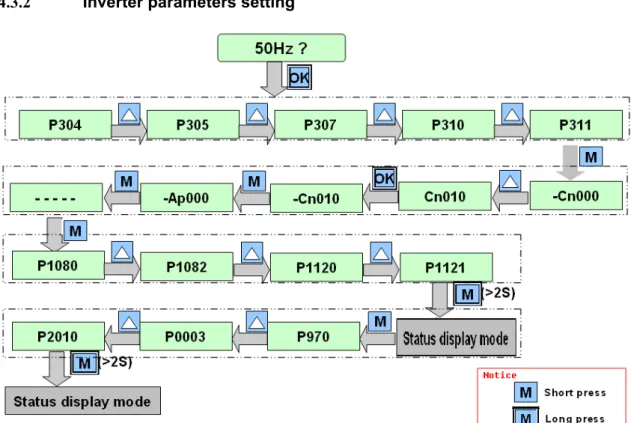
4.3.2 Inverter parameters setting
Figure 4-2 Overview of the SINAMICS V20 commissioning procedure
Note When commissioning the inverter, the connection macro setting is a one-off setting. Make sure that you proceed as follows before you change the connection macro setting to a value different from your last setting: 1. Do a factory reset (P0010 = 30, P0970 = 1)
2. Repeat the quick commissioning and change the connection macro
Failure to observe may cause the inverter to accept the parameter settings from both the currently and the previously selected macros, which may lead to undefined and unexplainable inverter operation.
However, communication parameters P2010, P2011, P2021 and P2023 for connection macros Cn010 and Cn011 are not reset automatically after a factory reset. If necessary, reset them manually.
After changing P2023 setting for Cn010 or Cn011, power-cycle the inverter. During the power-cycle, wait until LED has gone off or the display has gone blank (may take a few seconds) before re-applying power.
4 Commissioning 4.3 V20 commissioning C o pyr ight Si em ens AG Error! Unknown d o cument property na me. A ll rig h ts re se rved
Step Instruction Comment
1. Install and connect the inverter system, check the following and than power on the inverter.
Check that all cables have been connected correctly and that all relevant product and plant/location safety precautions have been complied with.
Ensure that the motor and the inverter are configured for the correct supply voltage.
Tighten all screws to the specified tightening torque.
2. Set the 50/60 Hz selection menu. Choose 50Hz or 60Hz depending on in which region or country the inverter is used. Do a factory reset (P0010 = 30, P0970 = 1)
4 Commissioning 4.3 V20 commissioning C o pyr ight Si em ens AG Error! Unknown d o cument property na me. A ll rig h ts re se rved
The setup menu guides you through the main steps required for quick
commissioning of the inverter system. It consists of the following four sub-menus:
Sub-menu Functionality
1) Motor data Sets nominal motor parameters for quick commissioning 2) Connection macro selection Sets macros required for standard wiring arrangements 3) Application macro selection Sets macros required for certain common applications 4) Common parameter selection Sets parameters necessary for inverter performance optimization
3-1. Set motor parameters for quick
commissioning
Notice:
In the table below, the value of this parameter must be entered according to the ratings of the motor.
When first power-up or after a factory reset and select 60Hz, please also give the right value to P0308 and P0309.
Parameter Description Value
P0304 Rated motor voltage[V] 380
P0305 Rated motor current[A] 2.6
P0307 Rated motor power[kW] 1.1
P0310 Rated motor frequency[Hz] 50
P0311 Rate motor speed[RPM] 1400
3-2. Set connection macros.
Select Cn010
Connection macro Cn010 – USS control. This selection automatically sets the following parameters to the given values:
Parameter Description Value
P0700 Selection of command source 5 P1000 Selection of frequency 5 P2023 RS485 protocol selection 1
P2010 USS/MODBUS baud rate 8
P2011 USS address 1
P2012 USS PZD length 2
P2013 USS PKW length 127
4 Commissioning 4.3 V20 commissioning C o pyr ight Si em ens AG Error! Unknown d o cument property na me. A ll rig h ts re se rved 3-3 Set application macros. Select AP000.
The SINAMICS V20 defines certain common applications. Each application macro provides a set of parameter settings for a specific application. If no any application macros are applicable for your specific application, use the default one AP000.
3-4 Set common
parameters In the table below, the value of this parameter must be entered according to the special application.
Parameter Description Value
P1080 Minimum motor frequency[Hz] 0 P1082 Maximum motor frequency[Hz] 50 P1120 Ramp-up time[s] 0.5(without load) P1121 Ramp-down time[s] 0.5(without load) 3-5
Press the “M” button for 2 second to exit quick commission. 4.
Update communication parameters according to the actual application example.
Parameter Description Value
P0003 User access level =3
P2010 USS baud rate =6 (9600bps)
P2000 Reference frequency[Hz] 50
Note To switch on the inverter with the PLC, observe the following requirements:
The baud rate of the inverter (P2010) and the PLC program must be the same.
The USS address of the inverter and the PLC program must be the same.
After parameterization, switch off the power and then restart the inverter and the PLC.
5 Operation 5.1 Jog reverse C o pyr ight Si em ens AG Error! Unknown d o cument property na me. A ll rig h ts re se rved
5
Operation
5.1 Jog
reverse
DisplayWhen Jog reverses, switch off I0.0 and I0.6, switch on I0.5.
Input Value Description
I0.0 0 Select Jog mode
I0.5 1 Select Jog reverse
I0.6 0 Jog forward
Table 5-1 Jog reverse I/O address
When you set the input signals as indicated in the Table 5-1, the status changes are shown as follows:
5 Operation 5.2 Jog forward C o pyr ight Si em ens AG Error! Unknown d o cument property na me. A ll rig h ts re se rved
5.2 Jog
forward
When Jog reverses, switch off I0.0 and I0.5 and then switch on I0.6.
Input Value Description
I0.0 0 Select Jog mode
I0.5 0 Jog reverse
I0.6 1 Select Jog forward
Table 5-2 Jog forward I/O address
When you set the input signals as indicated in Table5-2, the status changes are shown as follows:
5 Operation 5.3 Auto mode C o pyr ight Si em ens AG Error! Unknown d o cument property na me. A ll rig h ts re se rved
5.3 Auto
mode
When Auto mode, switch on I0.0, I0.5, and I0.6.
Input Value Description
I0.0 1 Select Auto mode
I0.5 0 Jog reverse
I0.6 0 Jog forward
Table 5-3 Auto mode I/O address
When you set the input signals as indicated in Table5-3, the status changes are shown as follows:
6 Related literature C o pyr ight Si em ens AG Error! Unknown d o cument property na me. A ll rig h ts re se rved
6 Related
literature
The following table lists some useful references.Topic Title / link
/1/ Reference to the
document http://support.automation.siemens.com/CN/llisapi.dll?aktprim=4&lang=zh&referer=%2fCN%2f&func=cslib.csinfo&siteid=csius&groupid
=4000002&extranet=standard&viewreg=CN&&nodeid4=34677186 &objaction=csopen /2/ Siemens Industry Online Support http://support.automation.siemens.com /3/ V20 manual http://support.automation.siemens.com/WW/view/en/63899889 /4/ Industry Mall- Siemens DE https://eb.automation.siemens.com/goos/WelcomePage.aspx?regionUrl=/d e&language=en /5/ S7-200 System Manual http://support.automation.siemens.com/CN/llisapi.dll?func=cslib.csinfo&no deid1=56295728&lang=zh&siteid=csius&aktprim=0&extranet=standard&vi ewreg=CN&objid=37217116&treeLang=zh /6/ S7-200 technical document http://www.ad.siemens.com.cn/download/
7 History C o pyr ight Si em ens AG Error! Unknown d o cument property na me. A ll rig h ts re se rved
7 History
Version Date Modifications