Veritas™ Volume Manager
Troubleshooting Guide
Linux
Veritas™ Volume Manager Troubleshooting Guide
The software described in this book is furnished under a license agreement and may be used only in accordance with the terms of the agreement.Product Version: 5.1
Document version: 5.1
Legal Notice
Copyright © 2009 Symantec Corporation. All rights reserved.
Symantec, the Symantec Logo, Veritas, CommandCentral, NetBackup, SANPoint, SANPoint Control, Storage Foundation, and Veritas Storage Foundation are trademarks or registered trademarks of Symantec Corporation or its affiliates in the U.S. and other countries. Other names may be trademarks of their respective owners.
This Symantec product may contain third party software for which Symantec is required to provide attribution to the third party (“Third Party Programs”). Some of the Third Party Programs are available under open source or free software licenses. The License Agreement accompanying the Software does not alter any rights or obligations you may have under those open source or free software licenses. Please see the Third Party Legal Notice Appendix to this Documentation or TPIP ReadMe File accompanying this Symantec product for more information on the Third Party Programs.
The product described in this document is distributed under licenses restricting its use, copying, distribution, and decompilation/reverse engineering. No part of this document may be reproduced in any form by any means without prior written authorization of Symantec Corporation and its licensors, if any.
THE DOCUMENTATION IS PROVIDED "AS IS" AND ALL EXPRESS OR IMPLIED CONDITIONS, REPRESENTATIONS AND WARRANTIES, INCLUDING ANY IMPLIED WARRANTY OF MERCHANTABILITY, FITNESS FOR A PARTICULAR PURPOSE OR NON-INFRINGEMENT, ARE DISCLAIMED, EXCEPT TO THE EXTENT THAT SUCH DISCLAIMERS ARE HELD TO BE LEGALLY INVALID. SYMANTEC CORPORATION SHALL NOT BE LIABLE FOR INCIDENTAL OR CONSEQUENTIAL DAMAGES IN CONNECTION WITH THE FURNISHING,
PERFORMANCE, OR USE OF THIS DOCUMENTATION. THE INFORMATION CONTAINED IN THIS DOCUMENTATION IS SUBJECT TO CHANGE WITHOUT NOTICE.
The Licensed Software and Documentation are deemed to be commercial computer software as defined in FAR 12.212 and subject to restricted rights as defined in FAR Section 52.227-19 "Commercial Computer Software - Restricted Rights" and DFARS 227.7202, "Rights in Commercial Computer Software or Commercial Computer Software Documentation", as applicable, and any successor regulations. Any use, modification, reproduction release, performance, display or disclosure of the Licensed Software and Documentation by the U.S. Government shall be solely in accordance with the terms of this Agreement.
Symantec Corporation 20330 Stevens Creek Blvd. Cupertino, CA 95014
Technical Support
Symantec Technical Support maintains support centers globally. Technical Support’s primary role is to respond to specific queries about product features and functionality. The Technical Support group also creates content for our online Knowledge Base. The Technical Support group works collaboratively with the other functional areas within Symantec to answer your questions in a timely fashion. For example, the Technical Support group works with Product Engineering and Symantec Security Response to provide alerting services and virus definition updates.
Symantec’s maintenance offerings include the following:
■ A range of support options that give you the flexibility to select the right amount of service for any size organization
■ Telephone and Web-based support that provides rapid response and up-to-the-minute information
■ Upgrade assurance that delivers automatic software upgrade protection ■ Global support that is available 24 hours a day, 7 days a week
■ Advanced features, including Account Management Services
For information about Symantec’s Maintenance Programs, you can visit our Web site at the following URL:
www.symantec.com/techsupp/
Contacting Technical Support
Customers with a current maintenance agreement may access Technical Support information at the following URL:
www.symantec.com/business/support/index.jsp
Before contacting Technical Support, make sure you have satisfied the system requirements that are listed in your product documentation. Also, you should be at the computer on which the problem occurred, in case it is necessary to replicate the problem.
When you contact Technical Support, please have the following information available:
■ Product release level ■ Hardware information
■ Available memory, disk space, and NIC information ■ Operating system
■ Version and patch level ■ Network topology
■ Router, gateway, and IP address information ■ Problem description:
■ Error messages and log files
■ Troubleshooting that was performed before contacting Symantec ■ Recent software configuration changes and network changes
Licensing and registration
If your Symantec product requires registration or a license key, access our technical support Web page at the following URL:
www.symantec.com/techsupp/
Customer service
Customer service information is available at the following URL: www.symantec.com/techsupp/
Customer Service is available to assist with the following types of issues: ■ Questions regarding product licensing or serialization
■ Product registration updates, such as address or name changes
■ General product information (features, language availability, local dealers) ■ Latest information about product updates and upgrades
■ Information about upgrade assurance and maintenance contracts ■ Information about the Symantec Buying Programs
■ Advice about Symantec's technical support options ■ Nontechnical presales questions
Maintenance agreement resources
If you want to contact Symantec regarding an existing maintenance agreement, please contact the maintenance agreement administration team for your region as follows:
[email protected] Asia-Pacific and Japan
[email protected] Europe, Middle-East, and Africa
[email protected] North America and Latin America
Additional enterprise services
Symantec offers a comprehensive set of services that allow you to maximize your investment in Symantec products and to develop your knowledge, expertise, and global insight, which enable you to manage your business risks proactively. Enterprise services that are available include the following:
These solutions provide early warning of cyber attacks, comprehensive threat analysis, and countermeasures to prevent attacks before they occur. Symantec Early Warning Solutions
These services remove the burden of managing and monitoring security devices and events, ensuring rapid response to real threats.
Managed Security Services
Symantec Consulting Services provide on-site technical expertise from Symantec and its trusted partners. Symantec Consulting Services offer a variety of prepackaged and customizable options that include assessment, design, implementation, monitoring, and management capabilities. Each is focused on establishing and maintaining the integrity and availability of your IT resources. Consulting Services
Educational Services provide a full array of technical training, security education, security certification, and awareness communication programs. Educational Services
To access more information about Enterprise services, please visit our Web site at the following URL:
www.symantec.com
Technical Support
... 4Chapter 1
Recovering from hardware failure
... 11About recovery from hardware failure ... 11
Listing unstartable volumes ... 12
Displaying volume and plex states ... 13
The plex state cycle ... 13
Recovering an unstartable mirrored volume ... 16
Recovering an unstartable volume with a disabled plex in the RECOVER state ... 17
Forcibly restarting a disabled volume ... 17
Clearing the failing flag on a disk ... 18
Reattaching failed disks ... 19
Failures on RAID-5 volumes ... 20
System failures ... 20
Disk failures ... 21
Default startup recovery process for RAID-5 ... 23
Recovery of RAID-5 volumes ... 23
Recovery after moving RAID-5 subdisks ... 26
Unstartable RAID-5 volumes ... 27
Recovering from an incomplete disk group move ... 29
Recovery from failure of a DCO volume ... 30
Recovering a version 0 DCO volume ... 33
Recovering a version 20 DCO volume ... 35
Chapter 2
Recovering from instant snapshot failure
... 37Recovering from the failure of vxsnap prepare ... 37
Recovering from the failure of vxsnap make for full-sized instant snapshots ... 38
Recovering from the failure of vxsnap make for break-off instant snapshots ... 39
Recovering from the failure of vxsnap make for space-optimized instant snapshots ... 39
Recovering from the failure of vxsnap restore ... 40
Recovering from the failure of vxsnap reattach or refresh ... 40
Recovering from copy-on-write failure ... 41
Recovering from I/O errors during resynchronization ... 41
Recovering from I/O failure on a DCO volume ... 42
Chapter 3
Recovering from boot disk failure
... 43VxVM and boot disk failure ... 43
Possible root disk configurations ... 43
The boot process ... 44
VxVM boot disk recovery ... 44
Failed boot disk ... 45
Replacing a failed boot disk mirror ... 54
Accidental use of the -R, fallback or lock option with LILO ... 56
Restoring a missing or corrupted master boot record ... 57
Restoring a missing or corrupted /etc/fstab file ... 58
Restoring a missing or corrupted /etc/vx/volboot file ... 59
Recovery by reinstallation ... 60
General reinstallation information ... 60
Reinstalling the system and recovering VxVM ... 61
Chapter 4
Logging commands and transactions
... 71Command logs ... 71
Transaction logs ... 73
Association of command and transaction logs ... 75
Chapter 5
Backing up and restoring disk group
configurations
... 77About disk group configuration backup ... 77
Backing up a disk group configuration ... 78
Restoring a disk group configuration ... 79
Resolving conflicting backups for a disk group ... 81
Chapter 6
Restoring a previous array support library
... 83Downgrading the array support ... 83
Chapter 7
Error messages
... 85About error messages ... 85
How error messages are logged ... 85
Configuring logging in the startup script ... 86
Types of messages ... 87
Messages ... 89
Contents 8
Index
... 1419 Contents
Contents 10
Recovering from hardware
failure
This chapter includes the following topics: ■ About recovery from hardware failure ■ Listing unstartable volumes
■ Displaying volume and plex states ■ The plex state cycle
■ Recovering an unstartable mirrored volume
■ Recovering an unstartable volume with a disabled plex in the RECOVER state ■ Forcibly restarting a disabled volume
■ Clearing the failing flag on a disk ■ Reattaching failed disks
■ Failures on RAID-5 volumes
■ Recovering from an incomplete disk group move ■ Recovery from failure of a DCO volume
About recovery from hardware failure
Symantec’s Veritas Volume Manager (VxVM) protects systems from disk and other hardware failures and helps you to recover from such events. Recovery procedures help you prevent loss of data or system access due to disk and other hardware failures.
1
If a volume has a disk I/O failure (for example, because the disk has an
uncorrectable error), VxVM can detach the plex involved in the failure. I/O stops on that plex but continues on the remaining plexes of the volume.
If a disk fails completely, VxVM can detach the disk from its disk group. All plexes on the disk are disabled. If there are any unmirrored volumes on a disk when it is detached, those volumes are also disabled.
Note:Apparent disk failure may not be due to a fault in the physical disk media or the disk controller, but may instead be caused by a fault in an intermediate or ancillary component such as a cable, host bus adapter, or power supply.
The hot-relocation feature in VxVM automatically detects disk failures, and notifies the system administrator and other nominated users of the failures by electronic mail. Hot-relocation also attempts to use spare disks and free disk space to restore redundancy and to preserve access to mirrored and RAID-5 volumes.
For more information about administering hot-relocation, see the Veritas Volume
Manager Administrator’s Guide.
Recovery from failures of the boot (root) disk requires the use of the special
procedures.
See“VxVM and boot disk failure”on page 43.
Listing unstartable volumes
An unstartable volume can be incorrectly configured or have other errors or conditions that prevent it from being started. To display unstartable volumes, use thevxinfocommand. This displays information about the accessibility and
usability of volumes
To list unstartable volumes
◆ Type the following command:
# vxinfo [-g diskgroup] [volume ...]
The following example output shows one volume,mkting, as being unstartable:
home fsgen Started mkting fsgen Unstartable src fsgen Started rootvol root Started swapvol swap Started
Recovering from hardware failure
Listing unstartable volumes
Displaying volume and plex states
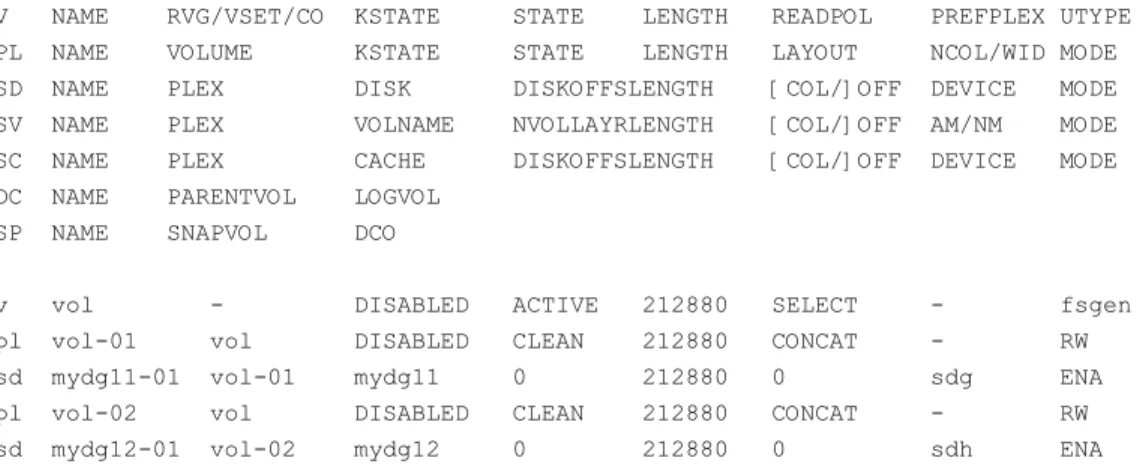
To display detailed information about the configuration of a volume including its state and the states of its plexes, use thevxprintcommand.
To display volume and plex states
◆ Type the following command:
# vxprint [-g diskgroup] -hvt [volume ...]
The following example shows a disabled volume,vol, which has two clean
plexes,vol-01andvol-02, each with a single subdisk:
# vxprint -g mydg -hvt vol
Disk group: mydg
V NAME RVG/VSET/CO KSTATE STATE LENGTH READPOL PREFPLEX UTYPE PL NAME VOLUME KSTATE STATE LENGTH LAYOUT NCOL/WID MODE SD NAME PLEX DISK DISKOFFSLENGTH [COL/]OFF DEVICE MODE SV NAME PLEX VOLNAME NVOLLAYRLENGTH [COL/]OFF AM/NM MODE SC NAME PLEX CACHE DISKOFFSLENGTH [COL/]OFF DEVICE MODE DC NAME PARENTVOL LOGVOL
SP NAME SNAPVOL DCO
v vol - DISABLED ACTIVE 212880 SELECT - fsgen
pl vol-01 vol DISABLED CLEAN 212880 CONCAT - RW sd mydg11-01 vol-01 mydg11 0 212880 0 sdg ENA pl vol-02 vol DISABLED CLEAN 212880 CONCAT - RW sd mydg12-01 vol-02 mydg12 0 212880 0 sdh ENA
See the Veritas Volume Manager Administrator’s Guide for a description of the possible plex and volume states.
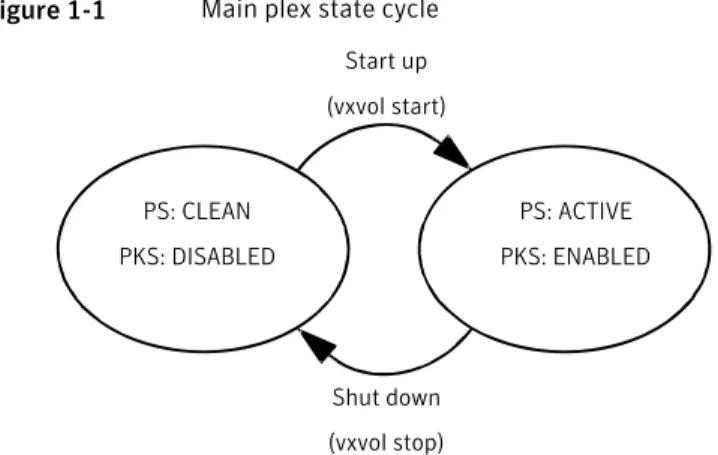
The plex state cycle
Changing plex states are part of normal operations, and do not necessarily indicate abnormalities that must be corrected. A clear understanding of the various plex states and their interrelationship is necessary if you want to be able to perform any recovery procedures.
Figure 1-1shows the main transitions that take place between plex states in VxVM.
13 Recovering from hardware failure
Figure 1-1 Main plex state cycle PS: CLEAN PKS: DISABLED PS: ACTIVE PKS: ENABLED Start up (vxvol start) Shut down (vxvol stop) PS = plex state
PKS = plex kernel state
For more information about plex states, see the Veritas Volume Manager
Administrator’s Guide.
At system startup, volumes are started automatically and thevxvol starttask
makes all CLEAN plexes ACTIVE. At shutdown, thevxvol stoptask marks all
ACTIVE plexes CLEAN. If all plexes are initially CLEAN at startup, this indicates that a controlled shutdown occurred and optimizes the time taken to start up the volumes.
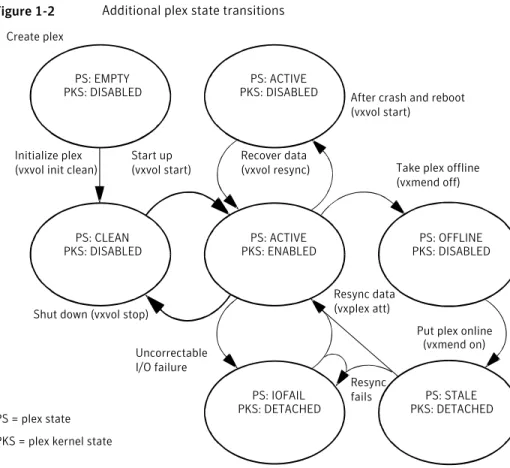
Figure 1-2shows additional transitions that are possible between plex states as a result of hardware problems, abnormal system shutdown, and intervention by the system administrator.
Recovering from hardware failure
The plex state cycle
Figure 1-2 Additional plex state transitions
Recover data (vxvol resync) Initialize plex
(vxvol init clean) Take plex offline (vxmend off)
Shut down (vxvol stop)
After crash and reboot (vxvol start)
Uncorrectable I/O failure
Put plex online (vxmend on) Resync data (vxplex att) Resync fails Create plex PS: EMPTY PKS: DISABLED PS: ACTIVE PKS: DISABLED Start up (vxvol start) PS: CLEAN PKS: DISABLED PS: ACTIVE PKS: ENABLED PS: OFFLINE PKS: DISABLED PS: IOFAIL PKS: DETACHED PS: STALE PKS: DETACHED PS = plex state
PKS = plex kernel state
When first created, a plex has state EMPTY until the volume to which it is attached is initialized. Its state is then set to CLEAN. Its plex kernel state remains set to DISABLED and is not set to ENABLED until the volume is started.
After a system crash and reboot, all plexes of a volume are ACTIVE but marked with plex kernel state DISABLED until their data is recovered by thevxvol resync
task.
A plex may be taken offline with thevxmend offcommand, made available again
usingvxmend on, and its data resynchronized with the other plexes when it is
reattached usingvxplex att. A failed resynchronization or uncorrectable I/O failure places the plex in the IOFAIL state.
There are various actions that you can take if a system crash or I/O error leaves no plexes of a mirrored volume in a CLEAN or ACTIVE state.
See“Recovering an unstartable mirrored volume”on page 16. See“Failures on RAID-5 volumes”on page 20.
15 Recovering from hardware failure
Recovering an unstartable mirrored volume
A system crash or an I/O error can corrupt one or more plexes of a mirrored volume and leave no plexCLEANorACTIVE. You can mark one of the plexesCLEAN
and instruct the system to use that plex as the source for reviving the others.
To recover an unstartable mirrored volume
1
Place the desired plex in theCLEANstate using the following command: # vxmend [-g diskgroup] fix clean plexFor example, to place the plexvol01-02in the CLEAN state:
# vxmend -g mydg fix clean vol01-02
2
To recover the other plexes in a volume from theCLEANplex, the volume mustbe disabled, and the other plexes must beSTALE. If necessary, make any other CLEANorACTIVEplexesSTALEby running the following command on each of
these plexes in turn:
# vxmend [-g diskgroup] fix stale plex
Following severe hardware failure of several disks or other related subsystems underlying all the mirrored plexes of a volume, it may be impossible to recover the volume usingvxmend. In this case, remove the volume, recreate it on
hardware that is functioning correctly, and restore the contents of the volume from a backup or from a snapshot image.
See thevxmend(1M) manual page.
3
To enable theCLEANplex and to recover theSTALEplexes from it, use thefollowing command:
# vxvol [-g diskgroup] start volume For example, to recover volumevol01:
# vxvol -g mydg start vol01 See thevxvol(1M) manual page.
Recovering from hardware failure
Recovering an unstartable mirrored volume
Recovering an unstartable volume with a disabled
plex in the RECOVER state
A plex is shown in the RECOVER state if its contents are out-of-date with respect to the volume. This can happen if a disk containing one or more of the plex’s subdisks has been replaced or reattached. If a plex is shown as being in this state, it can be recovered by using thevxmendandvxvolcommands.
To recover an unstartable volume with a disabled plex in the RECOVER state
1
Use the following command to force the plex into the OFFLINE state:# vxmend [-g diskgroup] -o force off plex
2
Place the plex into the STALE state using this command:# vxmend [-g diskgroup] on plex
3
If there are other ACTIVE or CLEAN plexes in the volume, use the following command to reattach the plex to the volume:# vxplex [-g diskgroup] att plex volume
If the volume is already enabled, resynchronization of the plex is started immediately.
If there are no other clean plexes in the volume, use this command to make the plex DISABLED and CLEAN:
# vxmend [-g diskgroup] fix clean plex
4
If the volume is not already enabled, use the following command to start it, and preform any resynchronization of the plexes in the background:# vxvol [-g diskgroup] -o bg start volume
If the data in the plex was corrupted, and the volume has no ACTIVE or CLEAN redundant plexes from which its contents can be resynchronized, it must be restored from a backup or from a snapshot image.
Forcibly restarting a disabled volume
If a disk failure caused a volume to be disabled, and the volume does not contain any valid redundant plexes, you must restore the volume from a backup after
17 Recovering from hardware failure
replacing the failed disk. Any volumes that are listed asUnstartablemust be
restarted using thevxvolcommand before restoring their contents from a backup.
To forcibly restart a disabled volume
◆ Type the following command:
# vxvol [-g diskgroup] -o bg -f start volume
The-foption forcibly restarts the volume, and the-o bgoption
resynchronizes its plexes as a background task. For example, to restart the volumemyvolso that it can be restored from backup, use the following
command:
# vxvol -g mydg -o bg -f start myvol
Clearing the failing flag on a disk
If I/O errors are intermittent rather than persistent, Veritas Volume Manager sets thefailingflag on a disk, rather than detaching the disk. Such errors can
occur due to the temporary removal of a cable, controller faults, a partially faulty LUN in a disk array, or a disk with a few bad sectors or tracks.
If the hardware fault is not with the disk itself (for example, it is caused by problems with the controller or the cable path to the disk), you can use thevxedit
command to unset thefailingflag after correcting the source of the I/O error.
Warning:Do not unset thefailingflag if the reason for the I/O errors is unknown. If the disk hardware truly is failing, and the flag is cleared, there is a risk of data loss.
Recovering from hardware failure
Clearing the failing flag on a disk
To clear the failing flag on a disk
1
Use thevxdisk listcommand to find out which disks are failing: # vxdisk listDEVICE TYPE DISK GROUP STATUS sdp auto:sliced mydg01 mydg online
sdq auto:sliced mydg02 mydg online failing sdr auto:sliced mydg03 mydg online
. . .
2
Use thevxedit setcommand to clear the flag for each disk that is markedasfailing(in this example,mydg02):
# vxedit set failing=off mydg02
3
Use thevxdisk listcommand to verify that thefailingflag has beencleared:
# vxdisk list
DEVICE TYPE DISK GROUP STATUS sdp auto:sliced mydg01 mydg online sdq auto:sliced mydg02 mydg online sdr auto:sliced mydg03 mydg online . . .
Reattaching failed disks
You can perform a reattach operation if a disk could not be found at system startup, or if VxVM is started with some disk drivers unloaded and unloadable (causing disks to enter thefailedstate). If the underlying problem has been fixed (such
as a cable or controller fault), use thevxreattachcommand to reattach the disks without plexes being flagged as STALE. However, the reattach must occur before any volumes on the disk are started.
Thevxreattachcommand is called as part of disk recovery from thevxdiskadm
menus and during the boot process. If possible,vxreattachreattaches the failed disk media record to the disk with the same device name. Reattachment places a disk in the same disk group that it was located in before and retains its original disk media name.
19 Recovering from hardware failure
To reattach a failed disk
1
Use thevxdisk listcommand to see which disks have failed, as shown in the following example:# vxdisk list
DEVICE TYPE DISK GROUP STATUS sdp auto:sliced mydg01 mydg online sdq auto:sliced mydg02 mydg online
- - mydg03 mydg failed was: sdr
- - mydg04 mydg failed was: sds
2
Once the fault has been corrected, the disks can be reattached by using the following command to rescan the device list:# /usr/sbin/vxdctl enable
3
Use thevxreattachcommand with no options to reattach the disks: # /etc/vx/bin/vxreattachAfter reattachment takes place, recovery may not be necessary unless a disk was faulty and had to be replaced. Reattachment can fail if the original (or another) cause for the disk failure still exists.
You can use the commandvxreattach -cto check whether reattachment is
possible, without performing the operation. Instead, it displays the disk group and disk media name where the disk can be reattached.
See thevxreattach(1M) manual page.
Failures on RAID-5 volumes
Failures are seen in two varieties: system failures and disk failures. A system failure means that the system has abruptly ceased to operate due to an operating system panic or power failure. Disk failures imply that the data on some number of disks has become unavailable due to a system failure (such as a head crash, electronics failure on disk, or disk controller failure).
System failures
RAID-5 volumes are designed to remain available with a minimum of disk space overhead, if there are disk failures. However, many forms of RAID-5 can have data loss after a system failure. Data loss occurs because a system failure causes the data and parity in the RAID-5 volume to become unsynchronized. Loss of
Recovering from hardware failure
Failures on RAID-5 volumes
synchronization occurs because the status of writes that were outstanding at the time of the failure cannot be determined.
If a loss of sync occurs while a RAID-5 volume is being accessed, the volume is described as having stale parity. The parity must then be reconstructed by reading all the non-parity columns within each stripe, recalculating the parity, and writing out the parity stripe unit in the stripe. This must be done for every stripe in the volume, so it can take a long time to complete.
Warning:While the resynchronization of a RAID-5 volume without log plexes is being performed, any failure of a disk within the volume causes its data to be lost. Besides the vulnerability to failure, the resynchronization process can tax the system resources and slow down system operation.
RAID-5 logs reduce the damage that can be caused by system failures, because they maintain a copy of the data being written at the time of the failure. The process of resynchronization consists of reading that data and parity from the logs and writing it to the appropriate areas of the RAID-5 volume. This greatly reduces the amount of time needed for a resynchronization of data and parity. It also means that the volume never becomes truly stale. The data and parity for all stripes in the volume are known at all times, so the failure of a single disk cannot result in the loss of the data within the volume.
Disk failures
An uncorrectable I/O error occurs when disk failure, cabling or other problems cause the data on a disk to become unavailable. For a RAID-5 volume, this means that a subdisk becomes unavailable. The subdisk cannot be used to hold data and is considered stale and detached. If the underlying disk becomes available or is replaced, the subdisk is still considered stale and is not used.
If an attempt is made to read data contained on a stale subdisk, the data is reconstructed from data on all other stripe units in the stripe. This operation is called a reconstructing-read. This is a more expensive operation than simply reading the data and can result in degraded read performance. When a RAID-5 volume has stale subdisks, it is considered to be in degraded mode.
A RAID-5 volume in degraded mode can be recognized from the output of the
vxprint -htcommand as shown in the following display:
V NAME RVG/VSET/COKSTATE STATE LENGTH READPOL PREFPLEX UTYPE PL NAME VOLUME KSTATE STATE LENGTH LAYOUT NCOL/WID MODE SD NAME PLEX DISK DISKOFFS LENGTH [COL/]OFF DEVICE MODE SV NAME PLEX VOLNAME NVOLLAYR LENGTH [COL/]OFF AM/NM MODE
21 Recovering from hardware failure
...
v r5vol - ENABLED DEGRADED 204800 RAID - raid5 pl r5vol-01 r5vol ENABLED ACTIVE 204800 RAID 3/16 RW sd disk01-01 r5vol-01disk01 0 102400 0/0 sda ENA sd disk02-01 r5vol-01disk02 0 102400 1/0 sdb dS sd disk03-01 r5vol-01disk03 0 102400 2/0 sdc ENA pl r5vol-02 r5vol ENABLED LOG 1440 CONCAT - RW sd disk04-01 r5vol-02disk04 0 1440 0 sdd ENA pl r5vol-03 r5vol ENABLED LOG 1440 CONCAT - RW sd disk05-01 r5vol-03disk05 0 1440 0 sde ENA
The volumer5volis in degraded mode, as shown by the volume state, which is
listed asDEGRADED. The failed subdisk isdisk02-01, as shown by theMODEflags; dindicates that the subdisk is detached, andSindicates that the subdisk’s contents are stale.
Warning:Do not run thevxr5checkcommand on a RAID-5 volume that is in
degraded mode.
A disk containing a RAID-5 log plex can also fail. The failure of a single RAID-5 log plex has no direct effect on the operation of a volume provided that the RAID-5 log is mirrored. However, loss of all RAID-5 log plexes in a volume makes it vulnerable to a complete failure. In the output of thevxprint -htcommand,
failure within a RAID-5 log plex is indicated by the plex state being shown as
BADLOGrather thanLOG.
In the following example, the RAID-5 log plexr5vol-02has failed:
V NAME RVG/VSET/COKSTATE STATE LENGTH READPOL PREFPLEX UTYPE PL NAME VOLUME KSTATE STATE LENGTH LAYOUT NCOL/WID MODE SD NAME PLEX DISK DISKOFFS LENGTH [COL/]OFF DEVICE MODE SV NAME PLEX VOLNAME NVOLLAYR LENGTH [COL/]OFF AM/NM MODE ...
v r5vol - ENABLED ACTIVE 204800 RAID - raid5
pl r5vol-01 r5vol ENABLED ACTIVE 204800 RAID 3/16 RW
sd disk01-01 r5vol-01disk01 0 102400 0/0 sda ENA
sd disk02-01 r5vol-01disk02 0 102400 1/0 sdb ENA
sd disk03-01 r5vol-01disk03 0 102400 2/0 sdc ENA
pl r5vol-02 r5vol DISABLED BADLOG 1440 CONCAT - RW
sd disk04-01 r5vol-02disk04 0 1440 0 sdd ENA
pl r5vol-03 r5vol ENABLED LOG 1440 CONCAT - RW
sd disk05-01 r5vol-12disk05 0 1440 0 sde ENA
Recovering from hardware failure
Failures on RAID-5 volumes
Default startup recovery process for RAID-5
VxVM may need to perform several operations to restore fully the contents of a RAID-5 volume and make it usable. Whenever a volume is started, any RAID-5 log plexes are zeroed before the volume is started. This prevents random data from being interpreted as a log entry and corrupting the volume contents. Also, some subdisks may need to be recovered, or the parity may need to be
resynchronized (if RAID-5 logs have failed).
VxVM takes the following steps when a RAID-5 volume is started:
■ If the RAID-5 volume was not cleanly shut down, it is checked for valid RAID-5 log plexes.
■ If valid log plexes exist, they are replayed. This is done by placing the volume in theDETACHEDvolume kernel state and setting the volume state toREPLAY,
and enabling the RAID-5 log plexes.
■ If no valid logs exist, the parity must be resynchronized. Resynchronization is done by placing the volume in theDETACHEDvolume kernel state and setting
the volume state to SYNC. Any log plexes are left in theDISABLEDplex kernel
state.
The volume is not made available while the parity is resynchronized because any subdisk failures during this period makes the volume unusable. This can be overridden by using the-o unsafestart option with thevxvolcommand.
If any stale subdisks exist, the RAID-5 volume is unusable.
Warning:The-o unsafestart option is considered dangerous, as it can make
the contents of the volume unusable. Using it is not recommended.
■ Any existing log plexes are zeroed and enabled. If all logs fail during this process, the start process is aborted.
■ If no stale subdisks exist or those that exist are recoverable, the volume is put in theENABLEDvolume kernel state and the volume state is set toACTIVE. The
volume is now started.
Recovery of RAID-5 volumes
The following types of recovery may be required for RAID-5 volumes: ■ Resynchronization of parity
■ Reattachment of a failed RAID-5 log plex ■ Recovery of a stale subdisk
23 Recovering from hardware failure
Parity resynchronization and stale subdisk recovery are typically performed when the RAID-5 volume is started, or shortly after the system boots. They can also be performed by running thevxrecovercommand.
See“Unstartable RAID-5 volumes”on page 27.
If hot-relocation is enabled at the time of a disk failure, system administrator intervention is not required unless no suitable disk space is available for relocation. Hot-relocation is triggered by the failure and the system administrator is notified of the failure by electronic mail.
Hot relocation automatically attempts to relocate the subdisks of a failing RAID-5 plex. After any relocation takes place, the hot-relocation daemon (vxrelocd) also
initiates a parity resynchronization.
In the case of a failing RAID-5 log plex, relocation occurs only if the log plex is mirrored; thevxrelocddaemon then initiates a mirror resynchronization to recreate the RAID-5 log plex. If hot-relocation is disabled at the time of a failure, the system administrator may need to initiate a resynchronization or recovery.
Note:Following severe hardware failure of several disks or other related subsystems underlying a RAID-5 plex, it may be only be possible to recover the volume by removing the volume, recreating it on hardware that is functioning correctly, and restoring the contents of the volume from a backup.
Resynchronizing parity on a RAID-5 volume
In most cases, a RAID-5 array does not have stale parity. Stale parity only occurs after all RAID-5 log plexes for the RAID-5 volume have failed, and then only if there is a system failure. Even if a RAID-5 volume has stale parity, it is usually repaired as part of the volume start process.
If a volume without valid RAID-5 logs is started and the process is killed before the volume is resynchronized, the result is an active volume with stale parity. The following example is output from thevxprint -htcommand for a stale RAID-5 volume:
V NAME RVG/VSET/COKSTATE STATE LENGTH READPOL PREFPLEX UTYPE PL NAME VOLUME KSTATE STATE LENGTH LAYOUT NCOL/WID MODE SD NAME PLEX DISK DISKOFFS LENGTH [COL/]OFF DEVICE MODE SV NAME PLEX VOLNAME NVOLLAYR LENGTH [COL/]OFF AM/NM MODE ...
v r5vol - ENABLED NEEDSYNC 204800 RAID - raid5
pl r5vol-01 r5vol ENABLED ACTIVE 204800 RAID 3/16 RW sd disk01-01 r5vol-01 disk01 0 102400 0/0 sda ENA
Recovering from hardware failure
Failures on RAID-5 volumes
sd disk02-01 r5vol-01 disk02 0 102400 1/0 sdb dS sd disk03-01 r5vol-01 disk03 0 102400 2/0 sdc ENA ...
This output lists the volume state asNEEDSYNC, indicating that the parity needs
to be resynchronized. The state could also have beenSYNC, indicating that a
synchronization was attempted at start time and that a synchronization process should be doing the synchronization. If no such process exists or if the volume is in theNEEDSYNCstate, a synchronization can be manually started by using the
resynckeyword for thevxvolcommand.
Parity is regenerated by issuingVOL_R5_RESYNC ioctlsto the RAID-5 volume.
The resynchronization process starts at the beginning of the RAID-5 volume and resynchronizes a region equal to the number of sectors specified by the-o iosize
option. If the-o iosizeoption is not specified, the default maximum I/O size is
used. Theresyncoperation then moves onto the next region until the entire length
of the RAID-5 volume has been resynchronized.
For larger volumes, parity regeneration can take a long time. It is possible that the system could be shut down or crash before the operation is completed. In case of a system shutdown, the progress of parity regeneration must be kept across reboots. Otherwise, the process has to start all over again.
To avoid the restart process, parity regeneration is checkpointed. This means that the offset up to which the parity has been regenerated is saved in the configuration database. The-o checkpt=sizeoption controls how often the checkpoint is saved.
If the option is not specified, the default checkpoint size is used.
Because saving the checkpoint offset requires a transaction, making the checkpoint size too small can extend the time required to regenerate parity. After a system reboot, a RAID-5 volume that has a checkpoint offset smaller than the volume length starts a parity resynchronization at the checkpoint offset.
To resynchronize parity on a RAID-5 volume
◆ Type the following command:
# vxvol -g diskgroup resync r5vol
Reattaching a failed RAID-5 log plex
RAID-5 log plexes can become detached due to disk failures. These RAID-5 logs can be reattached by using theattkeyword for thevxplexcommand.
25 Recovering from hardware failure
To reattach a failed RAID-5 log plex
◆ Type the following command:
# vxplex -g diskgroup att r5vol r5vol-plex
Recovering a stale subdisk in a RAID-5 volume
Stale subdisk recovery is usually done at volume start time. However, the process doing the recovery can crash, or the volume may be started with an option such as-o delayrecoverthat prevents subdisk recovery. In addition, the disk on which the subdisk resides can be replaced without recovery operations being performed. In such cases, you can perform subdisk recovery by using thevxvol recover
command.
To recover a stale subdisk in the RAID-5 volume
◆ Type the following command:
# vxvol -g diskgroup recover r5vol subdisk
A RAID-5 volume that has multiple stale subdisks can be recovered in one operation. To recover multiple stale subdisks, use thevxvol recover
command on the volume:
# vxvol -g diskgroup recover r5vol
Recovery after moving RAID-5 subdisks
When RAID-5 subdisks are moved and replaced, the new subdisks are marked as
STALEin anticipation of recovery. If the volume is active, thevxsdcommand may
be used to recover the volume. If the volume is not active, it is recovered when it is next started. The RAID-5 volume is degraded for the duration of the recovery operation.
Any failure in the stripes involved in the move makes the volume unusable. The RAID-5 volume can also become invalid if its parity becomes stale.
To avoid a volume becoming unusable, thevxsdcommand does not allow a subdisk
move in the following situations:
■ A stale subdisk occupies any of the same stripes as the subdisk being moved.
Recovering from hardware failure
Failures on RAID-5 volumes
■ The RAID-5 volume is stopped but was not shut down cleanly; that is, the parity is considered stale.
■ The RAID-5 volume is active and has no valid log areas.
Only the third case can be overridden by using the-o forceoption.
Subdisks of RAID-5 volumes can also be split and joined by using thevxsd split
command and thevxsd joincommand. These operations work the same way as
those for mirrored volumes.
RAID-5 subdisk moves are performed in the same way as subdisk moves for other volume types, but without the penalty of degraded redundancy.
Unstartable RAID-5 volumes
When a RAID-5 volume is started, it can be in one of many states. After a normal system shutdown, the volume should be clean and require no recovery. However, if the volume was not closed, or was not unmounted before a crash, it can require recovery when it is started, before it can be made available.
Under normal conditions, volumes are started automatically after a reboot and any recovery takes place automatically or is done through thevxrecovercommand.
A RAID-5 volume is unusable if some part of the RAID-5 plex does not map the volume length in the following circumstances:
■ The RAID-5 plex is sparse in relation to the RAID-5 volume length.
■ The RAID-5 plex does not map a region where two subdisks have failed within a stripe, either because they are stale or because they are built on a failed disk. When this occurs, thevxvol startcommand returns the following error message:
VxVM vxvol ERROR V-5-1-1236 Volume r5vol is not startable; RAID-5 plex does not map entire volume length.
At this point, the contents of the RAID-5 volume are unusable.
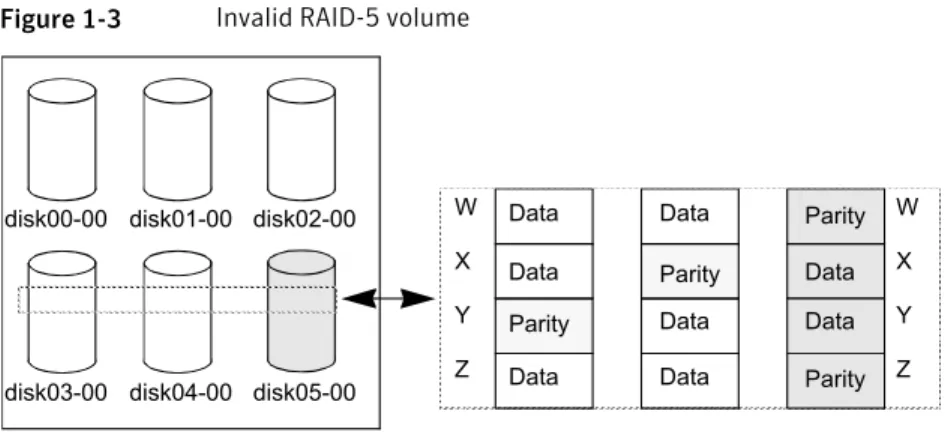
Another possible way that a RAID-5 volume can become unstartable is if the parity is stale and a subdisk becomes detached or stale. This occurs because within the stripes that contain the failed subdisk, the parity stripe unit is invalid (because the parity is stale) and the stripe unit on the bad subdisk is also invalid.
Figure 1-3illustrates a RAID-5 volume that has become invalid due to stale parity and a failed subdisk.
27 Recovering from hardware failure
Figure 1-3 Invalid RAID-5 volume
disk00-00 disk01-00 disk02-00
disk03-00 disk04-00 disk05-00 RAID-5 plex W X Y Z W X Y Z Data Data Data Data Data Data Data Data Parity Parity Parity Parity
There are four stripes in the RAID-5 array. All parity is stale and subdiskdisk05-00
has failed. This makes stripes X and Y unusable because two failures have occurred within those stripes.
This qualifies as two failures within a stripe and prevents the use of the volume. In this case, the output display from thevxvol startcommand is as follows:
VxVM vxvol ERROR V-5-1-1237 Volume r5vol is not startable; some subdisks are unusable and the parity is stale.
This situation can be avoided by always using two or more RAID-5 log plexes in RAID-5 volumes. RAID-5 log plexes prevent the parity within the volume from becoming stale which prevents this situation.
See“System failures”on page 20.
Forcibly starting a RAID-5 volume with stale subdisks
You can start a volume even if subdisks are marked as stale: for example, if a stopped volume has stale parity and no RAID-5 logs, and a disk becomes detached and then reattached.The subdisk is considered stale even though the data is not out of date (because the volume was in use when the subdisk was unavailable) and the RAID-5 volume is considered invalid. To prevent this case, always have multiple valid RAID-5 logs associated with the array whenever possible.
Recovering from hardware failure
Failures on RAID-5 volumes
To forcibly start a RAID-5 volume with stale subdisks
◆ Specify the-foption to thevxvol startcommand.
# vxvol [-g diskgroup] -f start r5vol
This causes all stale subdisks to be marked as non-stale. Marking takes place before thestartoperation evaluates the validity of the RAID-5 volume and
what is needed to start it. You can mark individual subdisks as non-stale by using the following command:
# vxmend [-g diskgroup] fix unstale subdisk
If some subdisks are stale and need recovery, and if valid logs exist, the volume is enabled by placing it in theENABLEDkernel state and the volume is available
for use during the subdisk recovery. Otherwise, the volume kernel state is set toDETACHEDand it is not available during subdisk recovery. This is done
because if the system were to crash or if the volume were ungracefully stopped while it was active, the parity becomes stale, making the volume unusable. If this is undesirable, the volume can be started with the-o unsafe start
option.
Warning:The-o unsafe startoption is considered dangerous, as it can make the contents of the volume unusable. It is therefore not recommended. The volume state is set toRECOVER, and stale subdisks are restored. As the
data on each subdisk becomes valid, the subdisk is marked as no longer stale. If the recovery of any subdisk fails, and if there are no valid logs, the volume start is aborted because the subdisk remains stale and a system crash makes the RAID-5 volume unusable. This can also be overridden by using the-o unsafe startoption.
If the volume has valid logs, subdisk recovery failures are noted but they do not stop the start procedure.
When all subdisks have been recovered, the volume is placed in theENABLED
kernel state and marked asACTIVE.
Recovering from an incomplete disk group move
If the system crashes or a subsystem fails while a disk group move, split or join operation is being performed, VxVM attempts either to reverse or to complete
29 Recovering from hardware failure
the operation when the system is restarted or the subsystem is repaired. Whether the operation is reversed or completed depends on how far it had progressed. Automatic recovery depends on being able to import both the source and target disk groups. However, automatic recovery may not be possible if, for example, one of the disk groups has been imported on another host.
To recover from an incomplete disk group move
1
Use thevxprintcommand to examine the configuration of both disk groups. Objects in disk groups whose move is incomplete have their TUTIL0 fields set to MOVE.2
Enter the following command to attempt completion of the move: # vxdg recover sourcedgThis operation fails if one of the disk groups cannot be imported because it has been imported on another host or because it does not exist:
VxVM vxdg ERROR V-5-1-2907 diskgroup: Disk group does not exist
If the recovery fails, perform one of the following steps as appropriate.
3
If the disk group has been imported on another host, export it from that host, and import it on the current host. If all the required objects already exist in either the source or target disk group, use the following command to reset the MOVE flags in that disk group:# vxdg -o clean recover diskgroup1
Use the following command on the other disk group to remove the objects that have TUTIL0 fields marked as MOVE:
# vxdg -o remove recover diskgroup2
4
If only one disk group is available to be imported, use the following command to reset the MOVE flags on this disk group:# vxdg -o clean recover diskgroup
Recovery from failure of a DCO volume
The procedure to recover from the failure of a data change object (DCO) volume depends on the DCO version number.
For information about DCO versioning, see the Veritas Volume Manager
Administrator’s Guide.
Recovering from hardware failure
Recovery from failure of a DCO volume
Persistent FastResync uses a DCO volume to perform tracking of changed regions in a volume. If an error occurs while reading or writing a DCO volume, it is detached and thebadlogflag is set on the DCO. All further writes to the volume are not
tracked by the DCO.
The following sample output from thevxprintcommand shows a complete volume
with a detached DCO volume (theTUTIL0andPUTIL0fields are omitted for clarity):
TY NAME ASSOC KSTATE LENGTH PLOFFS STATE ...
dg mydg mydg - - -
-dm mydg01 sdf - 35521408 -
-dm mydg02 sdg - 35521408 -
-dm mydg03 sdh - 35521408 - FAILING
dm mydg04 sdi - 35521408 - FAILING
dm mydg05 sdj - 35521408 -
-v SNAP-vol1 fsgen ENABLED 204800 - ACTIVE
pl vol1-03 SNAP-vol1 ENABLED 204800 - ACTIVE
sd mydg05-01 vol1-03 ENABLED 204800 0
-dc SNAP-vol1_-dco SNAP-vol1 - - -
-v SNAP-vol1_dcl gen ENABLED 144 - ACTIVE
pl vol1_dcl-03 SNAP-vol1_dcl ENABLED 144 - ACTIVE
sd mydg05-02 vol1_dcl-03 ENABLED 144 0
-sp vol1_snp SNAP-vol1 - - -
-v vol1 fsgen ENABLED 204800 - ACTIVE
pl vol1-01 vol1 ENABLED 204800 - ACTIVE
sd mydg01-01 vol1-01 ENABLED 204800 0
-pl vol1-02 vol1 ENABLED 204800 - ACTIVE
sd mydg02-01 vol1-01 ENABLED 204800 0
-dc vol1_-dco vol1 - - - BADLOG
v vol1_dcl gen DETACHED 144 - DETACH
pl vol1_dcl-01 vol1_dcl ENABLED 144 - ACTIVE
sd mydg03-01 vol1_dcl-01 ENABLED 144 0
-pl vol1_dcl-02 vol1_dcl DETACHED 144 - IOFAIL sd mydg04-01 vol1_dcl-02 ENABLED 144 0 RELOCATE
sp SNAP-vol1_snp vol1 - - -
-This output shows the mirrored volume,vol1, its snapshot volume,SNAP-vol1,
and their respective DCOs,vol1_dcoandSNAP-vol1_dco. The two disks,mydg03
andmydg04, that hold the DCO plexes for the DCO volume,vol1_dcl, ofvol1have failed. As a result, the DCO volume,vol1_dcl, of the volume,vol1, has been
detached and the state ofvol1_dcohas been set toBADLOG. For future reference,
31 Recovering from hardware failure
note the entries for the snap objects,vol1_snpandSNAP-vol1_snp, that point to vol1andSNAP-vol1respectively.
You can use such output to deduce the name of a volume’s DCO (in this example,
vol1_dco), or you can use the followingvxprintcommand to display the name
of a volume’s DCO:
# vxprint [-g diskgroup] -F%dco_name volume
You can use thevxprintcommand to check if thebadlogflag is set for the DCO
of a volume as shown here:
# vxprint [-g diskgroup] -F%badlog dco_name
This command returns the valueonif thebadlogflag is set. For the example
output, the command would take this form: # vxprint -g mydg -F%badlog vol1_dco
on
Use the following command to verify the version number of the DCO: # vxprint [-g diskgroup] -F%version dco_name
This returns a value of 0 or 20. For the example output, the command would take this form:
# vxprint -g mydg -F%version vol1_dco
The DCO version number determines the recovery procedure that you should use. See“Recovering a version 0 DCO volume”on page 33.
See“Recovering a version 20 DCO volume”on page 35.
Recovering from hardware failure
Recovery from failure of a DCO volume
Recovering a version 0 DCO volume
To recover a version 0 DCO volume1
Correct the problem that caused the I/O failure.2
Use the following command to remove thebadlogflag from the DCO:# vxdco [-g diskgroup] -o force enable dco_name
For the example output, the command would take this form: # vxdco -g mydg -o force enable vol1_dco
The entry forvol1_dcoin the output fromvxprintnow looks like this:
dc vol1_dco vol1 - - -
-3
Restart the DCO volume using the following command: # vxvol [-g diskgroup] start dco_log_volFor the example output, the command would take this form: # vxvol -g mydg start vol1_dcl
33 Recovering from hardware failure
4
Use thevxassist snapclearcommand to clear the FastResync maps for theoriginal volume and for all its snapshots. This ensures that potentially stale FastResync maps are not used when the snapshots are snapped back (a full resynchronization is performed). FastResync tracking is re-enabled for any subsequent snapshots of the volume.
Warning:You must use thevxassist snapclearcommand on all the
snapshots of the volume after removing thebadlogflag from the DCO. Otherwise, data may be lost or corrupted when the snapshots are snapped back.
If a volume and its snapshot volume are in the same disk group, the following command clears the FastResync maps for both volumes:
# vxassist [-g diskgroup] snapclear volume \
snap_obj_to_snapshot
Here snap_obj_to_snapshot is the name of the snap object associated with
volume that points to the snapshot volume.
For the example output, the command would take this form: # vxassist -g mydg snapclear vol1 SNAP-vol1_snp
If a snapshot volume and the original volume are in different disk groups, you must perform a separatesnapclearoperation on each volume:
# vxassist -g diskgroup1 snapclear volume snap_obj_to_snapshot # vxassist -g diskgroup2 snapclear snapvol snap_obj_to_volume
Here snap_obj_to_volume is the name of the snap object associated with the snapshot volume, snapvol, that points to the original volume.
For the example output, the commands would take this form ifSNAP-vol1
had been moved to the disk group,snapdg:
# vxassist -g mydg snapclear vol1 SNAP-vol1_snp # vxassist -g snapdg snapclear SNAP-vol1 vol1_snp
Recovering from hardware failure
Recovery from failure of a DCO volume
5
To snap back the snapshot volume on which you performed asnapclear, usethe following command (after using thevxdg movecommand to move the
snapshot plex back to the original disk group, if necessary):
# vxplex -f [-g diskgroup] snapback volume snapvol_plex
For the example output, the command would take this form: # vxplex -f -g mydg snapback vol1 vol1-03
You cannot use thevxassist snapbackcommand because thesnapclear
operation removes the snapshot association information.
Recovering a version 20 DCO volume
To recover a version 20 DCO volume1
Correct the problem that caused the I/O failure.2
Use thevxsnapcommand to dissociate each full-sized instant snapshot volumethat is associated with the volume:
# vxsnap [-g diskgroup] dis snapvol
For the example output, the command would take this form: # vxsnap -g mydg dis SNAP-vol1
3
Unprepare the volume using the following command: # vxsnap [-g diskgroup] unprepare volumeFor the example output, the command would take this form:
# vxsnap -g mydg unprepare vol1
35 Recovering from hardware failure
4
Start the volume using thevxvolcommand:# vxvol [-g diskgroup] start volume
For the example output, the command would take this form:
# vxvol -g mydg start vol1
5
Prepare the volume again using the following command:# vxsnap [-g diskgroup] prepare volume [ndcomirs=number] \ [regionsize=size] [drl=yes|no|sequential] \
[storage_attribute ...]
For the example output, the command might take this form:
# vxsnap -g mydg prepare vol1 ndcomirs=2 drl=yes
This adds a DCO volume with 2 plexes, and also enables DRL and FastResync (if licensed).
For full details of how to use thevxsnap preparecommand, see the Veritas
Volume Manager Administrator’s Guide and thevxsnap(1M) manual page.
Recovering from hardware failure
Recovery from failure of a DCO volume
Recovering from instant
snapshot failure
This chapter includes the following topics: ■ Recovering from the failure of vxsnap prepare
■ Recovering from the failure of vxsnap make for full-sized instant snapshots ■ Recovering from the failure of vxsnap make for break-off instant snapshots ■ Recovering from the failure of vxsnap make for space-optimized instant
snapshots
■ Recovering from the failure of vxsnap restore
■ Recovering from the failure of vxsnap reattach or refresh ■ Recovering from copy-on-write failure
■ Recovering from I/O errors during resynchronization ■ Recovering from I/O failure on a DCO volume
Recovering from the failure of vxsnap prepare
If avxsnap prepareoperation fails prematurely, thevxprintcommand may
show the new DCO volume in the INSTSNAPTMP state. VxVM can usually recover the DCO volume without intervention. However, in certain situations, this recovery may not succeed. If this happens, the DCO volume must be deleted.
2
To recover from the failure of the vxsnap prepare command
◆ Type the following command:
# vxedit [-g diskgroup] rm DCO_volume
Alternatively, the DCO volume is removed automatically when the system is next restarted. When the DCO volume has been removed, run thevxsnap preparecommand again.
Recovering from the failure of vxsnap make for
full-sized instant snapshots
If avxsnap makeoperation fails during the creation of a full-sized instant snapshot,
the snapshot volume may go into the DISABLED state, be marked invalid and be rendered unstartable. You can use the following command to check that the
inst_invalidflag is set toon:
# vxprint [-g diskgroup] -F%inst_invalid snapshot_volume
VxVM can usually recover the snapshot volume without intervention. However, in certain situations, this recovery may not succeed. If this happens, the DCO volume must be deleted.
To recover from the failure of the vxsnap make command for full-sized instant snapshots
1
Use thevxmendcommand to clear the snapshot volume’stutil0field:# vxmend [-g diskgroup] clear tutil0 snapshot_volume
2
Run the following command on the snapshot volume: # vxsnap [-g diskgroup] unprepare snapshot_volume3
Prepare the snapshot volume again for snapshot operations: # vxsnap [-g diskgroup] prepare snapshot_volumeRecovering from instant snapshot failure
Recovering from the failure of vxsnap make for full-sized instant snapshots
Recovering from the failure of vxsnap make for
break-off instant snapshots
If avxsnap makeoperation fails during the creation of a third-mirror break-off instant snapshot, the snapshot volume may go into the INSTSNAPTMP state. VxVM can usually recover the snapshot volume without intervention. However, in certain situations, this recovery may not succeed. If this happens, the snapshot volume must be deleted.
To recover from the failure of the vxsnap make command for break-off instant snapshots
◆ Type the following command:
# vxedit [-g diskgroup] rm snapshot_volume
Alternatively, the snapshot volume is removed automatically when the system is next restarted.
Recovering from the failure of vxsnap make for
space-optimized instant snapshots
If avxsnap makeoperation fails during the creation of a space-optimized instant
snapshot, the snapshot volume may go into the INSTSNAPTMP state. VxVM can usually recover the snapshot volume without intervention. However, in certain situations, this recovery may not succeed. If this happens, the snapshot volume must be deleted.
To recover from the failure of the vxsnap make command for space-optimized instant snapshots
◆ Type the following command:
# vxedit [-g diskgroup] rm snapshot_volume
Alternatively, the snapshot volume is removed automatically when the system is next restarted.
If thevxsnap makeoperation was being performed on a prepared cache object
by specifying thecacheattribute, the cache object remains intact after deleting
the snapshot. If thecachesizeattribute was used to specify a new cache
object, the cache object does not exist after deleting the snapshot.
39 Recovering from instant snapshot failure
Recovering from the failure of vxsnap restore
If avxsnap restoreoperation fails, the volume being restored may go into the DISABLED state.
To recover from the failure of the vxsnap restore command
◆ Type the following command:
# vxvol [-g diskgroup] start volume
Recovering from the failure of vxsnap reattach or
refresh
If avxsnapreattach orrefreshoperation fails, the volume being refreshed may
go into the DISABLED state, be marked invalid and be rendered unstartable.
To recover from the failure of the vxsnap reattach or refresh commands
1
Use the following command to check that theinst_invalidflag is set toon:# vxprint [-g diskgroup] -F%inst_invalid volume
2
Use thevxmendcommand to clear the volume’stutil0field:# vxmend [-g diskgroup] clear tutil0 volume
3
Use thevxsnapcommand to dissociate the volume from the snapshothierarchy:
# vxsnap [-g diskgroup] dis volume
4
Use the following command to start the volume: # vxvol [-g diskgroup] start volume5
Re-run the failedreattachorrefreshcommand.This results in a full resynchronization of the volume. Alternatively, remove the snapshot volume and recreate it if required.
Recovering from instant snapshot failure
Recovering from the failure of vxsnap restore
Recovering from copy-on-write failure
If an error is encountered while performing an internal resynchronization of a volume’s snapshot, the snapshot volume goes into the INVALID state, and is made inaccessible for I/O and instant snapshot operations.
To recover from copy-on-write failure
1
Use thevxsnapcommand to dissociate the volume from the snapshot hierarchy:# vxsnap [-g diskgroup] dis snapshot_volume
2
Unprepare the volume using the following command: # vxsnap [-g diskgroup] unprepare snapshot_volume3
Prepare the volume using the following command:# vxsnap [-g diskgroup] prepare volume [ndcomirs=number] \
[regionsize=size] [drl=yes|no|sequential] \
[storage_attribute ...]
The volume can now be used again for snapshot operations.
Alternatively, you can remove the snapshot volume and recreate it if required.
Recovering from I/O errors during resynchronization
Snapshot resynchronization (started byvxsnap syncstart, or by specifying sync=ontovxsnap) stops if an I/O error occurs, and displays the following message
on the system console:
VxVM vxsnap ERROR V-5-1-6840 Synchronization of the volume volume stopped due to I/O error
After correcting the source of the error, restart the resynchronization operation.
To recover from I/O errors during resynchronization
◆ Type the following command:
# vxsnap [-b] [-g diskgroup] syncstart volume
41 Recovering from instant snapshot failure
Recovering from I/O failure on a DCO volume
If an I/O failure occurs on a DCO volume, its FastResync maps and DRL log cannot be accessed, and the DCO volume is marked with the BADLOG flag. DRL logging and recovery, and instant snapshot operations are not possible with the volume until you recover its DCO volume.
If the I/O failure also affects the data volume, it must be recovered before its DCO volume can be recovered.
See“Recovering a version 20 DCO volume”on page 35.
Recovering from instant snapshot failure
Recovering from I/O failure on a DCO volume
Recovering from boot disk
failure
This chapter includes the following topics: ■ VxVM and boot disk failure
■ Possible root disk configurations ■ The boot process
■ VxVM boot disk recovery ■ Recovery by reinstallation
VxVM and boot disk failure
Veritas Volume Manager (VxVM) protects systems from disk and other hardware failures and helps you to recover from such events. Recovery procedures help you prevent loss of data or system access due to the failure of the boot (root) disk.
The procedures for recovering volumes and their data on boot disks differ from the procedures that are used for non-boot disks.
See“About recovery from hardware failure”on page 11.
Possible root disk configurations
It is possible to set up a variety of configurations for theroot(/) file system and
other critical file systems that are used by the operating system (such as/usr), and for the swap area.
Using the/usrfile system as an example, the following cases are possible:
3
■ /usris a directory under/and no separate partition is allocated for it. In this
case,/usrbecomes part of therootvolvolume when the root disk is
encapsulated and put under Veritas Volume Manager control.
■ /usris on a separate partition from the root partition on the root disk. In this
case, a separate volume is created for theusrpartition when the root disk is
encapsulated.
■ /usris on a disk other than the root disk. In this case, a volume is created for
theusrpartition only if you use VxVM to encapsulate the disk. Note that
encapsulating the root disk and having mirrors of the root volume is ineffective in maintaining the availability of your system if the separateusrpartition
becomes inaccessible for any reason. For maximum availability of the system, it is recommended that you encapsulate both therootdisk and any other disks that contain other critical file systems, and create mirrors for these volumes and for the swap area.
Therootvolvolume must exist in the boot disk group.
There are other restrictions on the configuration ofrootvolandusrvolumes.
See the Veritas Volume Manager Administrator’s Guide.
VxVM allows you to putswappartitions on any disk; it does not need an initial swaparea during early phases of the boot process. However, it is possible to have
theswappartition on a partition not located on the root disk. In such cases, you are advised to encapsulate that disk and create mirrors for theswapvolume. If
you do not do this, damage to theswappartition eventually causes the system to
crash. It may be possible to boot the system, but having mirrors for theswapvol
volume prevents system failures.
The boot process
On a system with an encapsulated root disk, VxVM usesinitrdto load VxVM
modules and to start the system volumes on the root disk. For more information aboutinitrd, refer to theinitrd(4) manual page.
VxVM boot disk recovery
If there is a failure to boot from the VxVM boot disk on Linux, the recovery method depends on the type of failure.
The following are some possible failure modes: ■ Failed boot disk
Recovering from boot disk failure
The boot process
■ Failed boot disk mirror
■ Accidental use of the -R, fallback or lock option with LILO ■ Missing or corrupted master boot record
■ Missing or corrupted /etc/fstab file ■ Missing or corrupted /etc/vx/volboot file
If recovery fails, recovery by reinstallation may be required. See“Recovery by reinstallation”on page 60.
Failed boot disk
If the boot disk fails at boot time, the system BIOS displays vendor-specific warning messages.
The system can automatically boot from a mirror of the root disk under the following conditions:
■ The geometry of the mirror disk must be the same as that of the root disk. ■ The mirror disk must have a suitable GRUB or LILO master boot record (MBR)
configured on track 0.
Additional information is availble on how to set up an MBR.
See“Restoring a missing or corrupted master boot record”on page 57. If no root disk mirror is available, recovery by reinstallation is required. See“Recovery by reinstallation”on page 60.
Use thevxprint -dcommand to confirm that the root disk has failed:
# vxprint -d
TY NAME ASSOC KSTATE LENGTH PLOFFS STATE TUTIL0 PUTIL0
dm rootdisk - - - - NODEVICE -
-dm rootmir sdb - 164504997 - - -
-In this example, the boot disk,rootdisk, is shown with the stateNODEVICE.
The methods to recover the root disk depend on the circumstances of the failure.
Warning:Only use these procedures if your root disk has gone bad. VxVM automatically tries to synchronize the contents of the root disk and its mirrors. If the procedures are used when the root disk is still good, this can cause data corruption when VxVM is restarted as it does not know which disk contains valid data.
45 Recovering from boot disk failure
See“Reconnecting a disconnected root disk”on page 46. See“Failed root disk”on page 46.
Reconnecting a disconnected root disk
If the disk media has not failed, but the root disk has become disconnected, it can be reconnected.
To reconnect a disconnected root disk
1
Shut down the system, and then power it down.2
Reconnect the disk.3
Power up the system, but do not allow it to reboot. Instead, enter the system’s BIOS settings mode (this is usually achieved by pressing a key such asEsc, F2orF12on the console keyboard). Verify in the BIOS settings that the systemis set to boot from the root disk (in this example,sda). Otherwise the system may not be bootable.
4
Reboot the system, selectingvxvm_rootat the GRUB or LILO boot prompt asappropriate.
5
Use thevxprint -dcommand to confirm that the disk is now active:# vxprint -d
TY NAME ASSOC KSTATE LENGTH PLOFFS STATE TUTIL0 PUTIL0
dm rootdisk sda - 16450497 - - -
-dm rootmir sdb - 16450497 - - -
-6
Use thevxprint -pcommand to view the state of the plexes. One or moreof the plexes on the mirror disk are shown with the state STALE until their contents are recovered. You can use thevxtaskcommand to monitor how
the recovery and reattachment of the stale plexes is progressing, as shown in this example:
# vxtask list
TASKID PTID TYPE/STATE PCT PROGRESS
160 PARENT/R 0.00% 2/0(1) VXRECOVER
161 161 ATCOPY/R 41.78% 0/12337857/5155232 PLXATT mirrootvol rootvol
Failed root disk
If the disk media has failed, the following methods can be used to replace the failed disk:
Recovering from boot disk failure
VxVM boot disk recovery