PICK JET
word processor guide
-88A00783AO 1
RECORD OF REVISIONS
Title: PICK JET Word Processor Guide
Document No. 88A00783A01
Date Issue
March 1984 Original Issue
NOTICE
The information contained in this document is subject to change without notice.
General Automation makes no warranty or representation with regard to this material, including, but not limited to, the implied warranties of merchanta-bility and fitness for a particular purpose. General Automation shall not be liable for errors contained herein.
General Automation assumes no responsibility for the use or reliability of its software on equipment that is not furnished by General Automation.
This document contains proprietary information which is protected by copyright. All rights are reserved. No part of this document may be photocopied or
reproduced without the prior written consent of General Automation.
This document embodies confidential information proprietary to PICK Systems Inc., and shall not be used, reproduced, copied, disclosed, or transferred in any manner except under written agreement.
PICK JET
word processor guide
88A00783AO 1
Copyright~ by General Automation, Inc. 1045 South East Street P.O. Box 4883
RECORD OF REVISIONS
Title: PICK JET Word Processor Guide
Document No. 88A00783A01
Date Issue
March 1984 Original Issue
NOTICE
The information contained in this document is subject to change without notice.
General Automation makes no warranty or representation with regard to this material, including, but not limited to, the implied warranties of merchanta-bility and fitness for a particular purpose. General Automation shall not be liable for errors contained herein.
General Automation assumes no responsibility for the use or reliability of its software on equipment that is not furnished by General Automation.
This document contains proprietary information which is protected by copyright. All rights are reserved. No part of this document may be photocopied or
reproduced without the prior written consent of General Automation.
This document embodies confidential information proprietary to PICK Systems Inc., and shall not be used, reproduced, copied, disclosed, or transferred in any manner except under written agreement.
88A00783A
FOREWORD
This document is one of a family of ZEBRA reference manuals devoted to PICK processors that are on call within the PICK operating system. Before reading this document and using the processor described, it is recommended that you first become familiar with the PICK terminal control language and file
structure. These subjects are thoroughly covered in 88A00782A, listed below with other documents covering PICK processors.
Document No.
88A00757A 88A00758A 88A00759A 88A00760A 88A00774A 88A00776A 88A00777A 88A00778A 88A00779A 88A00780A 88A00781A 88A00782A
Title
PICK Operator Guide ACCU-PLOT Operator Guide COMPU-SHEET Operator Guide
Quick Guide for the PICK Operating System PICK Utilities Guide
PICK ACCESS Reference Manual PICK SPOOLER Reference Hanual PICK BASIC Reference Manual PICK EDITOR Referance Manual PICK PROC Reference Manual PICK RUNOFF Reference Manual
Introduction to PICK TCL and FILE STRUCTURE
TMACCU-PLOT is a trademark of ACCUSOFT Enterprises
TMcOMPU-SHEET is a trademark of Raymond-Wayne Corporation
TMpICK is a trademark of PICK Systems
TMZEBRA is a trademark of General Automation, Inc.
T A
E'.L E
o
F CON TEN T SSect i on. • • Page Section • • • • • •
How to Use this Manual
What is the JET word processor?
St .. ~p 1 : SP"3C i of"l,J i nl.) a format
Step ~? : Ent.er i nl;j a Docufllent
Stl!:!P 3: Pr i nt i nlJ a Document
First time using JET
First time Designing a Ruler
First time Insert.ing Text
First time Positioning Cursor
Example of JET verb usage
Options for JET-IN and JET-OUT
lO-Key Pad Cursor Positioning
Editing Keys--a Table
2 Cursor Positioning Keys
3 Editing keys--Description
4 Using the Ruler Editor
5 Inputting Text
8 Automatic Word Wrap
~~ Hqphenat i on
10 Spelling check on Input
11 Inputting with tabs
'I .-,
.. ~.~
:24
33
35
30 co
.... 1
37
38
14 Boldfacing 40
16 JET-OUT Command Lines 41
18 Special Text Insertion Commands 45
20 Handling Multiple eRTs with JET 48
How to Use this Manual
This manual covers the use of the JET word processing system.
It is divided into several sections.
The first section is a tutorial for first time users, and the second section is a comprehensive reference manual.
If you have never used the JET word processor before, you :. h 0 u 1 d s tart wit h the fir' s t s t:'=! C t ion. Fir':, t , rea rJ t h .. ~ " T h r e e
Steps to using JETII. Once you understand the use of JET-IN and JET-OUT, you can try the tutorial.
Thl:~ tutorial is lIinteractivl:,:!lI; that is, to follo, ... tutorial, you should have a CRT (terminal) attached to computer system running the JET word processor software.
Note: before trying the the tutorial, configure your CRT for a blinking, block cursor.
The tutorial will lead you through the design and entry of a sample memQ, complete with examples of rulers, typing at tab stops, and moving the cursor. Once you have completed the tutorial, you can read the remainder of the manual.
Follow i ng t.he tutor i a1 =.ect i on are "refer'ence" : ... :!!ct i cln:·. These sections are for users with a working knowledqe of the JET ~"ord proc eSE·or·.
The JET-IN reference section covers the CRT editing keys, cur so I'" po 5 i t ion i nl;} key s, us i n g the k e q bo a r d t Q t I .. JP I:~ t I:,:! >~ t, t h If:!
different type of tabs, hyphenation, spelling checking, underlining, boldfacing, and the ruler editor.
The JET-OUT reference section covers the commands that can be used when printing documents with JET-OUT, to control headings, foot.ings, paging, hilightinq, and merging of text from d~3ta f i ll?!s.
The last section covers using JET on different eRTs, using JET a s a s c r I:~ I:,:! n ,,~d j t (J r, and a t r 0 u b 1 e ".- s h 0 0 tin I';:' qui ct.::! •
1')
What is the JET word processor?
The JET word processor software is a system of computer prograMs which enables a computer with a PICK operatIng system to function as a word processor.
It gives anyone with access to a CRT (or terminal) and a pr i ntl~r the capab iii t i I~S (Jf a word proc1!;!ss i ne;! compt..ltl~r.
The JET word processor is divided into two parts. The first i s call1~d "JET-INII c3nd is used t(J et1t .. 3,. ... data f,"om qOL.II" CRT
into t.he computer sqstef,l. The second is called "JET-OUT"
and is used to print data from the computer system onto a
PI"'-inter.
What does JET do?
The JET word processing system will help you produce:
Letters, per-sorlal ized letter~~, form letters, for-fIls-for fill-in, listings, reports, memos, manuals, mailing lists, phone lists, ledger sheets, state-ments, invoices, purchase orders, sales orders, sales brochures, software, documentation, and various and sundry types of paperwork. You can even use JET to eliminate paperwork.
With JET-IN (and a CRT or terminal) you can:
Indent, tab, center, fill paragraphs, JU5tif~ left and right margins, align columns of data, fill paragraphs to margins, wrap lines automatical14, hyphenate, create, modify and update documents.
With JET-OUT (and a printer) you can:
Automatically paginate; print headings, footings, page numbers, and highlights; compile documents;
m.~r9C:! data from :-t.andar-d 1/ bo i 1 er~ll a::t.e" sour-c es,
from your CRT, or even output from ACCESS, PROC or
BASIC proqr-cHtl.
-1
Three Steps to Using JET
The three steps to producing a document (letter, memo, form,
fIl anua 1, et.c.) us i rll.~ t.he JET word proc essor are as fo 11 OI,.JS:
1 • D I:~ t e r min e the " for fll at" o f t h e doc u m I: n t •
The format. is t.he shape, struct.ure, the the text on the page--as opposed subject matter, of the document.
or arrangement of to the content, or
For example, the format of a business letter would include a heading, bod~, and footing, with left and right margins and paragraph indentions. The content of each letter (name, address, and subject matter) might differ, but all the letters would have the same format. This design step may be done with pencil and paper.
The JET word processor uses special rYl~r lines to establish or define the margins and tab settinqs in a document, and special £Qmmin~ lines to control everything else. Command lines always start with the
"back slash" charac ter (" \ ") on thl: CRT k e'.Jboard.
2 • lise ,JET -- I N c::nd a Cr~T k eqboc::rd to "erlter·1I or tl.~.lpe in th.:-!
document, camp b!":!te t~ i th tl~>~t, command I i nl:,:!s, and ru ll=r lines, into the computer.
Input n~~ text by typing on your CRT (terminal) keyboard, or merge ~~l§~lng text (standard formats, boilerplate, names and addresses, etc.) from disk files.
JET··- IN 1 ets I::JOl~ "ovl!:!rv i ew" the document bid d i 5p 1 alA i nl.:=j i t on your CRT screen, to see how it would print. Then you II ed i t II or rev i 5e thl!:! tl:~}-~t, c omflland 1 i nes, and rt~ ll=r lines, until the CRT overview matches what. you want to put on pap .. ~r.
3. lise JET-OllT and a printer to print. the document.
Letters, memos, and forms are usually printed only once. Longer works, such as manuals, may be printed first as drafts, to be marked for revision. Rough drafts and forms are usually printed on quicker dot-matrix or line printers; letters and final drafts may require slower II 1 e t t. E! r - qua lit I:J " P r i n t e r·:. wit h bet t e r t.1 . .J p e q L.I ali t.1.-:I •
,J E T .. -0 U T c an pr i n t t h I:,:! doc U fll e n t o n a " h (3 rd·- cop I.:J II terfll i nal, c~ "5 laVE!" elr "corl~ .. ole" pr i nt.:!r at.t.ached to t.h.:!
CRT, or on serial printers or line printers, through the SpOOlE!r·.
Step 1: Specifying a format
Thl~ format of a doCUtlll~nt is the shal="~_, arranl.;JI:';!ml~nt,
alignment, or visual appearance of the data on each page. For example, a one-page memo might look something like this:
To: D'~partm'i:!nt
From: Person Regarding: Subject
*
First paragraph, h~re, is full of words, words, and more words.*
More words words words make up the second paragraph.CC: Rec i p i ent
_____________
B~slQi@n~______________________________________ _
The fQrm~~ of the above memo is the following: a heading section, followed by the body of the memo, followed by a
distribution section. Each section has its own format.
The heading section has th.:! words, "To:", "From:", Ci:nd
"I;;'~'.~ard in';):" a I i qned on the r i f~ht, and thf~ two names and the subject aligned on the left.
The body of the memo mark each paragraph.
inside the bullet.
hai:' an aster i s,~~ (If.;.:") or "bullet" to
Each paragraph is indented completely
The distribution (recipient) section has the same format as the heading section--right and left aliqned columns.
It is important to distinquish between the fQrm§i~ or shape of a document, and the SQnt~nt§ of the document. The following memo has the ~!m! format as the above memo, but it has 11ff~r~n~ content.
To: Fr-'om:
HI:~'.~ard i nl);
Off i CI~ Staff
K. Sylvester Livingston JET word processing
Our new JET word processing software has been installed.
*
Remember to use JET for all office letters and memos.cc:
l.al.~lc:_____________ Bi!Rh __________________________________________ _
Once you have designed a format for document, you can continue to use the subsequent documents of the same type.
a particular sam.:! format.
Step 1: Specifying a Format (continued) Designing Rulers
The fQCffi~~ of a s~ction of a document is controlled by the "r'u 1 er'" at the top of th.: 5·':C t i on. Ru l.:rs ar'€! §:~§f..l
§!
1 i I""I':Sof text in a document. Rulers are special b~cause:
1. Rul.:rs appear on the CRT (during input and editing) only; th~y do not appear when you print a document.
2. Rulers ar.: created and modified in a special way, us i n 'd the /I r u II!:! r ~d i tor" •
3 • Ru l.:rs usua 1 1 q app.:ar c:S a II rev.:r'=·~ v i dt?o" lint? on
th~ CRT. (Grey bar with black letters.)
A ruler conta i I""IS a It?ft and r' j I"~ht tllar'g i n, an opt. i one:l "~~on€!
indicator ll , and a tab character for ~ach different tab stop us.:d in a s.:ction of c: docum.:nt.. The left and right margin
d~fine the ~l~~b of a s~ction of a document. The zone indicator controls word wrapping and hyph.:nation. The tabs align words on the left, right, or center, align numbers on the decimal point, and indent paragraphs.
Each ruler controls the format of any text appearing below that ruler in the document, until anotht?r ruler is encountered. There is no limit to the number of rulers in a
docum~:!!nt. i'lor i s th~:!!re c:: 1 i mit. on the number of tc~bs stclp:. in a ruler. However, there can only be one left margin (l), one right margin (R), and one zone indicator (Z) in a ruler.
The action of a ruler is detailed in the sample memo below:
left fllarg i n
I Right tab Zone indicator
I I Auto tab I Right margin
1 _________ 1 __ 1 ____________________ 1 __________ 1 _______________ _
~
_________
~__ e ____________________
~__________
B _______________ _
I To: Office Staff
I From: K. Sylvester livingston IRegarding: JET word processing
I I I
I
*
Our i'1t:!W JET word proc ess i nl.~I software has been installed.
I I
I
*
Remember to use JET for all I office lett€!rs and memos.I I
I C C : Lo'.Jlc:
I Ralph
Step 1: Specifying a format (continued) Entering new rulers
Once you have designed the section of a document, you using the JET-IN utility.
ru bE!rs '=Iou need to format .~ac h csn begin to enter the rulers,
Rulers are created and entered into a document with the JET
"rul.~r ":l!d i tor". The first time '.Jou ,JET·-IN a new document, you are given a chance to edit rulers before you start to enter the text of the document.
When the cursor is positioned to an existing ruler line,
pr'~ss the "Ell ke'.J to ed it that ruler. t~h'!:!n the cursor is on
c: 1 i ne of te~·~t, pr.;:ss the II E II k e':J tCI insert a nE!W ru ler ..i us t above the cursor position.
To create a ruler, simply move the CRT cursor to the left and right, pressing the backspace key to go left, and the space bar to go right. When the cursor is at the position in the ruler where you wish to make a change, press the key for the ru I er c harac ter ' . .Jou wal'",t in that pos i t i on, or pres.s. the "_" (minus sign or hyphen) key to r~mQ~§ the character at that position.
Note: A ruler may contain only Q~~ esch of these characters:
Z
Zone indicatorEach ruler csn contain OOIOY of the following tab characters:
<
Left te:,:bA Auto tab
>
Right tabDecimal tab
C Cel'",ter tab
When cresting rulers, it is best to r~OOQY~ any tab stops that are not needed to avoid problems or confusion later.
F' I ac i n9 th.:!" Z" (zone i nd i c ator) ~.!Q§~r: to the "R" (r i .; .. ht margin) will force you to do OOQr§ hyphenation when you are
I!:!nt..~rinl;' tl~~·~t. F'lacin.;} thlE! "Z" f~!::t!.bgr to th.~ ll!:!ft of th.= flRIl will reduce the I i ~el i hood of hav i n9 t ( ) hqph,?n<3te.
Up to nine rulers may be created and saved with the ruler editor, but they will only b~ saved while you are entering the document. However, rulers can be saved more permanently
b'::J I~ntl=r i nl.~ them int.o a "def au It" ru l,=r doc U/I}.=nt, and ~b.~;§~~
rulers can then be merged int.o any document at any time.
To embed a ruler into the document and leave the ruler .. ~d i t.or, pr.=ss th .. ~ "ESCAPE" «)r II ESC") k I~'::J. To '=>: i t the rt..ll.ar ed j tor without c han,;, i nq or embedd i n •. ~ thti!! ru I er, pI'"·es.s the II X II
k e • .J •
Step 2: Entering a Document
There are four ways to begin entering text in a JET document:
1. Use JET-IN to enter a n~~ document; exit the ruler ed i tor b,.~ press i nq the "ESCAPE" kel.J and bel;" i n entering text at the 1QQ of the new document.
2. Use JET-IN to edit an ~~l§1lo9 document; II I II (i nsert te~d:,) k 1E!ld and blE!l~ i n enter i nl.~ to the !~f~ of the £~~§Q~ location.
press thl~ tl~}~t jus t
3. JET -. I N an §:~j_§~l.ng doc um.?nt, c::nd ~Iress the II L II (insert line) key, to begin entering text on a n~~
Iln!L
just ~!lQ~ the cursor location.4 • JET - I Nan §: ?.1.1
§!
-L n 9 doc U "l e n t; pre~. s the .. f".J .. (r e pIa c eword) key and replace the ~Q~~ at the cursor location with a new word.
When you are entering text with a ruler that contains tab s t()PS, pre~;s i nl.:j thlE! II TAB" k el.J wi 1 1 mOVIE! thl:':! cursor to th I~ next tab stop to the right. (If your CRT keyboard does not h a v If:! <3 TAB k e I.J, pre s s t h IE! " con t r 0 I - I II k e 'd of' 0 r the TAB k e I:J b IJ
simultBn.?'c'u~;ly holdin,;" dow-n the "CONTROL" or "CTRLII
kel.J and prl:,:!ss i ng thl:':! II I II k 'l:!'d. )
Once you have pressed the tab key, the text you type will be formatted as you type it. For all tabs, the CRT cursor will first Jump to the right, until it is directly under the tab stop in thtE! ruler. For lef't, and auto tabs, cont i nUl!:! tl....JP i nq normally. When typing at a left tab, the text will wrap back to the left margin; when typing at an auto tab, the text will wrap to the location of the auto tab in the ruler.
When typing at a right tab, the cursor will stay in the same spot, and the text will move to the left as you type. When typing at a center tab, the text will move both left and right as you type. Typing at a decimal tab is identical to t I.J pin I;' a t a r i q h t tab, un til ad .. :::! c i fIl a 1 . poi n t o r p l?o rio d (". II )
ke~ is pressed. Then the decimal point will remain aligned
un~~r the deciroal tab, and the remaining digits in the number
are typed normally.
When you reach the end of a line that is
nQi
the last line in a paragraph, simply keep typing. When you get past the right marg i n, (the "R" in the ruler), the cur'sor will drop down to thlE! nl!:!>~t 1 i nl!:!. Th i s fl:':!aturlE! is called II word wrap II • You shouldnQi
press the "RETURN" or "NEWLINE" ke~~ at the end of a line, if there are to be any mQr~ lines in that paragraph, since this will defeat the word wrap f.:!atl...lre. Onlq pr'ess theStep 3: Printing a Document
Once you have entered a document, complete rulers and command lines needed to format properly, use JET-OUT to print the document.
{.,Ii th
the
all the document
,..IET--OUT can pr i nt th.~ dOc:ul.lent on a "hard-cop~.J" ter-m i rial, a
"5 lavl~1J or "console" pr inter attached to thl~ CRT 1 or on serial printers or line printers, through the spooler. For
e>~amp Ie, a docul')I~nt named "MEMO" ina f i ll:~ named IJFOJ~MS"
could be printed several different ways, depending upon the "opt ions" (I et tl~rs in parentheses) spec i f i I::d;
JET-OUT FORMS MEMO
JET-OUT FORMS MEMO (P)
JET-OUT FORMS MEMO (C)
Prints the memo on the CRT screen, or on paper if the CRT is a "hard-cop' . .J" terminal.
Routes the MeMO to to be printed on a
or serial printer.
the SP<JO ll~"'" ,
lin.:! pr i ntl-~r
Prints the memo on a console printer, attached to the CRT.
The length of the page is determined by the page depth of the TERM verb setting. For example, suppose your TERM is set to:
p al.=lI:~ Width:
F' aq~-! Depth: Line Skip LF Delold FF 01:: I a'::J Bc~c k s:-pac e Term T'dPe
Terillinal 79 24
o
1 5 8 R Printer 132 60The default page length for JET-OUT will be 24 lines per page on the CRT, and 60 lines per page on the printer. To override the default page length, and set the page length to 55 lines, regardless of how the document is printed, enter a "\page 1 enqth 5~i" c ommar,d line in the doc U/,) .. ~nt.
JET-OUT will nQ~ normally print a form feed at the 1QQ of a dOCLH'll~nt. If documl::nts arl~ ~iet up with a "\footin';}" command, clr i f the!l_~ er,d with a "\bp" c olllilland, then a for-Ill fe€!d will be printed if~~r the document is printed. This method wastes the I€!Bst amount of paper. To force a form feed at the top of each document, use JET-OUT with the (F) option.
Paging is controlled by the TERM verb setting, or b~ b~nl;}th" commands. A n~t ... pal.=l"~ can b~ -f'orc~d wit.h a cOlllmand, clr a "\test pal;te" command.
" \pc~ge
"\bp"
First tiMe using JET
Follow this example to design, enter, and print a document using the JET word processor. To best appreciate the example, you should have access to a CRT (terminal) on a computer system that is running the JET word processor.
In the course of following the example, you will create a
file, enter a new document into the file with JET-IN, and then print the document with JET-OUT.
To properly follow the example, work from start to finish. Do not try to start in the middle of the example.
Logon to the account that has been assigned to 4ou, and t4pe th'i:! ·':-ollowinq: (don't tl . .Jpe th'i:!
">"
()r prompt charactli:!r))CREATE-FILE (WP.DATA 1,1 3,1)
The computer system should respond with a messaqe like:
[ 4 1 7 ] F I L E: .. W P • D A T A .. eRE ATE D ; BAS E ::: >D·~ >~ >! f'l 0 D U L 0::: 1 S E F' A R::: 1
[417] FILE "l..tF'.DATA" CREATED; BASE:::'.J'd'JI . .J MODULO::::3 SEF'AR:-.:1
If you instead get a message like:
[41:3J THE FILE NAME EXISTS IN THE MASTER DICTIONARY (MO).
Then I:;lOU d i dn' t need to create the file, c:nd can prclceed with
th .. ~ Ii:!>!amp IIi:!.
Now call up the JET interactive word processor to create a n Ii:! wit e fll (J E T - T EST) i nth I:: ~I F' • D A T f~ filii:! ':;l 0 u jus t c r Ii:! ate d :
)JET-IN WP.DATA JET-TEST
The !2Q!J:~Q!!! 1 i n,:: on thl:: CF~T sc rel::n, c a I l,::d th,:: "Status L i ne" ,
always will indicate what you are doing. The first time you JET ~~ IN the n~~~ i tefl) named II JET - TEST", the status line rl::ad~;:
changE! ruler or hit? for help "JET-TEST" View on
Above the status line is a list of the ke4S available when you are editing a ruler. The two rows of numbers above the ru18r line are to help you in laying out the ruler exactly the way you want it, by aligning with the properly numbered col umn. Th is ent i r'e CRT =·c reen i s c c: 11 ed the II ru 1 er he 1 p sc rt?!l::n • II
First time Designing a Ruler
Here is how the ruler for our example of a meMO is designed. The goal is to produce a memo with the following format:
TCI:
FrOfl} :
Re,~aJ"d i ng:
Departmerlt F'1E!rson Subject
First paragraph, here, is full of words, words, and more words.
*
More words words words make up the second paragraph.CC: Recipient
_____________
B~£lQl~~!______________________________________ _
First a left margin of one inch printer will print 10 characters per at position 10 in the ruler.
is chosen. Assuming the inch, the left margin is
T he words" To: " , .. From:" and .. Regard i n9;" c.~r.:! ar'ran,~ed ina column, and aligned by the right edge--this indicates a right tab. Since the longest word to appear at the right tab, the word "Re';,arding:", has 10 characters, the ri,.~ht tab is 10
spaces to the right of the margin, at position 20. This same r i ';,ht tab will also be used to al i qn thlE! "bulllE!ts".
The department name, the name of the originator of the memo, and the subject matter of the memo are arranged in a column, and aligned by the left edge. This indicates a left or auto tab. Because this same tab will be used to align the left edqe of th.:! paral.~raphs, an auto tab ("A") is c hClsen.
The two columns in the heading of the memo are three spaces apart, and the paragraphs are indented 3 spaces from the b I.J 1 1 e t s, sot h e aut 0 tab (" I~") i s 3 spa C IE! sf'" 0 fll t h IE! r i gh t tab
(">"), at positioJ,) 23.
The Y" i .;I h t filar gin, "R ", i s· at 55, be c au s e the s· a til p 1 e mem 0 i s·
on lIJ s i >~ i nc hiE! 5 wid IE! • The" Z " i s a t 44, far f r (HI) t h I: " F:", t. 0
inhibit hyphenation. The finished ruler design looks like:
1 2 3 4 6
!~~1~~Z~2Q!2~1~~Z~2Ql~~~~~Z~2Q!~~~~~Z~2Ql~~~~~Z~2Ql~~~~~Z~2Q
_________ b _________
~__
e _______
~____________
~__________
B
____ _
" "
Left 'Right I Auto Zone 'Right I
Margin I Tab I Tab Indicator' Margin I
at 10----+ at 20--+ +--at 23 at 44---+ at 55---+
Use the ruler editor to produc~ a ruler exactl~ like the one above. Move the cursor to po~; i t i on 10, and press thl: II L "
v.
e' . .J. Then move to pos it i on 20, and press the "}" k e'::J, lIlove t.o pos i t i on 23, press thl: "A" kel:l, move t.o 44, prl!:!s~; the"z"
keq, move to 55, and press the "R" ke':-J_Before you go on. • •
The various types of tabs available with the JET word processor give it power and flexibility. Use them!
Sometimes it will seem that the best way to indent or aliqn something is to type a few blanks at the start of the line, or between two columns, and not have to set up tab stops in a ruler. In the long run, however, you will be better off b~
using the tab stops.
With tabs, you can change the ruler which formats a section of the document, and JET will autoMatically reformat the section. This won't happen for you if you use blanks to align everything.
Also, if you change the size of a word that is at a tab stop, the remaining text will stay aliqned. If you are using blanks to align the text, you will always have to add or subtract blanks to keep the text aligned.
So use tabs when they are needed, but don't use tabs when they are not needed.
Each tab stop ina ruler should have a pur·pose. If a tab stop is not needed in a ruler, then it should be removed from the ruler. Extra tabs will only cause problems.
In particular, the ruler you are designing for the sample memo must be ~~§£t!y the same as in this manual, in order for you to properly follow the example. Therefore, for this example, you OOy§~ remove any extra tab stops.
To remove a character from the ruler, move the cursor on top o f t h ,== char act 1== r t () be .r ,== m a v ed, and pr f:! S S thl:-:: .. - II It. I:!! q •
The TAB key will move the cursor immediately to the next character to the right of the cursor position. This is the quickest way to position the cursor in order to remOV8 c h a r act 1== r 5 f '''" 0 m t h ,== r u l .. ~ r wit h t h I~ min lA S S i q n (II --") k e I::J •
The RETURN or NEWLINE key will move the cursor to position 1.
Once you have produced a ruler ~~i£~!Y like the above example rul':l!r, prl=ss thl== IIESCAPE" or "ESC" k,==~...J. This l",i 11 put the ru 1 er you c r.::e:ted at the tClp 1 in.:: of th.~ item, II JET _. TEST" •
Now you will be able ruler you Just designed I::JOU tl::Jpe it.
First time Inserting Text
Whenever you are using JET-IN to insert text in the item
",..IET--TEBT", t.he belttom (statul!,) line c."lf the CRT rear.is;
insert text, then press ESCAF'E "JET-TEST" View on
The top line of the CRT screen will be the sample ruler you created e~rlier with the ruler editor. I t looks like t.his:
_________ b _________
~__
e ____________________
~__________
B ____ _
T h.::! c urso ... - i s now under the "L" in the ru l.:!r. When 1._.tOLJ are
inserting, the cursor always indicates where the next
character you type will be placed on the CRT screen.
Usually, you start inserting a line at the left margin.
1. Press the "TAB" (or CTRL-"I") ke'd 2 • Tldr:lI~ thl:':= word II To : II
3. Pres:- the IITAg" kel . .J
4. TldPe thl~ depart(ll'~nt name: "Off i c .. ~ Staff" 5. Press the "RETURN" or "NEWLINE" ke'.oJ
6. Prl~ss thl~ IITAB" key, thll:!n t'dPe the word IIFrom: II
7. Press the IITAB" ke1d, then tt:Jpe th.~ name II.{. S':-Ilvester Livingston", then press the RETURN or NEWLINE key.
8. Pre:-s the IIRETURN" kel:J al.~a i n t o j n~)ert an empt~.J line
9. Press the "TAB" ke'::J, and thl? ":.:11 (astl=r i sk) ke'd
10. Pre:-s the "TABII kel:J, and tldPe the sentence "Remember to use JET for all of f ice II? t t e r san d fllll:! til 0 S • II
11 • Press the II ESCAPE" (clr "ESC ") k e1d.
Your version of the sample memo should look like this:
b _________
~__ A
____________________
~__________ B ______________ _
To: Office Staff
From: K. Sylvester Livingston
*
Remember to use JET for all office letters and memos.Not i c.:! that the words II To: II and "From:", wh i c hare t:!C;C h tqped
at a r i qht tab, arl?' II pushed 1\ to the lll:!ft as 1:l0U tl.Jpl?' thl?fJl.
JET-IN will forM~~ ~~xt as you type i t , whether you are using left, right, auto, decimal or center tabs.
Not ice, a 1 :.0 , w hat hap pen s as I:J 0 u t ~~ pet h.:l! w 0 r d II 0 f f i c .:! II • A:.
you type this word, i t extends
e!i1
the right margin. When t.h i s hapP,=ns, thl= JET soft.war .. ~ erasl~s the word, and I I t ... r<.~ps IIthe sentence' you are typing down to the next line.
This process of wrapping words, which happens ~l~bg~~ any
he 1 p from the person tl:lP i n9, is called If aut.omat i c word t ... rap If •
Fi~st time Positioning Cursor
Whenever you are using JET-IN to ~~lt text in the item II ,J E T - T EST I I , the bot to (,\ (s tat us) 1 i n e 0 f IJ 0 u r CRT r l:':.! ads ;
.ove curso~ or press ? for help "JET-TEST" View on
When you are editing, the first step is always to position the cursor to a particular spot in the document. There are many different keys that JET-IN uses to position the cursor.
Onl~ keq that positions the CtArSor is thl~ "T" [email protected]. It positions the cursor to the ~Q~ of the entire document.
Pr'ess the "T" keq. Your CRT (terminal) ~;creen will be erased, then the ruler you desiqned with the ruler editor, and the text of the memo you entered earlier will be displayed. The cursor will then be placed at the top left
C ornt:':!r of tht3! Cf<T. Your screen will look 1 i ",e th i.s.:
b _________
~__
e ____________________
~__________
B ______________ _
To: Office Staff
From: K. Sylvester Livingston
*
Remember to use JET for alloffice letters and memos.
Note that if your cursor is nQ~ blinking, it may be difficult for you to locate the cursor.
Another key that pos i t ions the cursor' i s· th€~ JIB" ke!J. It. positions the cursor to the ~Qt~Qm of the entire document.
F'rl~ss the liB" k e1d. The tl~~·:t on Idour CRT will not chanql~, but the cursor will move to the bottom of the memo, like this:
b ... _ ._ ._ .0_ ._ eo_ • _ _ ;~ • • _ _ _ ~ _ . _ . _ . . . _ _ • _ _ _ • _ _ . _ . _ . _ • _ _ . _ . _ . _ . _
b .. __
..-. __ ._ ._ ... _ .. _ ._
8 ._ .... _ .. _ ._ ._ ._ ... _ ._ ._ ,0" ••••• _ _To: Office Staff
From: K. Sylvester Livingston
*
Remember to use JET for alloffice letters and memos._
A
(the CURSOR is here)---+
The "T" (top) and liB" (bottom) It.el.Js ar.~! easl.J very useful. Now we will go on to some position the cursor.
First time Positioning Cursor (continued)
P,"',~ss th,~ "T" k .:I::J aqa in. Now tr'.d press i n.~ thl~ "9" k rf:!~.J a f'=l'"
times. The cursor on your CRT screen will move fQc~§r~ from
word to word, like this:
b _________
~__ A
____________________
~__________ B ________ ---__
l-h'1!re---+
to here--··-·---- ... ·
USI~
A
JET for all
A
to here---+
to here---+
one word at a time---+
The "9" k elJ is ca llr~d thl~ "word advanc I~" or "word forward"
ke';::l, because when IJOU press the "9" keq, the CRT curs·or (llOV":!!:.
forward to the next word to the right.
Press the "B" ke~':"J aCl~a i n. Now tr~.J pr.:!ss i n'~ the "?" ~~e'd a few
times. The cursor on 40ur CRT screen will move ~!£~~~r~ from right to left, like this:
---b _________
~__
e ____________________
~__________
B ______________ _
RelJll~mber to us'=
A A
JET for all
+--- Fro{l) here,
+---
to here,+---
to here,+--- to here,
+--- one word at a time.
The "7" k eq i s call ed ~he ., worr.:l boc k If k e'd, bee aus·e when 1.:-;tOU
prrf:!s~; th,:: "?" k'~I::l, the CRT cursor mov.!":!s back one word.
Similarl
'::,l, pre5.s.in';'1 the "1" arid "3" ke'Js will move the cw'"-s·or
forward or backward on,= §~*-n!:~!J£~ at <3 tim':. Thl~ "6" and "4"
keys will move the cursor forward and backward one £bi~i£!:~r
at a t i till:, and thl!":!"}" and "{If k e 1::1 5 l ... ill movl!":! thl:: cursor
forward and backward one Q§C§9C§Qb at a time.
G .. ~t to k nc)w som":!!
r j '.:jht k'~I . ..J5 will
dOClJment.
Example oT JET verb usage
On any computer with a PICK operating system, you communicate with the computer through T.C.L. (Terminal Control Language), by typing the names of programs. The names of these programs c:re cc:lled IIverbs". When 'Jou t, . .Jp.~ a verb name, '.Jou (Jlu!:.t a15.0 t'd P I:;: a II fill:;: II n a me, and 0 n e 0 r m 0 r I:;: II i t emil n a ,,11= s • E a chi t 1= m
contains a document, or a part of a document. Each file csn contain any number of items.
When '.Jou tqpe II JET -I Nil, fo 11 ow.~d b'.J a f i 1.2 naflle, fCll 10t,..Jed b'._.1
some item names, you invoke the JET word processor to create or €!d i t thoip~e items. When '.Jou t'.Jpe II ~JET -·OUT ", fo 1 lowed bq a file name, and some item names, you invoke the JET word processor to print those items on a CRT, or on a line printer or serial printer.
To use anq verb, you t4pe the verb name, followed b~ a file name, followed (usually) by one or more item names, followed
b':;I "optionsll. Th.:=! options are .2ach cc~pitc:l letter~., and must be inside parentheses.
You illa',J t' . .Jpe a "SELECT", "SSELECTII
or "QSELECTII
verb just before typing the JET-IN or JET-OUT verb. This will generate c: list of item-IDs. If you do not specifq any items with the JET-IN or JET-OUT verb, the list will be the list of items to edit or print. If you generate a selected list, and then specify JET-OUT, and do specify a list of item-IDs, then the list will be used to specify items in a data file, to be used with the ~insert command.
Here are some examples of T.C.L. (Terminal Control Language) commands to invoke the JET word processor. The first word in each e>~ample (the verb name,) will be either ",JET-·IN" or "JET-OUT". Thl:;: s .. ~cond word is thlE! f i liE! name. Th i s i s f cill clw.~d by the item 1 i st, if any, and the opt i or,~" if cHl' . .J.
T.C.L. Command •••••••••••••• Explanation ••••••••••••••••••••
)JET-IN WP.DOC FORMAT Enters JET word processor to
)JET-IN WP.DOC STEF'l STEF'2
>SSELEC T WF'. DOC .- II ED IT] II
>,-IET-·IN WF'.DOC
IE! d i t a n i t e i'), n a ill I~ d II FOR MAT II ,
inc: f i l~!, n c: f,) e d II W F' • DOC II ,
which contains word processor documentation.
Enters ,JET word edit two itl!:!ttls, and ISTEF'2", in file.
pr(Jc I::=ssor to
nam€!d "STEP111
t.h.::! II WP • DOC II
Selects those items in the file naflled "WF'. DOC" whose nc:mes
s tar t wit h II ED I Til, t. h I~ n 1-::= n t 1::= r s
the JET word processor to edit those items, "EDIT1", "EDIT211
,
Example of JET verb usage (continued)
T.C.L. Command •••••••••••••• Explanation ••••••••••••••••••••
}JET-OUT WP.DOC STEPl
)JET-OUT WP.DOC STEP2 (P)
}JET-OUT WP.DOC STEP3 (C)
>SELECT WP. DOC "" "STEP"" JET-OUT WP.DOC
)JET-OUT WP.DOC DRIVER (P)
Pr i nts the i te(,l named "STEP1" in the f i Ie n<'3med "WP. DOC" to the CRT (terminal), to produce one section of the JET word processor documentation.
Pr i nts thl:= item "STEP2" in the file "WP. DOC" to t.he 1 i ne printer.
Pr i nts the item "STEP3" i r, the fi 11:= "WP.DOC" to thl:= consol,:=
(slave) printer.
Selects only those items in the "WP • DOC" f i 1 e whclse names· are "STEP1", "STEP2", "STEP3", ,=tc. and then prints them on the CRT
(terminal) screen.
Prints the item named in thl:: fil'= "WP.DOC" line pr i ntlE~r.
"DF~IVER"
on thl::
Th is i t":!!(,l conta i ns many "\rl::ad" commandc;, ond will prodt..Jc e the entire JET word processor documentation.
>SSELECT CUST
)JET-OUT TEXT BILL (P)
Selects th,:: "CUST" fill::.
Prints the item "BILL" in the f i 11= "TEXT" 011 thl:: 1 i n'::pr i nt,=r •
Th is item conte: i ns " ... i ns .. ~rt" c ollllllands, wh i ch ';.ather· data frc,(,) items in the CUST file. This bill will print one time for each clf th.? customers selected in the "CUST" file.
>JET-OUT TEXT BILL (P)
>JET-OUT TEXT BILL (P,V)
Since no select list is specified, JET-OUT will print all ... INSERT commands, and this bill will print only once.
PI" i n·ts the item "BILL" in the file "TEXT" to the lineprinter. All command lines and ruler lines, and all ... insert commands will be printed.
>SELECT CUST WITH LATE :> "90" Selects the items i n th,,~! "CUST" >JET-OUT TEXT LATE.LETTER file with payments more than
ninety days late, and prints a
Options for JET-IN and JET-OUT
The following options are supported by the JET word processor JET-IN and JET-OUT functions. Some of them do not have a meaning for both JET-IN and JET-OUT, and some have slightl4 different meanings for JET-IN and JET-OUT.
Each option is listed by the option letter, by option name, and by the description of the option.
o
1=' t. N a 1111~ • • • • • Mea n i n'~. • • • • • • • • • • • • • • • • • • • • • • • • • • • • • • • • • • • • • •(C) Console Routes output of the JET-OUT verb to a console or slave printer (a printer that attaches to the rear of the CRT). This is accomplished b4 first turning on the CRT printer (or AUX) port, then printing the document, then turning off the CRT printer port.
(E) NEC Indicates NEC Spinwriter printer. Must be used in conjunction with the (a) option.
(F) Formfeed Prints a form feed at the top of each item.
(L) Line» Specifies line numbers for JET-OUT.
(N) (Nopa l;.t.3!) Suppresses pal~ i n9 for' the ,JET -OUT ver·b.
With the eN) option specified, the entire document will be printed on the CRT without stopping. Without the (N) option, output is suspended at the end of each page until the operator hits a CRT kel.J. (This is called IIpa J;.ti nql l . )
PreSSing a control-X ke4 at the bottom of a page, when
1/ pal;.t i n911, will ter'rn i rlate output clf the doc umerlt.
(P) Printl:":!r Specifies JET-OUT to print to the SPOOLER.
Usually, this will mean printin9 on a lin~printer or serial printer. However, the SPOOLER can alternatively route the out put t 0 c~ II h 0 1 d f i 1 e /I 0 r a (Il a 9 n f:! tic tap e •
Options for JET-IN and JET-OUT (continued.>
01=. t. N a 1.1 e • . • •• M IE! ani n ~~ • • • . • . • . • • • • • • • • • • • . • • • • • • • • • • • • • • . " • • •
(R) Random Suppr€!ss€!s "random i =:"!at i on II of nUfllber rout i ne t..Ised b'.J "JET-OUT"
r i ';'tht lIlar9 i ns.
t.h€! r a:rldofll
t.o just i fl::J
l,Jith thl~ (R) option specified, each time qou "JET-OUT" a
docum€!nt, it will be justifi€!d by inserting blanks in th€! same spots between words. Without the (R) option, the
distribution of the blanks within the line will vary from printing to printing.
Selects random marl';" ins.
"proport i Dna 1" spac i n9, i rl::.tead of blank spacing, to right-justifq
Th€! "propor·t i onal" method of jt,lst i f i cat i on is onll.J 5.uppclrted on letter quality printer, so this option must. be used with the (a) option, and th€! (E) or (U) option, as ne€!ded.
With this method, the spaces between words are adjusted to be the same width, within th€! nearest 1/120th of an inch. The spacing between letters remains the same. That is, each word is ~Irinted at the same pitch, and pitch only changes between words.
(U) (~UME
(V) (View)
Specifies aUME Sprint model letter-quality printer--must be used with the (a) option.
Disables the printing of ruler and command lines when used with JET-IN, enables the printing of ruler and COMmand lines when used with JET-OUT.
The view options allow you to see and modify any ruler or command lines when using JET-IN without the (V) option. If
you use JET-IN with the (V) option, you will not be able to see ruler lines or command lines, only lines of text. Usinq JET-OUT with th€! (V) option allows you to print the ruler and
command 1 i nl~s.
10-Key Pad Cursor Positioning
The n u (lll~ ric k e I-J pad, 0 r II t I:":! n --k e 1_::1 pad ", t o t h e r i q h t 0 f t h I~
alphabetic keys on the CRT keyboard, can be used to position the cursor when editinq. On an Ampex Dialoque 80 CRT, or
ADDS Regent CRT, the numeric keyboards look like:
7
4
Ampex Dialogue 80
8 9
6
1
I
1 TAB 1
1 2 I 3 E
1 1 1 I N
--- --- ---1 T
I 1 l i E
1 I
a
1 I RI I 1 I
7
4
1
a
ADDS Regent
8 9
5 6
2 3
E
N
T
E
I;:
When you are positioning the cursor, the keys function as though they were labeled:
Ampex Dialogue 80
I Word I Line I Word I
J ( - - 1 Up I --) J
1 Char I Page I Char I
I ( - - 1 Top I - - ) I
1 Sent I Line I Sent I Next
I (--- I Down I ----) I- '-i nl~
--- --- ---1
I I I I
I I Page I Pal;te I
1 I
<--
t --)- 1ADDS Regent
I Word I Line I Word I
I (-- J Up I --) 1
1 Che:r 1 F' ag.~ I Che;J"- 1 Ne~{t I
<---
I Top I --) I Line--- --- ---1
I I I I
1 Sent I Line 1 Sent I
I ( - - I Down 1 - - ) 1
1 P e-~9.~ I
I --) I
If your CRT has a similar numeric keypad, you can learn to use it for cursor positioning.
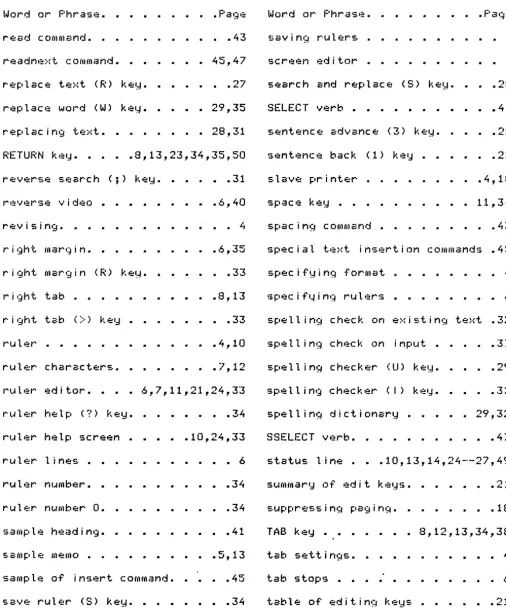
Editing Keys--a Table
Below is a summary of the ke45 on the CRT keyboard, and their function when you are editing a document. The keys are
group~d by the kind of text they operate on--Ietters, words, lines, sentences, paragraphs, etc., and b4 the function they perform--moving forward, moving backward, etc.
Some words have been abbreviated: Char. for character, Sent. for sentence, and Para. for paragraph.
Char. Word Sent. Para. Page Line Item Paste
+---+
I
NI~}·:t 6 9 3 } 2 I
Pr~:l!v i ous 4 7 1 { 0 I 8 I
Beq i nn i nt.;} t::"
oJ IRETURNI T
End A B
Any ("
~ S S S S G 0--9
''''!:,,~1.ete D Q y ~{ FD FD
J. ns.:!!rt I I I L L L M P
1\I:":!p lacl:! R W
Transpose Z ----USI:! Cut and Pastl?! k
el.Js---Chan';te ca~·e
*
II
Cut (delete) I J J J I J
P a~; tl:":! (mavl:! ) I P P P I P P
I I
D i ~;pla'd I I 0
I I
SI:!arch and I I
r€!place IS or ; S or I
S':!arch c3qa i n I A I A I
I I I
Fill:! I I I FI
I I I
+---+
Remaining keys and their functions are:
c
Reprint the CRT screen.E Enter Ruler Editor to change or insert a ruler.
u
Turn spelling checker on or off.1..,.1 Turn view (for ruler and command lines) on or off.
Check spelling of words from cursor downward.
Cursor Positioning Keys
When you are editing a document, the ke4s on the CRT keyboard are used to position the cursor or to perform text editing or word processing functions.
To make changes to existing text, you must first position the cursor where you want to modify or add text. Th@n you press the correct key to invoke the desired editing function.
The cursor positioning keys are listed by the key, the name of the function of the key, and the description of the function:
Key Name •••••.• Cursor positioning function ••••••.••••••.•••
T
6
9
1
3
Top
Bottom
Char back
Char adv
l,Jord back
l,Jord adv
S .. :::nt back
Sent aclv
Moves the cursor to the first character in the first line at the top of the document.
Moves the cursor to the end of the last line at the bottom of the document.
Moves the cursor left one charact@r, or if at the first character in a line, the cursor will move to the last character in the
prev-ious line. Note that the backspace (or control-H) key is also a character back key.
Moves the cursor right one character. The cursor can be positioned on space to the right of the last character in a line. At this position, thl~ "0" (oell~t,~ Charact'::~r)
key has a special function. Note that the space bar or blank is also a charact@r advance ke,.J.
Moves the cursor left to the beginning of the previous word. This may move the cursor up a l i nl~. At the top of th,~ CRT sc r'!:!I:":!n., i t mal . ..J jump back to the prey i OUE· ~,e::g.:::.
Moves the cursor to the right to the first character in the next word.
Moves the cursor to the first character in the sentence. If at the first character in
a sentence, cursor will go to the first character in the previous sentence.
Moves the cursor to the right to the first character in the next sentence. Note that a sentence ends with a period (.) question mark (?) or e>:c 1 C:;(Jlat i orl ~,o i nt ( ! ) , or' at the
Cursor Positioning Keys (continued)
K~y Nam~ ••••••• Cursor positioning function •••••••••••••••••
o
{ Para back
} Para adv
Moves the CRT cursor backwards 20 lines, or to the first line in th~ docum~nt.
Advances the cursor to the bottom line on the CRT screen; if it is already ther~, th~n
prints the next 20 lines, or to the end of th .. :":! docufJllE!nt.
Backs the cursor up one paragraph.
Advances cursor one paragraph.
A End-of-line Advances the cursor to the end of the line
CR RETURN
8 Line back
2
containing the cursor. If the cursor is already at the end of line, the cursor will advanc ~ to' the 'E!nd of thl? nl?>~t line. Th is key is useful when merging paragraphs.
The RETURN key <called the NEWLINE or ENTER key on some keyboards) will position the cursor to the first character in the line. If the cursor is already at the first character, it will advance to the first character in the next line.
Moves the cursor up to the pr~vious line, except at the first line, where it has no effect.
Move~ ..
e>~cept
effect.
the cursor down to the at the last lin~, where
ne~·~t lin":":!, it has no
N()t~~: Th .. ~ line back and line advance ke'.~s ("8" and "2") tr"d
to move th~ cursor directly up and down. However, if tabs are used, the cursor may move sidewa45, too.
F' <sqlE! top
s
G Goto Line
Moves the cursor to the first character in the pc.~I;.e, at the top of the CRT E·creen.
The search key can be used to position the cursor to any particular word.
Editing keys--Description
The following keys are used to insert, delete, locate,
repl~ce, move, merge, or change text. To use them, first position the cursor at the exact spot in the docum@nt where you w~nt to work on the text, then press the appropriate key. For some of the ke4s you will need to enter more information.
Name ..••••• Editing
S,~archl~s
ified bq S@arch) command prof'lptS:
functic.n •••••.•.••••••.••.•••••••...
for the last search string spec-an "S" (Searc h) o r " ; " (Reverse
command. If no previous search
was entered, the status line
No search string!
You must press a CRT key to proceed.
B Bottom Positions the cursor to the last character
in the last print line in the document.
If the last character is on the current page, the cursor is moved there. If the last line is less than 22 lines away, the screen is rolled up to the last line. If the last line
is 22 or more lines away,· the screen is erased and the last page is displayed.
o
Del char Deletes the char~cter ~t the current cursor position, and shortens the line.If the cursor is at the delimiter at the end of a line, this key will merge words from the next line. This enables you to merge paragraphs or lines of code together, or delete an extra RETURN (end of paragraph key> from text.
E Edit ruler Enters the Ruler editor. If the cursor is on a ruler line, that ruler will be edited. Otherwise, a new ruler will be inserted @~QY~ the current line. When you enter the Ruler editor, the status line pr'O(,lpts ~
change ruler or hit "?" for help
You may change the existing ruler, or add a new ruler. (See the section on the Ruler editor ke4s.)
When an ESCAPE (embed r'u 1 er) or .. X" (e~·~ i t Ru 1 er' ed i tor) ~~ el:J is pressed, you return to the editor. Pressing a question-mark ( " ? " ) ke'd will gf~t I.JOU to th.~ r'uler help scr·een.
Key Name ••••••• Editing function ••••••••••••••••••••••••••••
FI
FS
F i l~ doc Updates the document to the fil~, and exits th'E! "JET" {.,lord proc essor for th i s i "t'E!{Jl.
Saves the document to the file, and returns back into th'E! "JET" {.,lord proc'E!ssor.
Not.:!: wh~n ':Jou "FI" (file) or "FS" (save) a document that... is. more than 32,000 characters long, the status line reads:
Document too big- Type extension document name:
You must ent~r the item-ID (name) of the extension item. If the extension item exits on file, the status line reads:
Extension document already exists!
This is to prevent accidental loss of documents.
FG File delete Deletes the item, (you must first verify by press i n9 the "V" keq,) and e>d ts. the ",..I£TII word processor for this item.
FX Exits the current
changed, you must th.:! /lY" ke'.~.
item. If the item has first verify by pressing
FK Exit all Exits the current item and
i l l
items, when editing or word processing many items.I Insrt text Allows you to insert text, starting just before the current cursor position. The CRT screen is erased from the cursor postion to the end of the line, and the status line prCJ(.lptS:
insert text, then press ESCAPE
Pressing the RETURN (or NEWLINE) key will start a new line, or add null lines; text is added until the ESCAPE key is pr~ssed, at which time you are finished inputting, and are back to editing.
Note: The only way to §~Q~ Iney~tlng and r~§Yro~ §~l~lng is to pr,:ss th'E! "ESCAPE" (or "ESC") k .. ~q. F'r,:ss i n9 the RETURN (or NEWLINE) key will only add mQC~ ~l§D~ Iln~~~
Del line D~l~t~s a line, including ruler lines and backslash (command) lines.
Key Name. Editing function •••••••••••••••••••••••••••••••••••
M Merge Allows 40U to merge lines from another item,
possibl4 in another file, just below the current cursor position. The status line shows the prompt:
file name or RETURN for current:
T l.Jpe the name of you wish to merge,
ke~ to merge from edited. If you do system will prompt
the file that contains the item or press the RETURN (or NEWLINE)
the same file as the item being not enter a valid file name, the for file name again.
Once a valid file name (or RETURN entered, the status line shows the
IteM-ID or RETURN for "yyyyll
k eq) has bl:l!!!n i tl!!!m- I D prc'fllpt:
Whl!!!re tlyyyy" reprl!!!sents the naf,ll!!! of thl:":! i tl!!!(ll bl? i nl~
edited. Type the name of the item ~ou wish to merge from, or press the RETURN key to merge from the current item, as present in the fll~ at the time. If the item is not found, the system will prompt for file name again. Otherwise, the status line will show the prompt:
First lineN (RETURN for 001):
A RETURN key indicates the first line, otherwise the number entered must not be more than the number of lines in the item to be merged from, or the item-ID prompt will appear again. Once a valid starting line number (or RETURN key) has been entered, the status line will show:
Last lineN (RETURN for E-O-Item):
Press the RETURN key to merge up to and includinq the last line of the item, or enter the last desired line number. If this number is less than the first line number, the item-ID prompt will app.?ar c:';la in; if it i
=.
I~reat.?r than the number' of lines in the item, the system will merge up to and including the last line. The indicated number of lines are merged into the current document, starting after the line in which the cursor was originally positioned.Key Name ••••• Editing function ••••••••••••••••••••••••••••••
o
Overview The document is printed, from the current linePaste
to the last line, exactly as it would b~
pr j nted b'.oJ the "...lET -OUT" verb, .::!NC ept that the
output goes to the CRT.
This function is useful to determin~ the exact location of page breaks.
Inserts previously cut out sections of text. A one-digit paste number is prompted for, and the corresponding paste item is looked up. The status line prompts:
paste in which paste H (0--9)
The paste number must be 0 through 9, and the item-ID for a given paste number (N) will be:
Where XX is the port number of the CRT. Note that a paste item cut from one document can b~
pasted into a different document, but no more than 10 paste items may be used by one user
(one port) at a time.
Q Del word Deletes the word in which the cursor is
R
positioned, and closes up the sentence. Note that this may cause words from lines below th~
cursor to be moved up into the current line.
Repl text Replaces the text, starting at cursor position, with new text. I i n .. ~ prompts:
replace text, then press ESCAPE
thl:!: currl?nt The status.
Simply' t'dpe the new te}~t "or1 t.C)P of" the existing text. Not~ that if you att~mpt to replace text ~§~~ the end of a paragraph, you wi 11 cease "replac ing" and begin" insertin'.~"
text. The status line will then read:
insert text, then press ESCAPE
Note also that you can not replace a tab with anything. If you are replacing text and com~
Key Name ••••• Editing function ••••••••••••••••••••••••••••••
c
.... S€!arch S€!arch€!s for a word. Th€! status line prompts:
Search for:
Type the word (or phrase) you are searching for, and th~n press the RETURN key. The status line prompts:
Replace wi~h (or ESC for search only):
If you ar~ only s~arching, then press the ESCAPE key. If you wish to replace the word or phrase you are searching for with something different, then type that, and press th€! RETURN key. (Note that you can delete a word or phrase by s€!arching for it, and replacing it with "noth i n'~".) If I.JOU choosl:!! to sl~i31""ch ~n~ r€!plac€!, the status line prompts:
All occurences (Y/N):
If I:;lOU pr€!ss the "Y" ke'.J, JET--IN wi 11 replac€!
ev~ry occurence of the first word/phrase with the second. N€!xt the status line prompts:
Compare case (Y/N):
To search for a word §~!£~!y as you typed it, press the "Y II k €!Id. Th€!rl L-lp!=,er case arld low€!r case letters will not match; that is, the word "This." will not match "TI-IISII or "thisll.
If you s~arching for and replacing all occurrences of a word or phrase, then JET-IN will position the cursor to ~ach occurrence. The status line prompts:
Replace (Y=Yes N=No Q=Qui~):
If IdOU press thl~ "yll kel...J ~ JET·-IN \,.1 ill i=":":!rform
the replace, and reprint the CRT screen as
need~d. If I.JOU press thl:!! "(1" k,~q, JET-IN \ ... i 11
quit s€!arching, and you can r€!sume €!diting. If you press any other key, then JET-IN will look for another occurrence. If JET-IN finds one, it prompts you al.~a in, as abo'll:!!. Otherwise, the status line prompts:
String not found!
Then you must press one charsct€!r on the CRT keyboard before you can resume editing.
"',0
Key. Name ••••••• Editing function ••••••••••••••••••••••••••••
T Doc top Positions the cursor to the top of th8 document. The CRT screen is erased, and the first pag8 of the document is displayed.
U Spell ine~ F'r,:::ssin'~ the::: "U" k'E!I:J loli 11 alternat,:::lq turn the spelling checker for input on and off. The status line will prompt:
v
Vieww
Repl wordx
Spelling checker on!
Then you must press anyone key on the keyboard, in order to resume editinq. The spellin9 checker is disabled by the same "U" key, and the status line prompts:
Spelling checker off!
Once again, press anyone key to resume ,:::ditinq. Each l~se of thlii! .... _.,. '.~~~I.J will tl.~rn
the spelling checker on or off.
Switches the view from On to Off, or vice versa, and re-displays the current page. When the view is On, all command lines and ruler lines can be seen with JET-IN; when the view is Off, they are invisible lines.
Replaces the word at the current cursor positon. The CRT screen is erased from the beginnin9 of the word to end-of-line, and the status line prompts:
insert text, then press ESCAPE
Type the new word on the CRT keyboard, ending with an ESCAPE key. The remainder of the CRT screen is redisplayed, and you resume editing your document.
The II JET" word proc essor i s e>~ i ted; th"1! document is not updated to the file. If the
item has been £h§D9~~ during the interactive session, then the status line prompts:
iteM has changed: press uyu to exit