Lorem
Tangible Tools
& Techniques:
Co-Designing with
Locked-In Syndrome
Laura Beunk
Faculty
EEMCS/BSS
Supervisor
dr. F. Nijboer
Abstract
Contents
1 Introduction 8
1.1 Current situation . . . 8
1.2 Problem statement . . . 9
1.3 Research objectives . . . 9
1.4 Research outline . . . 9
2 State of the Art 10 2.1 Co-design . . . 10
2.1.1 Co-design Tools and Techniques . . . 10
2.1.2 The co-design process . . . 13
2.1.3 Co-design with verbal impairments . . . 16
2.1.4 Co-design with physical impairments . . . 16
2.2 Locked-In Syndrome . . . 17
2.2.1 Communication with Locked-In Syndrome . . . 17
2.2.2 Interaction with technology with Locked-In Syndrome . . . 17
2.3 Conclusion . . . 19
3 Research Methods 21 3.1 Research setup . . . 21
3.1.1 Participants . . . 21
3.2 Co-design Process . . . 22
3.3 Development of co-design tools & techniques . . . 23
3.3.1 Co-design Evaluation . . . 23
4 Pre-Design Phase 25 4.1 Overview of the Pre-Design Phase . . . 25
4.1.1 Goals . . . 25
4.1.2 Pre-design Expectations . . . 25
4.1.3 Pre-design Process . . . 26
4.2 Tools & Techniques for the Pre-design phase . . . 27
4.2.1 Probing for activities . . . 27
4.2.2 Adapting the existing SpeakUP prototype . . . 30
4.3 Design outputs of the pre-design phase . . . 30
4.3.1 Indirect observations . . . 30
4.3.2 Probing results . . . 31
4.3.3 Results of discussing the moods during daily activities . . . 31
4.3.4 Problem Statement . . . 34
4.4 Evaluation of the Tools & Techniques of the Pre-design phase . . . 34
4.4.2 Structured Evaluation of the Pre-design phase . . . 34
4.4.3 Conclusions from Evaluation of the Pre-design phase . . . 35
5 Generative Phase 36 5.1 Overview of the Generative Phase . . . 36
5.1.1 Goals & Expectations for the Generative Phase . . . 37
5.2 Tools & Techniques for the Generative Phase . . . 37
5.2.1 Making the scenario . . . 37
5.2.2 Enacting scenarios . . . 37
5.2.3 The generative session . . . 38
5.3 Design outputs for the Generative Phase . . . 39
5.3.1 Insights into the problem and context . . . 39
5.3.2 Ideas for solving the problem . . . 40
5.3.3 The chosen concept idea . . . 40
5.4 Evaluation of the Generative phase . . . 41
5.4.1 Observations . . . 41
5.4.2 Structured Evaluation of the Generative phase . . . 42
5.4.3 Conclusions from Evaluation of the Generative phase . . . 42
6 Evaluative Phase 43 6.1 Overview of the Evaluative phase . . . 43
6.1.1 Goals & Expectations for the Evaluative phase . . . 44
6.2 Tools & Techniques of the Evaluative phase . . . 44
6.2.1 Diverging from the concept . . . 44
6.2.2 Exploratory prototyping . . . 44
6.2.3 Specification of the concept . . . 44
6.3 Design outcomes of the Evaluative phase . . . 44
6.3.1 Breaking down the concept . . . 44
6.3.2 State of the Art relating to the concept . . . 45
6.3.3 Possible approaches to the system components . . . 46
6.3.4 Exploratory prototypes . . . 47
6.3.5 Evaluation of approaches and prototypes with the participant . 48 6.3.6 Final concept . . . 48
6.4 Evaluation of the Generative phase . . . 48
6.4.1 Observations . . . 48
6.4.2 Structured Evaluation of the Evaluative phase . . . 51
6.4.3 Conclusions from Evaluation of the Generative phase . . . 51
7 A tangible co-design method for Locked-in individuals 52 7.1 A tangible approach . . . 52
7.2 Tangible tools & techniques . . . 52
7.2.1 Probing . . . 53
7.2.2 Enacting scenarios . . . 53
7.2.3 Prototyping . . . 54
7.3 A tangible process . . . 54
8 Discussion 57 8.1 Tangibility in Co-design with verbal and physical impairments . . . 57
8.2 Tangible co-design tools and techniques . . . 58
8.3 Design outcome . . . 59
Bibliography 64
Appendices 65
A Generative session briefing 65
List of Figures
1.1 Changing of roles from a classical design approach (left) to the
participatory design approach (right) [1]. . . 9
2.1 The experience domain: what is experienced depending on the moment it took place [2]. . . 10
2.2 Relationship between the different layers of people, techniques and knowledge [2]. . . 11
2.3 Relationships between make, tell and enact [3]. . . 11
2.4 A framework relating make, tell and enact tools to purpose [4]. . 12
2.5 Probing process as seen by Mattlemaki. [5] . . . 13
2.6 Relationships between make, tell and enact [6]. . . 14
2.7 The co-design process with four phases (horizontal), two design approaches (vertical) and three methods (ovals) [6]. . . 14
2.8 Relationships between the three methods and time perspectives [6]. . . 15
2.9 The four creativity levels [1]. . . 15
2.10 Overview of access technologies categorized by the level of physi-cal movement the user is able to achieve [7]. Locked-in individuals can be on any of these levels. . . 18
2.11 Overview of an access solution through an access technology and a user interface the user’s functional intent is translated into a functional activity [7]. . . 18
2.12 Grid based scanning on a tablet. . . 19
2.13 Point based scanning on a tablet. . . 20
3.1 The Research through Design cycle in this study. . . 22
3.2 The design process as followed in this project. In circles the results of each phase. . . 22
4.1 The layered day in the life exercise. [8] . . . 26
4.2 The pre-design process with the taken steps and the outcomes (circles). . . 27
4.3 The emojis representing moods in order: very happy, happy, neu-tral, agitated, sadand an open option. . . 29
4.5 All pictures made with the probing tool over the course of three days. Each picture is a moment the participant was using a
particular infrared frequency to control his environment. . . 32
4.6 Outcome of the probing, a timeline with pictures throughout the day with the associated emotion and comments. . . 33
5.1 The generative process with all sub steps and outcomes (circles). 36 5.2 The steps from an intention to a function mapped out by the participants of the generative session. . . 39
5.3 Participants in during the generative session. . . 41
6.1 The evaluative process with sub steps and outcomes (circles). . . 43
6.2 The Switch Bot. . . 45
6.3 The MicroBot. . . 46
6.4 Exploratory prototypes. . . 49
6.5 Schematic of communication in the proposed system. . . 50
6.6 Schematic of the proposed system in an active state, converting user input into mechanical output. . . 50
7.1 The complete tangible co-design process, employing the tech-niques from section 7.2. . . 56
List of Tables
3.1 Overview of the qualitative evaluation methods. . . 24
4.1 Expectations before probing . . . 26
4.2 Overview of information to be gathered in the pre-design phase. . 27
4.3 Evaluation of the pre-design phase according to table 3.1. . . 35
5.1 Bed time scenario used in the generative session. . . 38
5.2 Evaluation of the generative phase according to table 3.1. . . 42
6.1 Evaluation of the evaluative phase according to table 3.1. . . 51
Chapter 1
Introduction
The locked-in syndrome is a serious neurological condition in which individuals lose almost all ways to interact with their environment due to a loss of movement and speech. This means these people have lost a significant amount control over their life. In order to help them interact with their environment in an empowering way, co-design may be a methodology that holds a lot of potential.
1.1
Current situation
Ever since the 1980’s design practice and research has become more focused on the user. Before this shift, design was for the user [8]. A product would be designed and only tested for success in a late stage of the design process, for example in focus groups lead by market researchers. This meant designers were less concerned with what they would design, they were mostly executioners of their client’s ideas. User centered design practice shifted the focus from designing for the client to designing for the user. User’s wants and needs were considered in earlier stages, however they remained mostly a passive object of observation. By consulting with users in earlier stages, it became a role of the designer to determine what to design as well as how. Designers included more research in their work and vise versa [8]. This has lead to the co-design approach that has been gaining traction. It aims at designing together with the user, not just for the user. This means that users play an active role in the design process to varying degrees. Designers, researchers and users work together, instead of separately as illustrated in figure 1.1 [1].
Figure 1.1.Changing of roles from a classical design approach (left) to the participatory design approach (right) [1].
1.2
Problem statement
Due to the state of their being, locked-in individuals lack power in their lives. The limited ways they have to interact with their environment often put them at the mercy of others around them. This lack of autonomy or even the fear of it can be detrimental to the individuals mental health [11].
1.3
Research objectives
Co-design is especially empowering due to its participatory nature, and therefore interesting to explore with this group. By designing a technical solution to enrich the ways locked in patients can interact with their environment with a participatory approach, the user is empowered in two ways. However, there is a lack of research on co-designing with locked-in individuals. Therefore, the objective of this research is to adapt and develop co-design methods for people with locked-in syndrome, and test these methods by applying them to the design of a technical solution with a locked-in patient.
This leads to the following research question:How can co-design methodology be applied to design a technical solution for a person with Locked-in Syndrome?
1.4
Research outline
Chapter 2
State of the Art
This chapter discusses the state of the art in co-design and technology related to locked-in syndrome. In the co-design section, approaches to co-design tools and the co-design process will be described followed by a review of co-design with both verbal and physical impairments. In the section about locked-in syndrome, the means of communication and interaction will be discussed followed by a review of technology used by people with locked-in syndrome.
2.1
Co-design
2.1.1
Co-design Tools and Techniques
[image:11.595.181.428.518.604.2]A key aspect of co-design is recruiting end users as “experts of their own expe-rience” [2]. There are the past, present and future experiences, as illustrated in figure 2.1. The goal is to capture these experiences and use them to explain the context of the design problem.
Figure 2.1.The experience domain: what is experienced depending on the moment it took place [2].
Generative techniques can help get deeper into the participants mind. It can expose tacit and latent needs [13]. Figure 2.2 illustrates how people, techniques and knowledge relate to each other in this context.
Figure 2.2.Relationship between the different layers of people, techniques and knowl-edge [2].
[3]. Each of those aspects relates to the techniques mentioned in figure 2.2: in-terviews are about telling, observations about enacting and generative sessions about making. However, these aspects cannot be separated from each other, as illustrated in figure 2.3. As Sanders & Stappers [6] have observed: “We have seen in practice that people make artifacts and then readily share their stories about what they made or they naturally demonstrate how they would use the artefact”. They even conclude that the meaning of the generated artifact is often only brought out when there is a story around it or when it is actually placed in a usage context. This was already stated by Sleeswijk-Visser as fundamental in their 2005 paper on context mapping [2]: “The basic principle behind generative techniques is to let people make designerly artefacts and then tell a story about what they have made”.
Figure 2.3.Relationships between make, tell and enact [3].
users for later phases), understanding experience and the generation of design ideas and concepts.
Figure 2.4.A framework relating make, tell and enact tools to purpose [4].
sensitizing tools, is to establish self-reflection on the part of the participants, which is then harvested during the generative sessions.” So in that case the probing also has a priming function.
Probing
Probing is done to elicit inspirational responses from the participant by giving them ambiguous prompt encouraging novel interpretation [14] or to gather in-formation [15]. Participants are provided with a toolkit consisting of several prompts and answering tools for them to respond to in their own time. The goal is not directly to get an objective view of the users needs, but The prompts are questions open for interpretation ranging from questions about the partici-pants personal life to ones relating more to the design challenge at hand. After the user finishes the self documentation, the probes are delivered back to the designers who can do the initial analysis, which can then be discussed with the users, using the probes to spark discussion. The combination of raw results and insights from the discussion can then serve as input for the rest of the design process [5]. The probing process is pictured in figure 2.5.
Figure 2.5.Probing process as seen by Mattlemaki. [5]
The answering tools can be diaries, postcards, cameras, maps, anything. Several aspects of these tools can be taken into account to make them more tempting to interact with [5]. The tone of the materials, aesthetically or other-wise, influences this. Participants should not feel pressured, and reducing the distance between designer and user can make them feel more comfortable. On one hand a casual look of the material can make it look less boring and official and more personal, while presenting abstract materials can lead to a more a detached attitude to requests, encouraging the participants to use the materials as they see fit. The designer can reveal themselves through the design of the tools and prompts, making the process more communicative.
2.1.2
The co-design process
present and future. Additionally in the pre-design phase the people involved can be primed, i.e. prepared to co-design. The generative phase is focused on producing ideas, insights and concepts for future designs. The design space and contexts of use are explored. Lastly, the evaluative phase is for assessment of design outcomes, in the present and near future. A comprehensive overview can be seen in figure 2.6.
Figure 2.6.Relationships between make, tell and enact [6].
They also show three approaches relative to the phase in the design process, as can be seen in figure 2.7. The three approaches are probes, generative toolkits and prototypes, the former two relating to earlier mentioned techniques. The approaches can be used to explore the three time frames by tailoring them to the time context. An overview of different applications in each time frame can be seen in figure 2.8.
Figure 2.7. The co-design process with four phases (horizontal), two design ap-proaches (vertical) and three methods (ovals) [6].
Figure 2.8.Relationships between the three methods and time perspectives [6].
2.1.3
Co-design with verbal impairments
Both methods relying upon language and omitting language have been imple-mented successfully to co-design with people that are verbally impaired. Virtual environments where participants have means to express themselves are used successfully by both Galliers [17] and Wilson [18]. Galliers used games to gain latent insights while Wilson’s environment was more a simulation of everyday life, which made it more of a direct communication tool. Both were effective, though had different purposes. The gamification is a more accessible way for the participants to engage and relies more on researchers to extract insights, while the other virtual environment enables participants to be more active in the design process.
The use of proxies to communicate during the design activities might impede upon the empowerment of the participants. In their study, Hamidi [19] chose the Participatory Design with Proxies approach based upon earlier successes. The proxies are people that stand in or for the target users, or join as a communica-tion intermediary, usually people close to them or similar to them. According to Hamidi in their study the main benefit of the proxies was that communi-cation barriers between researchers and users could be overcome more quickly. Indeed, communicating with people that are verbally impaired often takes ef-fort and time. However using proxies takes away power, according to Galliers [17]. They strongly reject using proxies, instead focusing on creating a bond with the users over an extended period of time. Konnerup [20] acknowledges both the benefits of proxies and building a relationship with the participants. In their opinion, the proxies are an aid for the latter. The focus is on choosing the right communication method for each participant. It seems important that participants are respected and that time is taken to communicate with them in order to understand them. However, communicating through proxies would take away an opportunity to empower the participant. Therefore proxies can assist in establishing means of communication and building a relationship, but should not be the only channel of communication.
2.1.4
Co-design with physical impairments
impairments, there seems to be less involvement of the participant in the gen-erative and tangible parts of the design process. Designers rely on descriptive verbal communication for these type of tasks, making them less generative and more reactive.
2.2
Locked-In Syndrome
2.2.1
Communication with Locked-In Syndrome
The most basic way of communication locked-in individuals use is some form of eye movement code [9]. This is usually a binary code, for example blinking once for yes and two for no or looking up for yes and down for no. This would mean only closed questions could be answered, however multiple systems have been developed to prompt locked-in individuals for more complex answers. The most common ones are alphabetical communication systems. In order to communi-cate a specific phrase, locked-in individuals spell every letter separately. The alphabet can be divided in a number of sections, where the locked-in individual will first respond positively when the right section is mentioned, and then to the right letter. Sometimes the letters are sorted by frequency and mentioned one by one, omitting the sectioning. There are many variations to this technique. The downside to this way of communication is that another person always needs to be present.
However, there are alternative and augmentative communication (AAC) methods that make it possible to communicate independently, even with a sin-gle movement [11]. Locked-in individuals are able to use on screen virtual key-boards to type out phrases. They are able to interact with this keyboard in several ways. Some interaction methods are precise enough to use the keyboard like a mouse would be used, while others use a similar way of prompting the user to select letters as with the alphabetical systems. This way of selecting things by either going over the options one by one or going over them in mul-tiple sections is called scanning [25]. This text can then be read out loud by a speech synthesizer.
2.2.2
Interaction with technology with Locked-In Syndrome
Figure 2.10. Overview of access technologies categorized by the level of physical movement the user is able to achieve [7]. Locked-in individuals can be on any of these levels.
Three types of user interfaces are identified by Tai et al.: (1) AAC aids which facilitate communication; (2) environment control units (ECU) which facilitate control of the environment and (3) computers which facilitate access to the functions usually present on a computer. Accessibility options on traditional computer-type user interfaces - including smartphones - facilitate the use of mainstream technology, e.g. Android switch access1. Many of these options use
the scanning method to go over the elements on the screen that can be interacted with, or even provide the ability to do point based scanning for more precise control. These ways of scanning are illustrated in figure 2.12 and figure 2.13 respectively. ECU’s like GEWA connect2 allow users to control many aspects
[image:20.595.126.508.272.485.2]of their home like lighting or the TV.
Figure 2.12.Grid based scanning on a tablet.
2.3
Conclusion
In order to go through a co-design process three types of methods should be present: probes, generative toolkits and prototypes. Within these types of methods tools should be present that allow artifacts to be created and dis-cussed. The tools throughout the the methods should build upon each other and gradually build up the creativity level of the participant.
Some obvious hurdles are visible when making and discussing with locked-in individuals. From literature some examples of co-design with similar impair-ments could be found. One of the ways to co-design with verbal impairment is to get the user in a context where they do not have to talk. This means either a change of environment that has alternative means of communication,
Figure 2.13.Point based scanning on a tablet.
for example a computer simulation; a change of activity into one where the re-searcher can extract insight by observing, for example a game; or an alternative communication method in a setting where talking would usually take place, for example using organization of pictures, to communicate. What is important in this communication is to establish a relationship with the participant, proxies can be used to help in this process. In co-design with physical impairment it seems that language and verbal communication is the main way of interacting with participants and extracting information. Generative tasks were mostly by means of verbal description, delegating the physical aspects. Observation is one way to omit the verbal aspect.
Chapter 3
Research Methods
This chapter describes the approach to research and design in this study. Research through design methodology served as a guideline for the approach to developing a co-design method. The co-design process provided a chronological structure and key outputs to work towards in each step. A structured approach with a consistent evaluation for tools and techniques allowed the co-design method to be assembled in a systematic way.
3.1
Research setup
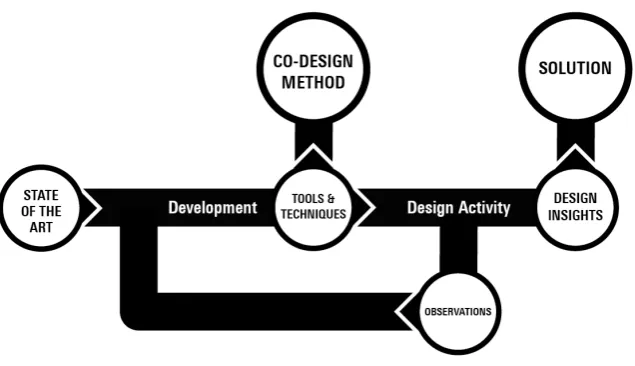
The approach to research in this study was in accordance with the Research through Design methodology. The unique aspect of this methodology is that it aims to use design to generate knowledge, as opposed to using design only to generate solutions [12]. That knowledge is then used to inform design and so forth. In the case of this study, research was done to inform the development of tools and techniques which were combined into co-design activities. These design activities were then executed, yielding both a design insight that contributed to a solution and knowledge about co-design. That knowledge in its turn informed the further research and development of co-design tools and techniques. That cycle was repeated until there was a final solution concept and a co-design method. The cycle is illustrated in figure 3.1.
3.1.1
Participants
Figure 3.1.The Research through Design cycle in this study.
3.2
Co-design Process
The project was structured according to a four phase co-design process as pro-posed by Sanders and Stappers [1]. The process is pictured in figure 2.7. The four phases are the pre-design phase, the generative phase, the evaluative phase and the post-design phase. The model was adapted for this project to focus on the results of each phase, as can be seen in figure 3.2. From the pre-design phase a problem statement was to be obtained through researching the user’s expe-rience. In the generative phase the goal was to obtain one or several concepts for a solution to the problem statement through generative activities including the enactment of scenarios to prime users. In the evaluative phase the concepts were evaluated through iterative prototyping with the user which was supposed to lead to a final prototype. However, the process ended in the middle of this phase, with a final solution concept. The last phase, the post-design phase, was never reached, but it would have been used to determine the success of the solution.
[image:23.595.131.449.136.319.2]The amount of insights, ideas and concepts over time was similar to the UK Design council’s double diamond structure [28] where there is divergence in user research and convergence to a problem statement, followed by another divergence for possible solutions and again convergence to a final solution.
3.3
Development of co-design tools & techniques
In order to systematically come up and test co-design tools and techniques in each phase, a consistent approach was needed. For each co-design method the following steps were followed: defining a goal, research, brainstorm, formaliza-tion, applicaformaliza-tion, and evaluation. The first step,defining a goal was a crucial step to effectively design a method, since it gave direction to the research. It was also important in the evaluation process since one of the measures was if the goal was reached. The research was to be able to built upon existing tools and techniques on which was elaborated in the brainstorm. The formalization
resulted in a process overview and a detailed approach. Beforeapplication, nec-essary tools were developed. After application the design activity wasevaluated
in a consistent way, as described in section 3.3.1.
3.3.1
Co-design Evaluation
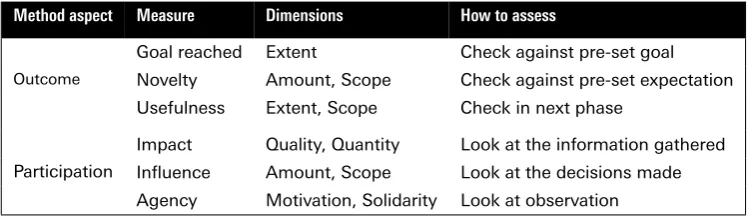
The success of co-design processes can be measured from at least two perspec-tives. The first aspect is the the amount of participation from the user. Sega-lowitz [29] proposes to assess this in three dimensions: (1) the impact of the participant on the project, measured by the value and rate of implementation; (2) the influence of the participant, both in scope and quantity; and (3) agency, by looking at the participants solidarity and willingness. This assessment struc-ture was successfully implemented by Garde & van der Voort [30].
Another aspect to assess is the key innovation outcomes existing of user ben-efit, feasibility and novelty as implemented by Trischler [31]. While Segalowitz assessment is more specific for co-design, the way of assessment presented second could be applied to projects that do not use a co-design process. The first takes participation as an inherently positive addition, while the second assessment does not assume this. To remain critical, it seems both assessments should be used in order to determine the success of a co-design process.
The aforementioned approaches are usually used to asses an entire design process. However in this research the individual parts of the process had to be evaluated, so the two scopes were applied to the individual design activities with some adjustments. Looking at outcome, three aspects could be qualitatively discussed. Firstly, reaching the goal. In the development of the method a clear goal was set. During evaluation it was assessed if and to what extent this goal was reached. Secondly, the novelty of the outcome was evaluated by comparing the outcomes to expectations set before the design activity was executed. Both the amount of novelty and its scope were taken into consideration. Lastly, the usefulness of the outcome was assessed by using it as input in the next phase and looking at the usefulness in extent and scope.
Method aspect Measure Dimensions How to assess
Outcome
Goal reached Extent Check against pre-set goal Novelty Amount, Scope Check against pre-set expectation Usefulness Extent, Scope Check in next phase
Participation
[image:25.595.111.486.125.234.2]Impact Quality, Quantity Look at the information gathered Influence Amount, Scope Look at the decisions made Agency Motivation, Solidarity Look at observation
Table 3.1.Overview of the qualitative evaluation methods.
Because some of the evaluation measures needed input that was generated before the application of the method, the evaluation process had to consist of two phases. This lead to the following evaluation approach:
• Before application: write down goals and expected outcomes.
Chapter 4
Pre-Design Phase
This chapter describes the first phase of the design process, the pre-design phase. In this phase user experiences were collected and synthesized into a problem state-ment. This was done using several tools and techniques that were evaluated after-wards.
4.1
Overview of the Pre-Design Phase
4.1.1
Goals
This phase had two goals: gathering information and defining a problem. The information to be gathered was about the participant’sexperience,context, mo-tivations and opportunities for improvement. A problem statement template from Stanford University [32] was adapted to capture both the information and the problem definition in one statement, the type of information is color coded to the topics above:
As atype of user, who ischaracteristics, I am trying tooutcome/job
whencontext so thatgoal, but I keep experiencingproblem/barrier
becauseroot cause, which makes me feelemotion.
4.1.2
Pre-design Expectations
Aspect Current knowledge
User and Experience A locked-in individual, unable to talk, unable to move his body except for a thumb and his head, ambitious, stubborn.
Context Lives in his own apartment with assistive personnel around, watches TV (sports).
Problems slow spelling system hinders efficient communication and people can be impatient sometimes making communication fail completely.
Goals and Motivations Communicate, express himself, run a business, give talks, be social
Table 4.1.Expectations before probing
4.1.3
Pre-design Process
The information to be gathered as represented in italics in the problem state-ment template can be related to a certain type of knowledge. The four types are as desicribed by Taylor et al. [13] asexplicit,observable,tacitandlatent. They are in that order from easiest to access to hardest to access, as is pictured in figure 2.2. Each topic of information has knowledge to be gathered of different types.
To gather these different knowledge multiple steps were needed. Therefore Sanders and Stapper’s day in the life exercise [8] was adapted for the project. In this exercise a timeline is first filled with the participants activities (explicit
[image:27.595.146.449.485.654.2]orobservable). The participant then mark high and low points (tacit) on which they reflect on the reasons (latent) in the next step. Figure 4.1 shows how different layers make up the exercise. In these layers the different types of knowledge can be acquired. All these relations are shown in table 4.2.
Figure 4.1.The layered day in the life exercise. [8]
during each activity and then gathering his reasons. Organizing these insights and ones acquired from an interview key themes were identified and eventually a final problem statement was formulated. An overview of this process can be seen in figure 4.2.
Figure 4.2.The pre-design process with the taken steps and the outcomes (circles).
CATEGORY ASPECT TYPE OF KNOWLEDGE LAYER
Experience
Type of user Explicit 1
Characteristics Observable 1
Emotion Tacit 2
Motivations Outcome/job Explicit 1
Goal Tacit 2
Context Context Observable 1
Opportunities Problem/barrier Observable/tacit 1/2
Root cause Latent 3
Table 4.2.Overview of information to be gathered in the pre-design phase.
4.2
Tools & Techniques for the Pre-design phase
4.2.1
Probing for activities
Since the first phase of this research was without a direction for the problem, the probes aimed to get a wide range of inputs from the participant, spread over multiple days. Insights about their characteristics, experience and context were all interesting at this point.
Due to the participant being locked-in, a special probing tool had to be developed. Common probing toolkits are comprised of tools like diaries and disposable photo cameras. However Locked-In individuals are unable to use such tools. In this case the participant was able to write emails, however it is a time intensive process for him to even write a single sentence. Since a picture “says more than a thousand words”, this format seemed ideal, and a tool was developed for him to take pictures with.
upside was that it enhanced the amount of dialogue between the participant and researcher-designer.
To emphasize the freedom of the participant, the initial probe delivery was kept very general. The goal at delivery was to communicate the process and the goal, but not yet provide the participant with too specific instructions. The instructions were in the spirit of the following:
1. As mentioned before, the goal is very broad, I just hope to get to know you a little more, who you are, what you do, what happens around you.
2. I’ll give you a tool, the camera, and you can do with it whatever you like. I hope you take a lot of pictures. You can move it too. Feel free to send me emails too, it’ll be like a diary, or a notepad.
3. Over time I’ll introduce some prompts, but anything is interesting! Just play around with having a camera.
4. At some points during the week I might ask you to elaborate on some pictures.
Due to the tool behaving differently there was a lot more input from the participant, making extra prompts unnecessary. This means that there were no more instructions given to the participant.
Tool development
Due to the participant being locked-in, a special probing tool had to be de-veloped. Common probing toolkits are comprised of tools like diaries and dis-posable photo cameras. However Locked-In individuals are unable to use such tools. In this case the participant is able to write emails, however it is a time intensive process to even write a single sentence. Since a picture “says more than a thousand words”, this format would be ideal. Therefore the objective in developing the probing tool was to make a camera the participant could trigger himself. An additional requirement was the remote accessibility of the pictures, in order to be able to process data without having to physically retrieve it from the participant. This was realised in the form of a Raspberry Pi with a USB we-bcam and IR receiver attached, running a NodeJS program that takes a picture upon receiving a specific IR signal and uploads it to Google Drive.
Assessing Moods and their Reasons
From the pictures received from the participant, a number was chosen to repre-sent an eventful day in the life of the participant. They were placed in order with a time stamp, so the participant could place the picture in the right context. The participant was then given the option to choose from options to describe his mood about the picture:very happy, happy, neutral, agitated, sad and an open option. These were represented by the emojis pictured in figure 4.3. A complete activity as presented to the participant can be seen in figure 4.4. The participant was able to use the SpeakUP soundboard to select the moods. The soundboard would scan over 6 LED lights and played a relevant sound when the participated selected one using the button attached to his hand.
[image:30.595.138.455.381.562.2]Figure 4.3. The emojis representing moods in order: very happy, happy, neutral, agi-tated, sadand an open option.
Figure 4.4.Example of an activity in the timeline as presented to the participant.
Extracting key themes
Specifying the problem
The problems raised in the key themes were assessed together with the partici-pant on their importance. The most promising and pressing problem was then chosen to further specify upon. This was done by asking why questions about the problem until a sufficiently open and abstract problem to design for was reached. This problem together with other information gathered was used to fill in the problem statement template in section 4.1.1.
4.2.2
Adapting the existing SpeakUP prototype
The participant had participated in another Creative Technology student project shortly before the start of this project and initially said he wanted to continue working on this. The prototype resulting from this project, called SpeakUP, was a soundboard scanning over six options, controllable by a single button. However, the participant had not been able to use the device since it had not yet been adapted to work with his personal button. At the start of this project he expressed the desire to finish this prototype first. Since it could be used as a co-design tool when working and the process of finishing it together with the participant could lead to some observations and insight, it was decided to first make this prototype functional.
Before meeting with the participant at his apartment, the soundboard device was adapted to have an input port for the participants button. At the apartment the device was placed on a communication pole together with some speakers to broadcast the sound. It was a good way to try out working together with the participant and getting used to the communication methods.
4.3
Design outputs of the pre-design phase
4.3.1
Indirect observations
Due to specific circumstances and people already familiar with the participant, a lot of information could be learned about him and his situation before directly contacting him.
A book about the participant The book about the participant [33] gave unique in-sights about his journey in making the most of his life after the brain stem infarct that caused his locked-in state. His attitude towards technology went through a major shift. In the beginning he did not want anything to do with technology, since he saw accepting the help of technology as surrender. How-ever, once he accepted the help he strove to make the most out of his options. This served both an illustration of his personality and the technology he has access to.
Information given by the project supervisor An interview with the supervisor, who is also
4.3.2
Probing results
Due to a faulty implementation of the infrared receiver, a lot more pictures were made than the participant intended to make. A total of 365 pictures were taken, which is on one hand a lot of input, but on the other hand makes a lot of it meaningless. It did give a comprehensive impression of when the participant was active. Figure 4.5 gives an overview of all the pictures made over the course of three days.
4.3.3
Results of discussing the moods during daily activities
The results of the probing discussion are summarized in figure 4.6. The following statements summarize the results of the discussion following from the moods:
• The participant values being able to do his own thing without being dis-turbed.
• If someone else is in the room he is unable do do work because when he is distracted the system reads inputs wrong.
• Work is important to the participant, he owns two companies.
• The participant likes having a normal routine, since he is not sick. For example getting up from the bed into his wheelchair every day.
• The participant likes to socialize.
• The participant enjoys watching sports.
• The participant has a bed and a wheelchair and is able to do the same things in both.
• The participant can work most at night because he is disturbed less.
• The participant only needs four hours of sleep per day, so he is awake a lot.
• The participants sometimes has communication problems with the assis-tive personnel, due to difficulties with the spelling system.
The participant added the following statements after the discussion when asked about any other problems he had:
• The participant would like to be able to adjust his bed.
• The participant is curious about the functionality a splitter for his button might have.
• The participant would like to be able to add a flashing alarm light to the soundboard.
• The participant wants a more extensive calculator added to his device.
4.3.4
Problem Statement
Insights about the participant and a main theme were extracted from the results of the probing to formulate the following problem statement:
As aLocked-in individual, who isambitious, entrepreneurial and likes to work uninterrupted, I am trying tocontrol my environmentwhen
I am by myself at homeso thatcan live my daily life independent of others, but I keep experiencingthe inability to control certain things
because my current system is limited to infrared, which makes me feeldependent.
4.4
Evaluation of the Tools & Techniques of the Pre-design phase
4.4.1
Observations
Visiting the participant’s home gave both insight into his context and into ways of communication.
Communication Direct communication is done via the spelling system, but can
also be done via the printer, and the participant can also move his head and look into certain directions to indicate the location of an object. The latter is an example of the non-verbal communication that being in the space with the participant enables. Working together on something, for example installing a prototype can be a mediator for communication. The common goal takes away some of the awkwardness that might occur in these situations where one person must take the lead in conversation.
In any case, the communication takes patience. During one of the sessions a nurse had trouble communicating with the participant. It turns out she didn’t take the time to finish spelling with him. It can take some time learning the system, but with some practice reciting the letters in the right order comes naturally. An advantage of spelling with the participant as opposed to him typing is that words and sentences can be guessed. The participant confirmed that he prefers people guessing over them spelling out the word even though they have a hunch.
Context Visiting the participant at his home was an effective way to get informa-tion about his environment. He is the one with the most extensive knowledge about it, there seems to be no one that has a complete overview except for him. However, communicating such things over email or through a conversa-tion would be very time intensive. By being in his environment with him, he could show most of the things he was able to do, and how.
4.4.2
Structured Evaluation of the Pre-design phase
problem statement that was useful in the next phases. In terms of participation, the participant was highly involved in the process and had as at least as much influence as the researcher.
Method aspect Measure Dimensions
Outcome
Goal reached The goal for this phase was to define a problem and to gather in-formation about the participant and his context. These goals were reached.
Novelty When comparing the results with the expectations, what was already known, there were definitely a lot of new insights. The different layers of the probing all gave unique perspectives on the participants life. Visiting him in his own context helped a lot in getting a clear image of the environment, that otherwise would have been very hard to obtain.
Usefulness The problem together with the insights were very useful in the rest of the process. The insights into the participant’s daily life, his context and his values guided the entire process.
Participation
Impact Lots of information was gathered from the participant and it was very useful.
Influence The problem statement was decided together with the participant. It was clearly one of his biggest wishes to be more independent and control specific things in his environment. So he really shaped the problem.
[image:36.595.97.499.176.446.2]Agency The participant was highly engaged and motivated to enrich his life. Throughout the visits he was engaged and eager to work together.
Table 4.3.Evaluation of the pre-design phase according to table 3.1.
4.4.3
Conclusions from Evaluation of the Pre-design phase
Chapter 5
Generative Phase
This chapter describes the second phase of the design process, the generative phase. In this phase scenarios were used to explore the problem space and ideas were gen-erated to solve it. First an overview of the phase is given including the process, goals and expectations. Then the tools and techniques used in the phase are explained. The design output from application of the tools and techniques is given and finally the method is evaluated.
5.1
Overview of the Generative Phase
[image:37.595.87.521.617.663.2]In the generative phase, several steps were undertaken. The core activity in-volved a generative session with multiple stakeholders. The first step towards this session was to translate the problem statement into a multi-step scenario. This scenario was presented during the generative session where the participants were asked enact it with three different time perspectives in mind. From this session solution ideas and other insights were translated to a concept. This process is pictured it figure 5.1.
5.1.1
Goals & Expectations for the Generative Phase
One aspect of the co-design method evaluation is evaluating the design outcome that resulted from using the method. In order to assess the outcome a goal and expectations were set to compare the outcome to.
The goal of the generative phase was to generate multiple ideas for a concept that could solve the problem. One of these ideas was then elaborated upon in the next phase to be able to specify a final concept.
Since the outcome of this phase should be a concept, the expectations are noted in the form of ideas about a concept. Some ideas of solving the problem of environment control as stated in section 4.3.4 were present before the execution of the design activities in this phase. These ideas related to expanding the envi-ronmental control system of the participant to be able to control more modern IoT devices, as the limited communication protocols of his current system do not allow this. Importantly, these modern systems are much more widespread, which would allow the participant to control a wider range of devices. An ex-ample would be allow the participant to communicate to a smart home hub like Google Home, and add devices to his home that can be controlled with this smart home hub. Besides using these ideas to compare the result to they were also discussed during the generative session, insights from this discussion can be found in section 5.3.1.
5.2
Tools & Techniques for the Generative Phase
Several tools and techniques from scenario-based design were developed and used for the generative phase. A scenario was constructed and then enacted by participants in a generative session.
5.2.1
Making the scenario
The first step in the generative phase was to construct a scenario. In order to solve the problem, a proper understanding of the context was needed. Scenarios are a way of exploring the context [34]. By translating the abstract problem into a concrete story, it is easier to think about it. The scenario as seen in table 5.1 was created to give the participants insight into the currently possible and currently impossible. An activity where multiple actions could be integrated needed to be chosen from the timeline made in the previous phase. In this case, going to bed was chosen due to it being the biggest state change in the daily life of the participant. The activities were chosen such that they required different types of interactions, some of which already possible for the participant to do.
5.2.2
Enacting scenarios
It is time for Paul to go to bed. Before he does so he want’s to accomplish a couple tasks:
1. Turn off the TV. 2. Turn off the lights.
3. Open the window. 4. Close the curtains.
5. Set the bed to a sleeping position.
Table 5.1.Bed time scenario used in the generative session.
anything is possible. This corresponds to the present-past-future model dis-cussed in section 2.1.1, and is inspired by narrative futuring, a method from psychology where people are guided to an an image of the future and then work backwards to find out how to get there [35]. The present is in this case used to create awareness about the current situation. The past scenario intended to give the participants insight into the fundamental mechanisms of interaction with the environment of the locked-in participant. The future scenario was meant to stimulate their imagination without the current limits of technology.
5.2.3
The generative session
The scenario tool and enacting technique described in section 5.2.1 and 5.2.2 respectively, were applied in a generative session. The generative session took place at the participant’s home and took approximately three hours. Besides the participant, someone close to him and another student joined the session. The structure was as follows:
1. Introduction.
2. Enacting the scenario in present time.
3. Enacting the scenario in the past, without technology.
4. Enacting the scenario in a future where everything is possible.
5. Discussion of insights.
6. Brainstorm sessions.
The external participants were not extensively briefed upon the possibilities and impossibilities to encourage communication with the participant. A para-phrased version of the initial briefing can be found in appendix A. They were also encouraged to explore the room and figure out the possibilities during the enacting of the scenarios. After enacting the future scenario the participants were provided with pens and paper to write down their ideas and encouraged to extract insights from the scenario enacting. They could then use these insights in the brainstorm session, which the researcher joined.
Extracting a concept
5.3
Design outputs for the Generative Phase
The generative phase generated several insights and ideas, and finally a concept.
5.3.1
Insights into the problem and context
During the session several insights were generated and some insights from earlier phases were emphasized. The following insights were gained with regards to the locked-inparticipant:
• The locked-in participant explicitly wants to minimize his interaction with the nursing staff. This has multiple reasons. As discovered in the pre-design phase he wants to work uninterrupted. Besides that he wants to have control over his social environment, ”choose his own friends”. It would also mean less work for the staff. This gives him a sense of control, power, fulfilment, autonomy and efficiency. The less interaction with staff, the more control he has over his social situation and time.
[image:40.595.110.489.410.649.2]• When the locked-in participant wants to interact with the environment, he goes through several steps. The steps from an intention to a functional result were mapped out. From this could be determined where a solution could intervene. This mapping is shown in figure 5.2.
Figure 5.2. The steps from an intention to a function mapped out by the participants of the generative session.
• With the current technology, the participant can control everything that works with infrared. However, things that require a physical mechanical action to be controlled cannot be controlled by the participant. This includes both completely analog things like the window or curtains, but also devices that only have a physical switch like the ceiling fan.
• Because the participant lives in a nursing home, some things that are integrated into the building like the ceiling fan would not be able to be replaced by a smarter solution. Therefore the solution must be external.
And finally, these insights were gained with regards to technology:
• A speech based system, or typing, would be too slow.
• Current assistive technology that the participant uses is quite sensitive. It has to be installed by specific people, since only they know how it works. However these people are not near the participant on a daily basis. The need for expert knowledge is detrimental to the accessibility of the technology. Therefore it would be important for the solution to be easy to use for anyone, and be well documented so that anyone can troubleshoot.
• The participant has built in a decent amount of redundancy in his system, so in case one thing breaks he has a backup. It could be a thing to keep in mind while developing the solution.
5.3.2
Ideas for solving the problem
The insights helped generate ideas that would intervene at several points in the intention-function process mentioned in figure 5.2.
• A flowchart for common tasks to be performed in order to make commu-nication with staff more efficient.
• A card set to aid communication.
• A robot assistant or robotic arm that physically controls the environment.
• A system that makes everything controllable by infrared.
• A system that scans over the environment to select devices to control.
• Making devices controllable by fixating on them, i.e. look in their direc-tion.
5.3.3
The chosen concept idea
Combining the ideas from the brainstorm the final concept idea was to design a modular system that can be controlled by infrared and has parts that can be combined together to do many kinds of actuation, including physical mechan-ical. People can form their own solutions by putting the parts together, like Lego. Making the parts open-source, more advanced users can make their own adjustments to expand the system.
be efficient to design one specific solution. A communication aid would also be widely applicable, however this would not decrease the amount of interruptions by staff, only the length. Additionally, such a system would be compatible with the participant’s current way of interaction with the environment control, which works very well for him.
5.4
Evaluation of the Generative phase
5.4.1
Observations
[image:42.595.156.438.423.638.2]During the generative session it took a some time for the participants to start the assignment of enacting the scenario. They started with a more passive ap-proach, talking about the scenario rather than enacting it. However after some encouragement they started to become more active, walking around and taking pictures of the environment. In the past scenario they were able to imagine the place without technology, but needed steering to extract the detailed steps that were more abstract to get a system overview. The steering that was needed dur-ing the session made some of the output more reactive than generative. Givdur-ing the participants more ambiguous input like multiple scenarios or more detailed scenarios might help. The small scale of the session made it possible to have a focus on the locked-in participant, as can be seen in figure 5.3, however during the brainstorm more people might have been beneficial. With more relevant stakeholders it would not be an issue if some participants were not focusing on the locked-in individual.
5.4.2
Structured Evaluation of the Generative phase
In order to be able to consistently evaluate the method in each phase, the same aspects of participation and outcome as shown in table 3.1 are assessed in each phase. Table 5.2 shows the results for each measure in this phase. Broadly, the method led to the outcome satisfying the goal and being useful for the next phase. Even though it was close to the initial idea that was generated before the start of the phase, some novel insights were gathered. The participation was successful in terms of impact, however the participants could have had more influence and the session could have been set up to give the participants more agency.
Method aspect Measure Dimensions
Outcome
Goal reached The goal of generating a concept idea was reached.
Novelty Comparing the outcome to the expectations, the focus on IoT did not shift, however the idea of using an existing hub was rejected and insights into the participant’s experience gave a novel direction to the idea.
Usefulness In the next phase it was shown that the concept that was generated was a sufficient base to be expanded upon.
Participation
Impact The participants were able to gather a lot of information together. They took initiatives in asking questions and investigating the context, leading to valuable insights.
Influence The session had an abrupt ending due to time constraints from one of the participants. This means the final decision for the concept was made by the main designer. However, this was the concept that gathered the most enthusiasm from the participants, so they did con-tribute to the decision.
[image:43.595.103.501.270.540.2]Agency The session was still quite guided, as mentioned in the observations. The participants were not always motivated to execute the assign-ment and needed encourageassign-ment. However, they were able to work together and nobody was excluded.
Table 5.2.Evaluation of the generative phase according to table 3.1.
5.4.3
Conclusions from Evaluation of the Generative phase
Chapter 6
Evaluative Phase
This chapter describes the third phase of the design process, the evaluative phase. In this phase the concept idea from the previous phase was explored, elaborated upon and eventually specified into a final concept. First an overview of the phase is given including the process, goals and expectations. Then the tools and techniques used in the phase are explained. The design output from application of the tools and techniques is given and finally the method is evaluated.
6.1
Overview of the Evaluative phase
[image:44.595.98.521.607.665.2]The evaluative phase started with the general concept idea that emerged from the generative phase described in chapter 5. Multiple ways to translate this concept idea into a final concept specification were created using exploratory prototypes, insights from all the previous phases and state of the art research. Then, the options were discussed and a final concept specification was chosen. This process is pictured it figure 6.1.
6.1.1
Goals & Expectations for the Evaluative phase
One aspect of the co-design method evaluation is evaluating the design outcome that resulted from using the method. In order to assess the outcome a goal and expectations were set to compare the outcome to. The goal of this phase was to specify a final concept, which would also be the final outcome of the design process in this research. The phase started with a broad idea for a concept, a modular system controlled by infrared as described in section 5.3.3 without any technical specification. It was still unclear what would be the best approach to realizing this concept, so there were no additional specific expectations.
6.2
Tools & Techniques of the Evaluative phase
The main technique used in the evaluative phase was prototyping. The resulting prototypes were the tools. These were used in a discussion with the locked-in participant to come to a concept specification.
6.2.1
Diverging from the concept
With the general concept defined in section 5.3.3 as a modular system that can be controlled by infrared and can do many kinds of actuation, multiple approaches to elaborating upon the concept were generated. This was done by dividing the concept into components and researching the different options for these components, which lead to different combinations forming the different approaches. Additionally, state of the art relating to the concept was researched.
6.2.2
Exploratory prototyping
Exploratory prototyping was done to investigate the feasibility of individual system components where this was not clear. In an iterative way possible so-lutions to parts of the system were made tangible and then tested. First as a proof of concept and then as it could be used in the current concept. The pro-totypes provided a tangible way to interact with sometimes complex concepts, and served as a mediator for communication about them.
6.2.3
Specification of the concept
A final concept was determined by evaluating the different possible approaches on their feasibility and effectiveness, together with the participant. The proto-types functioned as a communication mediator.
6.3
Design outcomes of the Evaluative phase
6.3.1
Breaking down the concept
6.3.2
State of the Art relating to the concept
IoT infrastructure
GEWA control Gewa control1 is an environment control device that can copy
infrared signals, allowing it to control any device that works with infrared. The device can save up to 81 signals that can be accessed using a single button. The device is very accessible but the disadvantage is that it is only compatible with infrared.
Node-RED Node-RED2is an IoT programming tool that requires no knowledge of
programming. It can wire together hardware devices, APIs and online services. It works with a browser based flow-editor.
Homey Homey3 is an example of an IoT hub that works with many different
existing systems. The majority of these integrations are on the output side, which allows many devices to be controlled. However the control of the hub is limited, as only a Smartphone App, Google Assistant, Amazon Alexa and Facebook Messenger can be used.
IoT mechanical switching devices
Switchbot Switch Bot4 is a small robot with an arm that can press buttons and
pull switches. It is controlled by an app over bluetooth and a hub can be added for control over WiFi. The arm is a pivoting arm that seems to be controlled by a small DC motor. Images of the Switch Bot can be seen in figure 6.2a and 6.2b.
(a) The Switch Bot with the arm extended, pushing a button.
[image:46.595.123.286.448.583.2](b)Exploded view of the Switch Bot.
Figure 6.2.The Switch Bot.
1https://www.abilia.com/en/our-products/environmental-control/controllers/control-18 2https://nodered.org/
Microbot Push The Microbot Push 5 is similar to the Switch Bot. The main
difference is the pushing arm moves linearly, which allows more control over the movement. In addition, the pushing tip is capacitive, which enables the use of the bot on touchscreens. Images of the Microbot Push can be seen in figure 6.3a and 6.3b.
(a)The Micro Bot Push attached to a coffee ma-chine.
[image:47.595.125.483.194.374.2](b)See through side view of the MicroBot Push.
Figure 6.3.The MicroBot.
6.3.3
Possible approaches to the system components
Interaction
The participant has two ways he interacts with technology. The first one is his GEWA device, for which he uses a button to scan through options. The second is his laptop, which uses infrared tracking to read his input. This means the system should either be directly controllable through the GEWA using infrared, or an interface compatible with his laptop should be developed. A third option could be to control the system directly with the button, however he needs this to control the GEWA and there is currently no way to split the signal.
Control
The control of the units could be done either directly or through a hub. Without the hub the system would be simpler. However, individual units would need to have more functionality. With a hub the units would be more light weight and it would make it easier to add communication protocols to the system while staying with the same interaction method for the participant.
Mechanical actuation
The mechanical actuation had two aspects to consider. One, the amount of actuators per unit and two, the type of actuation. The state of the art shows
two systems that have one actuator per unit. The downside of this would be that when there are multiple buttons close together, multiple units might not fit. Therefore it seemed beneficial to investigate ways to chain actuators together in an efficient way. However such chaining might be difficult considering different types of actuation like pushing, pulling and turning. Individual actuators would also be more straight forward and possibly easier to implement for users.
6.3.4
Exploratory prototypes
Exploratory prototyping was done to see how the concept multiple actuations from one could be implemented in an efficient way. First the mechanical princi-ple was explored and subsequently it was investigated how this principrinci-ple could be implemented in a space-efficient manner.
The mechanical principle
The goal was to come up with a way to use one motor for multiple actuations. This began with figuring out a way to translate the rotational movement of the motor to a linear movement. The base for this was a slider crank mechanism. One motor could quite easily actuate two sliders by attaching two cranks with a 180 degree angle to the motor. This would result in two sliders with opposite movements. A small prototype of this mechanism can be seen in figure 6.4a.
The next step was to combine two of the double slider mechanisms into a grid. Using paper the concept was explored, concluding that it was possible. After 3d printing components for one part of the grid to study the movement, a cad model of a four actuator grid was designed and 3d printed. this model had as input four sliders, which could be controlled with two motors. A picture of this prototype can be seen in figure 6.4c.
Approaches to implementing the mechanical principle
Realizing the crank slider grid with traditional joints would take up too much space and suffer from friction and misalignment. Therefore multiple alterna-tive ways to realize mechanical movements were explored. With a focus on 3D-printablility due to its compatibility with open source three concepts were chosen: Meta-material mechanisms, compliant mechanisms and active origami. For each of these concepts it was explored how joints could be made and how rotational movement could be translated to linear movement.
Meta-material mechanisms Meta-material mechanisms [36] use a configuration of rigid and shearing cells to make a mechanism. The mechanism can be 3D printed in one piece. Figure 6.4d shows a prototype of a mechanism that converts rotational movement into linear movement.
Compliant mechanisms Compliant mechanisms translate force through elastic body deformation. These mechanisms are made from one piece of material and are jointless. Figure 6.4f shows an example of a compliant pair of pliers, that manage to output thirty times the input force [38].
6.3.5
Evaluation of approaches and prototypes with the participant
The prototypes were used to facilitate a discussion with the participant about the different approaches to elaborating upon the general concept. The aspects the prototypes embodied were explained through the prototypes and the rest of the system could be explained in relation to the prototypes. Discussing the prototype and findings from research with the participant provided the following insights:
• Infrared is essential, the participant cannot always control the laptop, e.g. when moving the bed, because the tracking system of the laptop is too sensitive.
• Control of units should go via a hub that can act as a bridge between the infrared environment control and devices working on wifi or other technologies. This would make the system quite expandable.
• The mechanical concept is promising, but it is unclear if the one-part approach is possible.
• Using physical actuators might not always be the way to go. Therefore it should be possible to connect other IoT solutions to the system.
6.3.6
Final concept
Using the insights from the discussion a final system configuration was chosen. Figure 6.5 shows the communication configuration with the GEWA talking to a hub over infrared, and the hub talking to individual units over WiFi. Fig-ure 6.6 shows the information flow through the subsystems from user input to mechanical output.
![Figure 1.1. Changing of roles from a classical design approach (left) to the participatorydesign approach (right) [1].](https://thumb-us.123doks.com/thumbv2/123dok_us/9599856.463266/10.595.143.459.132.262/figure-changing-roles-classical-design-approach-participatorydesign-approach.webp)
![figure 2.1. The goal is to capture these experiences and use them to explain therience” [2]](https://thumb-us.123doks.com/thumbv2/123dok_us/9599856.463266/11.595.181.428.518.604/figure-goal-capture-experiences-use-explain-therience.webp)
![Figure 2.2. Relationship between the different layers of people, techniques and knowl-edge [2].](https://thumb-us.123doks.com/thumbv2/123dok_us/9599856.463266/12.595.206.388.450.623/figure-relationship-different-layers-people-techniques-knowl-edge.webp)
![Figure 2.4. A framework relating make, tell and enact tools to purpose [4].](https://thumb-us.123doks.com/thumbv2/123dok_us/9599856.463266/13.595.194.400.156.598/figure-framework-relating-make-tell-enact-tools-purpose.webp)
![Figure 2.9. The four creativity levels [1].](https://thumb-us.123doks.com/thumbv2/123dok_us/9599856.463266/16.595.129.497.170.385/figure-the-four-creativity-levels.webp)
![Figure 2.11. Overview of an access solution through an access technology and a userinterface the user’s functional intent is translated into a functional activity [7].](https://thumb-us.123doks.com/thumbv2/123dok_us/9599856.463266/19.595.132.466.181.321/overview-solution-technology-userinterface-functional-translated-functional-activity.webp)