TECHNOLOGYINCORP
J ~.. . " .' • • • • '" '" . ' ~
SYSTEM
INSTALLATION AND
SET-UP GUIDE
-
500-FORWARD TECHNOLOGY, INC. All Rights Reserved Printed in U.
s.
A.Document No.
88-0026-00 Rev. C
I.
II.
III. IV.
v.
VI.
FORWARD TECHNOLOGY GATEWAY WORKSTATION see
Table of Contents
Inspection Instructions
Procedure for Booting Up System
Procedure to Shut Down System Loading XENIX 1/4w Tape Drive Dumping XENIX 1/4w Tape Drive
FT-68X J2 Jumpers Diagram
August 15, 1983
1
2
Ie INSPECTION INSTRUCTIONS
The following procedure should be followed PRIOR to applying power to the unit.
Check to'., see that ALL CIRCUIT BOARDS are seated securely and "that
ALL CABLES are secure.
disk
on/off
reset
FT 5ge
tape
power
~~~~~~---SuPPly
-.~----+-~---card
cage
_~~~---~~---fan
Forward Technology Gateway Workstation 5S9 Figure 1
"
II. PROCEDURE FOR BOOTING UP SYSTEM
NOTE: Do ~ power up the system until an EIA RS-232 cable bas been connected between the system console port and an ASCII termin~l.
1. Configure an ASCII RS-232 terminal for 9699 baud, 8 data bits, one stop bit, and no parity. The cable should have "strai9ht through"'signal lines for pins 2,3, and 7 only. If the terminal requires additional signals for Clear To Send (CTS) or Carrier Detect {CD), use a null modem cable configuration.
2. Plug the unit power cord into a standard grounded three prong socket with 119 volts AC/69 Hz for domestic machines and 229 volts AC/59 Hz for foreign installations.,
3.
Note: If connecting to a power source other than that specified on the SYSTEM SERIAL NUMBER TAG, power jumpers within the unit ~ be changed'or damage will occur!ll
Apply power to the computer switch to the ON position. the rear of the unit. If switch.
element by moving the power The power switch is located on necessary, depress the RESET
4. Press the RESET switch.
NOTE: The reset awi tch is located in the same area as, the Workstation ON/OFF switch.
5. Your syst~m will. perform a diagnostic check of the FT-68X (allow 15 seconds).
Note: If you wish to change the physical boot device, consult the chart labeled J2 Connector Jumper Settings.
6. Your system has been configured at the factory to boot from the System Disk.
To Boot from the Disk:
a. The power on or reset switch will start the prom execution of the boot and will boot from the device which the J2 (CPU) connector is jumpered for. To boot from the disk, jumper pins 11 to 12 only.
b. The boot program will announce the loading procedure and version t of the PROMS.
!.I'he boot £.rom ... the disk device requires you to wait until
the' disk comes up to speed. After the disk is up to speed -or- if it already is:
enter l.C.lU at the console.
'.J;he prompt should appear seconds later.
The prompt is: "Load kernel or standalone program:
"
c. At the prompt, enter a l.C.lU to load the "md(0,B)xenix· kernel from the root file system.
e. At message "Loaded, hit return", type a rCRl.
f. This will start the kernel. If you have a 768KB, local extended memory, you may then enter a ~ to run the test.
g. When the test is complete and passed, the single ·user system is up and running.
7. Your system will display basic system information concerning the, size of local and multibus memory and display the version number of the XENIX operating system. This banner will be followed by a "[fti]" prompt.
8. To mount the multiuser version of XENIX and display basic date and time information, enter a ·CTRL D."
III. PRocEDURE TO GRACEFULLY SHUT DOWN THE SYSTEM
1. Login to root directory on the system console.
2. Enter the command.
fti> letc/haltsys
Note: Your system will execute the haltsys command and display the following message:
***NORMAL SYSTEM SHUTDOWN***
Do you want to reboot the system (Yin)?
3. To halt the system, enter a ~ or any other character for yes.
IV. LOADING XENIX - l/4"CA8TRIDGE TAPE
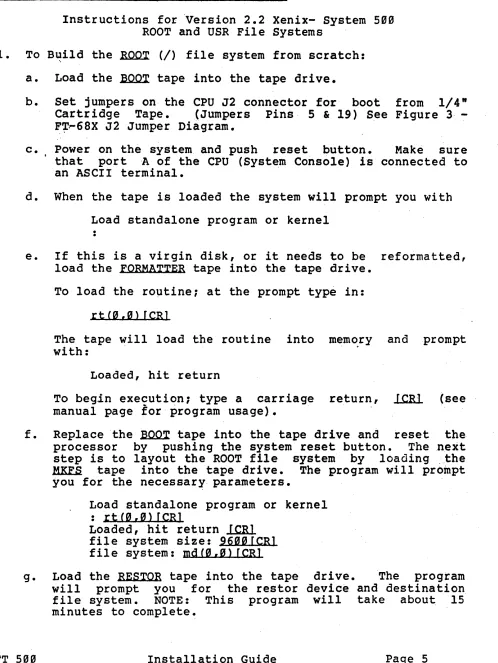
Instructions for 'Version 2.2 Xenix- System 5g"
ROOT and USR File Systems
1. To B~ild the ~ (I) file system from scratch:
a. Load the ~ tape into the tape drive.
b. Set jumpers on the CPU J2 connector fo'r boot from 1/4"
Cartr idge Tape. (Jumpers Pins 5 & 19) See Figure 3·
-F~~68X J2 Jumper Diagram.
c. Power on the system and push reset button. Make sure that port A of the CPU (System Console) is connected to an ASCII terminal.
d. When the tape is loaded the system will prompt you with
Load standalone program or kernel
e. If this is a virgin disk, or it needs to be reformatted, load the FORMATTER tape into the tape drive.
To load the ro~tine; at the prompt type in:
r t (0 , 0 > [CR 1
The tape will load the routine into mem~ry and prompt with: .
Loaded, hit return
To beg.in execution; type a carriage return, l.C.1U (see manual page for program usage).
f. Replace the ~ tape into the tape drive and reset the processor by pushing the system reset button. Thenext step is to layout the ROOT file system by loading :.the
HKES tape into the tape drive. The program will prompt
you for the necessary parameters.
Load standalone program or kernel
: r t (g , 0) [CR]
Loaded, hit return
lClU
file system size: 96a0[CRl file system: mdCa,a> [CRlg. Load the RESTOR tape into the tape drive. The program will prompt you for the restor device and destination file system. NOTE: This program will take about 15
minutes to complete~
[image:7.612.50.548.76.739.2]Load standalone program or kernel : r t (" , ") f CR J
Loaded, hit return ltRl
Load the ROOT file system dump tape in the tape drive.
tape? rtCo,o)ICRl dis k ? m d C" , 0) f CR J
last chance before scribbling on disk. ltRl
h. When you have completed the building of the ROOT file system. Put the ~ tape back into the tape drive and reboot the processor.
i.' You must now boot up the "/xenix" kernel and clean the ROOT file system.
Load stan~alone program or kernel
: ltRl
md(0,9}xenix
Loaded, hit return ltRl
j. If you have the extended 768KB local memory option, the kernel will ask you if you would like to run the memoiy test. If y6u select to run the test, it will ~ake
approximately 2 minutes.
k. The kernel will ask you if YOQ wish to "clean" the file system. You should always respond affirmatively.
Do you wish to clean the file system? (Yin) yfCRJ
1. When the clean process is completed, set the date on the system. Refer to Xenix Manual, Volume I, for instructions. The syntax of the date command is, "date
[[YY]MMDD]HHmm[.ss]".
where yy is year MM· is month DD is day HH is hour nun is minute
ss is second
For example:
fti> date 830815093" fCR]
m. To load the boot blocks to the disk drive.
fti> cp /stand/boot /dev/bootrCRJ
2. To install the Idev/usr file system:
a. In."order to build the USR file system the free list must be constructed. This is done by:
fti> mkfs Idey/usr 16944[CRl
b. To r.estor the USR files, mount the USR dump tape into" the tape drive and execute:
fti> restor rf Idey/rrtO Idey/usr[CRl
Last chance before scribbling on /dev/usr. l.ClU
c. The USR file system must be cleaned before going to the multi-user state, type:
fti> fack -y -t Itmp/fsck Idey/usr[CRl
3. To boot system from disk.
a. stop system execution and turn off the system by typing:
fti> letc/baltsys[CRl
Co Restore tbeJ2 jumpers to boot from disk. (Jumper Pin 11
to 12)
IX. DUMPING XENIX - 114ft
" TAPE DRIVE
1. To Create a DUMP of the ROOT File System.
a. ~ount 1/4" cartridge in tape drive, making sure that the
cartridge is ~
BAlE •.
b. Make sure system is in single user mode by typing:
fti> kill -1 lfCR]
c. .Type in:
fti> dump Ofu /dev/rrto /dev/rrootfCR]
2. Create a DUMP of the /USR File System
a. Mount 1/4" cartridge in 1/4ft Tape Drive. Make sure that cartridge is ~
BAlE.
NOTE: if /usr file system are too large" for 1/4 ft cartridge tapes, refer to Xenix Manuals for instructions on multi-tape dumps.
b. Type in:
fti> dump ofsu/dey/rrt0 1000 /dey/rusr[CRl
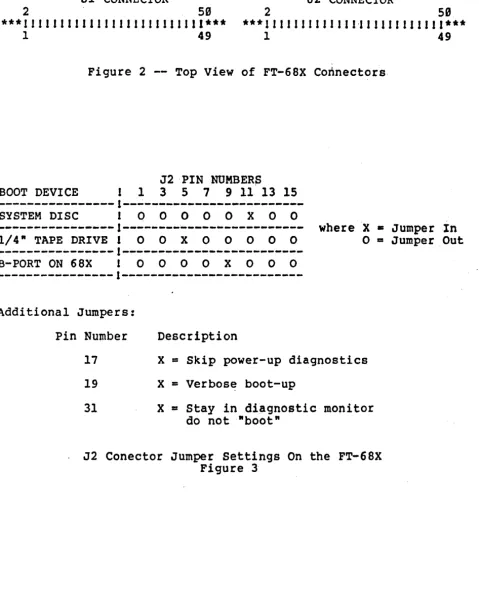
VI. FT-68X' J2 JUMPER DIAGRAMS
Jl CONNECTOR J2 CONNECTOR
2 50 2 59
***
J I J J J J 1 1 II J II J J J Jill J 1111*** ***
1 I I J I J I I 1 J J J 1,1 J J 1 J I I I 1 1 I 1***1 49 1 49
Figure 2 -- Top View of FT-68X Connectors
J2 'PIN NOMBERp
BOOT DEVICE J 1 3 5 7 9 11 13 15
---1---SYSTEM DISC 0 0 0 0 0
x
0 0---1---
where X • Jumper In 1/4" TAPE DRIVE 1 0 0 x 0 0 0 0 0 0 = Jumper Out---~---~--~--l---B-PORT ON 68X 1 0 0 0 0 X 0 0 0
---~---1~---Additional Jumpers:
FT 5""
Pin Number
17
19
31
Description
X
=
Skip power-up diagnosticsX
=
Verbos~ boot-upX
=
Stay in diagnostic monitor do not "boot", J2 Conector Jumper Settings On the FT-68X Figure 3
[image:11.620.52.531.135.729.2]