Digidesign
2001 Junipero Serra Boulevard Daly City, CA 94014-3886 USA tel: 650·731·6300 fax: 650·731·6399 Technical Support (USA) tel: 650·731·6100 fax: 650·731·6384 Product Information (USA) tel: 650·731·6102 tel: 800·333·2137 International Offices Visit the Digidesign Web site for contact information Web Site www.digidesign.comDigidesign
Plug-Ins Guide
Copyright
This guide is copyrighted ©2004 by Digidesign, a division of Avid Technology, Inc. (hereafter “Digidesign”), with all rights reserved. Under copyright laws, this guide may not be duplicated in whole or in part without the written consent of Digidesign.
DIGIDESIGN, AVID and PRO TOOLS are trademarks or registered trademarks of Digidesign and/or Avid Technology, Inc. All other trademarks are the property of their respective owners.
Product features, specifications, system requirements and availability are subject to change without notice.
contents
Chapter 1. Getting Started With Plug-Ins
. . . 1System Requirements. . . 1
Plug-In Formats. . . 2
Installing Plug-Ins . . . 2
Digidesign Registration . . . 3
Authorizing Plug-Ins. . . 3
Removing Expired Plug-Ins. . . 4
Conventions Used in This Guide . . . 5
Chapter 2. Working with Real-Time Plug-Ins
. . . 7Processing Power Requirements of TDM and RTAS Plug-Ins . . . 7
Delay in Digital Signal Processing. . . 10
Plug-Ins as Inserts. . . 11
Inserting Plug-Ins on Tracks . . . 12
Clip Indicators. . . 14
The Plug-In Window. . . 14
Adjusting Parameters . . . 18
Using a Key Input for Side-Chain Processing . . . 19
Automating Plug-Ins . . . 20
Using the Librarian . . . 22
Chapter 3. Working with AudioSuite Plug-Ins
. . . 25The AudioSuite Menu. . . 25
The AudioSuite Window. . . 26
The AudioSuite Processing Preferences Dialog. . . 30
Chapter 4. D-Fi
. . . 35Lo-Fi . . . 36
Sci-Fi. . . 38
Recti-Fi . . . 40
Vari-Fi. . . 42
D-Fi Demo Session. . . 42
Chapter 5. DINR
. . . 47Broadband Noise Reduction . . . 47
Broadband Noise Reduction Controls. . . 49
Using Broadband Noise Reduction. . . 53
Using BNR AudioSuite. . . 57
Chapter 6. Maxim
. . . 59About Peak Limiting. . . 60
Maxim Controls . . . 61
Using Maxim . . . 64
Chapter 7. Bruno and Reso
. . . 65DSP Requirements. . . 66
Inserting Bruno/Reso onto an Audio Track . . . 66
Playing Bruno/Reso . . . 67
Using a Key Input for Side-chain Processing . . . 68
Bruno Controls. . . 69
Reso Controls . . . 74
Chapter 8. Reverb One
. . . 83System Requirements. . . 83
A Reverb Overview . . . 84
Chapter 9. SoundReplacer
. . . 93Audio Replacement Techniques . . . 93
SoundReplacer Controls. . . 94
Using SoundReplacer. . . 97
Getting Optimum Results With SoundReplacer . . . 98
Using the Audio Files Folder for Frequently Used Replacement Files. . . 100
SoundReplacer Demo Session . . . 101
Chapter 10. SurroundScope
. . . 105Using SurroundScope. . . 105
SurroundScope Displays . . . 106
Chapter 11. Impact
. . . 109Impact Parameters. . . 109
Adjusting Impact Parameters. . . 110
Impact Parameters. . . 111
Using a Key Input for Side-Chain Processing . . . 114
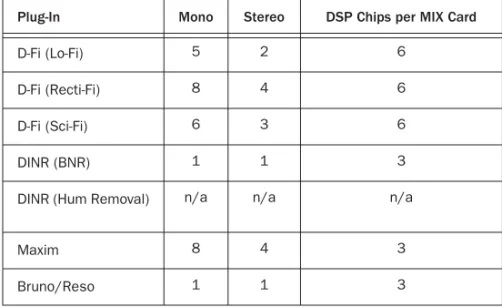
Appendix A. DSP Requirements for TDM Plug-Ins
. . . 115DSP Requirements . . . 116
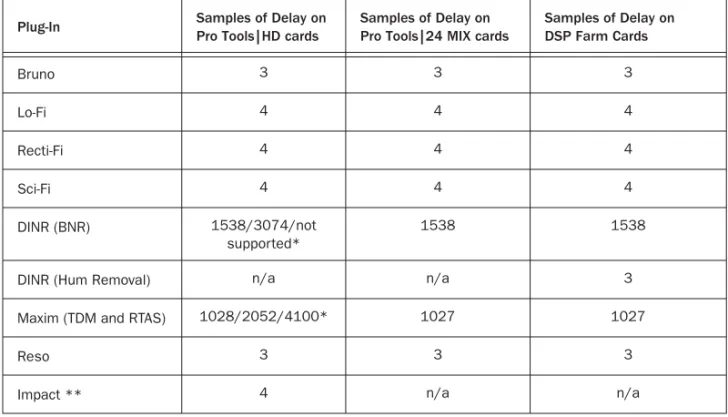
Appendix B. DSP Delays Incurred by TDM Plug-Ins
. . . 121chapter 1
Getting Started With Plug-Ins
Digidesign plug-ins provide a comprehensive set of digital signal processing tools for profes-sional audio production.
This guide explains the use of each of the plug-ins currently available from Digidesign. These plug-ins include:
• D-Fi™ creative sound design plug-ins
• DINR™ intelligent noise reduction
• Maxim™ peak limiter/sound maximizer
• Bruno™ & Reso™ cross-synthesis plug-ins
• Reverb One™
• SoundReplacer™ drum and sound
replace-ment plug-in • SurroundScope™
• Impact™
System Requirements
To use Digidesign plug-ins you need:
◆ A Digidesign-qualified Pro Tools system – or –
◆ A third-party software application that sup-ports the Digidesign TDM, RTAS, or AudioSuite plug-in standard
Digidesign can only assure compatibility and provide support for hardware and software it has tested and approved. For a list of Digidesign-qualified computers, operating systems, hard drives, and third-party devices, refer to the latest compatibility information on our Web site (www.digidesign.com/compato).
For more information on using plug-ins during mixdown with Pro Tools, see the Pro Tools Reference Guide.
Plug-In Formats
Plug-ins are special-purpose software compo-nents that provide additional signal processing functionality to Pro Tools. There are three for-mats of plug-ins:
• TDM plug-ins (real-time, DSP-based) • RTAS plug-ins (real-time, host-based) • AudioSuite plug-ins (non-real-time,
file-based processing)
TDM Plug-Ins
(TDM Systems Only)
TDM (Time Division Multiplexing) plug-ins function as track inserts, are applied to audio during playback, and process audio nondestruc-tively in real time. TDM plug-ins are designed for use on Pro Tools TDM systems, and rely on the processing power of Digidesign DSP cards. The number and variety of TDM plug-ins that you can use simultaneously in a session are lim-ited only by the amount of DSP available. You can increase available DSP by installing addi-tional HD Accel, HD Process, MIX Farm, or DSP Farm cards in your computer. This power-on-demand aspect is a significant advantage of TDM-based systems.
RTAS Plug-Ins
RTAS (Real-Time AudioSuite) plug-ins provide features and functionality similar to their TDM counterparts, but unlike TDM plug-ins, they rely on and are limited by the processing power of your computer. The more powerful your com-puter, the greater the number and variety of RTAS plug-ins that you can use simultaneously. Because of this dependence on the CPU or host
processing, the more RTAS plug-ins you use
con-currently in a session, the greater the impact on other aspects of system performance, such as available track count, edit density, and automa-tion latency.
RTAS plug-ins can be used on both Pro Tools TDM and LE systems.
AudioSuite Plug-Ins
Non-real-time AudioSuite plug-ins are not used during playback, but are instead used to process audio files on disk, creating new, rewritten audio files with the effect permanently applied. Audio-Suite plug-ins can be used on all Pro Tools sys-tems.
Installing Plug-Ins
The Digidesign Plug-In Installer CD-ROM lets you install and use not only the plug-ins which you have purchased, but also a demo version of other Digidesign plug-ins. Demo versions of plug-ins can be used for the length of their demo period, after which they will expire. Once the demo version of a plug-in has expired, pur-chase the plug-in and authorize it, or remove it (see “Removing Expired Plug-Ins” on page 4).
MIX Farm and DSP Farm cards are not supported on Pro Tools|HD-series systems. HD Accel and HD Process cards are not supported on Pro Tools|24 MIX-series sys-tems.
Demo Plug-Ins and Authorization
Some plug-ins require an iLok USB Smart Key present in order to run in demo mode. Demo au-thorization for such plug-ins can only be in-stalled over the internet from Digidesign’s Web site (www.digidesign.com) while you launch Pro Tools. Make sure that your Pro Tools-equipped computer is internet-ready and that your iLok USB Smart Key is inserted in an avail-able USB port before you launch Pro Tools to complete this automated process. This is a one-time-only procedure for plug-ins that require it.
Updating Older Plug-Ins
Because the Plug-In Installer CD-ROM contains the latest versions of all Digidesign plug-ins, you can use it to update any plug-ins you already own by installing the desired plug-in from the CD-ROM. If the installed iLok is already autho-rized, or there is already a valid authorization key on the destination hard disk, you will not be prompted for a new one.
Installation
To install a plug-in:
1 Insert the Plug-Ins Installer CD-ROM in your CD-ROM drive.
2 Open the Digidesign Plug-Ins directory.
3 Locate and double-click the Install file on the Installer CD-ROM for the plug-in you want to install.
4 Follow the on-screen instructions.
5 When the installation is complete, click Fin-ish (Windows) or Quit (Macintosh).
6 Repeat steps 3 through 5 for additional plug-ins that you want to plug-install.
You will be prompted to authorize the plug-ins when you launch Pro Tools.
Digidesign Registration
Make sure to complete and return the registra-tion card included with your Digidesign plug-in. Registered users will receive periodic software update and upgrade notices. Please refer to the registration card for information on technical support.
Authorizing Plug-Ins
Digidesign plug-ins are authorized using the iLok USB Smart Key (iLok) from PACE Anti-Pi-racy.
The iLok is similar to a dongle, but unlike a don-gle, it is designed to securely authorize multiple software applications from a variety of software developers. This key can hold over 100 authori-zations for all of your iLok-enabled software. Once an iLok is authorized for a given piece of software, you can use the iLok to authorize that software on any computer.
License Cards are specific to each plug-in. You will receive the appropriate License Cards for the plug-ins that you purchase. License Cards have a small punch-out plastic chip called a GSM cutout.
Digidesign plug-ins for Pro Tools 5.3 and lower are not supported in Pro Tools 6.0 and higher.
The iLok USB Smart Key is not supplied with plug-ins, and must be purchased separately.
The authorization steps in this section must be repeated for each plug-in bundle, package, or in-dividual plug-in purchased.
To authorize a plug-in with iLok:
1 Insert the iLok into an available USB port on your computer.
2 Launch Pro Tools. You will be prompted to au-thorize any installed unauau-thorized plug-ins or software options.
3 Follow the on-screen instructions until you are prompted to insert the License Card into the iLok.
4 Separate the GSM cutout from the larger pro-tective card by pulling it up and out with your thumb. Do not force the cutout down with your finger.
5 Insert the GSM cutout into the iLok. Visually verify that the metal portion of the cutout makes contact with the iLok’s metal card reader.
6 Follow the on-screen instructions to complete the authorization process for each plug-in.
Removing Expired Plug-Ins
If you let a demo version of a plug-in expire, you should remove it from your system. Otherwise, each time you open Pro Tools you will be prompted with a message that the plug-in has expired.
Windows
To remove an expired plug-in:
1 From the Start menu, choose Settings > Con-trol Panel and double-click Add or Remove Pro-grams.
2 Select the expired plug-in from the list of in-stalled applications and click the Change/Re-move button.
3 When removal is complete, click OK to close the window.
Mac OS X
To remove an expired plug-in:
1 Locate the Library/Application Sup-port/Digidesign folder on your Startup drive.
2 Open the Plug-Ins folder or Plug-Ins (Unused) folder and drag the expired plug-in to the Trash.
3 Empty the Trash.
If you are already using a demo version of the plug-in or software option, launch Pro Tools before you insert the iLok, then insert the iLok into any available USB port when prompted by Pro Tools.
Conventions Used in This
Guide
All Digidesign guides use the following conven-tions to indicate menu choices and key com-mands:
:
The following symbols are used to highlight im-portant information:
Convention Action
File > Save Session Choose Save Session from the File menu Control+N Hold down the Control
key and press the N key Control-click Hold down the Control
key and click the mouse button
Right-click (Windows) Click with the right mouse button
User Tips are helpful hints for getting the most from your Pro Tools system.
Important Notices include information that could affect your Pro Tools session data or the performance of your Pro Tools system.
Shortcuts show you useful keyboard or mouse shortcuts.
Cross References point to related sections in the Pro Tools Guides.
chapter 2
Working with Real-Time Plug-Ins
Real-time plug-ins process audio nondestruc-tively in real time. They do not alter the original source audio, but only apply their effect during playback.
There are two formats of real-time plug-ins:
TDM Plug-Ins Rely on the processing power of Digidesign DSP cards. TDM plug-ins run only on TDM-equipped Pro Tools systems.
RTAS Plug-Ins Rely on the processing power of your computer. RTAS plug-ins run on Pro Tools TDM and LE systems.
Processing Power
Requirements of TDM and
RTAS Plug-Ins
TDM and RTAS plug-ins differ in their process-ing power requirements.
TDM Plug-Ins
Each real-time TDM plug-in that is inserted in a Pro Tools session uses a portion of your system’s total available DSP resources. Since these DSP re-sources reside on the cards that make up your particular Pro Tools hardware configuration, the amount of DSP available depends entirely on the number and type of DSP cards in your system.
You can add more mixing and processing power to your system by installing additional DSP cards, provided you have unused PCI expansion slots in your computer or use a Digidesign-ap-proved Expansion Chassis.
The System Usage window (Windows > Show System Usage) shows how much DSP is available on your system and gives an approximation of how it is currently being used.
DSP Sharing Between TDM Plug-Ins
With Digidesign’s MultiShell II technology, dif-ferent types of TDM plug-ins can share the same DSP chip at the same time. This lets you simul-taneously use a greater variety of plug-ins by ef-ficiently managing the DSP available on each chip in your system.
In order to take advantage of this capability, plug-ins must be MultiShell II compatible. The following Digidesign plug-ins are Multi-shell:
• Maxim • D-Fi
• SurroundScope
SoundReplacer is an AudioSuite only plug-in.
RTAS Plug-Ins
RTAS plug-ins rely on and are limited by the pro-cessing power of your computer’s CPU. The more RTAS plug-ins you use concurrently in a session, the greater the impact it will have on other aspects of your system’s performance, such as maximum track count, the density of edits possible, and latency in automation and recording.
For more information on the System Usage window, see the Pro Tools Reference Guide.
System Usage window
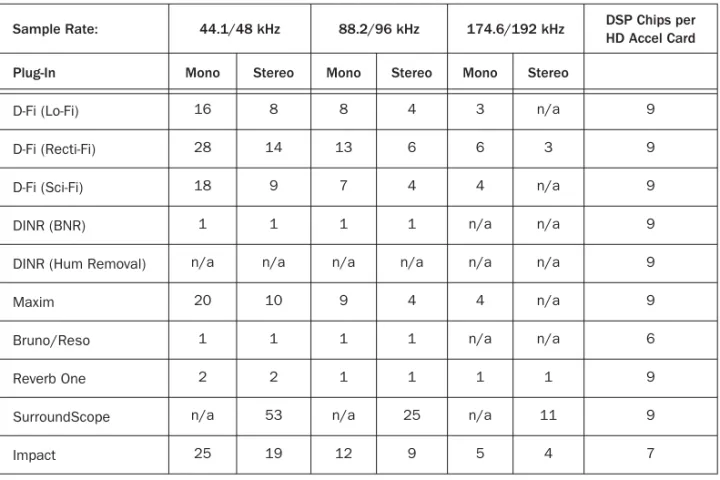
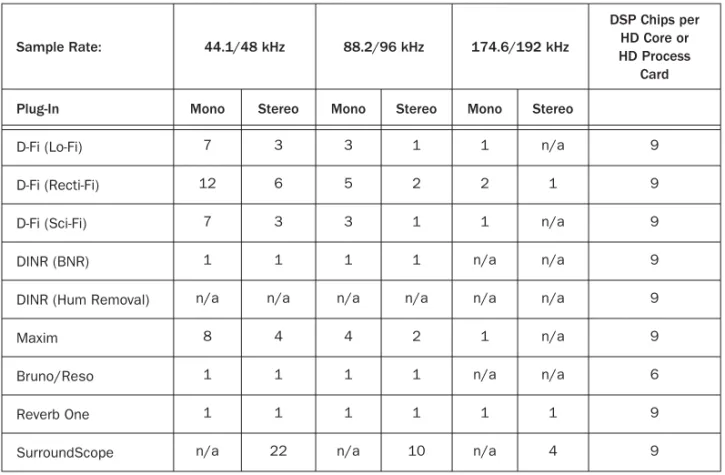
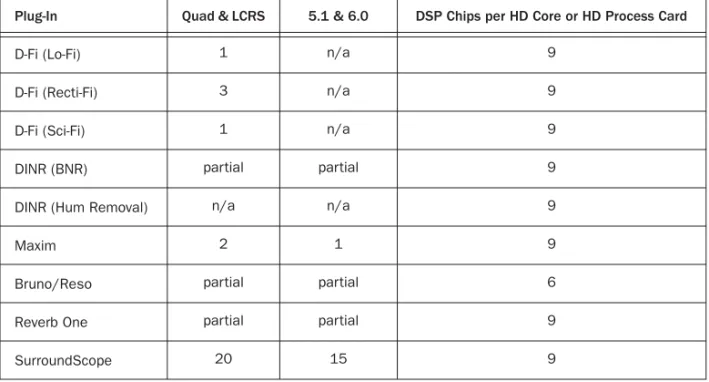
See Appendix A, “DSP Requirements for TDM Plug-Ins” compare the number of in-stances of each Digidesign TDM plug-in that can be powered by a single DSP chip. DSP usage differs according to card type.
For more information on the System Usage window, see the Pro Tools Reference Guide.
Improving RTAS Plug-In
Performance
You can increase the number of RTAS plug-ins your system can use concurrently by increasing the Hardware Buffer Size and CPU Usage Limit.
Hardware Buffer Size
The Hardware Buffer Size (H/W Buffer Size) con-trols the size of the hardware cache used to han-dle host processing tasks such as monitoring la-tency, as well as Real-Time AudioSuite (RTAS) plug-ins.
◆Lower Hardware Buffer Size settings reduce monitoring latency, and are useful when you are recording live input.
◆Higher Hardware Buffer Size settings allow for more audio processing and effects, and are use-ful when you are mixing and using more RTAS plug-ins.
To change the Hardware Buffer Size: 1 Choose Setups > Playback Engine.
2 From the H/W Buffer Size pop-up menu, select the audio buffer size, in samples.
3 Click OK.
CPU Usage Limit
The CPU Usage Limit controls the percentage of CPU resources allocated to Pro Tools host pro-cessing tasks such as RTAS plug-in performance and screen redraws.
◆ Lower CPU Usage Limit settings limit the ef-fect of Pro Tools processing on other CPU-inten-sive tasks, such as screen redraws, and are useful when you are experiencing slow system re-sponse, or when running other applications at the same time as Pro Tools.
◆ Higher CPU Usage Limit settings allocate more processing power to Pro Tools, and are useful for playing back large sessions or using more real-time plug-ins.
To change the CPU Usage Limit: 1 Choose Setups > Playback Engine.
2 From the CPU Usage Limit pop-up menu, se-lect the percentage of CPU processing you want to allocate to Pro Tools. (On dual-processor Mac-intosh computers, this setting controls the allo-cation of a single processor.)
In addition to causing slower screen re-sponse and monitoring latency, higher Hardware Buffer Size settings can affect the accuracy of plug-in automation, mute data, and timing for MIDI tracks.
Increasing the CPU Usage Limit may slow down screen response on slower computers.
3 Click OK.
Delay in Digital Signal
Processing
DSP processing in digital audio systems incurs signal delay of varying amounts. Such delays can vary from as short as a few samples to as long as several hundred samples, depending on the type of processing applied.
If you have recorded an instrument on multiple tracks using multiple microphones (a drum kit for example) and process the different tracks with different plug-ins, the tracks may go out of phase due to the varying amount of processing
delay imparted by each different plug-in.
Compensating for Delay
Pro Tools TDM 6.4 and higher provide Delay Compensation, which utilizes a portion of your system resources to delay signals as needed for time aligned output. For details on Delay Com-pensation, see the Pro Tools Reference Guide. When using earlier versions of Pro Tools, you need to compensate for these delays manually to avoid phase correlation problems.
Use the following methods, as available, to com-pensate for processing delay.
Automatic Delay Compensation
(Pro Tools|HD Systems Only)
On supported systems, the Delay Engine can be enabled to have Pro Tools automatically com-pensate for delays. For details on Delay Com-pensation requirements, operation, and limita-tions, see the Pro Tools Reference Guide.
TimeAdjuster
(TDM Systems Only)
You can compensate for TDM plug-in-induced delays by using the TimeAdjuster plug-in. This plug-in lets you apply a specific number of sam-ples of delay to the signal path of a Pro Tools track. TimeAdjuster provides settings files that apply the correct compensation time in samples for delay introduced by one or more plug-ins. See the DigiRack Guide for information about the Time Adjuster plug-in.
Manual Delay Compensation
You can manually compensate for processing delay by first calculating the amount of delay on each track, and then nudging other track’s play-lists later or earlier in time. This method is useful when Delay Compensation is unavailable, or when you want to conserve DSP resources.
For more information on Hardware Buffer Size and CPU Usage Limit, see the Pro Tools
Reference Guide.
See Appendix B, “DSP Delays Incurred by TDM Plug-Ins” for information on delays inherent in specific Digidesign TDM plug-ins. See the Pro Tools Reference Guide for a guide to calculating DSP-induced delays.
For information about TimeAdjuster in De-lay Compensation sessions, see the Pro Tools Reference Guide.
Plug-Ins as Inserts
Real-time plug-ins are available as in-line inserts on audio tracks, Auxiliary Inputs, and Master Faders. A maximum of 5 real-time plug-ins can be used per track.
When more than one insert is used on a track, they process the audio in series, each effect be-ing added to the previous one, from top to bot-tom in the Mix window.
Inserts can be used in two ways:
On Single Tracks An insert can be applied to an individual audio track or Auxiliary Input using the Insert Selector on that track.
With in-line inserts, you control the level of ef-fect by adjusting the controls of the plug-in.
As Shared Resources An insert can be used as a shared resource in a send-and-return arrange-ment by bussing signals from several tracks to an Auxiliary Input, and applying the insert to the Auxiliary Input track. With such an arrange-ment, you can control the send level for each track and the overall level of the effect can be controlled from the Auxiliary Input track. Shared arrangements let you make more effi-cient use of your system’s processing power.
Pre-Fader Operation
Real-time plug-ins function as pre-fader inserts (except on Master Fader tracks, where inserts are post-fader), meaning that their input levels are not affected by a track’s volume fader.
Real-time plug-ins are pre-fader, but post-disk. This means that if you record to disk with a plug-in inserted on the record track, you will hear the effect of the plug-in, but the effect will not be recorded to disk.
To record with a plug-in effect, create an Auxil-iary Input, insert the desired effect on the Aux-iliary Input track, then route the AuxAux-iliary Input to the audio track to which you want to record. Alternatively, bounce the audio track with the plug-in after recording in order to write the ef-fected audio to disk.
Mono, Multi-Mono, and
Multichannel Plug-Ins
Plug-ins can be used in mono, multi-mono, or multichannel formats, depending on the type of plug-in and whether the destination is a mono or multichannel track.
In general, when working with stereo and greater-than-stereo tracks, use multichannel plug-ins. If a multichannel version of a plug-in is not available, use a multi-mono version.
If you are using both TDM and RTAS plug-ins on the same track, RTAS plug-plug-ins must occur first in the signal chain, followed by TDM plug-ins. You cannot place TDM plug-ins before RTAS plug-ins.
On TDM systems, RTAS plug-ins can be in-serted on audio tracks only. For Auxiliary Inputs or Master Faders, use TDM plug-ins.
AudioSuite plug-ins provide another option for processing audio. See Chapter 3, “Work-ing with AudioSuite Plug-Ins.”
Mono Plug-Ins Used on mono tracks. Some mono plug-ins let you generate a stereo output from a mono channel. Plug-ins that occur on a track after a stereo plug-in are used in stereo as well.
Multi-Mono Plug-Ins Used on stereo or greater-than-stereo multichannel tracks when a multi-channel version of the plug-in is not available. Multi-mono plug-ins will analyze and process each channel independently without regard to each other. Controls for all channels are linked by default so that you can adjust them in tan-dem. You can unlink controls for independent adjustment using the Master Link button. See “Linking and Unlinking Controls on Multi-Mono Plug-ins” on page 17.
Multichannel Plug-Ins Used on stereo and greater-than-stereo multichannel tracks. On greater-than-stereo multichannel tracks, the controls for all channels are always linked to-gether.
Inserting Plug-Ins on Tracks
To use a real-time plug-in in a Pro Tools session, insert it on a track. Before doing so, make sure the Inserts View is shown in the Mix window.
To show inserts in the Mix window:
■ Choose Display > Mix Window Shows >
In-serts View.
To insert a plug-in on a track:
■ Click the Insert Selector on the track and
se-lect the plug-in that you want to use.
Plug-Ins by Category and Plug-In Favorites
Pro Tools 6.4 and higher lets you organize plug-ins by process category (such as EQ, Dynamics, Delay, and others), with individual plug-ins listed in the category sub-menus. When this op-tion is enabled, you can also designate fre-quently used plug-ins as Plug-In Favorites to simplify navigation and plug-in assignment. This Plug-Ins by Category option is enabled in the Pro Tools Preferences dialog box. See the
Pro Tools Reference Guide for more information
on plug-in Category and Favorites features.
Multi-mono dynamics-based or reverb plug-ins may not function as you expect. Use the multichannel version of a multi-mono dy-namics or reverb plug-in when available.
Inserting a plug-in (Pro Tools 6.4) with Plug-Ins by Category enabled
Inserting a plug-in (standard view)
To remove an insert from a track:
■ Click the Insert Selector and select No Insert.
Inserting Plug-Ins During Playback
On Pro Tools|HD and Pro Tools|24 MIX systems (Pro Tools 6.x only) and Pro Tools LE systems, plug-ins can be inserted or removed during playback, with the following restrictions:
◆Plug-ins cannot be inserted or removed dur-ing recorddur-ing (Pro Tools 6.x only).
◆A plug-in cannot be dragged to a different in-sert location during playback or recording. Stop playback to do this.
◆Plug-ins that change a track's format (a mono-to-stereo plug-in, for example) cannot be in-serted or removed during playback. Stop play-back to do this.
◆Plug-ins that contain automation cannot be removed during playback. Stop playback to do this.
◆Playback must be stopped when enabling plug-in controls for automation.
◆Side-chain inputs cannot be created during playback. Stop playback to do this.
Moving and Duplicating Inserts
You can move or duplicate an insert by dragging it to a different position on the same track or a different track. Inserts that are moved or dupli-cated retain their original settings and automa-tion.
To move an insert:
■ Drag the insert to a new insert location.
To duplicate an insert:
■ Alt-drag (Windows) or Option-drag
(Macin-tosh) the insert to a new insert location. The du-plicated plug-in retains its original settings and automation.
Making Plug-Ins Inactive
Pro Tools lets you set plug-ins as inactive in or-der to free up DSP resources for other plug-ins and processing. When a plug-in is inactive it re-tains its assignment, position, and related auto-mation playlists. However, it will not pass audio and does not consume any DSP or TDM re-sources.
To toggle a plug-in active or inactive:
■ Control-Start-click (Windows) or
Command-Control-click (Macintosh) the Insert button. – or –
Make the track inactive.
Removing a plug-in
Moving a plug-in
Dragging an insert on top of an existing in-sert will replace it.
For more information about making tracks inactive, refer to the Pro Tools Reference
To toggle plug-ins in the same insert position (1–5) on all tracks active or inactive:
■ Control-Start-Alt click (Windows) or
Com-mand-Control-Option click (Macintosh) an In-sert button in the position you want to toggle.
To toggle plug-ins in the same insert position (1–5) on all selected tracks active or inactive:
■ Control-Start-Alt-Shift-click (Windows) or
Command-Control-Option-Shift-click (Macin-tosh) an Insert button in the position you want to toggle.
Clip Indicators
(Pro Tools 6.4 Only)
Many plug-ins provide meters that let you see when the processed signal is clipping.
In addition to clipping displays that are a part of a plug-in’s individual interface, plug-ins that display clipping now report the clipping in the plug-in header. The insert button in the Mix and Edit window also turns red if a plug-in has clipped.
Plug-in clip indicators follow the current Pro Tools preference setting for clip display.
To clear plug-in clipping:
■ Click the clip LED in the plug-in header
The Plug-In Window
The Plug-In window appears whenever you click a plug-in Insert button on a track. This floating window lets you set the controls of any real-time plug-in insert in use on a track.
Plug-In Clipping indicator in the plug-In header
Clip LED
clipped
Plug-In window (mono Bruno shown)
Insert
Selector Settings menu
Track Selector Librarian menu Insert Position Selector Plug-In Selector Effect Bypass Compare Automation Insert button Safe button Convert plug-in Target button key input selector
Link Enable buttons
Master Link button Channel Selector
Settings Menu Lets you copy, paste, save, and import plug-in settings.
Track Selector Accesses any non-MIDI track in a session.
Librarian Menu Recalls settings files saved in the plug-in’s root settings folder or in the current session’s Settings folder. See “Using the Librar-ian” on page 22.
Insert Position Selector Accesses any insert on the current track.
Key Input Selector Lets you select audio on a particular input or bus and route it to trigger the plug-in. This menu only appears on plug-ins that feature side-chain processing. Key inputs are monophonic.
Plug-In Selector Lets you select any real-time plug-in installed in the Plug-Ins folder (that is created when you install Pro Tools).
Compare Toggles between the original saved plug-in setting and any changes you have made to it so you can compare them.
Effect Bypass Disables the currently displayed plug-in. This lets you compare the track with and without the effect.
Auto Lets you enable individual plug-in controls for automation recording. See “Automating Plug-Ins” on page 20.
Safe When enabled, prevents existing plug-in automation from being overwritten.
Convert Plug-In Lets you convert the insert from a TDM plug-in to an RTAS plug-in of the same type (or vice-versa). This feature can only be used on plug-ins that are available in both TDM and RTAS formats.
Target Button When multiple Plug-In windows are open, clicking this button selects that plug-in as the target for any computer keyboard com-mands.
Phase Invert Button Inverts the phase polarity of the input signal.
Clip LED Lights red to indicate if any meter in a in has clipped (not available on all plug-ins). The Plug-In Clip LED follows Pro Tools set-tings for clip indication (see the Pro Tools
Refer-ence Guide for more information).
Channel Selector Accesses a specific channel within a multichannel track for plug-in control editing. This menu appears only on multi-mono plug-ins inserted on tracks with more than one channel. Shift-clicking this selector opens a sep-arate Plug-In window for each channel of the multichannel track on which the plug-in is in-serted.
Master Link Button When enabled, links the controls on all channels of a multi-mono plug-in so that they can be adjusted plug-in tandem.
Link Enable Buttons Let you selectively link or unlink the controls of specific channels of a multi-mono plug-in. Each square represents a speaker channel. The Master Link button must be disabled to use the Link Enable buttons. See “Linking and Unlinking Controls on Multi-Mono Plug-ins” on page 17.
LFE Enable Enables plug-in processing of the LFE (low-frequency effects) channel on a multi-channel track formatted for 5.1, 6.1, or 7.1 sur-round formats. To disable LFE processing, dese-lect this button. For more information on the LFE channel, refer to the Pro Tools Reference
Guide.
Tempo Sync Enables compatible plug-ins to au-tomatically synchronize to the session tempo,
Opening Plug-In Windows
To open a Plug-In window:■ Click the plug-in button in the Mix or Edit
window channel strip.
By default, each plug-in you open will appear in the same location as a currently open plug-in, replacing it in the same window location.
Opening Multiple Plug-In Windows
Pro Tools normally displays a single Plug-In window from which you can adjust the controls of any plug-in in a session. You can also open additional Plug-In windows for specific plug-ins.
Once you begin working with multiple Plug-In windows, you will need to click the Target but-ton on the plug-in whose controls you want to adjust using keyboard commands.
To open an additional Plug-In window:
■ Shift-click the Insert button for the additional
plug-in.
To open Plug-In windows for each channel of a multi-mono plug-in:
■ Alt-click (Windows) or Option-click
(Macin-tosh) the Channel Selector in the Plug-In win-dow of the multi-mono plug-in.
To close all currently open Plug-In windows:
■ Alt-click (Windows) or Option-click
(Macin-tosh) the close box of any currently open Plug-In window.
Plug-In Window Controls
All plug-ins provide standard Pro Tools controls for track and insert selection, bypass, and other controls, in addition to processor-specific con-trols.
To select a different plug-in on the same track:
■ Click the Insert Selector and select a plug-in
from the pop-up menu.
To choose a different track:
■ Click the Track Selector and select a track from
the pop-up menu.
Choosing a plug-in from the Plug-In window
Bypassing Plug-Ins
To bypass a plug-in:
■ Click the Plug-In window’s Bypass button.
– or –
■ Control-click (Windows) or Command-click
(Macintosh) the plug-in’s Insert button in the Mix or Edit window.
Linking and Unlinking Controls on
Multi-Mono Plug-ins
When a mono plug-in is used on a multi-channel track, the controls are normally linked. Adjusting the Gain control on one channel, for example, will adjust it for all channels.
If necessary, you can unlink plug-in controls on specific channels of a track and edit them inde-pendently. You can also selectively link the con-trols of specific channels.
To unlink controls on a multi-mono plug-in:
■ Deselect the Master Link button.
To access controls for a specific channel:
■ Select the channel from the Channel Selector.
To link the controls of specific channels:
1 Deselect the Master Link button if it is not al-ready deselected.
2 Click the Link Enable buttons for the chan-nels whose controls you want to link.
When a plug-in insert is bypassed, the In-sert Selector in the Mix window changes its color to blue for easy visual reference. If some, but not all channels of an unlinked multi-mono plug-in are bypassed, the Insert Selector appears purple (Pro Tools 6.x) or half blue and half black (Pro Tools 5.x).
Bypass states indicated by color (Pro Tools 6.x)
Bypass states indicated by color (Pro Tools 5.3)
bypassed (blue)
some channels bypassed (purple)
unbypassed (gray)
bypassed (blue)
some channels bypassed (half blue)
unbypassed (black)
Channel Selector and Link controls
Link Enable buttons Master Link button
Adjusting Parameters
Editing Parameters Using a Mouse
You can adjust plug-in controls by dragging the control’s slider or knob, or by typing a value into the control’s text box.
To adjust a plug-in control:
1 Begin audio playback so that you can hear the control changes in real time.
2 Adjust the controls of the plug-in for the effect you want.
3 Closing the plug-in will save the most recent changes.
Keyboard Shortcuts
◆For finer adjustments, Control-drag (Win-dows) or Command-drag (Macintosh) the con-trol.
◆To return a control to its default value, Alt-click (Windows) or Option-Alt-click (Macintosh) the control.
Editing Parameters Using a Computer
Keyboard
You can use your computer keyboard to edit plug-in controls.
If multiple Plug-In windows are open, Tab and keyboard entry remain focused on the plug-in that is the target window.
Most controls have a corresponding parameter text field directly below it. This displays the cur-rent value of the parameter. You can edit the nu-meric value of a parameter with your computer keyboard.
To type a parameter value:
1 Click on the parameter text that you want to edit.
2 Change the value. • Type the desired value. – or –
• To increase a value, press the Up Arrow on your keyboard. To decrease a value, press the Down Arrow on your keyboard. • In fields that support values in kilohertz,
typing “k” after a number value will multi-ply the value by 1,000. For example, type “8k” to enter a value of 8,000.
• To move forward through the different control fields, press the Tab key. To move backward, press Shift+Tab.
3 Press Enter on the numeric keyboard to input the value and remain in keyboard editing mode.
– or –
Press Enter on the alpha keyboard (Windows) or Return (Macintosh) to enter the value and leave keyboard editing mode.
Using a Key Input for
Side-Chain Processing
Some plug-ins feature side-chain processing ca-pabilities. With side-chain processing you can trigger a plug-in from a separate reference track or external audio source. The source used for triggering is referred to as the Key Input. Key in-puts are monophonic.
A typical use for this feature is to control the dy-namics of one audio signal using the dydy-namics of another signal (the Key Input). For example, a kick drum track could be used to trigger gating of a bass track to tighten it up, or a rhythm gui-tar track could be used to gate a keyboard pad.
Key Input Filters
Some plug-ins feature key high-pass and low-pass filters. These controls let you define a spe-cific frequency range in the Key Input signal with which to trigger the plug-in effect. A com-mon production technique is to use these con-trols to filter a drum track so that only specific high frequencies (a hi-hat, for example) or low frequencies (a tom or a kick, for example) trigger the effect.
To use a Key Input for side-chain processing: 1 From the Key Input menu, choose the input or bus carrying the audio you want to use to trig-ger the plug-in.
2 Click External Key to activate side-chain pro-cessing.
3 To hear the audio source you have selected to control side-chain input, click Key Listen.
4 To filter the Key Input so that only specific fre-quencies trigger the plug-in, use the Key HPF and Key LPF controls (if available) to select the frequency range.
5 Begin playback. The plug-in uses the input or bus that you chose as a Key Input to trigger its effect.
6 Adjust the plug-in’s Threshold control (if available) to fine-tune Key Input triggering.
7 Adjust other controls to achieve the desired
ef-RTAS plug-ins do not provide side-chain processing when used on TDM-based sys-tems. If you want to use side-chain process-ing, use the TDM versions of plug-ins on TDM-based systems.
Automating Plug-Ins
You can automate changes to plug-in controls. You can later edit and modify each automated control individually. This lets you build up com-plex automation in stages.
To enable plug-in controls for automation: 1 Open the Plug-In window for the plug-in you want to automate.
2 Click the Automation button in the Plug-In window.
– or –
Control-Alt-Start-click (Windows) or Com-mand-Option-Control-click the Track View Se-lector in the Edit window.
3 Choose the controls to automate and click Add. If there are multiple plug-ins on the same track, you can select from among these by click-ing their buttons in the Inserts section of this di-alog.
4 Click OK to close the Plug-In Automation di-alog.
To create automation for a stereo plug-in with separate controls for each channel, record the automation for one channel then copy and paste it to the other channel as ex-plained in the Pro Tools Reference Guide.
Accessing the Plug-In Automation dialog
You can also use this keyboard shortcut to open the Plug-In Automation dialog. Control-Alt-Start-click (Windows) or Com-mand-Option-Control-click (Macintosh) any plug-in control in the Plug-In window, then choose Open Automation Dialog from the pop-up menu.
Plug-In Automation
Plug-In automation dialog
As an alternative to using the Plug-In Auto-mation dialog, you can enable individual plug-in controls directly from the Plug-In window by Control-Alt-Start-clicking (Win-dows) or Command-Option-Control-click-ing (Macintosh) the control.
To automate a plug-in:
1 In the Automation Enable window, make sure plug-in automation is enabled (Windows > Show Automation Enable).
2 Select an Automation mode for each track containing plug-ins you want to automate. For the initial automation pass, choose Auto Write.
3 Click Play to begin writing automation, and move the controls you want to automate.
4 When you have finished, click Stop.
After the initial automation pass, you can write additional automation to the track without completely erasing the previous pass by choos-ing Auto Touch mode or Auto Latch mode. These modes add new automation only when you actually move the control.
Record Safing Plug-In Automation
You can protect plug-in automation from being overwritten by using Automation Safe mode.
To enable plug-in safe mode: 1 Open a plug-in.
2 Click the Safe button so that it is highlighted.
To disable plug-in safe mode:
■ In the Plug-In window, click the Safe button
so that it is unhighlighted.
Automation Enable window
Plug--In Automation Enable button
Automation Safe enabled plug-in
For more information on creating and edit-ing automation, see the Pro Tools Reference
Guide.
Using the Librarian
The Settings Librarian makes it easy to create your own library of plug-in settings. Using the Librarian and Settings pop-up menus, you can copy, paste, save, and import these settings from plug-in to plug-in, or from session to session.
Once you create and save settings files to disk (and tell Pro Tools where to find them by assign-ing their root folder) they will appear in the Li-brarian menu.
The Settings Menu
The Settings menu let you save, copy, paste, and manage plug-in settings files.
Settings menu commands include:
Save Settings Saves the current settings. This command overwrites any previous version of the settings. The setting then appears in the Li-brarian menu.
Save Settings As Saves the current settings un-der a different name.
Copy Settings Copies the current settings. You can then apply these settings to the same type of plug-in on a different track by choosing the track in the Plug-In window and pasting the set-tings with the Paste Setset-tings command.
Paste Settings Pastes settings copied with the Copy Settings command.
Import Settings Imports a settings file from a lo-cation other than the Root Settings folder or Ses-sion folder.
Delete Current Settings File Permanently de-letes the current settings file from disk.
Lock Settings File Prevents the current settings from being overwritten by the Save command. If you attempt to save control settings, you will be required to save them using a different name or disk location.
Set As User Default Defines the current settings as the User Default for a specific plug-in.
Settings Preferences
The Settings Preferences sub-menus are for choosing preferences for saving and importing plug-in settings. They include:
Set Plug-In Default To Sets the default setting to either Factory Default (the standard default set-ting for that plug-in) or User Default (your cus-tom setting).
Librarian menu
Save Plug-In Settings To Selects the folder where plug-in settings are saved. If you choose Session Folder, the settings are saved in a folder named “Plug-In Settings” within the current Session folder. If you choose Root Settings Folder, the settings are saved in the folder you specified with the Set Root Settings Folder command.
Set Root Settings Folder Selects a location or
root folder for saving and importing settings. This root settings folder must be named “Plug-In Settings.” Use this command only if you want to choose a location other than the default Plug-In Settings folder.
In Pro Tools 6.1 and higher, the default location for the Root Plug-In Settings folder is as follows:
Windows Program Files\Common Files\Digide-sign\DAE\Plug-In Settings
Macintosh Library/Application Support/Digi-design/Plug-In Settings
Choosing a Destination for
Settings
Before you save plug-in settings, select their des-tination folder.
To select a destination folder:
■ From the Settings pop-up menu, choose
Set-tings Preferences > Save Plug-In SetSet-tings To, and choose Session Folder or Root Settings Folder. If you choose Root Settings folder, Pro Tools saves to the default Plug-In Settings folder un-less you have specified a different location for the Root Settings folder.
To select a different Root Settings folder: 1 From the Settings pop-up menu, choose Set-tings Preferences > Set Root SetSet-tings Folder.
2 Select the folder you want to use as your Root folder and click Select.
Managing Settings
Use the Settings pop-up menu to manage set-tings.
To save a setting:
1 Choose Save Settings from the Settings pop-up menu.
2 Type a name and click OK. The setting appears in the Librarian menu.
To load a previously saved setting:
■ Choose the setting from the Librarian pop-up
menu.
To import a setting:
1 Choose Import Settings from the Settings pop-up menu.
2 Locate the settings file you want to import and click Open. Pro Tools loads the setting and copies it to the root destination folder.
To save plug-in settings to any location other than the default Plug-In Settings folder, you must first create a folder named “Plug-In Settings” in the new location and then save to that folder.
Unlinked multi-mono plug-ins have specific rules for settings. See “Editing Settings on Unlinked Multi-Mono Plug-ins” on page 24.
Press Control+Shift+S (Windows) or Com-mand+Shift+S (Macintosh) to save plug-in settings.
To copy a setting:
■ Choose Copy Settings from the Settings
pop-up menu.
To paste a setting:
1 Open the destination plug-in.
2 Choose Paste Settings from the Settings pop-up menu.
To create a custom User Default setting: 1 Create and save a setting.
2 Choose Set As User Default from the Settings pop-up menu.
To make a plug-in default to your custom setting:
■ From the Settings pop-up menu, choose Set
Plug-In Default To > User Setting.
Editing Settings on Unlinked
Multi-Mono Plug-ins
When a multi-mono plug-in is unlinked, im-porting, copying, pasting, or bypassing settings affects only the currently selected channel.
To apply an operation to all channels of an unlinked plug-in:
■ Hold down the Alt key (Windows) or Option
key (Macintosh) while performing the com-mand.
Creating Subfolders for Settings
To make it easier to find specific types of set-tings, you can subdivide settings files by creat-ing subfolders for them.
If you are using Reverb One, for example, you may want to organize settings by room size. This lets you keep your library well organized with hierarchical menus for settings.
To create a settings subfolder:
1 From the Settings pop-up menu, choose Save Settings.
2 Click the New Folder button and type a name for the subfolder.
3 Name the setting and click Save. The setting is saved within the subfolder.
Press Control+Shift+C (Windows) or Com-mand+Shift+C (Macintosh) to copy plug-in settings.
Press Control+Shift+V (Windows) or Com-mand+Shift+V (Macintosh) to paste plug-in settplug-ings.
chapter 3
Working with AudioSuite Plug-Ins
AudioSuite plug-ins differ from TDM and RTAS plug-ins in that they are not used nondestruc-tively in real time, but are instead used to pro-cess and modify audio files on disk. Depending on how you configure a non-real-time Audio-Suite plug-in, it will either alter the original source audio file or create an entirely new audio source file.
The AudioSuite Menu
In Pro Tools, AudioSuite plug-ins are accessed through the AudioSuite menu.
The AudioSuite menu supports Plug-In by Cate-gory and Plug-In Favorites (requires Pro Tools 6.4 or higher).
The AudioSuite Window
When you choose a plug-in from the AudioSuite menu, the AudioSuite window ap-pears. This floating window lets you access and edit the controls for any AudioSuite plug-in.
Plug-In Selector
This menu lets you select any AudioSuite plug-in plug-installed plug-in your Plug-Ins folder. (The Plug-In Selector follows the Pro Tools preference for viewing plug-ins by category.)
Selection Reference
This menu aims the selected process at either re-gions selected in an audio track or playlist, or at regions selected in the Audio Regions List. When you select a region on-screen (in either a track/playlist or the Region List) Pro Tools nor-mally selects both occurrences of the region. Since you may not want to process both, this menu provides a convenient means of limiting the AudioSuite process to regions selected in one or the other.
Playlist Applies AudioSuite processing only to regions currently selected in tracks/playlists in the Edit window. Processing will not be applied
AudioSuite controls Settings menu Librarian menu File Mode Selector Plug-In Selector Compare button Process Mode Selector Selection Reference Use in Playlist button Preview button Bypass button Process button
Plug-In Selector pop-up menu
Region List Applies AudioSuite processing only to regions currently selected in the Audio Re-gions List. Processing will not be applied to re-gions located in tracks and playlists in the Edit window.
Use In Playlist Button
This button determines whether the AudioSuite plug-in will replace allinstances of the selected regions everywhere in the session, or only the occurrences of the regions that are currently se-lected.
Use In Playlist Off When Use in Playlist is dis-abled, a new, processed version of the selected region will be added to the Regions List. No orig-inal regions will be replaced or overwritten any-where in the session.
Use In Playlist On, Reference = Region
List When Use in Playlist is enabled and the Se-lection Reference pop-up menu is set to Regions List, all copies of the selected region will be re-placed everywhere in the session.
Use In Playlist On, Reference = Playlist When Use in Playlist is enabled and the Selection Ref-erence menu is set to Playlist, only regions se-lected in tracks in the Edit window will be re-placed. If the session includes other copies of the region used in other playlists, those copies of the original, unprocessed region will not be replaced.
File Mode Selector
This menu lets you select whether or not the Au-dioSuite plug-in will process the selected audio destructively or nondestructively, and how the original files will be modified.
There are three options:
Overwrite Files Processes the selected regions de-structively, overwriting the original audio. Not all AudioSuite plug-ins can be used destruc-tively.
Create Individual Files Processes the selected re-gions nondestructively, creating a new audio file for each region. The new audio files are added to the session, leaving the original source audio files in the Regions List unchanged. (Whether the processed audio is added to the current playlist or only to the Regions List, is de-termined by the Selection Reference setting, as explained above.)
Create Continuous File Processes the selected re-gions nondestructively and creates a new audio file consisting of the selected regions consoli-dated into a single, unbroken region. This mode is particularly useful if you are assembling a composite track from multiple takes. This mode is not available when the Selection Reference is set to Region List.
Use in Playlist button
If the Selection Reference pop-up menu is set to Region List, the Use in Playlist button will automatically be disabled to ensure that you do not accidentally replace every occurrence of the region in a session.
File Mode pop-up menu
The Create Continuous File option is not available with some time domain plug-ins. To achieve a similar result, use the Dupli-cate plug-in to consolidate regions processed with these plug-ins.
Process Mode Selector
If you have made a selection that includes mul-tiple regions, this pop-up menu lets you specify whether AudioSuite processing is performed on a region-by-region, or entire-selection basis.
Region by Region Analyzes each region in a se-lection individually, rather than over the entire multi-region selection as a whole.
Entire Selection Uses the entire selection for analysis. All regions will be analyzed and pro-cessed relative to the entire selection.
Chan/Track Process Mode Selector
If you have made a selection that includes re-gions from multiple tracks, the Normalize AudioSuite plug-in (as well as some third-party AudioSuite plug-ins) lets you choose whether you want to perform processing on a channel-by-channel/track-by-track, or an all-chan-nel/all-tracks basis using the Chan/Track Process Mode Selector.
Peak On Each Chan/Track Analyzes and pro-cesses each selected track individually. If you ap-ply the Normalize plug-in to multiple tracks or a multichannel track in Peak On Each Chan/Track mode, each channel or track will be normalized independently, without regard to the other se-lected tracks.
Peak On All Chans/Tracks Uses all currently se-lected channels and tracks for analysis. If you apply the Normalize plug-in to a multichannel track or multiple tracks in Peak On All
Chans/Tracks mode, the tracks will be analyzed as a single entity and regions will be normalized relative to the averaged peak level within all se-lected channels and tracks.
Preview
The Preview button lets you audition the effect of a plug-in before you process the audio. By ad-justing the plug-in controls while you listen to this audio preview, you can fine-tune the effect. Not all AudioSuite plug-ins support this feature. The Preview function routes audio to the spe-cific outputs you have chosen with the Audition pop-up in the Outputs page of the I/O Setup di-alog. Make sure you have configured this option correctly for your system or you may not be able to hear previewed audio.
Process Mode Selector
Chan/Track Process Mode Selector pop-up menu
See the DigiRack Plug-Ins Guide for more information on the Normalize AudioSuite plug-in.
For more information on using the I/O Setup dialog to configure your system’s au-dio outputs, refer to the Pro Tools Reference
Before you use Preview, be aware that:
◆The performance of the Preview function de-pends on the speed of your CPU. Faster comput-ers preview AudioSuite effects better than slower computers.
◆Regardless of how many tracks and regions are currently selected, the Preview button will audition only the first selected stereo track or the first selected pair of mono tracks.
◆If you are using Region-by-Region processing mode, the Preview function will preview only the first region within a multi-region selection. To hear all selected regions, temporarily select Create Continuous File from the File Mode menu before previewing.
◆The Preview function is affected by the Audi-oSuite Buffer Size option (on the Processing page of the Pro Tools Preferences dialog). See “The AudioSuite Processing Preferences Dialog” on page 30.
Bypass
When Bypass is enabled, the selected audio is auditioned without AudioSuite processing so you can quickly compare unprocessed audio with the affect of the plug-in. The Bypass button applies only to previewing. It does not affect ac-tual AudioSuite processing.
Process
Clicking this button begins AudioSuite process-ing of the selected audio. Processprocess-ing can occur during playback (though it may take slightly longer). Processed files are auto-named with the region or audio file’s name plus an acronym for the chosen AudioSuite process.
New files are written to the hard disk specified for that track in the Disk Allocation dialog, or to the same drive as the original file if the region is not currently on a track. See “Auto-File Naming of AudioSuite-Processed Audio” on page 30.
Multichannel Processing
Many Digidesign AudioSuite plug-ins allow up to 48 channels of audio to be processed simulta-neously.
Undoing AudioSuite Processing
If you have processed an audio selection nonde-structively, the Undo and Redo commands let you undo the selected AudioSuite process. You can undo or redo an AudioSuite process during audio playback.
Undo is not available when a plug-in is con-figured for destructive editing since the pro-cess has already overwritten the source au-dio file.
Auto-File Naming of
AudioSuite-Processed Audio
When new audio files are created as a result of AudioSuite processing, Pro Tools will auto-name these files according to the type of plug-in used. The name of the region determines the prefix, while the type of AudioSuite plug-in determines the suffix.
Auto file-naming follows these rules:
◆New regions are named beginning with the region name, followed by an abbreviation of the current AudioSuite process, followed by stan-dard Pro Tools file and region numbering.
◆If a plug-in’s File Mode pop-up is set to Over-write, the original region’s name will not be changed.
◆If a plug-in’s File Mode pop-up is set to Create Individual Files, the resulting regions will have an abbreviated version of the plug-in name ap-pended to them.
Other AudioSuite Controls
In addition to the standard AudioSuite controls, there are a number of special-purpose controls found on certain plug-ins:
Plug-In Librarian and Settings Menus The Set-tings and Librarian pop-up menus that appear in some AudioSuite plug-ins provide a means of saving, loading, copying, pasting and organiz-ing custom plug-in settorganiz-ings files. See “Usorganiz-ing the Librarian” on page 22.
Analyze Button Lets you analyze a selection without actually processing it. “For example, on the DigiRack Gain plug-in, the Analyze feature lets you determine the maximum peak level on a track at a specific gain value before you process the audio.”
Side-Chain Input Selector Lets you select a track or bus to be used to trigger processing. In order to use this feature, the key input source audio must occur at the same time as the target audio. See “Using a Key Input for Side-Chain Process-ing” on page 19.
The AudioSuite Processing
Preferences Dialog
Before you begin using AudioSuite plug-ins, use the Preferences dialog (Setups > Preferences > Processing) to configure default AudioSuite op-tions according to your needs. These opop-tions in-clude the default dither setting, a dither on/off checkbox, and the AudioSuite buffer size op-tion.
Side-chain inputs for plug-ins have no effect on AudioSuite processes when the Selection Reference is set to Region List.
AudioSuite Dither When selected, dither is ap-plied during certain AudioSuite processes (such as Normalize and Gain), using the dither algo-rithm selected in the Dither Plug-In pop-up. Dither is most useful when working with low-level files that contain a fade in or fade out.
Dither Plug-in AudioSuite plug-ins always create files that inherit the session’s bit depth. The Dither Plug-In pop-up menu lets you choose the dither algorithm used for dithering higher-bit source files during AudioSuite processing.
Edit Settings Accesses options for the presently selected Default Dither plug-in. In the case of the Digidesign Dither plug-in, this lets you turn noise shaping on or off.
Bit Depth Selects the default bit depth used by the dither function during AudioSuite process-ing. Bit depth can be set to 16-, 18-, 20-, or 24-bit.
AudioSuite Buffer Size Selects the size of Pro Tools memory buffer for processing and pre-viewing AudioSuite plug-ins. Choices are Mini, Small, Medium, Large, or Jumbo. In general, choosing a smaller buffer speeds up AudioSuite previewing functions. Choosing a larger buffer speeds up AudioSuite processing of audio files.
To configure the AudioSuite Buffer Size: 1 Choose Setups > Preferences.
2 Click Processing.
3 Select an AudioSuite Buffer Size.
Though the default setting will work well for most situations, you may want to set the buffer according to your current task: Before you audi-tion an AudioSuite plug-in, set this buffer to Mini or Small. Then, when you are ready to pro-cess a file, reset it to Large or Jumbo.
4 Click Done.
TC/E Lets you select the Time Compression Ex-pansion plug-in and default settings used when editing with the Time Trimmer.
Using AudioSuite Plug-Ins
AudioSuite plug-ins can be applied to whole re-gions, partial rere-gions, or selections that are made up of whole and partial regions across one or more tracks.
The basic steps to use AudioSuite plug-ins are: • Select (highlight) the audio in tracks that you
want to process (see “Selecting Tracks for AudioSuite Processing” on page 32).
• Select an AudioSuite plug-in from the Audio-Suite menu.
• Configure plug-in parameters as needed. • Process the selected audio with the current
AudioSuite plug-in settings.
Refer to the DigiRack Plug-Ins Guide for more information about noise shaping.
Refer to the DigiRack Plug-Ins Guide for more information about dither.
Refer to the Pro Tools Reference Guide for more information about the Time Trimmer.
When audio selected in the Edit window in-cludes partial regions, the regions will automat-ically be split into two or more regions when they are processed. Processing will occur only on the selection, leaving other regions un-changed.
Only audio files on locally connected hard drives can be processed with AudioSuite plug-ins. You cannot process audio files on remote hard drives over a network.
Selecting Tracks for AudioSuite
Processing
Because AudioSuite processes are performed on the specific regions that you select, it is impor-tant that you select only those regions, or parts of regions, you actually want to process. Selecting a region in the Audio Regions List will automatically select it in a track (if it currently resides on one). This is the default behavior for Pro Tools. However, you can change this using the Region Selection Follows Track Selection, or Track Selection Follows Regions List Selection options in the Editing page of the Preferences di-alog. See the Pro Tools Reference Guide for an ex-planation of these Preferences.
Selecting Tracks for Delay or Reverb
Processing
Because some AudioSuite effects such as delay and reverb add additional material to the end of the selected audio (a reverb tail or a delay tap), it is very important that you make a selection that
is longer than the original source material so that
the plug-in can write it into the audio file. If you select only the original material, without leaving additional space at the end, a reverb de-cay or delay that occurs after the end of the re-gion will be cut off.
To compensate for this, place the region in a track and select the desired audio plus an amount of blank space at the end of the region equal to the amount of delay or reverb decay that you have added in the plug-in. The plug-in will then have space at the end of the region in which to write the final delay or decay. If you select more blank space than you need, you can remove it using the Trim tool after ap-plying AudioSuite processing.
To process audio with an AudioSuite plug-in: 1 Select regions to process in one or more target tracks and/or in the Audio Regions List. Shift-click to select multiple regions. Only regions that are selected will be processed.
2 Choose the desired AudioSuite plug-in from the AudioSuite menu.
3 Click the Preview button to begin playback of the selected material.
Processing a locked region will cause the re-gion to become unlocked, and processing a muted region will cause it to become un-muted. For more information on locked and muted regions, refer to the Pro Tools Refer-ence Guide.
When processing a single audio channel with an AudioSuite plug-in, make sure that the plug-in is set to Mono mode (if avail-able).
4 Adjust the plug-in controls to achieve the ef-fect that you want. These settings will determine how the file is processed and what effect the processing will have on the original regions. Fol-low these guidelines:
• To process the selected region only in the track in which it appears, select Playlist from the Selection Reference pop-up. Alter-natively, if you want to process the selected region in the Audio Regions list only, choose Region List from this pop-up. • If you want to process and update every
oc-currence of the selected region throughout your session, enable the Use In Playlist but-ton (and also select Region List from the Se-lection Reference pop-up). Alternatively, if you do not want to update every occur-rence of the selected region, deselect the Use In Playlist button.
• To configure the plug-in for destructive processing, select Overwrite Files from the File Mode pop-up menu. This will over-write and permanently modify the original source audio files.
• Alternatively, to configure the plug-in for nondestructive processing, select Create Individual Files from the File Mode pop-up menu. This will create new audio files that have been processed with the AudioSuite Plug-in and leave the original source audio files untouched.
• If you have selected multiple regions for processing and want to create a new file that connects and consolidates all of these regions together, select Create Continuous File from the File Mode pop-up menu.
5 Finally, when you are ready, click the Process button.
The selected audio is processed according to the settings you have specified. Pro Tools appends an acronym to the region’s name indicating the AudioSuite process that has been applied. The new audio files then appear in your session.
Using AudioSuite Plug-Ins in
Stereo
Some AudioSuite plug-ins can be used in either mono or stereo. If you plan to use them in ste-reo, be aware of the following:
◆ To process a mono track and obtain a stereo result, select the desired track or region plus an empty track or region. Then set the plug-in to Stereo mode and select the Sum Inputs button (if present) to center the dry signal. When you process the audio, the result will be two tracks or regions that represent the right and left chan-nels of the processed audio. You should then pan these tracks hard right and hard left in your mix.
◆ If you set a plug-in to Stereo mode, then select an odd number of Pro Tools tracks for process-ing (as opposed to an even number), the plug-in will process the selected tracks in pairs, in stereo. However, the last odd, unpaired track will be processed as mono, using the left channel set-tings of the stereo plug-in. If you want the last track to be processed in stereo, you must select an additional track to pair it with—an empty one if necessary.
chapter 4
D-Fi
D-Fi consists of four separate plug-ins for TDM, RTAS, and AudioSuite. D-Fi plug-ins form a unique sound design tool kit for processing and deconstructing audio in several retro and syn-thesis-oriented ways.
Lo-Fi
Lo-Fi provides retro and down-processing ef-fects, including:
• Bit-rate reduction • Sample rate reduction
• Soft clipping distortion and saturation • Anti-aliasing filter
• Variable amplitude noise generator Lo-Fi can be used as either a real-time TDM or RTAS plug-in or as a non-real-time AudioSuite plug-in.
Sci-Fi
Sci-Fi provides analog synthesizer-type effects, including:
• Ring modulation • Frequency modulation
• Variable-frequency, positive and negative resonator
• Modulation control by LFO, envelope fol-lower, sample-and-hold, or trigger-and-hold
Sci-Fi can be used as either a real-time TDM or RTAS plug-in or as a non-real-time AudioSuite plug-in.
The multichannel TDM version of the Lo-Fi plug-in is not supported at 192 kHz, use the multi-mono TDM or RTAS version instead.
The multichannel TDM version of the Sci-Fi plug-in is not supported at 192 kHz. Use the multi-mono TDM or RTAS version instead.