User’s Guide
ScreenFlow Version 4.5 User’s Guide
Copyrights and Trademark Notices
Copyright © 2014 Telestream, Inc. All rights reserved worldwide. No part of this
publication may be reproduced, transmitted, transcribed, altered, or translated into any languages without the written permission of Telestream. Information and
specifications in this document are subject to change without notice and do not represent a commitment on the part of Telestream.
Telestream, Flip4Mac, FlipFactory, Episode, Telestream MAP, MetaFlip, GraphicsFactory, MotionResolve, ScreenFlow, and Split-and-Stitch are registered trademarks and Pipeline, Launch, Wirecast, Videocue, Drive-in, and Vantage are trademarks of Telestream, Inc.
QuickTime, Mac OS X, and Safari are trademarks of Apple, Inc. Bonjour, the Bonjour logo, and the Bonjour symbol are trademarks of Apple, Inc.
Microsoft, Windows Media Technologies and Silverlight are trademarks of Microsoft Corporation.
THIS SOFTWARE IS PROVIDED BY THE COPYRIGHT HOLDERS AND CONTRIBUTORS “AS IS” AND ANY EXPRESS OR IMPLIED WARRANTIES, INCLUDING, BUT NOT LIMITED TO, THE IMPLIED WARRANTIES OF MERCHANTABILITY AND FITNESS FOR A PARTICULAR
PURPOSE ARE DISCLAIMED. IN NO EVENT SHALL THE COPYRIGHT OWNER OR CONTRIBUTORS BE LIABLE FOR ANY DIRECT, INDIRECT, INCIDENTAL, SPECIAL, EXEMPLARY, OR CONSEQUENTIAL DAMAGES (INCLUDING, BUT NOT LIMITED TO, PROCUREMENT OF SUBSTITUTE GOODS OR SERVICES; LOSS OF USE, DATA, OR PROFITS; OR BUSINESS INTERRUPTION) HOWEVER CAUSED AND ON ANY THEORY OF LIABILITY, WHETHER IN CONTRACT, STRICT LIABILITY, OR TORT (INCLUDING NEGLIGENCE OR OTHERWISE) ARISING IN ANY WAY OUT OF THE USE OF THIS SOFTWARE, EVEN IF ADVISED OF THE POSSIBILITY OF SUCH DAMAGE.
Other brands, product names, and company names are trademarks of their respective holders, and are used for identification purpose only.
AudioRestore, iZotope®; ©2011 iZotope, Inc. All Rights Reserved. Sparkle, copyright (c) 2006 Andy Matuschak.
Permission is hereby granted, free of charge, to any person obtaining a copy of this software and associated documentation files (the "Software"), to deal in the Software without restriction, including without limitation the rights to use, copy, modify, merge, publish, distribute, sublicense, and/or sell copies of the Software, and to permit persons to whom the Software is furnished to do so, subject to the following conditions: The above copyright notice and this permission notice shall be included in all copies or substantial portions of the Software.
THE SOFTWARE IS PROVIDED "AS IS", WITHOUT WARRANTY OF ANY KIND, EXPRESS OR IMPLIED, INCLUDING BUT NOT LIMITED TO THE WARRANTIES OF MERCHANTABILITY, FITNESS FOR A PARTICULAR PURPOSE AND NONINFRINGEMENT. IN NO EVENT SHALL THE AUTHORS OR COPYRIGHT HOLDERS BE LIABLE FOR ANY CLAIM, DAMAGES OR OTHER LIABILITY, WHETHER IN AN ACTION OF CONTRACT, TORT OR OTHERWISE,
ScreenFlow Version 4.5 User’s Guide
ARISING FROM, OUT OF OR IN CONNECTION WITH THE SOFTWARE OR THE USE OR OTHER DEALINGS IN THE SOFTWARE.
RSS reader class, copyright (c) 2002, Brent Simmons. All rights reserved.
Redistribution and use in source and binary forms, with or without modification, are permitted provided that the following conditions are met:
Redistributions of source code must retain the above copyright notice, this list of conditions and the following disclaimer.
Redistributions in binary form must reproduce the above copyright notice, this list of conditions and the following disclaimer in the documentation and/or other materials provided with the distribution.
Neither the name of ranchero.com or Brent Simmons nor the names of its contributors may be used to endorse or promote products derived from this software without specific prior written permission.
THIS SOFTWARE IS PROVIDED BY THE COPYRIGHT HOLDERS AND CONTRIBUTORS "AS IS" AND ANY EXPRESS OR IMPLIED WARRANTIES, INCLUDING, BUT NOT LIMITED TO, THE IMPLIED WARRANTIES OF MERCHANTABILITY AND FITNESS FOR A PARTICULAR
PURPOSE ARE DISCLAIMED. IN NO EVENT SHALL THE COPYRIGHT OWNER OR CONTRIBUTORS BE LIABLE FOR ANY DIRECT, INDIRECT, INCIDENTAL, SPECIAL, EXEMPLARY, OR CONSEQUENTIAL DAMAGES (INCLUDING, BUT NOT LIMITED TO, PROCUREMENT OF SUBSTITUTE GOODS OR SERVICES; LOSS OF USE, DATA, OR PROFITS; OR BUSINESS INTERRUPTION) HOWEVER CAUSED AND ON ANY THEORY OF LIABILITY, WHETHER IN CONTRACT, STRICT LIABILITY, OR TORT (INCLUDING NEGLIGENCE OR OTHERWISE) ARISING IN ANY WAY OUT OF THE USE OF THIS SOFTWARE, EVEN IF ADVISED OF THE POSSIBILITY OF SUCH DAMAGE.
This project uses software developed by the OpenSSL Project for use in the OpenSSL Toolkit (http://www.openssl.org). This toolkit is licensed as follows:
Copyright (c) 1998-2005 The OpenSSL Project. All rights reserved.
Redistribution and use in source and binary forms, with or without modification, are permitted provided that the following conditions are met:
1. Redistributions of source code must retain the above copyright notice, this list of conditions and the following disclaimer.
2. Redistributions in binary form must reproduce the above copyright notice, this list of conditions and the following disclaimer in the documentation and/or other materials provided with the distribution.
3. All advertising materials mentioning features or use of this software must display the following acknowledgment: "This product includes software developed by the
OpenSSL Project for use in the OpenSSL Toolkit. (http://www.openssl.org/)"
4. The names "OpenSSL Toolkit" and "OpenSSL Project" must not be used to endorse or promote products derived from this software without prior written permission. For written permission, please contact: [email protected].
ScreenFlow Version 4.5 User’s Guide
5. Products derived from this software may not be called "OpenSSL" nor may "OpenSSL" appear in their names without prior written permission of the OpenSSL Project.
6. Redistributions of any form whatsoever must retain the following acknowledgment: "This product includes software developed by the OpenSSL Project for use in the OpenSSL Toolkit (http://www.openssl.org/)"
THIS SOFTWARE IS PROVIDED BY THE OpenSSL PROJECT “AS IS” AND ANY EXPRESSED OR IMPLIED WARRANTIES, INCLUDING, BUT NOT LIMITED TO, THE IMPLIED WARRANTIES OF MERCHANTABILITY AND FITNESS FOR A PARTICULAR PURPOSE ARE DISCLAIMED. IN NO EVENT SHALL THE OpenSSL PROJECT OR ITS CONTRIBUTORS BE LIABLE FOR ANY DIRECT, INDIRECT, INCIDENTAL, SPECIAL, EXEMPLARY, OR CONSEQUENTIAL DAMAGES (INCLUDING, BUT NOT LIMITED TO, PROCUREMENT OF SUBSTITUTE GOODS OR SERVICES; LOSS OF USE, DATA, OR PROFITS; OR BUSINESS INTERRUPTION) HOWEVER CAUSED AND ON ANY THEORY OF LIABILITY, WHETHER IN CONTRACT, STRICT LIABILITY, OR TORT (INCLUDING NEGLIGENCE OR OTHERWISE) ARISING IN ANY WAY OUT OF THE USE OF THIS SOFTWARE, EVEN IF ADVISED OF THE POSSIBILITY OF SUCH DAMAGE. This product includes cryptographic software written by Eric Young
([email protected]). This product includes software written by Tim Hudson ([email protected]).
ShortcutRecorder, copyright 2006-2007 Contributors. All rights reserved. License: BSD
Jesper, waffle software, <[email protected]> David Dauer, <[email protected]>
Jamie Kirkpatrick, Kirk Consulting Ltd, <[email protected]> CTGradient, v 1.5, copyright (c) 2006 Cotingent.
Created by Chad Weider on 12/3/05.
ScreenFlow Version 4.5 User’s Guide
Limited Warranty and Disclaimers
Telestream, Inc. (the Company) warrants to the original registered end user that the product will perform as stated below for a period of one (1) year from the date of shipment from factory:
Hardware and Media—The Product hardware components, if any, including equipment supplied but not manufactured by the Company but NOT including any third party equipment that has been substituted by the Distributor for such equipment (the “Hardware”), is free from defects in materials and workmanship under normal operating conditions and use.
Software—If software is supplied as part of the product, the software will operate in substantial conformance with specifications set forth in its product user's guide. The Company does not warrant that the software will operate uninterrupted or error-free, will meet your requirements, or that software errors will be corrected.
Warranty Remedies
Your sole remedies under this limited warranty are as follows:
Hardware and Media—The Company will either repair or replace (at its option) any defective Hardware component or part, or Software Media, with new or like new Hardware components or Software Media. Components may not be necessarily the same, but will be of equivalent operation and quality.
Software—If software is supplied as part of the product and it fails to substantially confirm to its specifications as stated in the product user's guide, the Company shall, at its own expense, use its best efforts to correct (with due allowance made for the nature and complexity of the problem) such defect, error or nonconformity.
Software Updates—If software is supplied as part of the product, the Company will supply the registered purchaser/licensee with maintenance releases of the Company’s proprietary Software Version Release in manufacture at the time of license for a period of one year from the date of license or until such time as the Company issues a new Version Release of the Software, whichever first occurs. To clarify the difference
between a Software Version Release and a maintenance release, a maintenance release generally corrects minor operational deficiencies (previously non-implemented features and software errors) contained in the Software, whereas a Software Version Release adds new features and functionality. The Company shall have no obligation to supply you with any new Software Version Release of Telestream software or third party software during the warranty period, other than maintenance releases.
ScreenFlow Version 4.5 User’s Guide
Restrictions and Conditions of Limited Warranty
This Limited Warranty will be void and of no force and effect if (i) Product Hardware or Software Media, or any part thereof, is damaged due to abuse, misuse, alteration, neglect, or shipping, or as a result of service or modification by a party other than the Company, or (ii) Software is modified without the written consent of the Company.
Limitations of Warranties
THE EXPRESS WARRANTIES SET FORTH IN THIS AGREEMENT ARE IN LIEU OF ALL OTHER WARRANTIES, EXPRESS OR IMPLIED, INCLUDING, WITHOUT LIMITATION, ANY
WARRANTIES OF MERCHANTABILITY OR FITNESS FOR A PARTICULAR PURPOSE. No oral or written information or advice given by the Company, its distributors, dealers or agents, shall increase the scope of this Limited Warranty or create any new warranties. Geographical Limitation of Warranty—This limited warranty is valid only within the country in which the Product is purchased/licensed.
Limitations on Remedies—YOUR EXCLUSIVE REMEDIES, AND THE ENTIRE LIABILITY OF TELESTREAM, INC. WITH RESPECT TO THE PRODUCT, SHALL BE AS STATED IN THIS LIMITED WARRANTY. Your sole and exclusive remedy for any and all breaches of any Limited Warranty by the Company shall be the recovery of reasonable damages which, in the aggregate, shall not exceed the total amount of the combined license fee and purchase price paid by you for the Product.
Damages
TELESTREAM, INC. SHALL NOT BE LIABLE TO YOU FOR ANY DAMAGES, INCLUDING ANY LOST PROFITS, LOST SAVINGS, OR OTHER INCIDENTAL OR CONSEQUENTIAL DAMAGES ARISING OUT OF YOUR USE OR INABILITY TO USE THE PRODUCT, OR THE BREACH OF ANY EXPRESS OR IMPLIED WARRANTY, EVEN IF THE COMPANY HAS BEEN ADVISED OF THE POSSIBILITY OF THOSE DAMAGES, OR ANY REMEDY PROVIDED FAILS OF ITS ESSENTIAL PURPOSE.
Further information regarding this limited warranty may be obtained by writing: Telestream, Inc.
848 Gold Flat Road Nevada City, CA 95959
You can call Telestream, Inc. via telephone at (530) 470-1300.
Part Number: 127975 Publication Date: April, 2014
Contents
Telestream Contact Information
15
About ScreenFlow
17
Record. Edit. Share. 18
Using ScreenFlow in Trial Mode
(Telestream Web Store Only) 18
What’s New in ScreenFlow 18
Making Movies in ScreenFlow 19
Making Slide Shows in ScreenFlow 19
Getting Started
21
Tour 1—Recording With ScreenFlow 22
Configuring Your Recording 22
Beginning Your Recording 23
Tour 2– Editing Your Screencast 24
The Editing Window 24
Canvas Cropping 26
Image Cropping 26
Actions 26
Video Properties 26
Screen Recording Properties 28
Callout Properties 28
Media Library 29
Tour 3—Publishing Your Screencast 30
Publishing 31
Recording Media in ScreenFlow
33
How ScreenFlow Records and Saves Media 34
Setting Recording Preferences 35
Configuring Recording Options 35
Contents
Configuring Recording in the Add Additional Recording Window 38
Recording Media in ScreenFlow 39
Stopping, Pausing & Resuming Your Recording 39
Using the Countdown Window 39
Recording When you Start ScreenFlow 40
Creating a Document Without Recording 40
Adding Recordings to a ScreenFlow Project 40
Recording Clips Generally 41
Setting the Recording Timer 41
Recording Tips 42
Setting Your Display Resolution 42
Using Text in a Screencast 42
Considerations for Narrative Screencasts 43
Record Everything at Once 43
Record Your Display—Then Add Narration 43
Editing ScreenFlow Projects
45
Editor Window Overview 45
Adding Media to Your Project 47
Adding Clips 48
Deleting Clips 48
Using the Editor Window’s Toolbar 49
Editing Your Project on the Canvas 49
Zooming and Panning the Canvas 50
Configuring the Canvas 51
Arranging and Adjusting Clips on the Canvas 52
Placing a Clip Spatially 53
Resizing/Scaling a Clip 53
Cropping a Clip 53
Rotating a Clip 53
Editing your Project on the Timeline 54
Using the Scrubber 54
Using the Scale 55
Zooming In and Out on the Timeline 55
Using Tracks 55
Adding and Deleting Tracks 56
Using the Track Controller 56
Trimming Clips 56
Splitting a Clip 57
Trimming a Clip 57
Creating and Closing Gaps in a Single Track 57
Creating and Closing Gaps Across All Tracks 57
Using In and Out Points 58
Changing a Clip’s Play Speed 59
Grouping Clips 60
Locking Clips 60
Contents
Using Markers to Identify Points on the Timeline 61
Adding Markers 61
Jumping to a Marker 62
Deleting Markers 62
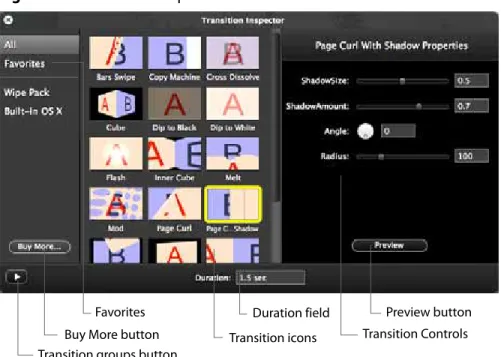
Creating Transitions 63
Adding Transitions 63
Configuring Video Transitions 63
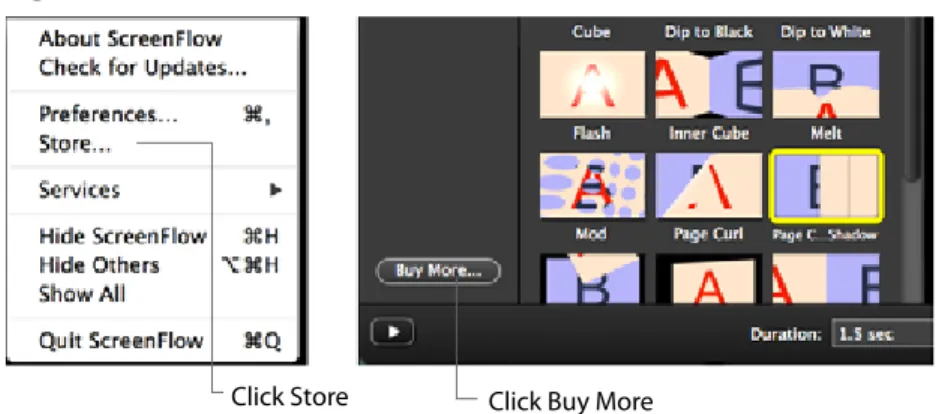
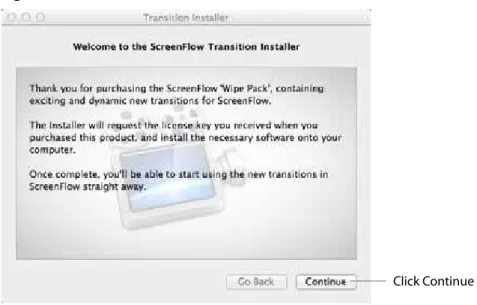
Purchasing Transition Packs 64
Configuring Audio Transitions 69
Using Actions 69
Adding an Action 70
Configuring Actions 70
Using Nested Clips 70
Creating Nested Clips 71
Viewing and Editing Nested Clips 72
Creating Closed Captions 72
Displaying and Previewing Closed Captions 73
Adjusting Video to Accommodate Caption Text 73
Adding and Configuring Closed Captions 75
Generating Closed Captions 76
Exporting Closed Captions as SRT Subtitles 76
Configuring Video Properties 77
Configuring Audio Properties 79
Configuring Screen Recording Properties 82
Configuring Callout Properties 84
Adding Freehand Callouts to Images 86
Configuring Annotations Properties 87
Adding an Annotation Clip 88
Adding and Configuring Annotation Items 88
Configuring Text Properties 89
Adding and Configuring a Text Clip 90
Using Dictation to Add Text 92
Using Audio and Video Filters 93
Adding a Filter 93
Removing a Filter 94
Re-ordering Filters 94
Configuring a Filter 95
Using the Chroma Key Filter 96
Implementing a Chroma Keyed Clip 97
Applying the Chroma Key Filter 97
Selecting a Chroma Key Color 98
Refining the Chroma Key Filter Settings 99
Using the Media Library 99
Managing Media in your Media Library 100
Using the Media Library Controls 101
Adding Media to the Timeline 102
Contents
Publishing Your ScreenFlow Project
103
Exporting Your Video 104
Using the Export Window 104
Customizing Codec Settings 106
H.264/AAC (MPEG-4) Customization 107
QuickTime Customization 109
Windows Media Format Customization 111
Managing your Export Presets 112
Configuring Export Dimensions 113
Configuring Other Options 114
Video File Size Considerations 115
Reducing Video File Size 115
Reducing the Frame Rate 115
Publishing to YouTube 116
Publishing to Vimeo 120
Publishing to Google Drive 122
Publishing to Dropbox 125
Publishing to Facebook 129
Publishing to Flash 130
Publishing Your Video to Your Web Server 132
Upload Manager Interface 132
Setting Preferences
135
General Pane 136
Timeline Pane 137
Advanced Pane 139
Licenses (Telestream Web Store Only) 140
Licensing ScreenFlow 140
Upgrading, Changing and Deactivating a Serial Number 141
Using ScreenFlow Menus
143
ScreenFlow Helper Menu 143
ScreenFlow Menu 144
File Menu 145
Save Commands 147
OS X Mountain Lion Save Commands 147
OS X Lion Save Commands 148
Edit Menu 149 Mark Menu 155 Insert Menu 157 Font Menu 158 Actions Menu 160 View Menu 161
Contents
Window Menu 163
Purchase Menu (Telestream Web Store Only) 164
Help Menu 165
Troubleshooting
167
Installing ScreenFlow
171
Platform Requirements 172
Installing ScreenFlow via Telestream Web Store 173
Unlocking ScreenFlow via Telestream Web Store 174
Activating Your Telestream Web Store License 175
Installing Telestream Audio 176
Uninstalling Telestream Audio 176
Deactivating Your ScreenFlow License 176
Removing ScreenFlow from Your Computer 178
Removing ScreenFlow Files Upgraded from Version 2.0 178
Removing ScreenFlow Files Upgraded from Version 3.0 178
Telestream Contact
Information
To obtain product information, technical support, or to provide comments on this guide, contact us using our Web site, email, or phone number as listed in Table 1.
Table 1. Telestream Contact Information
Resource Contact Information
Telestream Technical Support
Web Site: http://www.telestream.net/telestream-support
Support Web Mail. www.telestream.net/telestream-support/ screen-flow/contact-support.htm
ScreenFlow Technical Support, FAQs, Forums, & Upgrades
Web Site: http://www.telestream.net/telestream-support/ screen-flow/support.htm
Telestream, Inc. Web Site: http://www.telestream.net/purchase/store.htm
Online Web Store: [email protected]
Sales and Marketing Email: [email protected]
Telestream, Inc. 848 Gold Flat Road
Nevada City, CA. USA 95959 International
Distributor Support
Web Site: www.telestream.net
See the Telestream Web site for your regional authorized Telestream distributor.
Telestream Technical Writers
Email: [email protected]
If you have comments or suggestions about improving this document, or other Telestream documents—or if you've discovered an error or omission, please email us.
About ScreenFlow
This guide is designed to help you understand how to use ScreenFlow to record, edit, and create high-quality screencasts and encode them as MPEG-4 files, or publish them directly to video sites such as YouTube, for your audience to enjoy.
This guide also provides hints, tricks, and other information to help you make the best screencasts possible.
Record. Edit. Share.
Using ScreenFlow in Trial Mode (Telestream Web Store Only)
What’s New in ScreenFlow
Making Movies in ScreenFlow
Making Slide Shows in ScreenFlow
Note: If you haven’t installed ScreenFlow yet and would like to now, proceed to
About ScreenFlow Record. Edit. Share.
Record. Edit. Share.
Telestream’s ScreenFlow is a powerful, easy-to-use screen recording and video editing software for Mac.
With ScreenFlow, you can easily create screencasts—recording your entire display while simultaneously capturing your video camera, microphone, and your computer audio. ScreenFlow is ideal for creating screencasts for software demos, tutorials, application previews, training, and business presentations.
The easy-to-use editing interface lets you creatively edit your video, and add additional images, voice-overs, text, and music beds, with callouts and transitions for a truly professional-looking video. The finished result is an MP4 movie, ready for publishing to your Web site, blog or directly to YouTube or Vimeo.
Or, use ScreenFlow simply as an intuitive video editor to edit and create your own best picture nominee.
Using ScreenFlow in Trial Mode
(Telestream Web Store Only)
Note: This topic does not apply if you purchased ScreenFlow from the Mac App Store. The App Store has its own installation and licensing procedure.
Until you unlock ScreenFlow by purchasing a license and activating it, ScreenFlow operates in trial mode. In trial mode, all of ScreenFlow’s features are available, but your movies are watermarked when you export or publish them.
To unlock ScreenFlow, go to Unlocking ScreenFlow via Telestream Web Store.
What’s New in ScreenFlow
This version of ScreenFlow has many new features that improve its capabilities and user experience.
•
New publishing options added: Google Drive, Facebook & Dropbox.•
Asynchronous uploads for faster workflows•
Enhanced Transition InspectorAbout ScreenFlow Making Movies in ScreenFlow
Making Movies in ScreenFlow
With full support for 64-bit architecture, ColorSync, Retina displays and built on Cocoa, not only is ScreenFlow a powerful, intuitive and responsive application for creating screencasts, it doubles down as a snappy movie maker.
With its essential nonlinear editor features like the canvas and timeline, making movies using your own clips is a snap. Import your own movie clips into the media library, and drop them right into the timeline. With its magnetic properties, you can join and sync clips without overlaps or clicks in a single drop, then add transition effects, and voice overs and music beds.
Using ScreenFlow’s essential features, making your own movies is easy. You don’t have to wade through a cluttered jumble of things you’ll never use, just to get your movie built. ScreenFlow helps you do what you want—make great movies for friends and customers. It doesn’t force you to become a professional editor just to get the job done. Everything you need is at your fingertips: clip nesting and grouping, video and sound effects, tracks and canvas, video clipping, transitions, and support for external camera and mic recording.
Use ScreenFlow’s integrated rendering in MEPG-4, QuickTime, and Windows Media (Telestream Web Store edition only), and you’ll be premiering your movie in no time.
Making Slide Shows in ScreenFlow
Slide shows have never been easier to make either. You can use images in leading formats including PNG, TIFF, and JPEG and many others. You can adjust each image to display just the right length of time. And, you can make great transitions, create text overlays and graphics, and add your own voice-overs and add music beds, trimmed just right. Just like movies, you can use integrated publishing directly in ScreenFlow to render your movie for publication or distribution.
About ScreenFlow
Getting Started
These tours are designed to introduce you to the capabilities and significant features of ScreenFlow.
We encourage you to take these tours before beginning a screencast or other ScreenFlow project. They help you to gain a basic understanding of how ScreenFlow works and help to familiarize yourself with the program.
The creation of a ScreenFlow screencast is a three step process: first you record your video, next you edit your screencast project, and finally you export your screencast to a video file or publish it directly to an Internet video service such as YouTube and others. For video tutorials, please visit our ScreenFlow demos page.
Tour 1—Recording With ScreenFlow
Tour 2– Editing Your Screencast
Getting Started
Tour 1—Recording With ScreenFlow
Tour 1—Recording With ScreenFlow
This first tour focuses on creating a high quality recording for editing and publishing. When creating a screencast, it is important to prepare your recording properly while considering how you intend to use this screencast.
We recommend that you record a few sample screencasts to familiarize yourself with ScreenFlow and its options, before creating a screencast for publication.
To record a screencast with ScreenFlow, follow these basic steps:
1. Open your Applications folder.
2. Drag ScreenFlow onto your dock bar.
3. Double-click the ScreenFlow icon to launch the application.
When you launch ScreenFlow, it displays a Configure Recording window.
Figure 1. Screenflow Recording Window
If you’re ready to start recording, you check the options you want enabled, and click the red Record button.
Before you create your first screencast, take a moment to consider ways of approaching the process.
Configuring Your Recording
Use the Configure Recording window to specify your recording sources. This
automatically opens when you launch the application, but it can also be accessed from ScreenFlow Helper > Configure Recording… or File > New Recording.
Record Desktop from. This option records your computer display. This source records by default and cannot be deselected. If you have multiple displays connected, you can choose between them. ScreenFlow cannot record multiple displays simultaneously.
Record Video from. This option records video from any camera connected to your computer. Use the popup menu to choose from multiple cameras. Upon selecting a source, a preview image displays below.
Record Audio from. This option records from any microphone connected to your computer. Use the popup menu to choose from multiple microphones. Upon selecting the source, the volume level is displayed below.
Getting Started Tour 1—Recording With ScreenFlow
Record Computer Audio. Choose this option to record all sounds played through your computer. The ScreenFlow audio driver must be installed to use this setting. If the driver is not installed, you are prompted to install it.
Beginning Your Recording
When you are ready, click the Record button. ScreenFlow enters a countdown mode before recording. You can change the length of this countdown (see Using the
Countdown Window).
Create a short presentation then stop your recording: press Shift-Command-2 or select Stop Record from the ScreenFlow Helpermenu in the upper-right corner of your display.
When you stop recording, ScreenFlow opens your recording in the ScreenFlow editing window with all of your recorded sources placed on the timeline.
Display video and computer audio are combined into one clip; camera video and microphone audio are combined in another clip, to maintain video/audio sync. Video and audio can be separated by selecting the clip and choosing Edit > Detach Audio.
Getting Started
Tour 2– Editing Your Screencast
Tour 2– Editing Your Screencast
The purpose of this tour is to familiarize you with the basic editing features of ScreenFlow. This tour describes some of the most common and basic editing techniques.
For a comprehensive description of editing features, see Editing ScreenFlow Projects. When you finish your recording, ScreenFlow creates a new document and recorded media is placed at the beginning of the timeline. The media elements on the timeline reference your project’s stored media. Changes made on the timeline or on the canvas do not alter your original recording.
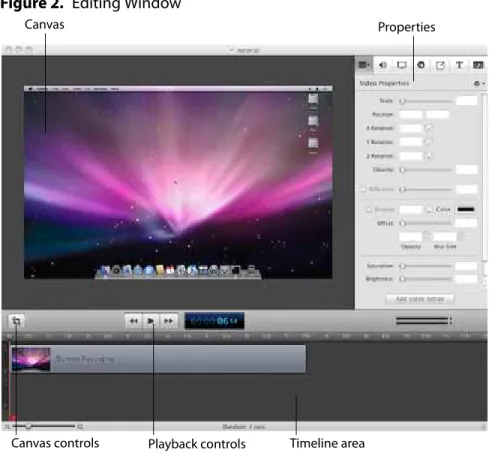
The Editing Window
The space used for editing is the editing window, which consists of three main parts: Canvas Control, Playback Controls, and Timeline area.
Figure 2. Editing Window
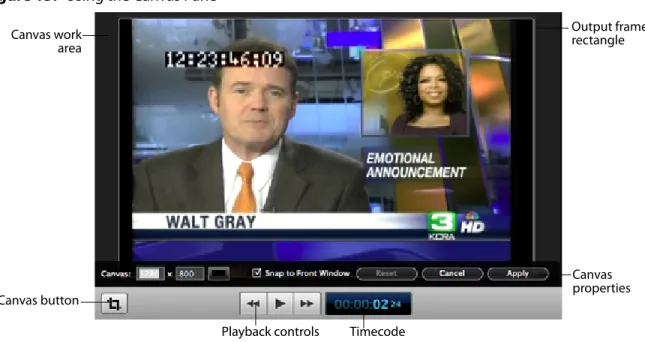
Canvas Controls
The large, central area of the editing window is called the canvas. This offers a preview of all visual elements in your project. The gray space around the preview is for elements that will not be present in your exported video. This is used to display off-screen
Canvas
Timeline area Canvas controls Playback controls
Getting Started Tour 2– Editing Your Screencast
elements present in scaling and panning effects. The elements displayed on the canvas reflect the position of the scrubber on the timeline.
You can set the canvas size and background color using the canvas controls (see
Configuring the Canvas).
Timeline Area
The wide area at the bottom of the screen is the timeline. This is a visual representation of the temporal length of your screencast. The scale at the top of the timeline
represents measurements of time.
The red vertical line on the timeline is called the scrubber. This represents the current temporal position of the preview currently displayed on the canvas.
The timeline is divided into tracks to manage different clips overlapping at the same time. If the clip is visual (i.e. video, image, or text), the upper most track is displayed over the lower tracks.
Between the canvas and the timeline are playback controls which enable you to play your screencast and jump to the beginning or end of your video.
Properties
On the upper-right side of the editing window are the Properties tabs. These are the main editing controls of ScreenFlow and allow you to configure each clip in your screencast. It also includes the media library which stores all recorded and imported media in an unaltered state.
For more information, see the Properties topics in Editing ScreenFlow Projects. ScreenFlow provides two different types of cropping.
Getting Started
Tour 2– Editing Your Screencast
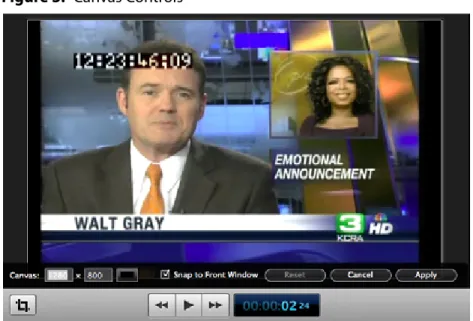
Canvas Cropping
Canvas cropping is used to change the resolution or aspect ratio of the workspace you have to edit in. This can be useful if you want to constrain your screencast to only a portion of the total recording (i.e. a foreground window).
Canvas cropping is accessible through the canvas control button. This is set by numerically entering the width and height values or dragging the edge of the canvas with your mouse cursor.
The canvas cannot be set to a value larger than the original recording. Remember, the canvas size represents your total usable display space, which converts to the frame size of your video when you export or publish it.
Image Cropping
To crop an image, select the video or still image on the canvas. Hold the Control key and drag the edge or handles of the image to crop it. Use the shift key to constrain the cropping action to the original ratio of the image.
Actions
Actions are property changes used to transition the media from one state to another. Actions are added to a clip by selecting the clip, opening the property that you want to alter, then clicking the Add Action button at the bottom of the properties pane. The action is placed in relation to the position of the scrubber, but can be moved on the clip. The duration of the action is changed by dragging the edge of the action to lengthen or shorten the action.
Figure 4. Video Properties Action
Place the scrubber before or after the action to make changes to the property relative to the action. When the scrubber is placed before the action, this sets the properties of the clip before the action. When the scrubber is placed after the action, this sets the properties of the clip after the action.
Video Properties
Video properties can be used to make changes to any recorded or imported video, video action, or image file. This includes both screen and camera recordings.
This tour focuses on the most common features. For more details, see Configuring Video Properties.
Getting Started Tour 2– Editing Your Screencast
Figure 5. Video Properties
Scale. Use this option to change the size of a video or image relative to the size of the canvas. This can be used for highlighting a particular portion of the screen or with a video action to create a zoom effect.
Use the slider or enter a percentage value to change the image scale.
Position. Position represents the location of your video or image on the canvas. The position is based on the exact placement of the center of your image. Values in the position field are represented in pixels.
You can reposition the image by dragging the image on the canvas, nudging the image with the arrow keys, or entering a numerical value in the position fields.
Opacity. This is the degree to which the image is translucent. The greater the value, the more opaque the image. If the value is set to zero, the image is invisible.
This is used with a video action to fade an image in or out. It is particularly useful if you would like to periodically display your camera recording.
Getting Started
Tour 2– Editing Your Screencast
Screen Recording Properties
Screen recording properties are effects specific to demonstrations using the mouse and keyboard. They can only be applied to screen recording clips.
This tour focuses on the most common features. For more details, see Configuring Screen Recording Properties.
Figure 6. Screen Recording Properties
Pointer Zoom. Often it can be difficult to see the mouse in a screencast, particularly if the video has been significantly resized. Increasing the pointer zoom value makes the mouse cursor larger and easier for the viewer to follow.
Click Effect. This feature can be used to make a visual effect when you click your mouse. Select Radar to screencast a red circle with each click or Invert to change the cursor from black to white with each click.
Sound on Click. Select this option to generate a click sound when the mouse button is pressed.
Show Keys Pressed. Select this option to display the text as you were typing it while recording.
Show Modifier Keys Pressed. Select this option to display modifiers used in hotkey commands, F1 through F12, and the arrow keys.
Callout Properties
Callout Properties are used to highlight a specific portion of the screen. They can be applied to screen recordings, images, or video clips. Unlike the other properties, Callout Properties must be used with an action.
Getting Started Tour 2– Editing Your Screencast
This tour focuses on the most common features. For more details, see Configuring Callout Properties.
Figure 7. Callout Properties
Highlight. Callouts are capable of highlighting an area in three different ways. Mouse cursor highlights a circular space around the mouse cursor. Foreground Window highlights any window which is currently active. Freehand allows you to draw the area you want to highlight.
Opacity. The opacity slider controls the opacity of the space outside the callout. A low value makes the surrounding area more visible, while a high value makes the
surrounding area less visible.
Zoom Up. This option magnifies the area inside the callout to make it more prominent.
Border. This option increases the range of the callout area to draw attention to a larger space. This feature is not available with freehand callouts.
Media Library
The media library stores all recorded and imported media in an unaltered state. This media may be dragged from the media library to your timeline or canvas for inclusion in the project. You can drag this media into your project multiple times to replicate the same file.
Getting Started
Tour 3—Publishing Your Screencast
Tour 3—Publishing Your Screencast
The purpose of this tour is to familiarize you with publishing your screencast.
ScreenFlow screencasts are not video files—they are saved as ScreenFlow documents (with a .screenflow extension), which can only be opened and used by ScreenFlow. There are two ways to publish your screencasts—by exporting them to a standard video file format or publishing them directly to an Internet video service, like YouTube or Vimeo.
Determining the correct export settings for your screencast depends on the complexity of your screencast and the intended use of the video after it has been produced. This tour explores the basics of ScreenFlow’s export options. For a comprehensive description, see Publishing Your ScreenFlow Project.
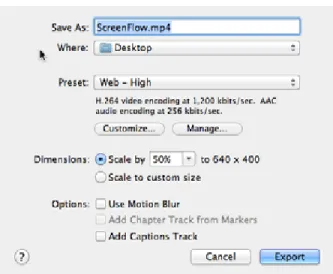
Select File > Export or press Command-E to export your presentation:
Figure 8. Export Settings Window
Save As. Choose a name for your exported video (default: ScreenFlow.mp4).
Where. Choose a location to export your video.
Preset. ScreenFlow has several export presets for your convenience. This tour focuses on the most commonly used presets.
•
Web-High. This is the default export option which encodes using the H.264 codec. It was chosen as the default codec based on both image quality and file size.•
Web-Low. This is an export option similar to Web-High, but formatted for a low bandwidth. It plays more smoothly on slow Internet connections but the image quality is not as good as Web-High.•
Lossless. This is an uncompressed export format ideal for additional editing. This format has the highest quality image but also the largest file size. When exported at 100%, the image quality is identical to the original recording.Getting Started Tour 3—Publishing Your Screencast
iPad / iPhone / Apple TV / iPod. These export options are formatted based on the recommended video specifications for these devices. They cannot be altered.
Windows Media. This option exports a video in the WMV format (Telestream Web Store edition only). This is a popular format for Windows users. This option uses a QuickTime plugin called Flip4Mac which must be licensed separately.
Note: Flip4Mac needs to be installed for this option to appear in the export menu.
Dimensions
These options are used to set the dimensions of your video export. You should not set a size larger that your canvas size. This does not improve image quality.
Scale by. Use this option to scale your screencast by a percentage value. This is an easy way to shrink your screencast while maintaining the aspect ratio.
Scale to custom size. Use this option to set the exact width and height of your exported video. Click the Letterbox Content box to add letterboxing to your export.
Publishing
In addition to encoding a video file, ScreenFlow can also publish screencasts directly to YouTube, Vimeo, Google Drive, Facebook, and Flash. These options are accessible from the File menu. For more information, see Publishing Your ScreenFlow Project.
Getting Started
Recording Media in
ScreenFlow
Creating a screencast or other project that involves video is typically a three step process: recording your media, editing the project, and exporting (or publishing) your screencast as a video file. This chapter focuses on the first step—recording video and audio directly in ScreenFlow.
Note: ScreenFlow automatically stops recording when you have less than 100 megabytes free on your system disk volume.
How ScreenFlow Records and Saves Media
Setting Recording Preferences
Configuring Recording Options
Recording Media in ScreenFlow
Recording Media in ScreenFlow How ScreenFlow Records and Saves Media
How ScreenFlow Records and Saves Media
ScreenFlow is actually comprised of two separate applications which work together seamlessly to provide you a wide variety of options and flexibility as you record media, edit, and export your screencasts.
In addition to ScreenFlow—the desktop application that stars up when you double-click the ScreenFlow icon—there is also a utility, called ScreenFlow Helper. It is ScreenFlow Helper that actually performs the task of audio and video recording. The ScreenFlow application enables you to compose and edit your screencast projects and export them, but it uses ScreenFlow Helper to perform audio and video recording. ScreenFlow Helper can be configured to start when you log in to your computer or only when you start ScreenFlow (in the ScreenFlow Preferences General Pane). When this option is disabled, ScreenFlow Helper always starts when you log in and stays running whether ScreenFlow is running or not.
ScreenFlow Helper always runs in the background so that you can start and stop recording without changing the state of your system. When ScreenFlow Helper is running, it displays a menu identified by a camera icon , in the Finder menu bar.
Note: ScreenFlow can record the computer screen as video, as well as record camera-based video (iSight, for example). Throughout this guide, the computer screen is referred to as the display—as in display video—in keeping with Apple’s terminology.
When you finish recording a clip in ScreenFlow, display video is combined with computer audio, and added to your screencast project and saved as a .scc file. Camera-based video (iSight, for example) and microphone-Camera-based audio is also combined, and added to a screencast file. Screencast files are stored in a ScreenFlow-controlled location, and clips are added to the project’s the media library.
ScreenFlow clips (sometimes called screen recordings or screencast files)—unlike clips recorded outside ScreenFlow in QuickTime or other video formats—contain spatial and temporal information about mouse tracking and key presses that enables powerful special effects to enhance your screencast.
Note: Clips recorded by ScreenFlow are saved in a proprietary ScreenFlow format, with a .scc extension, and referred to as screencast files. Screencast files can only be utilized by ScreenFlow. Because screencast files are automatically and transparently managed by ScreenFlow, you rarely ever encounter them or have to deal with them.
Recording Media in ScreenFlow Setting Recording Preferences
Setting Recording Preferences
ScreenFlow provides several options for recording. To view and change these
preferences, select ScreenFlow > Preferences. The recording options are displayed on the General tab and the Advanced tab.
For details, see Setting Preferences.
Configuring Recording Options
In ScreenFlow, you don't need to define a capture region in order to record a clip of your display for your screencast. ScreenFlow records your entire computer display with an advanced algorithm that produces the highest quality recording and small file size—giving you the flexibility to make changes to your frame size in post-production. You can set up ScreenFlow to record video and audio from various cameras and microphones, depending on your project, and you can change these settings any time you need to.
To configure your recording options, choose from these options:
•
Click on the ScreenFlow Helper menu and select Configure Recording to display the ScreenFlow window•
In ScreenFlow, select File > New Recording to display the ScreenFlow window•
In ScreenFlow, select File > Add Additional Recording to display the Add Additional Recording window. Additional Recording allows you to not record the screen, whereas Configure Recording always records the screen.Note: You can also add recording from the Media Library (see Using the Media Library).
The recording options are identical in both windows. However, the Add Additional Recording window also allows you to close ScreenFlow automatically before recording.
Configuring Recording in the ScreenFlow Recording Window
Recording Media in ScreenFlow Configuring Recording Options
Configuring Recording in the ScreenFlow Recording
Window
You use the ScreenFlow window to select recording options and record media. You can record multiple audio and video sources simultaneously: For example, you can record your display (with optional computer audio), and at the same time, record yourself using the iSight camera, and providing voice-over commentary.
Note: You can only record one screen (even if you have more than one) and one camera source, and only one computer audio, and one audio source at a time. For example, if you plug in three cameras, you can only choose one at a time to record.
You can display the ScreenFlow window depicted in (Figure 9) in both ScreenFlow and ScreenFlow Helper:
•
Click on ScreenFlow Helper menu and select Configure Recording•
In ScreenFlow, select File > New RecordingFigure 9. Configure Recording Window—2 Panes
The ScreenFlow window is a two-pane window—use the arrow at the bottom right to display the other pane.
You can also configure ScreenFlow to record your display unattended. For example, you might want to record a half-hour webinar and you don’t want to sit through it to stop the recording. Use the Stop Recording option on the second panel to specify the elapsed time to stop the recording, and click Set Timer, then start recording. Elapsed time recording is a one-off event—you need to set it every time you want to use it. Recording options are described in Table 2.
Recording Media in ScreenFlow Configuring Recording Options
Table 2. ScreenFlow Record Dialog Controls
Control Description
Record Desktop from your Color LCD
Note: If you have more than one monitor, ScreenFlow displays a list—select which monitor you want to record.
When configuring recording using the ScreenFlow window, ScreenFlow automatically records your computer display. This option can not be disabled.
When recording using the ScreenFlow Add Additional Recording window, you can check or uncheck Record Desktop from your Color LCD.
The frame size is determined by the display’s resolution. If you have multiple displays, you can choose between them, but you can’t record multiple displays simultaneously.
Record Video from Check to record video from a camera.
Use the popup menu to choose the camera you want to use. ScreenFlow displays live video below.
Record Audio from Check to record audio from a microphone.
Use the popup menu to choose the microphone you want to use. The volume level is displayed below.
Record Computer Audio
Check to record sound played through your computer. The ScreenFlow audio driver must be installed to record sounds played through your computer. If the driver isn’t installed, you’re prompted to install it (see Installing Telestream Audio).
Stop Recording After Specify when ScreenFlow should automatically stop this recording session. Click Set Timer to activate one time. Record Click the red button—the Record icon—to display the
countdown window (if enabled—see the Countdown option in the General Pane) and begin recording.
Recording Media in ScreenFlow Configuring Recording Options
Configuring Recording in the Add Additional Recording
Window
You can also use the Add Additional Recording window to select recording options, and record media to add to an open project document. To display the Add Additional Recording window in ScreenFlow, select File > Add Additional Recording (Figure 10) or click the Add Recording button in the media library, which is described in detail in Using the Media Library.
Figure 10. Add Additional Recording
Note: When you are recording using Add Additional Recording, you can select only those sources you want to record. You can disable display recording—by unchecking Record Desktop from your Color LCD—which you can’t do in the ScreenFlow
recording window.
You can also close the ScreenFlow application automatically, before recording—check the Close ScreenFlow before recording checkbox. Typically, you use this option when you don’t want the ScreenFlow application or its windows displayed on the desktop or the ScreenFlow icon displayed in the dock when you’re recording.
Note: Make sure that all open ScreenFlow documents have been saved prior to starting recording or it won’t close on command.
Recording Media in ScreenFlow Recording Media in ScreenFlow
Recording Media in ScreenFlow
Depending on how you plan to use your clip, choose these recording options:
Stopping, Pausing & Resuming Your Recording
Using the Countdown Window
Recording When you Start ScreenFlow
Creating a Document Without Recording
Adding Recordings to a ScreenFlow Project
Recording Clips Generally
Setting the Recording Timer
Stopping, Pausing & Resuming Your Recording
Before you start recording, it’s nice to know how to stop. To stop recording in ScreenFlow, click the ScreenFlow Helper menu and select Stop Record or press Shift-Command-2, the default shortcut to stop recording.
To pause your recording, click the ScreenFlow Helper menu and select Pause. When you pause recording, the solid black recording dot changes to a blinking paused dot. To start recording again, select Resume from the ScreenFlow Helper menu.
Using the Countdown Window
By default, each time you start recording (unless you’ve disabled it in Preferences), ScreenFlow displays the countdown window as shown below in Figure 11, providing a delay to allow you to prepare for recording.
Figure 11. Using the Countdown Window
By default, the countdown is set to 5 seconds. To change the countdown option (or to enable or disable the countdown window), select > Preferences > General. For details, see General Pane. You can set the countdown delay for up to ten seconds.
Recording Media in ScreenFlow Recording Media in ScreenFlow
To skip a countdown in progress, simply click on the countdown window and ScreenFlow begins recording immediately.
Recording When you Start ScreenFlow
To record a clip for a new screencast project, just start ScreenFlow. The ScreenFlow recording window displays and you can click the red Record button to start recording your first clip. (If you don’t want to record right now, just close the window.) During recording, the camera icon of the ScreenFlow Helper menu displays a black dot. When you stop recording, ScreenFlow displays a window that lets you add your recording to a new document, add to an existing document, or discard the document.
Creating a Document Without Recording
To create a ScreenFlow document without recording, start ScreenFlow. When the ScreenFlow recording window displays (Figure 12), click the Close button on the upper left corner. Now, select File > New Empty Document or press Shift-Command-N. ScreenFlow displays a dialog which allows you to set your canvas size to any dimension, regardless of your display size.
Figure 12. Using the Recording Complete Dialog
Select a preset canvas size from the Preset popup menu or enter a custom canvas size in the Width and Height fields.
Now, you can record video or work on your project using other media, as you want.
Adding Recordings to a ScreenFlow Project
To record a clip and add it to an open project, make sure the project window is open and selected. Then, select File > Add Additional Recording (Shift-Command-R) or press the Add Recording button in the media library. Verify your settings and click Record. Depending on your preferences, the countdown window displays, and then
ScreenFlow begins recording. During recording, the camera icon of the ScreenFlow Helper menu displays a black dot. When you stop recording, ScreenFlow adds the clip you just recorded to the project.
Recording Media in ScreenFlow Recording Media in ScreenFlow
Recording Clips Generally
To record a clip without deciding which project to add it to first, click on the ScreenFlow Helper menu and select Record or select File > New Recording. Depending on your preferences, the countdown window displays, and then ScreenFlow begins recording. During recording, the camera icon of the ScreenFlow Helper menu displays a black dot. When you stop recording, ScreenFlow displays a Recording Complete window
(Figure 13) so that you can create a new document with our recording, or add your recording to any open document.
Figure 13. Using the Recording Complete Dialog
To verify your settings first, click on the ScreenFlow Helper menu and select Configure Recording. When you’re ready, click the Record button. Depending on your preferences, the countdown window displays, and then ScreenFlow begins recording. When you stop recording, ScreenFlow displays the Recording Complete window, as shown above, so that you can add your recording to an open project, start a new one, or discard your recording.
Setting the Recording Timer
You can also configure ScreenFlow to record your display unattended. For example, you might want to record a half-hour webinar and you don’t want to sit through it to stop the recording.
To set up ScreenFlow to stop recording after a certain time, click on the ScreenFlow Helper menu and select Configure Recording. Use the Stop Recording option on the second panel to specify the elapsed time to stop the recording, and click Set Timer, then start recording. Elapsed time recording is a one-off event—you need to set it every time you want to use it.
Recording Media in ScreenFlow Recording Tips
Recording Tips
Before you begin your recording, it’s useful to consider how you (and your users) intend to use your screencast, how you want to organize your media, and how best to present your screencast on screen.
Setting Your Display Resolution
Using Text in a Screencast
Considerations for Narrative Screencasts
Setting Your Display Resolution
Two important factors to consider before you begin recording is the resolution of your display and the intended export resolution of your screencast. Since you usually do not intend to export your screencast at the same resolution that you recorded at, it is important to consider that your final video will be at a lower resolution than it is on your screen—especially if you are recording a large resolution display or a Retina display (maximum 2880 x 1800). This is especially important when you have text which must be legible. Digital video was not designed to capture text, so it can often be difficult to capture clearly.
Telestream recommends that you check your display resolution before recording (select System Preferences > Displays). Lower your display resolution as much as possible without impairing your ability to view your screencast clearly. Do not lower the resolution below your intended export resolution or you will lose quality.
Using Text in a Screencast
Digital video was designed primarily for capturing real world images, so it is often difficult to capture the thin lines of text legibly. Here are a few tips to consider when you are using text in your video:
•
Use larger point sizes (e.g., at least 25 points or more). Larger characters always ren-der better than small ones.•
Do not use serif fonts (e.g,. Times Roman). Always use sans-serif fonts (e.g., Arial or Helvetica).•
Use boldface fonts, since they render better, especially at smaller sizes.•
Do not use odd values for the output movie's frame height or width. Always use even numbers. Also, input sources having odd height or width values can result in illegible titles.•
Always generate non-interlaced video (the Lossless preset is the only format that you can specify as interlaced). Interlaced video is much more prone to poor quality text rendering because it may introduce flickering.Recording Media in ScreenFlow Recording Tips
Considerations for Narrative Screencasts
When creating narrative screencasts, you might consider two different approaches. For simple demonstrations, you may be able to narrate the demo as you perform it. For more complex demos, you may have a problem narrating in real time, as you perform the task using the keyboard and mouse.
Record Everything at Once
Record Your Display—Then Add Narration
Record Everything at Once
Using this method, you record each recording source in a single session—
simultaneously recording the display, camera video, microphone audio, and computer audio. When you are done recording, you can use the editing tools to finalize your screencast project.
For example, you might start a screencast project by recording your display, then cut to a Picture-in-Picture of a camera recording, as you demonstrate the application. Later, you fade out your video, leaving only the audio to narrate the remaining moments of the screencast.
This method is considered a single-pass production. It works well when your subject matter is simple, straightforward, or short. For longer or more complex screencast projects, you may find the second approach more comfortable.
Record Your Display—Then Add Narration
Using this method, you first record the display (optionally, without computer audio), demonstrating your application or subject matter without any video or voice-over. When you have finished your demonstration, you can record your camera and microphone sources while playing the video preview of your demonstration in ScreenFlow. This can be done in a single long recording or several short recordings. You can then edit your recordings to align your narration with your demonstration or fade your camera recording in and out when appropriate.
This workflow is effective when the screencast involves a series of complex mouse or keyboard operations, or you have several comprehensive steps or tasks to achieve, each of which take some effort to produce.
Recording Media in ScreenFlow Recording Tips
Editing ScreenFlow
Projects
You use the editor window to create your screencast or other ScreenFlow project, add media, and add text, actions, and other effects for clarity, emphasis, and visual appeal. You also use the editor window to arrange elements spatially and temporally in your project, and configure elements to behave or display just the way you want, and to preview your project and then go back and adjust your results.
Editor Window Overview
Adding Media to Your Project
Using the Editor Window’s Toolbar
Editing Your Project on the Canvas
Editing your Project on the Timeline
Using Nested Clips
Creating Closed Captions
Configuring Video Properties
Configuring Audio Properties
Configuring Screen Recording Properties
Configuring Callout Properties
Configuring Annotations Properties
Configuring Text Properties
Using Audio and Video Filters
Using the Chroma Key Filter
Using the Media Library
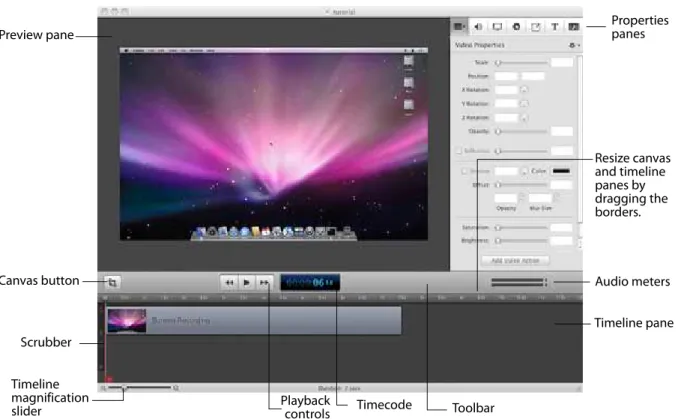
Editor Window Overview
You use the editor window (Figure 14) to create screencast or other ScreenFlow projects, and then edit your projects. This includes adding media, and adding text, actions, and other visual and audio effects for clarity, emphasis, and visual appeal.
Editing ScreenFlow Projects Editor Window Overview
The editor window also allows you to arrange your project’s elements both spatially and temporally, and configure each element’s properties to behave or display just the way you want, and to preview your project and then go back and adjust your results.
Figure 14. Editor Window Overview
The editor window is a document window for ScreenFlow documents. Each editor window displays a single ScreenFlow project. Each ScreenFlow project is stored in a ScreenFlow document, including the media library. You can open several ScreenFlow documents and work on these projects simultaneously.
Note: To create a new, untitled ScreenFlow document for a new project, see Creating a Document Without Recording.
The editor window consists of three panes: canvas, properties, and timeline.
You can resize the canvas and timeline panes by clicking and dragging the toolbar up or down. Click anywhere in the region of the toolbar directly below the toolbar icons (and above the timeline) and drag the toolbar up or down to resize the panes. The upper-left pane of the editor window is the canvas. The canvas is a spatial representation of the visual clips of your project (and their properties, actions, etc.), based on the position of the scrubber on the timeline. At any given point in time, elements in a project may be entirely or partially visible in the frame, or off-screen entirely. You use the canvas to arrange, resize and configure these elements. For details, see Editing Your Project on the Canvas.
Preview pane Timeline pane Canvas button Playback controls Properties panes Audio meters Timeline magnification slider Resize canvas and timeline panes by dragging the borders. Timecode Toolbar Scrubber
Editing ScreenFlow Projects Adding Media to Your Project
The bottom pane (directly below the playback controls) is the timeline—a temporal representation of your project, with a time scale at the top. The timeline enables you to arrange the clips in your project in play order, and add fades and other effects. The elements on the timeline reference media in your project’s media library. Changes made on the timeline or on the canvas do not alter your original media clips in the media library. For details, see Editing your Project on the Timeline.
The upper-right pane displays the properties panes and media library. There are six properties panes: video, audio, screen recording, callouts, annotations, and text. For details, see Configuring Video Properties. The media library (Using the Media Library) stores all recorded and imported media in its original format and state.
All three panes work together to help you create, edit, and preview your project.
Adding Media to Your Project
Media files are added as clips in ScreenFlow. And clips are the building blocks of every ScreenFlow project. Before you can accomplish any editing or composition, you need to add clips to your project. A clip in ScreenFlow is not the media itself—the media is the file that the clip represents (or points to). A clip not only points to a media file, it also contains all of the other information need to play and render the clip the way you’ve configured it. This may include start and stop times, fades and other actions, and other properties that you assign.
As mentioned before in Recording Media in ScreenFlow, you can record your display directly in ScreenFlow, and you can also record directly in ScreenFlow using a camera and microphone. When you do, these recordings are automatically managed by ScreenFlow, and clips are added to your project under your control.
You can also add media that has been recorded outside of ScreenFlow, and you can use still images as clips as well. ScreenFlow supports video and audio file formats that QuickTime Player can play in Mac OS X10.6.x and higher. ScreenFlow also supports many image formats, including PNG, JPEG, GIF, and TIFF images—if Preview can display a file, you can use it in ScreenFlow.
The media library is an integral part of ScreenFlow—it’s a central repository for media you’re using in a project, and knowing how it works will help you take advantage of it. Adding media to a project always involves adding a clip to the media library—even if it happens automatically. You either drag media from the file system onto the timeline and ScreenFlow adds its clip to the media library automatically—or you add media directly to the media library (creating a clip), and then you drag the clip onto to the canvas or timeline whenever you want to—creating a copy of the original clip.
You might think that dragging a clip onto the timeline merely places it there, but in fact it’s a copy. You can edit it without changing the properties of the original clip. And, you can drag the original clip onto the timeline over and over, as many times as you like. These topics focuses on the practical issue of getting clips into your project, ignoring the finer details of media library management for the moment. For those details, see
Editing ScreenFlow Projects Adding Media to Your Project
Adding Clips
Deleting Clips
Adding Clips
To add clips to your project use these methods:
•
Drag a clip from the media library directly onto the canvas. This allows you to locate the media’s frame spatially on the canvas. The clip is automatically placed in a new, top track on the timeline at the point of the scrubber.If this clip is a display recording and the canvas is the same size, you can just drag it onto the timeline—the clip is automatically positioned to fill the canvas correctly.
•
Drag a clip from the media library directly onto the timeline. This allows you to place the clip on the track(s) you want, and at the location on the timeline you want. You can select one or more clips using lasso selection—click and drag across some portion of each clip to select it.•
Double-click a clip in the media library to add it to the timeline at the point of the scrubber.•
Drag a clip from the file system (Desktop or Finder window) directly onto the time-line. This allows you to place the clip on the track you want, at the point on the timeline you want. The clip is automatically added to the media library.Note: You can also copy and paste clips in the same project, and you can copy and paste clips between open ScreenFlow document windows.
The default name of a clip is obtained from the media file it references. To change the name of a clip, double-click on the text or click the gear icon on the clip, and select Rename Clip. The new name does not change the name of the source file.
Deleting Clips
To delete clips from your project use these methods:
•
Select a clip on the canvas or timeline and press Delete or select Edit > Delete. This removes the clip from the canvas/timeline, but the original clip remains in the media library.•
Select a clip in the media library and press Delete or select Edit > Delete. This removes the clip from the timeline and deletes the clip from the media library. If the media is on the timeline, ScreenFlow displays a Delete dialog—click Delete to con-tinue. (This action does not delete the referenced media file—just the clip.)Editing ScreenFlow Projects Using the Editor Window’s Toolbar
Using the Editor Window’s Toolbar
Below the canvas is a toolbar. It displays several tools you’ll use to configure your canvas, preview your video, and monitor your audio, as described below, in Table 3.
Editing Your Project on the Canvas
The canvas (Figure 15) is a real-time video preview pane—a spatial representation of the visual elements of your project—which allows you to size and position the visual elements of your project. How (and where) the elements display at any point in time is controlled by the position of the scrubber on the timeline.
Table 3. Using the Editor Window Toolbar
Control Description
Canvas Button Click the canvas button (far left) to display the canvas controls—click it again to hide them. You can use these controls to view and adjust canvas properties: the canvas size (and resulting frame size of your exported video) and
background color.
For details, see Configuring the Canvas.
Playback Controls Use the playback controls (center) to play your project as well as jump to the beginning or end of your project.
You can also use the traditional video editor’s JKL keystrokes for Rewind, Stop, and Playback. Press J or L repeatedly to speed up rewind/playback respectively.
The timecode of the project is displayed directly to the right of the playback controls. (You can set timecode to SMPTE or ScreenFlow—see Timeline Pane.)
Audio Meter The audio meter (far right) displays audio volume. The top meter represents the left channel; the bottom, the right channel.
Editing ScreenFlow Projects Editing Your Project on the Canvas
Figure 15. Using the Canvas Pane
The center rectangle (which may be obscured by a clip, as shown above) represents the video frame of your project. Its dimension (which is set by clicking the Canvas button and using the canvas controls) determines the fra