Comodo One
Software Version 1.3
Remote Monitoring and Management
Administrator Guide
Guide Version 5.18.081115
Comodo One - RMM
-Administrator
Guide
Table of Contents
1 Introduction to Comodo One... 4
1.1 Sign Up for a Comodo One Account... 5
1.2 The Comodo One Web Interface... 7
1.3 Managing Administrators... 9
1.3.1 Admin Privilege Levels... 12
1.4 Managing Companies... 14
2 Introduction to Remote Monitoring and Management Module...18
2.1 Quick Start Guide... 22
2.2 System Requirements... 47
3 The RMM Web Interface ... 48
3.1 Viewing and Adding Devices... 49
3.2 Viewing Admin Details... 52
3.3 Viewing Polices... 53
3.4 Viewing Alerts... 56
3.5 Managing Notifications and Agent Settings... 57
3.6 Downloading RMM Administrative Console... 59
4 Installing RMM Administrative Console ... 60
4.1 Logging-in to the RMM Administrative Console ...64
5 The RMM Administrative Console... 65
6 The Devices Interface ... 68
6.1 Managing Sites... 69
6.2 Managing Devices... 71
6.2.1 Adding Devices for Managing and Monitoring...72
6.2.2 Removing Devices ... 77
6.3 Applying Policies... 78
6.4 Running Procedures... 80
7 The Sessions Interface ... 81
7.1 Managing Bulk Sessions... 83
7.2 Support Sessions Interface – An Overview... 85
7.3 Handling Support Sessions... 87
7.3.1 Chat Session with End-Users... 89
7.3.2 Running Procedures from a Support Session...91
7.3.3 Using RMM Tools... 93
7.3.3.1 Access Endpoints through Remote Desktop Connection...94
7.3.3.2 Managing Autoruns... 95
7.3.3.3 System Cleaner... 99
7.3.3.4 Power Management... 102
7.3.3.5 Managing Internet Browser Add-ons... 103
7.3.3.6 Active Connections Manager... 106
7.3.3.7 Restoring a Client System ... 107
7.3.3.8 Hardware Monitor Tool... 108
7.3.3.9 Accessing Command Prompt Window of Client System...109
7.3.3.10 Managing Currently Running Processes...110
10.1 Managing Policies... 131
11 The Alerts Interface... 140
Appendix – Issue Codes for Monitors ... 142
Comodo One - RMM
-Administrator
Guide
1 Introduction to Comodo One
Comodo One is the integrated platform for Managed Service Providers which combines Remote Monitoring, Service Desk and Patch Management modules into a single, easily navigated console.
Comodo One contains the following core components:
• Comodo Service Desk - A fully featured ticket management system which allows enterprises to implement strong and
effective work-flows for internal and customer-facing support departments. Comodo Service Desk allows
administrators and staff members to respond to tickets, reassign tickets to other departments or personnel, generate reports, create knowledge base articles and more.
• Comodo Patch Management – Provides administrators and MSPs with granular control over the deployment of
updates to operating systems and 3rd party applications on network endpoints. Featuring an easy to use interface, Comodo Patch Manager allows administrators to define patching policies and schedules and to remotely monitor the deployment of Windows and Linux operating system updates.
• Comodo Remote Monitoring and Management (RMM) – Comodo RMM is an efficient endpoint monitoring
application that allows administrators to monitor and manage multiple endpoints from one centralized console. You have the option to add Comodo Device Manager (CDM) as one of the component into Comodo One.
• Comodo Device Manager (CDM) - Allows MSPs to manage, monitor and secure mobile devices and Windows
endpoints which connect to customer networks. Once an iOS, Android or Windows device has been enrolled, administrators can quickly apply configuration profiles which determine network access rights, security settings and general preferences. A powerful addition to any MSP toolkit, Device Manager allows you to secure customer data regardless of the device that holds it.
Chapter 1 of this guide covers account set up, an introduction to the Comodo One web interface and initial configuration of administrators and staff members.
• Introduction to C1
• Sign Up for an Account – How to create an account
1.1
Sign Up for a Comodo One Account
Getting a Comodo One account is very easy and can be completed in a few steps.• Visit https://one.comodo.com/
Comodo One - RMM
-Administrator
Guide
• Complete the short enrollment form.
• Company Name: Enter the name of the company that
you want to enroll for Comodo One.
• Sub-domain: Enter the sub-domain to be used by
Comodo One. For example, if you enter the sub-domain 'milkyway' then you can access the Service Desk module by entering the URL
'https://milkyway.servicedesk.comodo.com'
• Contact Email: Enter your email address. You will
receive the verification link to this email address.
• Password field: Enter the password.
• End User License Agreement: Read the EULA fully and
select the 'I have read EULA and accept it' check box.
• Captcha: Enter the Captcha value to verify your
application
• Click the 'Sign up today' button.
A verification email will be sent to the email address you provided in the 'Contact Email' field:
• Click the 'Verify my email' link
That's it. You have successfully created a Comodo One account. Please note that this account will be automatically granted 'Account Admin' privileges and cannot be deleted. This is effectively the 'Master Admin'. You will be able to create 'MSP Admins' and Staff under this account. Refer to the section 'Managing Administrators' for more details.
1.2
The Comodo One Web Interface
The Comodo One interface gives Account Administrators and MSP Administrators/Staff direct access to the Comodo One modules. The interface also allows the Account Administrator to add MSP Administrators and Staff members who are privileged to access the C1 modules.
Comodo One - RMM
-Administrator
Guide
The name of the user that is currently logged in is shown at top left. Visit the Comodo One products help pages, Comodo Enterprise and MSP Consortium Forum pages by clicking the help icon at the bottom. The current version of C1 is displayed next to 'Help' and clicking it will display the release notes for the components.
• Settings: Change your current password.
• Logout: Allows you to log out of the interface.
• Home: After logging into the C1 interface, the 'Dashboard' will be
displayed as the home screen. Clicking the home button or the 'Comodo One' logo at the top will return you to the 'Dashboard'.
• Help: Click the icon to visit Comodo One help pages and
forum pages.
• Help Documents – Takes you to the Comodo One
products help page at
https://help.comodo.com/product-289-Comodo-One.html
• Comodo Enterprise Forum – A Comodo Enterprises
products forum page that allows to post your views and discuss all aspects of our products.
• MSP Consortium Forum – Takes you to the MSP
Consortium forum. The Managed Service Provider community is a lively, proactive hub of like-minded experts willing to help you develop answers to any technical or business related questions you may have.
• Version No: Click the version to view the release notes such as what new features are added and what bugs are fixed
and so on for the C1 core components.
The Left-Hand Menu
Dashboard: Displays consolidated, 'at-a-glance' statistical summary of vital information like statuses of managed endpoints, available patches, tickets and more.
Home: Returns you to the Comodo One home page. This page provides access to the service desk, patch management and RMM modules and allows Account Admins to manage MSP Administrators, Staff members and Companies.
Modules: Allows Account Admins, MSP Admins and Staff members to access the modules available in Comodo One. You can also open the modules by clicking the 'Open Module' button from 'Home' screen on the right side of the interface.
• Comodo Service Desk - A fully featured ticket management system which allows enterprises to implement
strong and effective work-flows for internal and customer-facing support departments. The support ticketing management system allows administrators and help desk staff to keep track of tickets raised by users, attend to them, reassign them to appropriate department or organizations, generate reports and more. Refer to the dedicated Service Desk guides for more details.
• Comodo Patch Management – Allows granular control over the deployment of updates to operating systems
and 3rd party applications on network endpoints. Featuring a centralized, easy to use interface, Comodo Patch Manager allows administrators to carry out various functions remotely such as deploy OS updates for both Windows and Linux machines, update 3rd party applications and more. Refer to the dedicated Patch Management
guide for more details.
• Comodo Remote Monitoring and Management – A complete endpoint management solution which combines
endpoint monitoring and alerting with ultra-fast remote desktop sharing, a robust ticketing sub-system, application life-cycle management, process and service management, endpoint security management and custom scripting for automated break-fixing. Refer to the dedicated RMM guide for more details.
• Comodo Device Manager (CDM) - This module is optional and can be added into the Modules section after
creating the Comodo One account. CDM allows administrators to manage, monitor and secure mobile devices and Windows endpoints which connect to customer networks. Once an iOS, Android or Windows device has been enrolled, administrators can quickly apply configuration profiles which determine network access rights, security settings and general preferences. A powerful addition to any MSP toolkit, Device Manager allows you to secure customer data regardless of the device that holds it.
App Store: Displays the Comodo applications that can be added to C1 as modules. Currently only CDM can be added and other apps are 'standalone' and planned to be integrated in the upcoming versions.
added here are automatically added to the Service Desk, RMM and Patch Management modules and be viewed by all MSP Admins when they are in those modules. Module-specific users and administrators can be added under these companies from within each module itself.
Notifications: This section displays the latest news about C1 components. Tip: You can expand or hide the left menu by clicking the button at the top:
1.3
Managing Administrators
The 'Staff' screen allows Account Administrators to add MSP Administrators. Once created, these users will be able to login into C1 at one.comodo.com and will be able to access the service desk, patch management and RMM modules.
To open the 'Staff' screen, click 'Management' on the left side and then 'Staff'
Staff List – Table of Column Descriptions
Column Header Description
Name The name of the administrator or staff member Email The email address of the administrator or staff member
Comodo One - RMM
-Administrator
Guide
both MSP Administrators and staff members.
Account Admin A check marks indicates this is the 'Master' administrator of the Comodo One account. He/she has the privileges to add MSP administrators and staff members for this account.
The interface allows Account Administrators to:
• Add MSP Administrators/Staff
• Edit the details of MSP Administrators/Staff • Remove MSP Administrators/Staff
To add MSP Administrators/Staff
• Click the 'New' button in the 'Staff' interface
The 'Add Staff' form will be displayed
• Select the 'Admin' check box if you want to add an MSP Administrator. Leave it blank if you want to add a staff
member.
• Enter the name of the Administrator or Staff in the 'Name' field.
• Enter the email address of the Administrator or Staff to which the verification email will be sent. • Click the 'Save' button.
A verification email will be sent to the email address. After clicking the verification link in the mail, the recipient will be asked to set a unique password for accessing Comodo One and the individual modules.
To edit the details of MSP Administrators/Staff
• Click the 'Edit' button
• Update the details as required. Please note the email address field cannot be edited. • Click the 'Save' button
Comodo One - RMM
-Administrator
Guide
To delete MSP Administrators or Staff:
• Select the administrator/staff member that you want to remove from the list and click the 'Delete' button:
• Click 'OK' to confirm removal
• Deleted administrators/staff members will no longer be able to access Comodo One or any of its modules.
1.3.1
Admin Privilege Levels
Account Admins, MSP Admins and MSP Staff for Comodo One modules are added and managed via the Comodo ONE web console at one.comodo.com. The following tables summarize the privileges of these user types in the web console itself and each of the individual modules.
Comodo One Web Console
Role
Description
Account Admin The Account Administrator is the top level administrator and can access all areas and functionality of the Comodo One Administrative console and the individual modules.
From the Comodo One web console, the Account Administrator can: • Add and manage companies for the MSP account • Add and manage MSP administrators
• Add and manage MSP staff members
MSP Admin An MSP Administrator has privileges to create new companies and staff members and has all the privileges of staff.
From the Comodo One web console, the MSP Administrator can: • Add and manage companies to the MSP account
Remote Management and Monitoring (RMM)
Role
Privileges
Account Admin • Add endpoints for monitoring and management • Create and apply monitoring policies to endpoints • View alerts for policy violations
• Initiate support sessions and accept support requests from end-users
• Deploy diagnostic and repair tools, run procedures and execute jobs on endpoints • Access endpoint computers through remote desktop connection to correct issues MSP Admin Same privileges as account admin
MSP Staff Same privileges as account admin
Service Desk
Role
Privileges
Account Admin • Access both admin panel and staff panel
• Enroll and manage end-users from different companies • Attend to and manage support tickets from end-users. • Assign and reassign tickets to staff members • Create new tickets on behalf of end users
• Set global prices for attending to different types of devices • View dashboard and system logs
• Configure service desk via the 'settings' interface • Manage help topics, SLA plans, ticket filters and more.
• Create and manage privilege based user groups and assign staff members to them. • Create and manage departments for the MSP and assign staff members to them. • Generate announcements for staff members
• Generate and view reports
• Update knowledgebase articles like FAQ's and canned responses MSP Admin • Same privileges as account admin
MSP Staff • Staff members can access the staff panel but not the admin panel • Enroll and manage end-users from different companies
• Attend to support tickets from end-users • View the dashboard
Comodo One - RMM
-Administrator
Guide
The following privileges are conditional on the privileges of the group to which the staff member belongs:
• Assign and reassign tickets to other staff • Create new tickets on behalf of end users
• Set prices for attending different types of devices for specific company • Update knowledgebase articles like FAQ's and canned responses.
Note: The restriction for staff members from accessing the admin panel is not implemented in this version. The restriction will come to force in the next version.
Patch Management
Role
Privileges
Account Admin • Enroll Endpoints for remotely installing and uninstalling patches and applications • Add tags to endpoints and create groups of endpoints for bulk management • Move endpoints from one company to another
• Upload third party/custom applications for remote installation
• Remotely install recent OS patches and applications on to endpoints and schedule patch/application installation policies
• Remotely restart/shutdown endpoints
• View patch management operations and reports • Configure remote logging and notification settings. MSP Admin • Same privileges as account admin
MSP Staff Same privileges as account admin except:
• Staff members cannot upload third party/custom applications
1.4
Managing Companies
The 'Company' screen allows Account Administrators to add organizations/companies/departments who will use the RMM, Service Desk and Patch Management modules. MSP Administrators and Staff members can attend to the needs of the added organizations.
Company List – Table of Column Descriptions
Column Header Description
Name The name of the company
Contact Email Email address defined for the organization. Address The address of the organization
Postal Code The area postal code of the organization Description Company description
The interface allows Account and MSP Administrators to:
• Add an organization
• Edit the details of an organization • Remove an organization
To add an organization
• Click the 'New' button in the 'Company' interface
Comodo One - RMM
-Administrator
Guide
• Fill the details in the respective fields. • Click the 'Save' button.
• Click 'OK' in the confirmation dialog.
To edit the details of an organization
• Click the 'Edit' button
• Update the details as required. Please note the email address field cannot be edited. • Click the 'Save' button
Comodo One - RMM
-Administrator
Guide
• Click 'OK'
To remove an organization from the list
• Select the organization that you want to remove from the list
• Click the 'Delete' button
• Click' OK' in the confirmation dialog
2 Introduction to Remote Monitoring
and Management Module
Comodo Remote Monitoring and Management (CRMM) grants Managed Service Providers complete visibility and control over the systems they manage. It combines comprehensive endpoint monitoring and alerting with ultra-fast remote desktop sharing, professional services automation (PSA), powerful policy and job creation interfaces, automatic support ticket generation and custom scripting for automated break-fixing. CRMM is the single-pane-of-glass that helps MSPs to improve the efficiency of their workflows and take the quality of service they provide to customers to the next level.
Comodo RMM setup and management involves three components - the web interface, the admin console and the endpoint agent.
• The web Interface is for user management and can be accessed by logging in at one.comodo.com then opening the
RMM module.
The admin console is the chief management software and is used to monitor endpoints, define policies and configure/respond to endpoint alerts. The console should be installed on a local workstation or server and can be downloaded from the RMM web interface. Alternatively, you can also use a portable version of RMM console that doesn't require any installation.
• An RMM agent must be installed on each endpoint so that it may report to the admin console. The agent can be
downloaded from the RMM admin console or the web interface: To download and provision agents from the admin console:
• Log into the admin console software with your Comodo One username and password • Make sure 'Devices' is selected in the drop-down menu at top-left
Comodo One - RMM
-Administrator
Guide
• Select a company and site under which the endpoints will be managed
• The 'Enrollment Method' section allows you to generate download links for the endpoint agents. You can provision the
agent to your endpoints in one of four ways:
• Create an enrollment link from which user can download the agent • Email endpoint users with an agent download link
• Create an enrollment code so your users can download the agent from www.joincomodo.com • Obtain agent download links which can be passed to users
Note: The agent downloaded from the 'RMM msi' tab and installed on endpoints will report to RMM Console only, whereas the agent downloaded from the other three tabs will report to both RMM Console and Patch Management interface.
▪ After the agent has been installed the endpoint can be managed from the admin console. To download and provision agents from the web interface
• Log into the C1 web interface interface with your username and password • Click 'RMM' from the 'Modules' section
By default the 'Devices' screen will be displayed:
• Select a company and site under which the endpoints will be managed
The agent downloaded from the first download button, when installed on endpoints will report to RMM admin console only whereas the agent downloaded from the second download button and installed on endpoints will connect to both RMM and Patch Management consoles.
• Download and save the required agent by clicking the respective download button
After the agent has been installed the endpoint can be managed from the admin console.
RMM Features and Benefits
• Up-to-the-second inventory of all managed devices in a single console • Easily configure endpoint security policies using the intuitive policies interface
• Receive instant alerts and automatically create a service desk ticket if an endpoint falls out of compliance with its
policy
• Panoramic, real time information allows you to make better, more informed decisions
• Multiple plug-ins allow you to observe running processes, services, active connections, auto-run applications, browser
extensions, system restore points and more
• Ability to run system and registry clean operations with a single click • Easily transfer files between your computer and endpoint machines
• Built-in RDP software allows you to access client machines directly from the management console • Run commands in multiple interpreter languages
Comodo One - RMM
-Administrator
Guide
• Advanced Procedure Wizard allows you to create and run commands in sequential order • Remotely restart and shutdown endpoints with the integrated power manager
• Agent runs as a service, the endpoint need not be logged in
• Patent pending rescue option allows administrators to restart endpoints in rescue mode
Guide Structure
This guide is intended to take you through the configuration and use of Comodo RMM and is broken down into the following main sections. The guide can be navigated using the bookmark links on the left.
• Introduction to Remote Monitoring and Management Module • Quick Start Guide
• System Requirements • The RMM Web Interface
• Viewing Devices
• Viewing Admins and Roles
• Managing Notifications and Agent Settings • Downloading RMM Administrative Console • Installing RMM Administrative Console
• Logging-in to the RMM Administrative Console • The RMM Administrative Console
• The Devices Interface • Managing Sites • Managing Devices • Applying Policies • Running Procedures • The Sessions Interface
• Managing Bulk Sessions
• Support Sessions Interface – An Overview • Handling Support Sessions
• The Jobs Interface • Managing Jobs
• Executing Jobs on Endpoints • The Procedures Interface
• Managing Procedures
• Running Procedures on Endpoints • The Policies Interface
• Managing Policies • The Alerts Interface
• Appendix – Issue Codes for Monitors
2.1
Quick Start Guide
This tutorial briefly explains how an admin can setup Comodo Remote Monitoring and Management (RMM).
Comodo RMM setup and management involves three components - the web interface, the admin console and the endpoint client software.
• The RMM web Interface is for user management and can be accessed by logging in at one.comodo.com then opening
• RMM client software must be installed on each endpoint so that it may report to the admin console. To download and
provision agents from the admin console:
• Client software download links can be obtained from the 'Enrollment Method' section of the 'Add Device'
Comodo One - RMM
-Administrator
Guide
• After the client software has been installed, the endpoint can be managed from the endpoint console.
The guide will take you through the following processes - click on any link to go straight to that section as per your current requirements.
• Step 1 - Activate your Admin account
• Step 2 - Login to RMM web console and download technician console • Step 3 - Install Technician Console
• Step 4 - Login to Technician Console • Add and manage devices • Create procedures • Create and execute jobs
• Create and apply monitoring policies • View Alerts
• Handle support sessions • The Support Sessions Interface
• Have a chat interaction with the End-user • Execute pre-defined actions on the endpoint
• Access the Endpoint through Remote Desktop Connection • Run a procedure
Step 1 - Activate your Admin account
• Click the validation link in the email to activate your admin account.
You will be taken to the password setting page of RMM.
• Enter a password of your choice and re-enter it for confirmation • Click 'Set'
Note: Set a secure password with a combination of upper and lower case characters, numbers and special characters, so that it could not be easily guessed. Your password should contain at least one uppercase character, one lower case character, one numeral and one special character.
Your password will be set and will be automatically logged into C1 web console.
Step 2 - Login to RMM web console and download technician console
You can access the RMM web console by logging in at one.comodo.com and clicking Open Module' in the RMM tile. Alternatively you can login to the RMM web console directly at https://manage.comodo.com.
Comodo One - RMM
-Administrator
Guide
• Enter your email address as your username, enter your password and click 'Login'. The RMM web console will open.
• The setup file is available for 32-bit and 64-bit versions of Windows as well as a portable version, which does not
• Follow the wizard and complete the installation.
Note: To run the portable version, just double click on the file.
Step 4 - Login to Technician Console
On successful completion of the installation, the console will open. Also, you can open the console manually by clicking the
Technician Console desktop icon or by clicking 'Start' > 'All Programs' > 'COMODO' > 'RMM Administration Console' > 'RMM Administration Console' from the Windows Start menu.
Comodo One - RMM
-Administrator
Guide
• Enter your username (email address) and password in the respective text fields and click 'SIGN IN'.
• Procedures – Lists all procedures available for deployment to endpoints. Procedures
can be run directly on endpoints and/or can be used to create jobs to be executed on selected endpoints. You can create new procedures from this interface.
• Policies – Displays active monitoring policies which have been deployed to endpoints. Alerts are generated if a policy
is violated. You can view all policies, create new policies and deploy policies to endpoints by clicking the 'Policy Manager' button at the bottom of the interface.
• Alerts – Displays alerts generated when applied policies on endpoints are breached and allows you to run a
procedure.
Add and Manage Devices
RMM requires client software to be installed on each endpoint in order to deploy monitoring policies, receive alerts, execute jobs/procedures and for the technician to provide support through a support chat session. While enrolling a new device, the admin can instruct the end-user to download and install the client after authenticating them to RMM.
• Open the Devices interface by choosing Devices from the drop-down at the top left. The list of endpoints enrolled for
monitoring and management is displayed. To add new endpoints
Comodo One - RMM
-Administrator
Guide
The 'Add a device' dialog will open.
• Select company – Choose the company to which the endpoint belongs.
• Select site - Choose the site at which the endpoint is located. If you are adding a device at a new site, click
ADD SITE and create the new site
• OS name – Choose the operating system of the endpoint added
• Device type – Choose whether the endpoint is a workstation (PC) or a server. If you are not sure, choose
'Auto-detect'
• Description - Enter a short description of the device • Choose the 'Enrollment Type' by clicking on the respective tab
Note: 'Comodo One', 'Email' and 'Code' tabs allow you to download the installer with options to install 'Patch Management' agent also along with the RMM agent.
• Enrollment Link – Clicking 'Comodo ONE' will generate an enrollment link. Visiting the link will allow your
customer to download and install the agent. If installation is successful, the endpoint will appear in the devices list under the selected company and site and in Patch Management console if opted to install PM agent also.
• RMM Agent only - Clicking 'RMM msi' will generate an enrollment link that is used to download RMM agent
only. The standalone RMM installer is useful if you plan to enroll endpoints in bulk using Active Directory via Group Policy Object method. Refer to the page at https://help.comodo.com/topic-289-1-723-8726-RMM---Bulk-Enrollment-via-Active-Directory.html for more details about enrolling endpoints via AD.
• Email – Enter the email address of an end-user whose endpoint you wish manage. RMM will send an email
• Click 'CLOSE' to add the device.
Repeat the process to add more devices. You will be able to apply monitoring policies, view alerts and manage endpoints after the client software has been installed on the endpoint.
Create Procedures
A 'Procedure' is a set of actions to be run on an endpoint. You can select a series of actions with defined parameters, to be performed in sequence while creating a procedure. The procedure can be run ad-hoc on any endpoint and can also be used while creating a job to be executed on specific endpoint(s).
• Choose 'Procedures' from the drop-down at the top left . A list of available procedures will be displayed.
To create a new procedure
• Click 'Create' from the bottom
The 'Crete a new procedure' dialog will open.
• Enter a name and a short description in the respective fields and choose the operating system from the drop-down at
the left.
Comodo One - RMM
-Administrator
Guide
Action Parameters Required
Application Installer Enter the following parameters:
• Download URL for the application
• Name of the setup file and command line parameters • Command for canceling installation for failsafe reasons
Power Manager Choose the power control operation from:
• Restart
• Restart in safe mode • Shutdown
• Restart in rescue mode
System Restore Choose whether to create a restore point or to restore the system to a previous state.
• Enter the name of the restore point
Shell Execute Basic
• Enter the execution command for the process • Enter the parameters to be passed to the process
Advanced
• Enter the working directory for the process • Choose the execution options:
• Wait for process to finish – Completes the process before termination • Hide Window – Executes the process at the background
File Transfer Enter the path of the source file to be copied from the host computer at which the technician console is installed. The file will be copied to the folder c:\lps-temp\file-transfer at the endpoint. System Cleaner Select the cleaner modules to be applied:
• Disk Cleaner • Registry Cleaner
• Repeat the process to add more actions to the procedure. Upon running the procedure, the actions will be executed in
order.
• Click 'SAVE' to save your procedure.
The 'Procedure' will be added to the list and will be available for inclusion in a job created for a specific endpoint. The procedure can also be run ad-hoc on any desired endpoint.
• Repeat the process to add more procedures as required.
Tip: You can create new procedures using an existing procedure as a template. To create a new procedure, select an existing procedure and click 'Create From' from the bottom. The 'Create a new procedure' dialog will open with the actions pertaining to the existing procedure preselected. You can edit the parameters to create a new procedure.
To run a procedure
• Click 'Run Procedure' from the bottom
• Choose the procedure to be run from the drop-down at the top
• Select the endpoints on which the procedure is to be run and click 'RUN PROCEDURES'
A Job will be automatically created for running the selected procedure and will be executed.
Create and Execute Jobs
A Job is a collection of procedures compiled to run on selected endpoints. You can create new jobs by including the existing procedures and selecting the endpoints for execution.
• To open the Jobs interface, choose Jobs from the drop-down at the top left. The Jobs interface displays the jobs
created and executed by all admins belonging to your MSP. To create a new job
Comodo One - RMM
-Administrator
Guide
All jobs created so far will be displayed.
• Click 'CREATE' from the top of the 'Job Manager' dialog.
• Select the procedures to be run as per the job.
Tip:You can add new procedures from this interface too by clicking 'NEW' from the top of the interface. Refer to the previous section 'Create Procedures' for more details.
• Click 'Next'
Step 3 – Select Target Endpoints
Comodo One - RMM
-Administrator
Guide
• Click 'FINISH'
The job will be added to the list of created jobs in the Job Manager interface and will be available for execution at any time. To execute a saved job
• Open the 'Job Manager' interface by clicking 'Job Manager' from the task bar of the Jobs interface • Choose the job(s) to be executed
• Click 'RUN' from the title bar of the Job Manager interface.
Create and Apply Monitoring Policies
RMM monitors enrolled endpoints based on the policies applied to them You can create policies to monitor various system events, and define whether alerts and/or service desks tickets are created if an endpoint violates the policy. Alerts can be viewed from the 'Alerts' interface. Admins can remediate the issues by running jobs or procedures on the endpoint or by initiating a support session with the end-user.
• To open the 'Policies' interface, choose 'Policies' from the drop-down at the top left. The interface displays which policy
is in effect on an endpoint and whether or not the endpoint is compliant with its policy. New policies can be created by clicking the 'Create' button at the bottom of the interface.
To create a new policy
• Click 'Create' from the bottom of the interface
Comodo One - RMM
-Administrator
Guide
• Enter a name and a short description for the policy in the respective fields • Choose the monitoring module from the left.
The parameters pane for the chosen module will open on the right.
• Specify the conditions and thresholds of the rule in the right pane. Your rules are automatically saved as you go along,
so you can freely select other modules on the left if you wish to add more rules to the policy.
Tip: You can add any number of conditions for a particular rule by clicking the '+' button at the right. To remove a condition, click the 'X' button to the right.
• Add more modules to the policy by selecting them on the left.
A green check-mark is shown next to modules which are included in the current policy.
• Click 'Create' to save your policy.
The policy will be added to the list in the 'Policy Manager' interface and will be available for application to desired endpoints at any time.
To apply a policy to endpoints
Policies can be applied from the 'Devices' and 'Policies' interfaces.
• Click 'Apply Policy' from either of these interfaces
• Select the policy you wish to apply from the drop-down at the top
• Choose the endpoints to which the policy should be applied and click 'Apply Policy'.
Comodo One - RMM
-Administrator
Guide
Tip: Clicking the arrow at the right of a policy name displays the policy's rules.
An alert will be generated and service desk ticket created if any of the monitored parameters exceed the thresholds set by the policy. You can view the alert from the Alerts interface.
View Alerts
RMM generates alerts in the event of a policy violation by a monitored endpoint. If required, you may also configure that a ticket is created in Service Desk.
• To view the alerts interface, choose 'Alerts' from the drop-down at the top left.
The 'Alerts' interface displays the alerts generated so far and allows you to take measures by running appropriate procedures/jobs or by accessing the endpoint through Remote Desktop session.
Alerts raised by each policy are grouped together.
• Clicking on the button beside the issue code code displays a list of endpoints on which the alert was generated.
Depending on the nature of the issue reported by the alert, you can resolve the issue by:
• Running procedures; • Executing jobs;
Or
• Initiate a support sessions and take remote access of the endpoint(s).
Once the issue has been resolved, you can remove the entry from the list of alerts by selecting the endpoint(s) under the alert and clicking Fix from the bottom of the interface.
Handle Support Sessions
The support session enables you to accept support requests from your customers. By establishing a support session you can:
• Engage in chat sessions with clients to advise on and resolve problems. • Take remote desktop control of the client computer
• Perform actions like cleaning the client's computer, power management, system restore, file transfer, system inventory
audit and so on.
• Run procedures to correct issues identified by policy violation alerts
A chat support session can be initiated in two ways:
• From the technician console. Refer to the section 'Initiating a support session from the technician console' for
more details.
• By accepting a support request from an end-user. Refer to the section Accepting support request from an
end-user for more details.
Initiating a support session from the technician console
If you require to perform a maintenance operation or run procedures you can initiate the session by clicking 'Takeover' from the 'Devices' interface.
• Open the 'Devices' interface by choosing Devices from the drop-down at the top-left
• Click 'Take Over' under 'Action' in the row of the device (endpoint) to which the support session is to be started.
A session will be established.
• Click 'Display' under 'Action' to open the support session interface.
Accepting a support request from an end-user
Note: The chat window at the endpoint will be available only if the feature is enabled. Please refer to 'Agent Settings' in the section 'Managing Notifications and Agent Settings' for details about enabling/disabling the chat window.
An end-user requiring a support from a technician can initiate a support session by opening the RMM client installed on their endpoint, and describing their issue in the chat window that is displayed.
Comodo One - RMM
-Administrator
Guide
Once an end-user starts the support session, the number beside 'Waiting' in the Sessions interface will incremented by one.
You can accept the support request and start the support session from the 'Sessions' window. To accept a support request
• Open the 'Sessions' interface by choosing Sessions from the drop-down at top left. • Click the 'Waiting' tab to view pending session requests.
• Click 'Approach' under 'Action' in the row of the device (endpoint) to which the support session is to be started
A session will be established.
Note: The chat window in the 'Support Sessions Interface' will be available only if the feature is enabled. Please refer to 'Agent Settings' in the section 'Managing Notifications and Agent Settings' for details about enabling/disabling the chat window. Left Hand Side Navigation – The left hand side navigation contains controls and buttons for various tasks like running a procedure, deploying tools on to the endpoint to perform various actions and audits, transfer the support session to other clients and so on.
• END – Concludes the support session and closes the session window for the endpoint.
• TRANSFER – Allows you to transfer the support session to another technician.
• TRANSFER BACK IN QUEUE – Allows you to transfer the support session to the queue under the Sessions interface
and allows any technician to approach and run the session
• RUN PROCEDURE – Allows you to run procedures on the endpoint. You can select procedures from those that are
available in the 'Procedures' interface. Refer to the section Run a Procedure for more details.
• Deploy Tool – Allows you to select tools for performing various tasks such as system cleaning, power management,
system restore and so on. Refer to the section Execute pre-defined actions on the endpoint for more details Main Configuration and Information Area – The main configuration and information area displays the configuration screens for the tools selected from the 'Deploy Tool' drop-down.
Chat Window – Allows you to start a support chat with the user. Refer to the section Have a chat interaction with the
Comodo One - RMM
-Administrator
Guide
• Have a chat interaction with the End-user • Execute pre-defined actions on the endpoint
• Access the Endpoint through Remote Desktop Connection • Run a Procedure
Chatting with End-users
The chat window at the right of the session window allows you to communicate with the user to discuss the problem. You can also request permission to execute remote fixes or to access the endpoint through remote desktop connection.
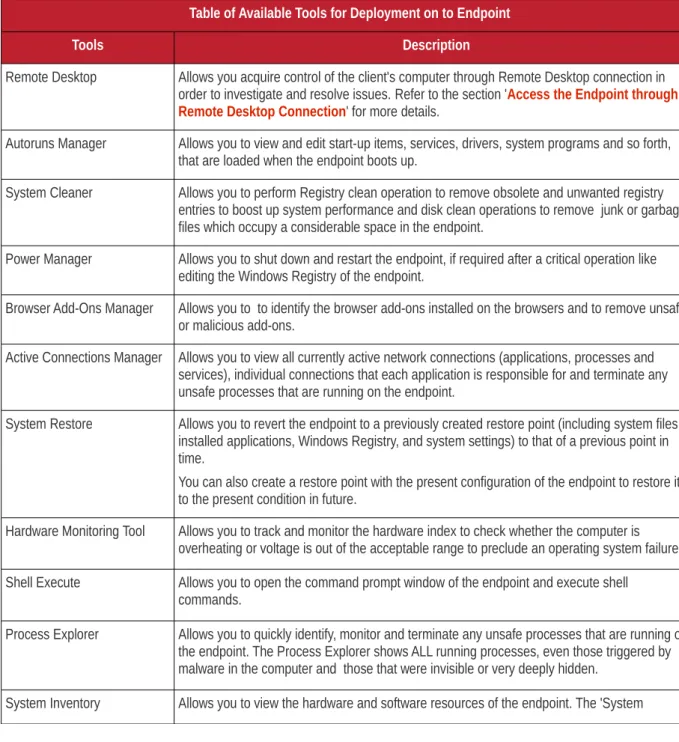
Table of Available Tools for Deployment on to Endpoint
Tools Description
Remote Desktop Allows you acquire control of the client's computer through Remote Desktop connection in order to investigate and resolve issues. Refer to the section 'Access the Endpoint through Remote Desktop Connection' for more details.
Autoruns Manager Allows you to view and edit start-up items, services, drivers, system programs and so forth, that are loaded when the endpoint boots up.
System Cleaner Allows you to perform Registry clean operation to remove obsolete and unwanted registry entries to boost up system performance and disk clean operations to remove junk or garbage files which occupy a considerable space in the endpoint.
Power Manager Allows you to shut down and restart the endpoint, if required after a critical operation like editing the Windows Registry of the endpoint.
Browser Add-Ons Manager Allows you to to identify the browser add-ons installed on the browsers and to remove unsafe or malicious add-ons.
Active Connections Manager Allows you to view all currently active network connections (applications, processes and services), individual connections that each application is responsible for and terminate any unsafe processes that are running on the endpoint.
System Restore Allows you to revert the endpoint to a previously created restore point (including system files, installed applications, Windows Registry, and system settings) to that of a previous point in time.
You can also create a restore point with the present configuration of the endpoint to restore it to the present condition in future.
Hardware Monitoring Tool Allows you to track and monitor the hardware index to check whether the computer is overheating or voltage is out of the acceptable range to preclude an operating system failure. Shell Execute Allows you to open the command prompt window of the endpoint and execute shell
commands.
Process Explorer Allows you to quickly identify, monitor and terminate any unsafe processes that are running on the endpoint. The Process Explorer shows ALL running processes, even those triggered by malware in the computer and those that were invisible or very deeply hidden.
Comodo One - RMM
-Administrator
Guide
Inventory' audit provides a valuable information for determining compatibility of the hardware with the operating systems, and identifying any changes to a system that might develop problems.
File Transfer Allows you to transfer any file between the your computer and the endpoint.
Access Endpoints through Remote Desktop Connection
RMM allows you to gain remote desktop access to the endpoint and execute necessary actions to solve issues. During the time the you are working with the endpoint, the end-user can view the actions taken by you and can operate the computer simultaneously. If the end-user wishes, he/she can even terminate the desktop connection by clicking Disconnect from the client chat window.
Note: The chat window on the endpoint will be available only if configured. Please refer to 'Agent Settings' in the section 'Managing Notifications and Agent Settings' for details about enabling/disabling the chat window.
To initiate a remote desktop connection
• Enter a message in the chat window to request remote desktop access • Choose Remote Desktop from the Deploy Tool drop-down at the left
The desktop of the endpoint will open in a new 'Remote Desktop' tab in the main
configuration area. During the session you will be able to continue the conversation over the chat window.
If required, the end-user can terminate the remote desktop connection by clicking the 'Disconnect' button at the top of the chat window..
Run Procedures
You can also execute pre-defined procedures on the endpoint from the support session interface. To run a procedure
A new Run Procedure tab will open in the main configuration area. The Select Procedure drop-down will display the pre-configured procedures which are available at the 'Procedures' interface. For more details on creating and managing procedures, refer to the section Create Procedures.
• Choose the procedure to be run at the endpoint from the 'Select procedure' drop-down.
The sequence of actions contained in the chosen procedure will be displayed in the list at the right.
• Repeat the process to add more procedures by clicking the '+' button at the right end • Click 'Execute'.
A job will be created with the list of selected procedures for the endpoint and will be executed.
2.2
System Requirements
The list below shows supported operating systems and hardware requirements for endpoints running the RMM agent. Supported Operating Systems
• Microsoft Windows client family • Windows XP (32 bit)
• Windows Vista (32 bit and 64 bit) • Windows 7 (32 bit and 64 bit) • Windows 8 (32 bit and 64 bit) • Microsoft Windows Server family
• Windows 2003 Server (SP2 or higher) x86 and x64 editions • Windows 2003 Small Business Server
• Windows 2003 Small Business Server R2
Comodo One - RMM
-Administrator
Guide
• Windows 2008 Server R2
• Windows 2011 Small Business Server • Windows 2012 Server
Minimum Hardware Requirement
• Disk space – 100 MB • Memory – 100 MB
• Processor – Single core 1.8 GHz or better
3 The RMM Web Interface
Comodo RMM has two main interfaces, the 'Web Interface' and the 'Administrative Console', that are used for operating the application. The 'Web Interface', which can be opened after logging-in to Comodo One is used for viewing admin users and their roles. You can also download the 'Admin Console', either portable or install versions which is used for monitoring customers' endpoints. Refer to the section 'The RMM Administrative Console' for more details about the admin console. The 'Notification' feature in the 'Web Interface' allows to configure the pop-up notifications on enrolled customers' endpoints for various actions such as remote session and more.
To open the RMM web interface, first log into C1, then click 'RMM' under 'Modules' on the left. By default, the 'Devices' screen will be displayed:
Refer to the following sections for more details:
• Viewing and Adding Devices • Viewing Admins and Roles • Viewing Polices
• Viewing Alerts
• Managing Notifications and Agent Settings • Downloading RMM Administrative Console
To view the details of enrolled devices, click 'Devices' on the left
The 'Devices' screen will be displayed and by default it will be in 'Tree View' You can switch to list view by clicking the 'Tree View' link at the bottom.
Devices – Table of Column Descriptions
Column Header Description
Host Name The name of the endpoint. In tree view, the endpoints will be displayed below the name of the company and the site in which they are located.
Comodo One - RMM
-Administrator
Guide
Site The location of the endpoint. Refer to the section 'Managing Sites' for more details.
Company The name of the company under which the endpoint was enrolled. Refer to the section 'Managing Companies' for more details.
Device Type The type of device, whether it is a 'Workstation' or a 'Server' Operating System The installed operating system on the device
Status Indicates whether the device is connected to the RMM admin console or not. You can view the full details of a device in the 'Details' pane by clicking on it either in list view or tree view.
The endpoint's details such as its operating system, its external and internal IP and more will be displayed in the 'Device Info' section. The 'System Inventory' tab displays the hardware and software details and the 'Sessions' tab displays the details of the sessions of the selected endpoint.
To close the 'Details' pane, click on the endpoint row again or the button at the top right. Device Info
The 'Device Info' section will display the details of device information such as name of the device, where it is located, when it was enrolled to RMM and more
• Click on an item to expand and view its details. Click again to collapse the section.
Sessions
The 'Sessions' section will display the details of the sessions between the admin and the user, such as the date, start and end time of the session.
• Click on the 'Sessions' tab
• Click on an item to expand and view its details. You can view the 'Job Logs' and 'Chat Log' under 'Intervention', which
displays tools deployed and the details of the chat between the admin and user during the session. Click again to collapse the section.
To close the 'Details' section, click on the endpoint row again or the button at the top right.
Adding Devices from the Web Interface
Comodo One - RMM
-Administrator
Guide
can add devices from the RMM admin console also. Refer to the section 'Adding Devices for Managing and Monitoring' for more details.
To download agent from the web interface
• Click 'Add device(s)' button at the top of the 'Devices' screen
• Select company: Choose the company for which you want to enroll a device.
• Select site: Choose the location where the device is available for enrollment. This will be auto-populated with the
locations added for a company. Refer to the sections 'Managing Companies' and 'Managing Sites' for more details.
• Download Agent: The agent downloaded from the first download button, when installed on endpoints will report to
RMM admin console only whereas the agent downloaded from the second download button and installed on endpoints will connect to both RMM and Patch Management consoles.
• Download and save the required agent by clicking the respective download button
After the agent has been installed, the endpoint can be managed from the admin console.
3.2
Viewing Admin Details
The 'Admins' screen provides the details of the administrators added for the account such as their username, full name, whether they are logged in to the RMM admin console or not. The administrators and staff members can be added in the C1 web interface only. Refer to the section 'Managing Administrators' for more details.
The 'Admins' details screen will be displayed on the right.
Admins – Table of Column Descriptions
Column Header Description
Username The email address provided during adding the administrator is the username for logging-in to RMM web interface
Alias The alias email address of the administrator
Email The email address provided during adding the administrator for the account Full name The name of the administrator
Role The role of the administrator. The privileges depends on the role assigned. Refer to the section 'Admin Privilege Levels' for more details about privileges for different roles.
Status Indicates whether the administrator is signed in to RMM admin console. 'Disconnected' indicates the admin has not logged-in to the RMM admin console at least once after his/her addition.
Last connected Indicates the administrator’s last login date and time to RMM admin console
Locked Indicates whether the administrator is enabled to access RMM admin console and web interface
• Click 'Previous page' and 'Next page' at the bottom to navigate to different pages.
3.3
Viewing Polices
The 'Policies' section in the RMM web interface provides the details of polices created by admins and to the number of endpoints the policies to which they are applied. The polices can be created by admins from the RMM admin console. Refer to the section 'Managing Policies' for more details.
Comodo One - RMM
-Administrator
Guide
Template Policies – Table of Column Descriptions
Column Header Description
Policy name The name of policy created by the administrator Description The description provided while creating the policy Creator The username of the administrator who created the policy
Global Indicates whether it is a global policy that can be used all admins. This feature will be available in the next version.
You can view the details of a policy in the 'Details' pane by clicking on it anywhere on the row. The details pane will slide out from the right side.
The name of the monitor and the conditions for the rules configured for the monitoring module will be displayed in the slide out pane. For more details about how to create a policy refer to the section ''Managing Policies'.
• To close the 'Details' section, click on the policy row again or the button at the top right.
To view the details of applied polices, click 'Applied Policies' under 'Polices' on the left
Applied Policies – Table of Column Descriptions
Column Header Description
Monitor The name of the policy
Description The description provided while creating the policy
Endpoints Indicates the number of devices to which the the policy is applied Status Indicates whether the applied policy is violated or not
Comodo One - RMM
-Administrator
Guide
• Alarm – Policy is breached and an alert generated. A service desk ticket is also
automatically created in the Service Desk module.
You can view the details of endpoints to which the policy is applied by clicking on it anywhere on the row. The details pane will also slide out from the right side.
• Click on the applied policy again to close the endpoint details row.
3.4
Viewing Alerts
RMM generates alerts in the event of a policy violation by a monitored endpoint and displays them in the RMM admin console as well as in the web interface.
Monitor The name of the monitoring module
Alerts Count The total number of alerts of that type for that policy
You can view the details of endpoints, name of the company and site and the alert status by clicking on it anywhere on the row.
• Click on the description of the policy to view the company, site, endpoint name and status details. • Click on the alert row again to close the details section.
3.5
Managing Notifications and Agent Settings
The notifications configured in this interface will be shown on endpoint machines when various actions or events are initiated from the RMM admin console. This includes items such as when a remote session starts or finishes, what a chat session is initiated or when actions are performed on the endpoint. The agent component settings done here determine whether to display the main chat window, RMM desktop and tray icons on endpoints.
Notifications and agent component settings are configured on a per-organization basis so they cover all its endpoints (your organizations are listed on the left). The top row allows you to configure ‘Global’ settings per notification and agent setting type. ‘Inherited’ means that the organization will use the global setting configured in the top row.
Important Note: This feature is not enabled for the current version and will be active in the next version. Click the following links for more details on each setting
• Notification Settings • Agent Settings
Notification Settings
Comodo One - RMM
-Administrator
Guide
Notifications Table
Event Description
Go To Tray It shows a notification when the chat window is closed In Session The notification will be displayed whenever a session is started
Chat The notification will be displayed when admin initiates a chat with the endpoint Unattended Every Time The notification will be displayed whenever an endpoint's chat window is minimized Action Performed Any action performed by the administrator on an endpoint such as running a procedure Session Ended The notification will be displayed whenever the session is ended
Remote Remote connection of an endpoint is initiated
Unattended First Time The notification will be displayed whenever the RMM agent is started first time on an endpoint
Agent Settings
Agent Component Options Table
Component Description
Main View Determines whether to show or hide the main chat window on the endpoint Desktop Icon Determines whether to show or hide the RMM agent desktop icon on the endpoint Tray Icon Determines whether to show or hide the RMM tray icon on the endpoint
3.6
Downloading RMM Administrative Console
The RMM Administrative Console is the chief management software and is used to monitor endpoints, define policies and configure/respond to endpoint alerts. The console is available in two formats – installable version that should be installed on a local workstation or server and a portable version that doesn't require any installation. Refer to the section 'System
Requirements' to know about the software and hardware requirements. The admin console can be downloaded from the RMM web interface and is available for both 32 and 64 versions of Windows OS.
Comodo One - RMM
-Administrator
Guide
• Click on the Windows version that you want to download
• Click the 'Save File' button
The admin console package will be downloaded to your default download location. Refer to the next section 'Installing RMM Administrative Console' to know how to install it on a workstation or a server. The portable version can be executed by double clicking on the file.
4 Installing RMM Administrative
Console
• Click 'Next' to continue.
Step 2: End User License Agreement
Comodo One - RMM
-Administrator
Guide
• Click 'I Agree' to continue installation. If you want to cancel the installation, click 'Cancel'.
Step 3: Ready to Install
The next stage is confirmation of the installation settings.
The program will be installed in the default location C:\Program Files\Comodo\RMM Administration Console
Step 5: Finalizing the Installation
Comodo One - RMM
-Administrator
Guide
On completion, the login dialog will open. Refer to the next section 'Logging-in to the RMM Administrative Console' for more details.
4.1
Logging-in to the RMM Administrative Console
After installation, the RMM Administrative Console can be started from the Windows Desktop or from the Start menu. Start Menu• Click 'Start' and select All Programs > Comodo > RMM Administration Console
Windows Desktop
• Just double click the RMM icon in the desktop to start RMM Administrative console
• Enter the Comodo One credentials or that was reset by you on clicking the verification link in the 'Admin Verification'
email.
• If you are using the portable version, just double click on the file and enter the Comodo One credentials.
On successful verification, the RMM Administration Console will be displayed.
5 The RMM Administrative Console
The Administrative Console is the nerve center of Comodo Remote Monitoring and Management (CRMM), allowing administrators to add devices, create policies, automatically run procedures and more on monitored computers.
Comodo One - RMM
-Administrator
Guide
The console consists of the following main areas that can be selected from the drop-down menu near the top left – 'Devices', 'Sessions', 'Jobs', 'Procedures', 'Policies' and 'Alerts'.
Main Functional Areas
• Devices – View, manage and add devices for monitoring. You can also add
and manage sites, run procedures and apply configured policies on endpoints.
• Sessions – View the endpoints that are connected to the agent, run
procedures and deploy tools such as 'Issue Tracker, System Restore and more.
• Jobs – View the jobs that are completed, started and in progress. You can
also stop the job from this interface.
• Procedures – Create procedures from a set of predefined actions such as
'System Restore', 'File Transfer', 'Shell Execute' and run them on endpoints
• Policies – Create policies and deploy them onto endpoints so as to generate
alerts if policies are violated.
• Alerts – View the generated alerts, run a fix or run procedures on affected
endpoints. Notification Icon
The notification icon at the top right of the interface blinks to alert the admin when an endpoint in session is disconnected or reconnected.
The messages that are in bold indicate that they are not read.
• Click the 'Mark as read' link below the message window after viewing the messages • Click the 'Clear' link to remove the messages from the window.
• Click on the notification icon again to close the message window.
About
Opens the 'About' dialog of RMM admin console that contains the version number, copyright information, license information and option to purchase and change the license key.
Comodo One - RMM
-Administrator
Guide
Help
Opens the online help guide main page. The RMM admin help guide contains detailed explanations of the functionality and usage of the application.
6 The Devices Interface
The 'Devices' screen allows admins to view, add and manage company endpoints which are monitored by the RMM interface. The interface provides address, system and user details about each endpoint and allows administrators to directly apply policies and run procedures.
To open the 'Devices' screen, click 'Devices' from the drop-down at the top left
Devices – Column Description
Column Header Description
Company The name of the company under which the devices are enrolled. Refer to the section 'Managing Devices' for more details.
Site The device's location of a company. Refer to the section 'Managing Sites' for more details. Hostname The name of the enrolled device.
Operating system The operating system of the enrolled device
Device type Indicates whether the device is a workstation or a server Logged user The name of the logged user for the device
Internal IP The IP address of the device inside the internal network External IP The IP address of the device in the external network
Compliant Indicates whether the device is compliant or non-compliant for applied policies. Refer to the section 'Managing Policies' for more details.
Applied policy name Displays the name of the policy applied for the device Description The description provided for the device while adding
Action Indicates whether the device is ready for remote session, in session or not available for remote session
To view the details of endpoints enrolled for companies at different sites under a single column, click the 'Company' header twice.