ViPNet ThinClient 3.3
© 1991–2014 Infotecs Americas. All rights reserved. Version: 00060-07 90 01 ENU
This document is included in the software distribution kit and is subject to the same terms and conditions as the software itself. No part of this publication may be reproduced, published, stored in an electronic database, or transmitted, in any form or by any means — electronic, mechanical, recording, or otherwise — for any purpose, without the prior written consent of Infotecs Americas Inc.
ViPNet® is a registered trademark of Infotecs Americas Inc., New York, USA.
All brands and product names that are trademarks or registered trademarks are the property of their owners.
Global contacts page http://www.vipnet.com/index_all.php
Contents
Introduction ... 5
About This Document ... 6
Audience ... 6
Document Conventions ... 6
Feedback ... 8
Chapter 1. General Information ... 9
ViPNet ThinClient Purpose ... 10
ViPNet ThinClient Hardware Versions ... 11
System Requirements ... 11
Chapter 2. Adding a Terminal Server to Your Network ... 12
Overview ... 13
Checklist: Adapting Your Network for Work with a Terminal Server ... 15
Creating ViPNet ThinClient Hosts in ViPNet Network Manager... 16
Terminal Server Tunneling ... 18
Creating and Saving Key Sets for ViPNet ThinClient Hosts ... 20
Sending Key Set Updates ... 22
Chapter 3. Installing and Upgrading the ViPNet ThinClient Software ... 24
Writing the ViPNet ThinClient Software Image on a USB Drive ... 25
Writing the Software Image for Windows OS ... 25
Writing the Software Image for Linux OS ... 27
Installing the ViPNet ThinClient Software ... 29
Upgrading the ViPNet ThinClient Software ... 30
Chapter 4. Keys and Host Links Installation ... 32
Keys and Host Links Installation Purpose ... 33
Starting and Configuring ViPNet ThinClient ... 38
Starting ViPNet ThinClient Hardware Version 1... 38
Starting ViPNet ThinClient Hardware Version 2... 39
System Time Setup... 39
Configuring a Network Connection ... 40
Appendix A. Glossary ... 42
Appendix B. Index ... 45
ViPNet ThinClient 3.3. Deployment Guide
|
6About This Document
Audience
This document is intended for specialists who install and configure the ViPNet ThinClient software, and who deploy and work with thin clients to organize a secure environment while connecting to a terminal server.
Document Conventions
This document concerns the following conventions:
Table 1: Document conventions
Icon Description
Warning: Indicates an obligatory action or information which may be critical for
continuing user operations.
Note: Indicates a non-obligatory, but desirable action or information which may be
helpful for users.
Tip: Contains additional information.
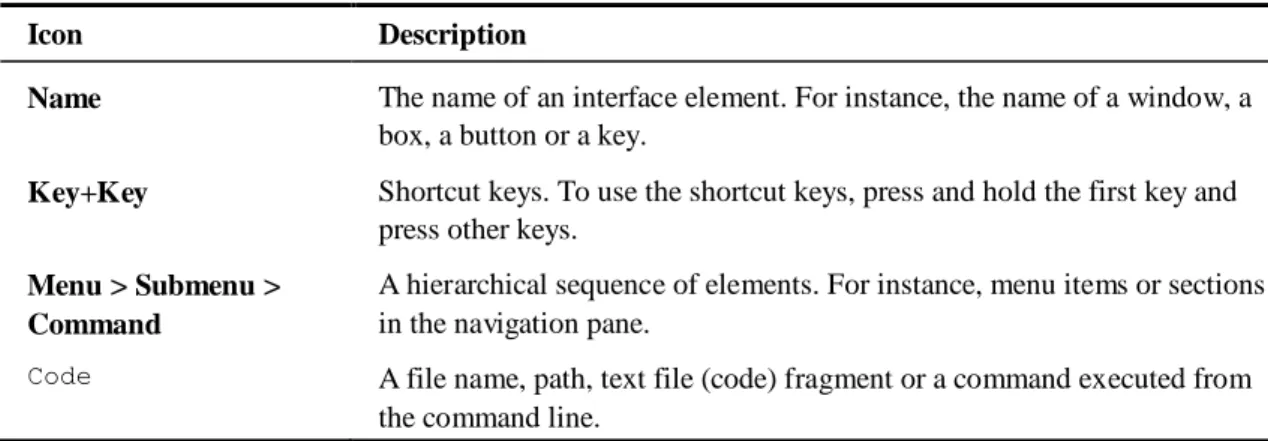
Table 2: Conventions for highlighted information
Icon Description
Name The name of an interface element. For instance, the name of a window, a box, a button or a key.
Key+Key Shortcut keys. To use the shortcut keys, press and hold the first key and
press other keys.
Menu > Submenu > Command
A hierarchical sequence of elements. For instance, menu items or sections in the navigation pane.
Code A file name, path, text file (code) fragment or a command executed from
the command line.
The following conventions are used in this document for commands' description: The commands you can execute only in the administrator mode are rubricated. For
example:
command
The parameters, which should be specified by a user, are enclosed in angle brackets. For example:
command <parameter>
Optional parameters are enclosed in square brackets. For example: command <mandatory parameter> [optional parameter]
If you can specify one of several parameters when typing a command, the available variants are enclosed in curly brackets and divided with a vertical bar. For example: command {variant-1 | variant-2}
ViPNet ThinClient 3.3. Deployment Guide
|
8Feedback
Finding Additional Information
For more information about Infotecs products and technologies, see the following resources: ViPNet documentation web portal http://www.infotecs.us/doc_vipnet/ENU/index.htm. Information about current Infotecs products http://infotecs.us/products/.
Information about Infotecs solutions http://infotecs.us/solutions/. Frequently asked questions
http://www.infotecs.us/doc_vipnet/ENU/index.htm#3_17014.htm.
Contacting Infotecs
We value any feedback from you. If you have any questions concerning Infotecs products and solutions, any suggestions, complains or other feedback, feel free to contact us by means of the following:
Global contacts page http://www.vipnet.com/index_all.php Telephone (Germany): +49 (0) 30 206 43 66 0
Telephone (USA): +1 (646) 589-8571
Errata
Infotecs makes every effort to ensure that there are no errors or misprints in the text of all documents supplied with ViPNet software. However, no one is perfect, and mistakes do occur. If you find an error in one of our documents, like a spelling mistake or some inaccuracy in describing user scenarios or system features, we would be very grateful for your feedback. By sending in errata you may save other reader hours of frustration, and at the same time you will be helping us provide documentation in even higher quality.
General Information
ViPNet ThinClient Purpose 10
ViPNet ThinClient Hardware Versions 11
ViPNet ThinClient 3.3. Deployment Guide
|
10ViPNet ThinClient Purpose
The ViPNet ThinClient software functions as a terminal server's thin client (on page 43) and is designed for creating a secure client environment. ViPNet ThinClient allows you to organize secure access to a remote desktop on a Windows Server 2003/2008 terminal server (on page 43) (over the RDP protocol) or a Citrix XenApp terminal server (over the ICA protocol), as well as to Citrix XenApp published applications (over the ICA and HTTP protocols), web services (over HTTP and HTTPS), and VMware Horizon View virtual desktops (over RDP and PCoIP). The advantages of working in the thin client mode are lower software and hardware expenses, system administration time saving, and enhancing protection against malicious users on an internal network.
In terms of the ViPNet technology, ViPNet ThinClient is a ViPNet client that encrypts IP traffic and functions as a personal firewall. A terminal server may work on a ViPNet host or on a host tunneled by a ViPNet coordinator. Therefore, a ViPNet ThinClient host is protected from network attacks and terminal session interruptions.
ViPNet ThinClient Hardware Versions
ViPNet ThinClient is supplied in two hardware versions. These versions differ by a storage medium that is used as a boot drive:1 A USB flash disk.
2 You can install the ViPNet ThinClient software on a nettop. This variant uses an embedded boot drive.
ViPNet ThinClient is running Linux OS. The computer's keyboard and monitor are used as a system console.
System Requirements
We recommend you to use ViPNet ThinClient hardware version 1 on IBM-compatible computers (desktops and laptops) with the following configuration:
Minimum (CPU): Pentium III. Minimum RAM: 2 GB. Minimum disk space: 2 GB.
Network Interfaces: 1 Ethernet 10/100/1000 (Ethernet 10/100). Minimum quantity of USB 2.0 ports: 3.
ViPNet ThinClient 3.3. Deployment Guide
|
12Adding a Terminal Server to
Your Network
Overview 13
Checklist: Adapting Your Network for Work with a Terminal Server 15 Creating ViPNet ThinClient Hosts in ViPNet Network Manager 16
Terminal Server Tunneling 18
Creating and Saving Key Sets for ViPNet ThinClient Hosts 20
Sending Key Set Updates 22
Overview
This chapter provides an example of adding a terminal server (on page 43) with several clients (see Thin client on page 43) to your network. Clients are hosts with installed ViPNet
ThinClient.
The ViPNet ThinClient hosts may be deployed in Ethernet or Wi-Fi networks, or they may access the Internet by using an LTE modem or a 3G modem of a mobile operator like Vodafone.
Note. If you have ViPNet ThinClient hardware version 1, you may start it on any
computer upon loading it from a USB drive with a copy of the ViPNet ThinClient software. For more information, see Starting ViPNet ThinClient Hardware Version 1 (on page 38).
When you create hosts for ViPNet ThinClient, you need to register them on a ViPNet
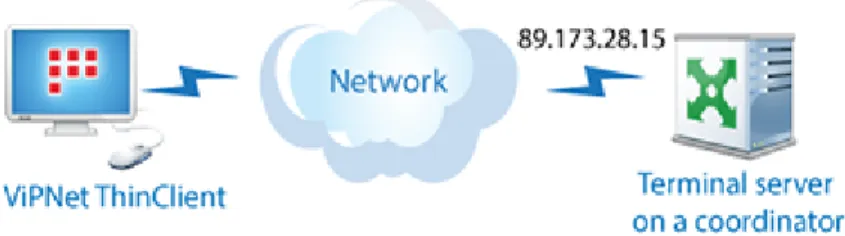
coordinator. The coordinator must be accessible from the Internet by a public IP address or via a firewall with static addresses translation. Sometimes, the coordinator may be a terminal server or it may tunnel the terminal server (see Tunneling on page 43).
If the coordinator is a terminal server, then, in ViPNet ThinClient program options (see Starting and Configuring ViPNet ThinClient on page 38), specify the coordinator's access IP address as the terminal server's IP address (on the scheme below, it is 89.173.28.15).
Figure 1: A terminal server tunneled by a coordinator
If the coordinator tunnels a terminal server or ViPNet ThinClient hosts are registered on another coordinator, then, in ViPNet ThinClient program options, specify the terminal server's real IP address (on the scheme below, it is 10.0.0.2).
ViPNet ThinClient 3.3. Deployment Guide
|
14Checklist: Adapting Your Network for
Work with a Terminal Server
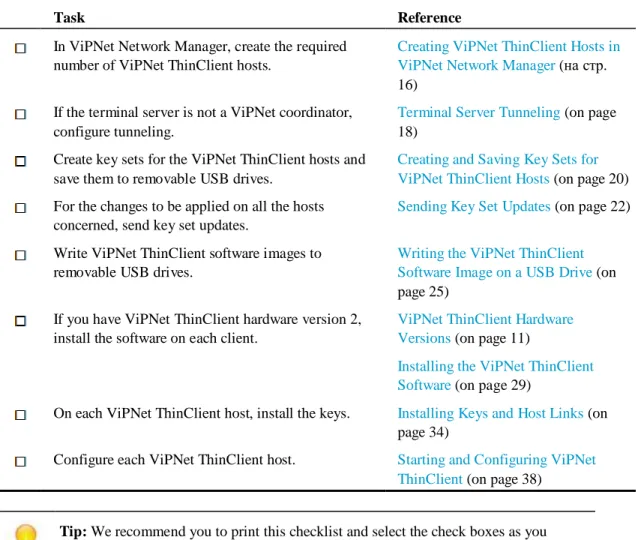
To include ViPNet ThinClient hosts on your network, complete the tasks in the checklist below.
Table 3: Checklist: Adapting your network for work with a terminal server
Task Reference
In ViPNet Network Manager, create the required number of ViPNet ThinClient hosts.
Creating ViPNet ThinClient Hosts in
ViPNet Network Manager (на стр.
16) If the terminal server is not a ViPNet coordinator,
configure tunneling.
Terminal Server Tunneling (on page 18)
Create key sets for the ViPNet ThinClient hosts and save them to removable USB drives.
Creating and Saving Key Sets for
ViPNet ThinClient Hosts (on page 20)
For the changes to be applied on all the hosts concerned, send key set updates.
Sending Key Set Updates (on page 22)
Write ViPNet ThinClient software images to removable USB drives.
Writing the ViPNet ThinClient
Software Image on a USB Drive (on
page 25) If you have ViPNet ThinClient hardware version 2,
install the software on each client.
ViPNet ThinClient Hardware Versions (on page 11)
Installing the ViPNet ThinClient Software (on page 29)
On each ViPNet ThinClient host, install the keys. Installing Keys and Host Links (on page 34)
Configure each ViPNet ThinClient host. Starting and Configuring ViPNet ThinClient (on page 38)
Tip: We recommend you to print this checklist and select the check boxes as you
ViPNet ThinClient 3.3. Deployment Guide
|
16Creating ViPNet ThinClient Hosts in
ViPNet Network Manager
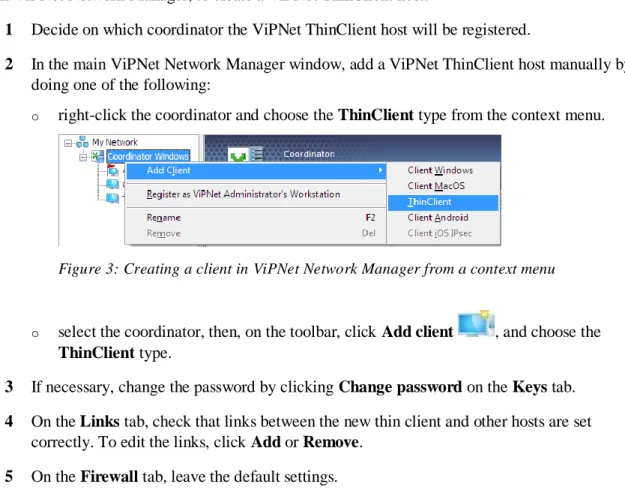
In ViPNet Network Manager, to create a ViPNet ThinClient host:1 Decide on which coordinator the ViPNet ThinClient host will be registered.
2 In the main ViPNet Network Manager window, add a ViPNet ThinClient host manually by doing one of the following:
o right-click the coordinator and choose the ThinClient type from the context menu.
Figure 3: Creating a client in ViPNet Network Manager from a context menu
o select the coordinator, then, on the toolbar, click Add client , and choose the
ThinClient type.
3 If necessary, change the password by clicking Change password on the Keys tab.
4 On the Links tab, check that links between the new thin client and other hosts are set correctly. To edit the links, click Add or Remove.
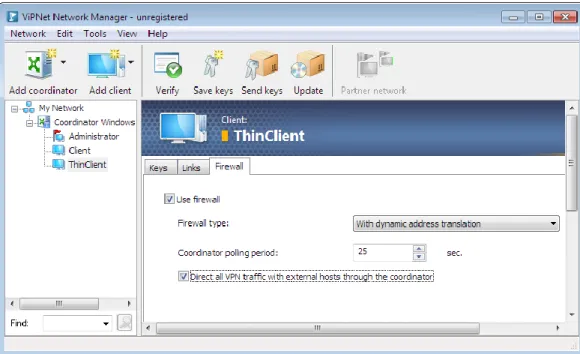
Select the Direct all VPN traffic with external hosts through the coordinator check box, if you want all external connections to be established only through the coordinator. In this case, you get more stable connections in the ViPNet network, though the traffic exchange rate may decrease.
Figure 4: Establishing external connections through the coordinator
The new ViPNet ThinClient host will be added to the navigation pane. You can change the host's name right after its addition.
For more information on ViPNet Network Manager, see the document “ViPNet VPN. User's Guide.”
ViPNet ThinClient 3.3. Deployment Guide
|
18Terminal Server Tunneling
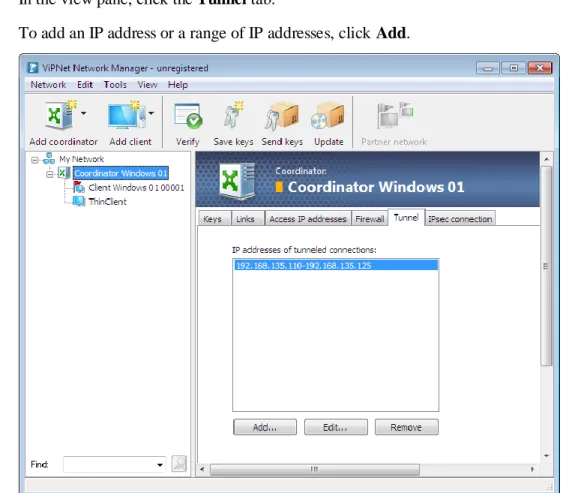
To configure a list of tunneled addresses on a tunneling server:
1 In the navigation pane of the main ViPNet Network Manager window, select the coordinator that will tunnel the terminal server.
2 In the view pane, click the Tunnel tab.
3 To add an IP address or a range of IP addresses, click Add.
Figure 5: Configuring tunneled connections
Note: We recommend you to place hosts that should be tunneled by a coordinator
behind a different network interface of the coordinator or behind a different coordinator. This will make your network more secure and easier to manage.
To ensure correct traffic routing between tunneled hosts and ViPNet hosts:
Tunneled hosts should be placed in the same routed network as the tunneling coordinator. The IP packets you send from tunneled hosts to ViPNet hosts should be passed through the
tunneling coordinator. To do this, do one of the following:
o On the tunneled hosts, specify the tunneling coordinator as the default gateway. o On the tunneled hosts, specify static routes for ViPNet hosts through the tunneling
ViPNet ThinClient 3.3. Deployment Guide
|
20Creating and Saving Key Sets for
ViPNet ThinClient Hosts
To create keys for a newly created ViPNet ThinClient host and to save them on a removable drive:
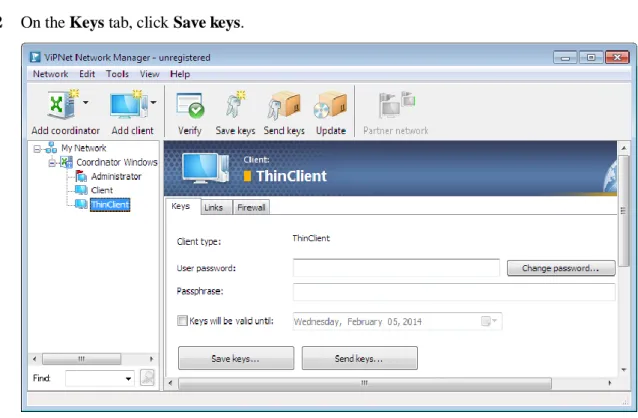
1 In the navigation pane of the main ViPNet Network Manager window, select the ViPNet ThinClient host.
2 On the Keys tab, click Save keys.
Figure 6: Saving keys
Note: The ViPNet Network Configuration Verification window may be displayed. If
conflicting situations are detected, you must solve them. Otherwise, you will not be able to create key sets. If only insufficient data is detected, you can click Skip and continue creating key sets.
3 In the Browse For Folder window, specify the folder you are going to save the key sets to.
4 Upon the key sets have been created, in Windows Explorer, the folder will be opened, where key sets, user and administrator passwords of ViPNet hosts have been saved to. Key sets files have a .dst extension and are stored in folders named after the
corresponding ViPNet hosts. ViPNet user passwords are saved in the ViPNet.txt file. You can view the ViPNet host administrator's password, which is valid for all the hosts on your ViPNet network, in the My Network section, on the Passwords tab.
5 Copy the key sets and user passwords to a removable drive (for example, a CD or a USB flash drive).
ViPNet ThinClient 3.3. Deployment Guide
|
22Sending Key Set Updates
If you have modified the ViPNet network configuration, you need to send the updated key sets to the ViPNet hosts affected by the changes. Before sending updates, make sure ViPNet Client or ViPNet Coordinator is running on the ViPNet network administrator's workstation.
To send key sets updates to ViPNet hosts:
1 Do one of the following:
o On the toolbar, click Send Keys .
o On the Tools menu, click Keys, and then click Send Key Sets.
2 Accept a key set update on the ViPNet network administrator's workstation before sending key set updates to ViPNet hosts. If the key sets updates have not been accepted on the administrator's workstation yet, you will be warned about it.
Figure 7: ViPNet software is not updated when trying to send updated key sets across the network
To accept the updates on the ViPNet network administrator’s workstation, click Continue.
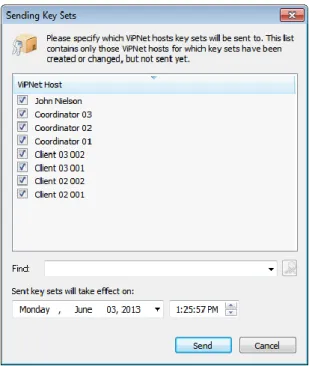
3 In the Sending Key Sets window, make sure that the check boxes, associated with the ViPNet hosts you want to send key set updates to, are selected.
Figure 8: Sending key sets
4 To filter the list, type some of the characters that appear in the required ViPNet hosts’ names in the Find box.
5 If necessary, to postpone receiving of the updates on hosts, in the Sent key sets will take effect on box, specify a certain date and time for accepting the updates on the hosts.
ViPNet ThinClient 3.3. Deployment Guide
|
24Installing and Upgrading the
ViPNet ThinClient Software
Writing the ViPNet ThinClient Software Image on a USB Drive 25Installing the ViPNet ThinClient Software 29
Upgrading the ViPNet ThinClient Software 30
Writing the ViPNet ThinClient Software
Image on a USB Drive
The ViPNet ThinClient software is distributed in two variants:
A file thinclient_vipnet_x.x.usb.img that is a ViPNet ThinClient boot drive image. A file thinclient_vipnet_x.x.img that is a ViPNet ThinClient installation disk image. If you have ViPNet ThinClient hardware version 1 (see ViPNet ThinClient Hardware Versions on page 11), to install the ViPNet ThinClient software, write the boot drive image
thinclient_vipnet_x.x.usb.img to a removable USB drive.
If you have ViPNet ThinClient hardware version 2, to install the ViPNet ThinClient software, do the following:
1 Write the ViPNet ThinClient installation disk image thinclient_vipnet_x.x-xxx.img on a removable USB drive.
2 With the USB drive, install the ViPNet ThinClient software on the computer (see Installing the ViPNet ThinClient Software on page 29).
Writing the Software Image for Windows OS
To write a ViPNet ThinClient software image for Windows OS, use a freeware utility USB Image Tool. The utility does not require installation and runs on Windows XP or Vista OS. You can find the latest USB Image Tool version on its developer's web site http://www.alexpage.de/.
Note: The USB Image Tool utility requires .Net Framework 2.0.
To write the software image on a USB drive:
ViPNet ThinClient 3.3. Deployment Guide
|
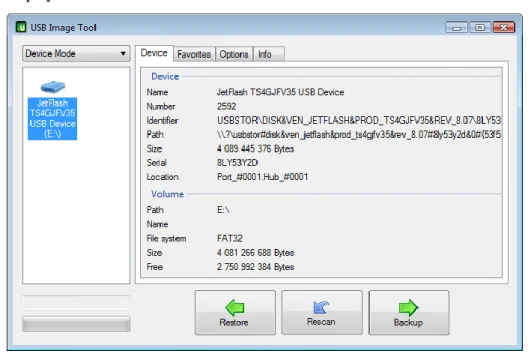
262 Start USB Image Tool. Set the Device Mode. In the navigation pane, available USB drives are listed. In the view pane (on the Device tab), information on the selected device is displayed.
Figure 9: USB Image Tool window
3 In the navigation pane, select your USB drive and click Restore.
4 In the displayed window, navigate to the file with the software image and click Open.
5 The software image will be written on the USB drive. The writing process is displayed in the left bottom corner of the utility window.
Figure 10: Writing a software image
Upon the process has been completed successfully, safely disconnect the USB drive. The drive is ready to use.
Writing the Software Image for Linux OS
Before you write a software image for Linux OS, verify the image. To do this, in the directory where the software image and its md5 sum are stored, execute the following command:
md5sum -c thinclient_vipnet_<Major>.<Minor>-<Build>.img.md5
Upon a successful verification, write the image file on a removable USB drive by executing the dd command. To do this:
1 Connect a removable USB drive to the computer (the device type depends on the ViPNet ThinClient hardware version; a common USB flash drive is used for hardware version 2).
2 Specify the file corresponding to the device in the /dev directory (usually, it is /dev/sda or /dev/sdb).
ViPNet ThinClient 3.3. Deployment Guide
|
284 Execute the following command (if you have root user rights or the rights to write on the device you have specified in step 2):
dd if=<image_name> of=<device_file_name>
Tip: To save the image quicker, you may specify block size equal to 1 M:
dd if=<image_name> of=<device_file_name> bs=1M
Upon the process has been completed successfully, safely disconnect the USB drive. The drive is ready to use.
Installing the ViPNet ThinClient
Software
To install the ViPNet ThinClient software, you need a USB drive with a ViPNet ThinClient installation disk written on it (see Writing the ViPNet ThinClient Software Image on a USB Drive on page 25).
To restore the ViPNet ThinClient software from an image:
1 Connect a monitor and a keyboard to your computer.
2 Connect the USB drive with the ViPNet ThinClient installation disk image to the computer.
3 Switch on the computer and press Delete to enter the BIOS setup.
Note: In ViPNet ThinClient hardware version 2, the BIOS configuration program is
password-protected by default; the password is vipnet.
4 In BIOS, configure booting from the USB drive, then save the BIOS settings and exit.
5 Turn on the computer. The ViPNet ThinClient setup program will be automatically launched upon boot.
6 The setup program will display a list of system disks. Type the number of the disk to install ViPNet ThinClient on and press Enter.
7 The software installation process will be launched. Disconnect the USB drive and press
Enter. The computer will be rebooted.
8 In BIOS, configure booting from the drive with installed ViPNet ThinClient.
After the first ViPNet ThinClient startup, the ViPNet host configuration setup will be started. This procedure is required before you start using ViPNet ThinClient (see Installing Keys and Host Links on page 34).
ViPNet ThinClient 3.3. Deployment Guide
|
30Upgrading the ViPNet ThinClient
Software
You can upgrade the ViPNet ThinClient software either locally on the host or remotely by using the ViPNet Network Manager program. In this document, local upgrading is described. For information about remote upgrading, see the document “ViPNet ThinClient. Administrator’s Guide.”
To upgrade the ViPNet ThinClient software locally:
1 Get the thinclient_vipnet_driv_<version number>.lzh file with the software upgrade and copy it to your removable USB drive.
2 Switch from the graphical interface to the command line interface (CLI) by pressing
Ctrl+Alt+F1.
3 In the command line interface, switch to the administrator mode by executing the enable command and entering the ViPNet host administrator password.
4 Execute the admin upgrade software usb command. You will be prompted to connect your USB drive containing the upgrade file.
5 Connect the USB drive to your computer and press Enter.
6 The USB drive will be scanned for .lzh files:
o If no such files are found, you will be informed about it and the software will not be upgraded.
o If such files are found, an enumerated list of these files will be displayed and you will be prompted to enter the required file number or refuse from upgrading. If you refuse, the software will not be upgraded.
7 Type the file number and press Enter.
8 Before upgrading the software, the free space on the disk will be checked:
o If there is enough free disk space, the software will be upgraded by using the selected file. When the upgrading is completed, disconnect the USB drive containing the upgrade file and reboot your computer.
If the free space on the disk is not enough for upgrading the software locally:
1 Export the ViPNet keys, host links, and settings to the *.vbe file.
2 On the computer, install the new software version by using the installation disk (see Installing the ViPNet ThinClient Software on page 29). If you use a USB boot drive, write the boot drive image on it (see Writing the ViPNet ThinClient Software Image on a USB Drive on page 25).
3 Import the ViPNet keys, host links, and the settings to the host by using the earlier created *.vbe file.
For information about exporting and importing keys, host links, and ViPNet ThinClient settings, see the document “ViPNet ThinClient. Administrator’s Guide.”
ViPNet ThinClient 3.3. Deployment Guide
|
32Keys and Host Links Installation
Keys and Host Links Installation Purpose 33
Installing Keys and Host Links 34
Keys and Host Links Installation
Purpose
Before you start working with ViPNet ThinClient, you should install keys and host links for your ViPNet host (see Keys and host links on page 43). Otherwise, ViPNet ThinClient will not function and you will not be able to manage it using the command line interface.
You can install keys and host links in one of the following ways:
Install keys and host links after you have written the boot drive image to a removable USB drive (for hardware variant 1) or after ViPNet ThinClient installation (for variant 2). Import keys and host links, as well as ViPNet services' parameters to an already
functioning ViPNet ThinClient host (upon you have upgraded the software or when you need to move keys and host links, and services' parameters from another functioning ViPNet ThinClient host).
For more information on importing keys, host links, and ViPNet services' settings, see the document “ViPNet ThinClient. Administrator's Guide.”
To install keys and host links, you need:
A key set (on page 43) (*.dst file) for your ViPNet ThinClient host saved on a USB removable drive.
An external storage device, if you will use it to log on to the ViPNet ThinClient host. In this case, your user keys must be saved on this device.
ViPNet ThinClient 3.3. Deployment Guide
|
34Installing Keys and Host Links
To install keys and host links:
1 Make sure that you have a removable USB drive formatted with FAT32 file system containing a key set file *.dst.
If an external device with the user keys is required for user authentication, this device is also needed to install keys.
2 Connect a monitor and a keyboard to your computer. If you have ViPNet ThinClient hardware version 1 (see ViPNet ThinClient Hardware Versions on page 11), connect the USB boot drive.
3 Turn on the computer.
4 If you have ViPNet ThinClient hardware version 1, during the power-on self-test, press
Delete for BIOS setup and choose to boot from a USB drive. Save and exit.
5 Upon the operating system has been started, a web browser window will be displayed prompting you to install a key set.
Figure 11: Installing keys and host links
7 If an external device is required for the user authentication, connect this device to your computer, too.
8 Select a logon mode:
o Password, if your key set includes user keys.
o Removable drive, if your user keys were saved on an external device.
9 Select the .dst file from the list. If the list is empty, click to scan the USB drive.
10 Depending on the selected authentication type, in the corresponding box, type your ViPNet user password or your external authentication device PIN.
11 Click Install. Once the keys are installed successfully, the corresponding message will be displayed at the bottom of the window. Then, the ViPNet ThinClient home page will be displayed.
If the password (PIN) is incorrect, or the keys have been created not for the ThinClient host type in ViPNet Network Manager, an error message will be displayed at the bottom of the window. In this case, type your password once again or choose another key set.
12 After you install keys and host links, configure the system date and time (see System Time Setup on page 39) and the ViPNet ThinClient host's network connection (see Configuring a Network Connection on page 40).
ViPNet ThinClient 3.3. Deployment Guide
|
36Configuring a Terminal Server
and ViPNet ThinClient Hosts
Configuring a Terminal Server 37
Starting and Configuring ViPNet ThinClient 38
Configuring a Terminal Server
Before you start working with external authentication devices, make sure that the corresponding up-to-date device drivers are installed on the terminal server.
If redirection of USB drives, printers or audio devices is required in a terminal session, make sure that it is allowed in the terminal server settings.
ViPNet ThinClient 3.3. Deployment Guide
|
38Starting and Configuring ViPNet
ThinClient
To start ViPNet ThinClient, you must configure system date and time (see System Time Setup on page 39) and network connection (see Configuring a Network Connection on page 40).
Starting ViPNet ThinClient Hardware Version 1
If you have ViPNet ThinClient hardware version 1 (see ViPNet ThinClient Hardware Versions on page 11):
1 Turn off the computer and connect your USB drive containing the ViPNet ThinClient software.
2 Turn on the computer. During the power-on self-test, press Delete for BIOS setup.
3 Choose to boot from a USB drive and exit saving changes.
4 If an external device is required for the user authentication, also connect this device to your computer's USB port.
Warning: Never connect more than one external device to the ViPNet ThinClient host.
5 At the operating system startup, in the displayed window, type the external device's PIN or the ViPNet user password (depending on the logon mode). Then press Enter.
After the operating system startup, ViPNet ThinClient desktop will be displayed.
6 If necessary, configure the system time (see System Time Setup on page 39) and network connection.
Starting ViPNet ThinClient Hardware Version 2
If you have ViPNet ThinClient hardware version 2 (see ViPNet ThinClient Hardware Versions on page 11):
1 Turn on the computer.
2 If an external device is required for the user authentication, also connect this device to your computer's USB port.
Warning: Never connect more than one external device to the ViPNet ThinClient host.
3 At the operating system startup, in the displayed window, type the external device's PIN or the ViPNet user password (depending on the logon mode). Then press Enter.
After the operating system startup, ViPNet ThinClient desktop will be displayed.
4 If necessary, configure the system time (see System Time Setup on page 39) and network connection.
5 To start working, connect to the terminal server or web resources.
System Time Setup
For a client to communicate with other ViPNet hosts correctly, you should configure the system date and time as described below. If the system date and time have been specified incorrectly, protected connections with other ViPNet hosts may be blocked.
To configure the system date and time via the web interface:
1 In the multiwindow mode, click . On the menu, click Options. The ViPNet ThinClient home page will be displayed.
2 On the home page, click System Options.
3 On the System Options page, click the System Options tab.
4 Specify the time zone, date, and time:
ViPNet ThinClient 3.3. Deployment Guide
|
40 o Choose what time is set in BIOS: UTC stands for UTC time. In this case, system time is calculated as a sum of BIOS time and a time zone offset.
Local stands for local time. In this case, the time set in BIOS is considered correct system time for the specified time zone.
Figure 12: System time setup
5 To synchronize the time with NTP servers, to the right of the Time box, click the icon . By default, public NTP servers from the pool.ntp.org cluster are used. If necessary, you can add more NTP servers to the list. For example, you may add your corporate NTP server.
6 To apply the changes, click Save.
Configuring a Network Connection
To edit the network connection settings in a web interface:1 In the multiwindow mode, click and, on the menu, click Configuration. In the Firefox web browser window, the ViPNet ThinClient home page will be displayed.
2 On the home page, click the Network Interfaces tile.
3 On the Network Interfaces page, click the tab that corresponds to the required connection type.
Note: The list of suggested connection types depends on your computer's configuration.
The ViPNet ThinClient software supports Ethernet, Wi-Fi, 3G, and LTE connections.
5 If you configure the connection manually, we recommend you to specify the addresses of the DNS and NTP servers used on the network.
To do this, on the ViPNet ThinClient homepage, click the Network Services tile. Then, on the corresponding tabs, add server addresses.
For more information about configuring a network connection, see the document “ViPNet ThinClient. Administrator's Guide.”
ViPNet ThinClient 3.3. Deployment Guide
|
42Glossary
C
Client (ViPNet client)
A ViPNet host that is the start and the end point of data transfer. Opposite to a coordinator, a client does not route VPN traffic and service data.
Coordinator (ViPNet coordinator)
A network host with installed ViPNet Coordinator software or a ViPNet Coordinator HW/VA appliance. A ViPNet coordinator functions as a server on a ViPNet network and routes VPN traffic and service data.
D
Digital signature
An attribute of an electronic document intended to protect the document authenticity. It is generated when encrypting information using a private key of a digital signature. A digital signature identifies the public key certificate owner, as well as proves non-repudiation of the document contents.
I
IP address server
A feature of the ViPNet Coordinator software, providing collection and distribution of information about ViPNet host statuses (accessible, unavailable, last time of user activity).
K
Key set
A file with the .dst extension created in ViPNet Key and Certification Authority for each user of a ViPNet host. This file contains host links, keys, and a license file necessary to start working with the ViPNet software on the host. To ensure functioning of a ViPNet program, you must install a key set on the host with this program.
Keys and host links
Includes host links, host keys, and user keys. They are changed when updated from ViPNet Network Manager.
T
Terminal server
A server that provides computing resources for remote clients, which connect to the server via the network. The advantages of working in the thin client mode are: software and hardware cost saving, system administration time saving, enhancing of protection against malicious users in the internal network.
Terminal session
A session of remote access to applications running on a terminal server.
Thin client
A host that is used for access to applications running or data located on a terminal server.
Tunneling
ViPNet ThinClient 3.3. Deployment Guide
|
44 UUnprotected host
A host that exchanges unencrypted traffic with a ViPNet host.
V
ViPNet host
A network node with installed ViPNet software registered in ViPNet Network Manager.
ViPNet network
A logical network that is created and maintained with ViPNet software and consists of ViPNet hosts.
A ViPNet network has a special addressing system, which provides for data exchange between its hosts. Each ViPNet network has its own unique number (host ID).
ViPNet Network Manager
A program that is a part of the ViPNet VPN software suite. It is intended to create, configure, and administer small and middle-sized ViPNet networks. ViPNet Network Manager also functions as certification and key authorities.
Virtual protected network (VPN)
A technology that ensures deployment of a logical network over an existing physical network, which provides establishment of multiple network connections between computers or local networks. The trust level in a virtual network does not depend on the trust level in core networks due to the usage of cryptography methods (encryption, authentication, public key infrastructure, means of protection against roll-forwards and of non-repudiation of contents of the messages transferred via a logical network).
Index
CConfiguring a Network Connection • 35, 38 Creating and Saving Key Sets for ViPNet ThinClient Hosts • 15
Creating ViPNet ThinClient Hosts in ViPNet Network Manager • 15 I
Installing Keys and Host Links • 15, 29 Installing the ViPNet ThinClient Software • 15, 25, 31
K
Key set • 33
Keys and host links • 33 S
Sending Key Set Updates • 15 Starting and Configuring ViPNet ThinClient • 13, 15
Starting ViPNet ThinClient Hardware Version 1 • 13
System Time Setup • 35, 38, 39 T
Terminal server • 10, 13
V
ViPNet ThinClient Hardware Versions • 15, 25, 34, 38, 39
W
Writing the ViPNet ThinClient Software Image on a USB Drive • 15, 29, 31