350 East Plumeria Drive San Jose, CA 95134 USA
May 2013
Part Number TBD v1.0
Programming Language
A H a n d s - O n G u i d e
If you are new to programming in the Java programming language (Java) and have some experience with other languages, this tutorial could be for you. It walks through how to use the JavaPlatform software to develop a basic network application that uses common Java platform features. This tutorial is not comprehensive, but instead takes you on a straight and uncomplicated path through the more common features available in the Java platform. This tutorial is a learning tool and should be viewed as a stepping-stone for persons who find the currently available materials a little too overwhelming to start with.
To reduce your learning curve, this tutorial begins with a simple program in Lesson 1, develops the program by adding new features in every lesson, and leaves you with a general electronic commerce application, and a basic understanding of object-oriented programming concepts in Lesson 15. Unlike other more reference-style texts that give you a lot of
definitions and concepts at the beginning, this tutorial takes a practical approach. New features and concepts are described when they are added to the example application. Please note the final application is for instructional purposes only and would need more work to make it production worthy. By the time you finish this tutorial, you should have enough knowledge to comfortably go on to other Java programming language learning materials and continue your studies.
If you have no programming experience at all, you might still find this tutorial helpful; but you also might want to take an introductory programming course before you proceed.
Lessons 1 through 8 explain how applications, applets, and servlets/JavaServer Pages are similar and different, how to build a basic user interface that handles simple user input, how to read data from and write data to files and databases, and how to send and receive data over the network.
Lessons 9 through 15 walk you through socket communications, building a user interface using more components, grouping multiple data elements as one unit (collections), saving data between program invocations (serialization), and internationalizing a program. Lesson 15 concludes the series with basic object-oriented programming concepts.
This tutorial covers object-oriented concepts at the end after you have had practical experience with the language so you can relate the object-oriented concepts to your experiences.
Appendix A presents the complete and final code for this tutorial.
JavaBean Technology
Acknowledgements
Many Java Developer Connection (JDC) members contributed comments and
suggestions to this material when the first eight lessons appeared on the JDC website in March and April of 1999, and the last eight appeared the following July. With those suggestions and many others received from the review team at Addison-Wesley Longman, the material has evolved into an introduction to Java programming language features for persons new to the platform and unfamiliar with the terminology.
I also relied on the help of co-workers, friends, and family for whose help I am very grateful. I would like to thank my friend and co-worker, Mary Aline, for providing the French translations for the Chapter 13, Internationalization chapter, and my best friend and husband Jeffrey Pawlan (WA6KBL) who worked with Wolf Geihe (DJ4OA) in Germany to provide the German translations for that same chapter. I do not want to forget Stephanie Wilde, our contract editor at the JDC, who helped with copy editing on the early versions of this material posted to the JDC website. And Dana Nourie, our JDC HTML editor, who in her quest to learn Java, provided unending enthusiasm for this work and contributed to the section on how to set the CLASSPATH environment variable on the Windows platform.
Special thanks go to Allan Jacobs and Orson Alvarez who went through the example code and text making a number of excellent suggestions to improve them, and to Calvin Austin whose helpful suggestions at the outset made the earlier lessons more
understandable and accessible to novice programmers. Finally, thanks to Danesh Forouhari who made some excellent suggestions to improve the graphics, and who encouraged me to include a short section on JavaServer Pages technology. And I cannot forget my manager, Margaret Ong, who stood behind me all of the way in this effort. Lastly, I want to acknowledge various individual reviewers within Sun Microsystems, Inc., whose expert knowledge in their respective areas was an invaluable asset to completing the examples: Rama Roberts (object-oriented programming), Dale Green
Chapter 1 Compile and Run a Simple Program
About the Java Platform . . . 11
Set Up Your Computer . . . 11
Write a Program . . . 12
Compile the Program . . . 12
Run the Program . . . 12
Code Comments. . . 12
Double Slashes . . . 13
C-Style Comments . . . 13
Doc Comments. . . 13
API Documentation . . . 13
Exercises . . . 14
Chapter 2 Building Applications
Application Structure and Elements . . . 16Fields and Methods . . . 17
Constructors . . . 20
Exercises . . . 21
Chapter 3 Building Applets
Application to Applet. . . 23Run the Applet . . . 24
Applet Structure and Elements. . . 24
Extend a Class . . . 24
Behavior . . . 25
Appearance . . . 27
Packages . . . 27
Exercises . . . 28
Chapter 4 Building a User Interface
Project Swing APIs . . . 30Import Statements . . . 31
Class Declaration . . . 32
Instance Variables . . . 33
Constructor . . . 33
Action Listening . . . 35
Event Handling . . . 35
Exercises: Applets Revisited . . . 37
Applet and Application Differences. . . 38
Chapter 5 Building Servlets
About the Example . . . 40HTML Form . . . 40
Servlet Code. . . 41
Class and Method Declarations . . . 42
Method Implementation . . . 43
JavaServer Pages Technology. . . 44
HTML Form. . . 44
JSP Page . . . 44
Exercises . . . 46
Chapter 6 Access and Permissions
File Access by Applications . . . 48Constructor and Instance Variable Changes . . . 48
Method Changes . . . 49
System Properties . . . 52
File.separatorChar . . . 52
Exception Handling. . . 52
File Access by Applets . . . 54
Grant Applets Permission . . . 56
Creating a Policy File . . . 56
Run an Applet with a Policy File . . . 56
Restrict Applications . . . 57
File Access by Servlets . . . 58
Exercises . . . 58
Code for This Lesson . . . 58
FileIO Program . . . 58
FileIOAppl Program . . . 61
FileIOServlet Program . . . 63
AppendIO Program. . . 64
Chapter 7 Database Access and Permissions
Database Setup . . . 69Create Database Table . . . 69
Database Access by Applications . . . 69
Establish a Database Connection . . . 70
Database Access by Applets . . . 73
JDBC Driver . . . 73
JDBC-ODBC Bridge with ODBC Driver . . . 75
Database Access by Servlets . . . 76
Exercises . . . 76
Code for This Lesson . . . 77
DbaAppl Program . . . 79
DbaOdbAppl Program . . . 82
DbaServlet Program . . . 84
Chapter 8 Remote Method Invocation
RMI Scenario . . . 87About the Example . . . 87
Program Behavior. . . 88
File Summary . . . 89
Compile the Example . . . 90
Start the RMI Registry . . . 91
Start the Server. . . 92
Run the RMIClient1 Program . . . 93
Run the RMIClient2 Program . . . 93
RemoteServer Class . . . 94
Send Interface . . . 95
RMIClient1 Class . . . 96
actionPerformed Method . . . 96
main Method . . . 96
RMIClient2 Class . . . 97
actionPerformed Method . . . 97
main Method . . . 97
Exercises . . . 98
Code for This Lesson . . . 98
RMIClient1 Program . . . 98
RMIClient2 Program . . . 100
RemoteServer Program . . . 102
Send Interface . . . 103
Chapter 9 Socket Communications
What are Sockets and Threads? . . . 105About the Examples . . . 105
Example 1: Client-Side Behavior . . . 106
Example 1: Server-Side Behavior. . . 106
Example 1: Compile and Run . . . 106
Example 1: Server-Side Program . . . 107
Example 1: Client-Side Program . . . 108
Example 2: Multithreaded Server Example . . . 110
Exercises . . . 113
Code for This Lesson . . . 113
SocketClient Program. . . 113
SocketServer Program . . . 115
SocketThrdServer Program . . . 117
Classes . . . 122
Objects . . . 123
Well-Defined Boundaries and Cooperation . . . 123
Inheritance and Polymorphism . . . 124
Data Access Levels . . . 126
Classes . . . 126
Fields and Methods . . . 126
Global Variables and Methods . . . 127
Your Own Classes . . . 127
Well-Defined Boundaries and Cooperation . . . 127
Inheritance . . . 128
Access Levels. . . 128
Exercises . . . 129
Setting Access Levels. . . 129
Organizing Code into Functional Units . . . 129
Chapter 11 User Interfaces Revisited
About the Example . . . 131Fruit Order Client (RMIClient1) . . . 131
Server Program . . . 132
View Order Client (RMIClient2) . . . 132
Compile and Run the Example . . . 132
Fruit Order (RMIClient1) Code . . . 134
Instance Variables . . . 135
Constructor . . . 135
Event Handling . . . 137
Cursor Focus . . . 139
Converting Strings to Numbers and Back. . . 140
Server Program Code. . . 141
Send Interface . . . 141
RemoteServer Class. . . 141
View Order Client (RMIClient2) Code. . . 142
Exercises . . . 143
Calculations and Pressing Return . . . 143
Extra Credit. . . 144
Code for This Lesson . . . 144
RMIClient1 Program . . . 144
RMIClient2 Program . . . 149
RMIClient1 Improved Program . . . 152
Chapter 12 Develop the Example
Track Orders. . . 159sendOrder Method . . . 159
getOrder Method. . . 160
Other Changes to Server Code . . . 161
Maintain and Display a Customer List . . . 162
Create a Set . . . 163
Access Data in a Set . . . 164
Display Data in a Dialog Box . . . 165
Exercises . . . 166
Code for This Lesson . . . 167
RemoteServer Program . . . 167
RMIClient2 . . . 169
Chapter 13 Internationalization
Identify Culturally Dependent Data. . . 174Create Keyword and Value Pair Files. . . 175
German Translations . . . 177
French Translations . . . 178
Internationalize Application Text. . . 179
Instance Variables . . . 179
main Method . . . 179
Constructor . . . 181
actionPerformed Method . . . 182
Internationalize Numbers . . . 182
Compile and Run the Application . . . 183
Compile. . . 183
Start the RMI Registry . . . 183
UNIX . . . 183
Win32 . . . 183
Start the Server. . . 184
Start the RMIClient1 Program in German. . . 184
Start the RMIClient2 Program in French. . . 184
Exercises . . . 185
Code for This Lesson . . . 186
RMIClient1 . . . 186
RMIClient2 . . . 191
Chapter 14 Packages and JAR File Format
Set up Class Packages . . . 197Create the Directories. . . 197
Declare the Packages. . . 198
Make Classes and Fields Accessible . . . 198
Change Client Code to Find the Properties Files . . . 199
Compile and Run the Example. . . 199
Compile. . . 199
Start the RMI Registry . . . 200
Start the Server. . . 200
Start the RMIGermanApp Program . . . 201
Start the RMIClient2 Program in French. . . 201
Using JAR Files to Deploy . . . 201
Fruit Order Set of Files (RMIClient1) . . . 203
Exercises . . . 205
Appendix A Code Listings
RMIClient1 . . . 207RMIClient2 . . . 212
DataOrder. . . 217
Send . . . 217
RemoteServer . . . 218
RMIFrenchApp . . . 220
RMIGermanApp . . . 225
RMIEnglishApp. . . 230
RMIClientView Program . . . 234
RMIClientController Program . . . 238
1
If you are new to the Java programming language, you are probably wondering what all the talk is about. You might have heard of applets, applications, and servlets/JavaServer Pages, but are not sure what they are and when you would want to write an applet as opposed to an application or servlet. Or maybe you are just curious about the basic set of application programming
interfaces (APIs) available in the platform and do not want to read a lot of pages to find out what is available.
This short tutorial gives you a hands-on introduction to the Java programming language. It starts with compiling and running the simple program presented in this lesson, adds new features with explanations in each successive lesson, and introduces APIs commonly used in general
programs.
This lesson covers the following topics: • About the Java Platform
• Set Up Your Computer
• Write a Program
• Compile the Program
• Run the Program
• Code Comments
• API Documentation • Exercises
If you are new to Java, you might have heard of applets, applications, servlets, and JavaServer Pages, but are not sure what they are and how they differ. Or maybe you are just curious about the basic set of application programming interfaces (APIs) available in the platform and do not want to read a lot of pages to learn the basics.
This short tutorial gives you a hands-on introduction to Java. It starts with compiling and running the simple program presented in this lesson, adds new features with explanations in each successive lesson, and introduces APIs commonly used in general programs.
This lesson covers the following topics: • About the Java Platform
• Set Up Your Computer
• Write a Program
• Compile the Program
• Run the Program
• Code Comments
• API Documentation
About the Java Platform
Before you can write and compile programs, you need to understand what the Java platform is and configure your computer to run the programs. The Java platform consists of the Java APIs and the Java Virtual Machine (JVM).
Java APIs are libraries of compiled code that you can use in your programs. They enable you to add ready-made and customizable functionality to save you programming time. The simple program in this lesson uses a Java API to print a line of text to the console. The printing capability is provided in the API ready for you to use. You supply the text to be printed. Figure 1 shows the Java platform architecture. The JVM sits on top of your native operating system. Your program sits on top of the JVM and calls compiled code from the API libraries that live within the JVM.
Java Virtual Machine Java Program
Java APIs
Your Computer System
Figure 1. Java Platform Architecture
Programs written in Java are run (or interpreted) by another program called the JVM. If you have used Visual Basic or another interpreted language, this concept is probably familiar to you. Rather than running directly on the native operating system, the program is interpreted by the JVM for the native operating system. This means that any computer system with a JVM installed can run programs written in Java regardless of the computer system on which the applications were originally developed.
Set Up Your Computer
Write a Program
Use the text editor of your choice to create a text file with the following text (source code). Name the text file ExampleProgram.java. Programs written in Java are case sensitive. //A Very Simple Example
class ExampleProgram {
public static void main(String[] args){
System.out.println(“I’m a Simple Program”);
}
}
Compile the Program
When you compile a Java program, the source code is converted to byte codes, which are platform-independent instructions for the JVM.
Execute the Java compiler as follows: javac ExampleProgram.java
Run the Program
Once your program successfully compiles, you can interpret and run the program on any JVM. The JVM byte code interpreter converts the Java byte codes to platform-dependent machine codes so that you computer or browser can understand and run the program. Execute the java command as follows to run the example program:
java ExampleProgram
The following commands show the entire sequence to compile and run the example program: > javac ExampleProgram.java
> java ExampleProgram.java
I’m a Simple Program
Code Comments
Double Slashes
You can use C++-style double slashes (//) to tell the compiler to treat everything from the slashes to the end of the line as text.
//A Very Simple Example
class ExampleProgram {
public static void main(String[] args){
System.out.println(“I’m a Simple Program”);
}
}
C-Style Comments
Instead of double slashes, you can use C-style comments (/* */) to enclose one or more lines of code to be treated as text.
/* These are C-style comments */
class ExampleProgram {
public static void main(String[] args){
System.out.println(“I’m a Simple Program”);
}
}
Doc Comments
To generate documentation for your program, use doc comments (/** */) to enclose lines of text for the javadoc tool to find. The javadoc tool locates the doc comments embedded in source files and uses those comments to generate API documentation.
/** This class displays a text string on the console. */
class ExampleProgram {
public static void main(String[] args){
System.out.println(“I’m a Simple Program”);
}
}
API Documentation
Exercises
1 What is the name of the program that runs (or interprets) programs written in Java? 2 Name the interpreter command, and explain what it does.
2
All applications, applets, and servlets written in Java have almost the same structure and share many common elements. They also have some differences. This lesson describes the structure and elements common to applications.
This lesson covers the following topics: • Application Structure and Elements
• Fields and Methods
• Constructors
Application Structure and Elements
You crate an application from classes. A class defines class fields to store the data, and class methods to work on the data. A class is similar to a struct in the C and C++ languages in that it can store related data of different types, but the big difference between a class and a struct is that a class also defines accessor methods to work on its data. The C and C++ languages separate functions from the struct that defines the data.
Every application needs one class with a main method. The class with the main method is the entry point for the program and is the class name passed to the java interpreter command to run the application. The code in the main method executes first when the program starts.
The ExampleProgram.java code from Chapter 1 has no fields or accessor methods. Because ExampleProgram is the only class in the program, it has a main method. class ExampleProgram {
public static void main(String[] args){
System.out.println(“I’m a Simple Program”);
}
}
In the above code, the public static void keywords mean the JVM interpreter can call the program main method to start the program (public) without creating an instance of the class (static), and the program does not return data to the JVM interpreter (void) when it ends.
An instance of a class has data members and methods as defined by that class. While the class describes the data and methods to work on the data, a class instance acquires and works on the data.
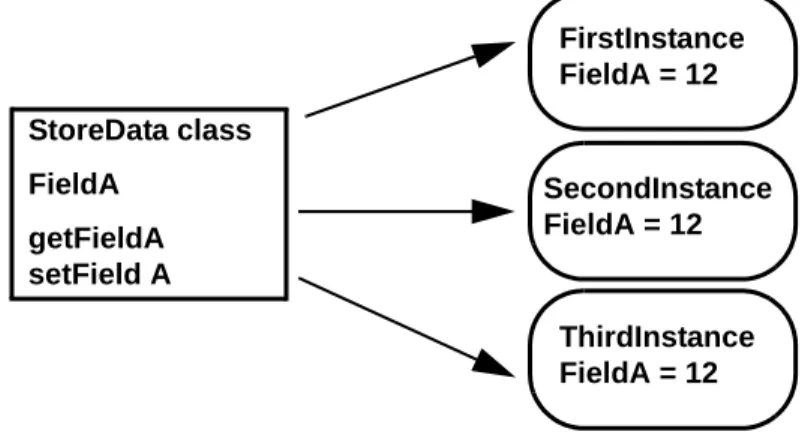
Figure 2 shows three instances of the StoreData class by the names: FirstInstance, SecondInstance and ThirdInstance. While class instances share the same definition (class), they are separate from each other in that each instance can acquire and work on different data.
StoreData class FieldA
getFieldA setField A
FirstInstance FieldA = 12 SecondInstance FieldA = 12
It is not always necessary to create a class instance to call methods and access fields in a class. An instance of the ExampleProgram class is never created because it has no fields to access and only the one static main method to call. The main method for
ExampleProgram just calls println, which is a static method in the System class. The java.lang.System class, among other things, provides functionality to send text to the terminal window where the program was started. It has all static fields and methods. The Java platform lets a program call a method in a class without creating an instance of that class as long as the method being called is static. Just as the JVM interpreter command can call the staticmain method in the ExampleProgram class without creating an instance of it, the ExampleProgram class can call the staticprintln method in the System class without creating an instance of the System class.
As you explore Java, you will come across library classes such as System, Math, or Color that contain all or some static methods and fields, and you might find that static
methods and fields can make sense when you write your own classes.
For example, the Color class provides ready access to common colors such as red, blue, and magenta through its static fields, and you can get custom colors by creating a Color class instance and passing specific values to the Color class constructor. For more
information on constructors, see Constructors .
Fields and Methods
The LessonTwoA.java program alters the simple example to store the text string in a static field called text. The text field is static so that its data can be accessed directly by the staticprintln method without creating an instance of the LessonTwoA class. class LessonTwoA {
//Static field added
static String text = “I’m a Simple Program”;
public static void main(String[] args){
System.out.println(text);
}
}
The LessonTwoB.java and LessonTwoC.java programs add a getText method to the program to retrieve and print the text. The LessonTwoB program accesses the non-static text field with the non-static getText method. Non-static methods and fields are called instance methods and fields. This approach requires that an instance of the LessonTwoB class be created in the main method.
class LessonTwoB {
//Static and non-static fields
String text = “I’m a Simple Program”;
static String text2 = “I’m static text”;
//Methods to access data in the fields
String getText(){ return text; }
String getStaticText(){return text2;}
public static void main(String[] args){
LessonTwoB progInstance = new LessonTwoB();
String retrievedText = progInstance.getText();
String retrievedStaticText = progInstance.getStaticText();
System.out.println(retrievedText);
System.out.println(retrievedStaticText);
}
}
The LessonTwoC program accesses the statictext field with the staticgetText method. Static methods and fields are called class methods and fields. This approach allows the program to call the staticgetText method directly without creating an instance of the LessonTwoC class.
class LessonTwoC {
static String text = “I’m a Simple Program”;
//Accessor method
static String getText(){
return text;
}
public static void main(String[] args){
String retrievedText = getText();
.out.println(retrievedText);
}
}
Class methods can operate only on class fields, but instance methods can operate on class and instance fields. The difference is that there is only one copy of the data stored in a class field, but each instance has its own copy of the data stored in an instance field.
For example, the following ExampleClass class definition has one static field, one instance field, and two accessor methods to set the value for each field.
class ExampleClass {
static FieldA = 36;
FieldB=0;
private void setFieldA (value){
FieldA = value;
}
private void setFieldB (value) {
FieldB = value;
}
public static void main(String[] args){
// Do something
}
}
If another class creates two instances of ExampleClass, then, FieldA has the value 36 and FieldB has the value 0 for both instances. Figure 3 shows the following:
• If another class calls setFieldA on the first instance of ExampleClass with a value of 25, then the FieldA value in both instances changes to 25.
• If another class calls setFieldB on the first instance of ExampleClass with a value of 50, then the FieldB value in the first instance changes to 25, but the FieldB value in the other instances remains 0.
AnotherClass Create instance 1 Create instance 2 Call setFieldA(25) on instance 1
Call SetFieldB(50) on instance 2
Instance 1 FieldA=25 FieldB = 0
Instance 2 FieldA=25 FieldB = 50
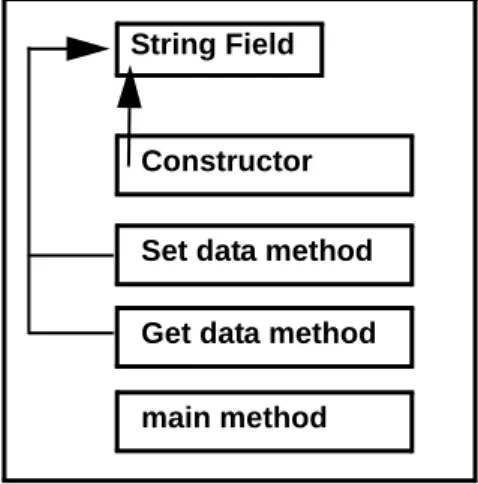
Constructors
A constructor is a special method that prepares the new instance for use by initializing the instance fields. The constructor always has the same name as the class and no return type. If you do not write your own constructor, the compiler adds an empty constructor. The empty constructor is called the default constructor and initializes all non-initialized fields and
variables to zero. A constructor might or might not have parameters depending on whether the class provides its own initialization data or gets it from the calling method.
Figure 4 shows the constructor, accessor methods, and main method.
String Field
Constructor Set data method Get data method main method Figure 4. Constructor
The LessonTwoD program converts the LessonTwoB program to use a constructor without parameters to initialize the text string field.
class LessonTwoD{
String text;
//Constructor
LessonTwoD(){
text = “I’m a Simple Program”;
}
String getText(){
return text;
}
public static void main(String[] args){
LessonTwoD progInst = new LessonTwoD();
String retrievedText = progInst.getText();
System.out.println(retrievedText);
}
The LessonTwoE program passes the string to be printed to the constructor as a parameter: class LessonTwoE{
String text;
//Constructor
LessonTwoE(String message){
text = message;
}
String getText(){
return text;
}
public static void main(String[] args){
LessonTwoE progInst = new LessonTwoE("I’m a simple program");
String retrievedText = progInst.getText();
System.out.println(retrievedText);
}
}
Exercises
1 An application must have one class with which kind of method? 2 What is the difference between class and instance fields?
3
Like applications, you create applets from classes. However, applets do not have a main method as an entry point, do have several methods to control specific aspects of applet
execution, and while applications run in the JVM installed on a computer system, applets run in the JVM installed in a web browser. You can also run an applet in a special tool for testing applets called appletviewer.
This lesson converts one of the applications from Chapter 2, Building Applications to an applet, describes the structure and elements common to applets, and shows you how to use the appletviewer tool.
This lesson covers the following topics: • Application to Applet
• Run the Applet
• Applet Structure and Elements
• Packages
Application to Applet
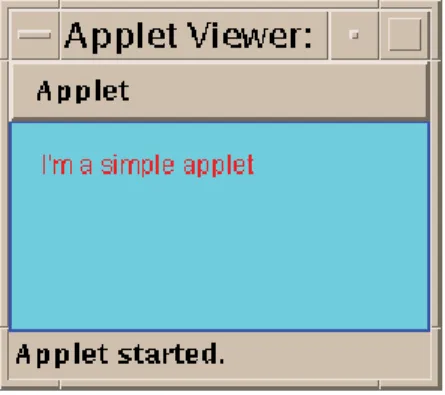
The following code is the applet equivalent to the LessonTwoB example in Chapter 2. Figure 5 shows how the running applet looks. See Run the Applet for information on the structure and elements of the applet code.
Figure 5. A Simple Applet
import java.applet.Applet;
import java.awt.Graphics;
import java.awt.Color;
//Make applet class public
public class SimpleApplet extends Applet{
String text = "I'm a simple applet";
public void init() {
setBackground(Color.cyan);
}
public void start() { System.out.println("starting..."); }
public void stop() { System.out.println("stopping..."); }
public void destroy() { System.out.println("preparing to unload..."); }
public void paint(Graphics g){
System.out.println("Paint");
g.drawRect(0, 0, getSize().width -1, getSize().height -1);
g.setColor(Color.red);
g.drawString(text, 15, 25);
}
The SimpleApplet class is public so that the program that runs the applet (a browser or the appletviewer tool), which is not local to the program, can execute it.
Make sure to compile the applet: javac SimpleApplet.java
Run the Applet
To execute the applet, create an HTML file with the Applet tag as follows: <HTML>
<BODY>
<APPLET CODE=SimpleApplet.class WIDTH=200 HEIGHT=100>
</APPLET>
</BODY>
</HTML>
An easy way to run the applet is to use the appletviewer tool. The following
appletviewer command executes the simpleApplet.html file, which contains the above HTML code:
appletviewer simpleApplet.html
Applet Structure and Elements
The Java Applet class has what you need to design the appearance and manage the behavior of an applet. The Applet class provides a graphical user interface (GUI)
component called a Panel and a number of methods. To create an applet, you extend the Applet class and implement the appearance and behavior you want.
The applet appearance is created by drawing onto the Panel or adding other GUI components such as push buttons, scrollbars, or text areas to the Panel. The applet behavior is defined by implementing its methods.
Extend a Class
Most classes of any complexity extend other classes. To extend another class means to take the data and behavior from the parent class and add more data and/or behavior to the child class. In the C++ language, this is called subclassing.
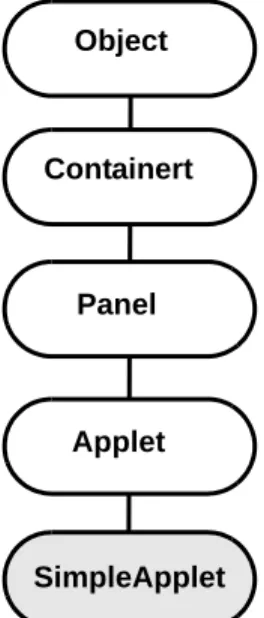
Figure 6 shows the class hierarchy for the SimpleApplet class. The Object class is the parent of all Java classes not explicitly extended from any other class.
Object
Containert
Panel
Applet
SimpleApplet
Figure 6. Extending the Applet Class
The Applet class provides the init, start, stop, destroy, and paint methods you saw in the example applet code. The SimpleApplet class must override these methods to do what the SimpleApplet class needs them to do because the Applet class provides no functionality for these methods.
However, the Component class does provide functionality for the set Background method, which is called in the init method. The call to setBackground is an example of calling a method inherited from a parent class instead of overriding a method inherited from a parent class.
You might wonder why Java provides methods without implementations. It is to provide conventions for everyone to use for consistency across Java APIs. If everyone wrote their own method to start an applet, for example, but gave it a different name such as begin or go, the applet code would not be interoperable with other programs, tools, and browsers, or portable across multiple platforms. For example, both Netscape and Internet Explorer know how to look for the init and start methods.
Behavior
The init Method
The init method is called when the applet is first created and loaded by the underlying software. This method performs one-time operations the applet needs to function such as creating the user interface or setting the font. In the example, the init method initializes the text string and sets the background color.
public void init() {
text = "I'm a simple applet";
setBackground(Color.cyan);
}
The start Method
The start method is called when the applet is visited such as when the user goes to a web page with an applet on it. The example prints a string to the console to tell you the applet is starting. In a more complex applet, the start method would do things required at the start of the applet such as begin animation or play sounds.
public void start() {
System.out.println("starting...");
}
After the start method executes, the platform calls the paint method to draw to the applet's Panel. A thread is a single sequential flow of control within the applet, and every applet is made up of multiple threads. Applet drawing methods are always called from a dedicated drawing and event-handling thread.
The stop and destroy Methods
The stop method stops the applet when the applet is no longer on the screen such as when the user goes to another web page. The example prints a string to the console to tell you the applet is stopping. In a more complex applet, this method should do things like stop
animation or sounds. The destroy method is called when the browser exits. Your applet should implement this method to do final cleanup.
public void stop() {
System.out.println("stopping...");
}
public void destroy() {
System.out.println("preparing to unload...");
Appearance
The Applet class is a Panel component that inherits a paint method from its parent Container class. To draw onto the applet's Panel, implement the paint method to do the drawing. The Graphics object passed to the paint method defines a graphics context for drawing on the Panel. The Graphics object has methods for graphical operations such as setting drawing colors, and drawing graphics, images, and text. The paint method for the SimpleApplet draws the I'm a simple applet string in red inside a blue rectangle.
public void paint(Graphics g){
System.out.println("Paint");
//Set drawing color to blue
g.setColor(Color.blue);
//Specify the x, y, width and height for a rectangle
g.drawRect(0, 0, getSize().width -1, getSize().height -1);
//Set drawing color to red
g.setColor(Color.red);
//Draw the text string at the (15, 25) x-y location
g.drawString(text, 15, 25);
}
Packages
The applet code also has three import statements at the top that explicitly import the Applet, Graphics, and Color classes in the java.applet and java.awt API library packages for use in the applet. Applications of any size and all applets access ready-made Java API classes organized into packages located elsewhere on the local or networked system. This is true whether the Java API classes come in the Java platform download, from a third-party, or are classes you write yourself and store in a directory separate from the program.
There are two ways to access these ready-made libraries: import statements, which you saw in the code in Application to Applet , and full package names. The following code rewrites the example applet to use full package names instead of import statements. A compiled class in one package can have the same name as a compiled class in another package. The package name differentiates the two classes. For example
public class SimpleApplet extends java.applet.Applet{
String text = "I'm a simple applet";
public void init() {
text = "I'm a simple applet";
setBackground(java.awt.Color.cyan);
}
public void start() {
System.out.println("starting...");
}
public void stop() {
System.out.println("stopping...");
}
public void destroy() {
System.out.println("preparing to unload...");
}
public void paint(java.awt.Graphics g){
System.out.println("Paint");
g.setColor(Color.blue);
g.drawRect(0, 0, getSize().width -1, getSize().height -1);
g.setColor(java.awt.Color.red);
g.drawString(text, 15, 25);
}
}
Note: The examples do not need a package declaration to call
System.out.println because the System class is in the default java.lang package.
Exercises
1 What are some differences between applications and applets? 2 Name the applet methods that control the applet’s behavior.
4
This lesson adds a user interface to the LessonTwoD application from Chapter 2, Building Applications. The user interface is built with the Java Foundation Classes (JFC) Project Swing (Project Swing) APIs. Project Swing APIs provide a wide-range of classes for building friendly and interesting user interfaces and handling action events from user inputs such as mouse clicks and keyboard presses.
This is a very basic introduction to Project Swing that is developed more in Chapter 11, User Interfaces Revisited.
This lesson covers the following topics: • Project Swing APIs
• Import Statements
• Class Declaration
• Instance Variables
• Constructor
• Action Listening
• Event Handling
• Main Method
• Exercises: Applets Revisited
Project Swing APIs
The Project Swing API provides the building blocks (components) for creating interesting and friendly user interfaces. You can choose from basic controls such as buttons and
checkboxes, components that contain other components such as frames and panels, and information displays such as labels and text areas.
When you build a user interface, you place basic components and information displays inside container components. If the user interface has many elements, then place container
components within other container components. Ultimately, every applet and application has a top-level container to hold all of its user interface components.
An applet’s top-level container is a browser window, and an application’s top-level container is a frame. A frame component is a window that provides a title, banner, and methods to manage the appearance and behavior of the window. An applet relies on the browser for this type of functionality. An applet can have only one top-level panel, but an application can have many top-level panels.
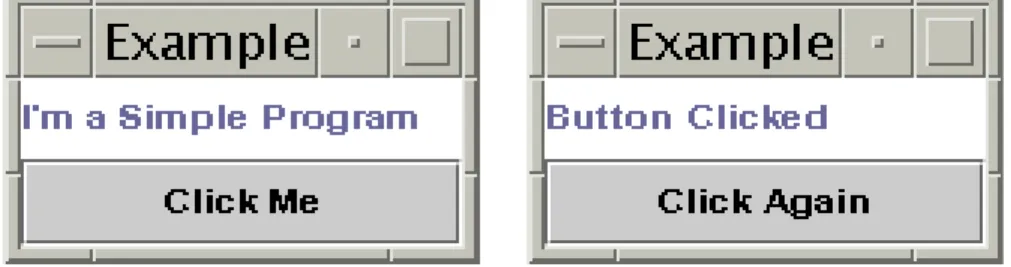
The Project Swing code for this lesson builds the simple application in Figure 7. The frame (window) on the left appears when you start the application, and the frame on the right appears when you click the button. Click again to go back to the original frame on the left.
Import Statements
The import statements in the SwingUI.java code indicate which Java API packages and classes the program uses. The first two lines import specific classes in the Abstract Window Toolkit (awt) package, and the third line imports the event package within the awt package. Your code is clearer to someone else reading it when you import exactly the classes and packages you need and no others. But, if you use a lot of classes in one package, it is probably easier to import an entire package including its subpackages as shown by the fourth import javax.swing statement.
The Abstract Window Toolkit (AWT) is an API library that provides classes for building a user interface and handling action events. However, Project Swing extends the AWT with a full set of GUI components and services, pluggable look and feel capabilities, and assistive
technology support. Project Swing components include Java-language versions of the AWT components such as buttons and labels, and a rich set of higher-level components such as list boxes and tabbed panes. Because of the enhanced functionality and capabilities in the Project Swing class libraries, this tutorial focuses on the Project Swing APIs.
import java.awt.Color;
import java.awt.BorderLayout;
import java.awt.event.*;
import javax.swing.*;
//Class Declaration
class SwingUI extends JFrame implements ActionListener {
//Instance variables
JLabel text, clicked;
JButton button;
JPanel panel;
private boolean _clickMeMode = true;
//Constructor
SwingUI(){ //Begin Constructor
text = new JLabel(“I’m a Simple Program”);
button = new JButton(“Click Me”);
button.addActionListener(this);
panel = new JPanel();
panel.setLayout(new BorderLayout());
panel.setBackground(Color.white);
getContentPane().add(panel);
panel.add(BorderLayout.CENTER, text);
panel.add(BorderLayout.SOUTH, button);
//Event handling
public void actionPerformed(ActionEvent event){
Object source = event.getSource();
if (source == button) {
if (_clickMeMode) {
text.setText("Button Clicked");
button.setText("Click Again");
_clickMeMode = false;
} else {
text.setText("I’m a Simple Program");
button.setText("Click Me");
_clickMeMode = true;
}
}
}
//main method
public static void main(String[] args){
SwingUI frame = new SwingUI();
frame.setTitle(“Example”);
WindowListener l = new WindowAdapter() {
public void windowClosing(WindowEvent e) {
System.exit(0);
}
};
frame.addWindowListener(l);
frame.pack();
frame.setVisible(true);
}
}
Class Declaration
The ActionListener interface, like all other interfaces in Java, defines a set of methods, but does not implement their behavior. Instead, you provide the interface method
implementations for the class that implements the interface.
The Java platform lets a class extend only one class, which in this case is JFrame, but lets it implement any number of interfaces. In this example, the SwingUI class implements the ActionListener interface only.
When a program class implements an interface, it must provide behavior for all methods defined in that interface. The ActionListener interface has only one method, the actionPerformed method. So, the SwingUI class must implement the
actionPerformed method, which is covered in Event Handling .
Instance Variables
These next lines in the SwingUI class declare the Project Swing component classes the SwingUI class uses. These are instance variables (or fields) that can be accessed by any method in the instantiated class. In this example, they are built in the SwingUI constructor and accessed in the actionPerformed method implementation.
The private boolean variable is an instance variable that is only accessible to the SwingUI class. It is used in the actionPerformed method to find out whether or not the button has been clicked.
JLabel text;
JButton button;
JPanel panel;
//Start out waiting to be clicked
private boolean _clickMeMode = true;
Constructor
The constructor creates the user interface components, adds the components to the JPanel object, adds the panel to the frame, and makes the JButton components action listeners, which is covered in Action Listening . The JFrame object is created in the main method when the program starts.
SwingUI(){
text = new JLabel(“I’m a Simple Program”);
button = new JButton(“Click Me”);
//Add button as an event listener
button.addActionListener(this);
//Create panel
//Specify layout manager and background color
panel.setLayout(new BorderLayout());
panel.setBackground(Color.white);
//Add label and button to panel
getContentPane().add(panel);
panel.add(BorderLayout.CENTER, text);
panel.add(BorderLayout.SOUTH, button);
}
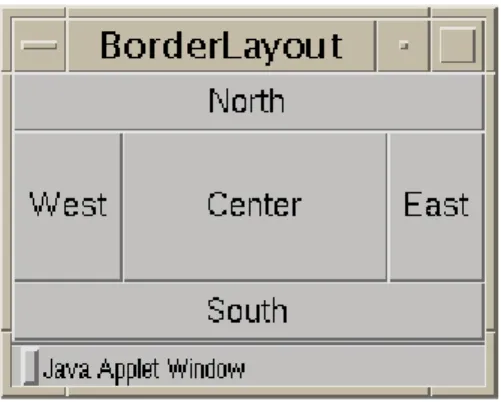
When the JPanel object is created, the layout manager and background color are specified. The layout manager in use determines how user interface components are arranged in the display area. The code uses the BorderLayout layout manager, which arranges user interface components in the five areas shown in Figure 8.
Figure 8. Border Layout
To add a component to the layout, specify the area with the static fields provided in the BorderLayout class. The next code segment adds components to the panel in the center and south regions of the border layout. Components are added to the content pane where the components reside so that the layout manager can control the component layout and provide functionality that allows different types of components to work together. The call to the getContentPane method of the JFrame class adds the Panel to the JFrame container. //Create panel
panel = new JPanel();
//Specify layout manager and background color
panel.setLayout(new BorderLayout());
panel.setBackground(Color.white);
//Add label and button to panel
getContentPane().add(panel);
panel.add(BorderLayout.CENTER, text);
panel.add(BorderLayout.SOUTH, button);
Action Listening
In addition to implementing the ActionListener interface, you have to add the action listener to the JButton components. In this example the action listener is the SwingUI object because its class implements the ActionListener interface.
What this means in this example is that the SwingUI object listens for action events. When a button click action event occurs, the Java platform services pass the button click action to the actionPerformed method implemented in the SwingUI class. The actionPerformed implementation described in Event Handling on page 35 handles the action event.
Component classes have the appropriate add methods to add action listeners to them. The JButton class has an addActionListener method, and the parameter passed to addActionListener is this, meaning that the SwingUI action listener is added to the button and the Java platform services pass any button-generated actions to the
actionPerformed method in the SwingUI class. button = new JButton(“Click Me”);
//Add button as an event listener
button.addActionListener(this);
Event Handling
The Java platform passes an event object to the actionPerformed method. The event object represents an action event that occurred. The actionPerformed method has an if statement to determine whether the button component fired the action event and to test the _clickMeMode variable to find out the state of the button component.
If the button component is waiting to be clicked, the label and button text change to reflect that the button was just clicked. If the button component has been clicked, the label and button text change to invite another click.
public void actionPerformed(ActionEvent event) {
Object source = event.getSource();
if (source == button){
if (_clickMeMode) {
text.setText("Button Clicked");
button.setText("Click Again");
_clickMeMode = false;
} else {
text.setText("I’m a Simple Program");
button.setText("Click Me");
_clickMeMode = true;
}
}
Main Method
The main method creates the top-level frame, sets the title, and includes code that lets the user close the window using the frame menu.
public static void main(String[] args) {
//Create top-level frame
SwingUI frame = new SwingUI();
frame.setTitle(“Example”);
//This code lets you close the window
WindowListener l = new WindowAdapter() {
public void windowClosing(WindowEvent e) {
System.exit(0);
}
};
frame.addWindowListener(l);
//This code lets you see the frame
frame.pack();
frame.setVisible(true);
}
}
The code to close the window uses an adapter class. If the event listener interface you need provides more functionality than the program actually uses, you can use an adapter class. The Java APIs provide adapter classes for all listener interfaces with more than one method. You can use the adapter class instead of the listener interface and implement only the methods you need. In the example, the WindowListener interface has seven methods and this program needs only the windowClosing method so it makes sense to use the
WindowAdapter class instead of the WindowListener interface.
The next code segment extends the WindowAdapter class and overrides the windowClosing method. The new keyword creates an anonymous instance of the extended inner class. Anonymous means that you do not assign a name to the class, and you cannot create another instance of the class without executing the code again. It is an inner class because the extended class definition is nested within the SwingUI class. This approach takes only a few lines of code. Implementing the WindowListener interface would require six empty method implementations. Remember to add the WindowAdapter object to the frame object so the frame object listens for window events.
WindowListener l = new WindowAdapter() {
//The instantiation of object l is extended to include this code:
public void windowClosing(WindowEvent e) {
System.exit(0);
}
};
Exercises: Applets Revisited
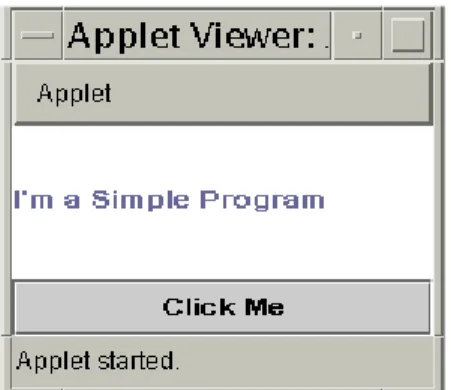
Using what you learned in Chapter 3 and in this lesson, convert the example code for this lesson into the applet shown in Figure 9. A solution that uses the JApplet follows the figure. You could also use the Applet class, which was the class used in Chapter 3. The JApplet class is the Project Swing class equivalent for creating applets, and the applet code for this exercise is almost identical except the JApplet class requires calls to getContentPane() to set the layout and color and to add components to the panel, which you do not need if you use the Applet class.
Figure 9. Applet Version of Application
import java.awt.Color;
import java.awt.BorderLayout;
import java.awt.event.*;
import javax.swing.*;
public class ApptoAppl extends JApplet implements ActionListener {
JLabel text;
JButton button;
JPanel panel;
private boolean _clickMeMode = true;
public void init() {
getContentPane().setLayout(new BorderLayout());
getContentPane().setBackground(Color.white);
text = new JLabel(“I’m a Simple Program”);
button = new JButton(“Click Me”);
button.addActionListener(this);
getContentPane().add(BorderLayout.CENTER, text);
getContentPane().add(BorderLayout.SOUTH, button);
public void start() {
System.out.println(“Applet starting.”);
}
public void stop(){
System.out.println(“Applet stopping.”);
}
public void destroy(){
System.out.println(“Destroy method called.”);
}
public void actionPerformed(ActionEvent event) {
Object source = event.getSource();
if (source == button){
if (_clickMeMode) {
text.setText("Button Clicked");
button.setText("Click Again");
_clickMeMode = false;
} else{
text.setText("I’m a Simple Program");
button.setText("Click Me");
_clickMeMode = true;
}
}
}
}
Applet and Application Differences
The differences between the applet and application versions of the example are as follows: • The applet class is public so another program such as appletviewer can access it. • The applet class extends Applet. The application class extends JFrame.
• The applet version has no main method.
• The application constructor is replaced in the applet by start and init methods. • GUI components are added directly to the Applet. User interface components are
5
Like applications and applets, you use classes to build servlets. But servlets are different from applications and applets in that the purpose of a servlet is to extend a server program to enhance its functionality. One very common use for servlets is to extend a web server by providing dynamic web content.
This lesson shows how to create a very simple browser-based HTML form that executes a basic servlet to process user data that is entered onto the form. The example is the servlet version of the applet and application examples studied so far. This lesson concludes with how to convert the servlet to a JavaServer Page (JSP).
Servlets are easy to write. All you need is Tomcat, which is the combined Java Server pages and Servlets reference implementation. You can download a free copy of Tomcat form the
java.sun.com website.
This lesson covers the following topics: • About the Example
• HTML Form
• Servlet Code
• JavaServer Pages Technology
About the Example
Web servers respond to browser requests with the HyperText Transfer Protocol (HTTP). HTTP is the protocol for moving hypertext files across the internet, and HyperText Markup Language (HTML) documents contain text that has been marked up for interpretation by an HTML browser such as FireFox.
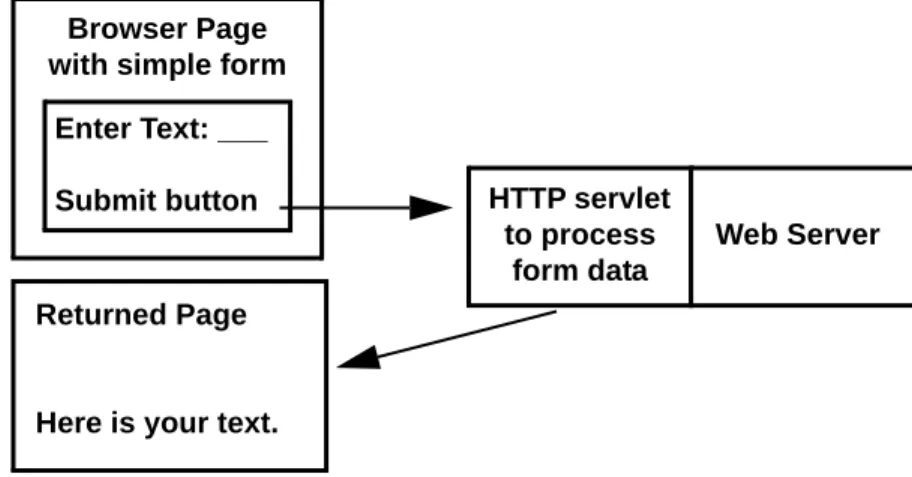
A browser accepts user input through an HTML form. The simple form used in this lesson has one text input field for the user to enter text and a Submit button. When the user clicks the Submit button, the simple servlet executes and processes the user input. In this example, the simple servlet returns an HTML page that displays the text entered by the user.
Figure 10 shows the flow of data between the browser and servlet for this example.
Browser Page with simple form
Enter Text: ___
Submit button Returned Page
Here is your text.
HTTP servlet to process
form data
Web Server
Figure 10. Returning an HTML Pages
HTML Form
Figure 11 shows the HTML form for the example. The following code for HTML form has an ACTION parameter that is shown in bold where you specify the location of the servlet.
I’m a Simple Form
Enter some text and click the Submit button.
<HTML>
<HEAD>
<TITLE>Example</TITLE>
</HEAD>
<BODY BGCOLOR="WHITE"><BR>
<H2>I’m a Simple Form</H2>
Enter some text and click the Submit button.<BR>
<FORM METHOD="POST" ACTION="/servlet/ExampServlet">
<INPUT TYPE="TEXT" NAME="DATA" SIZE=30>
<P>
<INPUT TYPE="SUBMIT" VALUE="Click Me">
<INPUT TYPE="RESET">
</FORM>
</BODY>
</HTML>
When the user clicks the Click Me button on the form, the servlet gets the text entered and returns an HTML page with the text. Figure 12shows an example page returned by
ExampServlet.java. See Servlet Code for a description of the servlet code that retrieves the user input and generates this HTML page.
Button Clicked
Four score and seven years ago.
Return to Form.
Figure 12. HTML Page Returned to Browser
To run the example, put the servlet and HTML files in the correct directories for the web server as indicated by the web server documentation or your administrator.
Servlet Code
The ExampServlet program builds an HTML page to return to the user. The servlet code does not use any Project Swing or AWT components or have action event handling code. For this simple servlet, you need to import only the following packages:
• java.io for system input and output. The HttpServlet class uses the IOException class in this package to signal that an input or output exception of some kind has
occurred.
• javax.servlet, which contains generic (protocol-independent) servlet classes. The HttpServlet class uses the ServletException class in this package to indicate a servlet problem.
import java.io.*;
import javax.servlet.*;
import javax.servlet.http.*;
public class ExampServlet extends HttpServlet {
public void doPost(HttpServletRequest request,
HttpServletResponse response)
throws ServletException, IOException {
response.setContentType(“text/html”);
PrintWriter out = response.getWriter();
out.println(“<body bgcolor=FFFFFF>”);
out.println(“<h2>Button Clicked<h2>”);
String data = request.getParameter(“data”);
if(data != null && data.length() > 0){
out.println(data);
} else {
out.println(“No text entered.”);
}
out.println(“<P>Return to <A HREF=../exampServlet.htm>Form</A>”);
out.close();
}
}
Class and Method Declarations
All HTML servlet classes extend the HttpServlet abstract class. Because HttpServlet is abstract, your servlet class must extend it and override at least one of its methods. An abstract class is a class that contains unimplemented methods and cannot be instantiated itself. You extend the abstract class and implement the methods you need so all HTTP servlets use a common framework to handle the HTTP protocol.
public class ExampServlet extends HttpServlet {
public void doPost(HttpServletRequest request,
HttpServletResponse response)
throws ServletException, IOException{
The ExampServlet class is declared public so that the web server that runs the servlet, which is not local to the servlet, can execute it.
The doPost method performs the HTTP POST operation, which is the type of operation specified in the HTML form used for this example. The other possibility is the HTTP GET operation, in which case you would implement the doGet method instead.
GET requests might pass parameters to a URL by appending them to the URL. A POST request might pass additional data to a URL by directly sending it to the server separate from the URL. A POST request cannot be bookmarked or emailed and does not change the URL of the response. A GET request can be bookmarked, emailed, and can add information to the URL of the response.
The parameter list for the doPost method takes a request and response object. The browser sends a request to the servlet and the servlet sends a response back to the browser. The doPost method implementation accesses information in the request object to find out who made the request, what form the request data is in, and which HTTP headers were sent. It also uses the response object to create an HTML page in response to the browser request. The doPost method throws an IOException if there is an input or output problem when it handles the request, and a ServletException if the request could not be handled. These exceptions are handled in the HttpServlet class.
Method Implementation
The first part of the doPost method uses the response object to create an HTML page. It first sets the response content type to be text/html, then gets a PrintWriter object for formatted text output.
response.setContentType(“text/html”);
PrintWriter out = response.getWriter();
out.println(“<body bgcolor=#FFFFFF>”);
out.println(“<h2>Button Clicked</h2>”);
The next line uses the request object to get the data from the text field on the form and store it in the data variable. The getparameter method gets the named parameter, returns null if the parameter is not set, and returns an empty string if the parameter has no value. String data = request.getParameter(“data”);
The next part of the doPost method gets the data out of the data parameter and passes it to the response object to add to the HTML response page.
if(data != null && data.length() > 0){
out.println(data);
}else {
out.println(“No text entered.”);
}
The last part of the doPost method creates a link to take the user from the HTML response page back to the original form and closes the response.
out.println(“<P>Return to <A HREF=../exampServlet.html>Form</A>”);
out.close();
JavaServer Pages Technology
JavaServer Pages (JSP) let you put segments of servlet code directly within a static HTML or eXtensible Markup Language (XML) page. When the JSP page executes, the application server creates, compiles, loads, and runs a background servlet to execute the servlet code segments and return an HTML page.
A JSP page looks like an HTML or XML page with servlet code segments embedded between various forms of leading (<%) and closing (%>) JSP tags. There are no
HttpServlet methods such as doGet and doPost. Instead, the code that would normally be in those methods is embedded directly in the JSP page with scriptlet tags.
HTML Form
It is straightforward to convert the servlet example to a JSP page. First, change the ACTION parameter in the HTML form to invoke the JSP page instead of the servlet as shown below. Note that the JSP page is not in the servlets directory, but in the same directory with the HTML page.
<HTML>
<BODY BGCOLOR="WHITE">
<TITLE>Example</TITLE>
<TABLE><TR><TD WIDTH="275">
<H2>I’m a Simple Form</H2>
Enter some text and click the Submit button.<BR>
<FORM METHOD="POST" ACTION="ExampJsp.jsp">
<INPUT TYPE="TEXT" NAME="data" SIZE=30>
<P>
<INPUT TYPE="SUBMIT" VALUE="Click Me">
<INPUT TYPE="RESET">
</FORM>
</TD></TR></TABLE>
</BODY>
</HTML>
JSP Page
JSP directives are instructions that are processed by the JSP engine when the JSP page is translated to a servlet. The directives used in this example tell the JSP engine to include certain packages and classes. Directives are enclosed by the <%@ and %> directive tags. JSP scriptlets let you embed Java code segments into the JSP page. The embedded code is inserted directly into the servlet that executes when the page is requested. Scriptlets are enclosed in the <% and %> scriptlet tags.
A scriptlet can use the following predefined variables: request, response, out, and in. This means that you can use these variables without declaring them. For example, the PrintWriter out = response.getWriter() line used in the servlet code to create the out object is not needed in a JSP page.
<HTML>
<HEAD>
<TITLE>Example JSP Page</TITLE>
</HEAD>
<BODY>
<%@ page import="java.io.*" %>
<%@ page import="javax.servlet.*" %>
<%@ page import="javax.servlet.http.*" %>
<%
response.setContentType("text/html");
out.println("<body bgcolor=FFFFFF>");
out.println("<h2>Button Clicked<h2>");
String data = request.getParameter("data");
if(data != null && data.length() > 0){
out.println(data);
} else {
out.println("No text entered.");
}
out.println("<P>Return to <A HREF=../exampJsp.html>Form</A>");
out.close();
%>
</BODY>
</HTML>
Other JSP tags you can use are comments (<%-- comment %>), declarations (<%! String data %>), expressions (<%= request.getParameter %>), and JSP-Specific tags. The following code shows the JSP page converted to use the comment and declaration tags.
<HTML>
<TITLE>Example JSP Page</TITLE>
</HEAD>
<%-- Import Statements --%>
<%@ page import="java.io.*" %>
<%@ page import="javax.servlet.*" %>
<%@ page import="javax.servlet.http.*" %>
<%-- Declaration --%>
<%! String data; %>
<%
response.setContentType("text/html");
out.println("<body bgcolor=FFFFFF>");
out.println("<h2>Button Clicked<h2>");
data = request.getParameter("data");
if(data != null && data.length() > 0){
out.println(data);
}else {
out.println("No text entered.");
}
out.println("<P>Return to <A HREF=../exampJsp.html>Form</A>");
out.close();
%>
</BODY>
</HTML>
Exercises
6
So far, you have learned how to retrieve and handle a short text string entered from the keyboard into a simple UI or HTML form. But programs also retrieve, handle, and store data in files and databases.
This lesson expands the applet, application, and servlet examples from the previous lessons to perform basic file access using the APIs in the java.io package. It also shows you how to grant applets and servlets permission to access specific files, and how to restrict an application so it has access to specific files only. You learn how to perform similar operations on a database in Chapter 7, Database Access and Permissions.
This lesson covers the following topics: • File Access by Applications
• File Access by Applets
• Restrict Applications
• File Access by Servlets
• Exercises
File Access by Applications
The Java platform provides a rich range of classes for reading character data (alphanumeric) or byte data (a unit consisting of a combination of eight 1’s and 0’s) into a program, and writing character or byte data out to an external file, storage device, or program. The source or destination might be on the local computer system where the program is running or anywhere on the network. See Code for This Lesson for full source code listings.
This section shows you how to read data from and write data to a file on the local computer system.
• Reading: A program opens an input stream on the file and reads the data in serially (in the order it was written to the file).
• Writing: A program opens an output stream on the file and writes the data out serially. This first example converts the SwingUI.java example from Chapter 4, Building a User Interface to accept user input through a text field and then save it to a file.
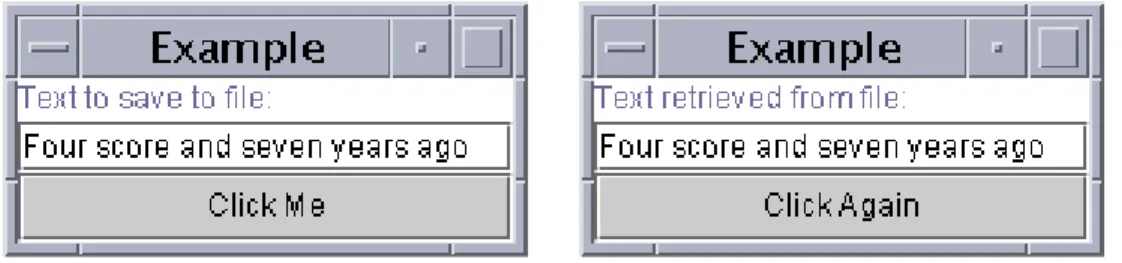
The window on the left appears when you start the FileIO application. When you click the button, whatever is entered into the text field is saved to a file. After that, the file is opened, read, and its text displayed in the window on the right. Click again and you are back to the original window with a blank text field ready for more input.
Figure 13. Click the Button
The conversion from the SwingUI program from Chapter 4 to the FileIO program for this lesson primarily involves the constructor and the actionPerformed method as described in the next sections.
Constructor and Instance Variable Changes
The constructor instantiates the textField with a value of 30. This value tells the Java platform the number of columns to use to calculate the preferred width of the text field object. Lower values result in a narrower display, and likewise, higher values result in a wider display.
Next, the text label object is added to the North section of the BorderLayout and the textField object is added to the Center section.
//Instance variable for text field
//Constructor
FileIO(){
text = new JLabel(“Text to save to file:”);
button = new JButton(“Click Me”);
button.addActionListener(this);
//Text field instantiation
textField = new JTextField(30);
panel = new JPanel();
panel.setLayout(new BorderLayout());
panel.setBackground(Color.white);
getContentPane().add(panel);
//Adjustments to layout to add text field
panel.add(BorderLayout.NORTH, text);
panel.add(BorderLayout.CENTER, textField);
panel.add(BorderLayout.SOUTH, button);
}
Method Changes
The actionPerformed method uses the FileInputStream and FileOutputStream classes to read data from and write data to a file. These classes handle data in byte streams instead of character streams. Character streams are used in the applet example. A more detailed explanation of the changes to the method implementation comes after the code. public void actionPerformed( ActionEvent event){
Object source = event.getSource();
if(source == button){
String s = null;
//Variable to display text read from file
if (_clickMeMode){
FileInputStream in=null;
FileOutputStream out=null;
try {
//Code to write to file
String text = textField.getText();
byte b[] = text.getBytes();
String outputFileName = System.getProperty(“user.home”,
File.separatorChar + “home” +
File.separatorChar + “zelda”) +
File.separatorChar + “text.txt”;
out = new FileOutputStream(outputFileName);
out.write(b);