State Management
T
he most significant difference between programming for the Internet and program-ming for the desktop is state management—in other words, how you retain information for the current user. In a traditional Windows application, state is managed automatically. Memory is plentiful and always available. In a web application, it’s a different story. Thousands of users might simultaneously run the same application on the same computer (the web server), each one communicating over the stateless HTTP of the Internet. These conditions make it impossible to program a web application like a traditional Windows program.Understanding these state limitations is the key to creating efficient, robust web applications. In this chapter, you’ll learn why state is no trivial issue in the world of Internet programming, and you’ll see how you can use ASP.NET’s state management features to store and manage information carefully and consistently. You’ll explore different state options, including view state, session state, and custom cookies, and consider how to transfer information from page to page using cross-page posting and the query string. You’ll also look at how you can react to application events with the global.asax file.
The Problem of State
In a traditional Windows program, users interact with a continuously running applica-tion. A portion of memory on the desktop computer is allocated to store the current set of working information.
In a web application, the story is quite a bit different. A professional ASP.NET site might look like a continuously running application, but it’s really just a clever illusion. Web applications use a highly efficient disconnected access pattern. In a typical web request, the client connects to the web server and requests a page. When the page is delivered, the connection is severed, and the web server abandons any information it has about the client. By the time the user receives a page, the “application” has already stopped running.
Because clients need to be connected for only a few seconds at most, a web server can handle thousands of requests without a performance hit. However, if you need to retain infor-mation between user actions (and you almost always do), you need to take additional steps.
View State
In the previous chapters, you learned how ASP.NET controls use view stateto remember their state. View state information is maintained in a hidden field and automatically returned to the server with every postback. However, view state isn’t limited to server controls. Your web page code can add bits of information directly to the view state collec-tion of the containing page and retrieve it later after the page is posted back. The type of information you can store includes simple data types and your own custom objects.
The ViewState property of the page provides the view state collection. This property is an instance of the StateBag collection class. To add and remove items in this class, you use a dictionary-based syntax, where every item has a unique string name.
For example, consider this code:
' The this keyword refers to the current Page object. It's optional. Me.ViewState("Counter") = 1
This places the value 1 (or rather, an integer that contains the value 1) into the view state collection and gives it the descriptive name Counter. If currently no item has the name Counter, a new item will be added automatically. If an item is already indexed under the name Counter, it will be replaced.
When retrieving a value, you use the key name. You also need to cast the retrieved value to the appropriate data type using the casting syntax you saw in Chapter 2 and Chapter 3. This extra step is required because the ViewState collection stores all items as generic objects, which allows it to handle many different data types.
Here’s the code that retrieves the counter from view state and converts it to an integer:
Dim counter As Integer
counter = CType(Me.ViewState("Counter"), Integer)
■
Note
ASP.NET provides many collections that use the same dictionary syntax. This includes the collec-tions you’ll use for session and application state, as well as those used for caching and cookies. You’ll see several of these collections in this chapter.A View State Example
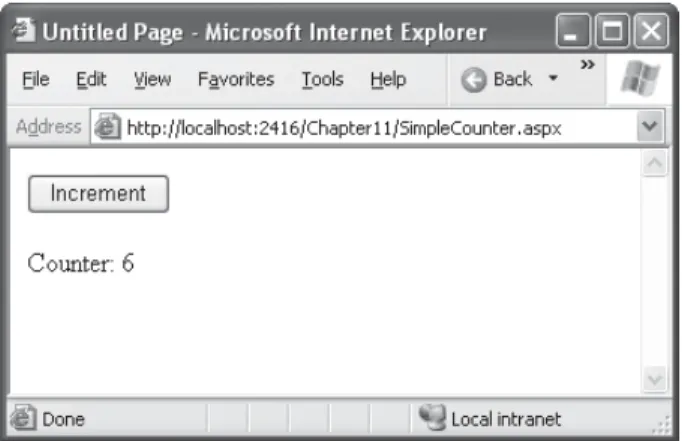
The following example is a simple counter program that records how many times a button is clicked. Without any kind of state management, the counter will be locked perpetually at 1. With careful use of view state, the counter works as expected.
Figure 9-1. A simple view state counter
Protected Sub cmdIncrement_Click(ByVal sender As Object, _ ByVal e As EventArgs) Handles cmdIncrement.Click
Dim Counter As Integer
If ViewState("Counter") Is Nothing Then Counter = 1
Else
Counter = CType(ViewState("Counter"), Integer) + 1 End If
ViewState("Counter") = Counter
lblCount.Text = "Counter: " & Counter.ToString() End Sub
End Class
The code checks to make sure the item exists in view state before it attempts to retrieve it. Otherwise, you could easily run into problems such as the infamous null reference exception.
Figure 9-1 shows the output for this page.
Making View State Secure
You probably remember from Chapter 5 that view state information is stored in a single jumbled string that looks like this:
<input type="hidden" name="__VIEWSTATE" value="dDw3NDg2NTI5MDg7Oz4="/>
As you add more information to view state, this value can become much longer. Because this value isn’t formatted as clear text, many ASP.NET programmers assume that their view state data is encrypted. It isn’t. Instead, the view state information is simply patched together in memory and converted to a Base64 string. A clever hacker could reverse-engineer this string and examine your view state data in a matter of seconds.
If you want to make view state more secure, you have two choices. First, you can make sure the view state information is tamperproof by instructing ASP.NET to use ahash code. A hash code is sometimes described as a cryptographically strong checksum. The idea is that ASP.NET examines all the data in your view state and runs it through a hashing algo-rithm (with the help of a secret key value). The hashing algoalgo-rithm creates a short segment of data, which is the hash code. This code is then added at the end of the view state data.
When the page is posted back, ASP.NET examines the view state data and recalculates the hash code using the same process. It then checks whether the checksum it calculated matches the hash code that is stored in the view state for the page. If a malicious user changes part of the view state data, ASP.NET will end up with a new hash code that doesn’t match. At this point, it will reject the postback completely. (You might think a really clever user could get around this by generating fake view state information anda matching hash code. However, malicious users can’t generate the right hash code, because they don’t have the same cryptographic key as ASP.NET. This means the hash codes they create won’t match.) Hash codes are actually enabled by default, so if you want this functionality, you don’t need to take any extra steps. Occasionally, developers choose to disable this feature to prevent problems in a web farm where different servers have different keys. (The prob-lem occurs if the page is posted back and handled by a new server, which won’t be able to verify the view state information.) To disable hash codes, you can use the enableView-StateMac attribute of the <pages> element in the web.config or machine.config file, as shown here:
<configuration xmlns="http://schemas.microsoft.com/.NetConfiguration/v2.0"> <system.web>
<pages enableViewStateMac="false" /> ...
</system.web> </configuration>
Even when you use hash codes, the view state data will still be readable by the user. In many cases, this is completely acceptable—after all, the view state tracks information that’s often provided directly through other controls. However, if your view state contains some information you want to keep secret, you can enable view state encryption.
You can turn on encryption for an individual page using the ViewStateEncryptionMode property of the Page directive:
<%@Page ViewStateEncryptionMode="Always" %>
Or you can set the same attribute in a configuration file:
<configuration xmlns="http://schemas.microsoft.com/.NetConfiguration/v2.0"> <system.web>
<pages viewStateEncryptionMode="Always" /> ...
</system.web> </configuration>
Either way, this enforces encryption. You have three choices for your view state encryption setting—always encrypt (Always), never encrypt (Never), or encrypt only if a control specifically requests it (Auto). The default is Auto, which means a control must call the Page.RegisterRequiresViewStateEncryption() method to request encryption. If no control calls this method to indicate it has sensitive information, the view state is not encrypted, thereby saving the encryption overhead. On the other hand, a control doesn’t have absolute power—if it calls Page.RegisterRequiresViewStateEncryption() and the encryption mode is Never, the view state won’t be encrypted.
■
Tip
Don’t encrypt view state data if you don’t need to do so. The encryption will impose a performance penalty, because the web server needs to perform the encryption and decryption with each postback.Retaining Member Variables
You have probably noticed that any information you set in a member variable for an ASP.NET page is automatically abandoned when the page processing is finished and the page is sent to the client. (The Counter variable in the previous code listing is an example.) Interestingly, you can work around this limitation using view state.
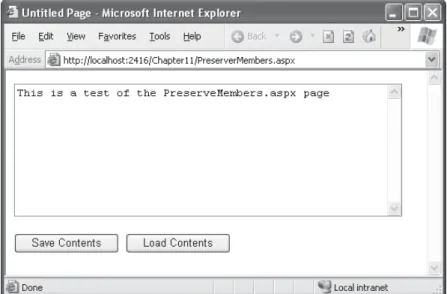
Figure 9-2. A page with state
The following example uses this technique with a single member variable (named Con-tents). The page provides a text box and two buttons. The user can choose to save a string of text and then restore it at a later time (see Figure 9-2). The Button.Click event handlers store and retrieve this text using the Contents member variable. These event handlers don’t need to save or restore this information using view state, because the PreRender and Load event handlers perform these tasks when page processing starts and finishes.
Public Partial Class PreserveMembers Inherits System.Web.UI.Page
' A member variable that will be cleared with every postback. Private Contents As String
Protected Sub Page_Load(ByVal sender As Object, _ ByVal e As EventArgs) Handles Me.Load
If Me.IsPostBack Then
' Restore variables.
Contents = CType(ViewState("Text"), String)
End If End Sub
Protected Sub Page_PreRender(ByVal sender As Object, _ ByVal e As EventArgs) Handles Me.PreRender
' Persist variables.
ViewState("Text") = Contents
Protected Sub cmdSave_Click(ByVal sender As Object, _ ByVal e As EventArgs) Handles cmdSave.Click
' Transfer contents of text box to member variable. Contents = txtValue.Text
txtValue.Text = "" End Sub
Protected Sub cmdLoad_Click(ByVal sender As Object, _ ByVal e As EventArgs) Handles cmdLoad.Click
' Restore contents of member variable to text box. txtValue.Text = Contents
End Sub
End Class
The logic in the Load and PreRender event handlers allows the rest of your code to work more or less as it would in a desktop application. However, you must be careful not to store needless amounts of information when using this technique. If you store unnec-essary information in view state, it will enlarge the size of the final page output and can thus slow down page transmission times. Another disadvantage with this approach is that it hides the low-level reality that every piece of data must be explicitly saved and restored. When you hide this reality, it’s more likely that you’ll forget to respect it and design for it.
If you decide to use this approach to save member variables in view state, use it exclusively. In other words, refrain from saving some view state variables at the PreRender stage and others in control event handlers, because this is sure to confuse you and any other programmer who looks at your code.
■
Tip
The previous code example reacts to the Page.PreRender event, which occurs just after page pro-cessing is complete and just before the page is rendered in HTML. This is an ideal place to store any leftover information that is required. You cannot store view state information in an event handler for the Page.Unload event. Though your code will not cause an error, the information will not be stored in view state, because the final HTML page output is already rendered.Storing Custom Objects
To make your objects serializable, you need to add a <Serializable> attribute before your class declaration. For example, here’s an exceedingly simple Customer class:
<Serializable()> _
Public Class Customer
Public FirstName As String Public LastName As String
Public Sub New(ByVal firstName As String, ByVal lastName As String) Me.FirstName = firstName
Me.LastName = lastName End Sub
End Class
Because the Customer class is marked as serializable, it can be stored in view state:
' Store a customer in view state.
Dim cust As New Customer("Marsala", "Simons") ViewState("CurrentCustomer") = cust
Remember, when using custom objects, you’ll need to cast your data when you retrieve it from view state.
' Retrieve a customer from view state. Dim cust As Customer
cust = CType(ViewState("CurrentCustomer"), Customer)
Transferring Information
One of the most significant limitations with view state is that it’s tightly bound to a specific page. If the user navigates to another page, this information is lost. This problem has sev-eral solutions, and the best approach depends on your requirements.
In the following sections, you’ll learn two basic techniques to transfer information between pages: cross-page posting and the query string.
Cross-Page Posting
One approach that’s new in ASP.NET 2.0 is to trigger a postback to another page. This technique sounds conceptually straightforward, but it’s a potential minefield. If you’re not careful, it can lead you to create pages that are tightly coupled to others and difficult to enhance and debug.
The infrastructure that supports cross-page postbacks is a new property named PostBackUrl, which is defined by the IButtonControl interface and turns up in button controls such as ImageButton, LinkButton, and Button. To use cross-posting, you simply set PostBackUrl to the name of another web form. When the user clicks the button, the page will be posted to that new URL with the values from all the input controls on the current page.
Here’s an example—a page named CrossPage1.aspx that defines a form with two text boxes and a button. When the button is clicked, it posts to a page named CrossPage2.aspx.
<%@ Page Language="VB" AutoEventWireup="False" CodeFile="CrossPage1.aspx.vb" Inherits="CrossPage1" %>
<html>
<head runat="server">
<title>CrossPage1</title> </head>
<body>
<form id="form1" runat="server" > <div>
First Name:
<asp:TextBox ID="txtFirstName" runat="server"></asp:TextBox> <br />
Last Name:
<asp:TextBox ID="txtLastName" runat="server"></asp:TextBox> <br />
<br />
<asp:Button runat="server" ID="cmdPost"
Figure 9-3. The source of a cross-page postback </div>
</form> </body> </html>
The CrossPage1 page doesn’t include any code. Figure 9-3 shows how it appears in the browser.
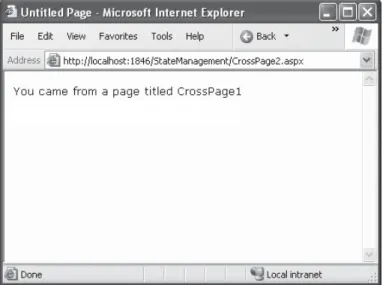
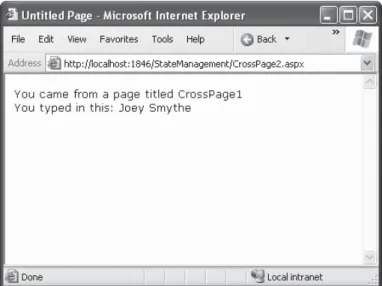
Now if you load this page and click the button, the page will be posted back to CrossPage2.aspx. At this point, the CrossPage2.aspx page can interact with CrossPage1.aspx using the Page.PreviousPage property. Here’s an event handler that grabs the title from the previous page and displays it:
Public Partial Class CrossPage2 Inherits System.Web.UI.Page
Protected Sub Page_Load(ByVal sender As Object, _ ByVal e As EventArgs) Handles Me.Load
If PreviousPage IsNot Nothing Then
lblInfo.Text = "You came from a page titled " & _ PreviousPage.Header.Title
End If End Sub
Figure 9-4. The target of a cross-page postback
Note that this page checks for a null reference before attempting to access the PreviousPage object. If it’s a null reference (Nothing), no cross-page postback took place. This means CrossPage2.aspx was requested directly, or CrossPage2.aspx posted back to itself. Either way, no PreviousPage object is available.
Figure 9-4 shows what you’ll see when CrossPage1.aspx posts to CrossPage2.aspx.
Getting More Information from the Source Page
The previous example shows an interesting initial test, but it doesn’t really allow you to transfer any useful information. After all, you’re probably interested in retrieving specific details (such as the text in the text boxes of CrossPage1.aspx) from CrossPage2.aspx. The title alone isn’t very interesting.
To get more specific details, such as control values, you need to cast the PreviousPage reference to the appropriate page class (in this case it’s the CrossPage1 class). Here’s an example that handles this situation properly, by checking first whether the PreviousPage object is an instance of the expected class:
Protected Sub Page_Load(ByVal sender As Object, _ ByVal e As EventArgs) Handles Me.Load
Dim prevPage As CrossPage1
prevPage = TryCast(PreviousPage, CrossPage1)
If prevPage IsNot Nothing Then
' (Read some information from the previous page.) End If
Rather then checking whether PreviousPage is the correct type of object and then casting it with CType(), this code uses a shortcut with TryCast(). If a conversion can’t be made, TryCast() simply returns a null reference.
You can also solve this problem in another way. Rather than casting the reference manually, you can add the PreviousPageType directive to the .aspx page that receives the cross-page postback (in this example, CrossPage2.aspx), right after the Page directive. The PreviousPageType directive indicates the expected type of the page initiating the cross-page postback. Here’s an example:
<%@ PreviousPageType VirtualPath="~/CrossPage1.aspx" %>
Now, the PreviousPage property will automatically use the CrossPage type. However, this approach is more fragile because it limits you to a single page class. You don’t have the flexibility to deal with situations where more than one page might trigger a cross-page postback. For that reason, it’s usually more flexible to use the casting approach.
Once you’ve cast the previous page to the appropriate page type, you still won’t be able to directly access the control objects it contains. That’s because the controls are declared as protected members, so they aren’t publicly accessible to other classes. You can work around this by using properties.
For example, if you want to expose the values from two text boxes in the source page, you might add properties that wrap the control variables. Here are two properties you could add to the CrossPage1 class to expose its TextBox controls:
Public ReadOnly Property FirstNameTextBox() As TextBox Get
Return txtFirstName End Get
End Property
Public ReadOnly Property LastNameTextBox() As TextBox Get
Return txtLastName End Get
End Property
A better choice is to define specific, limited methods that extract just the information you need. For example, you might decide to add a FullName() property that retrieves just the text from the two text boxes. Here’s the full page code for CrossPage1.aspx with this property:
Partial Class CrossPage1
Inherits System.Web.UI.Page
Public ReadOnly Property FullName() As String Get
Return txtFirstName.Text & " " & txtLastName.Text End Get
End Property
End Class
This way, the relationship between the two pages is clear, simple, and easy to maintain. You can probably change the controls in the source page (CrossPage1) without needing to change other parts of your application. For example, if you decide to use different controls for name entry in CrossPage1.aspx, you will be forced to revise the code for the FullName property. However, your changes would be confined to CrossPage1.aspx, and you wouldn’t need to modify CrossPage2.aspx at all.
Here’s how you can rewrite the code in CrossPage2.aspx to display the information from CrossPage1.aspx:
Protected Sub Page_Load(ByVal sender As Object, _ ByVal e As EventArgs) Handles Me.Load
If PreviousPage IsNot Nothing Then
lblInfo.Text = "You came from a page titled " & _ PreviousPage.Header.Title & "<br />"
Dim prevPage As CrossPage1
prevPage = TryCast(PreviousPage, CrossPage1) If prevPage IsNot Nothing Then
lblInfo.Text &= "You typed in this: " & prevPage.FullName End If
End If
End Sub
Figure 9-5. Retrieving specific information from the source page
■
Note
Cross-page postbacks are genuinely useful, but they can lead the way to more complicated pages. If you allow multiple source pages that post to the same destination page, it’s up to you to code the logic that figures out which page the user came from and then act accordingly. To avoid these headaches, it’s easiest to perform cross-page postbacks between two specific pages only.ASP.NET uses some interesting sleight of hand to make cross-page postbacks work. The first time the second page accesses Page.PreviousPage, ASP.NET needs to create the previous page object. To do this, it actually starts the page processing but interrupts it just before the PreRender stage, and it doesn’t let the page render any HTML output.
However, this still has some interesting side effects. For example, all the page events of the previous page are fired, including Page.Load and Page.Init, and the Button.Click event also fires for the button that triggered the cross-page postback. ASP.NET fires these events because they might be needed to initialize the source page.
The Query String
Another common approach is to pass information using a query string in the URL. This approach is commonly found in search engines. For example, if you perform a search on the Google website, you’ll be redirected to a new URL that incorporates your search parameters. Here’s an example:
http://www.google.ca/search?q=organic+gardening
The advantage of the query string is that it’s lightweight and doesn’t exert any kind of burden on the server. However, it also has several limitations:
• Information is limited to simple strings, which must contain URL-legal characters.
• Information is clearly visible to the user and to anyone else who cares to eavesdrop on the Internet.
• The enterprising user might decide to modify the query string and supply new val-ues, which your program won’t expect and can’t protect against.
• Many browsers impose a limit on the length of a URL (usually from 1KB to 2KB). For that reason, you can’t place a large amount of information in the query string and still be assured of compatibility with most browsers.
Adding information to the query string is still a useful technique. It’s particularly well suited in database applications where you present the user with a list of items that corre-spond to records in a database, such as products. The user can then select an item and be forwarded to another page with detailed information about the selected item. One easy way to implement this design is to have the first page send the item ID to the second page. The second page then looks that item up in the database and displays the detailed infor-mation. You’ll notice this technique in e-commerce sites such as Amazon.
To store information in the query string, you need to place it there yourself. Unfortunately, you have no collection-based way to do this. Typically, this means using a special HyperLink control or a special Response.Redirect() statement such as the one shown here:
' Go to newpage.aspx. Submit a single query string argument ' named recordID, and set to 10.
Response.Redirect("newpage.aspx?recordID=10")
You can send multiple parameters as long as they’re separated with an ampersand (&):
' Go to newpage.aspx. Submit two query string arguments: ' recordID (10) and mode (full).
Response.Redirect("newpage.aspx?recordID=10&mode=full")
The receiving page has an easier time working with the query string. It can receive the values from the QueryString dictionary collection exposed by the built-in Request object:
Dim ID As String = Request.QueryString("recordID")
Figure 9-6. A query string sender
■
Note
Unlike view state, information passed through the query string is clearly visible and unencrypted. Don’t use the query string for information that needs to be hidden or made tamperproof.A Query String Example
The next program presents a list of entries. When the user chooses an item by clicking the appropriate item in the list, the user is forwarded to a new page. This page displays the received ID number. This provides a quick and simple query string test with two pages. In a sophisticated application, you would want to combine some of the data control features that are described later in Part 3 of this book.
The first page provides a list of items, a check box, and a submission button (see Figure 9-6).
Here’s the code for the first page:
Public Partial Class QueryStringSender Inherits System.Web.UI.Page
If Not Me.IsPostBack Then ' Add sample values.
lstItems.Items.Add("Econo Sofa")
lstItems.Items.Add("Supreme Leather Drapery") lstItems.Items.Add("Threadbare Carpet") lstItems.Items.Add("Antique Lamp")
lstItems.Items.Add("Retro-Finish Jacuzzi") End If
End Sub
Protected Sub cmdGo_Click(ByVal sender As Object, _ ByVal e As EventArgs) Handles cmdGo.Click
If lstItems.SelectedIndex = -1 Then
lblError.Text = "You must select an item." Else
' Forward the user to the information page, ' with the query string data.
Dim Url As String = "QueryStringRecipient.aspx?" Url &= "Item=" & lstItems.SelectedItem.Text & "&" Url &= "Mode=" & chkDetails.Checked.ToString() Response.Redirect(Url)
End If End Sub
End Class
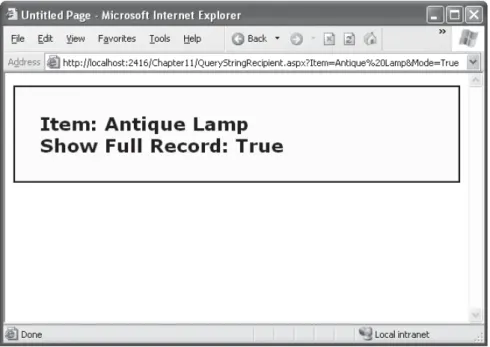
Public Partial Class QueryStringRecipient Inherits System.Web.UI.Page
Protected Sub Page_Load(ByVal sender As Object, _ ByVal e As EventArgs) Handles Me.Load
lblInfo.Text = "Item: " & Request.QueryString("Item") lblInfo.Text &= "<br />Show Full Record: "
lblInfo.Text &= Request.QueryString("Mode")
End Sub
End Class
Custom Cookies
Custom cookies provide another way that you can store information for later use. Cookies are small files that are created on the client’s hard drive (or, if they’re temporary, in the web browser’s memory). One advantage of cookies is that they work transparently without the user being aware that information needs to be stored. They also can be easily used by any page in your application and even be retained between visits, which allows for truly long-term storage. They suffer from some of the same drawbacks that affect query strings— namely, they’re limited to simple string information, and they’re easily accessible and readable if the user finds and opens the corresponding file. These factors make them a poor choice for complex or private information or large amounts of data.
Some users disable cookies on their browsers, which will cause problems for web applications that require them. For the most part, cookies are widely adopted because so many sites use them. However, they can limit your potential audience, and they aren’t suited for the embedded browsers used with mobile devices. Also, users might manually delete a cookie file stored on their hard drives.
A good rule of thumb is to use cookies to retain preference-related information, such as a customer’s last order item or e-mail address. You can then use this information to provide a richer experience. However, you shouldn’t require the use of cookies or assume that they’ll always be present.
Cookies are fairly easy to use. Both the Request and Response objects (which are provided through Page properties) provide a Cookies collection. The important trick to remember is that you retrieve cookies from the Request object, and you set cookies using the Response object.
To set a cookie, just create a new HttpCookie object. You can then fill it with string information (using the familiar dictionary pattern) and attach it to the current web response:
' Create the cookie object.
Dim cookie As New HttpCookie("Preferences")
' Set a value in it.
cookie("LanguagePref") = "English"
' Add it to the current web response. Response.Cookies.Add(cookie)
A cookie added in this way will persist until the user closes the browser and will be sent with every request. To create a longer-lived cookie, you can set an expiration date:
' This cookie lives for one year.
cookie.Expires = DateTime.Now.AddYears(1)
You retrieve cookies by cookie name using the Request.Cookies collection:
Dim cookie As HttpCookie = Request.Cookies("Preferences")
' Check to see whether a cookie was found with this name. ' This is a good precaution to take,
' because the user could disable cookies, ' in which case the cookie will not exist. Dim language As String
If cookie IsNot Nothing
The only way to remove a cookie is by replacing it with a cookie that has an expiration date that has already passed. This code demonstrates the technique:
Dim cookie As New HttpCookie("LanguagePref") cookie.Expires = DateTime.Now.AddDays(-1) Response.Cookies.Add(cookie)
A Cookie Example
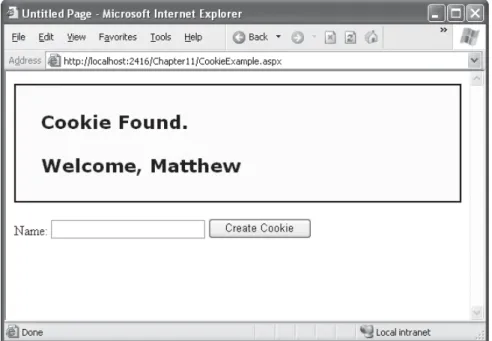
The next example shows a typical use of cookies to store a customer name. If the name is found, a welcome message is displayed, as shown in Figure 9-8.
Here’s the code for this page:
Public Partial Class CookieExample Inherits System.Web.UI.Page
Protected Sub Page_Load(ByVal sender As Object, _ ByVal e As EventArgs) Handles Me.Load
Dim Cookie As HttpCookie = Request.Cookies("Preferences") If Cookie Is Nothing Then
lblWelcome.Text = "<b>Unknown Customer</b>" Else
lblWelcome.Text = "<b>Cookie Found.</b><br /><br />"
lblWelcome.Text &= "Welcome, " & Cookie("Name") End If
End Sub
Protected Sub cmdStore_Click(ByVal sender As Object, _ ByVal e As EventArgs) Handles cmdStore.Click
Dim Cookie As HttpCookie = Request.Cookies("Preferences") If Cookie Is Nothing Then
Cookie = New HttpCookie("Preferences") End If
Cookie("Name") = txtName.Text
Cookie.Expires = DateTime.Now.AddYears(1) Response.Cookies.Add(Cookie)
lblWelcome.Text = "<b>Cookie Created.</b><br /><br />" lblWelcome.Text &= "New Customer: " & Cookie("Name") End Sub
End Class
■
Note
You’ll find that some other ASP.NET features use cookies. Two examples are session state (which allows you to temporarily store user-specific information in server memory) and forms security (which allows you to restrict portions of a website and force users to access it through a login page). Chapter 18 discusses forms security, and the next section of this chapter discusses session state.Session State
There comes a point in the life of most applications when they begin to have more sophisticated storage requirements. An application might need to store and access complex information such as custom data objects, which can’t be easily persisted to a cookie or sent through a query string. Or the application might have stringent security requirements that prevent it from storing information about a client in view state or in a custom cookie. In these situations, you can use ASP.NET’s built-in session state facility.
Session Tracking
ASP.NET tracks each session using a unique 120-bit identifier. ASP.NET uses a proprietary algorithm to generate this value, thereby guaranteeing (statistically speaking) that the number is unique and it’s random enough that a malicious user can’t reverse-engineer or “guess” what session ID a given client will be using. This special ID is the only piece of information that is transmitted between the web server and the client. When the client presents the session ID, ASP.NET looks up the corresponding session, retrieves the serialized data from the state server, converts it to live objects, and places these objects into a special collection so they can be accessed in code. This process takes place automatically.
For this system to work, the client must present the appropriate session ID with each request. You can accomplish this in two ways:
Using cookies: In this case, the session ID is transmitted in a special cookie (named ASP.NET_SessionId), which ASP.NET creates automatically when the session collection is used. This is the default, and it’s also the same approach that was used in earlier versions of ASP.
Using modified URLs: In this case, the session ID is transmitted in a specially modified (or munged) URL. This is a new feature in ASP.NET that allows you to create applica-tions that use session state with clients that don’t support cookies.
Session state doesn’t come for free. Though it solves many of the problems associated with other forms of state management, it forces the server to store additional informa-tion in memory. This extra memory requirement, even if it is small, can quickly grow to performance-destroying levels as hundreds or thousands of clients access the site.
In other words, you must think through any use of session state. A careless use of session state is one of the most common reasons that a web application can’t scale to serve a large number of clients. Sometimes a better approach is to use caching, as described in Chapter 26.
Using Session State
You can interact with session state using the System.Web.SessionState.HttpSessionState class, which is provided in an ASP.NET web page as the built-in Session object. The syntax for adding items to the collection and retrieving them is basically the same as for adding items to a page’s view state.
For example, you might store a DataSet in session memory like this:
Session("dsInfo") = dsInfo
You can then retrieve it with an appropriate conversion operation:
■
Note
Chapter 13 explores the DataSet.Session state is global to your entire application for the current user. However, session state can be lost in several ways:
• If the user closes and restarts the browser.
• If the user accesses the same page through a different browser window, although the session will still exist if a web page is accessed through the original browser window. Browsers differ on how they handle this situation.
• If the session times out due to inactivity. More information about session timeout can be found in the configuration section.
• If the programmer ends the session in code.
In the first two cases, the session actually remains in memory, because the web server has no idea that the client has closed the browser or changed windows. The session will linger in memory, remaining inaccessible, until it eventually expires.
Table 9-1 describes the methods and properties of the HttpSessionState class.
Table 9-1. HttpSessionState Members
Member Description
Count Provides the number of items in the current session collection.
IsCookieless Identifies whether the session is tracked with a cookie or modified URLs.
IsNewSession Identifies whether the session was created only for the current request. If no information is in session state, ASP.NET won’t bother to track the session or create a session cookie. Instead, the session will be recreated with every request.
Mode Provides an enumerated value that explains how ASP.NET stores session state information. This storage mode is determined based on the web.config settings discussed in the “Session State Configuration” section later in this chapter.
SessionID Provides a string with the unique session identifier for the current client.
Timeout Determines the number of minutes that will elapse before the current session is abandoned, provided that no more requests are received from the client. This value can be changed programmatically, letting you make the session collection longer when needed.
Abandon() Cancels the current session immediately and releases all the memory it occupied. This is a useful technique in a logoff page to ensure that server memory is
reclaimed as quickly as possible.
A Session State Example
The next example uses session state to store several Furniture data objects. The data object combines a few related variables and uses a special constructor so it can be cre-ated and initialized in one easy line. Rather than use full property procedures, the class takes a shortcut and uses public member variables.
Public Class Furniture
Public Name As String
Public Description As String Public Cost As Double
Public Sub New(ByVal name As String, _
ByVal description As String, ByVal cost As Double) Me.Name = name
Me.Description = description Me.Cost = cost
End Sub
End Class
Three Furniture objects are created the first time the page is loaded, and they’re stored in session state. The user can then choose from a list of furniture piece names. When a selection is made, the corresponding object will be retrieved, and its information will be displayed, as shown in Figure 9-9.
Public Partial Class SessionStateExample Inherits System.Web.UI.Page
Protected Sub Page_Load(ByVal sender As Object, _ ByVal e As EventArgs) Handles Me.Load
If Me.IsPostBack = False Then ' Create Furniture objects.
Dim Piece1 As New Furniture("Econo Sofa", _ "Acme Inc.", 74.99) Dim Piece2 As New Furniture("Pioneer Table", _
"Heritage Unit", 866.75) Dim Piece3 As New Furniture("Retro Cabinet", _
"Sixties Ltd.", 300.11)
' Add objects to session state. Session("Furniture1") = Piece1 Session("Furniture2") = Piece2 Session("Furniture3") = Piece3
' Add rows to list control. lstItems.Items.Clear()
lstItems.Items.Add(Piece1.Name) lstItems.Items.Add(Piece2.Name) lstItems.Items.Add(Piece3.Name) End If
' Display some basic information about the session. ' This is useful for testing configuration settings. lblSession.Text = "Session ID: " & Session.SessionID lblSession.Text &= "<br />Number of Objects: " lblSession.Text &= Session.Count.ToString()
lblSession.Text &= "<br />Mode: " & Session.Mode.ToString() lblSession.Text &= "<br />Is Cookieless: "
lblSession.Text &= Session.IsCookieless.ToString() lblSession.Text &= "<br />Is New: "
Protected Sub cmdMoreInfo_Click(ByVal sender As Object, _ ByVal e As EventArgs) Handles cmdMoreInfo.Click
If lstItems.SelectedIndex = -1 Then lblRecord.Text = "No item selected." Else
' Construct a key name based on the index.
' For example, Furniture1, Furniture2, and so on. Dim Key As String
Key = "Furniture" & _
(lstItems.SelectedIndex + 1).ToString()
' Retrieve the Furniture object from session state. Dim Piece As Furniture = CType(Session(Key), Furniture)
' Display the information for this object. lblRecord.Text = "Name: " & Piece.Name lblRecord.Text &= "<br />Manufacturer: " lblRecord.Text &= Piece.Description
lblRecord.Text &= "<br />Cost: $" & Piece.Cost.ToString() End If
End Sub
End Class
It’s also a good practice to add a few session-friendly features in your application. For example, you could add a logout button to the page that automatically cancels a session using the Session.Abandon() method. This way, the user will be encouraged to terminate the session rather than just close the browser window, and the server memory will be reclaimed faster.
MAKING SESSION STATE MORE SCALABLE
When web developers need to store a large amount of state information, they face a confounding prob-lem. They can use session state and ensure excellent performance for a small set of users, but they risk poor scalability for large numbers. Alternatively, they can use a database to store temporary session information. This allows them to store a large amount of session information for a long time (potentially weeks or months instead of mere minutes). However, it also slows performance because the database must be queried for almost every page request.
record. To reduce the number of database queries, you’ll also add the session information to the cache (indexed under the session identifier). On subsequent requests, your code can check for the session information in the cache first. If the information is no longer in the cache, your code can retrieve it from the database as a last resort. This process becomes even more transparent if you create a custom component that provides the session information and performs the required cache lookup for you.
For more information, read about custom components in Chapter 24, and caching in Chapter 26.
Session State Configuration
You configure session state through the web.config file for your current application (which is found in the same virtual directory as the .aspx web page files). The configuration file allows you to set advanced options such as the timeout and the session state mode. If you’re creating your web application in Visual Studio, your project will include an auto-matically generated web.config file.
The following is a typical web.config file, with the most important attributes you can use to configure session state:
<?xml version="1.0" encoding="utf-8" ?> <configuration>
<system.web>
<!-- Other settings omitted. -->
<sessionState
cookieless="UseCookies" cookieName="ASP.NET_SessionId" regenerateExpiredSessionId="false"
timeout="20" mode="InProc"
stateConnectionString="tcpip=127.0.0.1:42424" stateNetworkTimeout="10"
sqlConnectionString="data source=127.0.0.1;Integrated Security=SSPI" sqlCommandTimeout="30"
allowCustomSqlDatabase="false" customProvider=""
/>
</system.web> </configuration>
Cookieless
You can set the cookieless setting to one of the values defined by the HttpCookieMode enumeration, as described in Table 9-2.
Table 9-2. HttpCookieMode Values
Value Description
UseCookies Cookies are always used, even if the browser or device doesn’t support cookies or they are disabled. This is the default. If the device does not support cookies, session information will be lost over subsequent requests, because each request will get a new ID.
UseUri Cookies are never used, regardless of the capabilities of the browser or device. Instead, the session ID is stored in the URL.
UseDeviceProfile ASP.NET chooses whether to use cookieless sessions by examining the BrowserCapabilities object. The drawback is that this object indicates what the device should support—it doesn’t take into account that the user may have disabled cookies in a browser that supports them.
AutoDetect ASP.NET attempts to determine whether the browser supports cookies by attempting to set and retrieve a cookie (a technique commonly used on the Web). This technique can correctly determine whether a browser supports cookies but has them disabled, in which case cookieless mode is used instead.
Here’s an example that forces cookieless mode (which is useful for testing):
<sessionState cookieless="UseUri" ... />
In cookieless mode, the session ID will automatically be inserted into the URL. When ASP.NET receives a request, it will remove the ID, retrieve the session collection, and forward the request to the appropriate directory. Figure 9-10 shows a munged URL.
Because the session ID is inserted in the current URL, relative links also automatically gain the session ID. In other words, if the user is currently stationed on Page1.aspx and clicks a relative link to Page2.aspx, the relative link includes the current session ID as part of the URL. The same is true if you call Response.Redirect() with a relative URL, as shown here:
Response.Redirect("Page2.aspx")
Figure 9-11. Three tests of cookieless sessions
Figure 9-11 shows a sample website (included with the online samples in the CookielessSessions directory) that tests cookieless sessions. It contains two pages and uses cookieless mode. The first page contains a HyperLink control and two buttons. The HyperLink’s NavigateUrl property is set to the relative path Cookieless2.aspx. If you click this link, the session ID is retained, and the session information can be retrieved on the new page.
Even programmatic redirection works with cookieless session state, as long as you use a relative path. For example, the second button in this example uses the Response.Redirect() method to forward the user to the Cookieless2.aspx page. Here’s the code, which preserves the munged URL with no extra steps required:
Protected Sub cmdLink_Click(ByVal sender As Object, _ ByVal As EventArgs) Handles cmdLink.Click
Response.Redirect("Cookieless2.aspx") End Sub
The only real limitation of cookieless state is that you cannot use absolute links, because ASP.NET cannot insert the session ID into them. For example, if you use the third command button, the current session will be abandoned. The code is as follows, and Figure 9-12 shows the result of this code:
' Create a new URL based on the current URL (but ending with ' the page Cookieless2.aspx instead of Cookieless1.aspx. Dim url As String = "http://" & Request.Url.Authority & _
Request.Url.Segments(0) & Request.Url.Segments(1) & _ "Cookieless2.aspx"
Response.Redirect(url)
End Sub
Figure 9-12. A lost session
By default, ASP.NET allows you to reuse a session identifier. For example, if you make a request and your query string contains an expired session, ASP.NET creates a new session and uses that session ID. The problem is that a session ID might inadvertently appear in a public place—such as in a results page in a search engine. This could lead to multiple users accessing the server with the same session identifier and then all joining the same session with the same shared data.
To avoid this potential security risk, you should include the optional
Timeout
Another important session state setting in the web.config file is the timeout. This speci-fies the number of minutes that ASP.NET will wait, without receiving a request, before it abandons the session.
<sessionState
timeout="20" />
This setting represents one of the most important compromises of session state. A difference of minutes can have a dramatic effect on the load of your server and the per-formance of your application. Ideally, you will choose a timeframe that is short enough to allow the server to reclaim valuable memory after a client stops using the application but long enough to allow a client to pause and continue a session without losing it.
You can also programmatically change the session timeout in code. For example, if you know a session contains an unusually large amount of information, you may need to limit the amount of time the session can be stored. You would then warn the user and change the timeout property. Here’s a sample line of code that changes the timeout to ten minutes:
Session.Timeout = 10
Mode
The remaining session state settings allow you to configure ASP.NET to use different session state services, depending on the mode that you choose. The next few sections describe the modes you can choose from.
■
Note
If you’re hosting ASP.NET using more than one web server (which is affectionately known as aweb farm), you’ll also need to take some extra configuration steps to make sure all the web servers are in sync. Otherwise, one server might encode information in session state differently than another, which will cause a problem if the user is routed from one server to another during a session. The solution is to modify the <machineKey> section of the machine.config file so that it’s consistent across all servers. For more informa-tion, refer to Chapter 12.InProc
InProc makes sense for most small websites. In a web farm scenario, though, it won’t work. To allow session state to be shared between servers, you must use the out-of-process or SQL Server state service. Another reason you might want to avoid InProc mode is if you find that your users are losing session state information at unpredictable times. In ASP.NET, application domains can be restarted for a variety of reasons, including configuration changes and updated pages, and when certain thresholds are met (regardless of whether an error has occurred). If you find that you’re losing sessions beforethe timeout limit, you may want to experiment with a more durable mode.
■
Note
When using the StateServer and SQLServer modes, the objects you store in session state must be seri-alizable. Otherwise, ASP.NET will not be able to transmit the object to the state service or store it in the database. Earlier in this chapter, you learned how to create a serializable Customer class for storing in view state.Off
This setting disables session state management for every page in the application. This can provide a slight performance improvement for websites that are not using session state.
StateServer
With this setting, ASP.NET will use a separate Windows service for state management. This service runs on the same web server, but it’s outside the main ASP.NET process, which gives it a basic level of protection if the ASP.NET process needs to be restarted. The cost is the increased time delay imposed when state information is transferred between two processes. If you frequently access and change state information, this can make for a fairly unwelcome slowdown.
When using the StateServer setting, you need to specify a value for the
stateConnectionString setting. This string identifies the TCP/IP address of the computer that is running the StateServer service and its port number (which is defined by ASP.NET and doesn’t usually need to be changed). This allows you to host the StateServer on another computer. If you don’t change this setting, the local server will be used (set as address 127.0.0.1).
Once you find the service in the list, you can manually start and stop it by right-clicking it. Generally, you’ll want to configure Windows to automatically start the service. Right-click it, select Properties, and modify the Startup Type, setting it to Automatic, as shown in Figure 9-14.
Figure 9-13. The ASP.NET state service
■
Note
When using StateServer mode, you can also set an optional stateNetworkTimeout attribute that specifies the maximum number of seconds to wait for the service to respond before canceling the request. The default value is 10 (seconds).SQLServer
This setting instructs ASP.NET to use an SQL Server database to store session informa-tion, as identified by the sqlConnectionString attribute. This is the most resilient state store but also the slowest by far. To use this method of state management, you’ll need to have a server with SQL Server installed.
When setting the sqlConnectionString attribute, you follow the same sort of pattern you use with ADO.NET data access. Generally, you’ll need to specify a data source (the server address) and a user ID and password, unless you’re using SQL integrated security. In addition, you need to install the special stored procedures and temporary session databases. These stored procedures take care of storing and retrieving the session infor-mation. ASP.NET includes a Transact-SQL script for this purpose called
InstallSqlState.sql. It’s found in the C:\[WinDir]\Microsoft.NET\Framework\[Version] directory. You can run this script using an SQL Server utility such as SQL Server Manage-ment Studio and sqlcmd.exe (for SQL Server 2005) or OSQL.exe and Query Analyzer (for earlier versions). It needs to be performed only once.
Ordinarily, the state database is always named ASPState. As a result, the connection string in the web.config file doesn’t explicitly indicate the database name. Instead, it simply reflects the location of the server and the type of authentication that will be used:
<sessionState sqlConnectionString="data source=127.0.0.1;Integrated Security=SSPI" ... />
If you want to use a different database (with the same structure), simply set allow-CustomSqlDatabase to true, and make sure the connection string includes the Initial Catalog setting, which indicates the name of the database you want to use:
<sessionState allowCustomSqlDatabase="true" sqlConnectionString=
"data source=127.0.0.1;Integrated Security=SSPI;Initial Catalog=CustDatabase" ... />
Custom
When using custom mode, you need to indicate which session state store provider to use by supplying the customProvider attribute. The customProvider attribute points to the name of a class that’s part of your web application in the App_Code directory or in a compiled assembly in the Bin directory or the GAC.
Creating a custom state provider is a low-level task that needs to be handled carefully to ensure security, stability, and scalability. Custom state providers are also beyond the scope of this book. However, other vendors may release custom state providers you want to use. For example, Oracle may provide a custom state provider that allows you to store state information in an Oracle database.
Application State
Application state allows you to store global objects that can be accessed by any client. Application state is based on the System.Web.HttpApplicationState class, which is provided in all web pages through the built-in Application object.
Application state is similar to session state. It supports the same type of objects, retains information on the server, and uses the same dictionary-based syntax. A common example with application state is a global counter that tracks how many times an operation has been performed by all the web application’s clients.
For example, you could create a global.asax event handler that tracks how many ses-sions have been created or how many requests have been received into the application. Or you can use similar logic in the Page.Load event handler to track how many times a given page has been requested by various clients. Here’s an example of the latter:
Protected Sub Page_Load(ByVal sender As Object, _ ByVal e As EventArgs) Handles Me.Load
Dim Count As Integer = CType(Application("HitCounter"), Integer) Count += 1
Application("HitCounter") = Count
lblCounter.Text = Count.ToString()
End Sub
Application state isn’t often used, because it’s generally inefficient. In the previous example, the counter would probably not keep an accurate count, particularly in times of heavy traffic. For example, if two clients requested the page at the same time, you could have a sequence of events like this:
1. User A retrieves the current count (432).
2. User B retrieves the current count (432).
3. User A sets the current count to 433.
4. User B sets the current count to 433.
In other words, one request isn’t counted because two clients access the counter at the same time. To prevent this problem, you need to use the Lock() and Unlock() methods, which explicitly allow only one client to access the Application state collection at a time.
Protected Sub Page_Load(ByVal sender As Object, _ ByVal e As EventArgs) Handles MyBase.Load
' Acquire exclusive access. Application.Lock()
Dim Count As Integer = CType(Application("HitCounter"), Integer) Count += 1
Application("HitCounter") = Count
' Release exclusive access. Application.Unlock()
lblCounter.Text = Count.ToString()
End Sub
Unfortunately, all other clients requesting the page will be stalled until the Application collection is released. This can drastically reduce performance. Generally, frequently modi-fied values are poor candidates for application state. In fact, application state is rarely used in the .NET world because its two most common uses have been replaced by easier, more efficient methods:
• Application state can also be used to store frequently used information that is time-consuming to create, such as a full product catalog that requires a database lookup. However, using application state to store this kind of information raises all sorts of problems about how to check whether the data is valid and how to replace it when needed. It can also hamper performance if the product catalog is too large. Chapter 26 introduces a similar but much more sensible approach—storing frequently used information in the ASP.NET cache. Many uses of application state can be replaced more efficiently with caching.
An Overview of State Management Choices
Each state management choice has a different lifetime, scope, performance overhead, and level of support. Table 9-3 and Table 9-4 show an at-a-glance comparison of your state management options.
Table 9-3. State Management Options Compared (Part 1)
View State Query String Custom Cookies
Allowed All serializable A limited amount String data. Data Types .NET data types. of string data.
Storage A hidden field in the The browser’s The client’s
Location current web page. URL string. computer (in memory or a small text file, depending on its lifetime settings).
Lifetime Retained permanently Lost when the user Set by the programmer. for postbacks to enters a new URL or Can be used in multiple a single page. closes the browser. pages and can persist
However, this can be between visits. stored in a bookmark.
Scope Limited to the Limited to the The whole ASP.NET current page. target page. application.
Security Tamperproof by default, Clearly visible and Insecure, and can be but easy to read. Enforced easy for the user modified by the user. encryption by issuing the to modify.
Page directive.
Performance Slow if a large amount None, because the None, because the Implications of information is stored, amount of data amount of data
but will not affect is trivial. is trivial. server performance.
Table 9-4. State Management Options Compared (Part 2)
Session State Application State
Allowed Data Types All .NET data types. All .NET data types.
Storage Location Server memory. Server memory.
Lifetime Times out after a predefined The lifetime of the application
period (usually 20 minutes, but (typically, until the server is rebooted). can be altered globally or
programmatically).
Scope The whole ASP.NET application. The whole ASP.NET application. Unlike other methods, application data is global to all users.
Security Very secure, because data is Very secure, because data is never never transmitted to the client. transmitted to the client.
Performance Slow when storing a large amount Slow when storing a large amount of Implications of information, especially if there information, because this data will
are many users at once, because never timeout and be removed. each user will have a separate
copy of session data.
Typical Use Storing items in a shopping basket. Storing any type of global data.
■
Note
ASP.NET has another, more specialized type of state management called profiles. Profiles allow you to store and retrieve user-specific information from a database. The only catch is that you need to authenti-cate the user in order to get the right information. You’ll learn about profiles in Chapter 20.The Global.asax Application File
The global.asax file allows you to write code that responds to global application events. These events fire at various points during the lifetime of a web application, including when sessions are created. This makes the global.asax file useful in conjunction with the state management features you’ve learned about so far. For example, you could use the global.asax file to preinitialize a set of objects that you store in application state for the duration of your application. Of course, you can also use these events to perform other tasks. For example, you can run some logging code that runs every time a request is received, no matter what page handles the request.
The global.asax file looks similar to a normal .aspx file, except that it can’t contain any HTML or ASP.NET tags. Instead, it contains event handlers. For example, the following global.asax file reacts to the Application.EndRequest event, which happens just before the page is sent to the user:
<%@ Application Language="VB" %>
Sub Application_EndRequest(ByVal sender As Object, ByVal e As EventArgs) ' Code that runs at the end of every request.
Response.Write("<hr>This page was served at " & DateTime.Now.ToString()) End Sub
</script>
This event handler uses the Write() method of the built-in Response object to write a footer at the bottom of the page with the date and time that the page was created (see Figure 9-15).
Each ASP.NET application can have one global.asax file. Once you place it in the appropriate virtual directory, ASP.NET recognizes it and uses it automatically. For example, if you place the global.asax shown previously into a virtual directory, every web page in that application will include a footer.
■
Tip
To add a global.asax file to an application in Visual Studio, choose Website ➤Add New Item, and select the Global Application Class file type.Generally, adding an automatic footer is not a useful function for a professional website. A more typical use might be writing an entry to a database log. That way, usage information would be tracked automatically. However, the global.asax file is a minor ingredient, and many web applications won’t use it at all.
The global.asax file supports the code-behind model, which allows you to split the code into a separate class in a .vb file. However, you don’t really need to take this step, because you won’t add any controls or markup to the global.asax file. If you create the global.asax file in Visual Studio, it won’t use the code-behind model.
Application Events
Application.EndRequest is only one of more than a dozen events you can respond to in your code. To create a different event handler, you simply need to create a subroutine with the defined name. Table 9-5 lists some of the most common application events that you’ll use.
Table 9-5. Basic Application Events
Method Name Description
Application_Start Occurs when the application starts, which is the first time it receives a request from any user. It doesn’t occur on subsequent requests. This event is commonly used to create or cache some initial information that will be reused later.
Application_End Occurs when the application is shutting down, generally because the web server is being restarted. You can insert cleanup code here.
Application_BeginRequest Occurs with each request the application receives, just before the page code is executed.
Application_EndRequest Occurs with each request the application receives, just after the page code is executed.
Session_Start Occurs whenever a new user request is received and a session is started.
Session_End Occurs when a session times out or is programmatically ended.
Application_Error Occurs in response to an unhandled error. You can find more information about error handling in Chapter 7.