IGEL Technology GmbH IGEL Universal Management Suite v4 06.05.2015
IGEL Universal Management
2
IGEL Technology GmbH IGEL Universal Management Suite v4 4.09.100
Important Information
Please note some important information before reading this documentation.
Copyright
This publication is protected under international copyright laws. All rights reserved. With the exception of documentation kept by the purchaser for backup purposes, no part of this manual – including the products and software described in it – may be reproduced, manipulated, transmitted, transcribed, copied, stored in a data retrieval system or translated in any form or by any means without the express written permission of
IGEL Technology GmbH.
Copyright © 2015 IGEL Technology GmbH. All rights reserved.
Trademarks
IGEL is a registered trademark of IGEL Technology GmbH.
Any other names or products mentioned in this manual may be registered trademarks of the associated companies or protected by copyright through these companies. They are mentioned solely for explanatory or identification purposes, and to the advantage of the owner.
Disclaimer
The specifications and information contained in this manual are intended for information use only, are subject to change at any time without notice and should not be construed as constituting a commitment or
obligation on the part of IGEL Technology GmbH. IGEL Technology GmbH assumes no responsibility or
liability for any errors or inaccuracies that may appear in this manual, including any pertaining to the
products and software described in it. IGEL Technology GmbH makes no representations or warranties
with respect to the contents thereof and specifically disclaims any implied warranties of merchantability or fitness for any particular purpose.
IGEL Support and Knowledge Base
If you have any questions regarding an IGEL product and are already an IGEL customer, please contact your dedicated sales partner first.
If you are currently testing IGEL products or your sales partner is unable to provide the help you need, please fill in the support form after logging on at the IGEL Support Portal
https://www.igel.com/en/members-area/login-logout.html.
We will then contact you as soon as possible. It will make things easier for our support staff if you provide us with all the information that is available. Please see also our notes regarding support and service information.
Please visit our IGEL Knowledge Basehttp://edocs.igel.com to find additional Best Practice and How To
documentation as well as the IGEL Support FAQ
3
IGEL Technology GmbH IGEL Universal Management Suite v4 4.09.100
Contents
1. IGEL Universal Management Suite ...71.1. Typical areas of use ... 7
1.2. Attributes of the IGEL UMS ... 8
1.3. IGEL UMS components... 9
2. Installation ...11
2.1. Installation requirements ... 11
2.2. Installing a UMS Server ... 12
2.3. Updating a UMS Installation ... 13
2.4. Connecting to External Database Systems ... 15
3. First steps ...18
3.1. Connecting the UMS Console to the server ... 18
3.2. Registering thin clients on the UMS Server ... 19
4. Working with the IGEL UMS ...26
4.1. The console window ... 26
4.2. The IGEL UMS Administrator ... 37
5. Thin Clients ...44
5.1. Managing thin clients ... 44
5.2. Configuring thin clients ... 51
5.3. Shadowing (VNC) ... 52
5.4. Firmware licenses ... 58
6. Profiles ...61
6.1. Order of priority for settings ... 61
6.2. Order of priority for profiles ... 62
6.3. Using profiles ... 63
6.4. User profiles - IGEL Shared Workplace ... 70
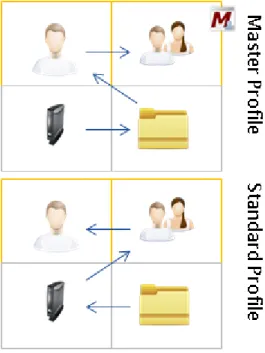
6.5. Master profiles ... 76
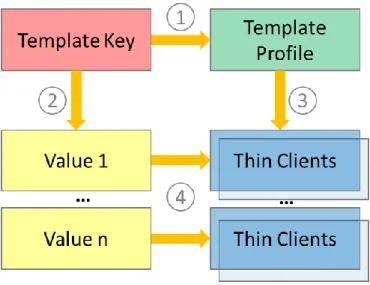
6.6. Template profiles ... 81
7. Views ...94
7.1. Creating a new view ... 94
7.2. Saving the view results list ... 98
7.3. Sending a View via E-mail ... 98
8. Scheduled Jobs ...100
8.1. Setting up a new task ... 100
8.2. Commands for Jobs ... 101
8.3. Details ... 102
8.4. Schedule ... 103
8.5. Assignment ... 104
4
IGEL Technology GmbH IGEL Universal Management Suite v4 4.09.100 9. Files ...107
9.1. Registering a file on the UMS Server ... 107
9.2. Transferring a file to a thin client ... 108
9.3. Removing a file from a thin client ... 109
9.4. Transferring a file to the UMS Server ... 109
10. Universal Firmware Update ...110
10.1. Changing server settings ... 110
10.2. Searching for and downloading updates ... 111
10.3. Importing from a local source ... 112
10.4. Importing from the UMS WebDAV ... 112
10.5. Assigning an Update to a Thin Client ... 113
11. Managing certificates ...114
11.1. Installing Server Certificates ... 114
11.2. Removing a Certificate ... 114
11.3. Saving a certificate ... 114
11.4. Importing a console certificate ... 115
12. Administration area ...116
12.1. UMS network ... 116
12.2. UMS Server ... 117
12.3. Global configuration ... 117
13. Importing Active Directory users ...125
13.1. Explanation of symbols ... 126
13.2. Searching in the Active Directory ... 127
13.3. Import results list ... 128
14. Administrator accounts and access rights ...129
14.1. Administrators and groups ... 129
14.2. Access rights ... 130
15. User logs ...136
15.1. Administration ... 136
15.2. Logging dialog window ... 137
16. Log files and support ...140
17. Optional Extensions (HA and UCB) ...141
17.1. IGEL UMS High Availability (HA) ... 141
17.2. IGEL Universal Customization Builder (UCB)... 149
18. Glossar ...162
19. Index ...163
5
IGEL Technology GmbH IGEL Universal Management Suite v4 4.09.100
About this document
This document describes the procedure for installing and using the IGEL Universal Management Suite
(UMS) based on Version 4.09.100. The firmware parameters for the thin client are described in greater detail in the relevant IGEL Universal Desktop or IGEL Zero manual, even if these parameters can be configured via the UMS.
This document assumes that a fully functional installation of the IGEL UMS as well as at least one IGEL thin client which is to be managed are available.
IGEL one thin clients may be registered in the UMS, but not configured.
This manual is divided into the following sections:
IGEL Universal Management Suite (page 7)
Attributes and components of the UMS
Installation (page 11) Requirements, installation, updates, external DB systems
First steps (page 18) Establishing a connection to the server, registering
Working with the IGEL UMS
(page 26)
Console window and Administrator
Managing, (page 29) configuring and mirroring thin clients; firmware licenses
Creating and (page 61) configuring profiles; user profiles (IGEL Shared Workplace)
Creating and (page 94) saving views
Setting up planned (page 100) tasks, details, schedule, assignment, results
Registering, (page 107) transferring and removing files on the server and client
Preparing, searching for, (page 110)
downloading, importing and assigning Universal Firmware Updates
Managing certificates (page 114)
Installing server and console certificates
Administration area (page 116) UMS Server, global configuration
Importing Active Directory users (page 125)
Symbols, searching in the AD, import results list
Administrator accounts and access rights (page 129)
Administrators, groups, authorizations
User logs (page 136) (general), administration, logging, filter settings
Log files and support (page 140) Help
Appendix (page 141) UMS High Availability Extension, Universal Customization
6
IGEL Technology GmbH IGEL Universal Management Suite v4 4.09.100
Formatting and meanings
The following formatting is used in the document:
Hyperlink Internal or external links
Proper names Proper names of products, firms etc. GUI text Items of text from the user interface
Menu→Path (Context) menu paths in systems and programs
Entry Program code or system entries
Keyboard Commands that are entered using the keyboard
Note regarding operation
Warning: Important note which must be observed
What is new in 4.09.100?
You will find the release notes for the IGEL Universal Management Suite 4.09.100 both as a text file next to the installation programs on our download server
(http://myigel.biz/index.php?dir=IGEL_UNIVERSAL_MANAGEMENT_SUITE/) and in our Knowledge Base (http://edocs.igel.com/).
The most important functional change in this version is the master profile (page 76) concept which makes configuring the thin clients even more flexible and straightforward thanks to more easily manageable administrator rights.
In addition, the IGEL Universal Management Suite can now send views via e-mail (page 98) – either with a click or automatically as an administrative task (page 119).
UMS now offers the option of allowing connections secured exclusively with HTTPS (SSL) (page 38) when
communicating with the server.
The Java version used has been updated. Java 1.8.0_40 or newer is now needed to bring up the UMS
7
IGEL Technology GmbH IGEL Universal Management Suite v4 4.09.100
1.
IGEL Universal Management Suite
The IGEL Universal Management Suite (UMS) is a user-friendly and highly efficient piece of software
which allows you to remote-configure and manage IGEL thin clients. Using the UMS helps to reduce the
costs of workstation administration and support. With its open, network-friendly structure, it can be incorporated optimally into an existing company infrastructure.
The IGEL Universal Management Suite sets new standards when it comes to managing modern thin clients. It offers a wide range of features which allow large thin client environments with various
configurations to be managed quickly, easily and securely – even across WANs. With its support for a wide
range of operating systems, databases and directory services such as Microsoft® Active Directory, the
Universal Management Suite can easily be integrated into any existing environment.
Each IGEL thin client comes with a free version of the IGEL Universal Management Suite. When combined
with the outstanding IGEL hardware, this gives you the most innovative thin client solution currently available on the market.
An overview of devices supported by the IGEL Universal Management Suite can be found in these FAQs.
1.1.
Typical areas of use
• Automatically setting up thin clients with the correct configuration when they go into operation
• Changing the settings of the devices as well as those of the software clients, tools and local logs
• Distributing updates and firmware images
8
IGEL Technology GmbH IGEL Universal Management Suite v4 4.09.100
1.2.
Attributes of the IGEL UMS
Quick installation: An assistant helps you during the installation procedure. As a further option, external database systems can also be used alongside the integrated database.
Straightforward management at the click of a mouse:
Most hardware and software settings can be made with just a few clicks. Standardized user interface: The UMS user interface is similar to that for local thin client
configuration. The additional remote management functions give the administrator complete control in the familiar, proven environment. No scripting: Although scripting is supported, you will only need it for managing the
thin client configuration in the most exceptional circumstances.
Asset management: Automatic capturing of all your hardware information, licensed features and installed hotfixes.
Commentary fields: For various customer-specific information such as location, installation date and inventory number.
Support for numerous operating systems:
The UMS Server can run on many common versions of Microsoft®
Windows® Server and Linux. Access independent of the
operating system:
The UMS Console is Java-based and allows system administration via any
device with the Java Runtime Environment – even without a local
installation of the UMS Console (Java Web Start), see Installation requirements (page 144).
Encrypted communication: Certificate-based SSL-encrypted communication between remote management servers and clients to prevent unauthorized
reconfiguration of the devices.
Failsafe update function: If the thin client fails while the update is in progress (e.g. as a result of a power outage or loss of the network connection), it will still remain usable. The update process will then be completed when the device next boots.
Based on standard
communication protocols:
There is no need to reconfigure routers and firewalls because HTTP and FTP are used.
Support for extensive environments:
The IGEL Universal Management Suite can be scaled to accommodate several thousand thin clients.
Group and profile-based administration:
The thin clients within a given organizational unit can be administered very easily via profiles. If members of staff move to another department, the administrator can change the settings with a simple drag-and-drop procedure.
Trouble-free rollout: IGEL thin clients can be automatically assigned to a group on the basis of either the relevant sub-network or a list of MAC addresses provided by IGEL. They then automatically receive the configuration settings for the group.
Comprehensive support for all configuration parameters:
Most IGEL thin client settings, such as device or session configurations, can be changed at the click of a mouse via the UMS user interface.
9
IGEL Technology GmbH IGEL Universal Management Suite v4 4.09.100
Transferral of administrative rights:
Large organizations can authorize a number of system administrators for different control and authorization areas. These administrative accounts can be imported from an Active Directory.
Planning tasks: Maintenance tasks can be scheduled to take place during the night so that day-to-day operations are not disrupted.
VNC shadowing: Members of the IT support team have remote access to thin client screens, enabling them to rapidly identify problems and demonstrate solutions directly to users.
1.3.
IGEL UMS components
The IGEL Universal Management Suite program (referred to below as the UMS) comprises the following three components:
• IGEL UMS Server (page 9)
• IGEL UMS Administrator (page 10) • IGEL UMS Console (page 10)
1.3.1.
UMS Server
–
the backend
The UMS Server is a server application which requires a relational database management system (RDBMS,
referred to below as a database; see Installation requirements (page 144) for supported databases. The database can either be on the server itself or installed on remote hosts and linked up accordingly.
The IGELUMS Server communicates internally with the database and externally with the registered thin
clients and the "control center", the UMS Console.
10
IGEL Technology GmbH IGEL Universal Management Suite v4 4.09.100
Data transmission between the server and thin clients/console is encrypted. Typically, the UMS Console is installed not only on the server system but also on other computers in the network.
Each configuration for the managed thin clients is saved in the database. Changes to the configuration are made in the database and are transferred to the thin client if necessary. The thin client can retrieve the information from the database during the booting procedure or you can send the new configuration to the thin client manually. A scheduled configuration update is also possible.
1.3.2.
UMS Administrator
–
the administration program
The UMS Administrator is one of the UMS Server's administrative components and, as such, is only available via the server.
The key parts of the UMS Administrator are as follows:
• Network configuration (ports, WebDAV resources)
• Database configuration (data sources, backups)
Many administrative tasks are also available via the UMS Console.
1.3.3.
UMS Console
–
the central control hub
The UMS Console is the interface to the UMS Server. The key functions of the UMS Console are as follows:
• Displaying the thin clients' configuration parameters
• Setting up profiles and planned tasks
• Administering firmware updates
The thin clients and their configuration are administered via the GUI of the UMS Console. This is the central control hub for thin client administration. The console can be installed either on the server itself or locally on another computer within the network. Alternatively, it can be launched as a Java Web Start application without being installed.
11
IGEL Technology GmbH IGEL Universal Management Suite v4 4.09.100
2.
Installation
In this chapter, you can find out what requirements must be met in order to install the UMS successfully. Using an example, we show an installation with a Windows or Linux operating system. You can also find out what you need to bear in mind when performing an update and where you can connect external database systems.
2.1.
Installation requirements
In order to install the IGEL Universal Management Suite, your hardware and software must meet the
following minimum requirements: UMS complete installation
• At least 1 GB of RAM (2 GB recommended)
• At least 1 GB of free HDD space (plus database system)
• For details of the supported operating systems, please see the UMS Data Sheet on the IGEL website.
Tip: FAQ for installing the UMS on 64-bit systems
Individual console installation
• At least 512 MB of RAM (1 GB recommended)
• At least 250 MB of free HDD space
• Java Web Start Console: Java 1.8.0_40 or newer required
• For details of the supported operating systems, please see the UMS Data Sheet on the IGEL website.
Warning: The UMS Server must not be installed on a domain controller system. Manually modifying the
Java Runtime Environment on the UMS Server is not recommended. Running additional Apache Tomcat
web servers together with the UMS Server is not recommended either.
For details of the supported database systems, please see the UMS Data Sheet on the IGEL website. Details
of the requirements when installing and operating the database can be found in the documentation for the particular DBMS.
From an IP point of view, the UMS Server and Load Balancer for high availability (High Availability (page 141), HA) must be within the same network without NAT or proxies which influence communication between the components.
The internal database (Embedded DB) cannot be used for an HA network. You can also use the Embedded
Database for a dedicated test installation with only a single server for the UMS Server and Load Balancer. However, you cannot use this to set up a real HA network.
12
IGEL Technology GmbH IGEL Universal Management Suite v4 4.09.100
2.2.
Installing a UMS Server
This example describes the complete procedure for installing a UMSServer with an internal Embedded DB.
If your required installation differs, you can select individual components accordingly, e.g. for an individual console installation.
You will find instructions for installing the UMS HA (High Availability) Extension in the Appendix (page 141).
2.2.1.
Installation under Windows
The procedure for installing the IGEL Universal Management Suite under Windows is as follows:
First download the current version of the IGEL Universal Management Suite from the IGEL Download
1.
Server and launch the installer by running the EXE file.
You will need administration rights for the computer in order to install the IGEL UMS. Close any other applications and confirm that you have done so.
2.
Read and confirm the license agreement. 3.
Read the explanation of the installation process. 4.
Select a path for the installation. 5.
Select the type of installation (see above). 6.
Set a user and the password for the database connection. 7.
Choose a name for the entry in the Windows Start Menu.
8.
Read the summary and start the installation process. 9.
Close the program once installation is complete. 10.
If you have chosen the standard installation, the IGEL Universal Management Suite Server will now
run with the Embedded Database. Launch the UMS Console.
11.
Connect to the server using the access data you gave during the installation (database user). 12.
To use the UMS with external databases, see Connecting external databases (page 15).
The Windows installer creates entries in the Windows software directory and the Start Menu. An icon for launching the UMS Console will also be placed on the desktop.
FAQ Installation of UMS on 64-bit systems
13
IGEL Technology GmbH IGEL Universal Management Suite v4 4.09.100
2.2.2.
Installation under LINUX
The procedure for installing the IGEL Universal Management Suite under Linux is as follows:
First download the current version of the IGEL Universal Management Suite from the IGEL Download
1.
Server. The installation program under Linux is an X11 application. Log in as ROOT.
2.
You will need ROOT rights for the computer in order to install the IGEL UMS.
Open a terminal window such as xterm, Console, Gnome Terminal etc. and switch to the directory of
3.
the installation package.
Check that the package can be executed. In order for it to be executed, you may need to create it using 4.
chmod a+x setup*.bin.
Run the setup-igel-ums-linux-0.1.bin installation file. Use sudo to run setup with ROOT
5.
permission.
The installer will be unpacked to /tmp, will run its Java Engine and will remove itself again once the installation is complete.
Close any other applications and confirm that you have done so. 6.
Read and confirm the license agreement. 7.
Read the explanation of the installation process. 8.
Select a path for the installation. 9.
Select the type of installation (see above). 10.
Set a user and the password for the database connection. 11.
Read the summary and start the installation process. 12.
Close the program once installation is complete. 13.
If you have chosen the standard installation, the IGEL Universal Management Suite Server will now
run with the Embedded Database.
Launch the UMS Console in installation folder, e.g. 14.
/opt/IGEL/RemoteManager/RemoteManager.sh
Connect to the server using the access data you gave during the installation. 15.
To use the UMS with external databases, see Connecting external databases (page 15).
FAQ Installation of UMS on 64-bit systems
(https://faq.igel.com/otrs-igel/public.pl?Action=PublicFAQZoom;ItemID=647)
2.3.
Updating a UMS Installation
Create a backup of the database before updating a previously installed version of the IGEL UMS.
If you still use an older version of the IGEL Remote Manager with SAP DB, we recommend that you switch
to the Embedded DB before updating the IGEL UMS. For a more detailed description of the switchover
14
IGEL Technology GmbH IGEL Universal Management Suite v4 4.09.100
Warning: Installing a version of the UMS which is older than the one currently used is only possible if you have a backup of the database with the corresponding older schema. This is because the database schema can only be updated to newer versions and changes cannot be undone! To ensure that it is possible to
revert to a previous version, you should make backups of your current system before updating the UMS.
It is advisable to set up a test system where you can initially install new versions of the IGEL UMS. This will enable you to check your processes before you start using the new version on your actual system. This also applies to hotfixes, patches etc. for the server system and database.
If you have a console version which is older than your server version, you will not be able to connect to
the server (Unable to load tree error message). In this case, be sure to update your installation of
the console too.
2.3.1.
Updating under WINDOWS
The procedure when updating under Windows is as follows:
First download the current version of the IGEL Universal Management Suite from the IGEL Download
1.
Server and launch the installer by running the EXE file.
You will need administration rights for the computer in order to install the IGEL UMS. Close any other applications and confirm that you have done so.
2.
Read and confirm the license agreement. 3.
Read the explanation of the installation process. 4.
Select a path for the installation. 5.
Choose a name for the entry in the Windows Start Menu.
6.
Read the summary and start the installation process. 7.
Confirm that you have closed all other UMS applications. 8.
Confirm the automatic updating of the database schema (see warning above). 9.
Close the program once installation is complete. 10.
Once the update has been installed successfully, the UMS Server will once again connect to the previously used database.
Launch the UMS Console. 11.
Connect to the server using the access data you gave during the installation. 12.
The Windows installer creates entries in the Windows software directory and the Start Menu. An icon for launching the UMS Console will also be placed on the desktop.
15
IGEL Technology GmbH IGEL Universal Management Suite v4 4.09.100
2.3.2.
Updating under LINUX
The procedure when updating under Linux is as follows:
First download the current version of the IGEL Universal Management Suite from the IGEL Download
1.
Server. The installation program under Linux is an X11 application. Log in as ROOT.
2.
You will need ROOT rights for the computer in order to install the IGEL UMS.
Open a terminal window such as xterm, Console, Gnome Terminal etc. and switch to the directory of
3.
the installation package.
Check that the package can be executed. In order for it to be executed, you may need to create it using 4.
chmod a+x setup*.bin.
Run the setup-igel-ums-linux-[version].bin installation file.
5.
The installer will be unpacked to /tmp, will run its Java Engine and will remove itself again once the 6.
installation is complete.
Close any other applications and confirm that you have done so. 7.
Read and confirm the license agreement. 8.
Read the explanation of the installation process. 9.
Select a path for the installation. 10.
Read the summary and start the installation process. 11.
Confirm that you have closed all other UMS applications. 12.
Confirm the automatic updating of the database schema (see warning above). 13.
Close the program once installation is complete. 14.
Once the update has been installed successfully, the UMS Server will once again connect to the previously used database.
Launch the UMS Console in installation folder, e.g. 15.
/opt/IGEL/RemoteManager/RemoteManager.sh
Connect to the server using the access data you gave during the installation. 16.
2.4.
Connecting to External Database Systems
You will find details of the supported database systems and the HA Extension in the IGEL UMS Data Sheet and on the IGEL website respectively. Details of the requirements when installing and operating the database can be found in the administration manual for the particular DBMS.
To configure the database, use the relevant DBMS management program.
The configuration for setting up the data source and connecting the UMS to the database should be carried out in the UMS Administrator.
16
IGEL Technology GmbH IGEL Universal Management Suite v4 4.09.100
2.4.1.
Oracle
To integrate Oracle, proceed as follows:
Set up a new database user with Resource authorization.
1.
Set up a new Oracle type data source in the UMS Administrator. 2.
A number of Oracle versions set up the Resource role without CREATEVIEW authorization. Please
ensure that this authorization is set for the role.
2.4.2.
Microsoft SQL Server
To connect the Microsoft SQL Server, proceed as follows:
Open the SQL Console of the SQL Server by selecting New Query. 1.
Use the following script as a template, change it as necessary and then execute it. 2.
To avoid problems when enabling the data source, ensure that LOGIN, USER and SCHEMA are the
same.
CREATE DATABASE rmdb GO
USE rmdb GO
CREATE LOGIN igelums with PASSWORD = 'setyourpasswordhere', DEFAULT_DATABASE=rmdb
GO
CREATE USER igelums with DEFAULT_SCHEMA = igelums GO
CREATE SCHEMA igelums AUTHORIZATION igelums GRANT CONTROL to igelums GO
Set up a new SQL Server type data source in the UMS Administrator.
3.
Ensure that the server port of the SQL Server is configured correctly in the data source. The default 4.
value is 1433.
The Microsoft SQL Server should allow Windows and SQL authentication.
2.4.3.
PostgreSQL
IGEL UMS uses PostgreSQL functions (from Version 8.2). Older versions are not supported.
When installing a new instance of the PostgreSQL database, set the following parameters: Install the database cluster with UTF-8 coding.
1.
Accept the conditions for all addresses, not just localhost.
2.
Activate Procedural Language PL/pgsql in the default database.
3.
For further information regarding installation of the PostgreSQL database, see http://www.postgresql.org.
17
IGEL Technology GmbH IGEL Universal Management Suite v4 4.09.100
Once installation is complete, carry out the following configuration procedure:
Change the server parameters: The parameter listen_addresses in the file postgresql.conf
1.
must contain the host name of the IGEL UMS Server OR'*' in order to allow connections to each
host.
Set up a host parameter in the file pg_hba.conf in order to give the UMS Server the authorization
2.
to log in using the user data defined there.
If the IGEL UMS Server is installed on the same machine as the PostgreSQL Server, no changes to
these files are needed.
Launch the administration tool pgAdmin.
3.
Create a new login role with the name rmlogin.
4.
Create a new database with 5.
name = rmdb
owner = rmlogin
encoding = UTF-8
Set up a new schema within the rmdb database with
6.
name = rmlogin
Check whether the language plpgsql is available in the rmdb database. 7.
If not, set it up.
In the UMS Administrator, create a new PostgreSQL-type data source with the host name of the
8.
PostgreSQL Server and the correct server port (default is 5432), user rmlogin and database rmdb.
2.4.4.
Apache Derby
As with other external databases, we recommend that you create a new database instance for use by the
IGEL UMS.
Perform the following steps to create a new database instance and define the instance as a data source in the UMS Administrator:
For security purposes, enable User Authentication in the Derby DB. 1.
Launch the ij Utility (in [derby-installation-dir]/bin).
2.
To create the rmdb instance, execute the following command:
3.
connect
'jdbc:derby:rmdb;user=dbm;password=dbmpw;create=true';
Define the UMS database user rmlogin with passwordi rmpassword
4.
CALL SYSCS_UTIL.SYSCS_SET_DATABASE_PROPERTY('derby.user.rmlogin', 'rmpassword');
Exit ij and launch the Derby Network Server. 5.
In the UMS Administrator, create a new Derby-type data source with the host name of the Derby
6.
Server and the correct server port (default is 1527), user rmlogin and database rmdb.
18
IGEL Technology GmbH IGEL Universal Management Suite v4 4.09.100
3.
First steps
In order to be able to work with the IGEL UMS, you will first need to install the UMS Server, Console and
Database before registering at least one thin client or loading the UMS Demonstration Database Backup.
This is available on the IGEL Download Server.
The procedure for connecting to the server and registering thin clients using the UMS Console is described below. You will find detailed information regarding the IGEL UMS functions in the chapter Working with IGEL UMS (page 26).
3.1.
Connecting the UMS Console to the server
To establish a connection to the UMS Server, proceed as follows: Launch the UMS Console.
1.
Click on System→Connect to... in order to connect to the UMS Server. 2.
Enter the server and user data in the login window: 3.
Figure 2: Log on to the UMS Console
UMS Server: Use the host name localhost if you are logging on to the server's
UMS Console.
Use the host name of the server if you are connecting from a remote
UMS Console.
Port: The port on which the IGEL UMS GUI server receives connections is set to 8443 by default. However, it can be changed with the help of the
19
IGEL Technology GmbH IGEL Universal Management Suite v4 4.09.100
User name and Password: Enter the user name and password of a UMS administrator. When setting up the IGEL UMS for the first time, these are the access data for
the database user account which was created while the UMS Server was
being installed. Log on using the user name <User>@<Domain> if you belong to a domain configured in the UMS.
Click on Connect.
The data entered here, e.g. server name, port and user name, are saved for subsequent connection processes. The next time you establish a connection, you will only need to enter the password. The server and user information last used are also stored in drop-down lists and can therefore be reused quickly. You can delete this list of stored login data in Misc→Settings→General→Clear Login History.
3.2.
Registering thin clients on the UMS Server
Thin clients can be registered in the UMS Database in various ways: • Searching for thin clients within the network (page 19)
• Importing thin clients via csv files (page 22) • Registering manually on the thin client (page 25) • Registering thin clients automatically (page 25) • Setting up thin clients manually (page 26)
If you would like to upload a server certificate of your own (page 116), please do this before registering thin clients on the UMS. Otherwise, you will need to remove the old certificates from the thin clients manually after changing the certificate.
3.2.1.
Searching for thin clients in the network
To search for thin clients in the network and select them for registration, proceed as follows: Log in to the UMS Console.
1.
The content panel of the console will be displayed.
Click on Thin Clients→Scan Thin Clients to access the window allowing you to search for thin clients in 2.
20
IGEL Technology GmbH IGEL Universal Management Suite v4 4.09.100
Alternatively, you can start a search by clicking on the button in the tool bar.
Figure 3: Scan for thin clients
You can search the entire network for thin clients that are switched on or restrict your search to 1.
specific IP address ranges.
Select the thin clients to be registered by checking the Include checkboxes. 2.
Click OK. 3.
3.2.2.
Scan for Thin Clients
A thin client must be switched on and functioning if it is to be scanned. Furthermore, the thin client's firmware must support the IGEL UMS software. This is the case for all IGEL thin clients with original
firmware as well as for devices from other manufacturers on which the IGEL Linux system was installed
using the IGEL Universal Desktop Converter 2.
21
IGEL Technology GmbH IGEL Universal Management Suite v4 4.09.100
Local network of the UMS server With this option, a broadcast message is sent by the
network containing the IGEL UMS server. The IGEL
UMS server may be in a different network segment from
the one that contains the IGEL UMS Console. If the server is installed on the IGEL UMS server and has various network interfaces, only the first interface will be used to send the broadcast message.
IP range When a message is sent, each IP in the specified range will be contacted, even if routers suppress broadcast messages.
List of IP ranges If a number of network segments need to be scanned, you can create a list of the IP ranges. To do this, click on Edit List and Add to add ranges.
Use TCP for searching Select this option if you would like to use TCP instead of UDP for scanning. In certain networks, scanning with TCP is more reliable, although it does take longer.
Once the scanning procedure is complete, the thin clients that have been detected will be displayed in a sortable list in the scan results window.
In the Certificate Stored column, you can see whether a thin client already has a certificate from a UMS Server. Thin client certificates can now be registered on the Server.
In the Filter field, you can enter a search string, e.g. parts of the device name, IP address or MAC address, which will be searched for in all visible fields.
22
IGEL Technology GmbH IGEL Universal Management Suite v4 4.09.100
3.2.3.
Registering thin clients
To register new thin clients, proceed as follows:
In the Include column, highlight the thin clients that you would like to register in your IGEL UMS 1.
Database.
Click Select New Devices to select all thin clients without a certificate. 2.
Confirm your selection by clicking on OK. 3.
The thin clients will now be registered in your database. This may take some time depending on the
performance of the IGEL UMS Server.
If a thin client is registered in the IGEL UMS Database, the server certificate will be saved on the thin client. Further access to the thin client will now be validated on the basis of this certificate. Only the owner of the other private part of the certificate can manage the thin client.
Store the thin clients in a selected directory within the navigation tree immediately after registering 4.
them. This will save you having to sort them manually.
The result of the procedure and any error messages will be displayed in a new window. Close this window in order to return to the main screen.
5.
3.2.4.
Importing thin clients
You can already register thin clients before they are actually installed within the network. In order to do this, you will need a csv file with the information on the thin clients needed for registration. This is at least the MAC address, the thin client name and the firmware ID.
The firmware for the thin clients must be available in the database for the import. To ensure that this is the case, it can be imported along with the firmware or provided by thin clients that have already been
registered. This method is therefore not always appropriate when setting up the IGEL UMS for the first time.
Launch the import under System→Import→Import Thin Clients.
1.
If invalid data, e.g. an unknown item of firmware or an error, are found during the import procedure, a corresponding message will appear in the lower part of the dialog field in the message window. The row with the relevant thin client will be highlighted in red.
Click on Clear to delete all messages from the window. 2.
Click on Import TCs to launch the import procedure. 3.
Thin clients that have been imported successfully will be highlighted in green.
The Import dialog window also contains a number of simple editing functions for making last-minute changes, e.g. correcting the firmware ID:
• Ctrl-C and Ctrl-V for copying and pasting a highlighted row • Del/Ctrl-X for deleting a highlighted row
23
IGEL Technology GmbH IGEL Universal Management Suite v4 4.09.100
Import with short format
The short format provides the information required for the import and assignment to a profile: MAC address, device name, firmware ID, profile ID.
The ID of a firmware version already registered can be found via Misc→Firmware Statistics. The ID of a profile is shown in the description data and in the tool tip for the profile.
Figure 5: Import with short format
Import with long format
Unlike the short format, the long format also allows further data, e.g. the storage directory in the UMS navigation tree, serial number, site etc. to be imported. You will see what information can be imported after selecting the long format in the import dialog.
Example:
00E0C5540B8B;IGEL-00E0C5540B8B;1;26 00E0C5540B8C;IGEL-00E0C5540B8C;1;26 00E0C5540B8D;IGEL-00E0C5540B8D;1;26
Example:
/Import;00E0C5540B9A;IGEL Universal Desktop
LX;5.03.100.01;IGEL-1;Büro1;EDV;Meier;0815;01.06.2014;F44 M;26;01
/Import;00E0C5540B9B;IGEL Universal Desktop
LX;5.03.100.01;IGEL-2;Büro2;EDV;Müller;4711;01.06.2014;F45 M;26;01
/Import;00E0C5540B9C;IGEL Universal Desktop
LX;5.03.100.01;IGEL-2;Büro3;EDV;Schulz;42;01.06.2014;F46M; 26;01
24
IGEL Technology GmbH IGEL Universal Management Suite v4 4.09.100
Figure 6: Import with long format
The Firmware column in the preview is made up of two values from the import file (system and firmware version).
The ID of a profile is shown in the description data and in the tool tip for the profile.
Import with IGEL serial number
The serial number format allows thin clients to be imported using a file produced in connection with the order. You can request this import file when ordering your IGEL thin clients. By doing so, the devices can be integrated into the UMS and configured before they are even delivered.
Figure 7: Import with serial number format
The device firmware is not imported from the file. The firmware with the highest ID is allocated by default.
The IDs for firmware versions already registered can be found via Misc→Firmware Statistics.
Example:
08154711;14D3B8C01B14110EBE;00E0C56133E4 47110815;14D3B8C01B14110EC6;00E0C56133EC 42007ABC;14D3B8C01B14110ED7;00E0C56133FD 007ABC42;14D3B8C01B14110EF9;00E0C561341F
25
IGEL Technology GmbH IGEL Universal Management Suite v4 4.09.100
In the import file, the serial number constitutes the first part of each row. In the preview, it is listed as the last column.
3.2.5.
Registering thin clients manually
You can also register a thin client on the UMS Server on the client itself:
Enter the name and the address of your UMS Server and the server port (standard setting 30001)
1.
under System→Remote Management in the thin client setup.
Carry out the registration procedure, entering the login data for the UMS Server. 2.
Reboot the thin client. 3.
On thin clients with the UDLX firmware, you will find a dedicated program for registering on the UMS Server under System in the Application Launcher. As a result, you can determine from the client itself the sub-directory in the navigation tree to which the client will be added.
There are two ways to pass on the IP address of the UMS Server to the thin client:
• If you register a thin client on the UMS Server, the IP address of the server will be saved on the thin
client. The registry key is: system.remotemanager.server0.ip.
The thin client connects to this IP address in order to retrieve its settings each time it boots. Alternatively, you can configure your DHCP server in such a way that it provides the IP address via Option 224.
• The second way is to create an alias with the name igelrmserver for the UMS Server in your DNS.
If you would like to add thin clients to your UMS Database manually, you must use one of these options. Otherwise, the thin client will not be able to connect to the server.
3.2.6.
Registering thin clients automatically
The IGEL UMS Server can be configured in such a way that all thin clients without a certificate which boot in the server's network are automatically registered.
To do this, enable the Automatic Registration parameter under Settings→Further Settings in the IGEL
1.
UMS Administrator program.
You can register an IGEL thin client on the UMS Server automatically by setting the DNS entry 2.
igelrmserver (Record Type A) or a DHCP option (224).
Set the DHCP option 224 as a string - not as DWORD - to the IP address of the server by adding the 3.
following to the dhcpd.conf file in the appropriate section, e.g. in the global area:
option igelrmserver code 224 = text
option igelrmserver "<IP of the UMS Server>"
You should also set the DNS entry igelrmserver to the IP address of the UMS Server.
26
IGEL Technology GmbH IGEL Universal Management Suite v4 4.09.100
Warning: If this option is enabled, each thin client without a certificate in the network will be added to the
UMS Database. If you reset a client to the factory settings and reboot it, it will immediately be registered on the server again. We recommend automatic registration if new clients are to be registered during a network rollout. Once the clients have been registered, disable the automatic registration option on the
UMS Server.
3.2.7.
Setting up thin clients manually
To create an entry for a thin client in the database manually, proceed as follows:
Select New Thin Client either in the context menu of a thin client directory or in the menu under 1.
System→New.
Give the MAC address, the name and the firmware of the thin client and, optionally, select a directory 2.
for the client.
The firmware for the thin clients must be available in the database for the manual set-up. To ensure that this is the case, it can be imported along with the firmware or provided by thin clients that have already
been registered. This method is therefore not always appropriate when setting up the IGEL UMS for the
first time.
4.
Working with the IGEL UMS
The IGEL Universal Management Suite provides extensive tools for managing your thin client infrastructure. The majority of administrative tasks can be found in the UMS Console, while the UMS Administrator provides a number of tools for server configuration.
The program's graphical user interface and the tools available are described in detail below.
4.1.
The console window
The UMS Console contains various tools and information areas. Key elements include:
• The navigation tree
• The (context) menu
• The content panel
27
IGEL Technology GmbH IGEL Universal Management Suite v4 4.09.100
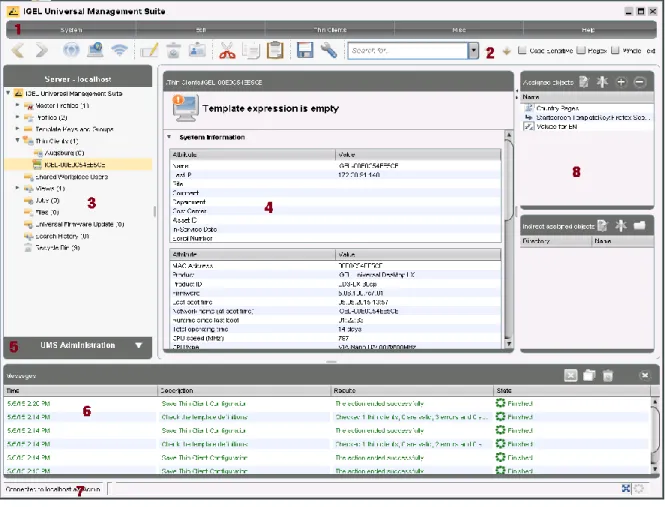
Figure 8: The UMS console window
1 The menu bar (page 28)
All commands and actions can be executed from the menu. You can use shortcuts (Alt + underlined character in the menu item) to access the menu bar via the keyboard.
2 Symbol bar (page 30)
Frequently used commands relating to objects in the navigation tree. 3 The navigation tree
(page 31)
Provides access to all UMS objects such as thin clients registered on the UMS Server, directories, profiles, views and planned tasks.
4 The content panel (page 33)
Information regarding the selected object (most entry fields can be edited directly).
5 UMS
administration (page 33)
Allows you to manage tasks, e.g. configuring domains, Universal Firmware
Updates and the scheduled backup of the UMS Database (Embedded DB only).
6 Messages (page 34)
Displays actions launched in the UMS Console. Green text indicates successful procedures. Red rows highlight a problem while the command was being executed.
7 Status row (page 34)
Status messages from the console, e.g. the server currently connected and the user name.
8 Context menu (page 35)
Objects such as profiles and files which are assigned to the thin clients or folders (directly or indirectly).
28
IGEL Technology GmbH IGEL Universal Management Suite v4 4.09.100
4.1.1.
Menu bar
At the top edge of the console window you will find the context-dependent menu bar. It consists of five menus – System, Edit, Thin Clients, Misc and Help.
System
Menu → System
Connec to ... Disconnect Allows you to establish and terminate the UMS Server connection Refresh Allows you to refresh the view
New Allows you to create new UMS objects such as directories, profiles, tasks etc.
Import/Export Allows you to import and export objects such as firmware, profiles, thin clients
Administrator Accounts Allows you to set up and manage UMS user accounts and groups Snapshot Management Allows you to manage structures on the UMS Web Server Logging Displays message/event logs and exports the logs
License Management Allows you to create and assign firmware licenses to thin clients VNC Viewer Allows you to shadow a thin client
Open Customization Builder *
Allows you to launch the Universal Customization Builder, see UCB in the
appendix (page 149).
Exit Allows you to exit the UMS Console application * if licensed
Edit
Menu → EditSave Description Allows you to save changes to the data in the content panel Edit Configuration Configuration parameters for a thin client or profile
Rename, Delete Object-related actions within the tree
Access Control Allows you to manage user and group rights for the selected object Cut, Copy, Paste Object-related actions within the tree
29
IGEL Technology GmbH IGEL Universal Management Suite v4 4.09.100
Thin clients
Menu → Thin ClientsThin client commands (Suspend, Shutdown ...)
Commands that can be issued to thin clients, e.g. shut down, restart, firmware update, send/receive settings, send message etc.
Take over Settings from ... Allows you to send profile settings to the thin client on a one-off basis
Clear Configuration Change Status flag
Allows you to reset change markings (blue dot next to the icons for the thin clients)
Check the template definitions * Allows you to check the assignment of template values Scan for Thin Clients Allows you to search for thin clients in the network of the UMS
Server * if feature enabled
Extras
Menu → Misc
Default Directories Automatic assignment of thin clients to directories according to specific rules.
Search Allows you to search for objects.
Scheduled Jobs Allows you to manage public holiday lists and assign tasks to hosts.
Change Password Allows the password of a logged-in user to be changed. SQL Console Direct access to the database with SQL scripts
Firmware Statistics A list of firmware versions registered in the database
Remove Unused Firmware Allows you to delete from the database firmware versions which are not used by any thin client or profile.
Cache Management Allows you to view, update and empty the UMS Server cache. Settings Configuration parameters such as console language, timeout
values for online checks or Universal Firmware Update search
etc.
Warning: The SQL Console is intended solely for administrative purposes. You can destroy the database through SQL operations on the Console.
30
IGEL Technology GmbH IGEL Universal Management Suite v4 4.09.100
Help
Menu → HelpHelp Link to the manual on edocs.igel.com
IGEL Knowledge Base Link to further online documentation on edocs.igel.com
Save Support Information... Allows you to save UMS Server and Console log files in a ZIP file Save TC Files for Support Allows you to save log and configuration files for a thin client in a
ZIP file.
Licenses from Third-Party Providers List of the licenses for third-party software and libraries used in
the UMS, e.g. Apache Tomcat
Info Shows details of the current version of the UMS Console and
Java environment as well as the logged-in user
4.1.2.
Tool bar
In the tool bar, you will find buttons for frequently used commands:
Figure 9: The symbol bar
The symbols are as follows (in the correct order):
Update Allows you to update the view and status of the thin clients. Online Check Allows you to perform an online check of the thin clients. Scan Thin Clients Allows you to search for thin clients within the network.
Rename Allows you to change the name of objects in the navigation tree. Delete Allows you to delete objects in the navigation tree.
Authorizations Allows you to specify access rights for selected objects. Cut, Copy, Paste You can also move objects within the tree via drag and drop. Save Description Data Allows you to save edited description data for thin clients or
profiles (data in the content panel).
Edit configuration Allows you to maintain the configuration parameters for thin clients or profiles. These normally correspond to the parameters in the clients' local setup.
Step Backwards / Forwards Allows you to move backwards and forwards in the console history.
The step backwards/forwards merely allows you to review the objects last visited. It does not allow you to undo changes you have made!
31
IGEL Technology GmbH IGEL Universal Management Suite v4 4.09.100
4.1.3.
Navigation tree (management tree)
The navigation tree (management tree) is subdivided into the following areas:
Master Profiles Allows you to create and organize master profiles Profiles Allows you to create and organize standard profiles Template Keys and Groups Keys and values for use in template profiles
Thin Clients Allows you to organize the managed thin clients in this area Shared Workplace Users Assigns specific profiles to AD users
Views Allows you to create configurable list views for thin clients Jobs Allows you to define scheduled tasks, e.g. firmware updates Files Allows you to register files for transferral to thin clients Universal Firmware Updates Allows you to download the current firmware versions for
distribution to thin clients Search History Saved search queries
Recycle Bin Contains deleted objects as well as objects which can be restored You can use sliders to change the size of individual areas and hide them. You can highlight and select objects in the navigation tree by clicking on them. You can select multiple objects using the Shift or the Ctrl key.
Under Thin Clients, you will find all of the thin clients registered in the database.
Tip: The number of items contained (including items in sub-folders) is shown after each folder. You can change the display settings in the menu under Misc > Settings > Show Number of Directory Items.
Select a directory.
The TC directory content page is shown in the content panel – with information on the contents of the directory and assigned objects (e.g. profiles).
Each thin client that is identified by its MAC address can only be shown once in the UMS tree. You can move a thin client by dragging and dropping it from one directory to another. The name shown in the tree is only used to identify the thin client in the UMS and does not need to be identical to the name of the thin client in the network – although this internal name is set to the network name when you register the thin client for the first time. The TC name does not need to be unique and can be used a number of times. The MAC address is the unique identifier here.
The color of the thin clients in the UMS tree indicates their respective status:
32
IGEL Technology GmbH IGEL Universal Management Suite v4 4.09.100
• Green if the thin client is online • Red if the thin client is offline
• Exclamation mark if changes have not yet been applied
Recognition occurs automatically by regularly sending UDP packets to the thin clients that are currently displayed in the UMS Console (default: every 3 seconds). You can update this status manually in the symbol
bar and specify the query interval for the online check in the Misc→Settings→Online Check menu.
The online check can be disabled completely in the UMS Administrator (page 37) application.
In the Profiles sub-structure, you can manage profiles for thin clients or thin client directories. You have the option of creating directories for saving profiles and can add, delete and change the profiles in this part of the structure. Information on a selected profile is shown in the content panel. To assign a profile to a thin client, you can drag and drop the thin client into the profile or vice versa. This also works with profiles and thin client directories. Profiles can also be assigned to the thin clients or thin client directories via the Add button in the object areas (8).
All generated thin client views are shown under Views. You can generate new views, edit or delete views and export the result of the view in various formats (e.g. XML). This tree structure can also contain sub-directories for arranging views.
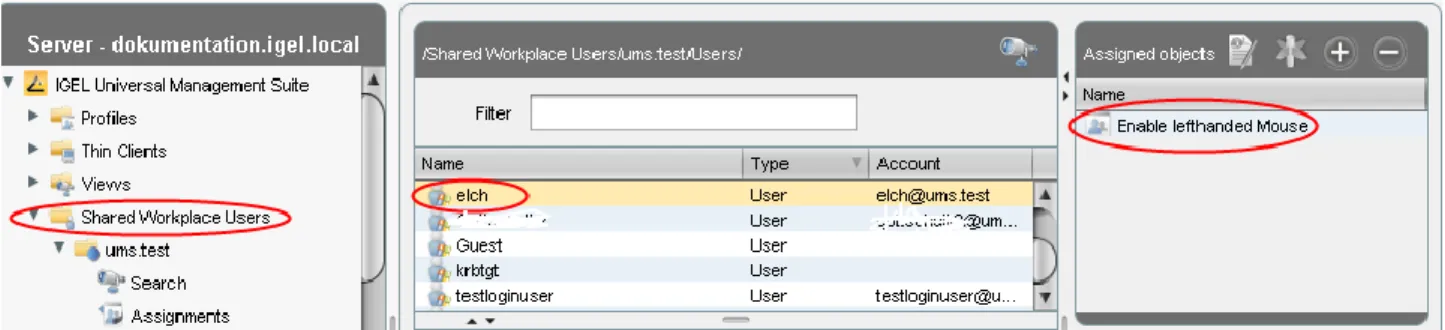
If you use the IGEL Shared Workplace function in order to distribute user-specific profiles to thin clients when logging on, you should assign one or more profiles to an AD user or a group in the Shared Workplace Users area. You can also generate a simulated view of the settings taking effect here.
All specified jobs are shown under Jobs. You can create new planned jobs and edit or delete listed jobs. Jobs are assigned to thin clients in the detailed view for a job. This tree structure can also contain sub-directories for organizing jobs.
33
IGEL Technology GmbH IGEL Universal Management Suite v4 4.09.100
4.1.4.
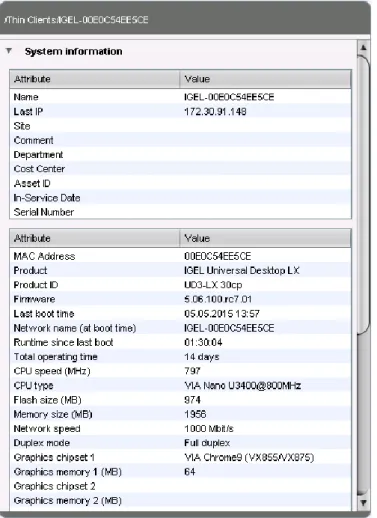
The content panel
The contents area or content panel shows the properties of the particular object highlighted in the tree. This can be the contents of a directory, e.g. the profiles, thin clients, sub-folders, tasks etc. contained therein, or detailed information relating to an object such as a thin client's system information, the basic data for a profile, the hit list for a view etc.
Figure 11: System information of the thin client
4.1.5.
UMS Administration
With Version 3.09 of the IGEL Universal Management Suite, a number of UMS Administrator settings
options have been moved to the administration area of the UMS Console. The console now features a new
UMS Administration area.
Configuration of the Active Directory and the server settings for Universal Firmware Updates have been
moved from the UMS Administrator to the administration area of the UMS Console. In the UMS
Administrator, a corresponding note is shown on the previously used tabs. You will also find new functions such as the alternative LDAP configuration or scheduled backups.
34
IGEL Technology GmbH IGEL Universal Management Suite v4 4.09.100
4.1.6.
Messages
The Messages window area contains information regarding the successful or unsuccessful execution of commands. If a command could not be executed successfully, a message written in red appears in the list. A warning symbol will also flash in the status bar of the UMS Console until the user selects the message.
Click Show Result or double-click the message in order to view the relevant details.
You can delete messages you have already dealt with or wait until the message window is automatically
reset when you close the UMS Console.
You can change the size of the message window using the middle slider or hide it altogether.
Figure 12: The Messages window
4.1.7.
Status bar
The status bar shows the name of the UMS Server currently connected and the user who is logged in to the
console. The symbol at the bottom right indicates the status of the message window. For example, it signals when new warning messages are present. These can be seen here even if the message area is hidden.
4.1.8.
Assigned objects
To ensure that you can quickly tell directly and indirectly assigned objects apart, the assigned objects area is subdivided into two parts.
Directly assigned objects have been assigned to an individual thin client, folder or profile, whereas indirect objects have been "inherited" via the file structure.
35
IGEL Technology GmbH IGEL Universal Management Suite v4 4.09.100
Double-click an object in the assignment area in order to directly edit the profile assigned to a thin client.
Figure 13: Directly and indirectly assigned objects
4.1.9.
Context menu
You will be given an object-dependent context menu by right-clicking on the corresponding object.
Depending on your selection, actions for folders, thin clients, Shared Workplace users etc. will be available. The chosen command will be carried out for all objects previously marked in the tree.
Certain commands can only be executed for individual objects, not for directories with objects. These options are then disabled in the menu. Example: The command File TC > UMS can only be executed for an individual thin client. In contrast, the command File UMS > TC can be executed for all thin clients in a directory.
4.1.10.
Search for objects in the UMS
36
IGEL Technology GmbH IGEL Universal Management Suite v4 4.09.100
• Quick Search
• Search function
• View
Quick Search in the symbol bar provides the quickest access to the search function. The entry mask is always visible in the console window. The key combination Shift-Ctrl-F places the cursor in the entry field. The Quick Search search queries are restricted to a small number of object properties: object name, object ID, MAC address, IP address. These data are buffered locally when the console is launched and can therefore be searched very quickly without having to access the database. The user's last 20 search queries are saved to allow quick access. They are saved in the console user's system user data (Windows Registry) rather than in the UMS database.
Figure 14: Search Parameters for Thin Clients
The normal UMS search function (Misc→Search or Ctrl-F key combination) provides additional options for searching the UMS database. In addition to the Quick Search data (see above), all other thin client, profile or view data can be selected here, e.g. an individual inventory number or the monitor model connected. Various criteria can be logically linked (AND / OR). The user's search queries are recorded under Search History in the navigation tree and can therefore be processed or reused easily.
Views (page 94) function very similarly to search queries. Here too, various criteria can be linked and the query saved. Unlike with search queries, however, views are available to all UMS administrators together –
depending on their authorizations. Views can also be taken into account when defining planned tasks (page
37
IGEL Technology GmbH IGEL Universal Management Suite v4 4.09.100
4.1.11.
Deleting objects in the UMS / recycle bin
With the IGEL Universal Management Suite from Version 4.07.100 onwards, you can also move objects to
the recycle bin instead of permanently deleting them straight away. The recycle bin is enabled or disabled globally for all UMS users.
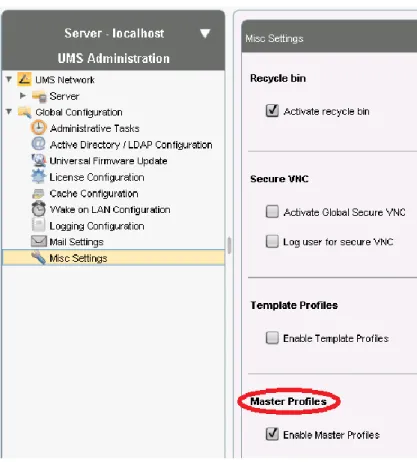
Enable the recycle bin in the administration area under Additional Settings→Enable Recycle Bin.
If an object in the structure tree is deleted (Delete function in the symbol bar, in the context menu or the Del key), it will be moved to the recycle bin following confirmation.
If the recycle bin is active, objects can also be deleted directly and permanently by pressing Shift-Del. Directories are moved to the recycle bin along with their sub-folders and all items and can therefore be restored again as a complete structure. You will find the UMS recycle bin as the lowest node in the UMS console structure tree. Items in the recycle bin can be permanently deleted there or restored. To do this, bring up the context menu for an item in the recycle bin.
If you cannot bring up the context menu for items in the recycle bin, the recycle bin is probably inactive. Check the status of the recycle bin as described above.
Virtually all items from the UMS structure tree can be moved to the recycle bin: thin clients, profiles, views, tasks, files and their directories. Shared Workplace users cannot be deleted, while administrator accounts (in account management) and search history items can only be deleted permanently (with Shift-Del). The highest nodes in the structure tree cannot be deleted either. However, this procedure will affect all deletable items beneath this node!
• Objects in the recycle bin cannot be found via the search function or views and cannot be addressed by
planned tasks.
• Thin clients in the recycle bin will not receive any new settings from the UMS but will remain registered
in the UMS and can be restored again along with all assigned profiles from the recycle bin.
• The fact that profiles in the recycle bin are no longer effective means that the settings for thin clients may change. Profiles previously assigned to thin clients will be reactivated if they are restored again.
• Planned tasks, views and search queries in the recycle bin will not be executed.
• At the same time, assigned profiles, files, views and firmware updates in the recycle bin are not active.
4.2.
The IGEL UMS Administrator
The IGEL UMS Administrator application is only available on one UMS Server as this makes it possible to intervene directly in communications between the services. It allows basic data such as the ports used or data sources connected to be edited. These functions are not available in the administration area of the console.
The Administrator's server configuration can be exported and imported again for backups via File. You can
change the language of the Administrator tool under File→Settings→Language.
The authorizations for changing settings depend on whether a person is authorized to change IGEL UMS
files on the server system. When using the IGEL UMS Administrator, you should therefore use the same
38
IGEL Technology GmbH IGEL Universal Management Suite v4 4.09.100
Figure 15: UMS Administrator
4.2.1.
Server settings
Using the UMS Administrator, you can change various server settings.
Ports/time limits
When the application is launched, the Settings window of the UMS Administrator will be displayed. Here,
you can specify the ports to be used by the UMS and other related settings such as the time limit etc. The IGEL UMS server uses these open ports for incoming queries: