Trend Micro™
DirectPass™ Password
Manager for PC
Product Guide
Trend Micro, Inc. 10101 N. De Anza Blvd. Cupertino, CA 95014
T 800.228.5651 / 408.257.1500 F 408.257.2003
www.trendmicro.com
Trend Micro Incorporated reserves the right to make changes to this document and to the service described herein without notice. Before implementing the service, please review the readme file and the latest version of the applicable user documentation.
Trend Micro, the Trend Micro t-ball logo, and DirectPass are trademarks or registered trademarks of Trend Micro, Incorporated. All other product or company names may be trademarks or registered trademarks of their owners.
Copyright © 2013 Trend Micro Incorporated, Consumer Technical Product Marketing. All rights reserved.
Trend Micro™ DirectPass™ Password Manager for PC 1.8 – Product Guide v1.9 provides help for analysts, reviewers, potential customers, and users who are evaluating, reviewing, or using Trend Micro DirectPass for PC or Android.
At Trend Micro, we are always seeking to improve our documentation. You can evaluate this document on the following web site:
DOCUMENT PROFILE:
Product Name: Trend Micro™ DirectPass™ Password Manager for PC 1.8
Document Title: Trend Micro™ DirectPass™ Password Manager for PC 1.8 - Product Guide v1.9 Document Filename: PG - DirectPass 1.8 for PC - Product Guide v1.9
Document Release Date: October 2, 2013 Team: Consumer Technical Product Marketing
Trend Micro™ DirectPass™ Password Manager for PC 1.8 – Product Guide v1.9
Contents
Executive Summary ... 5
Chapter 1: Introducing Trend Micro™ DirectPass™ Password Manager for PC ... 6
Product Overview... 6
Key Features... 7
System Requirements ... 8
Incompatible Software ... 8
Internet Connection ... 9
Recommended Environment ... 9
Target Market ... 9
Availability ... 9
Contacting Trend Micro ... 9
Consumer Support Line ... 9
Free phone, email and chat support ... 9
Chapter 2: Getting Started with Trend Micro™ DirectPass Password Manager for PC ... 10
Download and Install Trend Micro™ DirectPass and Create an Account ... 10
Chapter 3: The DirectPass Browser Plug-in ... 18
Using the DirectPass Browser Plug-in ... 18
Saving Account Credentials ... 20
Generating Strong Passwords ... 22
Locking DirectPass from the Browser Plug-in ... 24
Chapter 4: The DirectPass Console ... 26
Launching the DirectPass Console ... 26
Managing Passwords ... 28
Creating a Profile to Auto-Fill Forms ... 29
Creating Secure Notes ... 32
Editing Settings ... 34
Master Password ... 34
Data Controls ... 35
Auto Sign-In ... 42
Exception List ... 42
Proxy ... 44
Privacy ... 46
Manual Sync ... 46
Locking DirectPass from the Console ... 47
Support and Help ... 48
Chapter 5: The Secure Browser ... 49
Using the Secure Browser ... 49
Chapter 6: DirectPass for the Windows 8 Modern UI ... 53
Download and Install DirectPass for Windows 8 ... 53
Using Existing DirectPass Passwords ... 57
Saving New DirectPass Passwords ... 59
Chapter 7: Using the DirectPass Web Management Portal ... 64
Signing In to the DirectPass Web Management Portal ... 64
Editing Passwords ... 66
Editing Settings ... 71
Subscription Information ... 71
Master Password | Security Questions ... 72
Data Controls ... 73
Other ... 77
Signing Out of your Trend Micro Account ... 79
Chapter 8: DirectPass for Android ... 81
Download and Install DirectPass for Android and Create an Account ... 81
Adding Passwords ... 84
Profile ... 85
Secure Notes ... 85
Settings ... 86
Trend Micro™ DirectPass™ Password Manager for PC 1.8 – Product Guide v1.9
Executive Summary
Trend Micro™ DirectPass™ Password Managerfor PC 1.8 helps you manage all your online credentials in one secure location, ensuring an easy and safe online experience, as well as a faster, more secure, and convenient way to access web sites.
Among its key features, Trend Micro™DirectPass™ provides in-the-cloud synchronization across multiple devices and operating systems, including Windows 8 and Macintosh desktops and laptops, iOS and Android smartphones and tablets, allowing users to conduct secure online transactions while in the office, at home, or on the road.
Trend Micro DirectPass for PC 1.8 provides some leading functions including Keystroke Encryption, which protects your identity and credit card information by protecting your most commonly used keystrokes, preventing theft and fraud from keyloggers. DirectPass for PC, iOS, and Android also provides a Secure Browser, which gives an extra layer of security when performing online transactions on banking and other financial web sites.
DirectPass for PC 1.8 includes compatibility with a new Web Management Portal, allowing users access and management to their password database whether they’re on their own or a public computer. Finally, Innovative technology in DirectPass incorporates continuous adaptation to customer usage, improving the global list of safe web pages.
This product guide provides all you need to know to evaluate, install, and use Trend Micro™ DirectPass™ on Windows-based PCs and Android devices.
Chapter 1: Introducing Trend Micro™ DirectPass™
Password Manager for PC
This chapter introduces you to Trend Micro™ DirectPass™ Password Manager for PC. The topics discussed in this chapter include:
Product Overview Key Features
System Requirements Target Market Availability and Pricing Support contacts
Product Overview
In today’s digital world, individuals manage multiple online accounts, which require access via a unique user name and password. Given the multitude of online sites being accessed, individuals deploy various and often unsecure means to remember their credentials. They may use the same usernames and passwords on these websites, thus opening themselves up to universal “cracking” of their accounts. Or they may store them insecurely on paper or post-its, in a text file, or rely on a browser’s not-so-secure “autofill” function, or use a password management tool to manage them. The difficulty in managing all these credentials is compounded by the spread of mobile devices such as smartphones or tablets. How can a user manage their login usernames and passwords, while making sure all their online transactions are secure? And how can they manage them across all their computers and devices?
Trend Micro™ DirectPass™PasswordManager for PC 1.8 helps you manage and secure all your online credentials, ensuring an easy and safe online experience, while offering a faster, more secure, and convenient way to access web sites. Using a single Master Password, DirectPass users have instant access to all their login credentials, no matter where they’re located or what device they’re using. Among its key features, Trend Micro™ DirectPass provides in-the-cloud synchronization across multiple devices, allowing users to conduct secure online transactions while in the office, at home, or on the road. It also provides Secure Browser, which ensures ultimate data security while performing online transactions on banking or financial websites.
Trend Micro™ DirectPass™ Password Manager for PC 1.8 – Product Guide v1.9
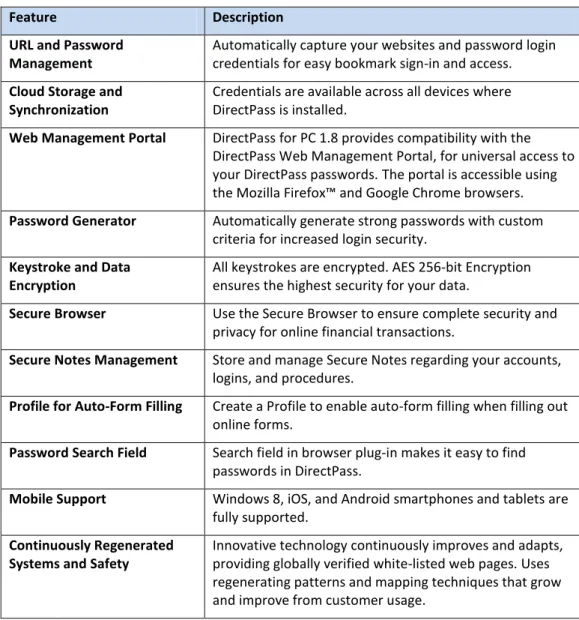
Key Features
Table 1. Key Features of Trend Micro™ DirectPass Password Manager for PC 1.8
Feature Description
URL and Password Management
Automatically capture your websites and password login credentials for easy bookmark sign-in and access. Cloud Storage and
Synchronization
Credentials are available across all devices where DirectPass is installed.
Web Management Portal DirectPass for PC 1.8 provides compatibility with the DirectPass Web Management Portal, for universal access to your DirectPass passwords. The portal is accessible using the Mozilla Firefox™ and Google Chrome browsers. Password Generator Automatically generate strong passwords with custom
criteria for increased login security. Keystroke and Data
Encryption
All keystrokes are encrypted. AES 256-bit Encryption ensures the highest security for your data.
Secure Browser Use the Secure Browser to ensure complete security and privacy for online financial transactions.
Secure Notes Management Store and manage Secure Notes regarding your accounts, logins, and procedures.
Profile for Auto-Form Filling Create a Profile to enable auto-form filling when filling out online forms.
Password Search Field Search field in browser plug-in makes it easy to find passwords in DirectPass.
Mobile Support Windows 8, iOS, and Android smartphones and tablets are fully supported.
Continuously Regenerated Systems and Safety
Innovative technology continuously improves and adapts, providing globally verified white-listed web pages. Uses regenerating patterns and mapping techniques that grow and improve from customer usage.
System Requirements
Before you attempt to install Trend Micro DirectPass 1.8 please ensure you meet the following system requirements.
Table 2. System Requirements
Operating System Processor Memory Free Disk Space Microsoft™ Windows™
XP with Service Pack 3 or higher (32-bit)
450Mhz minimum 800MHz recommended
256MB 100MB minimum 200MB recommended Windows Vista™ with
Service Pack 2 or higher (32-bit and 64-bit)
800MHz minimum 1GHz recommended
1GB 100MB minimum
200MB recommended Windows 7 with Service
Pack 1 or higher (32-bit and 64-bit)
800 MHz minimum 1GHz recommended
1GB 100MB minimum
200MB recommended Windows 8 (32-bit and
64-bit)
1GHz recommended 1GB 100MB minimum 200MB recommended Windows 8 (Windows
Store)
1GHz recommended 1GB (32-bit) 2GB (64-bit)
11MB minimum 20MB recommended Other Requirements
Compatible Browsers Microsoft™ Internet Explorer™ 8.0, 9.0, 10.0*, 11.0** Mozilla™ Firefox™ 3.6 ~ 23
Google Chrome 12 ~ 29 Compatible
Platforms/Devices
Mac OS X 10.6 or above Apple iOS 4.3, 5.0, 5.1, 6.0, 6.1
Windows XP SP3, Vista, 7, and 8 (Pro, RT) Google Android Phone 2.3, 3.2, 4.0, 4.1, 4.2, 4.3 Google Android Tablet 3.0, 3.1, 3.2, 4.0, 4.1, 4.2, 4.3
*Compatible with the plug-in, but not the Web Management Portal; **Est: October 2013
Incompatible Software
To identify software that you should remove from the computer before installing DirectPass, please refer to the following Web site:
Trend Micro™ DirectPass™ Password Manager for PC 1.8 – Product Guide v1.9
Internet Connection
Trend Micro™ DirectPass requires an Internet connection for activating online, checking the expiration date, downloading updates, sending Trend Micro URL/web queries and logs to the portal, logging into the management console, and browsing knowledge base pages on the Trend Micro Web site. If you have a dial-up or other connection to the Internet that charges fees per connection, by the amount of time connected or for the amount of data
downloaded, make sure your router or connection software does not automatically start a connection to support the features listed above to avoid extra connection fees. Follow your router's instructions to edit your router settings as required.
Recommended Environment
This Product Guide assumes that you are using Trend Micro DirectPass under Windows 8, 7, Vista, or XP; or on an Android device. All screenshots were shot using Windows 7
Professional, Windows 8, and Android 2.3.4 (for smartphones). If you are using a different operating system, or using an Android tablet (using Honeycomb), certain screens may appear differently and some procedures may require additional steps.
Target Market
Trend Micro™ DirectPass is targeted to all consumers who require complete security for their online digital accounts and transactions.
Availability
DirectPass for PC is available at www.directpass.com, from the Windows Store, and Amazon. DirectPass for Android is available from the DirectPass website above and Google Play. Trend Micro DirectPass for PC 1.8 is globally available September 30, 2013.
Contacting Trend Micro
Trend Micro Incorporated 10101 North De Anza Blvd. Cupertino, CA 95014
Tel: (408) 257-1500 or (800) 228-5651 Fax: (408) 257-2003
www.trendmicro.com
Further information is available at http://us.trendmicro.com/us/about/index.html
Consumer Support Line
(800) 864-6027
Free phone, email and chat support
Trend Micro also offers free phone, email, and chat support. For more information, see
Chapter 2: Getting Started with Trend Micro™
DirectPass Password Manager for PC
This chapter gets you started with Trend Micro™ DirectPass Password Manager for PC. In this chapter you’re shown how to Download and Install a copy of DirectPass. Installation is identical for all desktop versions of Windows, including Windows 8 Desktop.
Download and Install Trend Micro™ DirectPass and Create
an Account
To get started, you need to download and install a Free or Paid Version of Trend Micro DirectPass. The Free Version does not expire, but is limited to five Passwords and five Secure Notes. The Paid Version provides unlimited passwords and notes.
To download and install Trend Micro DirectPass:
1. Click www.directpass.com to access the Trend Micro DirectPass web page. The DirectPass web page appears.
Figure 1. DirectPass Webpage
2. Option 1: If you’re installing a Free Trial, click Get DirectPass for Free for the Free Trial of Trend Micro DirectPass. The DirectPass Download dialog appears.
Trend Micro™ DirectPass™ Password Manager for PC 1.8 – Product Guide v1.9
Figure 2. DirectPass Download
3. Click Windows or Windows 8, depending on your operating system, and DirectPass downloads.
4. Option 2: If you’re installing a Paid Version, click the link Buy DirectPass to save unlimited passwords.
Figure 4. Pick Your Subscription
5. When the page scrolls down, click the Buy Now button for the subscription you wish to purchase, then complete the purchase and sign-up process.
Note: Titanium Maximum and Premium Security users get a free subscription of DirectPass included with their purchase of Titanium 2014. Access to the bundle is provided in the Titanium Console.
6. When the download is complete, the Run or Save popup appears in your Internet Explorer browser. (The other browsers have a slightly different process.)
Figure 5. Download - Run Popup
7. Click Run to begin the install process. The DirectPass Installer downloads, begins the install process, and the User Account Control dialog appears.
Figure 6. User Account Control
Trend Micro™ DirectPass™ Password Manager for PC 1.8 – Product Guide v1.9
Figure 7. License Agreement
9. The default language is English. Click the link to switch to another language. 10. Note the checkbox Help make DirectPass better is checked by default. This provides
technical data to Trend Micro to help improve the product; no personal information is shared. If you wish to opt out of this feedback, uncheck the checkbox.
11. Read the License Agreement. If you agree, click Agree and Install. The installation proceeds and a progress dialog appears that shows you the progress of the installation.
Figure 8. DirectPass Installation Progress
12. When the installation has completed, a dialog appears letting you sign in to your Trend Micro Account.
Figure 9. Sign into Your Trend Micro Account
13. If you already have a Trend Micro Account, type in your Email Address and account Password and click Next. The Ready To Get Started screen appears. (See Figure 12,Step 17 in the instruction below.)
14. If you don’t have a Trend Micro Account, click the hotlink Don’t have a Trend Micro Account? The wizard changes, allowing you to enter your contact information to set up an account.
Figure 10. Create Account
15. Enter your Email Address, a Password, confirm the Password, provide your First and Last Name, select your Location, and check Receive the latest news and offers from Trend Micro if you choose to do so, then click Next. A dialog appears, asking you to confirm your email address.
Figure 11. Confirm Your Email Address
16. If you agree, click Agree and Confirm. Depending on your version, the Ready to Get Started with the Free Version or Ready to Get Started screen appears.
Trend Micro™ DirectPass™ Password Manager for PC 1.8 – Product Guide v1.9
Figure 12. Ready to Get Started with the Free Version
Figure 13. Ready to Get Started
17. Click Start Now to begin using DirectPass. If this is a new DirectPass account, a dialog appears, letting you Create a New Master Password. Otherwise, you’re taken directly to the Setup Complete screen (see Figure 16 below).
Figure 14. Create a New Master Password
18. For new users, enter your Master Password, Confirm the Master Password, provide yourself a Password Hint. You’re shown the strength of your password.
19. Click Next. A warning dialog appears, reminding you to Remember Your Master Password. If you forget your Master Password, you will lose all your DirectPass data. Since all your data is completely confidential and under your control, Trend Micro cannot help you retrieve your data if you forget it, though you can begin again with a new master password.
Figure 15. Remember Your Master Password
20. Mouse over the asterisks to view your Master Password, then click OK. A Setup Complete dialog appears.
Figure 16. Setup Complete
21. If needed, restart any of the web browsers open on your computer (your installed browsers are listed in the Setup Complete window) to begin using Trend Micro
DirectPass. It will ask to save your password the next time you sign into a website. Then click Finished to finish your setup. DirectPass launches your default web browser and provides a splash screen.
Trend Micro™ DirectPass™ Password Manager for PC 1.8 – Product Guide v1.9
Figure 17. DirectPass Splash Screen
22. Click Enable in the DirectPass Toolbar add-on popup. This enables the add-on in your browser.
23. Read the instructions on the splash screen, showing the easy 3-step process for saving passwords.
24. Congratulations! You’ve installed Trend Micro DirectPass and you may now begin using it.
Chapter 3: The DirectPass Browser Plug-in
This chapter provides an overview of the Trend Micro™ DirectPass browser plug-in. Topics discussed in this chapter include:
Using the DirectPass Browser Plug-in Saving Account Credentials
Generating Strong Passwords
Using the DirectPass Browser Plug-in
When Trend Micro DirectPass is installed, a plug-in appears on your Web browser that allows you log in to DirectPass and begin using it.
To begin using DirectPass with your browser:
1. Launch your Web browser and locate the DirectPass icon. Depending on your browser, it may be located on the left or right-hand side of your browser menu bar.
Figure 18. DirectPass Browser Plug-In Icon
2. Click the DirectPass icon. An entry dialog appears, letting you enter your Master Password to unlock Trend Micro DirectPass.
Figure 19. DirectPass Master Password > Unlock
3. In the field provided, type your Master Password and click Unlock.
4. If your browser has no previously stored passwords, you’re instructed to simply Start Signing In Automatically by logging into a website; DirectPass will ask to save your password.
Trend Micro™ DirectPass™ Password Manager for PC 1.8 – Product Guide v1.9
Figure 20. Start Signing In Automatically.
5. If your browser has previously stored any passwords, an Import dialog appears, allowing you to import the passwords into DirectPass.
Figure 21. Ready to Import Passwords
6. Click Import to import the passwords. A dialog appears to begin the import.
Figure 22. Import Passwords
7. If you wish to remove your passwords from your browsers after the import, leave the Remove Passwords from browsers after import checked. Click Start to import the password from your browser.
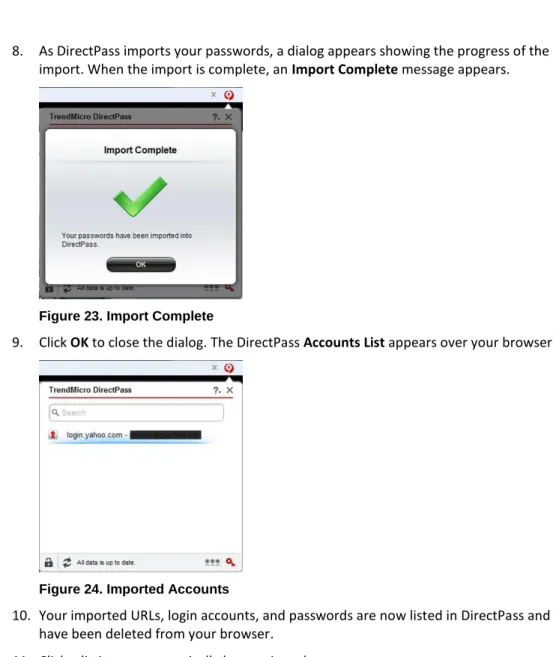
8. As DirectPass imports your passwords, a dialog appears showing the progress of the import. When the import is complete, an Import Complete message appears.
Figure 23. Import Complete
9. Click OK to close the dialog. The DirectPass Accounts List appears over your browser.
Figure 24. Imported Accounts
10. Your imported URLs, login accounts, and passwords are now listed in DirectPass and have been deleted from your browser.
11. Click a listing to automatically log you into that account.
Saving Account Credentials
Trend Micro DirectPass works as you browse to save account sign in credentials, so that you don’t have to remember them in the future.
To save an account’s credentials:
1. Launch your browser, click the DirectPass icon, and unlock DirectPass using your Master Password.
Trend Micro™ DirectPass™ Password Manager for PC 1.8 – Product Guide v1.9
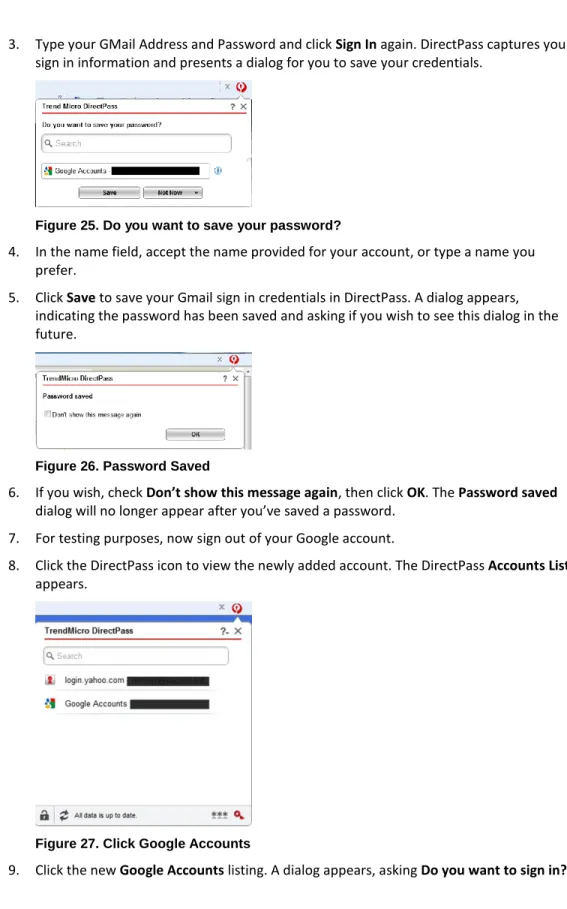
3. Type your GMail Address and Password and click Sign In again. DirectPass captures your sign in information and presents a dialog for you to save your credentials.
Figure 25. Do you want to save your password?
4. In the name field, accept the name provided for your account, or type a name you prefer.
5. Click Save to save your Gmail sign in credentials in DirectPass. A dialog appears, indicating the password has been saved and asking if you wish to see this dialog in the future.
Figure 26. Password Saved
6. If you wish, check Don’t show this message again, then click OK.The Password saved dialog will no longer appear after you’ve saved a password.
7. For testing purposes, now sign out of your Google account.
8. Click the DirectPass icon to view the newly added account. The DirectPass Accounts List appears.
Figure 27. Click Google Accounts
Figure 28. Do you want to sign in?
10. Note the checkbox Always sign in to websites without asking. Check this checkbox if you want to use the option.
11. Click the button for Google Accounts. DirectPass automatically signs you into your Google Account.
12. Repeat this process for any accounts you wish to add.
13. As the list of your accounts gets long, use the Search field in the DirectPass popup to locate specific passwords by simply clicking in the field and typing the proper string; e.g., “Google.” This will filter the list and only show Google accounts.
Generating Strong Passwords
When you create a new online account you’re often tempted to use a familiar, easy-to-remember password that you’ve previously used with multiple accounts. This weakens your security, potentially exposing you to data theft, since once the familiar password is cracked it’s a key to many of your online accounts. Trend Micro DirectPass helps you to generate and save strong custom passwords for each of your online accounts, thus strengthening the security of all your personal online data.
To generate a strong Password:
1. Open your browser and click the DirectPass icon. The DirectPass dialog appears for you to unlock DirectPass.
Trend Micro™ DirectPass™ Password Manager for PC 1.8 – Product Guide v1.9
Figure 29. Password Generator Icon
3. Click the Password Generator icon. A popup appears, showing the Password Generator.
Figure 30. Password Generator
4. Determine the password criteria you wish fulfill, such as password length (6-20 characters), and whether you want capital letters, lower-case letters, numbers, and symbols in your password.
5. Click the up or down arrow to pick a length and check or uncheck the checkboxes to include or exclude that type of character.
6. When you’ve selected your criteria, click the rotating arrow and a strong password will be generated. If you don’t like the password provided, click the rotating arrow again.
7. Once you have a password you like, click Copy to copy it to the clipboard. Just to be safe, you can also paste it in a text document, which you can delete later; or you can copy it into a Secure Note in the Console (see Creating Secure Notes in Chapter 4). 8. When you register for your new online account, paste this password into the password
field; or use it to change your current account password to a stronger password.
9. Once you log in to your online account with this password, pasting it from the Clipboard, DirectPass will capture it for you and you can save it as a named DirectPass account, as described in the previous section Saving Account Credentials.
Locking DirectPass from the Browser Plug-in
To lock DirectPass from the browser plug-in:
1. You should already be logged into DirectPass to test this option. 2. Click the DirectPass icon in your browser to open the DirectPass plug-in.
Figure 31. Lock/Unlock Icon
3. Click the Lock/Unlock icon in the lower left-hand corner of the DirectPass plug-in. A dialog appears, asking if you’re sure you want to lock Trend Micro DirectPass.
Trend Micro™ DirectPass™ Password Manager for PC 1.8 – Product Guide v1.9
Figure 32. Lock DirectPass
4. Optionally check Always lock without asking if you want to use that option, then click Lock to lock DirectPass. DirectPass locks and its icon changes from red to black.
Chapter 4: The DirectPass Console
Trend Micro™ DirectPass provides a Console to help manage all your credentials and settings. Topics discussed in this chapter include:
Launching the DirectPass Console Editing and Deleting Passwords
Creating a Profile to Auto Fill Online Forms Creating Secure Notes
Editing Settings
Launching the DirectPass Console
DirectPass provides three options to launch the DirectPass Console.
To launch the DirectPass Console:
Figure 33. The DirectPass Key Icon
1. If DirectPass is unlocked and the DirectPass plug-in is visible onscreen, click the Key Icon in the lower right-hand corner of the popup. This takes you directly to the DirectPass Console. (See Figure 33.)
Trend Micro™ DirectPass™ Password Manager for PC 1.8 – Product Guide v1.9
Figure 35. Trend Micro DirectPass Program
3. Alternately, select Windows Start > Programs > Trend Micro DirectPass Folder > Trend Micro DirectPass. If DirectPass is unlocked, you’re taken directly to the DirectPass Console. If DirectPass is locked, you’re presented with a dialog to enter your Master Password.
Figure 36. DirectPass Master Password Dialog
4. Type your Master Password into the field provided and click Unlock. The DirectPass Console appears, with the Passwords tab selected by default.
Figure 37. DirectPass Console
5. Select the relevant tab in the DirectPass Console menu to manage your Passwords, Profile, Notes, and Settings. We’ll explain these in the following sections.
Managing Passwords
To manage Passwords:
1. With the Passwords tab selected, select an account in the list. The account details appear.
Figure 38. DirectPass Console > Passwords
2. Double-click the account name in the list, or click Open Site Now to launch your browser and automatically log in to the account.
3. Mouse over the Password to obtain the password rating. A popup gives advice to make your passwords stronger.
4. Mouse over the Password asterisks to display the password; click it to copy it to the Clipboard.
5. Drag accounts up and down in the list to reorder them.
6. In a long list of passwords, search for a keyword in the Search field to filter the list and display only the relevant password(s).
7. Click the Trashcan to delete the selected account. A dialog appears, asking if you really want to delete these credentials.
Figure 39. Delete Credentials?
Trend Micro™ DirectPass™ Password Manager for PC 1.8 – Product Guide v1.9
Figure 40. Edit Password
10. Click Edit to proceed with the edit. The Edit Password screen appears.
Figure 41. Edit Password Screen
11. Edit the Password Value, or click + New Value to add a new value. A new row is created in the Password table to enter the new value.
12. Click the Trashcan in a value row to delete the value. 13. Click Save to save your changes.
14. Double-click the password, or click Open Site Now to test your changes.
Creating a Profile to Auto-Fill Forms
Trend Micro DirectPass lets you create a Profile to help you automatically fill online Forms.
To create a Profile:
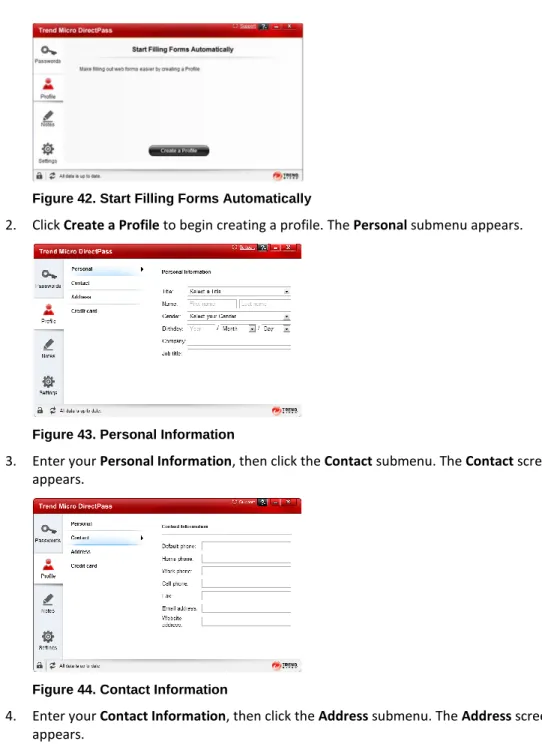
1. Click the Profile tab in the DirectPass Console. The Profile welcome screen appears, offering to let you Start Filling Forms Automatically.
Figure 42. Start Filling Forms Automatically
2. Click Create a Profile to begin creating a profile. The Personal submenu appears.
Figure 43. Personal Information
3. Enter your Personal Information, then click the Contact submenu. The Contact screen appears.
Figure 44. Contact Information
4. Enter your ContactInformation, then click the Address submenu. The Address screen appears.
Trend Micro™ DirectPass™ Password Manager for PC 1.8 – Product Guide v1.9
Figure 45. Address
5. Enter your Address details, then click the Credit Card submenu. The Credit Card screen appears.
Figure 46. Credit Card
6. Enter your Credit Card information.
7. DirectPass automatically saves your entries. Test the auto fill function by signing up for a new online account.
Figure 47. DirectPass Auto Fill
8. When you enter data into form fields corresponding to the data in your Profile, a popup will appear saying Click here to auto fill. Click the message to auto fill the field with the data stored in your Profile.
Creating Secure Notes
Trend Micro DirectPass lets you store information securely in the form of Secure Notes.
To create Secure Notes:
1. Click the Notes tab in the DirectPass Console. The Notes screen appears, inviting you to Start Taking Secure Notes.
Figure 48. Start Taking Secure Notes
2. Click Create a Note. The New Note screen appears.
Figure 49. Add a new Secure Note
3. In the “New Note” Title field, type the title for your Secure Note. (Or alternately, just type in the note field and the first 30 characters will become your title.)
4. Select the note field and begin entering your Secure Note.
5. Click Add New to add a new note. Your previous note is added to the Secure Notes list and a New Note is provided for you to enter the new note.
Trend Micro™ DirectPass™ Password Manager for PC 1.8 – Product Guide v1.9
Figure 50. New Note
6. To delete a note, select it in the list and click the Trashcan in the lower right-hand corner of the note field. A dialog appears, asking Are You Sure?Do you want to delete the selected note?
Figure 51. Delete Secure Note
7. Click Delete to delete it or Cancel to cancel your deletion.
8. Type a keyword in the Search field to find a particular note in a long list of notes. 9. Drag-and-drop notes to reorder them in your list.
Editing Settings
Trend Micro DirectPass provides a variety of settings to control how DirectPass operates.
Master Password
To edit your Master Password:
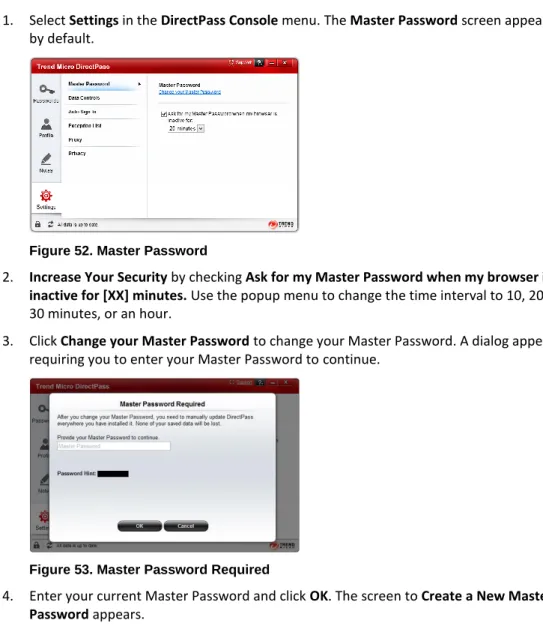
1. Select Settings in the DirectPass Console menu. The Master Password screen appears by default.
Figure 52. Master Password
2. Increase Your Security by checking Ask for my Master Password when my browser is inactive for [XX] minutes. Use the popup menu to change the time interval to 10, 20, or 30 minutes, or an hour.
3. Click Change your Master Password to change your Master Password. A dialog appears, requiring you to enter your Master Password to continue.
Figure 53. Master Password Required
4. Enter your current Master Password and click OK. The screen to Create a New Master Password appears.
Trend Micro™ DirectPass™ Password Manager for PC 1.8 – Product Guide v1.9
Figure 54. Create a New Master Password
5. Enter your new Master Password, Confirm the Master Password, provide a new Password Hint, and click Reset. This resets your Master Password.
Data Controls
Trend Micro DirectPass provides a set of Data Controls to automatically synchronize and back up your data to the cloud, to export your credentials to a CSV file, import credentials from another DirectPass or LastPass account, and import passwords from your Web browser.
To manage your Data Controls:
1. Select Data Controls from the Settings menu. The Data Controls screen appears.
Figure 55. Data Controls
2. By default, your DirectPass data is automatically synchronized, encrypted, and backed up to the cloud. This ensures secure access to your credentials from any device where you’ve installed DirectPass.
3. To disable this automatic sync and backup uncheck the checkbox Automatically synchronize and backup my data. A dialog appears, warning you that all new Trend Micro DirectPass data will be unavailable on your other devices.
Figure 56. Disable Auto Sync?
4. Click Disable to disable Auto Sync, or Cancel to cancel the operation.
To export data from DirectPass:
1. Double-click the DirectPass icon on your desktop to load the DirectPass Console. 2. Log into DirectPass using the Master Password from your other account and select
Settings > Data Controls. The Data Controls screen appears.
Figure 57. Export Data
3. Click the Export Data hotlink. A dialog appears, letting you Choose Protection Level for the exported data.
Trend Micro™ DirectPass™ Password Manager for PC 1.8 – Product Guide v1.9
6. An Export Complete dialog appears, indicating the success of the export, warning you that the CSV file is not protected by your Master Password, and showing you the path to the exported file.
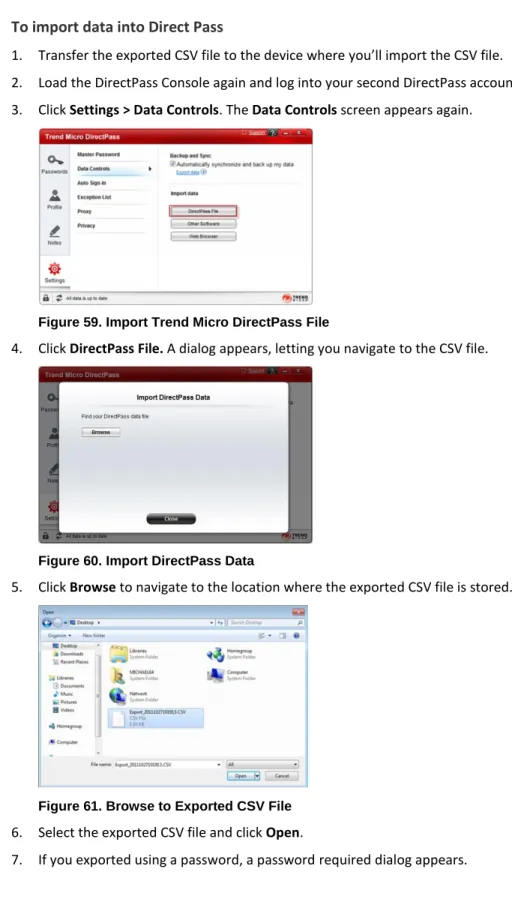
To import data into Direct Pass
1. Transfer the exported CSV file to the device where you’ll import the CSV file. 2. Load the DirectPass Console again and log into your second DirectPass account. 3. Click Settings > Data Controls. The Data Controls screen appears again.
Figure 59. Import Trend Micro DirectPass File
4. Click DirectPass File. A dialog appears, letting you navigate to the CSV file.
Figure 60. Import DirectPass Data
5. Click Browse to navigate to the location where the exported CSV file is stored.
Trend Micro™ DirectPass™ Password Manager for PC 1.8 – Product Guide v1.9
Figure 62. Password Required
8. Enter your password and click OK. The file is imported and an Import Complete dialog appears.
Figure 63. Import Complete 9. Click Close to close the dialog.
10. Delete the CVS file to protect your passwords.
11. Select Passwords in the main menu to view the imported passwords.
To import data from Other Software (LastPass):
1. To complete this option, you must have previously exported your credentials from LastPass to a CSV file and transferred it to the device where you’ll conduct the import.
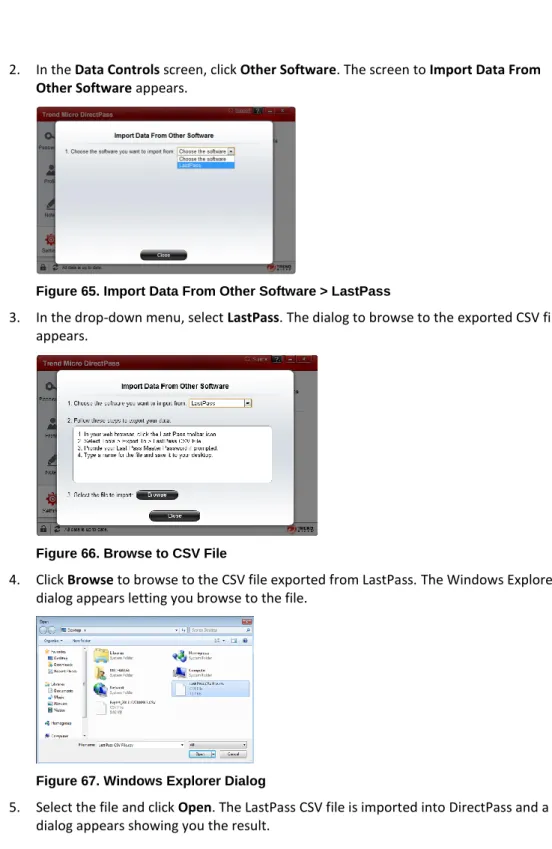
2. In the Data Controls screen, click Other Software. The screen to Import Data From Other Software appears.
Figure 65. Import Data From Other Software > LastPass
3. In the drop-down menu, select LastPass. The dialog to browse to the exported CSV file appears.
Figure 66. Browse to CSV File
4. Click Browse to browse to the CSV file exported from LastPass. The Windows Explorer dialog appears letting you browse to the file.
Figure 67. Windows Explorer Dialog
5. Select the file and click Open. The LastPass CSV file is imported into DirectPass and a dialog appears showing you the result.
Trend Micro™ DirectPass™ Password Manager for PC 1.8 – Product Guide v1.9
Figure 68. Import Complete from Other Software 6. Click Close to close the dialog.
7. Select Passwords in the main menu to view the imported passwords.
To import data from your browser:
For this option to be available you must have previously stored passwords in your browser. 1. Return to the Data Controls submenu.
Figure 69. Data Controls > Web Browser Import
2. Click Web Browser to begin importing data from your browsers. The Import Passwords dialog appears.
3. A progress dialog appears, showing you the progress of the import. When the import is complete, a dialog appears, showing the results.
Figure 71. Import Complete 4. Click OK to close the dialog.
Auto Sign-In
The Auto Sign-In function lets you always sign into websites without asking.
To edit Auto Sign-In:
1. Select Auto Sign-In from the Settings menu. The Auto Sign-In screen appears.
Figure 72. Auto Sign-In
2. By default, Auto Sign-In is unchecked. Check Always sign into websites without asking to enable the function.
Exception List
DirectPass allows you to add the URLs of websites for two exceptions to its normal behavior: Never ask to save passwords
Trend Micro™ DirectPass™ Password Manager for PC 1.8 – Product Guide v1.9
Figure 73. Exception List
2. Click + Add to add an exception. A dialog to Add or Edit an Item appears.
Figure 74. Add or Edit an Item
3. In the field provided, add the address (URL) of a website, then check the Response you desire:
Never ask to save sign in data Never ask to open in Secure Browser
4. Click OK. The exception is added to the ExceptionList with the colored indicator of the Response you chose.
Figure 75. Exception Added
5. To delete an exception, check the checkbox for the Website in the list and click the Remove button. The exception is removed.
6. To edit an exception, click the Edit pen in the right-hand column of the table for the item in the list. The editor reappears.
Figure 76. Add or Edit an Item
7. Make your changes and click OK to close the editor.
Proxy
Trend Micro DirectPass uses the Internet to synchronize your data and update the program. To ensure the proper connection, DirectPass allows you to configure your Internet Proxy settings.
To configure your Proxy settings:
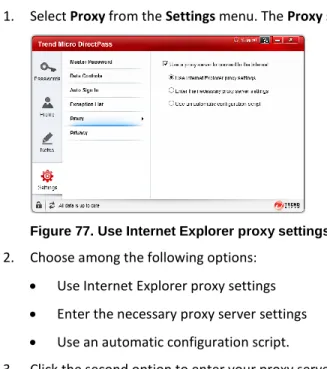
1. Select Proxy from the Settings menu. The Proxy settings appear.
Figure 77. Use Internet Explorer proxy settings 2. Choose among the following options:
Use Internet Explorer proxy settings Enter the necessary proxy server settings Use an automatic configuration script.
Trend Micro™ DirectPass™ Password Manager for PC 1.8 – Product Guide v1.9
Figure 78. Enter the necessary proxy server settings
4. Enter the Proxy and Port and credentials (User Name and Password) only if required. 5. Click the third option to use an automatic configuration script.
Figure 79. Use an automatic configuration script 6. Enter the address of the script.
Privacy
DirectPass provides automatic feedback to Trend Micro upon login usage patterns when logins fail for complicated multi-layer logins, so Trend Micro can update its login rules. No personal data is shared. You can opt out of this feedback by changing your privacy settings.
To configure your Privacy settings:
1. Select Privacy from the Settings menu. The Privacy screen appears.
Figure 80. Privacy
2. This option is checked by default. Uncheck it if you do not wish to provide anonymous feedback.
Manual Sync
At any time, you can also conduct a manual sync to synchronize your DirectPass local instance with the cloud. This makes any local change in DirectPass data on one device immediately available to all your other devices where DirectPass is installed.
To conduct a manual sync:
Figure 81. Manual Sync
1. From any screen, click the Sync arrows at the bottom of the DirectPass Console. This performs a synch with the cloud, then returns the result All data is up to date.
Trend Micro™ DirectPass™ Password Manager for PC 1.8 – Product Guide v1.9
Locking DirectPass from the Console
You can lock DirectPass directly from the Console (as well as from the Browser plug-in).
To lock DirectPass:
Figure 82. Unlocked Lock
1. From any screen, click the unlocked Lock icon at the bottom of the DirectPass Console. A dialog appears, asking Are you sure?
Figure 83. Lock Dialog
2. If you wish, to prevent this lock dialog from appearing in the future, check Always lock without asking.
Support and Help
The Trend Micro DirectPass Console provides Support and Help menus for a variety of support tasks:
Figure 84. Support and Help
1. Click the Support hotlink to take you to the online Trend Micro Support page. 2. Click the ? (Help) menu for a variety of options:
Online Help. This menu item launches an Online Help page to help you assist you when you need help using DirectPass options.
Welcome Page. This menu item takes you to the DirectPass Welcome Page. Click items at the bottom of the page to get help concerning that item.
Check Subscription. This menu item opens your Subscription page where you can view the remaining days left on your license, click Buy Now to purchase DirectPass, enter your Activation Code, or access your online Trend Micro Account.
About. This menu item lets you view Version, Account, License Type, and Expiration Date and to manually Update DirectPass.
My Account. This menu item takes you to your online Trend Micro Account. Trendmicro.com. This menu item launches the Trend Micro homepage.
Trend Micro™ DirectPass™ Password Manager for PC 1.8 – Product Guide v1.9
Chapter 5: The Secure Browser
This chapter explores Secure Browser—your hardened browser for all online financial transactions.
Using the Secure Browser
DirectPass provides a Secure Browser that provides greater security for all transactions conducted on financial websites.
To use Secure Browser:
Figure 85. Unlock DirectPass
1. Unlock DirectPass using your Master Password.
2. Open your browser and enter the URL of a financial institution. For example, type
www.wellsfargo.com. A dialog appears, asking if you’d like to open this website in Secure Browser.
Figure 86. Open in Secure Browser
3. Click Open in Secure Browser. Secure Browser launches in the background and provides a notice that you can now close your normal browser window.
Figure 87. Site is Now Open in Secure Browser
4. Click the Close box in the upper right-hand corner of your browser. Secure Browser appears from behind the normal browser window.
Figure 88. Sign On from Secure Browser
5. Log in to your financial account with your username and password. Your account page appears, along with a DirectPass dialog that allows you save your password.
Trend Micro™ DirectPass™ Password Manager for PC 1.8 – Product Guide v1.9
Figure 89. Do you want to save your password?
6. Note the checkbox Open in Secure Browser is checked by default. Leave this checkbox checked.
7. Click Save to save your financial credentials in DirectPass, then log out of your account. 8. For testing purposes, close Secure Browser and launch your normal browser again. 9. Type the financial URL again in the website field. The DirectPass dialog appears over the
webpage.
Figure 90. Browser with Direct Pass Dialog
10. Click the financial Account button in the dialog to sign in to your financial account. DirectPass automatically switches to Secure Browser and logs you into your account.
Figure 91. Banking Account Page in Secure Workspace
11. You may now safely conduct your financial transactions knowing they are completely secure.
Trend Micro™ DirectPass™ Password Manager for PC 1.8 – Product Guide v1.9
Chapter 6: DirectPass for the Windows 8 Modern UI
This chapter explores Trend Micro DirectPass for the Windows 8 Modern UI tileenvironment. DirectPass works in conjunction with an embedded browser, to ensure your security when logging into accounts. Topics discussed in this chapter include:
Downloading and Installing DirectPass for Windows 8 Pro and RT Using Existing DirectPass Passwords
Saving New DirectPass Passwords
Download and Install DirectPass for Windows 8
To install DirectPass for Windows 8:
1. Click/tap the Store tile in Windows 8. The Microsoft App Store appears.
2. Load the Windows 8 Search tool and type “DirectPass.” The DirectPass tile appears.
Figure 92. DirectPass for Windows 8
Figure 93. DirectPass App Manifest
4. Read the App Manifest. If you agree to the permissions required, click Install. The Windows App Store asks you to log into your Microsoft account.
Figure 94. Add your Microsoft account
5. Enter your Microsoft email address and password and tap/click Save. DirectPass downloads and installs. The DirectPass tile appears in the Start menu.
Figure 95. DirectPass Tile
Trend Micro™ DirectPass™ Password Manager for PC 1.8 – Product Guide v1.9
Figure 96. DirectPass Sign In
7. To sign into your Trend Micro account, enter your email address and password and click Sign In. The Trend Micro License Agreement appears.
Figure 97. License Agreement
8. Read the License Agreement. If you agree, click Agree. A screen appears for you to provide your Master Password. If you don’t already have a Master Password, the screen lets you create one.
Figure 98. Create your Master Password
9. Type your Master Password, provide a Password Hint, then Confirm Master Password and click Next.
Figure 99. Unlock with Master Password
10. If you already have a Master Password, type it in the field provided and click Unlock. 11. The Trend Micro DirectPass Passwords screen appears, with existing passwords shown
Trend Micro™ DirectPass™ Password Manager for PC 1.8 – Product Guide v1.9
Using Existing DirectPass Passwords
To Log Into an Existing DirectPass Account:
Figure 100. DirectPass Passwords
1. Continuing from the section above, click a password tile to sign into that account; for example, click Yahoo!. The DirectPass browser loads and initiates the sign-in.
2. If you have more than one sign-in for a website, DirectPass provides a drop-down menu for you to choose the account password you want to use.
Figure 101. Which Account Do You Want To Use?
3. Select the proper account password and click OK. DirectPass signs you into your account.
Figure 102. DirectPass Signed you Into Yahoo! Account
4. To access the DirectPass browser menus, to return to the DirectPassPasswords screen, do one of two things:
Position your cursor/finger near the top of the DirectPass browser screen. When the Hand appears, right-click/tap it.
Type Windows-Z on your keyboard.
5. The DirectPass browser menus appear, with the DirectPassPasswords tab showing in the upper left-hand corner of the screen.
Figure 103. DirectPass Browser Menus Open > Passwords
Trend Micro™ DirectPass™ Password Manager for PC 1.8 – Product Guide v1.9
Figure 104. DirectPass Passwords Screen
7. Click/tap another password tile to sign into another account.
Saving New DirectPass Passwords
To Save a New Password in DirectPass:
1. Click/tap DirectPass in the Start screen. The DirectPass login screen appears.
Figure 105. The Embedded DirectPass Browser 2. Enter your Master Password and click/tap Unlock.
Figure 106. Open Browser
3. Click/Tap Open Browser. The DirectPass browser menus appear.
Figure 107. Entering a URL into DirectPass Browser
4. In the URL field, type the URL of the account you wish to access (for example, www.gmail.com), and hit Enter. The website appears.
Trend Micro™ DirectPass™ Password Manager for PC 1.8 – Product Guide v1.9
Figure 108. Sample Website (Gmail)
5. Enter your username and password and click Sign In. A DirectPass dialog appears, asking Do you want to save your password?
Figure 109. DirectPass > Do You Want To Save Your Password
6. Click OK. DirectPass saves your new password and you’re signed into your account. 7. Sign out of your account to test your new DirectPass password.
8. Activate the DirectPass browser menus using the Hand or Windows-Z keystroke. The DirectPass browser menus appear, with the DirectPass tab located in the upper left-hand corner.
Figure 110. DirectPass Passwords Tab
9. Click/tap the Passwords tab. The DirectPass passwords screen appears.
Figure 111. DirectPass > Click Password Tile
10. Scroll to the password tile you wish to use and click it. DirectPass loads the webpage and signs you into your account.
Trend Micro™ DirectPass™ Password Manager for PC 1.8 – Product Guide v1.9
Figure 112. DirectPass > Signed Into Account 11. Repeat the process to add new passwords.
Figure 113. DirectPass Browser Tabs > New Tab
12. To create a new Tab to sign into websites, access the DirectPass browser menus using the Hand or Windows-Z keystroke, click the New Tab icon in the lower menu of the DirectPass browser, then type your new URL to access the website.
13. Delete Tabs in the upper menu by clicking their Close Box (X).
14. If you change a password in an account, log in manually to the account, using the new password. DirectPass will ask you again if you want to save it.
Chapter 7: Using the DirectPass Web Management
Portal
Trend Micro™ DirectPass 1.8 for PC provides compatibility with the DirectPass Web
Management Portal, in addition to the local DirectPass Console, to help you manage all your credentials and settings. You can use the Web Management Portal to access and manage your DirectPass passwords from any computer, even if DirectPass is not installed on it. Topics discussed in this chapter include:
Opening the DirectPass Web Management Portal Editing Passwords
Creating a Profile to Auto-Fill Online Forms Editing Settings
Signing Out of Your Trend Micro Account
Signing In to the DirectPass Web Management Portal
To Sign In to the DirectPass Web Management Portal:
Note: The Web Management Portal for DirectPass 1.8 for PC is not currently compatible with Microsoft Internet Explorer. Use Mozilla FireFox™ or Google Chrome to access the Web Management Portal.
1. Open your Mozilla FireFox™ or Google Chrome browser, type www.directpass.com and hit Enter. The DirectPass Sign in page appears.
Figure 114. DirectPass Sign In Page
Trend Micro™ DirectPass™ Password Manager for PC 1.8 – Product Guide v1.9
Figure 115. Provide Your Master Password
3. Enter your Master Password and click Unlock. The DirectPass Web Management Portal opens, with the Passwords page selected by default.
Figure 116. DirectPass Web Management Portal | Passwords
4. As with the plug-in, simply click a password to sign into that account. DirectPass loads a new browser window and signs you into that account.
5. The Web Management Portal for DirectPass also provides a Password Strength indicator (e.g., Weak, Fair, Strong). If you wish to change a password to increase its strength, the DirectPass Password Editor lets you do so.
Figure 117. DirectPass Console > Passwords
6. Mouse over a password in the list. The editing icons appear in line with the password, to the right of the Password Strength column.
7. Click the Pen icon to edit a password.
8. Click the Folder icon to move a password to a particular folder or to create a new folder. You may also click Add Folder above the left-hand column to add another folder. 9. Click the Trashcan icon to delete a password.
Editing Passwords
DirectPass lets you edit your passwords using both automatic and manual methods. Trend Micro recommends that you use the automatic method to edit your passwords.
To automatically edit a Password:
1. Using DirectPass, sign in to the chosen online account.
2. Using the password editor in your online account, change your password.
3. Sign out of the account. DirectPass automatically prompts you to choose the account you want to update by simply clicking the button with the account name. This changes the password within DirectPass for that online account.
Figure 118. Updating a Changed Account Password
Trend Micro™ DirectPass™ Password Manager for PC 1.8 – Product Guide v1.9
To manually edit a Password:
Warning: Manually editing a DirectPass password without changing it in the actual online account can make it unusable. One reason you might want to manually edit a password would be to allow DirectPass to test the new password’s strength before you actually change it in your online account.
5. For any password you wish to change, click the Pen icon on the right to open the Password Editor. The editor opens, allowing you to make changes to the password.
6. Click inside the Password field to display the password hidden by asterisks. To change it, simply select it, then type in your new password and click Done. The password is changed.
Creating a Profile to Auto-Fill Online Forms
Trend Micro DirectPass lets you create a Profile to help you automatically fill online Forms.
To create a Profile:
1. Click the Profile tab in the DirectPass Web Management Portal. The Profile tutorial screen appears, showing how DirectPass can help you Start Filling Forms Automatically.
Figure 119. Tutorial: Start Filling Forms Automatically
2. Click the tutorial screen to begin creating a profile. The Personal submenu appears.
Figure 120. Personal Information
Trend Micro™ DirectPass™ Password Manager for PC 1.8 – Product Guide v1.9
Figure 121. Contact Information
4. Enter your ContactInformation, then click the Address submenu. The Address screen appears.
Figure 122. Address
5. Enter your Address details, then click the Credit Card submenu. The Credit Card screen appears.
Figure 123. Credit Card
6. Enter your Credit Card information.
7. DirectPass automatically saves your entries. Test the auto fill function by signing up for a new online account.
Figure 124. DirectPass Auto Fill
8. When you enter data into form fields corresponding to the data in your Profile, a popup will appear saying Click here to auto fill. Click the message to auto fill the field with the data stored in your Profile.
Trend Micro™ DirectPass™ Password Manager for PC 1.8 – Product Guide v1.9
Editing Settings
Trend Micro DirectPass provides a variety of settings to control how DirectPass operates.
Subscription Information
To view and edit your Subscription Information:
1. Select Settings in the DirectPass Web Management Portal menu. The Subscription Information panel appears by default.
Figure 125. Subscription Information
2. The Subscription Information section shows the Days Remaining in your subscription, the Account email address, the date your subscription Expires, and a Renew Now button for you to purchase a renewal of your subscription.
3. The Activation Code section lets you enter a new activation code to renew your subscription.
Master Password | Security Questions
To edit your Master Password:
1. Click the Master Password submenu. The Master Password screen appears.
Figure 126. Master Password
2. Click Change your Master Password to change your Master Password. A dialog appears, asking you to Provide your Master Password to Continue.
Figure 127. Master Password Required
3. Enter your current Master Password and click OK. The screen to Create a New Master Password appears.
Trend Micro™ DirectPass™ Password Manager for PC 1.8 – Product Guide v1.9
Figure 128. Create a New Master Password
4. Enter your new Master Password, Confirm the Master Password, and click OK. This resets your Master Password.
5. Increase Your Security by checking Ask for my Master Password when my browser is inactive for [XX] minutes. Use the popup menu to change the length of time you’re inactive before you’ll be asked to reenter your Master Password.
6. In the Security Questions section, click Change to change your security questions and answers. You may used the predefined questions or create Custom questions. Click OK to confirm your changes.
Data Controls
Trend Micro DirectPass provides a set of Data Controls to automatically synchronize and back up your data to the cloud, to export your credentials to a CSV file, import credentials from another DirectPass or LastPass account, and import passwords from your Web browser.
To manage your Data Controls:
1. Select the Data Controls submenu. The Data Controls screen appears.
2. Data Controls lets you export your DirectPass data to a CSV file; you can protect the file with a password. You can also import data from another DirectPass or LastPass account.
To export data from DirectPass:
7. Click Export Data. The Choose Protection Level screen appears.
Figure 130. Export without a password
Figure 131. Use a password to protection the file 8. Select one of two options:
Export without a password. Use a password to protect the file.
9. Click Export. A dialog appears, saying Export Complete.
Figure 132. Download
10. Click Download to download the CSV file to your desktop (Downloads).
Trend Micro™ DirectPass™ Password Manager for PC 1.8 – Product Guide v1.9
2. Load the DirectPass Web Management Portal again and log into your second DirectPass account.
3. Click Settings > Data Controls. The Data Controls screen appears again. 4. Click DirectPass File. A dialog appears for you to Import DirectPass File.
Figure 133. Import DirectPass File
5. Click Choose File to navigate to the location where the exported CSV file is stored.
Figure 134. Browse to Exported CSV File
6. Select the exported CSV file and click Choose. The file is added to the Import dialog.
Figure 135. Import DirectPass CSV File
7. Click Import. If you exported using a password, a password required dialog appears. 8. Enter your password and click OK. The file is imported and an Import Complete dialog
appears.
9. Click Close to close the dialog.
10. Delete the CVS file to protect your passwords.
To import data from Other Software (LastPass):
1. To complete this option, you must have previously exported your credentials from LastPass to a CSV file and transferred it to the device where you’ll conduct the import. 2. In the Data Controls screen, click Other Software. The screen to Import Data From
Other Software appears.
Figure 136. Import Data From Other Software > LastPass
3. In the Import Data from drop-down menu, select LastPass. The dialog expands to allow you to choose the exported LastPass CSV file.
4. Click Choose File to browse to the CSV file exported from LastPass. A Finder dialog appears letting you browse to the file.
Figure 137. LastPass CSV
Trend Micro™ DirectPass™ Password Manager for PC 1.8 – Product Guide v1.9
Figure 138. Import Data from Other Software > LastPass CSV File Added 6. Click Import. If you exported using a password, a password required dialog appears. 7. Enter your password and click OK. The LastPass CSV file is imported into DirectPass and
an Import Complete dialog appears showing you the result. 8. Click Close to close the dialog.
9. Select Passwords in the main menu to view the imported passwords.
Other
DirectPass provides three other functions to tailor usage of the password manager.
Figure 139. Other Options
1. Auto Sign in. Check this checkbox to automatically sign in to websites without asking. 2. Password Exception. If you do not want DirectPass to save passwords for a specific
3. Help Make DirectPass Better. Check this checkbox to provide anonymous feedback on popular feature.
To add to or edit the Password Exception List:
8. Click the Plus (+) sign in the WebsiteMenu. The Add Website popup appears.
Figure 140. Add Website
9. In the field provided, type the address (URL) of a website, then Click OK. The exception is added to the WebsiteExceptionList.
Figure 141. Website Exception Added
10. To edit an exception, click the Edit pen in the right-hand side of the table for the item in the list. The editor reappears.
Figure 142. Edit Website
11. Make your changes and click OK to close the editor.
12. To delete an exception, position your mouse over the listing and when the Trashcan icon appears, click it to delete the exception. A popup appears, asking if you want to Delete Website?
Trend Micro™ DirectPass™ Password Manager for PC 1.8 – Product Guide v1.9
Figure 143. Delete Website?
13. Click Delete. The exception is removed.
Signing Out of your Trend Micro Account
You can sign out of your DirectPass Trend Micro Account directly from any submenu in the Web Management Portal (as well as from the Browser plug-in).
To Sign Out of Your DirectPass Trend Micro Account:
Figure 144. Sign Out
1. Click the Account pull-down menu and select Sign Out. You are signed out of your account both in the Web Management Portal and in the DirectPass plug-in.