BCM
CALL
LOGGER
Version 1.3.3
Contents
Contents ... 2
Legal Guff ... 3
About BCM Call Logger ... 4
Installation and prerequisites ... 5
Running for the first time ... 7
Processing Call Data ... 9
Automating Processing of Log Files ... 14
Displaying Call Information ... 15
Searching and exporting call reports ... 17
Reporting on Calls ... 18
Altering Settings and Licensing... 19
Troubleshooting and Support ... 21
Legal Guff
We’ve tried to keep the legal stuff short and simple, but sadly some of it is unavoidable.
Any product or brand names are trademarks of their respective companies. This includes, but is not necessarily limited to Avaya, Nortel, Business Communications Manager and Microsoft .NET Framework.
BCM Call Logger is copyright © 2011 Reincubate Ltd. You may not copy it, disassemble it, lend it, resell it or do anything that would infringe our copyright without our express written permission.
You may distribute the demo version, although if you do so you should include a link or reference to http://www.bcmcalllogger.com so users have a chance to find the latest version.
This user guide, all the text, screenshots, etc is also copyright © 2011 Reincubate Ltd. You may not copy or reproduce it in any form without our express written permission.
We do not offer any guarantees or warranty for the software. If it burns down your office or eats your pet goldfish then it’s not our fault and we can’t be held liable. It’s your own responsibility to take any backups of log files, BCM settings, etc. Your statutory rights under English law are not affected by this.
By running the BCM Call Logger software you accept these terms. They are
governed by the laws of England and you accept jurisdiction of the English courts. If you don’t accept these terms then you must uninstall BCM Call Logger.
About BCM Call Logger
Thanks for your interest in BCM Call Logger. The software is designed to provide a simple and easy to use way of extracting call log information from Nortel/Avaya Business Communications Manager telephone systems, without the complexity or expense of other call detail recording packages.
There are two parts to the software – a log processing module which converts Norstar format log files into a standard database (by default Microsoft Access but version 1.3.0 also introduces experimental support for SQL Server and MySql database storage), and a reporting module which can then report off this database. By taking this modular approach it is possible for end users to use their own
reporting software to generate desired reports – using BCM Call Logger only for the initial processing of log files.
Installation and prerequisites
IMPORTANT – We do not currently support BCM Call Logger on 64 bit operating systems. It may run, but we cannot guarantee it. This is due to Microsoft not supporting the Jet database engine (used to power
Microsoft Access) on 64 bit platforms.
If you have Office 2010 64 bit it may be possible to get BCM Call Logger to work by using the Microsoft ACE 64 bit driver which is available for download from the Microsoft website – contact us for more information. Alternatively with version 1.3.0 onwards it is now possible to use a SQL Server or MySql database. Instructions on how to do this can be found later in this user guide.
Microsoft .NET Framework
Before installing the BCM Call Logger software please ensure you have the Microsoft .NET Framework version 2.0 or greater installed on the computer you wish to install BCM Call Logger onto.
NB. BCM Call Logger is not compatible with the Microsoft.NET Framework versions 1.0 or 1.1
If you do not already have the .NET Framework (version 2.0 or greater) installed on your computer then you will need to download it from
http://www.microsoft.com/net/ before attempting to install BCM Call Logger. Access to BCM log files
As well as installing the .NET Framework you will also need to ensure you have access to the relevant BCM log files for the BCM Call Logger software to process. There are two main ways to access log files from a BCM system – CDR Pull and CDR Push. The former relies on the running of a small utility to ‘pull’ the log files from the BCM on a regular basis. The latter involves configuring the BCM to ‘push’ the log files to an FTP server on a regular basis.
It is beyond the scope of this document to explain this process in detail – to use CDR Push you will need to set up an FTP server, use the BCM configuration webpage (or Element Manager for newer BCM devices) to set the IP address, username and password of the FTP server, and tell the BCM how often to push log files to the FTP server (we recommend daily). If the FTP server is not on the same machine that the BCM Call Logger software will be installed on then you will also need to ensure the directory on the FTP server where the log files will be placed is visible as a network share or drive on the computer you will be installing BCM Call Logger onto.
Further details on how to configure CDR Pull or CDR Push can be found on our website at http://www.reincubate.com/blog/2009/may/10/extracting-log-files-nortel-bcm-telephone-system/
We recommend you set your BCM to produce logs in the Norstar All format, as this will provide the most detailed call information. As of version 1.1.2 we support the Norstar Real Time format for incoming calls only and SL-1 log format support is experimental and therefore is not guaranteed to work properly.
Once you have ensured the Microsoft .NET Framework is installed, you can download and run the BCMCallLoggerSetup.exe program from
Running for the first time
The first time you run the BCM Call Logger software you will be presented with a setup wizard. This will guide you through the process of setting up a new Microsoft Access database to store the processed log file information into and finding the folder or drive where the BCM log files are stored.
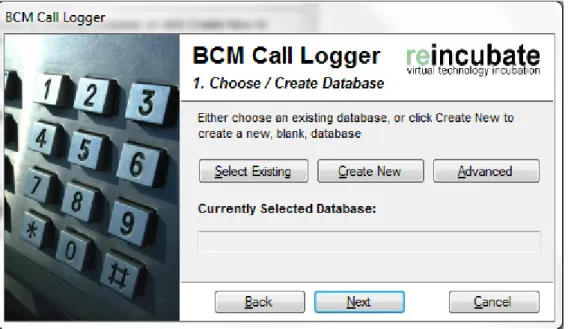
Figure 1 - Creating the database
The first step in the process is to create the database. If you already have an existing call log database from a previous version of BCM Call Logger then you can use the
Select Existing option at this point to choose the existing database. Otherwise click the Create New button and choose a location to save the new database.
If you wish to use a Microsoft SQL Server or MySql database then please refer to the following section – Using Advanced database options. WARNING – only use this option if you are experienced with OLEDB or ODBC connection strings. Failure to enter the correct information can render BCM Call Logger non-functional.
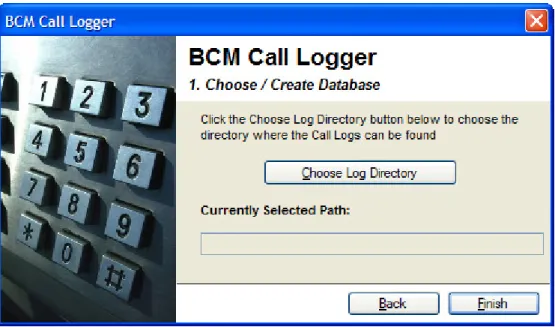
Figure 2 - Finding the log files
The next step is to choose the folder where the BCM log files can be found. This can either be a folder on the local hard disk, a network drive, or a network share. Click the Choose Log Directory button, browse to the relevant folder.
Once you have chosen the relevant log folder, click the Finish button to close the wizard and display the main screen. You should now proceed to the Processing Call Data chapter.
Using Advanced database options
Starting with version 1.3.0 of BCM Call Logger it is now possible to use the advanced database options button on the setup wizard to specify a custom OLEDB or ODBC connection string. This will enable BCM Call Logger to process logs and store the resulting information in a Microsoft SQL Server or MySql database.
NB. We have only tested against Microsoft SQL Server Standard 2008 R2 and MySql 5. Other versions of the same database software should work. We have not tested against other databases, although in theory any database that adheres to standard ANSI SQL rules and can be interfaced via an OLEDB or ODBC driver may work – please let us know if you get other databases working!
We do NOT currently support any database using propriatory drivers or the native Microsoft.NET Framework database drivers.
If you wish to use Microsoft SQL Server
You will need to create an empty database on your SQL Server and create a user with at least INSERT, SELECT, DELETE, UPDATE, CREATE TABLE and ALTER TABLE permissions. You may find it simpler to create a user which ‘owns’ the new database.
You can name the database anything you like, but we recommend you use the
database name bcmdata. The rest of this installation guide assumes you have used the preferred database name of bcmdata.
In the BCM Call Logger installation folder you will find a file called sqlserver.sql . This script can be run in SQL Management Studio and will create the appropriate tables in the newly created database. If you have not used the default database name of
bcmdata then you may need to edit the .sql script to correct the database name. Once you have created the database and run the SQL script to create the empty tables, run the setup wizard and click the Advanced button when prompted to choose or create a database.
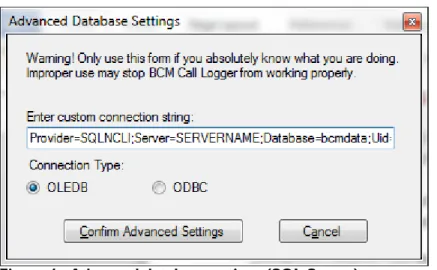
The Connection Type should be set to OLEDB . In the connection string box you should enter a SQL Server OLEDB connection string. You can find many connection string examples at http://www.connectionstrings.com but a typical example of an appropriate connection string would be as follows:
Provider=SQLNCLI;Server=SERVERNAME;Database=bcmdata;Uid=USER; Pwd=PASSWORD;
Make sure you change SERVERNAME to the hostname or IP address of the SQL Server and change USER and PASSWORD to the appropriate SQL Server user details.
If you are using Integrated Security then the connection string will look slightly different:
Provider=SQLNCLI;Server=SERVERNAME;Database=bcmdata;Integrated Security=SSPI;
With this example the only thing to change is the SERVERNAME value.
NB. Both examples assume you are using the preferred database name of bcmdata . If this is not the case you will also need to change the Database value.
If you do not already have SQL Server (or any of the SQL Server management tools) installed on the machine you wish to run BCM Call Logger on then you may need to download the latest SQL Native Client drivers (which are backwards compatible with any version of SQL Server from 2005 upwards) from:
http://go.microsoft.com/fwlink/?LinkID=239647&clcid=0x409 (32 bit)
http://go.microsoft.com/fwlink/?LinkID=239648&clcid=0x409 (64 bit)
Figure 4 - Advanced database options (SQL Server)
Once you have entered the appropriate connection string click the Confirm Advanced Settings button to save this information and return to the setup wizard. Click the
Next button to proceed in the wizard and return to the previous chapter of this user guide.
If you wish to use MySql
In order to interface with MySql you will need to install the MySql Connector/ODBC . This is not the same as the default MySql Connector/NET database software which is the normal option for Windows applications. At the time of writing you can find the appropriate download on the MySql website at
http://dev.mysql.com/downloads/connector/odbc/ . Don’t forget that if you have a 64 bit computer you may need to install both the 32 bit and 64 bit versions of the Connector.
In the BCM Call Logger installation folder you will find a file called mysql.sql . This script will create a blank database and initialise the appropriate tables. The script will NOT create a user or set the appropriate permissions, so once you have executed the script using your preferred MySql SQL script editor you will need to create a user with at least INSERT, SELECT, DELETE and UPDATE permissions on the new database.
As with the SQL Server example we are assuming the new database will be called
bcmdata . If this is not the case please edit the mysql.sql script accordingly. Once you have created the database, created a user and set the appropriate
permissions, run the setup wizard and click the Advanced button when prompted to choose or create a database.
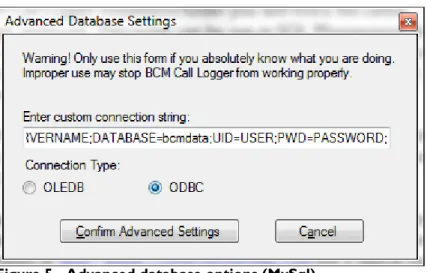
The connection type should be set to ODBC . In the connection string box enter the MySql Connector/ODBC connection string, which should look something like this:
DRIVER={MySQL ODBC 5.1
Driver};SERVER=SERVERNAME;DATABASE=bcmdata;UID=USER;PWD=PASSWORD;
As with the SQL Server example ensure you change SERVERNAME, USER and PASSWORD to the appropriate values. If you have changed the preferred database name you will also need to change the database value.
Figure 5 - Advanced database options (MySql)
Once you have entered the appropriate connection string click the Confirm Advanced Settings button to save this information and return to the setup wizard. Click the
Next button to proceed in the wizard and return to the previous chapter of this user guide.
Processing Call Data
In order to have any call data to report on, call information must be converted from the Norstar log format and imported into the database that was set up when you ran BCM Call Logger for the first time. This is done from the Process Call Data tab.
Figure 6 - Processing Call Data
When you enter the Process Call Data tab, the program will automatically scan the log file folder you chose when you ran BCM Call Logger for the first time and display a list of all log files in that folder which have not already been processed.
You may force BCM Call Logger to skip a particular log file by deselecting the tick box next to the relevant log file. You should not normally need to skip any log files. Click the Process Selected button to start processing the selected log files. A progress bar will indicate the status of the import – testing has shown a typical daily log file takes less than a second to process.
NB. BCM Call Logger will attempt to automatically identify the type of log file being processed. We recommend you set your BCM to produce log files in the Norstar All format for best results.
If you wish to manually process a single log file that is not in the main log file folder you can use the Process Individual File option. Click the Choose button to browse for the relevant log file, then click the Process button to process the individual log file.
This can be particularly useful if you have historical log file data that you wish to import separately.
If you wish to force BCM Call Logger to process a log file in a particular format, then you can use the Log File Format radio buttons to choose the relevant log format. We recommend you do not change this option from the default setting of Auto, which will analyse the log file and automatically choose the most appropriate log format for import, unless you are experiencing problems with date errors or have been advised to do this by Reincubate support.
BCM Call Logger will attempt to determine the date format used in your log files by analysing the dates within the log file and comparing them to the date within the filename of the log file. If BCM Call Logger is incorrect in its date processing, you can override the automatic date processing and choose a specific date format using the
Date Format radio buttons. We do not recommend you change this setting from Auto
Automating Processing of Log Files
Once you have completed any initial processing of historical log file data, you will typically want to set up an automatic routine to keep your log file processing up to date. Remember that if you do not process log files into BCM Call Logger then you cannot report off that data.
The simplest way to automate this process is to use the command line option
/processlogs on the BCMCallLogger.exe program from a scheduled task. This option tells BCM Call Logger to automatically process all log files in the main log file folder which have not already been processed.
To set up the scheduled task open the Scheduled Tasks folder (this can usually be found within Start | Programs | Accessories | System Tools) and create a new scheduled task. When asked what program to run, choose the Browse option and then enter the following command (all on one line):
“C:\program files\reincubate\bcm call logger\bcmcalllogger.exe” /processlogs
Don’t forget to include the speech marks at the beginning and end of the command line. If you have installed BCM Call Logger into a different folder then change the path as appropriate.
We suggest you set the scheduled task to run at the same frequency as your log files are either being pushed to FTP or are being pulled using CDR Pull. Make sure the scheduled task runs at least 30 minutes after the latest log files have been
transferred, to give the BCM time to complete the log transfer before BCM Call Logger then processes that information.
Displaying Call Information
Once you have processed some call information into BCM Call Logger you will be able to browse the processed call information and/or run reports. This is done from the Reporting tab.
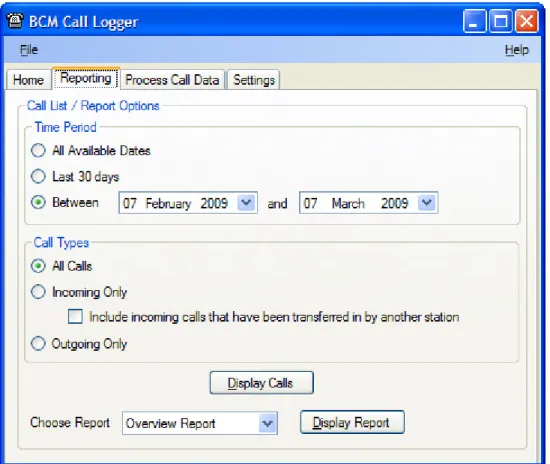
Figure 7 – Reporting
The first thing to do is choose a time period to report on. By default the system is set to report on call data in the last month. Use the Time Period options to choose your desired call range.
NB. Make sure you choose a period which actually has some call data, or reports may not run properly and you won’t see any call data
Next you should choose what type of calls you want to display. By default all calls will be displayed, but you can customise this to only show incoming calls (optionally including calls transferred into an extension) or only show outgoing calls.
Finally, click the Display Calls button to display the selected call data. If you have chosen a wide time period then it may take several seconds to consolidate and display the requested data.
Figure 8 - Displaying call data
Some information on this report is relevant to all calls, whilst other information is only relevant to incoming calls or outgoing calls. The following information is displayed for all calls:
Date/Time of the call
Line and Extension the call originated or terminated on The direction of the call
The result of the call (as reported by the BCM) Hold Time (number of seconds the call was on hold) Call Time (total call time in seconds)
For incoming calls the following additional information is displayed: Number Called (shows the particular DDI dialled by the caller)
Incoming No (if you have Caller ID this shows the caller’s number as reported by your telephone operator. This may not display if the caller is ex-directory)
Ring Time (number of seconds the call rang before being answered) For outgoing calls the following additional information is displayed
Number called (shows the number dialled by the outgoing caller, including any additional digits typed into the telephone keypad)
Searching, exporting and printing
call reports
Once you have created a call report you can search that report for a particular number or extension. There are several ways this can be done.
The first way to find a number is to use the global search facility. On the report menu, choose the Search option, then choose Find by Number . Enter a phone number into the search box and press the return key to search for all calls that include the search text in either the Number Called or Incoming No fields. A new call report will be displayed with any matching results.
Tip: If you can’t find the number you want try searching for the number without spaces, or excluding the area code.
The other way to search is to right-click any record on the call report. You will then get the option to display all calls to/from the incoming number for that record, all calls to/from the called number for that record, or all calls to/from the extension for that record. As with the main search, these options will open a new report window. You can export any report by using the Export option on the Report menu. This will save a comma separated file (csv) with all the records for the currently selected report. You will be able to choose the filename and location for the resulting CSV file.
Reports can be printed by choosing the Print option on the Report menu. This will display a print preview showing how the report will look on the resulting printout. You can then click the Print icon on the preview window to send the report to your default printer.
Tip: Always ensure you have chosen a sensible default printer. If you have more than one printer available you will not get a choice – the report will always be sent to the default printer.
Reporting on Calls
In addition to the main call display/reporting system there are a number of prebuilt Crystal Reports which can be generated from within BCM Call Logger. Currently the following reports are available:
• Overview Report – Displays a basic summary of all incoming and outgoing reports including total number and duration.
• Extension Summary Report – summarises all calls by extension, grouped into incoming calls, outgoing call and all calls
• Line Summary Report – summarises all calls by line
• Call Detail Report – Displays all calls in line item form, grouped by extension To generate a report, choose the relevant report from the Reporting tab and click the Display Report button. A preview window will then appear with the desired report. From this window you can export the report in a variety of common formats, or print the report.
Altering Settings and Licensing
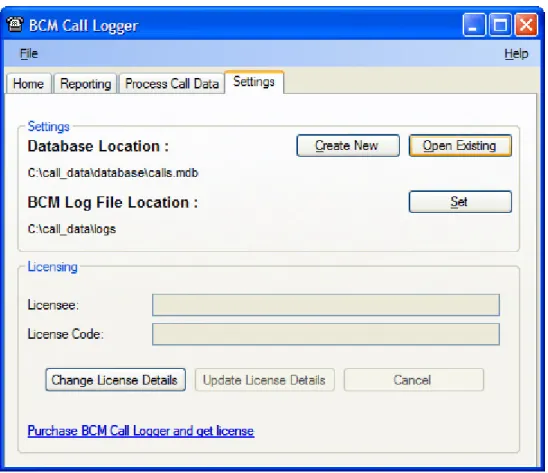
The Settings screen allows you to change where BCM Call Logger finds log files to process, where processed call data is stored, and also set or update licensing information once you have purchased BCM Call Logger.
Figure 9 – Settings
Changing program settings works in a similar way to the wizard that runs when BCM Call Logger is first installed. To create a brand new empty database to store
processed log information, click the Create New button and choose where to save the new database. To use an existing database (after a computer upgrade for example), click the Open Existing button and browse for the database you wish to use.
NB. Do NOT use the Create New or Open Existing options if you entered custom database settings in order to use a SQL Server or MySql database. If you need to change custom database settings please contact us for support (registered users only) and we will explain how to manually change the appropriate settings.
To change where BCM Call Logger finds log files to process, click the Set button and browse for the new log folder. This will not affect any existing log data which has already been processed into BCM Call Logger.
If you are running BCM Call Logger in demonstration mode, you will only be able to use the software for 30 days. After this time you will be unable to run BCM Call Logger. To purchase the software, please visit our website at
http://www.bcmcalllogger.com or click the Purchase BCM Call Logger and get license
link at the bottom of the Settings screen.
Once you have purchased BCM Call Logger you will be emailed a license. From the settings screen you should click the Change License Details button. This will unlock the Licensee and License Code fields, allowing you to enter the relevant information from your license email.
Important: Make sure you copy the licensee and license code exactly from your
license email. Any variation in the licensee name or license code will cause the licensing process to fail.
Once you have entered the license information, click the Update License Details
button. Your new license information will be automatically validated and, if successful, the new license information will appear in the relevant boxes, and all demo restrictions will be automatically and immediately lifted.
If you receive an error stating that your license information appears to be incorrect then please check the details carefully and re-enter them. If you still encounter problems then click the Cancel button to abort the licensing process and contact Reincubate for assistance.
Troubleshooting and Support
If you have problems with BCM Call Logger there are a number of initial steps you can take to resolve most issues. If these steps do not help you resolve your issues then you can contact Reincubate for assistance.
Cannot install BCM Call Logger
Please make sure you have the Microsoft .NET Framework (version 2.0 or greater) installed. Ensure you have installed any relevant updates from
http://update.microsoft.com and have restarted your computer.
Cannot run BCM Call Logger or get errors about the Microsoft JET database engine By default BCM Call Logger uses the Microsoft JET database engine to store call information. This is the same system used by Microsoft Access but is not fully supported on 64 bit versions of Windows. If you encounter errors on a 64 bit computer you may need to install the latest Microsoft JET service pack from Microsoft Update at http://update.microsoft.com .
Cannot run reports
If you can use BCM Call Logger but cannot generate reports, this may indicate a problem with the Crystal Reports runtime included with BCM Call Logger. Often uninstalling and reinstalling the software will resolve these types of issues.
Constant warnings about demo time limits / watermark on all reports
If you have the demo version of BCM Call Logger then you may only run the demo for 30 days. The demo version will display a warning every time it is run, and all reports from the demo version will have a ‘DEMO’ watermark imprinted on them. To purchase BCM Call Logger please visit http://www.bcmcalllogger.com
If you have purchased the software and you are still seeing demo messages then you may need to enter your licensing details on the Settings page.
Unable to enter licensing information as demo time limit has expired
If you have purchased BCM Call Logger after the 30 day demo time period has expired, you may be unable to gain access to the software to enter the license information. In this case you will have to uninstall BCM Call Logger, ensure the
C:\Program Files\Reincubate\BCM Call Logger folder has been completely deleted, then reinstall the software. You should then be able to access the software to enter your license information.
Caution: If you keep your log files or database in the same folder as the BCM Call
Call Logger. When you reinstall you will then be able to locate the existing log folder and database during the initial wizard process.
Errors relating to date formats when processing log files
If you are using a version of BCM Call Logger prior to version 1.1.5 then we suggest you upgrade. Previous versions had a bug where some log files with entries in UK date format were not processed and an error would be displayed.
If you are running BCM Call Logger 1.1.5 or greater and are still experiencing date-related issues then you may wish to try manually processing a log file and explicitly setting the log file date format.
NB. Log files in Norstar Real Time or SL-1 formats always seem to use US date format regardless of date configuration on the BCM. The only log file formats that appear to heed any date settings on the BCM are the Norstar CLID and Norstar All
formats.
Need to specify a particular date format when processing logs automatically
Starting with version 1.2.0 it is now possible to force log files to be processed using a particular date format. To do this, just add either /forceuk or /forceus as a second command line parameters to the scheduled task or batch file you are using to automatically process log files.
This will force BCM Call Logger to consider all dates in the log files to be in either UK (dd/mm/yyyy) format or US (mm/dd/yyyy) format.
Warning: Please don’t use these settings unless you either have a specific date
formatting problem you need to resolve, or you have been advised to do so by Reincubate support.
Unable to process foreign language log files
BCM log files are slightly unusual in that the log file content can vary depending on the language settings on your BCM system. Currently we support the following log file languages:
English Dutch French
If you have a log file in a different language you may not be able to process it using BCM Call Logger. In that case, please email a sample log file (ideally containing a variety of incoming and outgoing calls) to [email protected] and we will endeavour to add support for the language.
Contacting Reincubate for support
In the first instance please email [email protected] for any support issues or order queries. We aim to respond to any email queries within 2 working days. If you are a licensed user please include your license details in your email so we can confirm your entitlement to support.
Post
Please address any postal enquiries to: Reincubate Ltd
PO Box 63426 London
SE1P 5FA
Reincubate Limited is a company registered in England #5189175. A list of directors may be inspected at the registered office address.