Table of Contents
Overview ... 2
Prerequisites ... 2
Components ... 2
Archive Credentials ... 2
PST Loader ... 2
Changes From Previous Versions ... 4
Overall Configuration File Creation Process ... 4
PST Import Monitor ... 7
Deployment Best Practices ... 8
Client Machine ... 8
Account ... 8
Location of PST Files ... 8
PST File Ownership, Password Protection, and Permissions ... 9
PST Audit Repository ... 9
Automated Creation of Configuration Files ... 9
For More Information ... 11
HP Email Archiving software for Microsoft Exchange
2
Overview
The PST Import Tools have been developed to allow Administrators to load legacy PST data from local and network file systems into the Integrated Archive Platform (IAP). This reduces the storage capacity requirement placed upon the local and network file systems. This has the additional benefit of storing the email data in a compliant format allowing users, administrators, and compliance officers to search email from the entire enterprise.
This whitepaper discusses the individual components of the PST Import Tools and a number of best practices for the deployment of the PST Import Tools, but should not be used as a substitute for the pre-requisites stated in the following section.
Prerequisites
Prior knowledge of the PST Import Tools is essential to better understand the contents of this paper. The reader should, at a minimum, have completed the PST Import Tools training, and have read and understood the PST Import Tools chapter of the Email Archiving software for Exchange (EAsE) 2.1 Administrator Guide, 3rd Edition at:
http://spock.corp.hp.com/Pages.internal/spock2Html.aspx?htmlFile=sw_ilm_rim_msg.internal.html#rimease
This whitepaper also assumes that the reader has a reasonable level of understanding of the IAP and EAsE.
Components
The PST import process is divided into three distinct components: Archive Credentials, PST Loader, and PST Import Monitor. The following sections provide a brief synopsis of each of these components and their associated processes.
Archive Credentials
Setting the archive credentials is the first stage in the PST import process. This is where the credentials used for the remaining processes are configured and verified. The credentials used here are
specifically for access to the IAP and the domain within the IAP which will be used as the target for the PST import data. While the account used here does not specifically need to be the same as the HPAEServiceAccount account (which will already have been configured for access to Exchange), it is highly recommended that this account be used. This simplifies the entire end-to-end process and reduces confusion during the configuration of the PST Import Tools.
During the remainder of this document, it is assumed that the HPAEServiceAccount has been configured as described in the HP EAsE 2.1 Administrator Guide – “Creating the archive service account” on page 16. Additionally, the HPAEServiceAccount should be granted the IAP Admin right from the IAP Platform Control Center (PCC) Account Management page.
The archive credentials, once verified, are stored in the registry of the local machine using 128 bit AES Encryption. This provides a secure method for storing the account information, thus preventing it from being modified or viewed by users.
PST Loader
Creating the configuration files is the second stage in the PST import process. This is accomplished using the PST Loader. This utility is used to create a “combined” version of the default HP EAsE PST Importer.ini file – this file is created the first time PST Loader is used and some default values are
“combined” file. (A more complete description of this combination is contained in the “Overall Configuration File Creation Process” section below.)
The PST Loader also outputs the “xml” files which control the manner in which the PST Import Loader actually ingests data into the IAP. The configuration files control the PST files to load, which
repositories are the target for the ingestion, and whether all users identified in the headers of messages receive a copy of the message in their repository, etc.
The following is a list of all options available during the configuration.
• “Select files to process” – the location of the PST files, either on the local file system or at a network location. The Deployment Best Practices section discusses some recommendations for the location of PST files.
• “MAPI Login Information (for GAL Lookup)” – used to resolve email against the Global Address List (GAL) and to convert x.400 style addresses to SMTP style addresses.
o “Exchange Server” – the IP address or DNS hostname of an Exchange server to be
used for access to the GAL.
o “Exchange Mailbox” – a mailbox (HPAEServiceAccount) used for accessing the GAL.
This does NOT have to be an SMTP address. This parameter is entered as an SMTP address, e.g., [email protected].
• “IAP Parameters”
o “IAP Domain VIP Address (SMTP)” – the virtual IP address for the IAP and SMTP port
number 25.
o “IAP HTTP Portal Address” – the virtual IP address for the IAP and HTTP port number,
in this case, “81”. This should be entered in the following format: 16.89.88.170:81
o “IAP Domain Name” – the target domain in the IAP for data ingestion. This can be
found from either the PCC Administration Console or from the domain.jcml file on
the kickstart server.
o “User Repository (SMTP Address)” – the target IAP repository for data ingestion. This,
in most cases, relates directly to the identified owner of the PST file(s).
o “Audit Repository for Import Logs” – the IAP repository that import log files will be
delivered to. This can be any repository that is established in the IAP. This is discussed in further detail in the Deployment Best Practices section.
• “Archiving Options”
o “Use TNEF to Capture Email” – recommended; this option delivers the message using
Microsoft’s Transfer Neutral Encapsulation format. This allows the message to be stored in the IAP with the highest level of fidelity, preserving many of the MAPI properties which are not contained in a standard RFC-822 MIME message.
o “Store Folder Information” – required for consistency when the IAP is configured to
capture folder information during normal operation.
o “Forced Processing of PST Files” – allows a PST file to be processed again even if its
hash has been previously processed. This is useful for debugging.
o “Tombstone Options”
– “Create Tombstone in PST” – allows the user to select the tombstone inside a PST file and retrieve the message from the IAP.
4
• “Select Output File” – the location and name of the xml import description file created by the PST Loader.
Changes From Previous Versions
If you have used PST Importer previously, you may notice that some changes have been made to the parameters entered in the PST Import Tools. The majority of these changes are to the various
descriptions to improve clarity.
However, two options have been removed since they have been rendered obsolete:
• “Distribute to all recipients”
• “Ensure Owner Receipt”
Overall Configuration File Creation Process
This section is included to re-iterate the overall creation process.
When the PST Loader is first executed, you are presented with the following dialog box:
Figure 1. PST Loader Dialog Box
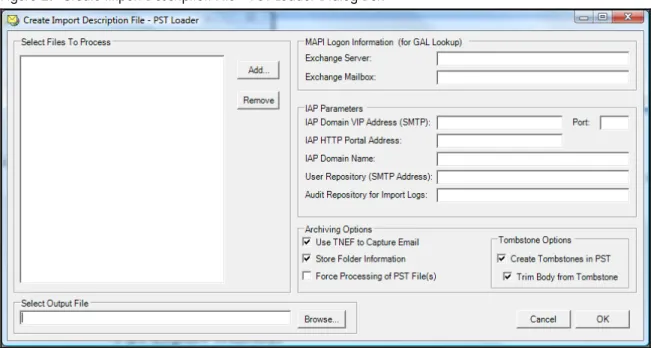
Two options are available here: you can either create a new “import description file” (XML), or open an existing file and schedule the job. When selecting “New”, you are presented with the following dialog box, “Create Import Description File – PST Loader”. This is used solely for creating the “import description file” (XML), and not for scheduling the job to run.
As can be seen here, the PST Loader has not been run previously since no parameters from the HP EAsE PST Importer.ini file have been inserted into the dialog box. It’s important to note here
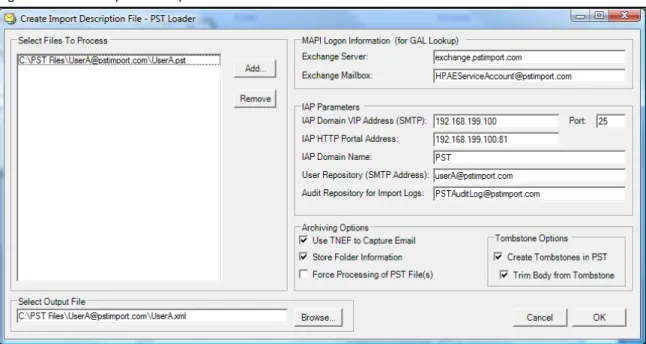
that if the PST Loader has been run previously, some parameters may already be present. For example:
Figure 3. Create Import Description File – No Parameters Present
In this second example, you’ll see that the fields have been pre-populated. This may be caused by a combination of user-specific information, as well as defaults from the HP EAsE PST
Importer.ini file. Once this dialog is complete and you click OK, the “Output File” (otherwise
known as the “import description file”) is created. At this point no “ini” file for the actual job has been created, because nothing has been scheduled.
However, once the “Create Import Description File – PST Loader” dialog box is completed, the import description file field in the PST Loader is populated. Once a log file is identified, this dialog will create the “ini” file for the job and create an entry in the AEDB.MDB database.
6
For example, when the following parameters are entered:
Figure 5. PST Loader – Both Fields Populated
This results in the creation of the following “ini” file:
Figure 6. Resultant “ini” File in Notepad
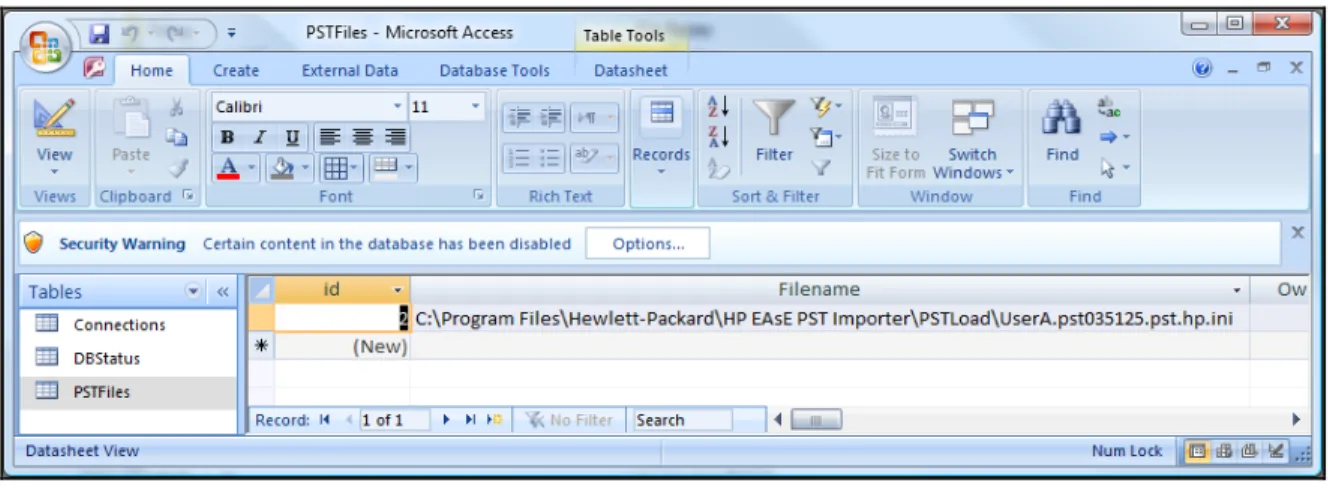
The PST Loader also creates an entry in the AEDB.MDB database for scheduling purposes. The PST
Import Monitor uses this table to identify the jobs that need to be run.
PST Import Monitor
The third and final stage of the PST import process is starting the jobs that have been scheduled. This is done from the PST Import Monitor tool. The PST Import Monitor identifies the files to be processed by interrogating the AEDB.MDB database to locate the “ini” files for jobs currently in the queue.
Figure 8. PST Import Monitor Window Showing 1 Queued PST File
Following from the previous example, you can see that one (1) file is ready for processing.
Once the ingestion of the scheduled PST files is complete, the PST Import Monitor summarizes the level of success of the ingestion.
Figure 9. PST Import Monitor Window Showing 5 Completed Files
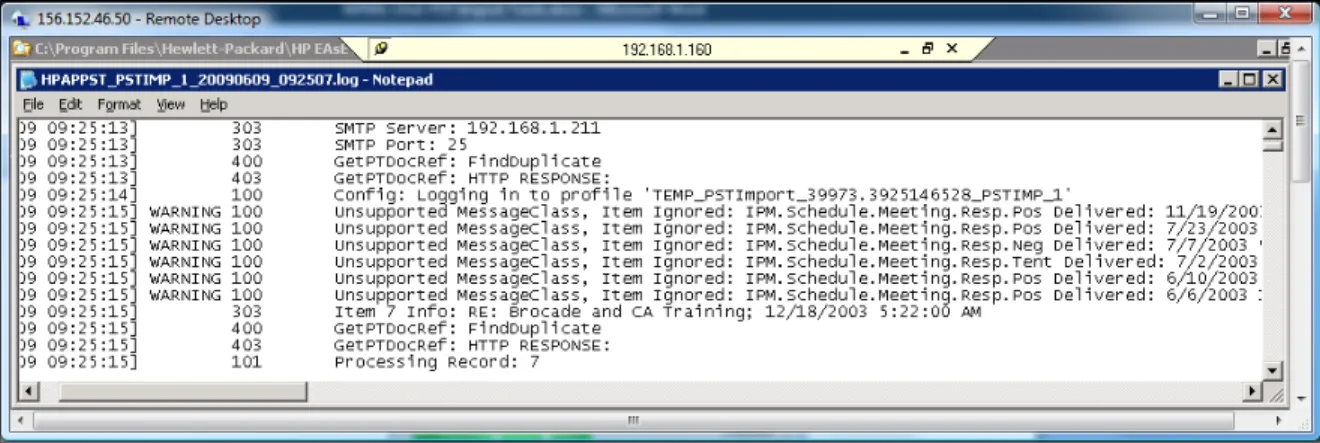
Items that are rejected or ignored may be so for various reasons: unsupported content, malformed messages, etc. Any duplicate items are also presented.
8
Further investigation can be carried out by looking at the log files for the specific job. These are located on the client machine, typically in the directory, C:\Program
Files\Hewlett-Packard\EAsE PST Importer\LogFiles.
For example:
Figure 10. Example Log File
Deployment Best Practices
There are a number of best practices for deployment situations which aid the overall use of PST Import Tools. The basis of these best practices is to, where possible, keep the implementation standard and consistent.
Client Machine
It is recommended that a dedicated client machine be used for the PST Import Tools. This should meet the minimum requirements detailed in the EAsE Administrator Guide and the PST Import Tools training material. One consideration is the amount of available disk space on the machine, especially if the intention is to move all PST files to a local file system for processing.
Account
During the configuration of EAsE, an HPAEServiceAccountaccount is created. This account has the required access to the Exchange environment, and therefore sufficient permissions to the Global Address List (GAL). It is recommended that this account be used not only for the Archive Credentials, but also as the logon account for the client machine. For the sake of completeness, the default Outlook profile should be configured with the HPAEServiceAccountaccount.
Note: The HPAEServiceAccountaccount in the IAP is created by DAS. Remember that the
HPAEServiceAccount account requires that “IAP Admin” rights are applied using the IAP PCC Account Management.
Location of PST Files
While the PST Import Tools can import PST files located on network files shares, it is recommended that PST files be transferred onto the local client machine or at least onto a dedicated network file share. Where possible, PST files should be stored in a structure organized by file owner, thus providing a mechanism for tracking the target repositories for the import.
For example: C:\PSTimport [email protected] [email protected] [email protected] Unknown
By organizing the file structure in this way, it is possible to automate the creation of the configuration files, thus simplifying the overall process.
PST File Ownership, Password Protection, and Permissions
Depending on the requirement for PST Imports by specific customers, it may be required that the emails contained in PST files are only targeted at specific repositories. In this case, the File Ownership property is required, but may not be correct depending on the source of the file. Determining the primary owner of the file requires a manual intervention, since the PST Import Tools are not designed to determine who the primary user of a PST file is.
Secondly, the PST Import Tools offer no ability to import password-protected PST files. If passwords are known, it is possible to remove the password protection by connecting to the PST file from the Outlook client and removing the password. Password-protected PST files cannot be imported until the password is first removed. PST passwords may be reset using commercially available software; however, password removal actions are the responsibility of the customer.
Lastly, read and write permissions to the PST Files are required by the HPAEServiceAccount account including removal of any “Read-Only” attributes assigned at the file system level.
PST Audit Repository
PST Import Tools can send logging information to any IAP repository. In some cases, this may be a previously created Audit repository, or in fact, the target repository for the PST import. However, it is recommended that, where possible, you create a dedicated PST Import Logging user and repository from the IAP PCC Account Management webpage. This allows all PST logs to be searched in a single location and makes the task of identifying potential issues easier overall.
It is important to understand the logging process for PST Import Tools. The process creates log entries that are stored on a per-PST file basis, not for the overall PST Import Process. Therefore, a log is created for each PST file imported. Furthermore, the log file for a PST file may appear to be split in the logging repository since, if the PST Import process is interrupted, all of the logging “to-date” is sent to the logging repository.
Note that all log entries sent to the IAP are wrapped in a MIME message, so when searching the log repository, make sure the document type is set to ‘email’.
Automated Creation of Configuration Files
Earlier in this document, we discussed the “Overall Configuration File Creation Process”. As a follow on from this, we will now look at the options for automating the creation of the configuration files. The simplest method to automate the creation is to use a dedicated file structure to organize the PST files (as already discussed). Using a script (either VB Script or Perl), the structure and folder name information can be taken and used to create a set of XML “import description files”. The format should be as follows:
10
Figure 11. Example Import Description File
A number of fields in the XML file are consistent for all, such as <Server> and <Mailbox>. Some
parameters are more specific, such as <Repository> which can be taken from the folder name,
and <FilePath>.
After the creation of the XML files, the command line version of HPAEPSTLoadUtil.exe can be
used for scheduling PST files into PST Import Monitor. For example:
<Install Path>\EAsE PST Importer\HPAEPSTLoadUtil.exe /i c:\PSTfiles\[email protected]\UserA.xml /o
c:\PSTfiles\[email protected]\UserA.log
This method is strictly a suggestion, and a more robust process may be required in the future.
However as stated earlier, the simple approach eases the overall process and minimizes the potential human error.
For More Information
HP Email Archiving software for Microsoft Exchange
http://h18006.www1.hp.com/products/software/im/governance_ediscovery/exchangearchiving/index.html
HP Integrated Archive Platform
http://h18006.www1.hp.com/products/software/im/governance_ediscovery/iap/index.html
Technology for better business outcomes
© Copyright 2009 Hewlett-Packard Development Company, L.P. The information contained herein is subject to change without notice. The only warranties for HP products and services are set forth in the express warranty statements
accompanying such products and services. Nothing herein should be construed as constituting an additional warranty. HP shall not be liable for technical or editorial errors or omissions contained herein.
Linux is a U.S. registered trademark of Linus Torvalds. Microsoft and Windows are U.S. registered trademarks of Microsoft Corporation. UNIX is a registered